SPLIT-TONING
Olivia Parker
I have been split-toning my silver-chloride prints since 1975. The resulting warm-cool color relationship expands the space within the photograph, lengthens the apparent tonal range, integrates disparate objects, and enlivens the image in a way compatible with my thinking.
Split-toning can be just one more gimmick unless it is used as an integral part of individual expression. I had been a painter before beginning to photograph, and loved to work with color. Yet color photography did not appeal to me because I could not control the image the way I wanted to, and permanence is a problem with color materials. I was fascinated by the special qualities and limitations of black-and-white photography. When I saw a split-toned experiment in a friend’s darkroom I could not resist trying the technique. Fortunately, I began experimenting during a warm spell in September as the developer temperature must be warmer than normal for the color I like. The toned prints reminded me of red and white chalk drawings on gray paper. Here appeared a way to work with a kind of color suited to my imagery. Gradually I began to think in terms of split-toned images as I looked through the ground glass.
Often I use flat objects, such as old books, combining them with other objects or peculiarities of light. The split-toning gives the photograph an expanded space that helps me to transform an object into something other than originally intended. Although the shadow areas in my prints become a very dark brown, the whites seem intensely white, because their coldness next to the browns makes them appear whiter. Expressive contrasting edges are heightened. For me, this contrast intensifies the experience of the print.
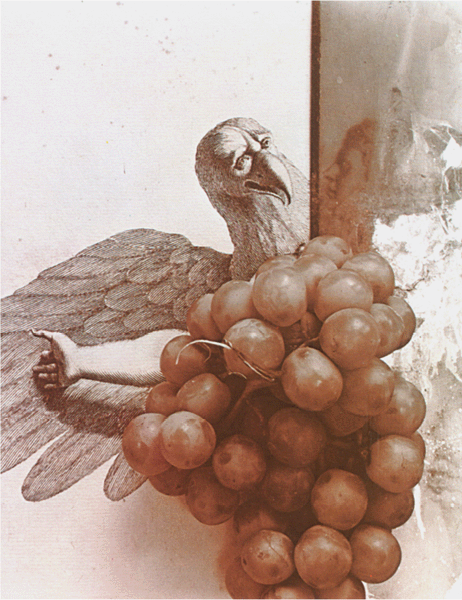
For a photograph to work, it must have a certain wholeness. Often I find that split-toning can help me combine disparate objects. I have never found that split-toning could salvage an uninteresting image, but it helps unify, making things look as though they belonged together rather than like objects deliberately juxtaposed. In the image opposite, the grapes seem to belong in the engraving. The engraving becomes more spatial; the grapes slip into that space. We all make certain assumptions about the subject of a photograph being real. Here grapes and engraving are so unified that we are forced to question our assumptions about both. Are the grapes drawn? No, they must be real. The setting must be drawn, but how can something real appear to exist in it? This is a simplified explanation of the kind of tension and impact possible in a split-toned photograph, which would be more difficult to achieve in an untoned photograph and impossible in a painting.
Split-toning lends subtle, often unexpected qualities to each image. A piece of cloth may become extraordinarily sensual; a shadow can seem to liquefy or become three-dimensional. I have made a very personal exploration of this technique. I hope that you will find many other ways to use it expressively.
Split-Toning
The procedure for split-toning is generally the same as for standard archival toning, but the prints stay in the selenium toner longer than they would for intensification and permanence.
The paper you select makes a pronounced difference. Split-toning works best on silver-chloride contact papers, such as Kodak AZO, and less satisfactorily on chlorobromide enlarging papers, such as Agfa Portriga-Rapid. Bromide papers are affected very little by the selenium. It is possible but impractical to enlarge onto chloride papers, because the paper is so slow you will need exposure times of 6 min or more. If you do not have negatives large enough to contact print, you can make enlarged negatives using one of several graphic arts films (try Kodak SO-015). Photograms on AZO are another possibility. Dan Ranalli’s photograms, shown in the previous chapter, are made on AZO paper and split-toned in selenium.
The developer I use is Kodak Selectol, diluted 1:1. Different developer formulas will affect the final image color, and only experimentation will allow you to evaluate the possibilities.
The temperature of the print developer is the single most critical factor affecting the success of a split-toned print. Since I find the most satisfactory range of developer temperatures to be between 23° and 25° C, I use a water-jacketed developer tray to maintain a constant temperature. I usually use 25° C developer for AZO grades 2 and 3, but grade 4 sometimes works better at 23° C. Developed below or above these temperatures, a print will, when toned, go brownish all over rather than splitting. With some prints, success and failure can be as little as 0.5° apart, although most will yield satisfactory results developed anywhere between 23° and 25° C.
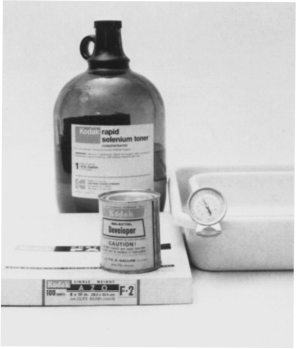
Materials necessary for successful split-toning are few, but rather specific.
Water seems to be a significant variable. In January and February my prints do not have the extreme split in color they achieve in summer. Upon examining analyses of our town water I found some consistent increases and decreases in chemical content and hardness at different times of the year, but there are so many factors I cannot determine which change in the water suddenly improves things in mid-March. When I use distilled water to mix both developer and toner, the split is comparatively poor. You will have to experiment with your local water.
The processing differs little from the normal. I usually develop prints for 1 min, but a shorter development can soften a print and give more overall warmth. Prolonged development can harden and cool the final effect. AZO paper developed in Selectol less than 40 sec or more than 1 ½ min can yield a degraded image.
After the stop bath and the first fixing bath, let the prints rest in a tray of water until you are ready to refix and tone several prints at once. Be sure to change the water in the holding tray and circulate prints frequently, or stains will appear during the toning.
Toning directly follows the second fixing bath of 4 min. Transfer the prints directly into a toner-clearing bath made of 70ml selenium toner, 30ml Perma Wash, and 20g Kodalk or sodium metaborate to 1 liter of water. If stains occur at this point, you will have to separate these ingredients into two baths, leaving the prints in the first (30ml Perma Wash and 20g Kodalk in 1 liter of water) for 5 min before transferring them to the second bath (70ml selenium toner in 1 liter of water). Put the prints in one at a time, making sure not to splash any toner back into the fixer. Agitate the prints by repeatedly pulling the bottom one out and replacing it on top of the pile. I do about eight prints at a time and have never been able to manage this repositioning with tongs. Selenium, like mercury, is a cumulative poison and can be adsorbed through the skin. I wear inexpensive vinyl surgical gloves, available at the drug store. Be sure you have good ventilation when toning.
Controlling the Split
As you watch the prints in the toner, you will see a brief period of black intensification; then the whole print will look duller and you will wonder why you are ruining a good print. Then the darks will begin to warm, and after a while you will see the split. This will take 4 min or more, depending upon the exhaustion of your toning solution. When you like the color, transfer the print quickly to a water bath. If you then decide it needs more toning, you can put it back in the toner. Grade 4 paper tones faster than grades 2 and 3. I find it splits better in the lighter tones.
I filled many trash barrels with prints before I became comfortable with the process. I still experiment frequently and throw out many. Fortunately, mistakes are not too expensive. AZO is available in grades 0–5 in single weight, but in double weight only grades 2 and 3 are available. Since I print 8x10 negatives on 11x14 paper and do not want to handle single-weight paper in that size, I have to control the contrast of my 8x10 negatives so that they will print well on grades 2 or 3. This is much easier when making enlarged negatives specifically for the process.
Wash your prints after toning for at least 20 min. For permanence I wash two hours at 24½ C, and there is little, if any, loss of tone color.
Dry the prints face down on fiberglass screens after squeegeeing. What little flattening is needed can be done quickly in a dry mount press or overnight between rag boards under a pile of books.
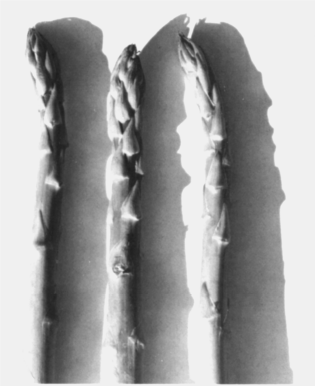
The original image color on this untoned print is very slightly olive-black.
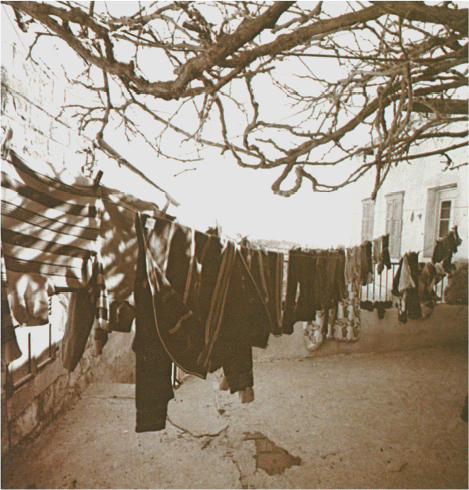
Murray Riss split-toned this photograph, enhancing its sense of spatial ambiguity. The original negative was made on 120 roll film and enlarged to make a full-sized negative for printing on contact-speed AZO paper.
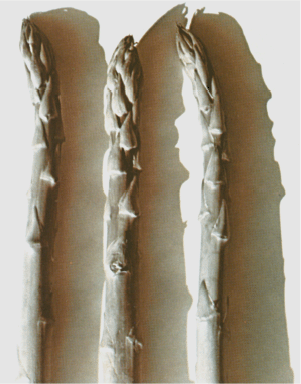
Removed from the selenium toner at the proper moment, this print exhibits a distinct split in the color from the steel-gray of the lighter areas to the warm brown of the shadows.
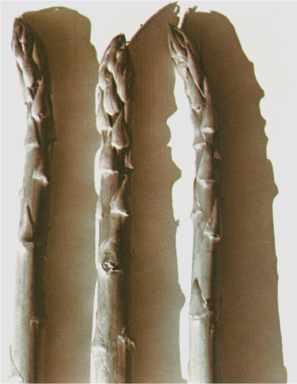
If the print is allowed to remain in the toner too long, the brown color will continue to invade progressively lighter areas until the print is a uniform brown color.

