DYE TRANSFER
Kenda North
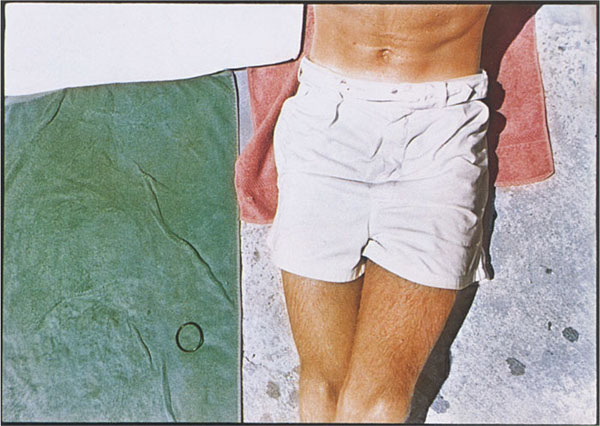
A process used by an artist should be a tool for the visualization of ideas. The evolve-ment of my work in dye transfer has been based on the premise that through chance, accidents, skill, and courage, materials intended for one thing can be made to do something quite different.
Dye transfer was originally introduced by Kodak in 1946 as a means of reproducing a full-color print from a color transparency. The process involves the making of three separation negatives from the original transparency and exposing these to three sheets of matrix film, which are processed, dyed, and printed in register on a single sheet of paper. The process is widely used in this manner, and the final prints are valued for their richness, stability, and fidelity to the original.
The inherent flexibility of the process has intrigued creative photographers since its introduction. In the late 1940s, Henry Holmes Smith chose it when looking for a material that “would produce the most desirable approach to the study of the possibility of color photography as a medium for creative expression with abstract play of light.” Smith’s early works were photograms made by exposing glass coated with heavy syrup to intermediate negatives and then matrix film. The sheets of film were multiple-printed to create abstract studies of transmitted and absorbed color.
I began using dye transfer out of frustration with the limitations of conventional color materials. The color of the finished print never looked the way I had originally envisioned it through the camera. I was looking for what Syl Labrot spoke of as “color as an exact re-creation of the sensations of realism.” The perception of color is a sensory act and a subjective response. We say that the sky is blue, but cannot express the range of blues that one can see from dawn to dusk. My interest in dye transfer evolved out of the desire to modify the extant realism of the photograph and to persuade the viewer to feel more of my perceptions.
Hand coloring by dye transfer is a lengthy and intimate process. Although the processed matrix is transparent, it contains all the tones of the negative. I mix the yellow, magenta, and cyan dyes into the desired hues and selectively work them into the image with soft brushes. My color choice is usually a spontaneous response to the emerging tones and colors. I often try to make the relationship of the color to the image raise questions. I can use a flesh tone that appears real and make the shadow cast by the figure blue. What color is a shadow? I can set the figure into a tension created by complementary colors formalizing the relationships between specific areas of the image.
My recent work has been a series of pictures exploring the sensuous and tactile relationship of a figure to color, fabric, and light. The sensuality is often suggested by the closeness, anonymity, and narcissism of the images.
The application of color to make a unique print is often frustrating, but it encourages me to learn about the use of color. Fortuitous accidents still happen with the materials, leading me to new areas of invention and surprise.
Setting Up
The process outlined here is a modified and simplified version of the Kodak Dye Transfer procedure. The information comes from several sources, particularly from Henry Holmes Smith and Larry McPherson, and from a great deal of trial and error.
Dye transfer was introduced in 1946 to replace its predecessor, the Wash-Off Relief Process. Called an imbibition color process, dye transfer is commonly used to make extremely high-quality prints from color transparencies. It utilizes the principles of color reproduction developed by physicists during the nineteenth century.
To make a full-color print, the color of the original transparency is first separated into its primary-color components onto three sheets of black-and-white negative film by enlargement through red, green, and blue filters. These separation negatives are then color-corrected by a series of masks and exposed onto Kodak Matrix Film. These matrices, when processed, become positives with each emulsion forming a gelatin relief. In other words, shadow areas of the image leave thick gelatin on the matrix, while the highlight areas are represented by a thin layer of gelatin. These matrices are soaked in dyes of the secondary, or subtrac-tive, primary colors: yellow, magenta, and cyan; and individually printed in register on one sheet of receptive paper.
Used to make full-color prints, the dye-transfer process requires specialized equipment and demands extensive testing to produce satisfactory results. It rarely is used outside sophisticated custom-color photographic labs in larger cities.
Used experimentally, for unrealistic or hand-applied color, prints can be produced with little beyond standard black-and-white darkroom equipment. The matrix film can be exposed with one or several black-and-white negatives. The color can be worked into the image by applying the dyes to the matrix by brush or by soaking, and they can be printed in or out of register. When used in this manner, the process is very flexible and you will find that it can be modified to produce an incredible range of visual ideas.
The following processing instructions differ from those published by Kodak for its dye-transfer products. Matrix film has an unhard-ened gelatin-silver emulsion coated on an acetate film base. During processing, the exposed gelatin is hardened, or tanned; then the unex-posed gelatin is washed away, leaving the relief image. The Kodak process uses a tanning developer and leaves a silver image in the film. In the wash-off relief process, the R10A bleach tans the gelatin and bleaches the silver out. This enables you to see the applied color in the matrix and preview how it will print.
The Materials
In addition to the contents of a normal black-and-white darkroom, you will need the following special equipment to make dye-transfer prints:
1. Kodak Dye Transfer Paper Conditioner, Catalog No. 1465814, is available as a stock solution, which is diluted with distilled water to make one gallon. Paper conditioner has a long shelf life although eventually it will become too acidic, affecting the transferring.
2. Kodak Matrix Dye Set, Catalog No. 1465798, includes dye concentrate and dye buffer to make one gallon each of magenta, yellow, and cyan. Also available is a five-gallon size. Dilute the dyes according to directions and be sure to use distilled water.
3. Kodak Matrix Film 4150 is available in standard sizes from 8x10 to 20x24. The film is often manufactured a little larger to accommodate holes punched for registration.
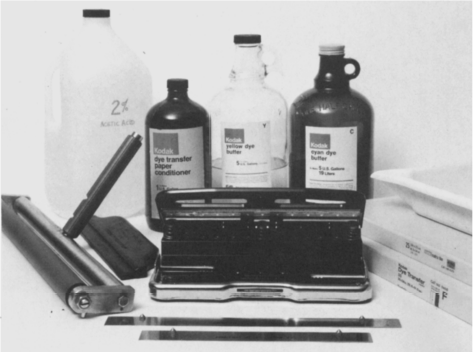
4. Kodak Dye Transfer Paper is also available in standard sizes from 8x10 to 20x24. Unfortunately, the paper is packaged only in large quantities. Other photographic paper can be mordanted to accept the dyes according to Kodak’s instructions.
Note: The above materials are available only from professional photo stores. They usually have to be special ordered, and delivery can take up to eight weeks.
5. 2% Acetic Acid Solution is made by diluting glacial acetic acid (see Formulas, p. 194). Although Kodak recommends a 1% acid solution, most labs find a 2% solution to be preferable.
6. Roller or Squeegee should be large enough to cover the size print you are making.
7. Condit Register Strips are stainless steel register strips 6½″ or 9”″. Order according to the size film you are working with. Use the strips with the high pins. These are available from Condit Manufacturing Co., Sandy Hook, CT, 06482.
8. Adjustable Paper Punch. The Kodak Register Punch is efficient and precise but expensive. An adjustable paper punch will suffice for film sizes up to 11x14.
9. Trays should be plastic with flat bottoms. Trays with ridges will scratch the film.
• Printing board can be made by epoxying a Condit Register Strip to a heavy sheet of glass. Be sure to glue it so the pin side is placed toward the center of the glass. Registration boards are available from Kodak but are very expensive.
The Wash-Off Relief Process
For steps 1 through 4, use a red 1A safelight or the equivalent. All processing, including exposure, should be done with the matrix film emulsion side down. The emulsion of the film is very sensitive. Take great care to avoid scratching it. When transferring the film from one chemical bath to another, submerge the film carefully to avoid streaking. Agitate the film in the trays constantly and gently. When processing more than one sheet of film, agitate by moving the bottom sheet to the top repeatedly.
1. Expose the matrix film through the base with the emulsion face-down on the easel. As with all sheet film, the emulsion side is up when the notched corner is on the upper right or lower left. If you forget and expose the film through the emulsion side, the entire emulsion, image and all, will wash down the drain during step 5.
2. Develop in DK-50, a packaged Kodak developer, for 5 minutes at 20° C. A more readily available substitute is Kodak HC-110 developer. The contrast of the film can be modified by diluting the developer. HC-110 diluted 1:4 from the stock solution is equivalent to straight DK-50.
3. Rinse in water for 3 minutes at 20° C. Use two trays and transfer the matrices from tray to tray, making several water changes.
4. Bleach in R10A for 3 to 5 minutes. The formula is given on page 194. The silver image will gradually fade. Wear gloves for this step.
Steps 5 through 9 can be carried out in room light. The matrix film is now processed one sheet at a time with the emulsion side up.
5. Rinse the matrix in hot water, approximately 30° C. Make several water changes and gently agitate the tray until no milkiness remains on the film. This washes the unexposed gelatin off the film, leaving the image in relief.
6. Rinse the film in cool water for 1 minute.
7. Fix in plain hypo (without hardener) for 3 minutes at 20° C.
8. Wash in running water for 2 minutes. If your tap water is heavily chlorinated, use bottled or distilled water for a final rinse.
9. Dry the film in a dust-free environment. When the film has dried completely, store it in a soft plastic or paper folder for protection.
Exposure
To determine your initial exposure, use your normal test-strip technique. The image visible before the bleach step will be an indication of satisfactory exposure, although the final print will be your best reference.
Matrix film is equivalent in contrast to a grade 2 Kodabromide paper. Your exposure will depend on the image you want, but I recommend using contrasty negatives. When exposing, leave borders for handling the film and one larger border for punching the film later. The developer and bleach should be discarded after processing, but the fixer can be reused until exhausted.
To make several matrices for printing in register, punch the film before exposure and use the printing board with register strips as an easel during exposure.
Dyeing the Matrix
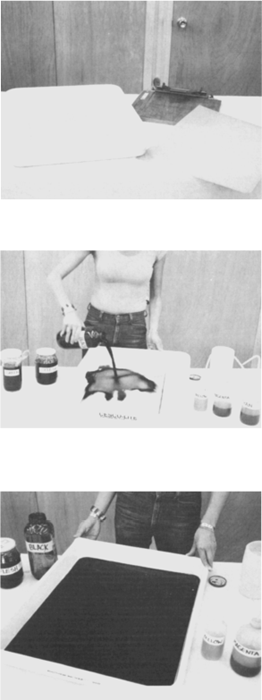
On the right is a sheet of unprocessed matrix film. An exposed and processed sheet is in the tray on the left. The image in relief is almost transparent. The matrix will absorb dye in proportion to the amount of gelatin that has been exposed: a shadow area will absorb more dye than a highlight will. The Kodak Register Punch shown is useful for ease in printing and essential for critical registration. An adjustable paper punch can be used for smaller film sizes.
Place the matrix in the tray, emulsion up, and apply one color to the entire image. I’ve mixed several colors from the yellow, magenta, and cyan dyes. Black is made from approximately equal proportions of all three dyes.
The matrix will fully absorb the dye in 3 to 5 minutes. Constant agitation will help it absorb more evenly.
After pouring the dye back into its container, rinse the matrix in the 2% acetic acid solution. The acid solution rinses away the excess dye and sets the dye on the matrix. The acid can be used until it becomes discolored. I usually mix up several gallons when printing.
If desired, the dye can be removed from the matrix by rinsing it under warm water or by soaking it in a tray of fairly hot water. This technique can be used for several purposes. The highlights will rinse away first, which will increase the contrast of the image. Increasing the contrast can be done more precisely by using Kodak Highlight Reducer, listed on page 194. The warm water rinse will also desaturate the color and eventually will wash it away completely.
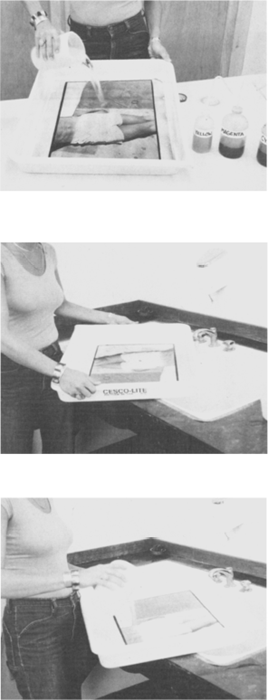
If you use a warm water rinse, soak the matrix again in the acid solution to set the dye.
Printing the Matrix
After drying the matrix, which can be done rapidly with a hair dryer, you can selectively color the matrix. I work with very soft brushes, using the acid as a diluting agent, and slowly add the color to each area. After each application of dye, the matrix should be rinsed in acid and dried. The final printed image will be very close to what you see in the tray. If you haven’t already scratched the matrix during processing, you will find it very easy to do it during the coloring. If you do, try to make creative use of the scratches and continue to manipulate the image. If the gelatin is rubbed or scratched off the matrix it will not accept dye and will print white in those areas.
After the matrix has been dyed to completion, soak it in a tray of clean acid solution. The dyed matrix must be thoroughly wet before printing. Presoak a sheet of Kodak Dye Transfer Paper in warm water for several minutes, then place it in Kodak Paper Conditioner. The paper should soak in the conditioner for at least 10 minutes and can safely be left for several hours.
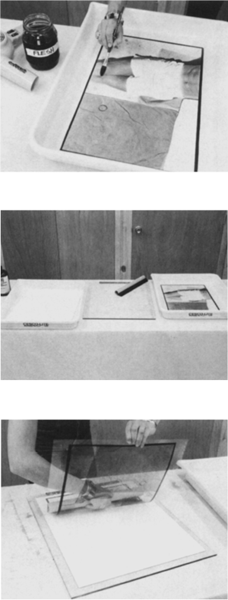
Remove the paper from the conditioner and place it on the printing board, emulsion up, with one edge butted against the register strip. Wipe the excess conditioner from the paper and rinse the solution from your hands. Lift the matrix from the acid tray and allow it to drain for a few seconds. With the emulsion side facing the paper, hold the matrix up and affix the punched edge to the pins on the register strip. Continue to hold one end away from the paper as you slowly roll the matrix into contact with the paper, using a roller or squeegee. Be firm enough to squeegee any air bubbles out; excessive pressure is not advisable.
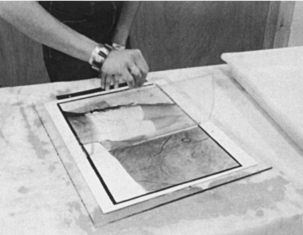
The transfer of the dyes is a simple chemical process. The film has been rinsed in the acid solution and the paper soaked in the alkaline paper conditioner. When rolled into contact, the dyes will migrate to the surface of lesser acidity.
Leave the matrix and the paper in contact for 3 to 5 minutes. It often helps to use heat when printing: you can either warm up the board by rinsing it under hot water before printing or place a warm sponge over the matrix while it is in contact with the paper.
Lift the matrix slowly from the paper. Before removing the matrix from the pins, check for areas where the dye hasn’t transferred. If there are any, splash some paper conditioner on the print and roll the matrix down again.
If you wish to make multiple printings in register on the same sheet of paper, take care not to move the print on the board. The paper must be kept wet with paper conditioner between printings. If you cover the print with a sheet of clear acetate, it will keep the paper wet and allow you to lay the dyed matrix over the print to visualize how the color will look.
After the dye has transferred, squeegee or sponge excess moisture from the print and dry it on a screen. The matrix can be rinsed in water and hung to dry or returned to a dye bath for another print. The matrices can be dried and stored with the dye on them. To print a matrix at a later date, rinse the film in the acid solution and proceed as usual.

Other Possibilities
Other possibilities for control and manipulation of the process are the masking out of image areas and printing on other surfaces. Masks made from litho film (see the chapter on high contrast, p. 108) can be used to leave certain areas of the image unexposed on the matrix. You can mask the processed matrix directly, using Photo Maskoid or rubber cement.
In lieu of Kodak Dye Transfer Paper, the dyes can be transferred to any fresh or out-of-date photographic papers. To prepare (mordant) the paper, fix in Kodak Photo-Fix or Kodak Fixing Bath F-5 for 3 minutes and then wash thoroughly to remove the residual hypo. The paper can then be dried or placed directly in paper conditioner.
The dyes can be transferred to a processed black-and-white print if it has been mordanted with Photo-Fix or F-5.
The dyes can be transferred to other materials, such as fabric, but there must be a gelatin base to retain image sharpness.
For further information on the process, see Kodak publication E-80, Kodak Dye Transfer Process.
Formulas
Plain Fixer
450g
sodium thiosulfate
2000ml water
Dissolve the sodium thiosulfate in the water at 52° C and allow to cool before using. A liquid rapid fixer can be used, mixed as directed without the hardener.
R10A Bleach
Part A:
20g
ammonium dichromate
4ml sulfuric acid
1000ml water
Dissolve the ammonium dichromate in half the water at room temperature. Add the sulfuric acid, then the remaining water. Handle the acid with great care, and always add acid to water, not the reverse.
Part B :
45g sodium chloride
1000ml water
Mix at room temperature. Non-iodized table salt is sufficiently pure sodium chloride for this use.
To make a working solution of R10A bleach, mix 1 part of Part A and 1 part of Part B with 6 parts of water.
2% Acetic Acid Solution
20ml glacial acetic acid
1000ml water
Mix acid into the water carefully at room temperature. Do not add water to acid.
Kodak Matrix Highlight Reducer R-18
1.2g Calgon dishwasher detergent or sodium polymetaphosphate
1000ml water
Mix together at 32° C. Add 50ml of this solution to a liter of the acid solution and agitate the matrix in it for 1 minute to clear the highlights.
Kodak Matrix Clearing Bath CB-5
120g Calgon or Kodak Anti-Calcium 35ml ammonium hydroxide
1000ml water
Mix the Calgon and ammonium hydroxide into the water at 32° C. To make a working solution, dilute this stock solution 1:11 with water. To remove residual dye from the matrix, rinse in the working solution. Follow with a running water wash and a rinse in the acid bath before applying dye again.

