
THE SABATTIER EFFECT
John Craig
The French photographer Armand Sabattier discovered in 1862 that unique positive/negative effects could be obtained by reexposing to light and redeveloping an exposed and partially developed negative or print. Ever since then, photographic artists have been intrigued by this phenomenon, commonly though inaccurately called solarization. Many have utilized this effect very successfully in their personal modes of creative photographic expression. An early example is the photographs made from solarized negatives that Man Ray produced in the late 1920s and early 1930s. More recently, such photographic artists as Robert Fichter, Edmund Teske, Jerry Uelsmann, and Todd Walker have creatively used the Sabattier effect in their imagery. Each has dealt with the process in a unique and expressive way that has contributed to the success of his photographic work. I have been fortunate to have come in contact with the work of these artists, and my own imagery has been influenced accordingly.
The Sabattier effect has become a method by which photographers can introduce some painterly graphic elements into photographic image making. Unique and fascinating spatial juxtapositions are created by the combination of positive and negative tonal information in a single print. Photographically real forms become distorted and abstracted.
One of the more interesting results of the Sabattier effect is the creation of Mackie lines, thin white lines on the print formed between adjacent dark and light tonal areas. They serve to separate these areas and accent the positive/negative qualities of the image. These Mackie lines are similar to expressive hand-drawn lines, though they are drawn with light. When working with the Sabattier effect, I feel more like an alchemist or magician than a technician. Subtle as well as dramatic alterations take place on the surface of the print and contribute to a sense of surrealism and the revelation of a separate reality.
The Nature of the Sabattier Effect
The unique visual qualities of the Sabattier effect are the result of a combination of chemical reactions. A piece of ordinary photographic paper is exposed normally, and at some point during the development process the print is reexposed to light. The dark areas, shadows, of the print are affected little by this reexposure, because most of the silver halides in these areas have already been converted to metallic silver by the first exposure and development. The bright areas, or highlights, still contain unexposed or slightly exposed and undeveloped silver halides, which remain light-sensitive. These can still be converted to metallic silver through additional exposure and further development. The result is a darkening of these highlight areas to a light or very dark gray, depending upon how much they were reexposed and redeveloped.
Two other manifestations of the Sabattier effect are an apparent lightening of the light gray areas of the original print and the formation of Mackie lines. These lines are light, sometimes white, and are formed between the light and dark tonal areas of the print. They are the result of chemical by-products remaining from the first development, which retard further development.
Gaining control over the Sabattier effect will require extensive experimentation on your part. The following is a method of working with this process that has evolved through experimentation and experience. Within this method are available countless variations. You are encouraged to find your own, after exploring the few discussed here.

Man Ray, in this image from 1930, “Femme,” has achieved an unusual tonal reversal by using the Sabattier effect on the film, which? was then printed normally.
How to Produce a Sabattier Print
Select your negative; virtually any negative will do, although ones with slightly higher contrast usually give more interesting results. Position your negative in the enlarger, decide on the desired degree of enlargement, and focus.
Set up your processing chemicals: print developer, rinse water, print developer diluted 1:10, fixer, fixer remover, final wash water. Do not use stop bath. Turn off the white lights and work under safelight.
Make your first test using a series of exposures with the enlarger of 5, 10, 20, and 40 sec. Develop this strip for 1 Vi min, rinse, and fix.
Examine the test strip under white light to determine the best printing time. Select a time that gives a slightly lighter than normal print but still maintains a good black shadow and a crisp highlight, with substantial light areas throughout the print. This requirement is one of the reasons that a paper of higher than normal contrast is usually recommended.
Make a test print using the selected exposure time, exposing a full-sized piece of paper, and processing it normally. Examine this test print for overall appearance, and decide if any further alteration of printing time or development is needed. This full-sized test print, although not strictly necessary, is useful for comparison with the prints to follow.
Make five test prints using the decided-upon exposure time, remembering to mark the back of each for later identification. Place them in the developer one at a time, the second following the first after 1 min, and the rest at 30-sec intervals. Remove them all together to a running water rinse after the last test print has received 30 sec of development. Do not fix them yet. You now have a test series developed 30 sec, 1 min, 90 sec, 2 min, and 3 min.
Remove the prints from the rinse, drain them, and lay them face up on a larger piece of glass, Plexiglas, or stainless steel.
This test sthp was made on grade 5 paper to determine the initial exposure time. From the bottom, the enlarger exposure times shown are 5, 10, 20, and 40 sec.
Squeegee the prints carefully on this surface, stripping away excess water and making sure not to leave water streaks or spots. These, as illustrated at the end of this chapter, will cause uneven reexposure and redevelopment.
Position the damp prints under a controllable light source — any source of white light that can be regulated by your timer. Use another enlarger, if you have access to one, or remove the negative and its carrier from the one you used for the first exposure and use this en-larger. Be sure to protect the enlarger base from moisture and chemical contamination by using a piece of plastic, a tray, or a clean towel under the print and its support surface. If you are using an enlarger for reexposure, stop down the lens, if possible, one or two stops.
Reexpose all five test prints identically in a test strip sequence of 2, 4, 8, and 16 sec. The prints can be reexposed one at a time if you have insufficient room to line them up all together for exposure. When all five have been reexposed, place them together in the tray of diluted developer.
Redevelop the prints in the tray of diluted developer. Although dilution of 1:10 from working strength is my standard, dilutions of 1:4 to 1:12 or more can be used. Rock the tray gently and carefully watch the prints develop. You can use a 2 min redevelopment time as a standard, but feel free to shorten or lengthen the time for different results. Redevelop all five tests the same, and be sure to note the redevelopment time so you can duplicate the results on your final print.
Rinse, fix, and wash the prints.
Examine them closely under room light and evaluate them as shown in the test examples. The series of different redevelopment times gives you a wide range of results from which to choose.
Decide on a suitable combination of reexposure and redevelopment times. Use your creative judgment to determine how you would like the end product to look.
Repeat the redevelopment and reexposure procedure on a full-sized print, using the de-cided-upon times.
Complete the process with fixer remover, washing, and drying.
An exposure time of 10 sec was selected from the test strip to yield this test print, which favors the lighter tones without sacrificing a rich black.
The Test Strip Procedure
1. 30 sec development
2. 60 sec development
3. 90 sec development
4. 2 min development
All five of these test strips were given the same initial enlarger exposure: 10 sec at f/11 on grade 5 paper, as in the test print. Developed for the times shown, they were identically reexposed, from the bottom of each, 2, 4, 8, and 16 sec. They were redeveloped together for 1 min.
5. 3 min development
This final print was made after selecting the 8-sec section from the third test strip. The initial exposure time on grade 5 paper was 10 sec, the first development was 90 sec, reexposure was 8 sec, and redevelopment was 1 min. Only by devoting careful attention to detail can you begin to achieve even modestly repeatable results.
Methods of Control during Exposure
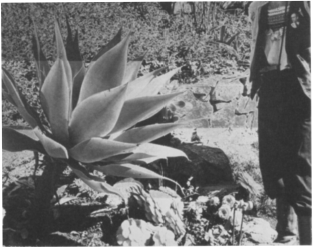
These images will show you some of the methods you can use to exert control over how much and where a print is reexposed and redeveloped. Refer back to the original result on the previous page for comparison.
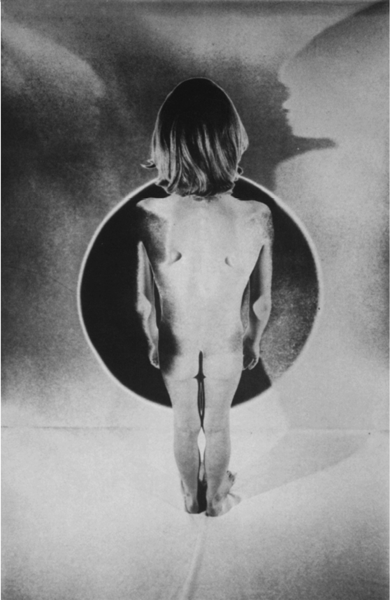
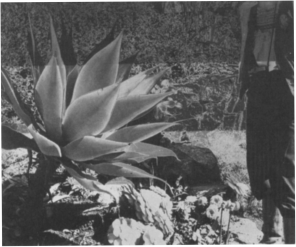
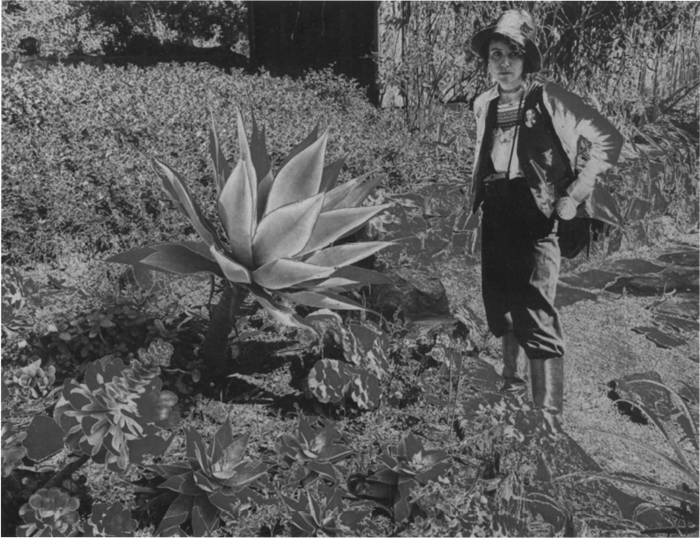
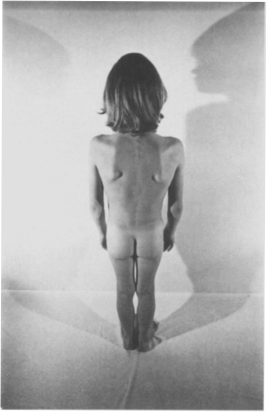
Local Control during First Exposure
The final result can be altered, as in normal printing, by varying the exposure in different areas. In this print the first exposure has been burned and dodged. The corners of the image have been given considerable extra exposure, thus darkening those areas and preventing further alteration from reexposure and redevelopment. The right side of the figure and the plants in the center foreground were dodged for about half of the initial exposure, allowing more alteration to take place during the second exposure and development.
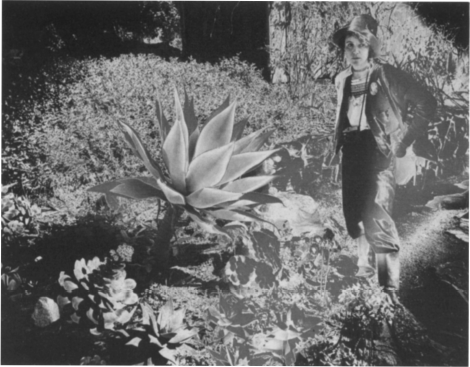
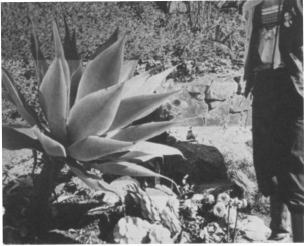
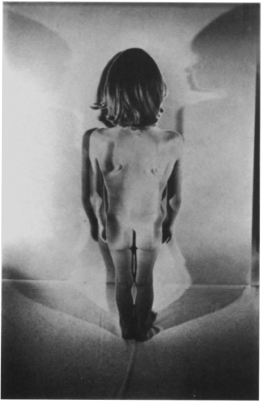
Local Control during Reexposure
Further control can be gained by varying the reexposure. This print was given the standard first exposure but was dodged and burned during the second exposure. The areas around the figure on the right side were given less than the normal reexposure, while the bottom corners were given significantly more, causing variation in the amount of Sabattier effect in different areas of the print.
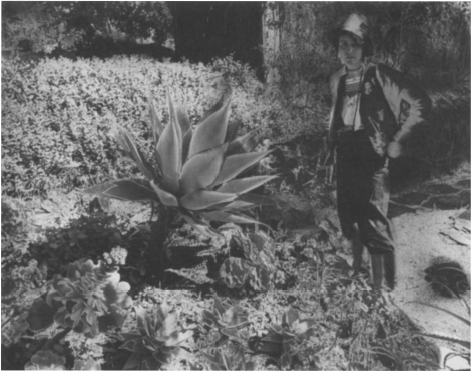
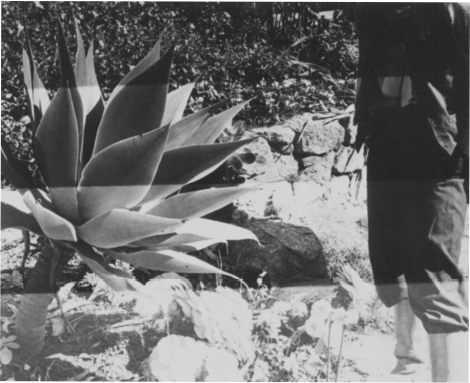
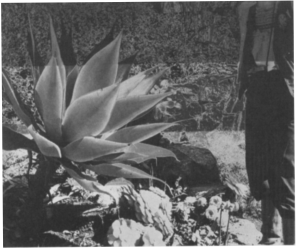
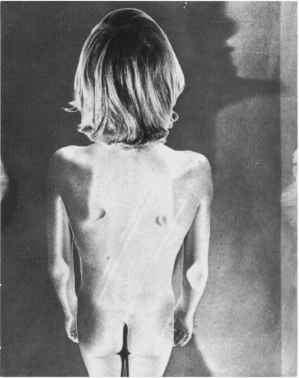
Selective Reexposure
The standard first exposure was given to this print, but instead of an enlarger as a source of light for the reexposure, a flashlight was used. If you use a flashlight, tape a cone of black paper around the front of your light to allow you to direct the light more accurately; you can also use a small penlight. You can draw with the flashlight and limit the reexposure to selected small areas of the image. The plants in the foreground, the upper left corner, and the area around the figure were reexposed in this way.
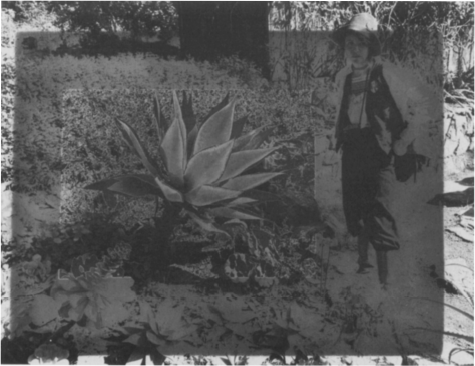
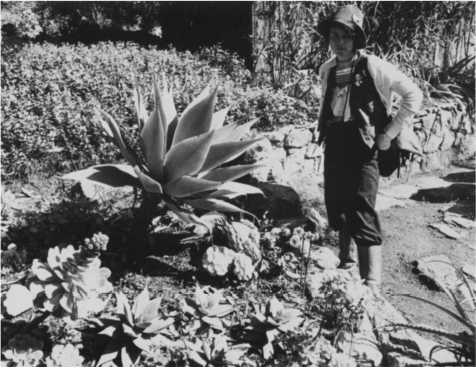
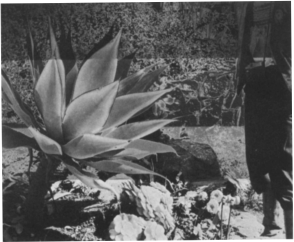
Multiple Reexposure
This print began with standard first exposure. For the reexposure the enlarger head was lowered with an empty 35mm negative carrier in position, and just the area in a rectangle around the central large plant was reexposed. The print was redeveloped for 2 min, rinsed, resqueegeed, and repositioned under the enlarger. You can use a red filter in the enlarger to reposition the image without further exposure. Next, the enlarger head was raised slightly, and the print was exposed once more, redeveloped, and completely processed.
Methods of Control in Processing
This is a test print, made on grade 6 paper.
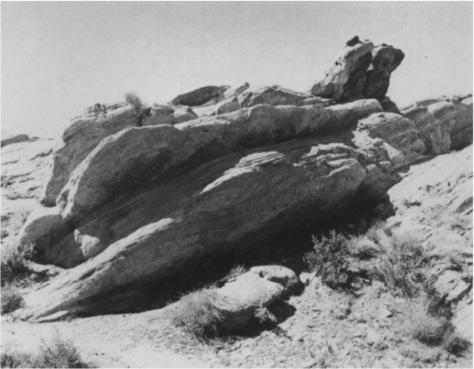
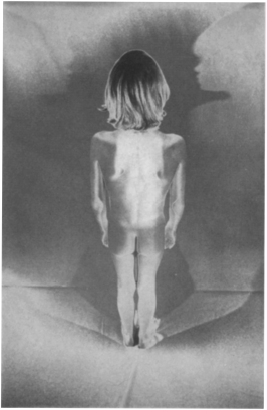
The unmanipulated Sabattier print is shown here for comparison to the prints opposite.
Selective Redevelopment
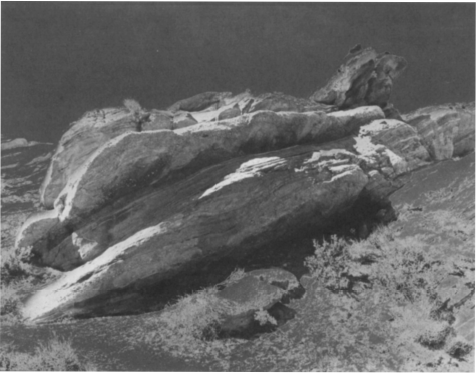
The print was reexposed normally but not placed in the tray of diluted developer. Instead, the developer was selectively painted on with a small brush, allowing the Sabattier effect to take place only on the top and right side of the image. A very small quantity of developer was used. It is necessary to watch the progress carefully in order to decide when to stop further redevelopment.
Selective Fixing
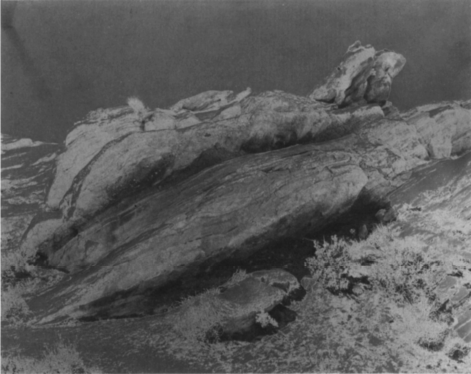
The print was reexposed overall, but just before its immersion in the redeveloper, a small amount of fixer was carefully applied with a small brush to the diagonal rocks. The application of fixer prevents any further development and consequently prevents the Sabattier effect in the areas on which it is applied. Rinse the fixer from the print with water before redevelopment to avoid contaminating your developer.
Tone Control With Bleach
Frequently, the Sabattier effect will leave you with a print of visual interest that is too dark to be completely satisfactory. Since the overall density of the print is difficult to control while attempting to obtain pleasing Sabattier effect, it is often necessary to lighten the print after processing using a reducer or bleach.
This print is a normal Sabattier print, which received overall reexposure and redevelopment.
Overall Bleaching
This print has been slightly bleached after it was fixed and rinsed. Use commercially packaged Farmer’s Reducer, or mix 10g potassium ferricyanide and 5g potassium bromide in 1 liter of water. Both chemicals are available at photo stores. Immerse the print in a tray containing the bleach and watch carefully to avoid overbleaching. This step can be done in room light. Diluted bleach will act more slowly, offering more control. Immerse the print again in fixer after bleaching to clear the yellow stain. Follow with your normal washing procedure.
Local Bleaching
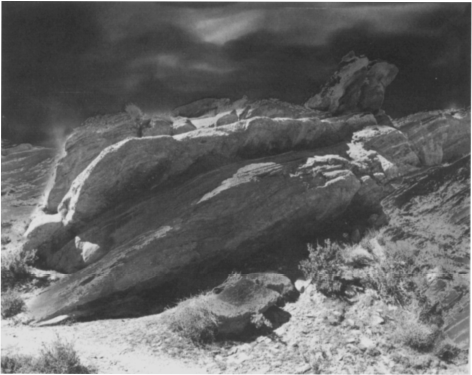
By applying the bleach with a small brush or Q-tip, you can limit the reducing action to selected areas. The background and the small rocks in the foreground have been lightened in this manner. You can mix stronger concentrations of bleach if greater or more rapid reduction is desired.
This print was lightly bleached overall in a tray, rinsed, and then brushed with bleach on the large right-hand rock.
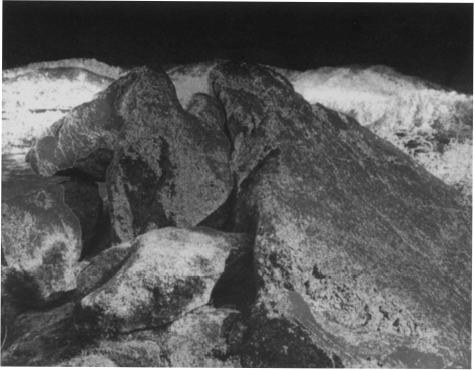
Bas Relief and Troubleshooting
Bas Relief
Unusual effects will result from using the enlarger light, with the negative still in place, to reexpose your Sabattier print. The shadow areas, thinner on the negative, receive more reexposure than the highlights. Imprecise alignment of the reexposing image on the print can produce notable edge effects.
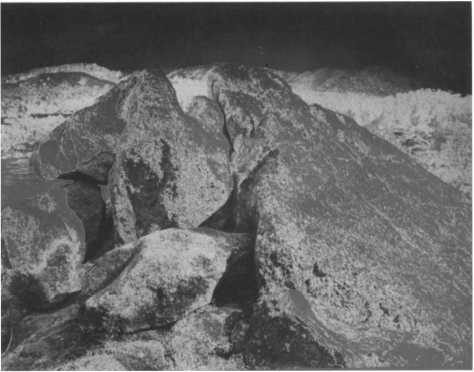
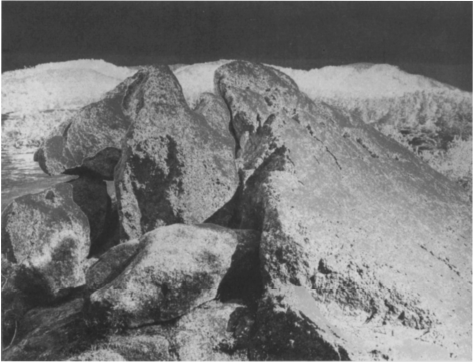
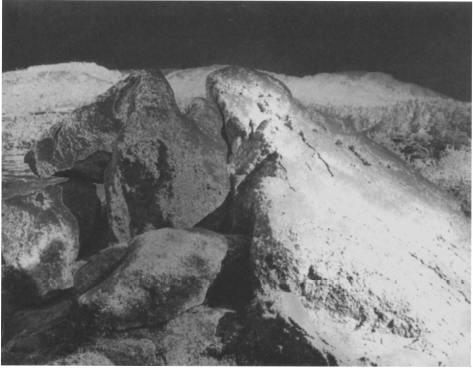
The standard test print, on grade 6 paper.
For comparison, a normal Sabattier print, given overall leexposure and redevelopment.
A Bas Relief print from the same negative.
Troubleshooting
Most of the unplanned and undesirable marks on your prints will be the result of imperfect squeegee technique. Be sure to use a clean, sharp-bladed rubber squeegee that is longer than the width of your paper. The surface on which you squeegee the print should be flat, smooth, and inflexible.
The streaks on this test piint could have been caused by uneven 01 insufficient piessuie on the squeegee, or by an uneven or unsharp squeegee blade.
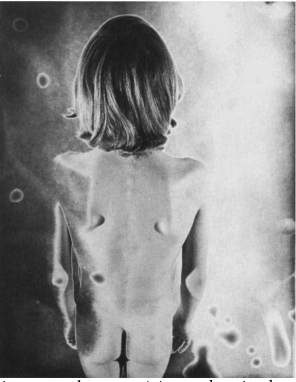
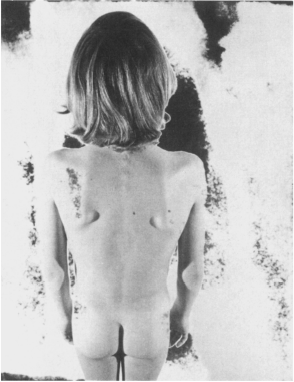
Mottled results like this are frequently the result of overzealous squeegeeing. Too much pressure is as bad as not enough.
Any water drops remaining on the print during reexposure act as tiny lenses, focusing the reexposure light into marks like these.