
"A computer lets you make more mistakes faster than any invention in human history—with the possible exceptions of handguns and tequila."
In this chapter we'll put all of the things you've learned so far in this book into practice in a real, working application. While there probably aren't enough pages to demonstrate a large enterprise application, we'll look at a succinct application that gives us all the salient features of a broader program.
This program will start from bootstrapping the injector in a web application and walk through designing services for persistence, transactions, and user interactivity. We'll also show how to apply some useful design patterns (such as the Provider pattern from chapter 5) and ways to properly leverage scope, lifecycle, and interception (AOP).
Let's start by defining what this program will be.
I've chosen to do a simple, trivial clone of the popular microblogging service Twitter. (This isn't in the least bit because I spend large chunks of my day on Twitter!) While I was writing this chapter, I thought crosstalk was cool code name.
Crosstalk serves as a good illustration of a straightforward yet vastly scalable website that has plenty of user interactivity and data processing needs. These make it an ideal problem domain to showcase the wonderful patterns of dependency injection.
Its requirements are diverse—ranging from persistence and presentation to security and user management. This gives us a good basis for drawing an illustrative architecture from start to finish, in a few pages. First, let's look at these requirements.
Our thesis is fairly straightforward: crosstalk allows users to write short text messages (called tweets) on their home page. This engenders some broad requirements. We need to
Authenticate users when they log on
Secure their home pages
Persist tweets in a database
We also need to ensure that the site is scalable and concurrent. In other words, it must be easily tolerant to many users accessing their home pages at once. Given all these requirements, it follows that crosstalk has several layers:
The presentation layer (website)
The persistence layer (database mechanism)
The security layer (authentication and securing pages)
We'll build this application using Google Guice as the injector and Google Sitebricks as the web application framework. Google Sitebricks is a simple, statically typed development system for rendering web pages. It follows the REST idiom, which makes it ideal for building HTML websites.
For persistence, we'll use Hibernate and warp-persist (seen in chapter 8) as the integration bridge with Guice. Let's get started.
First, we'll need a layout and structure for the crosstalk application. This needs to follow the Java Servlet standard so that it can be deployed in a servlet container like Apache Tomcat or Mort Bay Jetty. We'll use Jetty for this illustration, since it's very simple to get up and running with. And as the database, we'll go with Hypersonic (sometimes called HSQL), which is an in-memory SQL database that's easy to set up and configure.
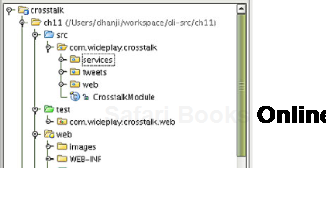
Here's the structure we'll start out with for the project (see figure 11.1):
src—The main source directory, with all our classes
test—A test sources directory, for our Jetty launcher
web—The directory for all the web resources (HTML templates, CSS stylesheets)
web/WEB-INF—A directory required by the servlet container to look for deployment descriptors
The file web.xml is a deployment descriptor that instructs the servlet container about how to configure this web application. We'll use a web.xml file very similar to the one used in chapter 5, when we were dealing with web scopes.
Once you have that layout set up (see figure 11.1), open a project in your favorite IDE and add the libraries shown in table 11.1 to the classpath:
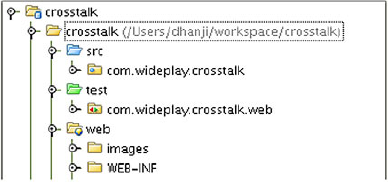
Table 11.1. Libraries<br></br>
Library | Description |
|---|---|
Google Guice core
| |
Guice AOP interface (included with Guice) | |
google-sitebricks.jar | Google's Sitebricks web framework
|
Servlet integration for Guice (included with Guice | |
hibernate3.jar | Hibernate core persistence framework
|
hibernate-annotations.jar | Annotations for Hibernate
|
ejb3-persistence.jar | Annotations for Hibernate (included with Hibernate Annotations) |
dom4j-1.6.1.jar | Dom4j XML parser (included with Hibernate) |
jta.jar | |
cglib-nodep-2.1_3.jar | CGLib used by Hibernate to proxy objects |
antlr-2.7.5h3.jar | Antlr compiler library (included with Hibernate) |
commons-collections.jar | Apache Collections library (included with Hibernate) |
commons-logging.jar | Apache Commons-Logging (required by Hibernate for log output) |
warp-persist-2.0-20090214.jar | Warp-persist integrates Hibernate with Guice
|
hsqldb.jar | Hypersonic In-Memory SQL database
|
servlet-api-2.5-6.1.9.jar | Java Servlet API (included with Jetty) |
jetty-6.1.9.jar | Mort Bay Jetty
|
jetty-util-6.1.9.jar | Utilities for working with Jetty |
jcip-annotations.jar | The set of annotations used in chapter 10 for thread-safety documentation
|
Tip
To add these libraries to the classpath in IntelliJ IDEA, open Settings > Project Settings and select the main (crosstalk) module. Then open the Dependencies tab and click Add. Now select Project Library and Add Jar Directory, choosing the directory where all these jars reside (or add them individually using the single-entry module library option).
Once you have all of those lined up, you should be good to go. If you aren't using an IDE, you can place all the jars in a lib directory and specify them individually on the command line.
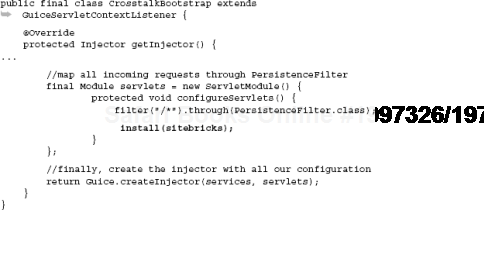
Now the central configuration for our application will reside in CrosstalkBootstrap. This is a simple Java class, a subclass of GuiceServletContextListener, from which we'll tell Guice how to wire our services together, as shown in listing 11.1.
Example 11.1. The Guice configuration for crosstalk (also creates the injector)
public final class CrosstalkBootstrap extends GuiceServletContextListener {

    @Override
    protected Injector getInjector() {

        //bind in all of our service dependencies
        final Module services = new ServicesModule();

        //tell Sitebricks to scan this package
        final Module sitebricks = new SitebricksModule() {
            protected void configureSitebricks() {
                scan(CrosstalkBootstrap.class.getPackage());
            }
        };

        //map all incoming requests through the PersistenceFilter
        final Module servlets = new ServletModule() {
                protected void configureServlets() {
                    filter("/*").through(PersistenceFilter.class);

                     install(sitebricks);
                }
        };
//finally, create the injector with all our configuration
return Guice.createInjector(services, servlets);
}
}It looks pretty simple, but let's examine what this does. By subclassing GuiceServletContextListener, we're able to create and register our own injector with guice-servlet and the servlet container itself. This listener must also be registered in web.xml so that it can be called when the application is deployed and made ready to run, as shown in listing 11.2.
Example 11.2. Web.xml config for guice-servlet and a crosstalk-specific listener
<?xml version="1.0" encoding="UTF-8"?>
<web-app xmlns="http://java.sun.com/xml/ns/javaee"
           xmlns:xsi="http://www.w3.org/2001/XMLSchema-instance"
           xsi:schemaLocation="http://java.sun.com/xml/ns/javaee
              http://java.sun.com/xml/ns/javaee/web-app_2_5.xsd"
           version="2.5">

    <filter>
        <filter-name>guiceFilter</filter-name>
        <filter-class>com.google.inject.servlet.GuiceFilter</filter-class>
    </filter>

    <filter-mapping>
        <filter-name>guiceFilter</filter-name>
        <url-pattern>/*</url-pattern>
    </filter-mapping>

    <listener>
        <listener-class>com.wideplay.crosstalk.CrosstalkBootstrap</listener-
     class>
    </listener>

</web-app>
Web.xml also creates a filter mapping so that all incoming requests are passed through the guice-servlet GuiceFilter. This allows guice-servlet to reroute requests through the filters and servlets configured in Guice's servlet pipeline, allowing us to take advantage of dependency injection idioms, lifecycle, scope and interception. We saw a setup very similar to this in chapter 5. GuiceFilter is provided by guice-servlet and requires no special treatment. We map it to /* to indicate that all URLs are to be filtered through it:
<?xml version="1.0" encoding="UTF-8"?>
<web-app xmlns="http://java.sun.com/xml/ns/javaee"
           xmlns:xsi="http://www.w3.org/2001/XMLSchema-instance"
           xsi:schemaLocation="http://java.sun.com/xml/ns/javaee
              http://java.sun.com/xml/ns/javaee/web-app_2_5.xsd"
           version="2.5">

    <filter>
        <filter-name>guiceFilter</filter-name>
        <filter-class>com.google.inject.servlet.GuiceFilter</filter-class>
</filter>
<filter-mapping>
<filter-name>guiceFilter</filter-name>
<url-pattern>/*</url-pattern>
</filter-mapping>
...
</web-app>This way, all incoming requests are rerouted through guice-servlet's GuiceFilter, allowing it to process requests that are specific to crosstalk and pass through requests for static resources like CSS stylesheets and images. Application-specific requests are handled by Google Sitebricks pages, which we'll now go about setting up.
Since we'll be using the Google Sitebricks web framework, we'll need to do extra configuration to tell it how to behave. Google Sitebricks has a simple philosophy where individual HTML pages are modeled as Java classes with a backing HTML template. Each such page class is registered against URL patterns in much the same manner as a servlet (or filter). We'll see how this works in a second. But first, let's tell guice-servlet to route all requests through Google Sitebricks, as shown in listing 11.3.
The line in bold directs Guice to install our web framework, meaning that Google Sitebricks gets a crack at all user requests and can decide which ones to process and which ones it can safely pass on to the servlet container (such as static resources).
Now, we can proceed to look at the Google Sitebricks configuration:
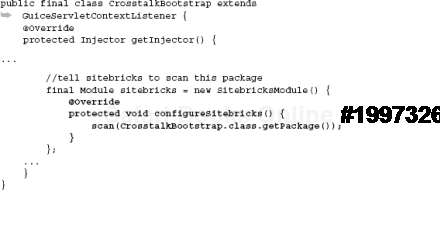
The method scan(...) tells Google Sitebricks which packages to work with. You may specify as many packages as needed this way.
By providing it with CrosstalkBootstrap's package, we tell Google Sitebricks to scan the entire package tree beginning with com.wideplay.crosstalk and to look for page classes and templates to serve.
Finally, we install one more module in our injector, which will handle all application services. This is, appropriately, the ServicesModule:
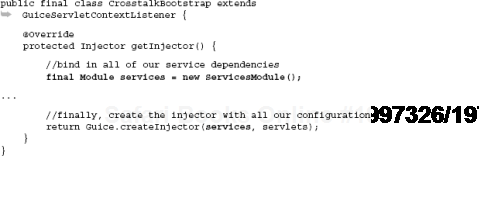
The Guice.createInjector() method is a varargs method, meaning that it takes any number of arguments. This is convenient for us as we can pass in our two modules, services and servlets, that configure our persistence and security, respectively. Note that Google Sitebricks web pages are processed by the SitebricksModule. We'll look at the services module in some more detail shortly, but first, let's examine the application's package structure.
In this section, we'll look at how crosstalk is broken down into modules by package, service type, and contract. We'll see some of the concepts presented in chapter 4 on modularizing code and in the chapter 10 on packaging clean designs that separate areas of concern.
Crosstalk's packages also expose no implementation details, so that accidental coupling of services does not occur. All collaboration between modules happens through publicly exposed interfaces, with well-defined contracts. Let's see how this structure is achieved.
Crosstalk's packages are organized very simply (shown in figure 11.2).
They are divided among the core application services, Google Sitebricks web pages, and any data model classes:
Notice that the services package exposes only interfaces (apart from the Guice ServicesModule configuration class). In chapter 4 we discussed the concept of loose coupling. This allows us to modify specific implementation details without affecting the presentation layer in any way. For example, we may choose to persist the data in a cluster data store rather than Hibernate and HSQL. By changing the implementation of classes in the services package, we can do this with no impact to the rest of the application. All implementation classes are hidden away as package-local. Figure 11.3 provides a complete picture of this approach.
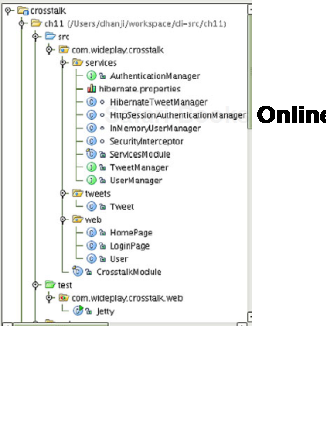
You may also notice that the web pages and the data model classes are public. This is because they are used directly by the framework (Google Sitebricks in the web pages' case and Hibernate in the data model's) and configured using flexible annotations, which already alleviate any coupling perils.
Now that we've taken a bird's-eye tour of the structure, let's get down to it. First, the business end of crosstalk, its user-facing presentation layer.
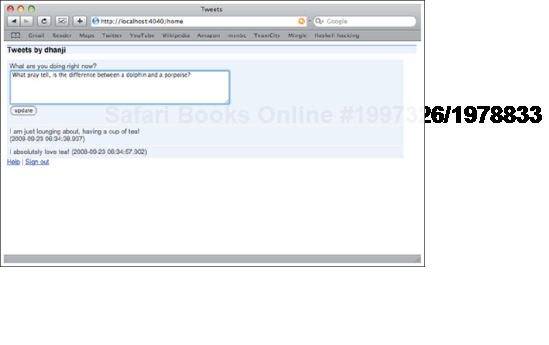
Let's look at some of crosstalk's functionality. Crosstalk's core requirement is the ability to post tweets on a user's home page. For this, we create a class HomePage, with a corresponding template in the web/ resources directory. HomePage looks like figure 11.4.
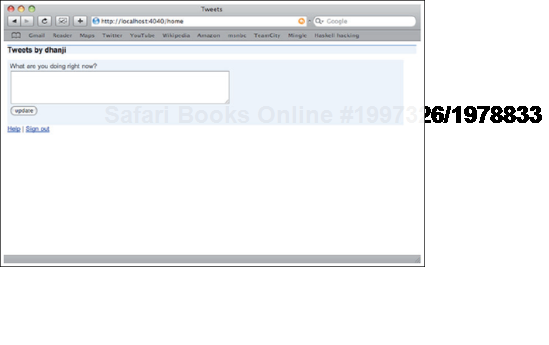
Figure 11.4. A user's home page with no content-it allows users to blog new tweets in a text box.<br></br>
The Java source code behind HomePage is shown in listing 11.4.
Example 11.4. HomePage Sitebricks page class models a crosstalk user's home page
package com.wideplay.crosstalk.web;

@At("/home") @Select("action") @RequestScoped
public class HomePage {
    //user context, tracks current user
    private User user;

    //page state variables
    private List<Tweet> tweets;
    private Tweet newTweet = new Tweet();

    //service dependencies
    private final TweetManager tweetManager;

    @Inject
    public HomePage(TweetManager tweetManager, User user) {
        this.tweetManager = tweetManager;
        this.user = user;
    }

    @Get("logout")
    public String logout() {
        user.logout();

        return "/login?message=Bye.";
    }

    @Get
    public String get() {

        //load tweets for current user
this.tweets = tweetManager.tweetsFor(user.getUsername());
//stay on current page
return null;
}
@Post
public String post() {
newTweet.setAuthor(user.getUsername());
//contents are in newTweet, add it to the data store
tweetManager.addTweet(newTweet);
//redirect back to this page using a GET
return "/home";
}
//getters/setters...
public String getUser() {
return user.getUsername();
}
public List<Tweet> getTweets() {
return tweets;
}
public Tweet getNewTweet() {
return newTweet;
}
}This looks pretty involved. Let's see what each bit actually means. First, we annotate the class with the @At annotation, which tells Google Sitebricks to serve this page at the given URI:
@At("/home") @On("action") @RequestScoped
public class HomePage { .. }
Now, whenever a user types in URL http://localhost:8080/home (assuming the application is deployed at localhost:8080), the HomePage will be served up by Google Sitebricks. We also see the familiar @RequestScoped annotation, which tells Guice to create a new instance of HomePage for every incoming request. This is important because it allows us to work with state that's specific to a user without stepping on other users' data, accidentally.
Finally, the @On annotation is used to resolve events to fire against. For now, let it suffice to say that @On controls which method annotated with @Get is called based on an incoming request parameter named action.
The visual companion to this page class is its HTML template. This template contains what a user will see. Let's see how it's built.
HomePage's template is a very simple HTML file. It contains dynamic text, which is provided by binding its data to the request-scoped instance of class HomePage, as shown in listing 11.5. It also contains a link to a stylesheet.
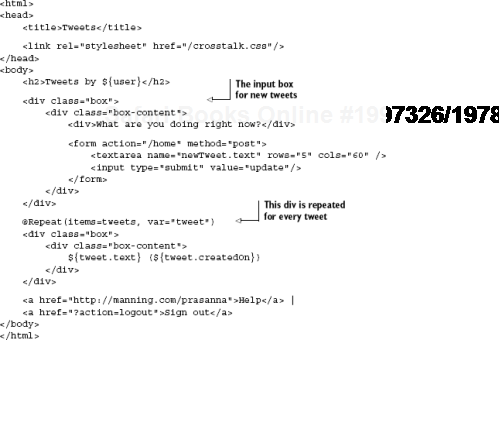
This line in particular is interesting because it resolves to a property of the HomePage class (that is, one that is accessed via a getter method):
<h2>Tweets by ${user}</h2>This heading is dynamically evaluated at runtime by calling HomePage.getUser(). HomePage.getUser() returns the username of the current user logged in to crosstalk:
public String getUser() {
    return user.getUsername();
}
One other interesting part of the template is the @Repeat annotation:
@Repeat(items=tweets, var="tweet")
<div class="box">
    <div class="box-content">
        ${tweet.text} (${tweet.createdOn})
    </div>
</div>
This tells Google Sitebricks to repeat the annotated tag (in this case, <div class="box"> over all the items in HomePage's property tweets. For each element in tweets, Google Sitebricks will render out the div tags expanding tweet.text and tweet.createdOn properties. In other words, this renders out the list of tweets posted by a user on their home page (see figure 11.5).
The other significant part of this template is the form. Users type their new tweets into a text field and post them by submitting the form:
<div>What are you doing right now?</div><form action="/home" method="post"><textarea name="newTweet.text" rows="5" cols="60" /> <input type="submit" value="update"/></form>
Since the form's textarea is bound to newTweet.text, Google Sitebricks will attempt to write the incoming form post to HomePage's property newTweet:
@At("/home") @On("action") @RequestScoped
public class HomePage {

    ...

    //page state variables
    private List<Tweet> tweets;
    private Tweet newTweet = new Tweet();

   ...
}
This is accomplished by navigating the getNewTweet() method to the appropriate setter methods on class Tweet, in this case, setText(). We take care to create a new instance of Tweet every time HomePage is created, thus every time it is requested, ensuring that tweets are never overwritten by accident.
Each new tweet entry by a user is recorded and modeled as an instance of class Tweet.
Tweet is the sole class in our domain model, and it consists of simple data fields describing a message, its creation date, and its author, as shown in listing 11.6.
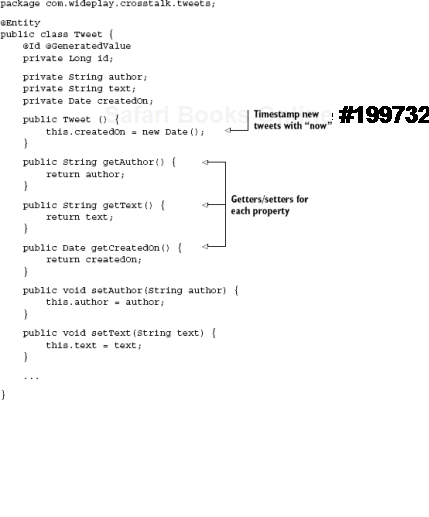
This class also contains a private field id, which is used by Hibernate to track tweets in the database. This field is annotated with some boilerplate, identifying it as a primary key that's generated automatically:
@Id @GeneratedValue
 private Long id;
The class itself is annotated with @Entity to indicate to Hibernate that this class is to be treated as a data entity.
Note
Internally, @Entity helps Hibernate separate classes that are mapped to tables from those that may be embedded as additional columns in a larger database table.
All of Tweet's properties have JavaBeans getter and setter methods as per the convention with Hibernate. So far we've seen how this models all of our data and keeps it organized. We need to go a step further and provide equals() and hashCode() methods to ensure that instances of Tweet behave properly in collections. This is also important for any class that Hibernate uses, since it will attempt to compare copies when optimizing for cached access.
equals() and hashCode() are quite straightforward, as shown in listing 11.7; they take all three data fields into account since together they form the identity of the Tweet.
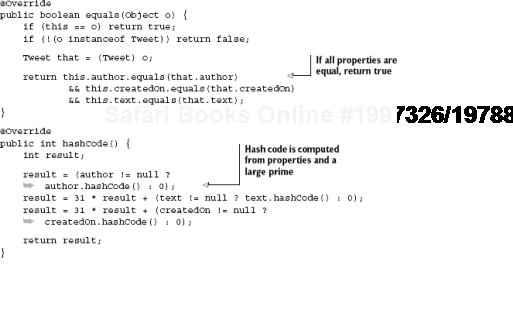
The idea is that objects are considered equal if they have the same values for author, text, and createdOn. Put another way, it's impossible to have all three match for two independent tweets. If two are posted at the same time, they will be from different authors. And if they are from the same author, they will necessarily have different creation times.
In order to track users across independent requests, we must use an HTTP session. However, rather than interact with it directly, crosstalk takes advantage of scoping. The class User serves as a context for the current user of the system. Wherever it's referenced from, User points to the user whose HTTP session is currently active. In listing 11.8 we mark User as scoped to the HTTP session by using the @SessionScoped annotation.
Example 11.8. Session-scoped User tracks information about the current user
@SessionScoped @NotThreadSafe
public class User {
    private String username;

    public String getUsername() {
        return username;
    }

    //logs in a user, by setting username to the current session
    public void login(String username) {
        this.username = username;
    }

    //logs out a user, by clearing username from session
    public void logout() {
        this.username = null;
    }
}
User does nothing more than store a username for the user who logs in and clears that name when the user logs out. Web page classes and services alike can check to find out whether someone is logged in and, if so, who is logged in by querying this service.
In HomePage, User is directly injected directly as a dependency:
@At("/home") @Select("action") @RequestScoped
public class HomePage {
    //user context, tracks current user
    private final User user;

    //page state variables
    private List<Tweet> tweets;
    private Tweet newTweet = new Tweet();

    //service dependencies
    private final TweetManager tweetManager;

    @Inject
    public HomePage(TweetManager tweetManager, User user) {
        this.tweetManager = tweetManager;
        this.user = user;
    }

    ...
}
This is safe because the session scope is wider than the request scope. This means that HomePage instances are shorter lived than User instances and therefore run no risk of scope-widening injection. HomePage retrieves a user's tweets by querying the TweetManager for tweets by username:
@Get
public String get() {
//load tweets for current user
this.tweets = tweetManager.tweetsFor(user.getUsername());
//stay on current page
return null;
}This method is called in normal operation when an HTTP GET request is received by the web server. The annotation @Get indicates to Google Sitebricks to use this method as an event handler prior to rendering the page. Once tweets are loaded (and stored in the tweets field), the template is rendered displaying all of a user's tweets. You may also have noticed a "Sign out" link on the HomePage, which a user clicks to leave the session:
<a href="http://manning.com/prasanna">Help</a> |
<a href="?action=logout">Sign out</a>
HomePage reacts to the sign-out action by logging the user out from the User service:
@Get("logout")
public String logout() {
user.logout();
return "/login?message=Bye.";
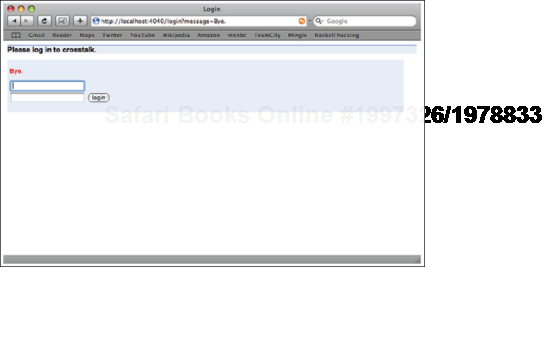
}Because of the @On("action") annotation at the top of the class, Google Sitebricks knows to call a different event handler. This time, method logout() is called since it's annotated with the value-matching action (@Get("logout")). The logout() method then redirects the user to a login page, where they must log in again to continue using the site:
@Get("logout")
 public String logout() {
     user.logout();

     return "/login?message=Bye.";
 }
The login page is both the exit and entry point for the crosstalk website and is also modeled as a Google Sitebricks page.
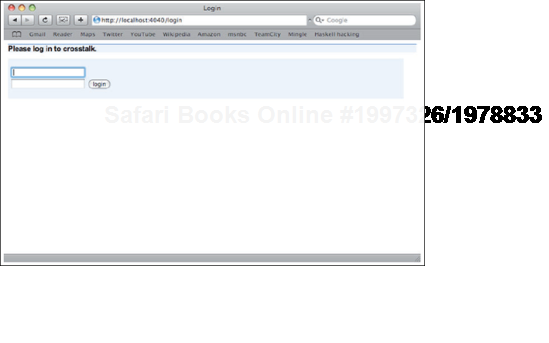
LoginPage, like HomePage, has a Java class and companion template, as shown in figure 11.6.
The template is fairly straightforward. It accepts a username and password, as shown in listing 11.9 (see figure 11.6 for the web version).
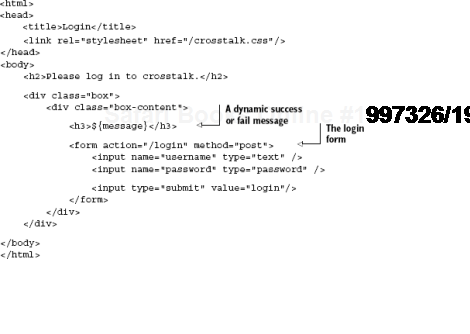
This form posts back to LoginPage with the entered credentials. LoginPage then uses this information to authenticate the user against a UserManager, as shown in listing 11.10.
Example 11.10. Page class LoginPage authenticates users logging into crosstalk
@At("/login") @RequestScoped
public class LoginPage {
    private String username;
private String password;
private String message = "";
//service dependencies
private final UserManager userManager;
private final User user;
@Inject
public LoginPage(UserManager userManager, User user) {
this.userManager = userManager;
this.user = user;
}
@Post
public String login() {

    //attempt to authenticate the user
    if (userManager.authenticate(username, password))
        user.login(username);
else {
        //clear user context from session
        user.logout();

        //stay on this page with error
        return "/login?message=Bad+credentials.";
    }

    //redirect to home page if successfully logged in
    return "/home";
}
//getters/setters...
public void setUsername(String username) {
this.username = username;
}
public void setPassword(String password) {
this.password = password;
}
public String getMessage() {
return message;
}
public void setMessage(String message) {
this.message = message;
}
}LoginPage has the standard getters and setters to expose its properties to the template and form input. Method login() asks UserManager (a data service) whether the username and password are valid:
@Post
public String login() {
//attempt to authenticate the user
if (userManager.authenticate(username, password))
user.login(username);else {
//clear user context from session
user.logout();
//stay on this page with error
return "/login?message=Bad+credentials.";
}
//redirect to home page if successfully logged in
return "/home";
}If they are valid, login() logs the user in via the session-scoped User service shown earlier. If not, a redirect is sent back to the login screen with an error message:
@Post
public String login() {
//attempt to authenticate the user
if (userManager.authenticate(username, password))
user.login(username);
else {
//clear user context from session
user.logout();
return "/login?message=Bad+credentials.";
}
//redirect to home page if successfully logged in
return "/home";
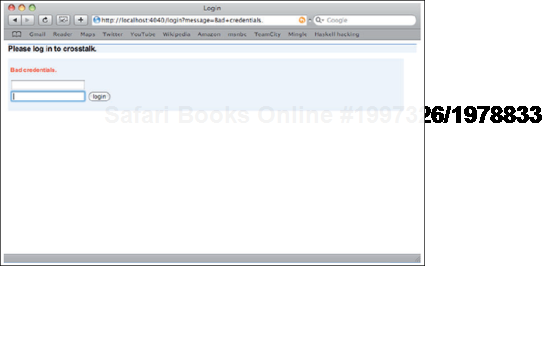
}This results in the "Bad credentials" error message as shown in figure 11.7.
Once successfully logged in, the user is sent to their home page to tweet away.
Data services that crosstalk uses are fairly simple. There's one for managing users (UserManager) and one for managing tweets (TweetManager)—not rocket science. Their implementations are subtly different. Let's look at the TweetManager implementation first, as shown in listing 11.11.
Example 11.11. Implementation for the TweetManager interface using Hibernate
@Immutable @Singleton
class HibernateTweetManager implements TweetManager {

    //the provider pattern helps us prevent scope-widening of sessions
    private final Provider<Session> session;

    @Inject
    public HibernateTweetManager(Provider<Session> session) {
        this.session = session;
    }

    @Finder(query = "from Tweet where author = :author")
    public List<Tweet> tweetsFor(@Named("author") String author) {

        //this method is intercepted by warp-persist DynamicFinders
        // and converted into a query. So you should not see an empty
        // list unless the database contains no Tweets for 'author'.
        return Collections.emptyList();
    }

    public void addTweet(Tweet tweet) {
        session.get().save(tweet);
    }
}
HibernateTweetManager implements the TweetManager interface by storing and querying tweets from the database using Hibernate's services. To add a new tweet, we use a session to the database and save a new instance of the Tweet data object:
public void addTweet(Tweet tweet) {
    session.get().save(tweet);
}
We use the Provider pattern here to avoid scope-widening the session, which is implicitly request scoped. I say implicitly, because its behavior is managed by warp-persist, as you'll see. HibernateTweetManager, like all other classes in the services package, is a thread-safe, immutable singleton. Querying objects is taken care of us by warp-persist's Dynamic Finders utility. Annotating the method tweetsFor() with @Finder tells warppersist to intercept and replace the method with logic that runs the bound query:
@Finder(query = "from Tweet where author = :author")
public List<Tweet> tweetsFor(@Named("author") String author) {

    // this method is intercepted by warp-persist DynamicFinders
    // and converted into a query. So you should not see an empty
    // list unless the database contains no Tweets for 'author'.
    return Collections.emptyList();
}
The string "from Tweet where author = :author" is an HQL (Hibernate Query Language) query, which tells Hibernate to load all tweets with the matching author. The method parameter author is annotated with an @Named("author") annotation, which binds the parameter into the query at the label :author.
Tip
For more information on warp-persist and dynamic finders, including tutorials, visit http://www.wideplay.com.
The UserManager service by contrast, does not use Hibernate to store users in the database. This is done as a matter of convenience to get us up and running quickly, as shown in listing 11.12.
Example 11.12. A UserManager that uses hard-coded user credentials
@Immutable @Singleton
class InMemoryUserManager implements UserManager {
    private final Map<String, String> users;

    public InMemoryUserManager() {
        final Map<String, String> users = new HashMap<String, String>();
        users.put("dhanji", "dirocks");

        //freeze the current hardcoded map so that it is thread-safe
        this.users = Collections.unmodifiableMap(users);
    }

//returns true if a username and password combination is valid
public boolean authenticate(String username, String password) {
        return users.containsKey(username)
            && users.get(username).equals(password);
    }
}
A simple hash table is stored in memory in this implementation, and the authenticate() method checks values in this hash table. We ensure that this hash table is immutable by wrapping it in an unmodifiable map. You should recall this best practice from chapter 10.
public InMemoryUserManager() {
    final Map<String, String> users = new HashMap<String, String>();
    users.put("dhanji", "dirocks");

    //freeze the current hardcoded map so that it is thread-safe
    this.users = Collections.unmodifiableMap(users);
}
This ensures that InMemoryUserManager is both highly concurrent and thread-safe (since it is immutable after construction). In a broader implementation, we'd use a Hibernate version of UserManager and have a separate set of pages for users to register and manage their accounts.
Now, let's look at interacting with a data store and retrieving and storing tweet data.
As you saw in section 11.2, all the components in the services package are separately configured. The ServicesModule takes care of this for us and is shown in listing 11.13.
Example 11.13. Security and persistence configuration (see also listing 11.1)
package com.wideplay.crosstalk.services;

public final class ServicesModule extends AbstractModule {
    private static final String HIBERNATE_CONFIG = "hibernate.properties";

    @Override
    protected void configure() {

        //configure persistence services, using hibernate
        install(PersistenceService
                .usingHibernate()
                .across(UnitOfWork.REQUEST)
                .buildModule()
        );

        //configure hibernate with our tweet data model class
        bind(Configuration.class).toInstance(new AnnotationConfiguration()
                .addAnnotatedClass(Tweet.class)
                .setProperties(loadProperties(HIBERNATE_CONFIG))
        );

        //configure crosstalk data services
        bind(TweetManager.class).to(HibernateTweetManager.class);
        bind(UserManager.class).to(InMemoryUserManager.class);

        //configure the in-memory authenticator (with hard-coded users)
        final HttpSessionAuthenticationManager manager =
            new HttpSessionAuthenticationManager();
        bind(AuthenticationManager.class).toInstance(manager);

        //intercept any @Get or @Post method on any page except LoginPage
        bindInterceptor(
                not(subclassesOf(LoginPage.class)),
                annotatedWith(Get.class).or(annotatedWith(Post.class)),

                new SecurityInterceptor(manager)
        );
    }

    private static Properties loadProperties(String props) {
        ...
    }
}
First up, we configure warp-persist to use Hibernate and provide us with a Hibernate unit of work (session to the database) every time an HTTP request arrives:
install(PersistenceService
        .usingHibernate()
        .across(UnitOfWork.REQUEST)
        .buildModule()
);
Then we configure Hibernate itself by binding the Configuration class to an annotation-based implementation that contains our Tweet domain model class:
bind(Configuration.class).toInstance(new AnnotationConfiguration()
        .addAnnotatedClass(Tweet.class)
        .setProperties(loadProperties(HIBERNATE_CONFIG))
);
To this configuration, we also add Hibernate configuration properties that tell it which database to use and so on (see the source code accompanying the book for details). The two data services, for users and tweets, are bound directly to their interfaces:
bind(TweetManager.class).to(HibernateTweetManager.class);
bind(UserManager.class).to(InMemoryUserManager.class);
All this is straightforward. Then we bind another service whose purpose we'll see very shortly:
//configure the in-memory authenticator (with hard-coded users)
final HttpSessionAuthenticationManager manager =
    new HttpSessionAuthenticationManager();
bind(AuthenticationManager.class).toInstance(manager);
The AuthenticationManager is used by crosstalk's security layer to detect whether a user has been authenticated correctly. This level of indirection is required because we can't always directly inject User into our services. You'll see why in a second. But first, a SecurityInterceptor is bound to all methods annotated with @Get and @Post except the LoginPage:
//intercept any @Get or @Post method on any page except LoginPage
bindInterceptor(
        not(subclassesOf(LoginPage.class)),
        annotatedWith(Get.class).or(annotatedWith(Post.class)),

        new SecurityInterceptor(manager)
);
This interceptor is used to secure parts of the website by intercepting requests for web pages, allowing us to ensure that only public parts of the site (that is, the login page) are seen by users who are not authenticated and also that only authenticated users may post tweets to their home pages. Let's see how this security interceptor works.
SecurityInterceptor is an AOP interceptor that runs on every event method, as shown in listing 11.14. It's intended to guard web pages and prevent them from being displayed to users who aren't properly authenticated.
Example 11.14. AopAlliance method interceptor applied across the app for security
class SecurityInterceptor implements MethodInterceptor {
    private final AuthenticationManager authenticationManager;

    public SecurityInterceptor(
AuthenticationManager authenticationManager) {
this.authenticationManager = authenticationManager;
}
public Object invoke(MethodInvocation methodInvocation)
throws Throwable {
//proceed with normal execution if a user is logged in
if (authenticationManager.isLoggedIn()) {
return methodInvocation.proceed();
}
//redirect to login page if the user is not properly logged in!
return "/login";
}
}SecurityInterceptor is an AopAlliance MethodInterceptor,[37] which is triggered every time an HTTP GET or POST handler method is fired by Google Sitebricks (except on LoginPage). If a user is logged in, then the method proceeds as normal. If not, a redirect is sent to the login page:
public Object invoke(MethodInvocation methodInvocation)
    throws Throwable {
    ...

    //redirect to the login page if user is not properly logged in!
    return "/login";
}
Method interceptors and their configuration are covered in chapter 8. If you're unsure of how the interception works, consult the section on proxying.
In the next section you'll see how the application's lifespan can be tied to a servlet engine so that it receives notifications about important events in its lifecycle.
Our database persistence framework has several expensive operations it must perform when starting up and several cleanup operations when shutting down. These are independent of a unit of work and must occur outside the regular operational life of the web application.
Ideally, this coincides with the web application's own lifecycle and the servlet's init() and destroy() events. Fortunately for us, warp-persist's PersistenceFilter handles all this hard work. On an init(), it triggers the creation of connection pools, the creation of tables and resources, and so on. In our case, this also kick-starts the Hypersonic HQSL database in memory. On shutdown of the filter (when destroy() is called), it closes down the Hibernate SessionFactory.
In addition, the PersistenceFilter is necessary to open and close Hibernate units of work on every request. This filter must be registered before installing the SitebricksModule so that pages can benefit from the session to the database being open.
So far, we've looked at presentation, persistence and modularity. We've also used interception to provide security and tied everything up with the web lifecycle. Let's now get crosstalk running and give it the real litmus test.
To run crosstalk, we'll create a simple class with a main method that fires up Jetty. We'll put this class in the test/ directory to distinguish it from the application proper. It looks like this:
public class Crosstalk {
    public static void main(String... args) throws Exception {
        Server jetty = new Server(8080);     //start at port 8080
        server.addHandler(new WebAppContext("web", "/"));

        jetty.start();
        jetty.join();
    }
}
Class Crosstalk creates an instance of Server, which represents the Jetty web server. We configure it to listen at port 8080 and use the web/ directory as its resource root. Finally, we also ask it to listen at the root URL context: "/".
Once Jetty is started, it's ready to begin servicing requests. We must use the join() method subsequently to prevent the application from exiting too early:
jetty.start();
jetty.join();
Now you're free to run the application (see figure 11.8). Point your browser to http://localhost:8080/login to see the login page and start using crosstalk!
This chapter was an example walkthrough of a real, working web application that embodies many of the concepts you've studied thus far in this book. I chose crosstalk as the problem domain, which is a simple clone of the popular microblogging service Twitter.
Crosstalk starts life as a Guice-based application that uses Hibernate for persistence and Google Sitebricks as the web framework to display web pages and react to user input. We also use Mort Bay Jetty as the servlet container. The injector is bootstrapped (as described in chapter 2) by using the guice-servlet integration layer that allows us to create and configure the injector when the web application is deployed to the servlet container.
Crosstalk consists of three main packages:
web—Contains the web page classes and componentsservices—Contains the data and security servicestweets—Contains the domain model classes for data persistence
All the components of package services are exposed via interfaces, and their implementation details are hidden away as package-local. This is an example of good modularity and loose coupling as shown in chapters 4 and 10.
Web pages are all request-scoped and utilize class User, which is a session-scoped service that tracks the current user who is logged in. LoginPage ensures that a username is attached to the User service upon login, and HomePage signs a user out as appropriate. These web components exemplify the ideas presented in chapters 5 and 6 on scoping.
Since starting and stopping the persistence engine is an expensive operation and ideally coincides with the start and close of the web application itself, we register a wrapping PersistenceFilter that allows us to hook into the servlet lifecycle. Refer to our investigation of lifecycle and its semantics in greater detail in chapter 7.
The SecurityInterceptor was added to secure home pages from users who aren't logged in. This is an example of the behavior modification or AOP interception techniques presented in chapter 8.
Finally, we tied all of these patterns and techniques with the whole application to realize the full benefits of dependency injection!