
Raspberry Pi computers are generally pretty sturdy and reliable, and Raspbian is a mature and stable operating system. That said, sooner or later you’re almost certain to experience problems with some of your Raspberry Pi computers. This chapter shows you how to troubleshoot the problems you’re most likely to encounter.
As you know from your experience with computers, many different things can go wrong with hardware, software, or both. Some problems have quick and easy fixes, whereas other problems—even if they initially appear trivial—can require involved steps and plenty of time to troubleshoot.
In this chapter, I’ll assume that you’ll be troubleshooting Raspberry Pi computers deployed in your classroom and that your priority is to keep the computers running and your classroom functioning smoothly. This means that you likely won’t have time to dig into the specifics of each problem the moment it occurs; instead, you will want to work around problems as far as possible. To this end, the chapter begins by suggesting a troubleshooting approach that assumes you have multiple Raspberry Pi computers—preferably more than you need running at any one point—and extra peripherals.
After that, we’ll cover how to keep the system software on your Raspberry Pi computers up to date. We’ll then move along to troubleshooting specific things that often go wrong, examining issues with startup, SD cards, network connections, displays, keyboards and pointing devices, and audio output.
How to Approach Troubleshooting Your Raspberry Pi Computers
When something goes wrong with a desktop computer in the classroom, you’ll normally need to troubleshoot it soon—if not immediately—to keep the classroom functioning usefully. But the nature, design, and low cost of Raspberry Pi computers mean that, in the classroom, you’re often better off using a restart-and-replace approach to troubleshooting instead of dealing with problems in situ.
Restarting as a Troubleshooting Move
As you’ll read repeatedly in this chapter, you can clear up many problems with Raspberry Pi computers simply by restarting them. The speed and simplicity of restarting an Raspberry Pi computer means that a restart is often a sensible place to start troubleshooting. A restart usually takes less than a minute, and any student can perform it—unless you’ve configured the Raspberry Pi computers to prevent restarts.
Replacing the SD Card
Your second major troubleshooting move for Raspberry Pi computers is to replace the SD card. This is a move that can clear up various kinds of problems ranging from the Raspberry Pi computer refusing to boot to the computer running unstably.
Sometimes you’ll want to take a known good SD card from another Raspberry Pi computer that’s working well and insert it in the problem Raspberry Pi computer to see if doing so solves the problems. Other times, you’ll want to replace the SD card either to perform a fresh installation of the operating system or to change the operating systems available. Either way, you’ll likely want to have a good supply of SD cards available, preferably in a waterproof storage box divided into compartments that you can label to indicate what’s on the SD cards in each compartment.
Replacing the SD card to solve apparently minor problems can feel like overkill, but it’s quick, effective, and inexpensive. Depending on the cases you’ve chosen for your Raspberry Pi computers, you often don’t even need to open the computer’s case to replace the SD card, so it’s far easier than physically replacing the hard drive or SSD in a regular desktop. If you’ve chosen cases to make sure your students don’t remove SD cards from the Raspberry Pi computers, you’ll need to do a bit more work—or have competent students do it for you.
Caution
To give yourself flexibility in troubleshooting your Raspberry Pi computers, avoid storing data files on the SD cards in the Raspberry Pi computers. Instead, keep all data files on the network or on other removable storage, such as USB sticks.
Replacing Peripherals
Your third major troubleshooting move is to replace peripherals that are causing problems. For input/output peripherals—such as the keyboard, the pointing device, and (in some cases) the display—replacement tends to be the only practical means as well as the easiest means for resolving problems. But even for other peripherals, replacing the peripheral that’s causing problems is often the fastest and easiest way of getting the Raspberry Pi computer working properly again.
This assumes that you’ll be able to put your hands on extra peripherals of the right kind. But in a classroom situation, you likely have extra peripherals available as replacements. If not, you can borrow peripherals from a Raspberry Pi computer on which they’re working correctly to troubleshoot the problem computer.
Replacing the Raspberry Pi Computer
Your fourth major troubleshooting move is to replace the Raspberry Pi computer itself. If you suspect the problem is only minor, this move too may feel like overkill—but your priority should be to keep your classroom fleet in full working order. To that end, replacing a problem Raspberry Pi computer with a known good one or a freshly configured one is as practical and sensible as it is effective.
A replacement strategy assumes that you have enough surplus Raspberry Pi computers to be able to swap them in and out as necessary. If you weren’t able to get the budget for extra computers in your initial deployment, try to work toward it as a long-term goal.
Keeping Raspbian Up to Date
To keep your Raspberry Pi computers running well, you should periodically update Raspbian to the latest version available so as to take advantage of any bug fixes, new features, or other improvements the Raspberry Pi Foundation has implemented.
Note
In this section, I assume your Raspberry Pi computers are running Raspbian, but the same principles—and in many cases, the same commands—apply to other operating systems you can run on the Raspberry Pi as well.
Note
You can also use the PiNet server to update Raspbian on Raspberry Pi clients. See Chapter 7 for details.
Getting to a Command Prompt
To update Raspbian, first get to a command prompt on the Raspberry Pi computer. These are the three most convenient ways to do this:
Connect via SSH: When you need to work from another computer, connect via SSH, specifying the username and Raspberry Pi computer’s IP address (for example, ssh [email protected] ) and then entering your password when prompted. This is a convenient way to work from your main computer—or from another Raspberry Pi computer, from a tablet, from a smart phone, or whatever you’re using.
Open a Terminal window: If the Raspberry Pi computer is set to boot to the GUI, click the Terminal button on the Panel to open a Terminal window. You can do this either working directly on the Raspberry Pi computer or working remotely via VNC or xrdp.
Use the command line: If you’ve set the Raspberry Pi computer to boot to the command line rather than to the GUI, simply give the commands at the command line.
Updating the System’s Package List
Once you’re at a command prompt on the Raspberry Pi computer, give the following command to update the system’s package list :
sudo apt-get update This may take a few minutes to execute, but usually not much more than that—it’s downloading the list of packages, not the packages themselves.
Checking How Much Space Is Available on the SD Card
Next, it’s a good idea to make sure that the SD card has enough space available for any packages the computer needs to download. You ought to do this because the apt command doesn’t check that there’s enough free space and will happily run the root partition out of free space by downloading packages.
To see how much space is available, give the following command:
df –h You’ll see output such as this:
Filesystem Size Used Avail Use% Mounted on/dev/root 7.4G 3.5G 3.5G 50% /devtmpfs 459M 0 459M 0% /devtmpfs 463M 0 463M 0% /dev/shmtmpfs 463M 13M 451M 3% /runtmpfs 5.0M 4.0K 5.0M 1% /run/locktmpfs 463M 0 463M 0% /sys/fs/cgroup/dev/mmcblk0p6 63M 20M 43M 32% /boottmpfs 93M 0 93M 0% /run/user/1000/dev/mmcblk0p9 4.5G 9.4M 4.2G 1% /media/pi/41fd8903-2ed9-4fe5-a742-76c36aa1aacc/dev/mmcblk0p8 512M 129M 384M 26% /media/pi/9791-7D8E/dev/mmcblk0p5 30M 2.5M 26M 9% /media/pi/SETTINGS/dev/mmcblk0p10 488M 408K 452M 1% /media/pi/data
Locate the /dev/root entry in the Filesystem column, and then look across the row to see the partition size, amount of space used and available, and the percentage used. Usually, as in this case, there’ll be plenty of space—but it’s wise to make sure. See the sidebar “Getting Rid of Downloaded Package Files” for an easy way to make space on the root partition if it’s nearly full.
Upgrading the System’s Installed Packages
Once you’ve checked the amount of free space, give the following command to upgrade all the Raspberry Pi computer’s installed packages to the latest versions available:
sudo apt-get dist-upgrade If there are packages to install, you’ll see a prompt telling you how much additional disk space will be used. Make sure that this is less than the amount of space you’ve just established is available, and then type y and press the Enter key.
The Raspberry Pi downloads and installs the updates. This may take many minutes, depending as usual on how much data there is to download and the speed of the Internet connection.
Troubleshooting Startup
In this section, we’ll look at how to troubleshoot startup problems. The Raspberry Pi uses a different architecture than standard computers, so we’ll start by going through what happens during startup so that you know what’s happening. We’ll then use that knowledge to identify and deal with common startup problems, such as the SD card being missing, damaged, or configured incorrectly; the Raspberry Pi signaling an error code; and the display receiving no video output even though the Raspberry Pi has actually booted.
Understanding What Happens During Startup
To troubleshoot startup problems, it’s helpful to know what happens while the Raspberry Pi is booting. Each Raspberry Pi board has two light-emitting diodes (LEDs) near the upper-left corner (looking with the SD slot at the top and the USB ports at the bottom) that help you to determine what’s happening. The LED on the left is the Power LED and is red. The LED on the right is the ACT LED and shows different colors depending on what’s happening. Figure 8-1 shows the Power LED and the ACT LED on a Raspberry Pi 3 Model B board. Figure 8-2 shows the Power LED and the ACT LED as you’ll see them through a case.
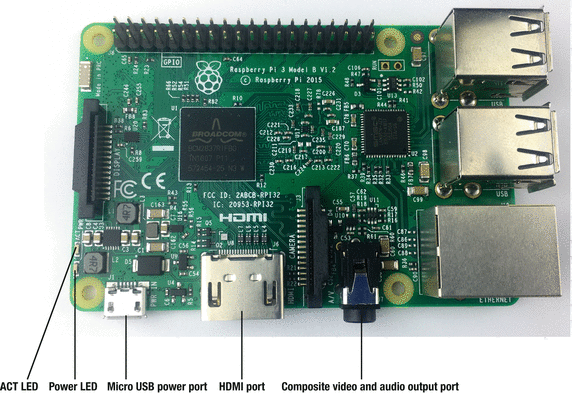
Figure 8-1. The Power LED and the ACT LED enable you to ensure that the Raspberry Pi board is getting power and is able to read the SD card.
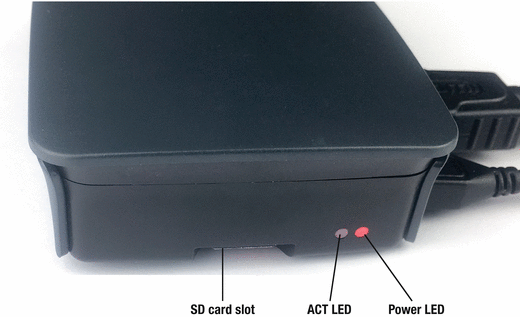
Figure 8-2. The Power LED and the ACT LED during bootup with the Raspberry Pi board in a case.
Here’s the brief version of the startup sequence :
Power on: When you connect a Raspberry Pi board to power (and switch on the power supply if necessary), the Power LED lights up and stays illuminated. Use the Power LED to determine whether the Raspberry Pi board is getting power.
Raspberry Pi reads the configuration and softwarefrom the SD card: The Raspberry Pi loads all its software from the SD card, including the configuration files. This normally takes around 20–30 seconds, depending on the model of the Raspberry Pi board. As the Raspberry Pi reads data from the SD card, the ACT LED flickers intermittently; the ACT LED lights up when the Raspberry Pi is reading data from the SD card, so the pattern of flickering varies. If the ACT LED blinks in a regular pattern, it’s indicating that something is wrong. See the section “Identifying Startup Errors from ACT LED Flashing Patterns,” later in this chapter, for information about interpreting the patterns.
The Raspberry Pi outputs video: Assuming the Raspberry Pi can read the SD card just fine, the Raspberry Pi starts outputting video. The Raspberry Pi outputs the video on the HDMI port as long as it detects a device connected to that port; if not, it outputs composite video on the composite video and audio port.
The Raspberry Pi boots to a command-line interface or a graphical interface, depending on how it is configured: With output on the display you’re using, you can watch the rest of the boot process. Once booting finishes, you can log in and start using the Raspberry Pi computer.
Generally speaking, if a Raspberry Pi computer fails to boot, and there’s no obvious damage to the computer (such as being physically smashed or doused in liquid), your first suspect should be the SD card—because if the SD card is damaged, or even if it’s configured incorrectly, that will prevent the Raspberry Pi computer from booting.
Solving Typical Boot Problems
Now that you know the essentials of what happens in the boot process, let’s look at how to solve typical boot problems that your Raspberry Pi computers may manifest. We’ll start with the most obvious—and easiest to fix—problems and work our way up from there.
Power LED Shows No Light
If the Power LED on the Raspberry Pi computer shows no light, the power supply either isn’t delivering enough power or isn’t delivering any power at all.
Note
If the Power LED illuminates briefly and then goes dark, the problem is usually that the power supply is delivering some power but not enough for this Raspberry Pi model. Try replacing the power supply with one designed for this Raspberry Pi model.
The first question is whether this power supply used to work with this Raspberry Pi computer. If you know it did, check for anything obvious that has changed. The most straightforward problem is that there are now more USB devices plugged into the Raspberry Pi computer, drawing too much power. In this case, disconnect all the devices except the keyboard and pointing device and try starting the Raspberry Pi computer again. If it now works, use a powered USB hub to connect the extra devices if you still need them.
Tip
If the number of USB devices plugged into the Raspberry Pi computer hasn’t changed, check also whether their power configuration has. For example, if the USB devices are connected to a powered USB hub, make sure that the hub’s power supply is working; if not, it will significantly increase the load on the Raspberry Pi’s USB ports. Similarly, make sure that any other USB device that has its own power supply is receiving power from it.
Caution
Raspberry Pi power requirements vary by model. Look back to the section “Choosing Power Sources for Your Raspberry Pi Computers” in Chapter 2 for advice on choosing suitable power supplies. See Table 2-2 in Chapter 2 for the specific power requirements.
If the Raspberry Pi computer has only a modest number of USB devices, the problem is more likely that the power supply has failed or is not suitable for this model of Raspberry Pi. Try connecting a power supply that you know to be good. For example, connect the power supply that has been powering another Raspberry Pi computer of the same type as the one that’s having the problem. If the problem Raspberry Pi computer works after you switch power supplies, your simplest solution is to replace the power supply with one of your surplus ones and put the power supply that may be bad into your To Check box; when you have time, try connecting it to a known good Raspberry Pi computer or to your multimeter.
Power LED Shows Light But ACT LED Shows No Light
If the Power LED on the Raspberry Pi computer shows a steady light but the ACT LED shows no light , you’ll know that the computer is getting power but no activity is happening on the SD card.
Power down the Raspberry Pi computer and make sure that the SD card is in the SD slot—someone might have removed the card, even if you didn’t yourself—and that the card is the right way up and the right way around. Inserting an SD card the wrong way up or backward (or both—bonus points) requires effort and determination, so if you find that your students or colleagues have demonstrated these usually admirable qualities, check both the SD card and the SD card slot for damage.
If there is an SD card in the slot, make sure that it’s fully inserted. Some Raspberry Pi models have a click-in micro SD slot that gives tactile feedback when the card is fully inserted, but more recent Raspberry Pi models (such as the Raspberry Pi 3 Model B) have a micro SD slot without the click-in component. As a result, it’s easy to insert the micro SD card most of the way, so that it looks as though it’s in properly but isn’t fully engaged with the contacts.
When you’re sure the Raspberry Pi computer has an SD card correctly and fully inserted, try booting it again.
If the Power LED illuminates but the ACT LED does not, the SD card is most likely the problem. Replace the SD card with a known good one that contains the NOOBS installer or a configured operating system and try booting again. If the Raspberry Pi computer boots correctly, put the SD card you’ve removed in your To Check box for testing or reconfiguration.
Power LED and ACT LED Both Illuminate Constantly
If the Power LED and the ACT LED on the Raspberry Pi computer both show a steady light , rather than the ACT LED flickering as it normally does, the problem is that the Raspberry Pi computer can’t read properly from the SD card. This may indicate either a physical problem with the connection between the SD card and the reader, a formatting problem with the SD card, or a problem that’s intermittent and more mysterious.
When this happens, try the following moves to get the Raspberry Pi computer working:
Restart the Raspberry Pi computer: Sometimes this is all that’s required to enable the system to read the SD card properly. But it’s not clear why, so you should note that this Raspberry Pi computer has suffered this problem and see if it recurs.
Remove the SD card and reinsert it: The problem may be that the SD card isn’t quite making full contact with the SD card slot. Remove the SD card, wipe off any dust or smears of chewing gum, and then reinsert the card, making sure you push it all the way into the slot.
Replace the SD card with a known good one: If the Raspberry Pi computer was working before but won’t work now, chances are that someone or something has managed to hose the partitions on the SD card, leaving the system unable to find a suitable partition to boot from. If this is the case, you’ll need to reformat the card and reinstall the software on it; in the meantime, replace the card to get the Raspberry Pi computer working again.
Identifying Startup Errors from ACT LED Flashing Patterns
If the Raspberry Pi is unable to boot, its only way of communicating the problem to you—other than total inactivity accompanied by the silence beloved of grumpy teenagers—is by flashing the ACT LED in patterns. Table 8-1 explains the meaning of regular patterns of flashing from the ACT LED and how to respond to them.
Table 8-1. ACT LED Flashing Patterns and Their Meanings
Flashes | Meaning | What to Do |
|---|---|---|
1 | The Raspberry Pi has Micron SDRAM. | Look to see if the processor has an M logo. If so, download and install the latest version of NOOBS or Raspbian and install it using a 4 GB or larger SD card. |
3 | The start.elf file is not found. | Insert an SD card that includes start.elf and boot again. |
4 | The start.elf file is corrupt. | Insert an SD card with an intact start.elf file and boot again. |
7 | The kernel.img file is not found. | Insert an SD card that includes kernel.img and boot again. |
8 | The SDRAM is not recognized. | Download the latest version of NOOBS or Raspbian. If the error recurs, the SDRAM is likely damaged; replace the Raspberry Pi board . |
ACT LED Flashes Intermittently But There’s No Video Output
If the Power LED illuminates and the ACT LED flashes intermittently after you provide power, you’ll know that the Raspberry Pi computer is reading from the SD card. If you’re not getting any video output on the connected display, chances are that the Raspberry Pi is trying to output video on the wrong port.
Tip
If the Raspberry Pi computer has an Ethernet cable plugged into its Ethernet port and connected to a working network, you can confirm that the Raspberry Pi has booted by seeing if the Ethernet LEDs are illuminated. If they are, the Raspberry Pi has booted.
Normally, you’ll want to start with the basics to solve the lack of video output:
Make sure the display is getting power: For many displays, you can check by glancing at the power light on the front.
Make sure the display and its cable are working: Disconnect the cable from the Raspberry Pi computer and connect it to another computer (Raspberry Pi or other) to make sure. Reconnect the cable to the problem Raspberry Pi.
Use HDMI if possible: Although Raspberry Pi computers can connect to displays via various technologies, HDMI is the easiest to use. See the section “Choosing Displays” in Chapter 2 for more information on displays and connections.
Switch the display to HDMI input: If you’re using a display that has multiple inputs, switch the display to HDMI input before starting the Raspberry Pi. This will help the Raspberry Pi’s HDMI port to detect the display, causing Raspbian to send the video output via HDMI rather than falling back to the composite port, which Raspbian uses as the default if it doesn’t detect an HDMI display.
Note
As explained in Chapter 5, the NOOBS installer always uses HDMI for video output unless you press 1, 2, 3, or 4 during the 10 seconds after the Raspberry Pi boots the installer. Press 1 to switch to ideal HDMI settings for the monitor that NOOBS has detected, press 2 for safe HDMI settings that should work with most monitors, press 3 to switch to PAL output on the composite port, or press 4 to switch to NTSC output on the composite port.
Force HDMI detection if necessary: If the Raspberry Pi computer isn’t detecting a display connected to its HDMI port, add the hdmi_force_hotplug=1 parameter to the config.txt file to force HDMI detection. This problem tends to occur more when you’re using an HDMI-to-DVI cable than when you’re using an HDMI-to-HDMI cable. See the section “Editing the config.txt File” in Chapter 5 for more information on editing config.txt and adding other parameters for configuring video.
NOOBS Dialog Box Opens But “Wait While NOOBS Initialises” Message Appears
If you’re booting a Raspberry Pi computer to the NOOBS installer, and the NOOBS dialog box opens, but the “Please wait while NOOBS initialises” dialog box opens and stays open, try restarting the Raspberry Pi computer by turning off the power, waiting a few seconds, and then turning on the power again. Failure to complete NOOBS initialization may indicate a minor glitch that a reboot will cure.
If the same problem continues, power the Raspberry Pi computer down and replace the SD card with one containing a fresh install of NOOBS.
Troubleshooting SD Card Issues
SD cards are usually pretty reliable, but if you’re running a classroom fleet of Raspberry Pi computers, you’ll likely run into problems with SD cards sooner or later.
Preparing to Deal with SD Card Issues
To enable yourself to recover quickly and easily from SD card problems, follow these two recommendations:
Treat the SD cards as replaceable: Use the SD cards only for booting the Raspberry Pi computers and running the operating systems you need. Keep all valuable files on the network or on students’ personal USB sticks rather than on the SD cards. This way, you can replace a problem SD card and troubleshoot it at your leisure.
Keep a stock of replacement SD cardsready for use: Format the SD cards and load them with the software you need—for example, install the latest version of NOOBS or install your default OS setup—so that you can instantly replace an SD card that has become corrupted or that has failed. Keep the SD cards in a compartmented box with labels indicating the cards’ contents—NOOBS, OS, To Check, Failed, and so on.
Identifying SD Card Problems
SD card problems can manifest themselves in various ways, but the following are most typical:
File corruption: If document files on the SD card become mangled or unreadable, the SD card may have suffered corruption.
Raspberry Pi computer gives errors: If the operating system starts displaying error messages, the SD card may have become corrupted.
Raspberry Pi computer fails to boot: As discussed earlier in the “Troubleshooting Startup” section, earlier in this chapter, corruption to the SD card may prevent a Raspberry Pi computer from booting.
Generally speaking, you’ll do best to take an aggressive approach to SD card problems: if you believe that an SD card is becoming (or has become) corrupted, deal with the problem immediately rather than waiting for things to get worse and confirm your diagnosis. Dealing with the problem may mean replacing the SD card or trying to repair it.
Avoiding SD Card Problems
If you find that the SD cards on your Raspberry Pi computers are getting corrupted, try the following fixes:
Use high-quality, genuine SD cards: A huge range of SD cards are available, especially at the low-price end. Generally, it’s best to stick with major manufacturers, such as (in no particular order) Kingston, SanDisk, Transcend, Integral, PNY, Panasonic, Lexar, Verbatim, Sony, and Samsung.
Caution
Avoid SD cards from brands with which you are not familiar. Many low-quality SD cards are available, often for tempting prices. Some of these cards are low-capacity cards marked as higher capacities, which is a recipe for problems; other cards are simply not very reliable, which is another recipe for problems. High-quality SD cards in Raspberry Pi–friendly capacities (16 GB and 32 GB) are affordable enough that it’s not worth wasting time or money on lower-quality cards.
Use high-quality power supplies and USB cables: As you know, the Raspberry Pi computers use relatively little power overall compared to full-size computers, but they still need the right amount of power. To keep a Raspberry Pi computer running well, use a power supply designed specifically for that Raspberry Pi model. If the power supply uses a separate USB cable rather than a built-in cable, make sure the cable is a high-quality one because a low-quality cable can lose as much as 1 V of potential difference between its ends. Connect the power supply to a reliable AC power source—“grid power” or “mains power”—or to an uninterruptible power supply that itself is connected to an AC power source.
Shut down the Raspberry Pi computer before turning off the power: Simply cutting the power to the Raspberry Pi can cause SD card corruption, so be sure to always shut down the Raspberry Pi computer formally:
Shut down from the desktop: Click the Menu button, click the Shutdown item to display the Shutdown Options dialog box, and then click the Shutdown button. A Raspberry Pi computer usually shuts down pretty quickly, but if you’re planning to switch off the power or unplug it, wait for a few seconds after the screen goes blank.
Shut down from the command line: Give the sudo halt command and wait for activity to cease.
Tip
If you allow students to power the Raspberry Pi computers on and power them off, make sure the students know they should use Shutdown command from the GUI or the sudo halt command from the command line rather than simply turning off the power.
Stop overclocking the Raspberry Pi computer: If you’ve overclocked the Raspberry Pi computer, try restoring it to its normal clock speed. In some cases, overclocking can cause the SD card to get corrupted, and removing the overclocking will end the problem.
Repairing an SD Card with the fsck Command
If you make sure that your SD cards contain only standard software installations, you may be able to deal with corrupted SD cards by simply reformatting them and reinstalling the software. But it’s more than possible that you’ll sometimes need to repair corrupted SD cards on which your students or colleagues have saved valuable files.
The easiest way to repair an SD card is by connecting the SD card to a Linux system and using the fsck command; fsck is the abbreviation for File System Consistency Check and does pretty much what its name says. You can run fsck manually from a command line and choose whether to repair problems automatically.
After connecting the SD card to a Linux system (such as one of your Raspberry Pi computers that’s working properly), open a Terminal window and give the following command to list the block devices on the system:
sudo lsblk -lYou’ll see a list of devices laid out in a table. The following listing shows just the beginning of the list from a Raspberry Pi computer:
NAME MAJ:MIN RM SIZE RO TYPE MOUNTPOINTsda 8:0 1 14.4G 0 disksda1 8:1 1 14.4G 0 part /media/pi7mmcblk0 179:0 0 14.5G 0 diskmmcblk0p1 179:1 0 1.1G 0 part
In the NAME column, look at the devices whose names begin with sda. In the example, there are two: sda and sda1. Because this is a Raspberry Pi computer, each device is removable (1 appears in the RM column), so you can’t distinguish them that way; by contrast, on a computer with a fixed disk, you’ll see 0 in the RM column for each fixed disk.
You can also see that each device is the same size (14.4 G), which might otherwise help you distinguish the device you want to check and fix. But by looking at the MOUNTPOINT column, you can see that sda1 is mounted in the media folder, which enables you to identify it as the external drive connected to the Raspberry Pi computer.
Now that you know which device you want to check, give the fsck command, using the –f parameter to force checking of parts of the filesystem that are not marked as dirty and the y parameter to attempt to fix any problems detected:
sudo fsck –fy /dev/sda1When the command finishes, see if you can recover the important files from the SD card.
Troubleshooting Network Issues
You can connect a Raspberry Pi computer to a network via either Ethernet or Wi-Fi. All Raspberry Pi models except the Raspberry Pi Zero have built-in Ethernet, whereas only the Raspberry Pi 3 Model B has built-in Wi-Fi (and Bluetooth). You can add Wi-Fi (and Bluetooth, if necessary) to other Raspberry Pi models by using a compatible Wi-Fi adapter.
Choosing Ethernet over Wi-Fi Wherever Possible
If you have the choice between connecting your Raspberry Pi computers via Ethernet and connecting them via Wi-Fi, it’s best to choose Ethernet.
Raspbian has good support for Wi-Fi; but even so, Wi-Fi tends to cause more problems that Ethernet. And though the Ethernet port built into each full-size Raspberry Pi is only Fast Ethernet (100 Mbps) rather than Gigabit Ethernet (1000 Mbps), Ethernet usually delivers faster speeds as well as greater reliability than Wi-Fi. The Wi-Fi speeds that manufacturers choose to quote are the theoretical maximum transfer rates for the equipment; and real-world speeds are usually much slower, especially when many computers and devices are connecting to the same Wi-Fi networks.
Checking the Connection Status
If you’re at the Raspberry Pi computer that’s having network problems, look at the Network icon at the right end of the panel to see what network status appears. This icon shows either the WiFi Networks icon or the Network icon:
WiFi Networks icon: The computer is connected to a Wi-Fi network. You can hold the pointer over the icon to display the details (see the left screen in Figure 8-3).
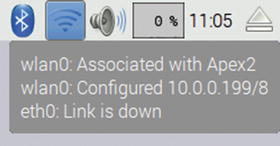
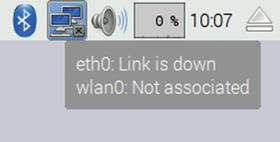
Figure 8-3. If the Raspberry Pi computer is connected to a Wi-Fi network, the WiFi Networks icon appears in the Panel (left). If not, the Network icon appears, with an X if there is no connection (right). In either case, hold the pointer over the icon to view details.
Network icon with X: The computer has neither a Wi-Fi connection nor a working Ethernet connection. Again, you can hold the pointer over the icon to display details of the bad news (see the right screen in Figure 8-3). The interface wlan0 is the first wireless network interface on the computer, such as the built-in wireless network interface on the Raspberry Pi 3 Model B.
Network icon without X: The computer has a working Ethernet connection. Once more, you can view the details by holding the pointer over the icon. The interface eth0 is the first Ethernet interface on the computer; on all Raspberry Pi models except the Raspberry Pi Zero, this should be the built-in Ethernet interface.
Troubleshooting Ethernet Connections
Ethernet connections tend to be reliable—but that’s not to say that they can’t go wrong. This section explains what to do when a Raspberry Pi computer shows it has no connection.
Making Sure the Ethernet Cable Is Working
First, make sure that the Ethernet cable is connected securely to the Raspberry Pi computer and to the network hardware—a wall Ethernet socket; a patch panel; or a switch, hub, or router—and is not damaged or severed in between.
If you have any doubt about the Ethernet cable, test it using a network cable tester. This is a device into which you plug each end of the cable and press a button to pass a signal through it, verifying whether the cable is transmitting the signal correctly. Most cable testers have a detachable section that you can connect at the far end of the cable, enabling you to test a cable you have deployed. The test is quick to perform and enables you to be confident that the Ethernet cable is working—assuming it is.
If you don’t have a network cable tester, replace the suspect Ethernet cable with a known good cable—for example, one that you’ve disconnected from a Raspberry Pi computer that was connecting just fine to the network.
Interpreting the Ethernet LEDs on the Raspberry Pi Computer
Next, look at the Ethernet LEDs on the Raspberry Pi computer. There are two LEDs (see Figure 8-4):
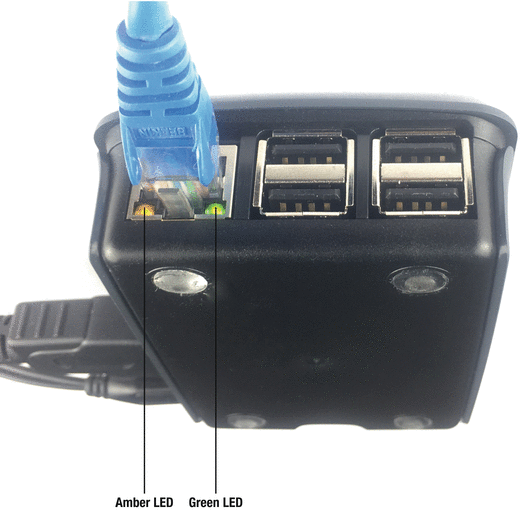
Figure 8-4. You can use the amber LED and the green LED in the Ethernet port to determine whether a Raspberry Pi computer has a working network connection.
Amber LED: This LED illuminates and stays illuminated when the Ethernet cable is connected to the Raspberry Pi and to another device, such as a network switch.
Green LED: This LED flickers when the Raspberry Pi is sending or receiving data across the Ethernet connection. It stays illuminated when the Raspberry Pi is not sending or receiving data.
If an Ethernet cable is connected to the Raspberry Pi but neither LED is illuminated, check for damage to the cable or for the cable being disconnected at the other end.
Restarting the Raspberry Pi Computer
If you’ve verified that the Ethernet cable is connected at both ends and intact in between, but the Ethernet LEDs aren’t illuminating, try restarting the Raspberry Pi computer as the next step. Like any computer, a Raspberry Pi computer can suffer any number of software glitches; restarting the Raspberry Pi normally clears up these problems and may restore network connectivity.
Troubleshooting Wi-Fi Connections
Wi-Fi is a wonderful and highly enabling technology, but it can be a source of problems on Raspberry Pi computers, just as it can on other computers.
When a Wi-Fi connection isn’t working, first check the connection status. Look at the Network icon on the Panel to see whether Raspbian is detecting a Wi-Fi connection.
If there is a Wi-Fi connection, hold the pointer over the WiFi Networks icon to see which wireless network the Raspberry Pi computer is connected to. If it’s the wrong network, click the WiFi Networks icon to display the menu of available networks, and then click the network the Raspberry Pi computer should be using. If a dialog box bearing the network’s name opens, enter the preshared key, and click the OK button.
Note
If the Raspberry Pi computer has a Wi-Fi connection to the right network, but it’s unable to access network resources, right-click the WiFi Networks icon, click WiFi Networks (dhcpcdui) Settings on the shortcut menu, and then use the WiFi Networks dialog box to configure the settings for the wireless network. See the section “Connecting to a Wi-Fi Network” in Chapter 6 for more details.
If there is no Wi-Fi connection, and the Raspberry Pi computer is using a USB Wi-Fi adapter, try unplugging the adapter and then plugging it back in. Disconnecting and reconnecting the adapter may force Raspbian to reload the network driver. If so, you can reestablish the connection to the Wi-Fi network manually if Raspbian does not reestablish it automatically. If not, try restarting the Raspberry Pi computer.
If there is no Wi-Fi connection, and the Raspberry Pi computer is a model with a built-in Wi-Fi adapter (such as the Raspberry Pi 3 Model B), restart the Raspberry Pi computer to get the Wi-Fi adapter working again.
Troubleshooting No Output on the Display
If the Raspberry Pi computer has booted successfully, but now the display shows no output, try checking for obvious problems first. If there are none, you may need to connect via SSH to solve the problem.
Checking for Obvious Problems
When the display shows no output, start by checking for obvious problems with the display:
Sleep: Make sure that the display isn’t asleep.
Power: Verify that the display is getting power.
Cabling: Check that whatever cable (or adapter or converter) links the Raspberry Pi computer to the monitor is connected at all relevant points and hasn’t been savaged by wildlife (or students).
Activity: Look at the Raspberry Pi computer’s LEDs to verify that the computer is powered on. First, check that the Power LED is showing a steady red. Then look at the ACT LED to see if it’s displaying an intermittent pattern of flashes (which indicates that it’s reading the SD card) or if it’s signaling a boot problem with a repeated pattern of flashes. If there’s no activity from the ACT LED, and the Raspberry Pi computer is connected to the network via Ethernet, look at the Ethernet LEDs to make sure that they’re illuminated; if so, you’ll know that the Raspberry Pi computer is running.
Troubleshooting Display Issues via SSH
If you’ve enabled SSH on the Raspberry Pi computer whose display is blank, try connecting via SSH. If you can establish an SSH connection, you can try editing the config.txt file and then restarting the Raspberry Pi computer; or you can shut down the Raspberry Pi computer properly (rather than simply cutting the power, which might cause corruption) so that you can take out the SD card and edit the config.txt file using another computer.
Note
See the section “Connecting via SSH” in Chapter 7 for instructions on connecting via SSH to a Raspberry Pi computer.
To edit the config.txt file via SSH, connect via SSH as usual, and then give the command for opening the file in an editor—for example, use the following:
sudo nano /boot/config.txtEdit the file as needed to fix the problem. For example, comment out or uncomment any lines as needed, or type new lines. Press Ctrl+O to write out (save) the file, and press the Enter key to accept its existing name as the file name. Then press Ctrl+X to exit the editor.
Once you’ve done that, you can give the shutdown command with the –r parameter to restart the Raspberry Pi computer:
sudo shutdown –r nowNote
If you don’t specify the now parameter for the shutdown –r command or the shutdown command, the Raspberry Pi computer will reboot or shut down one minute after you give the command. During that time, you can use the shutdown –c command to cancel shutdown if necessary.
If you prefer to shut down the Raspberry Pi computer so that you can remove the SD card safely, give the shutdown command without the –r parameter:
sudo shutdown now Troubleshooting USB Keyboards and Pointing Devices
If a USB keyboard or pointing device stops working, first try unplugging it and then plugging it back in. If that doesn’t make the device work, or if you suspect the device is broken, try plugging in a known good device and seeing if that works.
At this point, it’s usually best to restart the Raspberry Pi computer to get the input devices working again. If you’ve still got either the keyboard or the pointing device working, use it to open the main menu and give the Shutdown command, and then select the Reboot button in the Shutdown Options dialog box.
Note
If both the keyboard and pointing device seem to have stopped working, but the display is still getting output, make sure the Raspberry Pi computer hasn’t hung. Look at CPU Usage Monitor on the Panel to see if it’s still moving; if you’ve removed the CPU Usage Monitor, look at the clock readout instead and give it a minute to change.
If neither the keyboard nor the pointing device is working, connect to the Raspberry Pi computer via SSH if possible and restart it. See the section “Troubleshooting Display Issues via SSH,” earlier in this chapter, for information on connecting via SSH.
If you can’t connect via SSH, power down the Raspberry Pi computer by switching off or unplugging the power supply, and then switch it back on or plug it back in to restart it. As you know, shutting down the Raspberry Pi computer this way may cause corruption to the SD card, so do this only as a last resort.
Troubleshooting Audio Issues
As you know, a Raspberry Pi computer has two built-in interfaces for outputting audio:
HDMI: The HDMI port outputs digital audio along with digital video. If you’re using an HDMI display, getting audio out of the display’s speakers or headphone port is usually your best option.
Composite video and audio port: You can set the Raspberry Pi computer to output analog audio from the composite video and audio port.
If you’re not getting audio, first make sure that the volume isn’t muted or set to 0. In the Raspbian GUI, click the Volume Control icon on the Panel to display the Volume Control pop-up menu. Make sure the Mute check box at the bottom isn’t checked, and make sure the slider is not set right at the bottom.
Next, verify that the Raspberry Pi computer is set to use the right port. Right-click the Volume Control icon on the Panel to display the pop-up menu, and then click the Analog item or the HDMI item, as needed.
If you’re still not getting audio, make sure the HDMI cable or composite cable is securely connected at each end and not severed between them. Also check that your speakers have power (if they need it) and that their volume isn’t set to the minimum.
Summary
In this chapter, you’ve learned essential moves for troubleshooting your classroom deployment of Raspberry Pi computers. You have an overall strategy for keeping your Raspberry Pi computers running by using the two Rs—restarting and replacing—so that you can deal with difficulties when you have time. You know how to keep the system software up to date, how to deal with startup issues, how to fix problems with SD cards, how to troubleshoot network connections and blank displays, how to get balky keyboards and pointing devices working again, and how to redirect audio output to the port through which you want to output it.
This is the end of the book—apart from the Appendix, which points you to information resources.