Now that you’ve picked your Raspberry Pi models and chosen the software for them, it’s time to start putting everything together. In this chapter, we’ll look at how to build the Raspberry Pi computers and install software on them. In Chapter 6, we’ll go through setting up the network of Raspberry Pi computers.
Building the Raspberry Pi Computers
At this point, you should be all set to start building the Raspberry Pi computers—in other words, putting the Raspberry Pi boards in their cases and adding any other internally connected components you will use, such as the Raspberry Pi camera module.
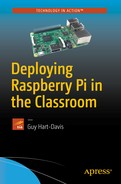
The specifics of assembling the cases will depend on the type or types of cases you have chosen, so I can’t offer you much helpful advice. Most cases are straightforward to put together, with many of the plastic cases simply snapping together. The official Raspberry Pi case for the Raspberry Pi 3 Model B board is an example of such a case. Figure 5-1 shows the six steps required to assemble the case .
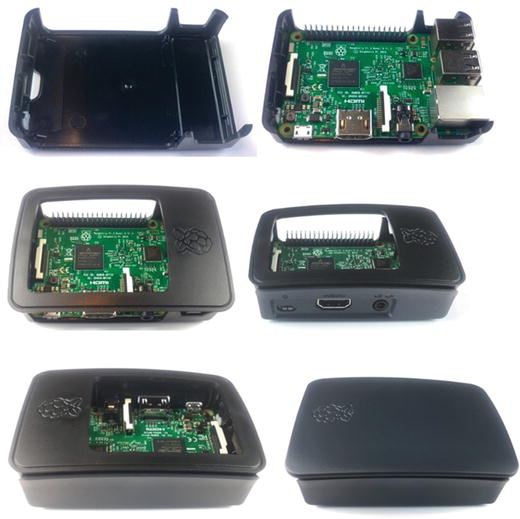
Figure 5-1. The official Raspberry Pi case for the Raspberry Pi 3 Model B clips together in six easy steps .
Connecting Peripherals and Power
Now that your Raspberry Pi boards are in their cases, you can connect peripherals and power to their ports. Figure 5-2 shows the ports on a Raspberry Pi 3 Model B with labels.
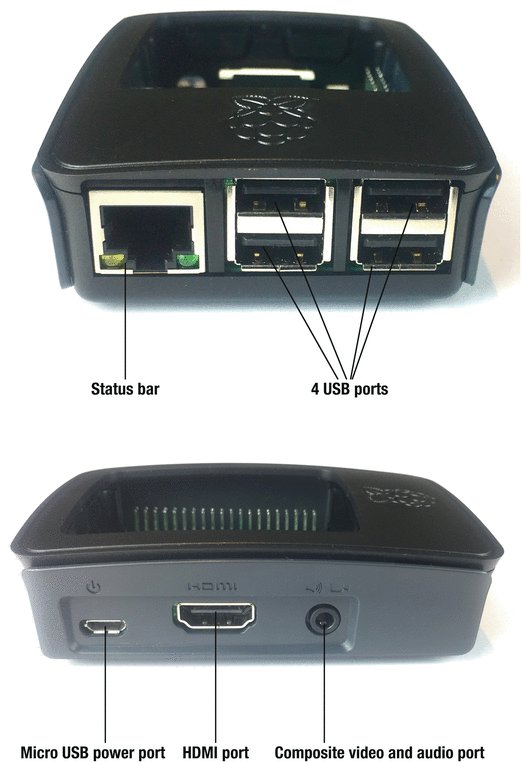
Figure 5-2. Ports on a Raspberry Pi 3 Model B in a case
Here’s how to connect the peripherals and power:
Keyboard: Connect to a USB port.
Pointing device: Connect to a USB port.
Ethernet cable: Connect to the Ethernet port.
Display: Connect to the HDMI port, using an adapter if necessary. If you will use composite video, connect the cable to the composite video and audio port.
Audio: If you’re using an HDMI display, the HDMI cable carries audio as well as video to the display, so you can play audio through the display’s built-in speakers or connect speakers or headphones to its audio output port. If you’re not using an HDMI display, you can connect an audio cable to the composite video and audio port.
Power: Connect the micro USB connector to the power port.
Downloading the NOOBS Installer
Next, you need the software for the Raspberry Pi computers—unless you have it already. This section shows you how to use the NOOBS installer to install the Raspbian operating system provided by the Raspberry Pi Foundation and (optionally) other supported operating systems.
Note
The Raspberry Pi 1 models use a full-sized SD card. All later models of Raspberry Pi, including the Raspberry Pi Zero, use a micro SD card. Most micro SD cards include an SD card adapter that enables you to use them with full-size SD card slots; if you have a micro SD card without an adapter, you can buy one from any electronics retailer.
If your Raspberry Pi computers came with the NOOBS (New Out Of Box Software) installation manager on a micro SD card, you’re all set to get started. If not, you can either buy an SD card containing NOOBS from a Raspberry Pi retailer or simply download NOOBS from the Raspberry Pi Foundation web site ( http://downloads.raspberrypi.org/NOOBS_latest ) and then burn it to an SD card.
Tip
Usually, it’s best to get the latest version of the NOOBS installer because it will contain the latest updates, features, and bug fixes. But you can also download older versions of the NOOBS installer if necessary by going to the Downloads area on the Raspberry Pi web site and navigating to the NOOBS/images/ folder: http://downloads.raspberrypi.org/NOOBS/images/ .
Formatting an SD Card for Use with the NOOBS Installer
If you’ve downloaded NOOBS and need to put it on an SD card, work through this section and the next. But if you’ve got NOOBS on an SD card, skip ahead to the section titled “Installing Operating Systems with the NOOBS Installer” later in this chapter.
Before writing the operating system to the SD card, you normally need to format the card. This section shows you how to format an SD card on Windows and on the Mac by using the SD Formatter app and on Linux by using other tools.
Caution
Before formatting the card, check to make sure it doesn’t contain any files you want to keep. If it does, copy the files to a safe location before formatting the card or use a different card instead.
Note
Windows and the Mac both include formatting tools that can format an SD card or a micro SD card with the FAT32 file system. But because none of these formatting tools fully uses the SD card’s features, you’ll do better to use the free SD Formatter app, which you can download for free from the SD Association’s web site.
Installing and using the SD Formatter app is a little different on Windows than on the Mac, so the following subsections cover the two platforms separately.
Installing the SD Formatter App on Windows
To install the SD Formatter app on Windows, follow these steps:
1. Open your browser if it’s not running or switch to it if it is running.
2. Go to https://www.sdcard.org/downloads/formatter_4/ and download the SD Formatter for Windows. This is a zip file that Windows may unzip automatically when the download finishes. If Windows displays the “How Do You Want to Open This File?” dialog box, select the File Explorer app, click the OK button, and then extract the setup.exe file manually.
3. Double-click the setup.exe file to run it, and then follow through the steps of the InstallShield Wizard for SDFormatter.
4. When the InstallShield Wizard finishes, click the Finish button to close it.
You can then run the SDFormatter app either from the desktop shortcut that the InstallShield Wizard normally creates without consulting you or from the Start menu.
Formatting an SD Card with the SD Formatter App on Windows
Once you’ve installed the SD app on your Windows PC or your Mac, you can format the SD card with it. To format the SD card, follow these steps:
1. Launch the app. The SDFormatter window opens (see Figure 5-3).
Figure 5-3. Using the SDFormatter app on Windows
2. Look at the Drive drop-down menu to see if it shows the SD card you want to format. If not, open the drop-down menu and select the right SD card. If the right card doesn’t appear in the drop-down menu, make sure the card is connected to your PC, and then click the Refresh button to refresh the list of drives.
3. Double-click the Volume Label box and type the name you want to give the SD card—11 characters maximum, using underscores and spaces if you want but not characters such as a colon (:) or backslash ().
4. In the Format Option area, click the Option button to display the Option Setting dialog box (see Figure 5-4).
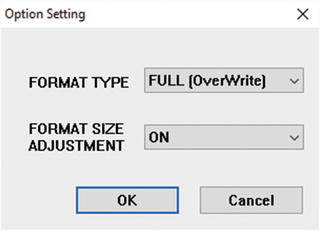
Figure 5-4. In the Option Setting dialog box for the SDFormatter app, choose the Full (OverWrite) format type and enable Format Size Adjustment.
5. Open the Format Type drop-down menu and select the Full (OverWrite) item.
6. Open the Format Size Adjustment drop-down menu and select the On item.
7. Click the OK button to close the Option Setting dialog box.
8. Back in the SDFormatter window, click the Format button. An SDFormatter dialog box opens (see Figure 5-5) to warn you not to remove the drive during formatting and to confirm that you want to format it.
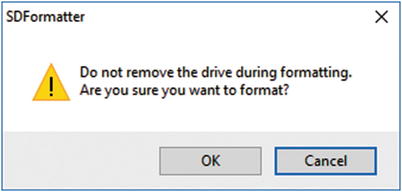
Figure 5-5. In this SDFormatter dialog box, confirm that you want to format the SD card.
9. Click the OK button. The Formatting dialog box opens and displays the progress of the format operation.
10. When the Memory Card Format complete! message appears, click the OK button to close the message box.
11. Click the Exit button to close the SD Formatter app.
Installing the SD Formatter Tool on the Mac
To install the SD Formatter app on the Mac, follow these steps:
1. Open your browser if it’s not running, or switch to it if it’s already running.
2. Go to https://www.sdcard.org/downloads/formatter_4/ and download the SD Formatter for Mac package.
3. Click the Downloads icon on the Dock to display the Downloads stack, and then click the SDFormatter package file. The Install SDFormatter installer runs.
4. Click the Continue button and follow through the installation process, entering your password and clicking the Install Software button when prompted to do so. You don’t need to make any decisions during the installation.
5. When the screen called “The Installation Was Successful” appears, click the Close button.
You can now launch the SD Formatter app by clicking the Launchpad icon on the Dock and then clicking the SDFormatter icon on the Launchpad screen.
Formatting an SD Card with the SD Formatter App on the Mac
Once you’ve installed the SD app on your Mac, you can format the SD card with it. To format the SD card, follow these steps:
1. Launch the app. The SDFormatter window opens (see Figure 5-6).
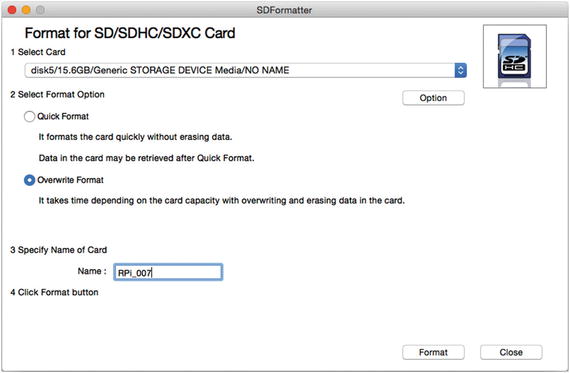
Figure 5-6. Formatting an SD card with the SDFormatter app on a Mac
2. Look at the Select Card pop-up menu and see if it shows the SD card you want to format. If not, open the pop-up menu and select the right SD card.
3. In the Select Format Option area, click the Option button to display the Logical Address Adjustment dialog box.
4. Select the Yes option button. (The No option button is the default.)
5. Click the OK button to close the Logical Address Adjustment dialog box.
6. Also in the Select Format Option area, select the Overwrite Format option button instead of the Quick Format option button. Overwriting the data on the SD card makes the formatting operation take longer, but it leaves the SD card in a better state for use with the Raspberry Pi computer.
7. In the Specify Name of Card area, double-click in the Name box and type the name you want to assign to the SD card—11 characters maximum, using underscores and spaces if you want, but none of the characters you can’t use in filenames such as colon (:) or forward slash (/).
8. Click the Format button. The SD Formatter app formats the card, displaying a progress readout as it does so.
9. When the “Card Format Complete!” readout appears, click the Close button. The SDFormatter window closes, and the app quits.
Formatting an SD Card on Linux
Linux offers a variety of different tools for formatting disks, including SD cards. Many distributions include a graphical tool for formatting disks as well as command-line tools. As an example, this section uses Ubuntu’s Disks app, which puts an easy-to-use graphical interface on the disk-formatting tools.
Caution
Even if you’re experienced with the command line, be especially careful when using command-line tools to format SD cards. It’s all too easy to unleash the formatting command on the wrong drive and permanently delete valuable data.
Follow these steps to format an SD card using the Disks app in Ubuntu :
1. Click the Search Your Computer button to open the Search panel.
2. Type disks in the Search box. The search results appear.
3. Click the Disks result in the Applications section of the Search panel. The Disks app opens.
4. In the left panel, click the entry for the SD card. You should be able to identify the right entry easily by its size. The details for the SD card appear (see Figure 5-7).
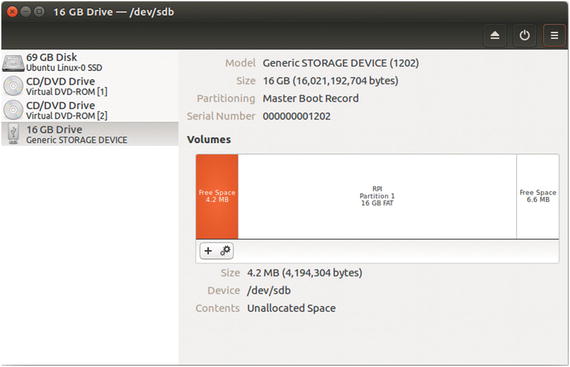
Figure 5-7. Use the Disks app on Ubuntu to format an SD card.
5. Click the Menu button in the upper-right corner of the Disks window to open the menu, and then click the Format Disk item. If you prefer keyboard shortcuts, press Ctrl+F. The Format Disk dialog box opens (see Figure 5-8).
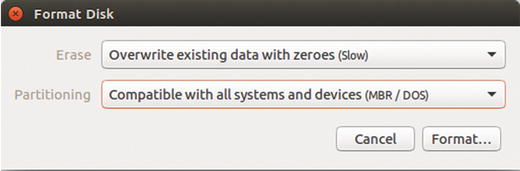
Figure 5-8. In the Format Disk dialog box, choose whether to overwrite the disk’s existing data and which type of Partitioning to use.
6. Open the Erase pop-up menu and choose Overwrite existing data with zeroes.
7. Open the Partitioning pop-up menu and choose Compatible with all systems and devices.
8. Click the Format button. A confirmation dialog box appears (see Figure 5-9), giving you one last chance to make sure you’ve chosen the right disk.
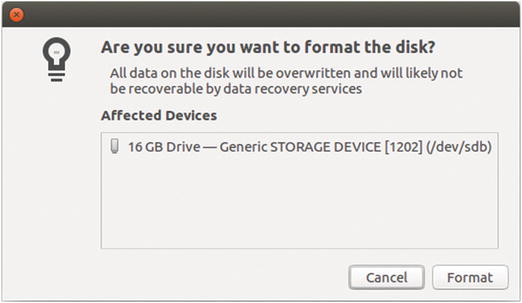
Figure 5-9. In the confirmation dialog box, verify that you’ve selected the right disk, and then click the Format button.
9. Click the Format button. The Disks app formats the disk, displaying a progress readout as it does so.
10. When the Disks app finishes formatting the disk, the SD card appears in the Volumes area marked as Free Space. Click the Create Partition (+) button just above the Size readout to display the Create Partition dialog box (see Figure 5-10).
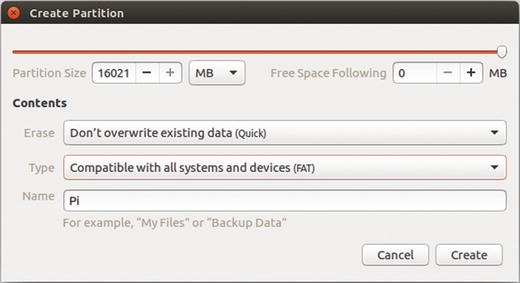
Figure 5-10. In the Create Partition dialog box, set the partition size and name, and then click the Create button.
11. In the Partition Size box at the top, set the partition size in megabytes. Normally, the Create Partition dialog box suggests the maximum size possible for the SD card, and you can simply accept this.
12. In the Erase pop-up menu, make sure the “Don’t overwrite existing data” item is selected.
13. In the Type pop-up menu, make sure the “Compatible with all systems and devices (FAT)” item is selected.
14. In the Name box, type the name you want to give the SD card.
15. Click the Create button. The Disks app creates the partition, which then appears in the Volumes box.
16. Click the Mount Selected Partition button (the button with the Play icon) to mount the new partition. The Mount Selected Partition button changes to the Unmount Selected Partition button (a Stop icon).
You can now copy files to the SD card, as explained in the section “Putting the NOOBS Installer on an SD Card on Linux” later in this chapter.
Tip
The Disks app also has a Restore Disk Image command that you can use to restore (in lay terms, “put”) an operating system image onto an SD card. If you have downloaded another operating system, such as Xubuntu or Ubuntu Mate (discussed in Chapter 3), you can use this command to put the image on the SD card. You can then boot from the SD card to install the operating system.
Putting the NOOBS Installer on an SD Card
If you’ve downloaded the NOOBS installer, unzip it and copy the files to the SD card you will use to install the operating system on the Raspberry Pi computer.
Putting the NOOBS Installer on an SD Card on Windows
To put the NOOBS installer on an SD card on Windows, follow these steps:
1. Open a File Explorer window to the folder that contains the NOOBS zip file. For example, if you’re using Windows 10 and you’ve downloaded the NOOBS zip file to your Downloads folder, click the Start button to open the Start menu, click the Show Jump List button to the right of the File Explorer item, and then click the Downloads item to display the Downloads folder.
2. Click the NOOBS zip file to select it. The Compressed Folder Tools tab appears on the Ribbon.
3. Click the Extract button under Compressed Folder Tools to display the Extract controls.
4. Click the Extract All button. The Extract Compressed (Zipped) Folders Wizard runs and displays the Select a Destination and Extract Files screen (see Figure 5-11).
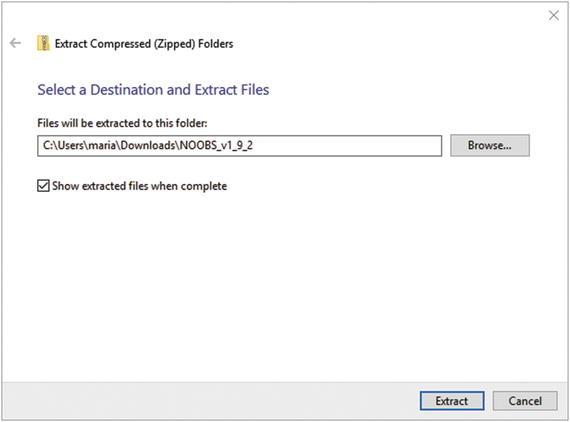
Figure 5-11. On the Select a Destination and Extract Files screen of the Extract Compressed (Zipped) Folders Wizard, choose the destination folder for the unzipped files and folders, and then click the Extract button.
5. Look at the “Files will be extracted to this folder” box. If the folder is okay, you’re set; if not, click the Browse button to display the Select a Destination dialog box, click the right folder, and then click the Select Folder button.
6. Select the “Show extracted files when complete” check box if you want Windows to display the files after the extraction finishes. If you’re planning to copy the files to an SD card, displaying the files is usually handy.
7. Click the Extract button. The Wizard extracts the files and then (assuming you selected that check box) displays them in a File Explorer window.
Putting the NOOBS Installer on an SD Card on the Mac
When the download of the zip file containing the NOOBS installer completes, OS X automatically unzips the zip file, puts its contents in a folder of the same name (minus the .zip file extension), and places the zip file in the Trash.
To put the NOOBS installer on an SD card, follow these steps :
1. Open a Finder window to the NOOBS folder. For example, if OS X unzipped the NOOBS zip file to a NOOBS folder in the Downloads folder, click the Downloads icon on the Dock, click the NOOBS folder, and then click the Open in Finder icon.
2. Insert the SD card in a reader connected to your Mac. The SD card appears in the Devices category in the Finder window. (If the Devices category is collapsed, move the pointer over the Devices heading, and then click the Show button that appears.)
3. Select all the items in the NOOBS folder. For example, with the NOOBS folder selected, press Cmd+A or choose Edit ➤ Select All from the menu bar.
4. Drag the selection to the SD card’s entry in the Devices list. Finder copies the items to the SD card.
5. After the copy operation finishes, click the Eject icon to the right of the SD card’s entry in the Devices list to eject the SD card.
Putting the NOOBS Installer on an SD Card on Linux
After you download the zip file containing the NOOBS installer, your version of Linux may unzip it automatically for you. If not, unzip it manually.
Once NOOBS is unzipped, open a file-management window to the folder that contains it. You can then select the files and folders within the NOOBS folder and drag them to the SD card to copy them there.
Installing Operating Systems with the NOOBS Installer
By this point, you should have an SD card containing the NOOBS installer. The following subsections show you how to install Raspbian and other operating systems on a Raspberry Pi computer using NOOBS.
Launching the NOOBS Installer
To install Raspbian using the NOOBS installer, follow these steps:
1. Insert the SD card containing the NOOBS installer in the Raspberry Pi computer.
2. Power on the Raspberry Pi computer. For example, connect the power lead to the micro USB power input. The Raspberry Pi computer starts, and after a few moments, the NOOBS screen appears (see Figure 5-12) .
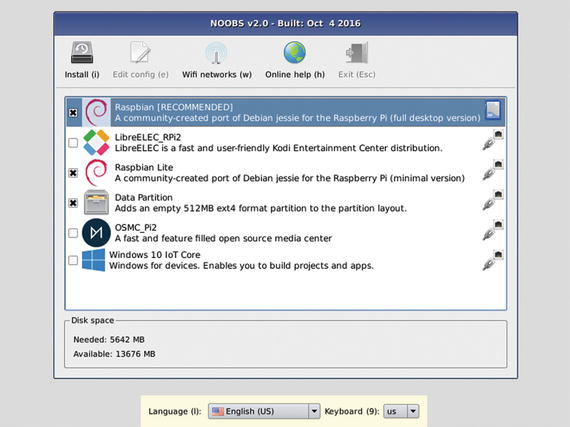
Figure 5-12. On the NOOBS screen, first check that the right language and keyboard layout are selected. Then choose the operating system you want to install and click the Install button.
Note
Normally, NOOBS detects the type of the connected display and produces output suitable for it. If you don’t see anything on the display, first check that it is connected firmly with an intact cable; if you’re not certain the cable works, replace it with one that you know works. Next, try pressing the keys for switching output modes: Press 1 for the preferred resolution from the HDMI port, press 2 for VGA resolution from the HDMI port, press 3 for PAL (Phase Alternating Line) output from the composite port, or press 4 for NTSC (National Television System Committee) output from the composite port. If your display still has no output, see the section “Editing the config.txt File” later in this chapter for information on editing the config.txt file to change the output.
You’ll notice that in Figure 5-12, the Edit Config (e) button and the Exit (Esc) button on the toolbar of the NOOBS window are dimmed and unavailable. These buttons become available when you are using NOOBS to change the existing configuration on a Raspberry Pi computer. See the section “Using Recovery Mode,” later in this chapter, for details on using NOOBS this way.
3. In the bar at the bottom of the screen (see Figure 5-12), verify that the Language pop-up menu shows the language you want to use. If not, open the pop-up menu and click the appropriate language.
4. Also in the bar at the bottom of the screen, verify that the Keyboard pop-up menu shows the keyboard layout you need. If not, open the pop-up menu and click the appropriate keyboard.
Connecting the Raspberry Pi computer to a Wi-Fi Network
After launching the NOOBS installer, you can connect the Raspberry Pi computer to a Wi-Fi network . You’d normally need to connect to a Wi-fi network only if
This is a Raspberry Pi computer with built-in Wi-Fi, such as the Raspberry Pi 3, or another Raspberry Pi model with the Raspberry Pi USB Wi-Fi Dongle.
You need to download an operating system.
The Raspberry Pi computer doesn’t have an Ethernet connection available.
To connect the Raspberry Pi computer to a Wi-Fi network , follow these steps:
1. Click the Wi-Fi Networks button on the toolbar or press the W key to display the “Wifi network selection” dialog box (see Figure 5-13).
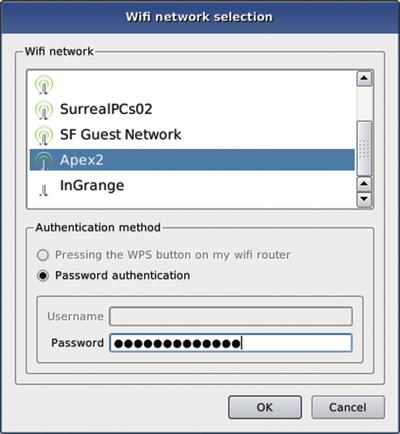
Figure 5-13. In the Wifi network selection dialog box, click the appropriate Wi-Fi network, choose and provide the authentication method, and then click the OK button.
2. In the “Wifi network” list box, click the Wi-Fi network to which you want to connect the Raspberry Pi computer.
3. In the Authentication method box, select the “Pressing the WPS button on my wifi router” option button or the “Password authentication” option button, as appropriate.
4. If you selected the Password authentication option button, click in the Password box and type the password for the Wi-Fi network.
5. Click the OK button. The Raspberry Pi computer connects to the network.
Choosing Whether to Create a Data Partition
Apart from installing an operating system, the NOOBS installer enables you to create a data partition on the SD card in the Raspberry Pi computer. The data partition is 512 MB in size and is formatted with the ext4 file system (fourth extended filesystem).
The data partition is an area in which you can safely save files that you want to keep even if you have to reinstall your operating systems. NOOBS keeps the data partition safe during reinstallation rather than overwriting it like the other partitions.
Caution
The data partition is a great idea, and in general it works well, but you’d be wise not to rely on it too much. First, you should be prepared for some of your SD cards to fail, particularly if used heavily or vigorously. And second, if you sometimes need to remove the SD cards from your Raspberry Pi computers, you may find it difficult to keep clear which card is which, because they’re almost impossible to label. In this case, you may be better off storing any important data on a server.
Selecting the Operating System and Performing the Installation
At this point, you should be ready to select and install one or more operating systems. In the NOOBS installer, follow these steps:
1. Select the check box for each operating system you want to install. For example, select the Raspbian check box to install the Raspbian operating system.
Note The icon on the right of each operating system’s button in the NOOBS window shows an SD card icon if the operating system is on the SD card and a chain icon if the operating system needs to be downloaded. Downloading one or more operating systems may take a while, depending on the speed of your Internet connection. As of this writing, the LibreELEC operating system is about 1 GB; the OSMC operating system is about 1.5 GB; and Windows 10 IoT Core is about 7.8 GB.
2. Click the Install button or press the I key. The Confirm dialog box opens (see Figure 5-14), making sure you want to overwrite all the existing data on the SD card.
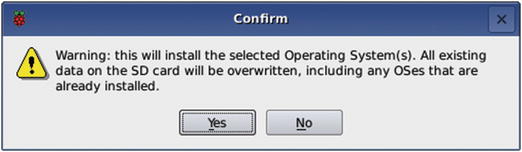
Figure 5-14. In the Confirm dialog box, click the Yes button to confirm that you’re prepared to overwrite all the existing data on the SD card.
3. Click the Yes button if you’re ready to go ahead. The installer runs, displaying a series of decorative and information screens and progress readouts as it does so. Figure 5-15 shows an example.
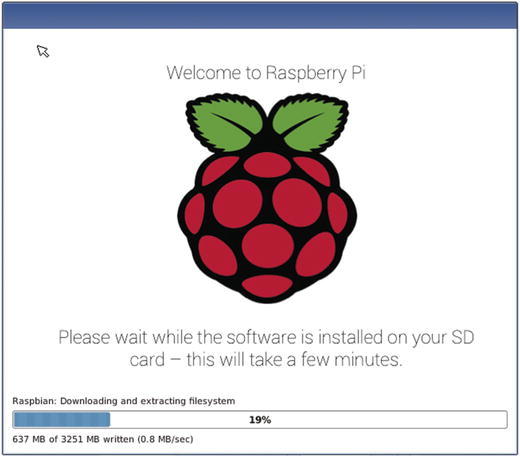
Figure 5-15. The NOOBS installer displays information and progress readouts as it works.
Note
You can install multiple operating systems on an Raspberry Pi computer if the SD card has enough free space.
When the installation finishes, the OS(es) installed dialog box appears (see Figure 5-16). Click the OK button to close the dialog box .
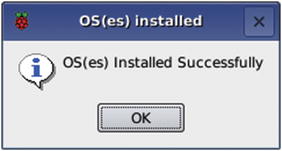
Figure 5-16. The NOOBS installer displays information and progress readouts as it works.
The Raspberry Pi computer then reboots. During the boot process, the Recovery splash screen appears for a couple of seconds. This is a gray screen with the Raspberry Pi logo in the middle and the prompt For Recovery Mode, hold Shift here. As the message says, you can press the Shift key to access Recovery mode. We’ll look at this in the section “Using Recovery Mode” later in this chapter.
If you installed multiple operating systems on the Raspberry Pi computer, the Select OS to Boot dialog box then appears for a few seconds (see Figure 5-17). Double-click the operating system you want to boot, or press the up-arrow key or down-arrow key to move the highlight to the operating system, and then press the Enter key. If the operating system you want is selected, you can also simply wait until the countdown completes and the Raspberry Pi computer boots that operating system.
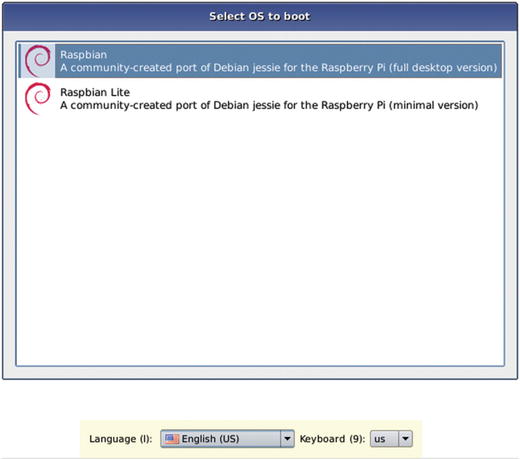
Figure 5-17. In the Select OS to boot dialog box, select the operating system by double-clicking or by pressing down arrow or up arrow and then pressing the Enter key.
Note
Below the Select OS to boot dialog box, you can also change the language and the keyboard if necessary.
Performing a Headless Install via VNC
As you’ve seen, booting the NOOBS installer and installing Raspbian or another operating system on a Raspberry Pi computer is straightforward, but you need to give commands directly on the computer. If you find it more convenient to work remotely, you can use Virtual Network Computing (VNC) to run the installation from another computer instead—or from another device, such as a tablet or a phone, if you prefer. This section shows you how to do so.
Getting a VNC Client if Necessary
If you don’t yet have a VNC client , you’ll need to get one. The following list gives examples of VNC clients that are known to work for headless installs:
Windows: TightVNC, which you can download for free from the TightVNC web site ( http://www.tightvnc.com/download.php ).
Mac: Chicken of the VNC, which you can download for free from the Chicken web site on SourceForge ( https://sourceforge.net/projects/chicken/ ).
Note
OS X and macOS include a built-in VNC client , Screen Sharing.app; but as of this writing, it doesn’t work for connecting to the NOOBS installer.
Linux: Many Linux distributions include a VNC app that will work for connecting to NOOBS. For example, the Ubuntu distribution includes the Remmina Remote Desktop Client app, which enables you to connect via VNC as well as via other protocols, such as RDP (Remote Desktop Protocol) and SSH.
iPhone or iPad: Mocha VNC Lite, which you can download for free from the App Store, can connect to NOOBS.
Android: VNC Viewer, which you can download for free from the Play Store, can connect to NOOBS.
Adding the vncinstall Command to the recovery.cmdline File
Your next move is to add the vncinstall command to the recovery.cmdline file. As its name suggests, the vncinstall command causes the NOOBS installer to install VNC.
Follow these steps to add the vncinstall command to recovery.cmdline:
1. Put the SD card you’ll use for this Raspberry Pi computer in an SD card reader connected to another computer.
2. Open the file called recovery.cmdline in a text editor, such as Notepad on Windows or TextEdit on the Mac. The file usually looks something like this:
runinstaller quiet ramdisk_size=32768 root=/dev/ram0 init=/init vt.cur_default=1 elevator=deadline3. Add the vncinstall command to the end after a space:
runinstaller quiet ramdisk_size=32768 root=/dev/ram0 init=/init vt.cur_default=1 elevator=deadline vncinstall4. Save the file.
5. Close the file.
Note
If you use TextEdit on the Mac to edit recovery.cmdline, an alert dialog box may open to warn you that the file is on a volume that does not support permanent version storage, which means that you won’t be able to access older versions of the file after you close it. This is fine because you don’t need the extra versions of the file that TextEdit can maintain on a fixed drive. So just click the OK button to dismiss the alert.
Replacing the SD Card and Booting the Raspberry Pi Computer
Now that you’ve added the vncinstall command to the recovery.cmdline file, eject the SD card from the computer you used for editing the file, and then replace it in the Raspberry Pi computer.
Make sure the Raspberry Pi computer is connected to your network via an Ethernet cable, and then power on the computer. You’ll see a short screen of status information, which may include several errors. No graphical interface appears, because VNC is now getting that information .
Finding the IP Address for the Raspberry Pi Computer
To connect via VNC to the Raspberry Pi computer, you need to know the IP address assigned to it. The following subsections give examples of tools you can use to find the Raspberry Pi computer’s IP address.
Windows, Mac, or Linux: Nmap
Nmap is a free network-scanning tool that you can download from the Nmap web site (www.nmap.org/download). Nmap is a command-line tool but includes a graphical front end called Zenmap.
Caution
Avoid the development releases of Nmap because these are not yet proven stable.
Normally, you’ll want to download the latest stable release self-installer file for your operating system. Run the self-installer file and follow through the installation. On the Choose Components screen, you’ll normally want to check all of the boxes to install all the components. On the WinPcap Options screen, check the Start the WinPcap Service “NPF” Now check box if you plan to use Zenmap right away. Check the Start the WinPcap Service “NPF” at Startup check box if you plan to use Zenmap regularly.
Once you’ve installed Nmap and Zenmap, run Nmap–Zenmap GUI from the Start menu (in Windows), from Launchpad (on the Mac), or in the normal way for the Linux distribution you’re using.
In the Target box, specify the IP address range you want to search. For a network that uses the 192.168 private range, you would normally use a target such as 192.168.0.0/24, where “/24” specifies the network mask; for a network that uses the 10.0 private range, you would normally use a target such as 10.0.0.0/24.
Next, open the Profile pop-up menu and choose Ping Scan, then click the Scan button. After a little while, the Nmap Output tab displays a list of the hosts found in that address range (see Figure 5-18), and you can identify the Raspberry Pi computer to which you want to connect.
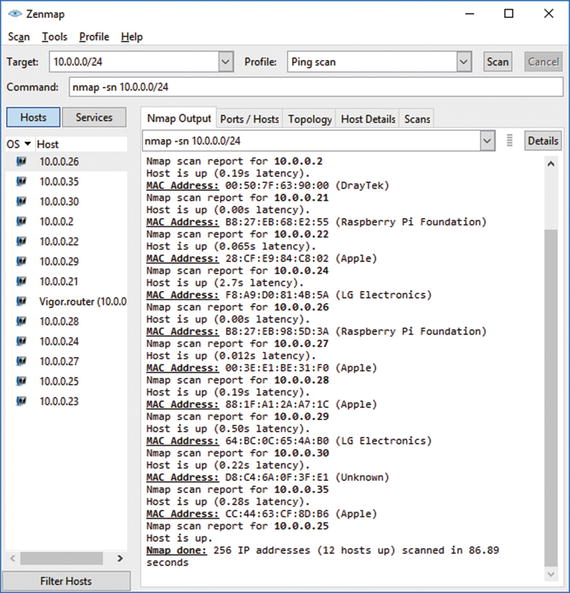
Figure 5-18. Nmap , shown here with the Zenmap graphical interface, is a network scanner you can use to determine the IP address of a Raspberry Pi computer on the network.
iPhone or iPad : Fing
Fing is a free network-scanning app that gives you a straightforward list of the computers and devices it finds on the network. The list shows each item’s IP address, MAC (Media Access Control) address, hostname (if available), and manufacturer. To identify the Raspberry Pi computer, look for the entry with Raspberry Pi Foundation listed as the manufacturer .
Tip
Fing displays the hostname for a Raspberry Pi computer that has one or more operating systems installed. If you’re about to set up a Raspberry Pi computer for the first time, look for the entry without a hostname. You can also tap the entry for a device to display a screen with more information about the device. From there, tap the Scan Services button to display the Services screen, where you can see whether the VNC service is running.
Android : IP Tools
IP Tools is a network-scanner app for Android that enables you to find out a wide range of information about the computers and devices on a network. The basic version of IP Tools is free and includes the functionality needed to determine IP addresses; you must pay if you want to upgrade to the Pro version of IP Tools.
After installing IP Tools via the Play Store app, follow these steps to find out the Raspberry Pi computer’s IP address:
1. Launch IP Tools either by tapping the Open button on the app’s screen in the Play Store app (if you still have it open) or by tapping the app’s icon on the Apps screen.
2. Swipe in from the right side of the screen to open the Navigation panel.
3. Tap the LAN (local area network) Scanner button to display the LAN Scanner screen.
4. Leave the default entry (127.0.0.1) in the box at the top of the screen.
5. Make sure the Show Manufacturer check box is checked.
6. Tap the right-arrow button to run the scan.
7. In the list of computers and devices that the LAN Scanner screen displays, look for the one with Manufacturer: RASPBERR (longer names are truncated to eight characters).
Connecting and Working via VNC
Now that you know the IP address of the Raspberry Pi computer, open the VNC client and connect to that IP address. Usually, the IP address is all you need to specify; the port number is 5900, but because this is the default VNC port, most VNC clients establish the connection without you specifying it. There’s no password for connecting to the NOOBS installer via VNC.
Once you’ve connected to the Raspberry Pi computer via VNC, you can use your computer’s keyboard and pointing device to control the Raspberry Pi computer much as if you were sitting at it. Figure 5-19 shows a Chicken of the VNC window connected to NOOBS for remote installation.
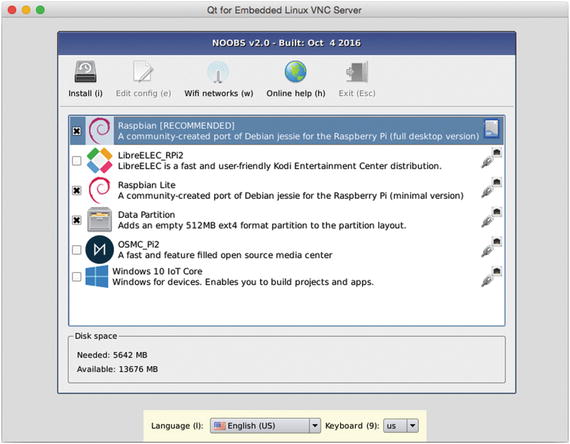
Figure 5-19. You can use a VNC client, such as Chicken of the VNC on the Mac, to control the NOOBS installer remotely.
Using Recovery Mode
The NOOBS installer provides a recovery and management feature called Recovery mode. You access Recovery mode by pressing the Shift key during startup. Recovery mode enables you to change the selection of operating systems installed on a Raspberry Pi computer.
Caution
Changing the operating systems on the Raspberry Pi wipes out the existing operating systems on the SD card. However, if you have created a data partition, NOOBS preserves it.
Recovery mode also enables you to edit the configuration files used to boot the Raspberry Pi computer. For example, you may need to change the display mode to use a different type of monitor or to remove a black border around the edge of the display.
Booting into Recovery Mode
To boot into Recovery mode, power the Raspberry Pi computer on and wait for the Recovery splash screen, a gray screen with the Raspberry Pi logo in the middle and a prompt to press Shift to enter Recovery mode, to appear. When you see the Recovery splash screen, press and hold the Shift key for a couple of seconds.
The NOOBS screen then appears (see Figure 5-20), looking much the same as for initial setup but now with the Edit Config button and the Exit button on the toolbar enabled.
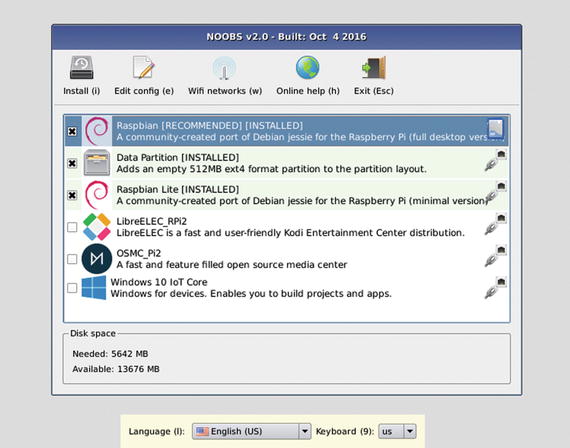
Figure 5-20. When you boot into Recovery mode, the NOOBS installer appears with the Edit Config button and the Exit button enabled.
Opening the Config Editor
In Recovery mode, you can edit the config.txt file and the cmdline.txt file by clicking the Edit Config button on the toolbar (or pressing the E key) and working in the Config Editor dialog box that opens. As you can see in Figure 5-21, the Config Editor dialog box has two tabs, one for config.txt and one for cmdline.txt.
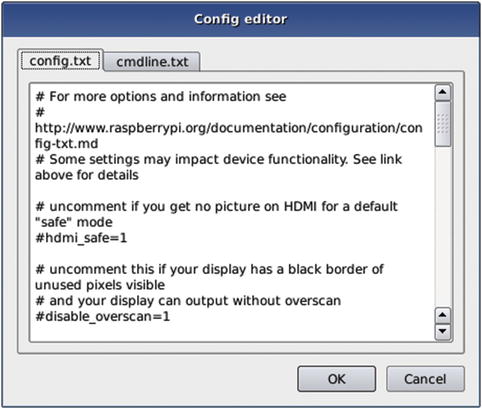
Figure 5-21. You can edit the config.txt file by clicking the config.txt tab in the Config Editor.
Recovery mode is usually the most convenient way to edit config.txt and cmdline.txt because you’re working directly on the Raspberry Pi computer and need only restart it to apply the changes. But you may sometimes need to remove the SD card from the Raspberry Pi computer and use another computer to edit the files. You might have to do this to solve problems that are preventing the Raspberry Pi computer from booting or to remove the keyboardtriggerdisable parameter from the recovery.cmdline file.
Note
You can also edit the config.txt file indirectly by using the Raspberry Pi Configuration tool while the Raspberry Pi computer is running. The Raspberry Pi Configuration tool prompts to restart the computer when you have made a change that requires a restart.
Editing the config.txt File
The config.txt file is a text file that contains configuration information for the Raspberry Pi computer. The config.txt file on the Raspberry Pi plays a similar role to the BIOS (Basic Input/Output System) on a normal PC, storing details of the system configuration required to start the computer.
The config.txt file is stored on the boot partition of the SD card. The Raspberry Pi computer’s GPU reads config.txt before the computer initializes the CPU and the Linux operating system.
The config.txt file can contain a wide variety of parameters. In this section, we’ll look at a sample config.txt file and discuss some of the changes you’re most likely to need to make. I’ll point you to where you can find a full reference to the parameters you can use in config.txt.
Meeting a Sample config.txt File
The following code listing shows a sample config.txt file from a Raspberry Pi 3 Model B running Raspbian Jessie. Here’s a quick word of explanation to start with:
Any line that starts with a # and a space is a comment.
Some of the comment lines are text that explain the options that follow and suggest when to use those options.
Most of the options are “commented out” by a # placed before them. You can “uncomment” an option by deleting the # before it. The option then takes effect when you restart the Raspberry Pi computer.
# For more options and information see# http://www.raspberrypi.org/documentation/configuration/config-txt.md# Some settings may impact device functionality. See link above for details# uncomment if you get no picture on HDMI for a default "safe" mode#hdmi_safe=1# uncomment this if your display has a black border of unused pixels visible# and your display can output without overscan#disable_overscan=1# uncomment the following to adjust overscan. Use positive numbers if console# goes off screen, and negative if there is too much border#overscan_left=16#overscan_right=16#overscan_top=16#overscan_bottom=16# uncomment to force a console size. By default it will be display’s size minus# overscan.#framebuffer_width=1280#framebuffer_height=720# uncomment if hdmi display is not detected and composite is being output#hdmi_force_hotplug=1# uncomment to force a specific HDMI mode (this will force VGA)#hdmi_group=1#hdmi_mode=1# uncomment to force a HDMI mode rather than DVI. This can make audio work in# DMT (computer monitor) modes#hdmi_drive=2# uncomment to increase signal to HDMI, if you have interference, blanking, or# no display#config_hdmi_boost=4# uncomment for composite PAL#sdtv_mode=2#uncomment to overclock the arm. 700 MHz is the default.#arm_freq=800# Uncomment some or all of these to enable the optional hardware interfaces#dtparam=i2c_arm=on#dtparam=i2s=on#dtparam=spi=on# Uncomment this to enable the lirc-rpi module#dtoverlay=lirc-rpi# Additional overlays and parameters are documented /boot/overlays/README# Enable audio (loads snd_bcm2835)dtparam=audio=on# NOOBS Auto-generated Settings:hdmi_force_hotplug=1
The following sections discuss the parts of the config.txt file and some changes you may want to make.
Getting Full Information on the config.txt File
At the top of the config.txt file is a URL you can visit to get full information on the configuration file:
http://www.raspberrypi.org/documentation/configuration/config-txt.md
On this page, you’ll find information about the many parameters you can configure in config.txt to change the configuration of a Raspberry Pi computer.
Resolving HDMI Display Issues
The Raspberry Pi boards use HDMI as the primary output for audio and video.
If you’re using an HDMI display but not getting output, or the output drops out, try using the hdmi_safe=1 option. This option applies the Safe mode for HDMI to increase compatibility. Safe mode has the effect of choosing the following options:
hdmi_force_hotplug=1hdmi_ignore_edid=0xa5000080config_hdmi_boost=4hdmi_group=2hdmi_mode=4disable_overscan=0overscan_left=24overscan_right=24overscan_top=24overscan_bottom=24
Alternatively, you can use the individual options :
hdmi_force_hotplug=1: Use this option if the HDMI display is not getting any output because the Raspberry Pi computer is directing output to the composite port.
hdmi_ignore_edid=0xa5000080: Use this option if the display is not providing accurate Extended Display Identification Data (EDID) . EDID is the information that enables the graphics card to know what resolutions, refresh rates, and so on the display can manage.
config_hdmi_boost=4: Use this option to increase the strength of the signal the Raspberry Pi computer outputs on the HDMI port. You’d do this if the HDMI display is getting no signal or shows interference or blanking. You can use values from 0 (the default) to 7, but try 4 first.
hdmi_group=2: Use this option to specify that the display is a monitor rather than a TV; if you’re using a TV, use hdmi_group=1. (The option hdmi_group=0 causes the Raspberry Pi computer to autodetect the monitor type from the EDID.) You use the hdmi_group option with the hdmi_mode setting (see the next paragraph).
hdmi_mode=1: Use this option to force VGA output (640 pixels × 480 pixels). You can also use a wide range of other settings. Table 5-1 shows the ones that are normally most useful; see http://www.raspberrypi.org/documentation/configuration/config-txt.md for the full list. There are settings for both the hdmi_group=1 option (TVs) and the hdmi_group=2 option (monitors).
Table 5-1. Settings for the hdmi_mode Option
hdmi_mode
hdmi_group
Resolution
Frequency
Other
1
1
640 × 480
60 Hz
VGA
4
1
720 p
60 Hz
5
1
1080 i
60 Hz
16
1
1080 p
60 Hz
19
1
720 p
50 Hz
20
1
1080 i
50 Hz
31
1
1080 p
50 Hz
40
1
1080 i
100 Hz
41
1
720 p
100 Hz
1
2
640 × 350
85 Hz
4
2
640 × 480
60 Hz
5
2
640 × 480
72 Hz
6
2
640 × 480
75 Hz
7
2
640 × 480
85 Hz
16
2
1024 × 768
60 Hz
17
2
1024 × 768
70 Hz
18
2
1024 × 768
75 Hz
69
2
1920 × 1200
60 Hz
70
2
1920 × 1200
75 Hz
71
2
1920 × 1200
85 Hz
72
2
1920 × 1200
120 Hz
Adjusting Overscan Settings
You may also need to edit the config.txt file to adjust overscan settings on the display you’re using with an Raspberry Pi computer. These are the settings you’re most likely to need to adjust:
disable_overscan=1: Use this option to turn off overscan. You’d do this if the display shows a black border of pixels around the output.
overscan_left, overscan_right, overscan_top, overscan_bottom: Use these options to adjust the position of the left border, right border, top border, and bottom border of the output. Use a positive value (the config.txt file suggests starting with 16) to move the image toward the middle of the screen; use a negative value (such as –16) to move the image toward the edge of the screen.
Forcing HDMI Mode or Composite PAL
You can also edit the config.txt file to force the Raspberry Pi computer to use HDMI mode or composite PAL . These are the options:
hdmi_drive=2: Use this option to force HDMI mode instead of DVI.
sdtv_mode=2: Use this option to force composite PAL output.
Enabling Optional Hardware Interfaces and Modules
Another reason for editing the config.txt file is to enable optional hardware interfaces and modules. These are the options you’re most likely to find useful:
dtparam=audio=on: This option is set to On by default, enabling audio. If you want to disable audio, comment out the line by placing # and a space at its beginning.
dtparam=i2c_arm=on: Use this option to enable I2C on the GPIO pins.
dtparam=i2s=on: Use this option to enable I2S audio hardware.
dtparam=spi=on: Use this option to enable the SPI driver.
dtoverlay=lirc-rpi: Use this option to enable the Linux Remote Control overlay.
Editing the cmdline.txt File
The cmdline.txt file passes arguments to the Linux kernel during startup. You can edit cmdline.txt by entering Recovery mode and working on the cmdline.txt tab of the Config Editor dialog box or by removing the SD card from the Raspberry Pi computer, connecting it to another computer, and opening it in a text editor (for example, Notepad on Windows or TextEdit on the Mac).
You may not need to edit cmdline.txt at all—but in case you do, Table 5-2 provides a quick reference to the default options the file contains. Table 5-3 also lists some options that you may want to use.
Table 5-2. Default Options for the cmdline.txt File
Option | Explanation |
|---|---|
dwc_otg.lpm_enable=0 | Disables low-power mode for USB. |
console=serial0,115200 | Sets the serial console number and the speed (115200 bps). |
console=tty1 | Sets the console to use TTY1 for input. |
root=dev/mmcblk0p7 | Specifies the boot partition to use. |
rootfstype=ext4 | Sets the root file system type to ext4. |
elevator=deadline | Sets the kernel to use the deadline method of processing input/output (I/O) requests. Some Raspberry Pi enthusiasts recommend changing to elevator=noop to improve performance. |
fsck.repair=yes | Automatically repairs errors detected during the file-system check. |
rootwait | Sets the computer to wait until a root device becomes available before continuing to boot. |
Table 5-3. Other Options for the cmdline.txt File
Option | Explanation |
|---|---|
ip= address | Sets a static IP address; for example, ip=192.168.1.100. |
smsc95xx.macaddr= address | Sets the specified MAC address to override the built-in MAC address; for example, smsc95xx.macaddr=B8:27:EB:60:00:BA. |
dwc_otg.speed=1 | Limits the speed of the USB bus to USB 1.1 (12 Mbps) instead of USB 2.0 (480 Mbps). |
dwc_otg.fiq_fix_enable=1 | When USB is not busy, reduces the number of USB interrupts to improve the CPU’s performance. |
dwc_otg.microframe_schedule=1 | Schedules periodic endpoints to avoid USB errors. |
dwc_otg.nak_holdoff_enable=1 | Enables the use of a hold-off time before retrying a USB transaction. |
dwc_otg.nak.holdoff= value | Specifies the hold-off time in microframes before retrying a USB transaction. The default is 8; you can set it to 0 to disable the hold-off time. |
Note
All the options in the cmdline.txt file appear on a single line, delimited by spaces. The line appears wrapped in the Config Editor (see Figure 5-22), but it doesn’t contain any carriage returns; if you include a carriage return, options after that point are ignored.
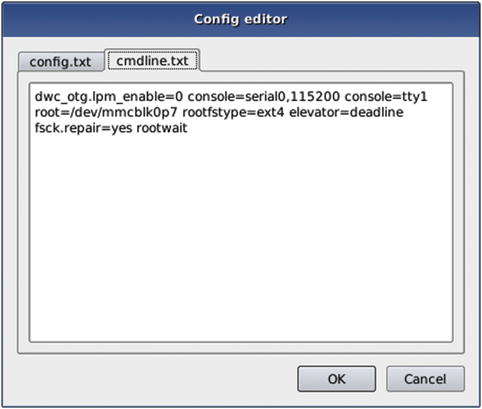
Figure 5-22. The cmdline.txt tab of the Config Editor dialog box enables you to edit the cmdline.txt file, which passes arguments to the operating system’s kernel during startup.
Learning Advanced Moves with NOOBS
In this section, we’ll look at three advanced moves you can perform with NOOBS. First, you can set NOOBS to install an operating system automatically. Second, you can set NOOBS to boot directly to a particular operating system. Third, you can create a custom version of Raspbian—or another operating system—to speed up configuration and deployment.
Setting NOOBS to Install an Operating System Automatically
You can set the NOOBS installer to install your chosen operating system automatically when you run NOOBS. This can be a great way of setting up Raspberry Pi computers quickly. Follow these steps:
1. Download NOOBS if you haven’t already done so. Unzip NOOBS if your computer’s operating system doesn’t do so automatically.
2. If the operating system you want to install automatically isn’t Raspbian, download the operating system. Unzip it, placing it in the os folder in NOOBS.
3. Remove any other operating systems from the os folder in NOOBS.
Note If you’re installing an operating system that includes multiple flavors (versions), open the flavours.json file in a text editor and remove the entries for all the flavors except the one you want to install.
4. Open the recovery.cmdline file, add the silentinstall parameter at the end, and then save the file.
5. Prepare an SD card and put your customized version of NOOBS on it as explained earlier in this chapter.
6. Put the SD card in a Raspberry Pi computer and power it on.
Booting Directly to a Particular Operating System
If you need to limit the actions your students can take with your Raspberry Pi computers, you may want to set the computers to boot directly to a particular operating system. Doing this prevents access to the NOOBS installer and to any other operating systems you have installed on the computers.
To boot directly to a particular operating system, you create a file named autoboot.txt in the NOOBS root folder. This file contains the number of the partition to boot.
The following subsections show you how to enable autobooting to a particular operating system.
Determining the Partition to Boot
After setting up the Raspberry Pi computer with all the operating systems you want it to have, open a Terminal window on the computer, type the following command, and press the Enter key:
sudo fdisk –lYou’ll see details such as these:
Device Boot Start End Sectors Size Id Type/dev/mmcblk0p1 8192 2341796 2333605 1.1G e W95 FAT16 (LBA)/dev/mmcblk0p2 2341797 15663103 13321307 6.4G 5 Extended/dev/mmcblk0p5 2342912 2408445 65534 32M 83 Linux/dev/mmcblk0p6 2408448 2537471 129024 63M c W95 FAT32 (LBA)/dev/mmcblk0p7 2539520 11165693 8626174 4.1G 83 Linux/dev/mmcblk0p8 11165696 12214269 1048574 512M c W95 FAT32 (LBA)/dev/mmcblk0p9 12214272 14614525 2400254 1.1G 83 Linux/dev/mmcblk0p10 14614528 15663103 1048576 512M 83 Linux
Look at the Type column on the right and identify the partitions whose type is W95 FAT 32 (LBA)—in this case, /dev/mmcblk0p6 (partition 6) and /dev/mmcblk0p8 (partition 8). Then look at the Size column for those partitions to establish which is the right one. In this case, /dev/mmcblk0p6 is 63 megabytes—too small—whereas /dev/mmcblk0p8 is 512 megabytes and is the partition we need.
Creating the autoboot.txt File
Now use a text editor to create a text file named autoboot.txt in the root folder on the NOOBS SD card. Enter a boot_partition= statement specifying the partition number you have identified. For example
boot_partition=8Save the file, and then boot the Raspberry Pi computer from the SD card.
Creating a Custom Version of Raspbian
One of the best aspects of NOOBS for teachers and educators is that you can use it to install a custom version of Raspbian—or of another standard Raspberry Pi operating system—including the packages and files you need. Installing a custom version enables you to set up and configure your Raspberry Pi computers quickly and efficiently. And when the settings on a Raspberry Pi computer get messed up, you can reinstall the custom version to reset the computer to your preferred settings quickly.
The following sections outline how to create a custom version of Raspbian that you can install on your Raspberry Pi computers.
Creating Your Custom Version
To create your custom version , install Raspbian on a Raspberry Pi computer as explained earlier in this chapter and then customize it as needed. For example
Choose the settings to use as the defaults for new installations.
Remove any included apps that you do not need in your custom version.
Install any other apps that you do need.
Once you’ve set up Raspbian the way you want it, shut down the Raspberry Pi computer, remove the SD card, and connect the SD card to a reader on the computer you’ll use for the rest of the process.
Creating the Root and Boot Filesystem Tarballs
The next step is to create two compressed tarball files, one called root.tar.xz containing the root filesystem and the other called boot.tar.xz containing the boot filesystem.
Open a Terminal window and navigate to the root folder on the SD card. Then use these commands to create the root tarball:
tar -cvpf root.tar /* --exclude=proc/* --exclude=sys/* --exclude=dev/pts/*xz -9 -e root.tar
Once you’ve done that, navigate to the root folder in the boot partition of the SD card. Then use these commands to create the boot tarball:
tar –cvpf boot.tarxz -9 –e boot.tar
Putting Your Custom Tarballs into NOOBS
Next, grab your copy of the NOOBS installer. If you already have the latest version, or an older version that you prefer to use, you’re all set. If not, download the latest version from http://downloads.raspberrypi.org/NOOBS_latest.
NOOBS comes as a zip file, which your computer’s operating system may unzip automatically for you. If not, unzip the file yourself to a convenient folder, and then open a window in your file-management app to that folder.
Inside the NOOBS folder, click or double-click (depending on your computer’s operating system) the os folder to display its contents: a folder for each operating system included for installation. Figure 5-23 shows the NOOBS folder structure in a Finder window on the Mac. The only operating system is Raspbian, as is standard for the full NOOBS installer.
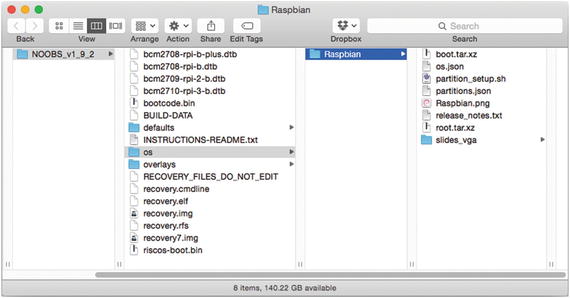
Figure 5-23. In the NOOBS folder, the os folder contains a folder for each operating systems included for installation—in this case, only Raspbian.
Create a copy or duplicate of the Raspbian folder within the os folder. For example, on the Mac, you might select the Raspbian folder and press Cmd+D or choose File ➤ Duplicate to duplicate the folder.
Whichever way you create the copy or duplicate, select its default name (such as Raspbian copy) and change it to the descriptive name you want to use. In this example, we use the name Schoolbian.
Now replace the root.tar.xz file and the boot.tar.xz file with the root tarball and boot tarball you created in the previous section.
Tip
If you want to emphasize the customizations to the operating system, you can replace its icon and the slides that appear during installation. The icon is the .png file, such as Raspbian.png. The slides are .png files in the slides_vga folder.
Editing the os.json File
Next, using a text editor, open the os.json file from the folder you’ve just created. You’ll see a text file that looks something like the next listing. Each line contains a field name in double quotes (such as "description"), followed by a colon and a space, and then the value for the field—again in double quotes.
Note
JSON is the acronym for JavaScript Object Notation, an open file format for exchanging data between systems or people.
{"description": "A community-created port of Debian jessie for the Raspberry Pi","kernel": "4.4","name": "Raspbian","password": "raspberry","release_date": "2016-05-27","supported_models": ["Pi Model","Pi 2","Pi Zero","Pi 3"],"url": "http://www.raspbian.org/","username": "pi","version": "jessie"}
Go to the "description" field and enter the description you want NOOBS to display for the customized operating system—for example, a customized version of Raspbian for our school’s Raspberry Pi fleet. Then go to the "name" field and replace Raspbian with the name you gave your folder, such as Schoolbian.
Save the changes to the os.json file and then close the file.
Editing the partitions.json File
Finally, you need to edit the partitions.json file to set the partition size and to specify the size of the uncompressed tarball files.
Open partitions.json in a text editor, and you’ll see something like the following listing:
{"partitions": [{"filesystem_type": "FAT","label": "boot","partition_size_nominal": 63,"uncompressed_tarball_size": 21,"want_maximised": false},{"filesystem_type": "ext4","label": "root","mkfs_options": "-O ^huge_file","partition_size_nominal": 3552,"uncompressed_tarball_size": 3152,"want_maximised": true}]}
For the boot partition and the root partition, enter the appropriate partition size in the partition_size_nominal pair and the size of the uncompressed boot tarball in the uncompressed_tarball_size pair.
Save and close partitions.json, and you’ll be ready to try your custom operating system.
Summary
In this chapter, you have learned how to build the Raspberry Pi computers and connect them to peripherals and power, perhaps with the help of your students. You know how to download the NOOBS installer; how to format an SD card for use with NOOBS; how to put NOOBS on the SD card; and how to install operating systems using NOOBS. You also know how to perform a headless install via VNC, use Recovery mode, and perform advanced moves with NOOBS.
In Chapter 6, we’ll examine how to connect the Raspberry Pi computers to a network.