
In this chapter, we’ll look at how to set up your Raspberry Pi computers in your classroom or lab, connect them to your establishment’s network, and verify that the computers and the network are working to your satisfaction.
This chapter assumes that you have built the Raspberry Pi computers and installed operating systems on them as discussed in Chapter 5.
Setting Up the Raspberry Pi Computers with Peripherals and Power
At this point, you should be ready to set up the Raspberry Pi computers in your classroom, perhaps with the help of your students.
Setup is likely to be more of a logistical challenge than a technical challenge. The following subsections give brief notes on connecting keyboards and pointing devices, displays, audio, power, and Ethernet cables.
Connecting Keyboards and Pointing Devices
For input, each Raspberry Pi computer will need a keyboard and a pointing device.
In most cases, USB keyboards and pointing devices are the best choice. You can connect them in moments by plugging them into the USB ports on the Raspberry Pi computer; they work during setup, enabling you to give commands; and you may not even need to configure them afterward.
Note
If you’re using PS/2 keyboards or pointing devices, connect them using PS/2-to-USB adapters. See the section “Choosing Keyboards and Pointing Devices” in Chapter 2 for more information on selecting keyboards and pointing devices to use with Raspberry Pi computers.
If you need to use Bluetooth keyboards or pointing devices, you’ll need to set them up after booting the Raspberry Pi computers. See the section “Connecting a Bluetooth Keyboard or Pointing Device,” later in this chapter, for instructions.
Note
If you’re using a USB hub to connect devices, make sure that the hub is receiving power, either from its own power supply or from the USB port into which it’s plugged on the Raspberry Pi computer.
Connecting Displays
Connect a display to each Raspberry Pi computer using a suitable connection type:
HDMI: This is the Raspberry Pi computer’s preferred means of output, so it’s the best choice if the display has an HDMI input.
DVI: Connect the display using an HDMI-to-DVI cable.
DisplayPort: Connect the display using an active HDMI-to-DisplayPort adapter.
Caution
For DisplayPort and VGA, you need active adapters and not passive adapters. Passive DisplayPort-to-HDMI adapters typically work only in one direction—taking DisplayPort output and delivering it to an HDMI input—not taking HDMI output and delivering it to a DisplayPort input. Passive HDMI-to-VGA cables and adapters do not work with Raspberry Pi computers.
VGA: Connect the display using an active HDMI-to-VGA cable.
Composite: For a display with a single composite input, use a composite cable with a single RCA connector at each end. For a display with separate video and audio inputs, use a cable that has a single RCA connector at one end and three RCA connectors at the other end. Plug the single RCA connector into the Raspberry Pi computer’s composite port. On the display, connect the yellow RCA connector to the video input, the red RCA connector to the right audio input, and the white or black RCA connector to the left audio input.
Note
See the section “Choosing Displays” in Chapter 2 for more information on selecting displays and adapters to use with Raspberry Pi computers.
Connecting Audio
If you’re using HDMI displays with built-in speakers, the HDMI cable carries the audio output from the Raspberry Pi computer to the display along with the video output, so you don’t need to make any further connections. If you’re using HDMI displays with audio outputs for external speakers, connect any speakers you’ll be using to the audio outputs.
Note
If you’re using active HDMI-to-DVI adapters that separate the audio signal from the video signal, connect an audio cable to the audio output on the adapter and to your display or speakers.
If the connection type for a display doesn’t carry audio, connect an audio cable to the Raspberry Pi computer’s composite port and to the input on the display or speakers.
Connecting Power
Next, connect a power supply to the micro USB power port on each Raspberry Pi computer. This is straightforward, but here are three quick points to bear in mind:
Right type of power supply: Make sure each power supply is the right kind for the Raspberry Pi model. See the section “Choosing Power Sources for Your Raspberry Pi Computers” in Chapter 2 for more information about power supplies and details of the power requirements of Raspberry Pi boards.
Keep the power off for now: Don’t connect the power supply to power yet unless you’re using a power socket with a switch that you can keep turned off for now.
Secure any extension sockets: Extension sockets can be a big help for sorting out power, especially ones that have a switch for each socket, enabling you to turn on or off the power to Raspberry Pi computers without unplugging them or their power supplies. If you’re using extension sockets to provide power to the computers and their displays, secure the extension sockets in place so that they can’t move around and drag the Raspberry Pi computers. For example, some extension sockets include screw holes for securing them to walls or furniture; others have recesses that slide onto two exposed screw-heads for quick mounting.
Connecting Ethernet
If you’ll be using Ethernet connections for the Raspberry Pi computers, connect an Ethernet cable to each Raspberry Pi computer’s Ethernet port and to the network hardware—for example, to a wall plate, to a switch, or to a router.
Booting and Configuring the Raspberry Pi Computers
Once you’ve connected all the hardware, it’s time to boot the Raspberry Pi computers. You can then perform further essential configuration, such as connecting Bluetooth keyboards and pointing devices, choosing settings to identify the computers, connecting to Wi-Fi networks, and configuring the network connections.
Powering on the Displays
Before you boot the Raspberry Pi computers, make sure that the displays are powered on and that they’re set to receive input on the appropriate port, such as HDMI. This is important because if a Raspberry Pi computer doesn’t detect a display on the HDMI port, it will output video on the composite port instead.
Note
If a display is powered on and switched to the correct input, but the Raspberry Pi computer still fails to detect it, you may need to use the hdmi_safe=1 option or the hdmi_force_hotplug=1 option in the config.txt file. See the section “Resolving HDMI Display Issues” in Chapter 5 for details.
Booting the Raspberry Pi Computers
Boot the Raspberry Pi computers by supplying power to them—for example, by plugging the connected power supply into a power socket or turning on the switch on a switched socket.
If all is well, each Raspberry Pi computer will boot, and you’ll see the command-line interface, a login screen, or the desktop, depending on how you configured Raspbian.
If a Raspberry Pi computer doesn’t boot, check its connections and try again. If it still doesn’t work, turn to Chapter 8 for troubleshooting suggestions.
Note
See the sections “Resolving HDMI Display Issues,” “Adjusting Overscan Settings,” and “Forcing HDMI Mode or Composite PAL” in Chapter 5 for information on how to deal with display issues.
Connecting a Bluetooth Keyboard or Pointing Device
Now that the Raspberry Pi computers are running, you can add Bluetooth keyboards and pointing devices to replace the USB devices where necessary. Follow these steps to add a Bluetooth device:
Click the Bluetooth icon on the panel to display the Bluetooth pop-up menu (see Figure 6-1).
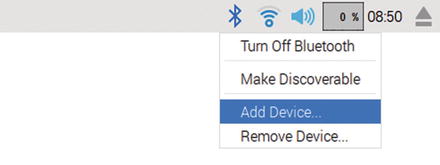
Figure 6-1. To connect a Bluetooth device, click the Bluetooth icon on the panel and then click Add Device on the Bluetooth pop-up menu .
Click the Add Device item to display the Add New Device dialog box (see Figure 6-2).
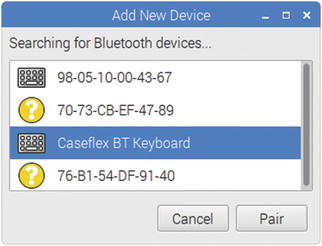
Figure 6-2. In the Add New Device dialog box, click the Bluetooth keyboard or pointing device, and then click the Pair button.
Click the entry for the Bluetooth keyboard or pointing device. This example uses a keyboard.
Click the Pair button. For some Bluetooth keyboards, the Pairing Device dialog box then opens, prompting you to enter a pairing code (see Figure 6-3). Type the pairing code on the keyboard, confirming that it’s the correct device, and then press the Enter key.
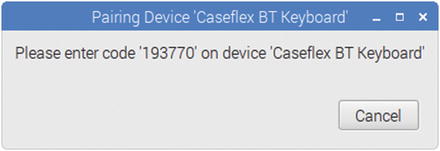
Figure 6-3. If the Pairing Device dialog box prompts you to enter a pairing code, type it on the keyboard and press the Enter key.
Next, Raspbian displays progress dialog boxes as it establishes the connection. When it has done so, it displays the Connected Successfully message in the Pairing Device dialog box (see Figure 6-4).
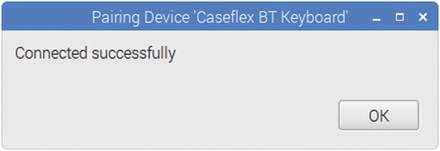
Figure 6-4. When the “Connected successfully” message appears in the Pairing Device dialog box, click the OK button to finish the pairing process.
Click the OK button. You can now start using the Bluetooth keyboard or pointing device.
Identifying Your Raspberry Pi Computers
To keep your classroom running smoothly, you’ll likely want to be able to identify your Raspberry Pi computers, both directly—by looking at a Raspberry Pi computer itself—and via the network.
You can give yourself a way to identify the Raspberry Pi computers directly by labelling them, preferably on a part of the case that can’t easily be swapped between computers. A tape labeler is easy and gives a neat look; but writing on cloth tape—or even directly on the cases—can work just fine too.
You can use MAC addresses , hostnames, and static IP addresses to identify your Raspberry Pi computers via the network. The following sections explain how to determine MAC addresses and how to assign hostnames and static IP addresses to your Raspberry Pi computers.
Returning the MAC Address for a Raspberry Pi Computer
As you probably know, “MAC address ” is the acronym for “Media Access Control address .” A MAC address in a unique identifier assigned to a network interface, such as the Ethernet interface or the Wi-Fi interface on a Raspberry Pi computer. A MAC address consists of six hexadecimal pairs separated by hyphens or colons, such as 18-AF-61-A9-2B-73 or C8:BC:C9:FB:D2:FC.
Note
A MAC address is stored in the hardware and cannot be changed; it is sometimes referred to as a hardware address, a physical address, or a burned-in address. However, a device can be configured to report a different MAC address than its true address. You can set the MAC address for a Raspberry Pi board by adding the smsc95xx.macaddr parameter to the cmdline.txt file (e.g., smsc95xx.macaddr=b8:28:eb:00:00:07). See the section “Using Recovery Mode” in Chapter 5 for instructions on editing the cmdline.txt file.
Tip
The MAC address for each network interface on each Raspberry Pi board starts with the same three pairs: b8:28:eb. You can use these standardized MAC addresses to identify your Raspberry Pi computers more easily across the network.
To return the MAC address of the Ethernet interface on a Raspberry Pi computer, open a Terminal window and give the following command:
cat /sys/class/net/eth0/addressTo return the MAC address of the Wi-Fi interface, use wlan0 instead of eth0:
cat /sys/class/net/wlan0/addressTo return the MAC address of the Bluetooth interface, give the hciconfig command:
hciconfigIn the output (see the following example), look at the BD Address line:
hci0: Type: BR/EDR Bus: UARTBD Address: B8:27:EB:32:F7:90 ACL MTU: 1021:8 SCO MTU: 64:1UP RUNNINGRX bytes:773 ACL:0 sco:0 events:50 errors: 0TX bytes: 2540 ACL:0 sco:0 commands:50 errors:0
Setting a Hostname for a Raspberry Pi Computer
The hostnameis a text string used to identify a computer or device on a network. Hostnames need to be unique for the network hardware to be able to resolve them. You can set the hostname for each Raspberry Pi computer manually to make the computers easier to identify by name.
Raspbian sets the hostname raspberrypi during installation, so if you install Raspbian on multiple Raspberry Pi computers, they’ll all have the same name. This doesn’t work well because only the first of those Raspberry Pi computers to join the network will have that hostname registered on the network; the other Raspberry Pi computers will appear not to have hostnames. So normally you’ll want to assign hostnames to your Raspberry Pi computers to help you identify them on the network. For example, you might use incrementing numbers (pi001, pi002, and so on); or you might use names for individual Raspberry Pi computers that play particular roles (e.g., musicbox or files).
Whatever naming convention you choose, follow these steps to set the hostname for a Raspberry Pi computer:
Choose Menu ➤ Preferences ➤ Raspberry Pi Configuration to open the Raspberry Pi Configuration dialog box.
Click the System tab to display its controls.
Type the name in the Hostname box.
Click the OK button to close the Raspberry Pi Configuration dialog box. The Reboot Needed dialog box opens.
Click the Yes button. The Raspberry Pi computer restarts, after which it appears on the network under its new hostname.
Setting Static IP Addresses
Most networks use Dynamic Host Configuration Protocol (DHCP) to assign IP addresses to most clients on the network. When a client joins the network, it requests an IP address from the DHCP server or DHCP allocator, which assigns the client a currently unused IP address from the pool of addresses it manages. After a client leaves the network, the DHCP server or allocator reclaims the IP address, returning it to the pool.
DHCP is an efficient way to manage IP addresses, but it means that you don’t know which IP address any particular computer or device has unless you look it up (for example, using its hostname or MAC address). You may prefer to assign static IP addresses to particular Raspberry Pi computers that you want to be able to identify quickly and easily. You might even want to assign static IP addresses to all your Raspberry Pi computers for ease of identification.
Caution
If you assign static IP addresses to your Raspberry Pi computers, make sure you use a range of IP addresses that’s not in the DHCP pool. Otherwise, you’ll get network conflicts when you start up a Raspberry Pi computer to which you’ve assigned a static IP address that the DHCP server has allocated to another computer or device
Configuring Network Connections
Your Raspberry Pi computers can connect to the network via either Ethernet or Wi-Fi :
Ethernet: If you plugged in the Ethernet cables before booting the Raspberry Pi computers, chances are that the computers have connected to the network. You may need to configure the network connection; see the section “Configuring the Network Connection for a Raspberry Pi Computer,” later in this chapter.
Wi-Fi: Unless you already set up a Wi-Fi network connection on the Raspberry Pi computers, you’ll need to connect them to the Wi-Fi network now. See the next section for details.
Connecting to a Wi-Fi Network
Follow these steps to connect a Raspberry Pi computer to a Wi-Fi network:
If the Raspberry Pi computer doesn’t have a built-in Wi-Fi adapter, plug a compatible Wi-Fi adapter into a USB port.
Click the Wi-Fi Networks icon at the right end of the Panel to display the list of available Wi-Fi networks (see Figure 6-5).
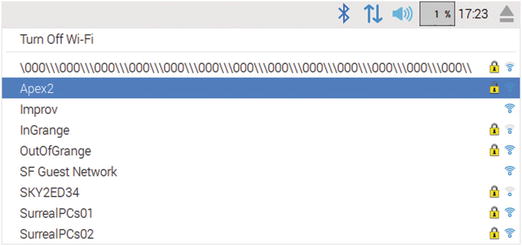
Figure 6-5. Open the Wi-Fi Networks pop-up menu and click the network to which you want to join the Raspberry Pi computer. At this point, the Wi-Fi Networks icon appears as two blue arrows, one pointing up and the other pointing down.
Note The built-in Wi-Fi on the Raspberry Pi 3 Model B is 2.4 GHz only. If your school has Wi-Fi access points providing 5 GHz networks, the Raspberry Pi 3 Model B will not show them.
Click the Wi-Fi network you want the computer to join. If the Wi-Fi network uses security, a dialog box whose title bar shows the network’s name (SSID) appears, prompting you for the Pre Shared Key (see Figure 6-6).
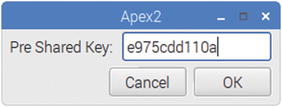
Figure 6-6. Open the Wi-Fi Networks pop-up menu and click the network to which you want to join the Raspberry Pi computer.
Type the preshared key (the password) for the network and click the OK button. The Raspberry Pi computer connects to the network.
When the Raspberry Pi computer has established the connection to the Wi-Fi network, the Wi-Fi Networks icon appears as a Wi-Fi symbol showing an access point with arc-like waves radiating from it. To see which Wi-Fi network the Raspberry Pi computer has connected to, hold the pointer over the Wi-Fi Networks icon and look at the pop-up balloon, which also shows the IP address and netmask (see Figure 6-7).
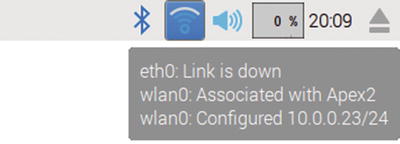
Figure 6-7. Once the Wi-Fi connection is established, the Wi-Fi Networks icon appears as a Wi-Fi symbol. You can hold the pointer over the icon to display a pop-up balloon showing the Wi-Fi network and the IP address.
Disconnecting from a Wi-Fi Network
If you need to disconnect from the current Wi-Fi network, follow these steps:
Click the Wi-Fi Networks icon on the Panel to display the Wi-Fi Networks pop-up menu.
Click the current network, the one with the green check mark to the left of its name. The Disconnect Wi-Fi Network dialog box opens (see Figure 6-8).
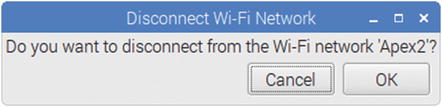
Figure 6-8. Click the OK button in the Disconnect Wi-Fi Network dialog box to disconnect from the current Wi-Fi network.
Click the OK button.
Note
You can also disconnect from the current Wi-Fi network by connecting to another Wi-Fi network. A Wi-Fi interface can have only one Wi-Fi network connection at a time, so connecting to a different network disconnects the Raspberry Pi computer from the current network.
Configuring the Network Connection for a Raspberry Pi Computer
If your network uses a DHCP server, each Raspberry Pi computer automatically requests an IP address and other network settings from the server when it tries to join the network. For some computers, however, you may want to configure the network connections manually. For example, you may need to configure static IP addresses for some Raspberry Pi computers, as discussed earlier in this chapter.
Follow these steps to configure either an Ethernet connection or a Wi-Fi connection:
Right-click the Networks icon on the panel to display the shortcut menu.
Click the WiFi Networks (dhcpcdui) Settings item to display the Network Preferences dialog box (shown in Figure 6-9 with some settings chosen).
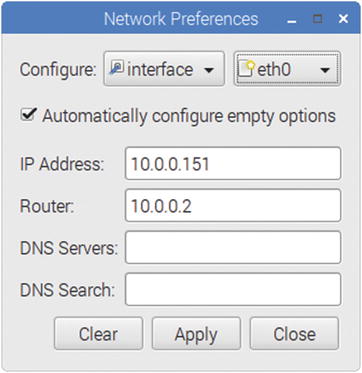
Figure 6-9. Use the Network Preferences dialog box to set a static IP address for a Raspberry Pi computer. You can also specify the address of the router and the DNS servers and add any DNS search domains needed.
On the Configure row, make sure the left pop-up menu shows Interface rather than SSID.
Still on the Configure row, click the right pop-up menu and choose the interface you want to configure. Choose eth0 for Ethernet; choose wlan0 for Wi-Fi.
If necessary, click the Clear button to clear the current configuration details.
Check the Automatically Configure Empty Options check box if you want Raspbian to automatically detect values for network parameters you don’t specify.
In the IP Address box, type the static IP address you want to assign the computer. Leave this box blank if you want the computer to get an IP address via DHCP.
In the Router box, type the IP address for the router. Leave this box blank if you want the computer to get the router’s address via DHCP.
In the DNS Servers box, type the list of DNS servers the computer is to use. Put the primary server’s address first and the secondary server’s address second, separated by a comma. Here, too, you can leave the box blank if you want the computer to get this information via DHCP.
In the DNS Search box, type any search domain you want to have automatically appended for DNS lookups. For example, you might enter your school’s domain here to cause any unqualified searches to be run using that domain.
Click the Apply button to apply your changes.
Click the Close button to close the Network Preferences dialog box.
To make your changes take effect, you need to restart the Raspberry Pi computer. To do so, choose Menu ➤ Shutdown to display the Shutdown Options dialog box, and then click the Reboot button.
Testing the Computers and the Network
Now that you’ve set up the workstations, test them and the network. For this, too, you may want to involve a group of your more trustworthy students to save yourself time and effort.
Prepare a checklist of the things you want to check for each Raspberry Pi computer. You could implement the checklist as a paper form or run it on tablets that connect to a database.
Here are examples of the items you may want to check:
Verify that each Raspberry Pi computer is running.
Log in if the Raspberry Pi computer is not set to log in automatically. See Chapter 7 for information on creating user accounts on Raspberry Pi computers.
Open the menu and verify that the apps are present.
Open a sample app and verify that it runs.
Open the Web browser and make sure that the Internet connection is working.
Shut down the Raspberry Pi computer and then restart it to verify that the SD card and filesystem are in good shape.
Shut down the Raspberry Pi computer.
Checks such as these will enable you to identify which Raspberry Pi computers—if any—need remedial configuration or other attention.
Summary
In this chapter, you’ve learned how to set up the Raspberry Pi computers in your classroom or lab, perhaps with the help of some of your more capable and responsible students. You know how to make the physical connections, boot and configure the computers, and how to test the computers and the network.
In Chapter 7, we’ll look at how to administer and manage the Raspberry Pi computers on your network.