Until now, we have discussed how to develop the Apex and Visualforce page with Chatter to develop some applications. In this chapter, we will go through the Chatter REST API concept. The following are the topics that will be covered in this chapter:
- Introducing and understanding Chatter REST API
- Understanding OAuth
- Generating tokens
Chatter REST (Representation State Transfer) API is available in all editions except the personal edition. To use this API, Chatter must be enabled for the organization. Chatter REST API and Chatter API refer to the same API. Chatter REST API provides programmatic access to the Chatter feed, user details, Chatter groups, the followers list, trending topics, private messages, and files. Use this API when you want to integrate Chatter with a third-party website such as Facebook or Twitter, or with a mobile application. Chatter REST API supports the JSON and XML data formats by using synchronous communication.
Authentication verifies who you are. The Chatter API is hosted by salesforce.com and uses the following authentication mechanisms:
- REST relies on HTTP.
- REST API is a very lightweight web service.
- Information is automatically set to the user's time zone and language.
- Relationships between objects can easily pass through without having to resolve foreign keys. For example, using Chatter API, you can get details about a user's followers or groups with one request per page.
Apex runs in a multitenant environment; governor limits are runtime limits enforced by the Apex runtime engine. Calls to the Apex REST classes count against the organization's API governor limits. All standard Apex governor limits apply to the Apex REST classes. For example, the maximum request or response size is 3 MB. The Chatter API requests are subject to rate limiting. Chatter API has a limit per user, per application, and per hourly rate access. When any organization exceeds the rate limit, all Chatter API assets return a 503 Service Unavailable error code for the user and the application.
Note
To learn more about governor limits, visit the http://wiki.developerforce.com/page/Governors_in_Apex_Code link.
The following screenshot gives a functional description of Chatter REST API:
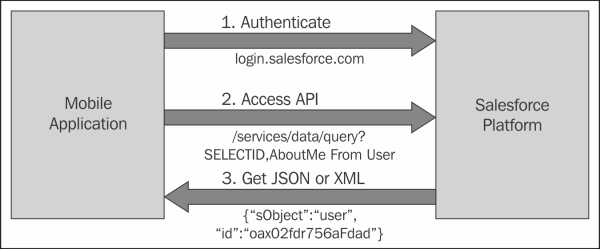
In basic terms words, the process flow for using Chatter API is described as follows:
- First, Chatter API sends an HTTP request to Salesforce.
- Authentication occurs between the user and the client app.
- Use HTTP request to access the Chatter API resources.
- An HTTP return code gets generated. The return code includes additional information, such as a Chatter API response body.
The following points guide you on when Chatter REST API can be used:
- When you want to build a mobile application that displays Chatter feed
- When you want to integrate a third-party website or some web-based application with Chatter so it can notify groups of users about events
- When you want to display the Chatter feed on a third-party system, such as your company intranet site, Facebook, or Twitter, after users authenticate it
- When you want to create skins for Chatter
- When you want to make Chatter feeds actionable and integrate them with third-party sites
- When you want to create Chatter games
The following are prerequisites:
OAuth permits third-party services such as Facebook and Twitter to access an end user's account information without exposing the user's credentials. By using OAuth, users can share their photos or Chatter posts with another site without sharing their login credentials. You can also use OAuth to get a valet key for the Web. OAuth allows the client application to access your data via Token, allotted by an authorization server in response to your access grant.
To get a third-party application access via Chatter REST API, you need an authorization code, an access token, and a refresh token.
- Authorization code: An authorization code is a short-lived token that signifies the user's access grant, generated by the authorization server and passed to the client application (third-party application) via the browser
- Access token: It's a smart key used by the client to get access to the end user's resource
- Refresh token: It's a smart key used by the client to get lifetime access to an end user's resource unless, and until, the end user revokes the application access using this token
In order to configure OAuth 2.0, log in to salesforce.com using the developer edition account credentials, navigate to Name | Setup | App Setup | Create | App | Connected Apps, and then click on New; you will see the following screenshot:
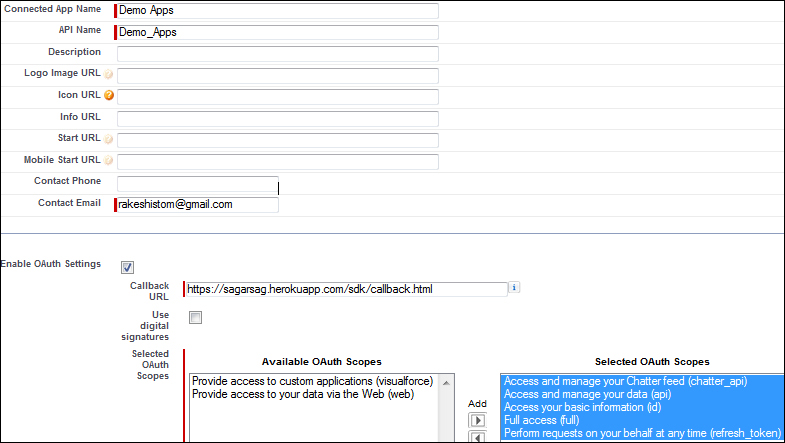
Callback URL
is nothing but an endpoint in your application where the user's browser redirects after acquiring a valid authentication code; it always starts with https://. After entering all the details, click on the Save button.
To get the authorization code, use the following code:
https://login.salesforce.com/services/oauth2/authorize?response_type=code&client_id=<your_client_id>&redirect_uri=<your_redirect_uri>
Here client_id is your application's consumer key and redirect_Uri is a Callback URL.
Clicking on the following login URL in the browser will prompt the user to authenticate and authorize the client application if they have not done it so far.
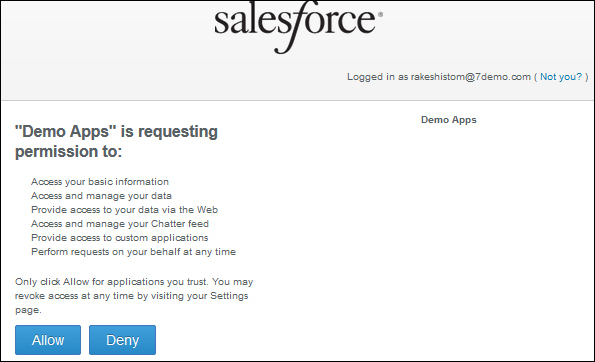
Once authorization is granted, the user's browser is redirected back to the redirected URL in the client application and the output will look like the following code:
https://sagarsag.herokuapp.com/sdk/callback.html?code=aPrxaSyVmC8fBbdcLLmy3s6_69zikRWj5jJ8._2N.vpJjR5vpIeC55msiyDEVyUKto5qJ8TV1w%3D%3D
The preceding code is your authorization code; just replace %3D with =. Extract the authorization code and save it.
cURL is a tool used to transfer data from or to a server using one of the supported protocols (DICT, FILE, FTP, FTPS, GOPHER, HTTP, HTTPS, IMAP, IMAPS, LDAP, LDAPS, POP3, POP3S, RTMP, RTSP, SCP, SFTP, SMTP, SMTPS, TELNET, and TFTP). The command is designed to work without user interaction.
Note
To learn more about cURL and its installation, browse the link: http://curl.haxx.se/docs/manpage.html
To get the access token, run the following command in the cURL compiler:
curl https://login.salesforce.com/services/oauth2/token -k -d "grant_type=authorization_code" -d "client_id=<Consumer_ Key> " -d "client_secret=< Consumer Secret >" –d "code=Authorization code" -d "redirect_uri=<Call Back URL>"
The output command is as follows:
{"id":"https://login.salesforce.com/id/00D90000000nqYHEAY/00590000001qt4zAAA","issued_at":"1378895400351","scope":"id full api visualforce web refresh_token chatter_api","instance_url":"https://ap1.salesforce.com",
"refresh_token":"5Aep8617VFpoP.M.4uVOHI6W3HypeZguc1zIVSUlboGfGbzGgY8qPrzLTcGdjt9ll9OJXVvJsK6qun7hhn22IOS","signature":"J9AP5xQkQj07Da4jfWcDT6t44wsLaWtPUV9xlpcpcXg=","access_token":"00D90000000nqYH!ARkAQMPR69REcrAoqwTaKYcG4VYcX_QZSW9QjdKwDqeMwGZ9R7oHChOWu0RDbtvh6UJ5eyth45p_lFTjSex6pAUNHO0lf3Kh"}
The preceding output contains your Access token and uses it to get access to the application:
The lifetime of an Access token found by the previous mechanisms is limited to the session timeout configured at Name | Setup | Security Controls | Session Settings. When an Access token expires, attempts to use it will prompt an error message, shown as follows:
https://login.salesforce.com/services/oauth2/tokengrant_type=refresh_token&client_id=<Consumer Key>&client_secret=<Consumer Secret>&refresh_token=<Access Token>
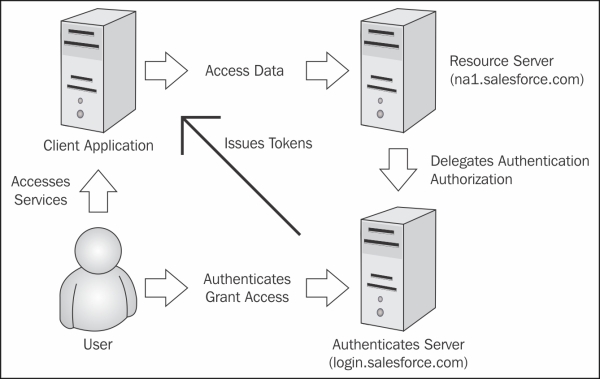
Once you have the access and authorization code, you can GET and POST data through the API:
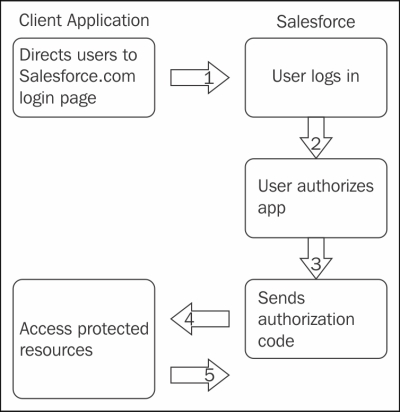
This flowchart is basically used by mobile applications that directly access Chatter API from JavaScript. In the previous diagram, the user asks for services to the client application or a third-party application and redirects the end user's browser to a web page hosted on the resource owner's authorization server. The end user logs in to Salesforce to authenticate them; if they haven't logged in, they must authorize the client application. On successful authorization, the user's browser is redirected to the URL. This URL can be used by the client application to retrieve the Access and Refresh tokens.
The following example demonstrates how to post a feed item:
|
Resource |
You can use one of the feed resource Chatter/feeds/news/user ID/feed items | |
|
HTTP method |
POST | |
|
Request body |
Feed Item Input | |
|
Request parameter |
Text | |
|
Request body example |
{ "body" : { "messageSegments" : [ { "type": "Text", "text" :"Your post" } ] } } | |
|
Request parameter example |
services/data/v28.0/chatter/feeds/news/me/feed-items?text=New+post | |
|
Returns |
Feed item |