
9
Integrating Caching and Content Delivery within Solutions
This chapter introduces guidelines for using cache technology to improve the performance of modern web applications. You will learn about best practices with Azure Cache for Redis (also referred to as Azure Cache) and content delivery networks (CDNs). These platform as a service (PaaS) technologies help to improve loading speed for customer sites and reduce the load for backend and data storage. They also increase the availability of the static content cached on a CDN such as media, scripts, and configuration files with a hundred copies across the internet.
Another common scenario where caching technology can help is delivering updates. IoT devices and mobile devices can download and install updates synchronously without overloading the origin server. Popular packaging registries such as NuGet and registries of container images such as the Docker Hub benefit from a CDN by caching their binaries close to the clients who want to download them.
In this chapter, you will get recommendations on how to reap the maximum benefits from caching solutions, including managing data size, connection encryption, and cache expiration settings, to increase security availability and reduce costs.
In this chapter, we will cover the following main topics:
- Introducing caching patterns
- Exploring Azure Cache for Redis
- Exploring Azure Content Delivery Network
Technical requirements
In addition to the technical requirements outlined in previous chapters, you will require the following to follow along with the exercises:
- The Azure Cache extension for Visual Studio Code – downloadable from here: https://marketplace.visualstudio.com/items?itemName=ms-azurecache.vscode-azurecache.
- Redis command-line tools for Windows – downloadable from here: https://github.com/microsoftarchive/redis/releases.
- The code files for this chapter can be downloaded from: https://github.com/PacktPublishing/Developing-Solutions-for-Microsoft-Azure-AZ-204-Exam-Guide/tree/main/Chapter09.
Code in Action videos for this chapter: https://bit.ly/3Bsut1l
Introducing caching patterns
When we start introducing caching technology, we should look back and find out what cache technology is. The cache is a service that stores data, like in the database, but provides the fastest access and does not persist data longer than requested by time-to-live settings. The data stored in the cache is usually the result of previous calculations or commonly requested data retrieved with a higher speed than from the database. In other words, the cache is a temporary storage of precomputed data. What data can be cached for modern web services? Firstly, the output of pages. Millions of page views on modern websites that retrieve the same page that is rarely updated can cache the output to return the user the previously generated response and save website resources.
The idea of caching temporary output is not new. Caching solutions were generally used for application services such as websites way before Azure built its first data center. One of the first officially supported caching algorithms was output caching. It was introduced in ASP.NET and developers can use web server memory to temporarily cache output. It works perfectly for static or almost static legacy websites, but it is not suitable for modern websites now because changes happen so often and page content expires immediately after caching. Another recommended approach is caching content based on query parameters. It helps in some cases but significantly increases memory consumption and slows down websites. Overall, output caching is not the best approach for modern websites. Meanwhile, the caching of objects used for generating pages will improve performance like upgrading a database will.
For example, an e-commerce website page contains a list of products with their given prices and stock quantities. The product list is rarely updated and can be cached for days; meanwhile, the prices may change every hour and stock items may be updated every minute. So, caching output for minutes does not improve performance but can cause inconsistency with stock counts. Clients will complain if they see that a product available on the main page cannot be ordered because it is out of stock.
How do we solve these problems and speed up performance? Let’s imagine a powerful technology established to temporarily cache the list of products for days, the price of products for hours, and the stock count for less than a minute. Let’s imagine the app can access that service faster than going to the database. Otherwise, there is no reason to have the data cached. Let’s imagine we can manually update this temporary storage when the data is changed in the source database (for example, an item is ordered and the stock count needs to decrease). Azure Cache for Redis should be considered for this kind of scenario.
The Redis cache is a powerful memory-based caching solution that can perfectly support our scenario and apply different treatments for each type of data. In other words, the Redis cache can perfectly support cache-aside patterns and can seriously improve your app performance. There is a trade-off between consistency and performance but you have all the power to manage and adjust data in the cache until it expires.
Let’s look at how we can implement a cache-aside pattern in Azure. We will also recommend two scenarios for refreshing data in the cache and you can select which works for your application better.
First, if the data is stored in the cache, it needs to be pulled at high speed. It will work best if you have data cached on the same server. Unfortunately, the local cache of one server cannot be used for another, so this prevents scaling. Instead of using local memory, the cache can be deployed on the dedicated server with high-speed connections.
Second, the data needs to be updated when it expires. For that reason, we can use a custom time to live (TTL) for each type of data you use. When the data expires, it can be cleaned up from the cache so it can be replaced by updated data from the database. Here, we can make the data client load the data and store that data in the cache to speed up the next load. The alternative option is to have the cache server generate an event to trigger your application just before the data expires to load updated values from the database.
Both options have pros and cons. If you make the client server load the data from the database when it is expired from the cache, you will have a cold request first before the hot request will reuse the data from the cache. Alternatively, if you build a service to refresh the expired data from the cache, you will avoid the first cold request but must spend more memory loading the data that is not going to be reused. Because the price you pay for caching in Azure depends on your memory usage, the preload solution can be quite expensive.
Finally, you can combine the advantages of preloading data and minimize the size of stored data by providing custom settings for each data type that you cache. Moreover, you can manually monitor changes in the database and update the cache and the database in the same transaction.
Let’s observe how the cache-aside pattern works for the e-commerce website we discussed previously. You will notice that the first request hits the database but the second request retrieved cached versions of products and decreased the database’s load:

Figure 9.1 – Implementation of the cache-aside pattern with Azure Cache for Redis
You already know the benefits of caching and the main patterns used for building effective caching strategies and reducing consistency issues. Now is the best time to take a look at what caching services are available in Azure. We will start from Azure Cache for Redis and continue with Azure CDN.
Exploring Azure Cache for Redis
Azure Cache for Redis is the Microsoft implementation of well-known Redis software. Redis means Remote Dictionary Server and was initially implemented in 2009 as a memory management service implemented on C and hosted on a Unix-like platform. Redis provides open source NoSQL storage, allowing the persisting of complex data structures for key-value storage. Redis supports clustering technology, which prevents it from failing and losing data in memory.
Microsoft adopted Redis technology to successfully run in Azure as a PaaS with a single server tier and cluster as well. Moreover, Azure Cache for Redis provides Redis open source and a commercial product from Redis Labs (Redis Enterprise) as secure and dedicated instances with full Redis API compatibility. Azure Cache for Redis can be used for various scenarios, including a cache-aside pattern for content and data persistence, a message broker, and even a sessions service transparently integrated with the .NET platform. Azure Cache for Redis depends on the pricing tier, deployed as a standalone or cluster, along with other Azure databases such as Azure SQL or Cosmos DB. Because Redis technology is based on the TCP protocol, it requires a specific port to be opened for communication with services provisioned in Azure or on-premises.
When you provision Azure Cache for Redis, you need to select the appropriate pricing tier. There are several pricing tiers available to meet everyone’s expectations:
- The Basic tier does not provide an SLA and should not be used for any production workloads. Meanwhile, it is ideal for development or testing. It does not support any clustering technology or geo-replication and this makes the service charges as low as possible.
- The Standard tier is suitable for production workloads and supports failover with primary/replica duplication. It still does not support cluster or geo-replication but provides an SLA of 99.9%. The Standard tier still does not persist the caching data during restarts, so your application should not rely on the persisting data in cache memory and should use the cache-aside pattern.
- The Premium tier provides the same features as the Standard tier and some advanced features such as clustering and data persistence that are important to many enterprises. It runs two nodes under the hood and can persist data during node restarts with an appropriate hangover to another synced node. Some useful features such as networking and importing are available only with the Premium tier.
- The Enterprise tier has all the functionality of the Premium tier, plus powerful enterprise-ready features such as Redis Search, Redis Bloom, and active geo-replication. Its availability has grown to an SLA of 99.999% and is suitable for business-critical applications.
- The Enterprise Flash tier has the same powerful reliability as the Enterprise tier but runs on fast non-volatile storage for massive cache implementations. In addition, it supports Redis Flash technology and provides a huge amount of memory, up to 1.5 TB.
Each pricing tier supports several sub-tiers with the ability to granularly manage required memory and connection. The number of client connections might also limit your application if using low-tier mode. Luckily, you can monitor connections from Azure Monitor and be notified when it reaches the limit to upgrade your instance to higher sub-tiers.
In the next paragraphs, you will learn more about Azure Cache by provisioning an instance in Azure and discovering its advanced settings, including pricing tiers, console commands, and security configuration. Let’s learn how to provision the service from the Azure CLI.
Provisioning Azure Cache for Redis from the Azure CLI
Provisioning an Azure Cache for Redis instance can be completed from the Azure portal, the Azure CLI, and PowerShell. To complete provisioning, you need to choose the region where you want the service located, the unique DNS name, and the pricing tier. The region should be the same as you use for the hosting of your solution to avoid cross -data center charges for traffic. The pricing tier should be chosen based on the requirements for memory consumption. For example, for the Basic tier, you can choose sizes between 0.25 GB and 50 GB. If the consumption grows, you can upgrade your size and migrate to a higher tier.
By running the following CLI commands, you will learn how to provision your Azure Cache for Redis instance and retrieve the connection keys for the connection. The commands should be run in Azure Cloud Shell, bash, or the bash terminal, with the Azure CLI installed locally:
#create a resource group
az group create --location eastus2 --name AzureCache-RG
#to avoid name collisions generate a unique name for your account
account=azurecache$RANDOM
#create Basic SKU instance
az redis create --location eastus2 --name $account --resource-group AzureCache-RG --sku Basic --vm-size C0
#retrieve key and address
$key=$(az redis list-keys --name $account --resource-group AzureCache-RG --query primaryKey -o tsv)
echo $key
echo $account.redis.cache.windows.net
The list of commands can be found at https://github.com/PacktPublishing/Developing-Solutions-for-Microsoft-Azure-AZ-204-Exam-Guide/blob/main/Chapter09/1-redis-provision/demo.azcli.
Upon successful execution of the previous commands, you should have provisioned an instance of the Azure Cache for Redis in your Azure subscription. In further tasks, you will learn how to configure the instance and access the Redis console.
Advanced configuration
From the Azure portal, you can find the instance you built and investigate the following advanced settings for security, diagnostics, and monitoring. You can also open the Redis console from the browser to run the commands to manage the instance.
Access key
To connect to the Redis instance in Azure from the SDK or console clients, you need to provide a connection key. There are two keys provided to meet compliance requirements for the periodic rotation of key values. You can choose the first key or copy the connection string with the key; then later, you can update the connection to leverage the second key and regenerate the first key without interrupting the application. Be aware that keys provide you full access to the key values and allow you to read, write, and manage the instance. You can find keys and connection strings from the Access key section of your Redis page on the Azure portal.
Firewall and virtual network integration
Azure Cache for Redis provides a variety of options for managing networking connections. You can rebind default port numbers. The 6379 and 6380 TCP ports are used for open and encrypted SSL connections. Remember that Azure Cache for Redis uses fast TCP communication instead of slow HTTPS requests.
The Azure Redis cache provides firewall rules customization. By default, no rules are defined, and connections are allowed from any IP address. You can replace the default rule with a rule for the exact IP or IP range. The private endpoint is available for leverage to connect specific types of services directly to the cache – Azure App Services, for example.
You can provide the firewall rules in the Firewall section of your instance on the Azure portal.
Diagnostic settings
There are several important metrics for Azure Cache for Redis that you need to monitor during production workload to avoid connection errors. A recommended best practice is setting up Azure alerts for these metrics to be notified when the workload exists in your instance. Here are two examples of important metrics:
- Memory consumption: A memory usage metric will allow you to monitor your current cache size and your maximum size depending on the tier level. During high memory pressure, your cache may start saving data on disk and significantly decrease performance.
- Connected clients: This is another important metric limited by the tier of your instance. New clients cannot be connected when the number of connections hits the maximum for your tier. High client connection numbers can also lead to a high server load when responding to repeated reconnection attempts.
For Premium and Enterprise pricing tiers, the Azure Cache for Redis instance can be configured with access from a virtual network. In this case, your cache instance can only be connected to virtual machines and applications within the virtual network of your choice.
The Redis console
There are several tools you can use to view and manage data stored in the cache:
- redis-cli – the original Redis client console, which you can install and run from localhost and use to communicate with the server in Azure. You need to provide connection information, including a hostname, port, and key. Remember that the console uses the default TCP ports 6379 and 6380 for the connection. Your client settings for SSL or no-SSL ports should match the settings on the server.
- The Azure Cache extension for Visual Studio Code – available for download and installation with your VS Code interface. When you sign in with your Azure account, the tool will retrieve a list of instances with a list of keys in it. You can create or delete existing keys from the UI.
- The Azure Redis console – a web-integrated tool that runs directly from the Azure portal and leverages connection through an automatically configured port on the server side. The tool only supports Redis commands and we will use this console in the next demos. You can find the console icon at the top of the Overview section of your Azure Cache for Redis page.
You have just learned about the different types of client applications that you can leverage to monitor and observe the content stored in the cache. In the next section, you will learn how to leverage the Azure Redis console to execute commands to operate with different data types.
Implementing basic operations with cached data
The Redis cache supports a variety of types to store any string or binary data in a key-value structure. It also supports the nested key-value structure. Each value associated with a key can be used as the key name of another key-value pair. The names of the keys should be self-explanatory, such as user-name or product:price:usd. A good naming approach will help you to manage the data in the cache explorer. For best performance, the value of the keys should be less than 100 KB and bigger values should be split into multiple keys.
The Redis cache supports the following types of data:
- Strings are the most common basic data values in Redis. With string data types, you can store JSON documents, binary representations of images, or cryptography keys. The maximum string value is 512 MB. The following operations can be used for creating and retrieving string values:
- For retrieving or updating string values: GET, SET, and GETSET
- For retrieving or updating binary values: GETBIT and SETBIT
- For when an integer is stored in the string values and can be incremented or decremented: INCR, DECR, and INCRBY
- For appending to strings: APPEND
- For retrieving or updating part of a string: GETRANGE and SETRANGE
- Lists are lists of strings, sorted by insertion order. You can create a list by adding a new element to the empty key. You can remove elements and list existing elements. Accessing list elements is very fast near the start and end of the list but accessing the middle elements is slow. The following operations can be used for creating and retrieving lists:
- For adding a new element to the top of the list: LPUSH
- For adding a new element to the bottom of the list: RPUSH
- For retrieving inserted items: LRANGE
- Sets are an unsorted collection of string elements. You can add, remove, and check for the existence of elements in a set. Sets can only add unique elements. This means that adding the same elements several times will override the same items, instead of adding a new item such as adding items in a list. The following operations can be used for creating and accessing items in sets:
- For adding new values to a set: SADD
- For retrieving the number of elements in a set: SCARD
- For retrieving elements from a set: SMEMBER
- Hashes are collections that map string fields and string values. Hashes are used mainly to store objects. They can store a large number of elements compactly, so you can use hashes for storing your custom objects with a large number of fields. The following operations help to manage hashes:
- For adding fields to a hash: HMSET
- For listing all fields in a hash: HGETALL
Furthermore, Azure Cache for Redis supports the following technical commands that you can also run to get additional information about a cache instance:
- For retrieving the number of keys in a cache instance: DBSIZE
- For retrieving information about connected clients: CLIENT LIST
- For retrieving full information about instances, including size, IP address, tier, version, and such: INFO
In the following hands-on exercise, you will be able to run these commands to understand how they work. Then, you will be able to leverage SDKs to get connected to cache instances and store and retrieve data in string, list, set, and hash data types. There are several C# SDKs you can integrate into your project:
|
SDK name |
Description |
|
ServiceStack.Redis |
The fork of the original C# client was written by Miguel De Icaza but significantly improved by adding new commands. |
|
StackExchange.Redis |
A well-known .NET client developed by Stack Exchange (Stack Overflow) for high-performance needs. We will use this package further for demo tasks. |
|
BeetleX.Redis |
A high-performance Redis client for .NET Core, the default supports JSON, the Protobuf data format, and asynchronous calls. |
|
FreeRedis |
This .NET client supports Redis 6.0+, clusters, sentinels, pipelines, and simple APIs. |
Table 9.1 – Popular C# SDKs to manage Redis from code
In this section, you have learned what different types of data are available in Redis. Now, we’ll move on to the next section to learn the commands to manipulate those data types from the Redis console.
Manipulating data in Azure Cache from the console
To get a better understanding of how caches manage different data types, the best option is to try to execute commands from the console and observe the results. To run these commands, you need to open the console in the Azure portal and execute the commands one by one. To get connected from redis-cli, you need to provide a name for your Azure cache instance and the access keys for the connection. To run the Redis console from the browser, you can open the Azure portal, find the instance you built from the previous demo, and select the Overview section. At the top of the page, under the name of your cache instance, you can find the console icon to run the console. Run the complete list of commands that can be found here:
https://github.com/PacktPublishing/Developing-Solutions-for-Microsoft-Azure-AZ-204-Exam-Guide/blob/main/Chapter09/2-commands/commands.txt
To observe the results directly from the cache instance, you can install the Azure Cache extension for Visual Studio Code, open the Azure tab (next to the extension), and find the Cache section. If you’ve already run a command to set values, you will see DB 0 and a list of the keys that you can open to observe the value.
Manipulating data in Azure Cache from C# code
Now you already know how to configure, test, and monitor your cache instance. You know how to leverage commands for observing the data in the cache. In the next task, you will build a C# console app to read and write data in different formats including lists, sets, and hashes. In the same way as you operated with the previous simple command from the preceding console, you can implement code to persist objects from a database with the cache-aside pattern. The following link contains a ready-to-go project to demonstrate your connecting and data manipulating operations:
https://github.com/PacktPublishing/Developing-Solutions-for-Microsoft-Azure-AZ-204-Exam-Guide/tree/main/Chapter09/3-redis-sdk
The following table lists the classes used for accessing and manipulating data of Azure Cache for Redis in the previous code example:
|
Class |
Description |
|
RedisKey |
Represents the key stored in the cache. It can implicitly convert string to and from and binary values. |
|
RedisValue |
Represents the value (string or binary data) of the key. |
|
Class |
Description |
|
ConnectionMultiplexer |
Has multi-purpose usage, mostly for accessing the Redis database and also retrieving server metrics such as status, subscribers, and slots. It also handles connection state change events. This thread-safe class instance should be configured just once. |
|
IDatabase |
The main database interface, implementing all operations with keys and values. It maps the Redis console commands to use ReadisKey and RedisValue. It has asynchronous and synchronous commands. |
Table 9.2 – SDK classes for data manipulation in Azure Cache for Redis
In the previous code example, you explored commands to persist different types of data in the cache. In the next section’s code examples, you will build a session service for the graceful scaling of a web application.
Leveraging Azure Cache for persisting web sessions
In the following code example, we implement a session state service for sharing state information between website instances. Usually, legacy applications do not provide appropriate session handling for session information. As a result, session values get lost when the user’s request is routed to another server instance, or the number of instances is scaled in. Losing session values can lead to application crashes and harm your users. Azure Cache for Redis provides a solution with a centralized session store that makes your application pass session values to another instance through writing and reading the session data from cache.
Let’s look at the following ASP.NET Core configuration with session handling implemented. Before you run the project, you need to update the appsettings.config configuration file and provide your Redis instance connection string in the AzureRedis parameter:
https://github.com/PacktPublishing/Developing-Solutions-for-Microsoft-Azure-AZ-204-Exam-Guide/tree/main/Chapter09/4-redis-stateserver
In the project, you can observe how the session state is enabled in StartupRedis.cs by adding builder.Services.AddSession and builder.Services.AddDistributedMemoryCache to the initialization code. The StackExchange provider for Redis is also configured in the same file to persist the session.
When testing how the cache hosts the session during server restarts, you need to run the project. Then, you should enter the session value in the text field and save it by clicking on the Set button. The update automatically refreshes and pulls the value from the session to the page, and you can observe the values. The values are also saved in Azure Cache for Redis transparently.
Then, you can restart the web server, clean up the session in memory, and mimic swapping slots or scale in. When the server starts again, you can refresh the web page and retrieve the stored value. Now, the values are transparently loaded from Azure Cache for Redis back to the session and appear on the page. The following screen demonstrates the session loaded from the cache:
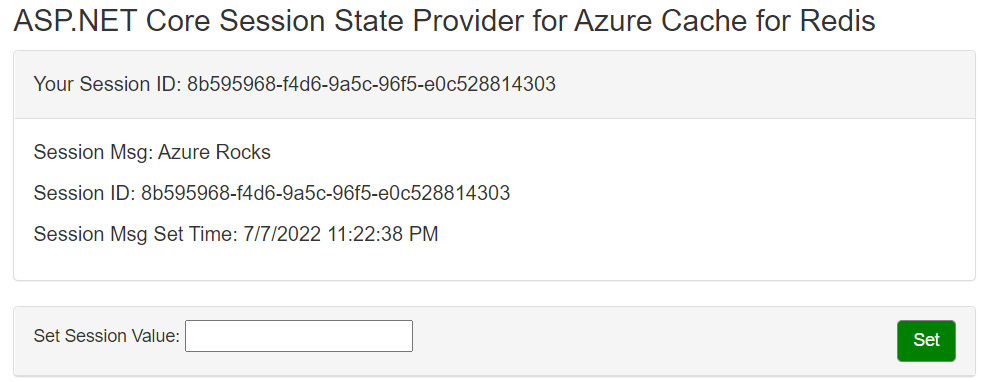
Figure 9.2 – The page loaded the Azure Rocks session value from the session stored on Azure Cache
In addition to session state, there are other cache scenarios when the cache is used as a message broker. For example, one application is used for updating data in the Redis cache and another application will read the updated data. Leveraging Azure Cache for Redis is not an optimal solution in terms of price, but ideal in terms of performance. Meanwhile, we recommend using Azure Service Bus or Azure Queue for implementing a message broker pattern. These messaging services will be explored in Chapter 13, Developing Message-Based Solutions.
How to cache your data effectively
When you design and develop an application, you need to be aware of the following guidelines about the appropriate use of Azure Cache:
- First, you need to choose data for caching. You should not cache every piece of information in your source database. This decision should be based on the data source and workload of your application. The greater the amount of data you have and the greater the number of people that need to access it, the greater the benefits of caching become, because caching minimizes the latency of handling large amounts of concurrent requests in the original data storage. Consider caching data that is regularly read but hardly updated. Again, you should not utilize the cache as the official repository for crucial information. Caches can be restarted or information lost under high memory pressure. That means you should not store the data you cannot lose in the cache. If your application is updating any data, you can update the cache and source or update the source and wait until the cache data expires and it will be replaced with a new copy.
- Second, you need to properly configure the expiration time. You can set Azure Cache for Redis to expire data and shorten the duration when the data persisted in the cache. It makes your application retrieve data from the dataset more often and the performance decrease again. According to the cache-aside pattern, when cached data expires, it is deleted from the cache, requiring the application to retrieve the data from the original data store. When configuring the cache, you may provide a default expiration policy, as well as a specific expiration for each object. You can trace the queries to your database and analyze how often it’s updated based on choosing a shorter expiration for corresponding objects. Specify the expiration period for the cache and the objects in it wisely. If you make it too short, objects will expire too quickly, and you will not get any performance gain. If you make the period too long, you have a risk of getting inconsistent data.
- Third, implement availability and scalability. It is important to understand that the cache is not a critical service in your application. The application should be able to function if it is unavailable. The application should not become unresponsive or fail while waiting for the cache service to resume. Always use an asynchronous pattern and retry policy for retrieving data from the cache. Remember that the basic tier of Azure Cache for Redis does not provide any SLA and should not be used for production workloads. Moreover, the standard tier may not be the best choice because of the low SLA and inability to leverage cluster technology. Clustering can increase the availability of the cache. If a node fails, the second node of the cache will still be working and will provide the service. You should be aware that the scaling of your cache instance can take a significant amount of time (up to an hour) and some of the pricing tiers will not allow downgrading to a lower tier, but you can still scale available memory.
You have already learned about the advantages of using Azure Cache for dynamic content managed from the application server and replacing the database. The next section of the chapter will introduce the caching technology available for static content. Let’s take a look at how caching static content can improve modern web applications.
Exploring Azure Content Delivery Network
You are already familiar with how to cache dynamic content with a cache-aside pattern. Now, let’s take a look at static content caching technology. The cache-aside pattern is still in play but now it needs to cache static files such as images, videos, JavaScript files, and CSS files. For legacy websites, these files are usually stored on the server, and delivery to the customerdelivery to the customer takes time takes time. Caching those files close to the user can significantly speed up loading and let the web server focus on processing dynamic pages. Azure proposes a solution by caching static files globally as close to users as possible with its CDN.
A CDN is a distributed network of endpoints that can host and deliver web content to users quickly and efficiently. To reduce latency, CDNs cache content on edge servers in point of presence (POP) locations close to end users. POP works like an old-school proxy in corporate networks but is geographically spread across many locations. Azure CDN provides developers with a global option for rapidly delivering high-bandwidth content to customers. Azure CDN also helps minimize traffic from the origin server and suits scenarios involving delivering application updates. The following figure represents how static content can be cached on POP servers:

Figure 9.3 – Implementation of the cache-aside pattern with CDN
Azure CDN supports two caching modes: loading assets on demand (based on the user request) and prepopulating assets from the origin to minimize delays with the first request. If you prefer to use an on-demand model, the first user request will initialize loading the asset directly from the origin and store it on the POP server. The first request might be executing slower than the others because it has to wait until the POP loads the content from its origin. All other requests can load the copy of assets directly from the POP server. The consistency issue discussed here can be avoided by configuring an appropriate TTL for each type of file.
The prepopulating or preloading approach will help you avoid the slowness of the first request, but will generate a traffic spike on the server because the content has to be loaded by the command, not demand.
The Azure CDN will leverage partner networks (Akamai and Verizon) and does not store files in Azure data centers unless you provision Azure CDN with the standard tier from Microsoft or choose content caching with Azure Front Door.
Azure Front Door
Azure Front Door is the networking service that allows access to the Microsoft global networking edge. This service provides you with fast and secure access to a web application deployed as PaaS. Front Door is an advanced load traffic manager working on Layer 7 and supports HTTP/HTTPS protocols. It can analyze traffic and protect your web application from cyberattacks. It’s a globally available service that can route customer traffic from the entry point to the nearest available application backend. Azure Front Door is based on routing settings, health monitoring checks, and failover configuration.
You might be curious as to why Azure Front Door is combined with CDN services. Originally, the classic Azure Front Door was responsible for providing scalable and secure entry points for the fast delivery of content. Now, this service is responsible for caching content, as well as for the fastest delivery of content. It means that Front Door now can offer CDN services. Previously, Microsoft offered CDN services from its data centers; now, these services have migrated into one, with a secure cloud CDN offering content caching and acceleration, intelligent threat protection, and global load balancing for your websites. We will further discuss configuration concepts with Front Door and CDN services and also discover another product provided in Azure CDN.
Dynamic site acceleration
Caching static content is a trivial task but caching dynamic content sometimes is not possible using the traditional approach. Another technology can be leveraged with Azure CDN to help cache dynamic content. Dynamic site acceleration (DSA) is an algorithm responsible for delivering dynamic content, involving the following techniques:
- Route optimization: Border Gateway Protocol (BGP) does not always provide optimization choices and faster routes can be taken through a point of presence. The route optimization algorithm can measure the latency from the network and use that information to choose the fastest and most reliable path to deliver dynamic content from the origin server to the end user.
- TCP optimizations: TCP is the standard for IP communication and is used for delivering information between browsers and websites. When initializing a connection, several back-and-forth requests are required to set up a TCP connection. The network connections also can slow down communication. Azure CDN handles this problem by optimizing TCP packet parameters and leveraging persistent connections.
- Object prefetch (Akamai products only): Traditional pages loading in the browser started from content followed by the browser loading page’s assets such as styles and images. Prefetch is a technique used to retrieve assets embedded in the HTML page while the page is rendered in the browser and before the browser requests those objects.
- Adaptive image compression (Akamai products only): This feature automatically monitors network speed and applies standard JPEG compression methods to improve delivery time when the network is lagging.
You have learned about the main technologies that help Azure CDN and Azure Front Door to successfully manage traffic and to cache static and dynamic content. Now is a good time to learn how to provision your Azure CDN instance.
Provisioning Azure CDN
When you provision Azure CDN, you need to deploy the CDN profile and CDN endpoint. Several endpoints can be configured on the same CDN profile. For provisioning Azure CDN, you do not need to provide an exact location because the location is set to “Global Network.” It means the servers will be located in all available geographical regions. All you need to do is to choose a unique name and select a product. Each product you choose has a different specification and price. You cannot change the product you have selected after deploying Azure CDN. The following products are available to select:
- Standard from Microsoft (classic): Microsoft CDN products support many Azure services, especially Azure Blob storage, commonly used by customers to store static content. The Standard tier of Microsoft CDN is based in Azure data centers, implements DSA, and is presently combined with Azure Front Door. After configuration of the CDN endpoint, the cached objects will immediately be available. It supports general delivery optimization and the customization of caching rules. It provides extended monitoring and allows you to involve your SSL/TLS certificate. From a pricing standpoint, this product is the most affordable. At the same time, the CDN does not support tokens or preloading assets.
- Azure Front Door: This product combines a standard Microsoft CDN with Azure Front Door. This provides the advantages of fast delivery based on the Azure edge network and high availability and security based on a load balancer, combined with a web application firewall, and also provides out-of-the-box CDN caching algorithms.
- Standard from Akamai: Akamai CDN is a well-known and highly geo-distributed network, allowing the use of adaptive image compression and object prefetching. It requires a few minutes to make objects available after finishing the endpoint configuration. Akamai CDN supports sophisticated optimization algorithms. The CDN does not support cache/header settings and URL redirect/rewrite, tokens, or preloading assets. You are also unable to involve an SSL/TLS certificate.
- Premium and standard from Verizon: The Verizon CDN is the most configurable and geo-distributed CDN network available when you provision Azure CDN. The standard tier supports all general features, including the preloading of assets. Premium Verizon supports individual portals where customers can configure additional parameters, such as tokenization and detailed monitoring and reporting. The premium tier is expensive but recommended for business-critical applications.
After provisioning a CDN profile, you can configure one or more CDN endpoints. An endpoint’s configuration requires a DNS unique name, origin host and port, origin type (Azure Blob, Azure Web Apps, and custom origins are supported), a path for caching, and a content optimization type. After configuration of the CDN endpoint, you will receive the DNS address and be able to reroute user requests to the provided address.
The pricing model of Azure CDN depends on the product selected for provisioning. Features between content delivery networks will vary. The charges depend on use and consist of charges for traffic moving between zones, configured cashing rules, and enabling DSA. Traffic charges are the most significant and depend on the zone of request and the zone of origin location. Each zone charge depends on the chosen CDN and will vary.
Provisioning with the Azure CLI
In the script, you need to execute Azure CLI commands locally in bash or upload the files you need to Azure Cloud Shell. The script will use static files provided in the folders and upload them to the storage account. Then, you build a CDN instance and download files directly from the storage and from the CDN endpoint to compare the speed.
Please open the script to get familiar with the commands. First of all, the script will build a resource group and an Azure Blob storage account for hosting static files. The storage account is created in the South Korea data center, but you can choose another location far away from your current location (Australia, for example). You have a few files to cache: an image, video, and JavaScript file will be uploaded to the storage account. Second, in the same folder, you can find an HTML file and you need to run a command to replace the links in the file with links to your Blob storage. The file can be opened locally to observe the overall performance. The third step is provisioning a CDN profile and endpoint to cache files from Blob storage. You also test the speed of loading from the CDN. The script will create a Microsoft-tier CDN because it will be updated faster than other tiers. If you are interested in exact measures, you can use the curl tool. Refer to the following link for further details:
Advanced CDN configuration
Now you know how to provision Azure CDN and create endpoints to cache static content. In the next section, you will learn how to use advanced CDN features, such as caching rules and global filters. You will also learn about preloading and purging content features. From the previous demo, you have provisioned the Azure CDN profile and endpoint and now you can observe the existing settings of your account.
Caching rules
Let’s start with caching rules and management to control caching behavior. In general, publicly available content can be cached based on caching rules. Caching rules are managed by TTL values. The default TTL for each file can be obtained using the Cache-Control header value from the origin server and can be overwritten using internal Azure CDN rules.
CDNs can override cache settings through the Azure portal by configuring CDN caching rules. The origin-provided caching settings are disregarded if you add one or more caching rules and set their caching behavior to Override or Bypass the cache. For any other content without the Cache-Control header value, Azure CDN automatically applies a default TTL of 7 days, unless it’s explicitly overridden by caching rules.
Azure CDN offers two ways to control how your files are cached: using caching rules and using query string caching. You can configure global caching rules for each endpoint in the profile to affect all requests to the endpoint. The global caching rule can override any source settings with Cache-Control headers. You also can configure custom caching rules to match specific paths and file extensions. Custom rules are processed in order and can override the global caching rule as well.
Purging cached content
Caching rules will help users to get the refreshed content when the TTL expires, but this approach does not include cases when the content is updated or modified at the source. The CDN might still have the old version, even if the file is updated at the source. To avoid this scenario, best practice recommends generating a new URL for a new version of your assets. Another popular approach is to purge a specific path or file type/name when the file is updated at the source.
Purging cached content will force all edge nodes to retrieve newly updated assets. You can purge all files on the nodes or purge files in the specific path, for example, /pictures/logo.png. You also can purge the files or folder by providing a wildcard, for example, /pictures/*.
Be aware that purge functionality will remove content from the edge nodes but the browser cache and proxy servers can still have content cached. The files will be eventually updated after the expiration of the TTL. Additional delays can also be caused by a purge operation taking approximately 2 minutes. That is why best practice recommends generating a new URL for the new version of the content.
Preloading
From the previous discussion of the CDN caching pattern, you will remember that first requests can take longer because the edge server has to request a file from the origin and save it locally for the next request. The second request for the file will be significantly faster if the file has not expired yet. To avoid this first-hit delay, CDN gurus initialize and preload the content. Preloading provides a better customer experience and will reduce spikes of network traffic on the origin server. Content preloading works best for large files, such as software updates or movies that need to be simultaneously released to a large audience. You can preload content by providing an exact path to the file or by using regular expressions.
Note
Be aware that the preloading feature is available only with Azure CDN Standard from Verizon and Azure CDN Premium from Verizon.
Geo-filter
When a user requests a website with CDN, the content is delivered by default for all available locations based on the CDN product deployed. Meanwhile, you can limit access to the content based on the country or region. The total charges for CDN depend on the zones, so blocking some countries can prevent the caching of content in specific regions and decrease charges.
You can configure geo-filtering for specific paths and recurring folders or configure rules for the root folder (for example, /, /pictures/, or /pictures/logo.png). Neither wildcard nor regular expressions are supported in the path. Only one rule can be applied to the same relative path. When you configure the rule, you can apply a list of the countries/regions and an Allow or Block action. The Allow action lets users from the specified countries/regions get access to assets requested from the recursive path. The Block action will deny access to the content requested from the recursive path. The Allow action is configured by default so all users from all regions can access the content.
Note
Be aware that the geo-filter feature is not available for Azure CDN Standard from Microsoft. Consider the fact that applying geo-filter will apply 10 minutes after saving the settings.
Configuring a website to leverage the CDN
This demo will continue the previous demo where you provisioned a CDN profile and endpoint. Now, files from the storage account should be cached by the CDN. Now it is time to prepare and upload your HTML page to test the CDN in action. Next, you need to replace the links to your CDN endpoint by running commands from the script. Run the command from the bash console to upload an HTML page to the static website on the storage account you built before. You can open a generated link to observe the caching performance. You can also compare it with the HTML file pointed to the storage account from the previous demo. The performance increase should be visible. Please note that files can be cached on the browser side and for ideal comparison, you should clear the cache from the F12 Developer Tool.
The next task is providing custom TTL policies for content. You will set TTL on the JavaScript file on the origin level by using the Cache-Control header. If your cache still retrieves the old version, you will use the purge command and the test page will load the latest JavaScript script. You can download the script from the following URL:
https://github.com/PacktPublishing/Developing-Solutions-for-Microsoft-Azure-AZ-204-Exam-Guide/blob/main/Chapter09/6-cdn-advanced/demo.azcli
Manipulating a CDN instance from code
You have already learned how to manage Front Door and CDN resources from the Azure portal and the Azure CLI. Now is a good time to get familiar with the SDKs you can leverage to manage resources. Let’s introduce the best management SDK for .NET Core, named Fluent. The exact package to manage CDN resources, Microsoft.Azure.Management.Cdn.Fluent, can be added to the project. You also can register a service account and provide it access to your subscription/resource group with contributor rights. The app ID, secret, and tenant can be saved in the configuration file.
The following code snippet will help you configure the instance of the Azure class to get access to the resources in your default subscription:
using Microsoft.Azure.Management.ResourceManager.Fluent;
var credentials = SdkContext
       .AzureCredentialsFactory.FromFile("yourconfigfile");
var azure = Microsoft.Azure.Management.Fluent.Azure
       .Configure()
       .Authenticate(credentials)
       .WithDefaultSubscription();
The following example demonstrates how to create a CDN profile:
using Microsoft.Azure.Management.Cdn.Fluent;
ICdnProfile profileDefinition = azure.CdnProfiles.Define("YourCdnProfileName")
    .WithRegion(Region.USEast)
    .WithExistingResourceGroup("YourResourceGroupName")
    .WithStandardVerizonSku();
This example will define the endpoint for the previous CDN profile:
cdnendpoint = profileDefinition.DefineNewEndpoint()
         .WithOrigin("your_origin")
         .WithHostHeader("your_origin")
         .WithQueryStringCachingBehavior(
              QueryStringCachingBehavior.IgnoreQueryString)
         .Attach();
As you can see from the previous code snippets, the manipulation of CDN resources is a trivial task and you have a powerful SDK to manage Azure resources. This is another example of infrastructure as code and it will be covered in Chapter 13, Developing Message-Based Solutions.
Summary
In this chapter, you have learned about caching with Azure Cache for Redis and Azure CDN. Both caching services can be successfully used for the cache-aside pattern to implement caching for static and dynamic content and configured with a custom expiration time to avoid inconsistency with the source of the data. Azure Cache for Redis is a PaaS available in Azure with a large scale of different price tiers. Azure Cache for Redis supports multiple data types such as strings, integers, lists, sets, and hashes to store strings, binaries, and object fields. Azure Cache for Redis should be used as temporary storage and the application should not rely on the cache data.
Azure CDN is designed for caching static data such as images, videos, and documents. The CDN can also help to speed up the loading of static content such as media, CSS, and JavaScript files. Azure CDN works as a proxy server for your customers and helps them to cache files very close to their location. The CDN network supports a variety of locations to store files, including Microsoft, Verizon, and Akamai data centers. Configuration settings will help you set up different caching policies for files in the path, specific extensions, and depending on the region/country of requests.
By provisioning and configuring Azure CDN and Azure Cache resources, you get experience required for the exam. Now, you can leverage caching technology in your web-based solution and recommend the appropriate size and configuration, depending on the requirements of exam questions.
In the next chapter, you will learn about monitoring technologies and tools that help you minimize downtime and proactively diagnose possible performance bottlenecks and avoid crashes. Let’s move on to the next chapter.
Questions
- What Azure Cache for Redis SKU does not provide an SLA?
- What Redis command is used to set TTL?
- What is the difference between a Basic and Premium SKU for Azure Cache for Redis?
- What protocol and port are used for connection to Azure Cache for Redis?
- What CDN products are available with a Premium SKU for Azure CDN?
- What are the three ways of controlling TTL in Azure CDN?
Further reading
- From the following link, you can learn additional Redis commands: https://redis.io/commands
- You can find more details and learn about scenarios to use Azure Cache here: https://docs.microsoft.com/en-us/azure/azure-cache-for-redis/cache-overview
- Here, you can get code examples and descriptions about hosting session state services on Azure Cache for Redis: https://docs.microsoft.com/en-us/azure/azure-cache-for-redis/cache-aspnet-session-state-provider
- You can learn details about caching features for Azure Front Door here: https://docs.microsoft.com/en-us/azure/frontdoor/front-door-caching
- You can read how to generate a service account to use the Fluent SDK here: https://docs.microsoft.com/en-us/dotnet/azure/sdk/authentication
- Learn more about the configuration of Azure Cache and the required network settings to get connected: https://docs.microsoft.com/en-us/azure/azure-cache-for-redis/cache-configure#access-ports
- A list of the available commands for managing Azure Cache for Redis can be found in the following documentation: https://docs.microsoft.com/en-us/cli/azure/redis?view=azure-cli-latest
- The process of purging CDN endpoints is discussed at the following link: https://docs.microsoft.com/en-us/azure/cdn/cdn-purge-endpoint
- Caching best practices can be learned about at the following link: https://docs.microsoft.com/en-us/azure/azure-cache-for-redis/cache-best-practices-memory-management