
2
Implementing IaaS Solutions
We’ll now build on some of the fundamentals we covered in the previous chapter, focusing on Infrastructure as a Service (IaaS) solutions. We will explore Azure virtual machines (VMs) in depth, covering topics of design decisions, additional resources related to VM creation, and availability options.
We’ll take what we’ve already covered about Azure Resource Manager (ARM) and build on this knowledge further, focusing on ARM templates in more depth and discussing some of the more complex outcomes that ARM templates can enable, such as multi-tiered templates, conditional resource deployments, and the different deployment modes available.
One of the most exciting and game-changing recent innovations in the developer world is containers. We’ll start off with an introduction to what containers and container images are and why the interest in containers is rapidly growing among developers. We’ll discuss the components of a Dockerfile and use it to build and run a container image. With a grasp of containers, we’ll then move into Azure specifics with Azure Container Registry and Azure Container Instances, having our container image running and managed within Azure.
By the end of this chapter, you’ll understand the important considerations and design decisions when provisioning Azure VMs, as well as how to perform more complex deployments with ARM templates. You’ll also understand what containers and container images are, their value, and the solutions Azure provides to manage them. This chapter will be our entry into more hands-on practical exercises.
In this chapter, we will cover the following main topics:
- Provisioning VMs in Azure
- Exploring ARM templates
- Understanding containers
- Managing container images in Azure Container Registry
- Running container images in Azure Container Instances
Technical requirements
In addition to the technical requirements outlined in Chapter 1, Azure and Cloud Fundamentals, you will require the following to follow along with the exercises:
- Visual Studio Code – downloadable from here: https://code.visualstudio.com/Download.
- The ARM Tools Visual Studio Code extension installed – found here: https://marketplace.visualstudio.com/items?itemName=msazurermtools.azurerm-vscode-tools.
- Git, which can be downloaded from here: https://git-scm.com/downloads.
- For container exercises, if using a Windows machine, enable the Windows Subsystem for Linux (WSL): https://docs.docker.com/desktop/windows/wsl.
- To build and run Docker images locally, the recommended tool to use is Docker Desktop. A Docker Personal plan is free for personal, individual use and can be found here: https://www.docker.com/products/personal.
- The code files for this chapter can be downloaded from here: https://github.com/PacktPublishing/Developing-Solutions-for-Microsoft-Azure-AZ-204-Exam-Guide/tree/main/Chapter02
Code in Action videos for this chapter: https://bit.ly/3RVP1GA
A Note on Docker Desktop
Although Docker Desktop is listed here as a technical requirement, and there will be exercises that make use of it, if you don’t want to sign up for a Docker Personal plan, skipping the exercises that use Docker Desktop and following along in theory is completely fine. There are alternatives as well, so feel free to do your own research into those should you wish.
Provisioning VMs in Azure
Although – as mentioned in the previous chapter – Platform as a Service (PaaS) services are becoming more popular, there are certainly times when you need more flexibility and control over your environment than PaaS can offer. Azure VMs provide the flexibility that virtualization offers, without the need to manage your own underlying infrastructure. As you will know by now, the management activities of VMs – such as installing software, patching, and configuration – are for you to perform.
Because of the flexibility that VMs offer, they can often be the logical choice for various scenarios, such as rapidly building and destroying development and test environments, providing quick and convenient means to scale environments should they be needed. Other scenarios might include high-performance computing (HPC) for complex computational workloads, as well as extending your existing infrastructure by connecting your corporate network to the Azure cloud network seamlessly, without the need to purchase additional hardware.
A mistake that often gets made when building out an application infrastructure in the cloud is not taking the many important design decisions into consideration before doing so. The following aspects should be considered before provisioning VMs:
- Availability
- Disks
- Limits
- Location
- Naming
- Operating system image
- Post-provision configuration
- Size
- Pricing model
Before we tackle the preceding list, the very first consideration should be the network. Without considering how all resources – both on-premises and cloud – should communicate, as well as how they are intended to be secured, provisioning VMs can quickly become more of a distraction than a means to empower and deliver productivity.
Availability
There are several Availability options that Azure offers for VMs, depending on your availability needs. You should avoid running a production workload on a single VM, as it wouldn’t be resilient in the face of planned or unplanned maintenance. When creating a new VM within the Azure portal, you are prompted to select your desired availability choice – Availability zone, Virtual machine scale set, or Availability set:
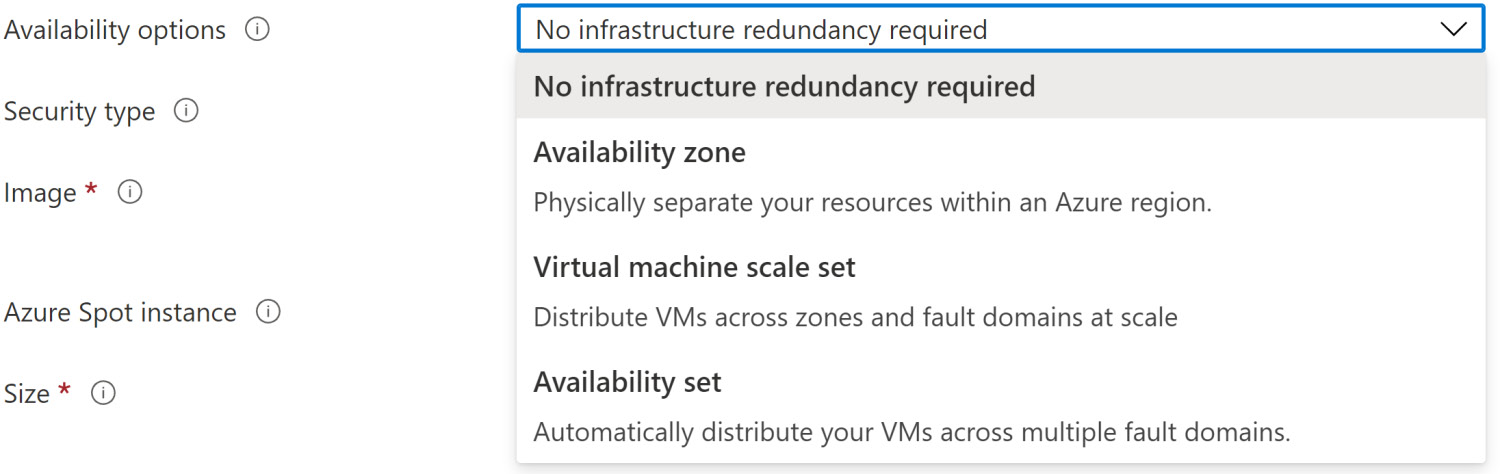
Figure 2.1 – VM availability options during creation
We should cover some terminology here first:
- Fault domains: Fault domains are logical groups of hardware within a data center that share the same power and network hardware. Distributing your resources across fault domains limits the impact of physical hardware failures and power interruptions.
- Update domains: Update domains are logical groups of hardware within a data center that might undergo maintenance or be rebooted at the same time. Only one update domain is rebooted at any one time and given 30 minutes to recover before maintenance is initiated on another update domain. As you might imagine, availability options that distribute resources across multiple update domains increase availability.
Now that we’ve got an understanding of what fault domains and update domains are, we can make more informed decisions about our infrastructure redundancy selection. Here are the options available to us:
- Availability zones were discussed in the previous chapter, so there’s no need to discuss those in more depth. You can choose which availability zone within your selected region to deploy the VM to, which will also apply to all resources created as part of the VM provisioning.
- Virtual machine scale sets allow you to create and manage a group of load-balanced VMs. High availability is achieved by distributing VMs across multiple availability zones and fault domains, also allowing your application to automatically scale based on demand or a pre-defined schedule.
- Availability sets are logical groups of VMs within a data center, where VMs are distributed across fault domains and update domains. Availability sets themselves don’t carry any costs; you only pay for the VM instances that you create. Each VM in the availability set should be able to handle the same requests, so you can benefit from the redundancy offered.
You could also combine an availability set or availability zone with an Azure Load Balancer for better application resiliency. You can read more about the Azure Load Balancer service in the Further reading section.
Another option you have when provisioning a VM is to assign it to a proximity placement group, which is a logical grouping used to ensure resources are physically located close to each other when low latency between resources is essential. You can read more information about proximity placement groups via the link in the Further reading section.
Disks
When it comes to disks, there are two main considerations – disk type and disk storage. The two types of disks available are standard and premium. For development and testing, standard disks can be cost-effective while still being performant. For production workloads, it’s recommended to use premium disks, which offer higher performance and lower latency, at a higher cost than standard.
The two options for disk storage are managed disks and unmanaged disks. With unmanaged disks, the storage account that holds the virtual disks is your responsibility. I/O operation limits per storage account and the requirement to add additional storage accounts when scaling is required are factors you need to consider and manage yourself.
The current recommendation and default option is to use managed disks, where the storage is managed by Azure – you define the disk size (which could be up to 4 TB), and Azure will create and manage both the disk and the storage behind it. There’s no need to concern yourself with storage account limits and thresholds, making scaling much easier with managed disks.
Limits
At the time of writing, there is a default limit of 25,000 VMs that a subscription can have per region and 20 virtual Central Processing Units (vCPUs). Yes, a limit of 20 vCPUs effectively means a limit of 20 VMs, but a support request can be raised to have a limit (such as vCPUs) increased. This is an important design decision because it may be more appropriate to choose another service on which to host your application when you consider this limit.
Location
Location – or region – was discussed in the previous chapter, so we won’t go over old ground explaining what it is. In the context of a VM, the location is also where the virtual disks will be created.
Naming
A decision that’s often overlooked is the naming convention to use for your VMs. The name is more than just an identifier within Azure – the name of a VM is used as the hostname as well. For Windows, the limit is 15 characters, whereas Linux has a limit of 64 characters. Changing the names of VMs after provisioning isn’t a trivial task, so the name should be considered carefully before you create the VM. A recommended practice in naming convention is to include some of these things: environment (is this for development or production?), location, the product or service the resource supports, the role of the resource, and – if applicable – the instance, when there’s more than one named instance. For example, the first production web server in the West Europe region might be called prodweu-webvm01.
Operating system image
Azure offers a variety of different operating system images that you can select to have installed on the VM during provisioning, both from the Windows and Linux families. Note that Azure only supports 64-bit operating system images. In addition to the base images, you can find images on Azure Marketplace that include additional software to support a specific scenario, saving you from having to install all the software components individually. You can also create your own disk image, upload it to Azure Storage, and use it to create a VM.
Within the Azure portal, you can view many available images from different publishers, including those that are custom-built for a specific type of workload. However, when we’re talking about programmatic deployment, it’s important to understand how to find the image details so that you can specify that in your script, command line, or ARM template. Azure Marketplace images are defined within a categorization hierarchy – a publisher contains one or more offers, and an offer can contain one or more stock keeping units (SKUs), which can have one or more versions (the latest can usually also be selected for the version). The following tables are example values for Windows and Linux images:

Figure 2.2 – Image category breakdown examples for Linux and Windows
Here, I will show you how to get the details of images available per region using the Az PowerShell module, as well as the Azure CLI (assuming you’re already authenticated in your session):
- To list all publishers available in the Central US region using PowerShell, use the following:
Get-AzVMImagePublisher -Location 'centralus' | select PublisherName
Using the CLI, use the following:
az vm image list-publishers --location 'centralus' --query [].name -o tsv
If we scroll, we can see both publishers from Figure 2.2 in the list.
- With the name of the publisher identified, we can find all offers from that publisher (we will use MicrosoftWindowsServer in this example) using PowerShell:
Get-AzVMImageOffer -Location 'centralus' -PublisherName 'MicrosoftWindowsServer' | select Offer
Using the CLI, use the following:
az vm image list-offers --location 'centralus' --publisher 'MicrosoftWindowsServer' --query [].name -o tsv
We will make a note of the WindowsServer offer for the next step.
- With the publisher and offer names obtained, we will list all the SKUs available under the WindowsServer offer using PowerShell:
Get-AzVMImageSku -Location 'centralus' -PublisherName 'MicrosoftWindowsServer' -Offer 'WindowsServer' | select Skus
Using the CLI, use the following:
az vm image list-skus --location 'centralus' --publisher 'MicrosoftWindowsServer' --offer 'WindowsServer' --query [].name -o tsv
We can see that the SKU from Figure 2.2 is listed, so we will make a note of that for the next step.
- Now that we have found the SKU, we can find all available image versions for that SKU using PowerShell:
Get-AzVMImage -Location 'centralus' -PublisherName 'MicrosoftWindowsServer' -Offer 'WindowsServer' -Skus '2016-Datacenter'
Using the CLI, use the following:
az vm image list --all --location 'centralus' --publisher 'MicrosoftWindowsServer' --offer 'WindowsServer' --sku '2016-Datacenter'
At the time of writing, the version shown in Figure 2.2 is listed among others. I purposely didn’t filter these results, so you can see the output showing all the properties we’ve just discussed. Also, note that if you used the CLI command, you also see the urn property. URN stands for Uniform Resource Name, and you can see that it combines all those properties, separated by a colon (:). Some tools accept an image URN, so I wanted to make sure it was pointed out. In fact, we will be using URNs shortly.
Post-provision configuration
If the VM you are provisioning is a Windows machine, you can take advantage of the VM extensions that Azure offers. These extensions enable additional configuration for things such as running custom scripts, collecting diagnostics data for monitoring the health of your application, and setting up Desired State Configuration (DSC) to manage the configuration of the environment after the machine is created, so any common tasks can be automated.
While ARM templates can provide desired state deployment, the configuration state of the deployed VM is not managed by ARM and can be managed through DSC. See the Further reading section for further information on DSC. Azure also supports cloud-init (https://cloud-init.io/) for most Linux distributions that support it.
Size
With Azure VMs, you don’t define the specifications for individual components such as processor, storage, or memory separately. Instead, Azure has the concept of VM sizes. The size determines the different specifications for the VM, and there’s a wide range available – you can also use Azure Policy to limit which sizes can be selected should you need to. A recommended way to determine which size you should select is to consider the type of workload the VM will be running.
The current workload types range from general-purpose for less demanding workloads, such as development and testing scenarios, to workloads with additional optimizations in either compute, memory, storage, or graphics, as well as high-performance compute, which was mentioned earlier in this chapter. Within each of these families, there is a variety of different sizes for you to choose from to best suit your needs. To help you select an appropriate VM size, Microsoft provides a useful VMs selector tool (which can be found here: https://azure.microsoft.com/pricing/vm-selector), allowing you to answer some questions about your requirements before providing recommendations on size. The very first selection in this tool is to indicate the type of workloads your VM will be responsible for, as you can see here:

Figure 2.3 – Workload selection within the VMs selector tool
From within the Azure portal, you can also apply a filter to the visible sizes based on workload type, so you are only presented with those sizes appropriate to that type of workload. If you need to change the size of your VM after provisioning, you can upgrade or downgrade if the current hardware configuration is supported in the new size. When you do resize a VM, be aware that it will be rebooted, which can potentially cause a temporary outage and change some configuration settings, such as the IP address.
If you would like to see which VM sizes are available within a specific region, you can use the Az PowerShell module that was introduced in the previous chapter, as well as the Azure CLI. To list all sizes and the respective specifications available in the West US region, for example, you could use the following PowerShell command:
Get-AzVMSize -Location 'westus'
For the same information using the Azure CLI, you could use the following command:
az vm list-sizes -l 'westus' --output table
Pricing model
Another important point that should be considered before creating a VM is cost. There are two main costs for each VM: storage and compute. You are charged separately for storing data in virtual hard disks that VMs use. Even if the VM is stopped/deallocated, the storage is still being used and therefore still incurs a charge, which was alluded to in the previous chapter.
Compute prices are shown per hour, but you get billed per minute that the VM is running. When the VM is stopped and deallocated, Azure releases (or deallocates) the hardware, so you will not incur compute costs during that time. As the Windows operating system has a license charge but Linux doesn’t, the compute charges for a Linux VM will be lower than that of a Windows machine of the same size (you may be able to save money by reusing an existing Windows license with the Azure Hybrid Benefit).
There are two different payment options available for compute costs: pay-as-you-go and Reserved VM Instances. With the pay-as-you-go option, you pay for compute capacity by the second, without any long-term commitment or upfront payments, with the ability to scale capacity up or down at any time. Reserved VM Instances allow you to purchase a VM in advance, with a commitment of 1 or 3 years. This option can provide up to 72% cost savings compared to pay-as-you-go. This option is more common when the VM needs to be running continuously or you need budget predictability and can commit to having the VM for at least a year.
The list we have just gone through isn’t exhaustive, but they represent the main design decisions that need careful consideration before any deployment occurs. Once those are decided, we can start thinking about creating our VM.
Creating a VM
As with other services in Azure, the availability of options can vary depending on the region you select. As we touched on previously, most resources in Azure can be created in the Azure portal, via PowerShell, the CLI, the REST APIs, the SDKs, and using ARM templates. We’re not going to go over how to open the VM creation wizard within the portal, as that’s something you are likely already familiar with; you should see all the options discussed up to this point when you start the wizard.
One thing I would like to point out is that you can make your life a little easier with URLs – if you want to head straight to the VM creation wizard, you can use this URL: https://portal.azure.com/#create/Microsoft.VirtualMachine-ARM. To head straight to the same wizard, but with the Windows Server 2016 Datacenter image selected, you can use this URL: https://portal.azure.com/#create/Microsoft.WindowsServer2016Datacenter-ARM. If you would like to find the URLs for other resources, head to Azure Marketplace, select your resource, and note the URL.
The quicker and more efficient way to create VMs is programmatically, also providing you with the flexibility to create multiples at once should you need to. We’re going to use PowerShell and the CLI to provision VMs next (we won’t give examples for both throughout the entire book; this is just demonstrating how the same things can be achieved with both).
We’re not going to look at the REST APIs right now because that would require a conversation around authentication and bearer tokens, which is a topic for later in this book. The exam just requires you to be aware that the REST APIs are an option for deploying and managing resources. You can see the REST API documentation for creating or updating VMs here should you wish: https://docs.microsoft.com/rest/api/compute/virtual-machines/create-or-update.
At the time of writing, the default image that gets used when you don’t specify an image for a new VM is Windows Server 2016 Datacenter. In the following exercises, we will create a Windows Server 2019 Datacenter VM and an Ubuntu Server 19.04 VM.
Image URNs
Using the same process that we followed earlier to get the image names, we can easily find the Windows Server 2019 Datacenter SKU using the following PowerShell command (or use the CLI if you prefer and substitute my location value with your own):
Get-AzVMImageSku -Location 'westeurope' -PublisherName 'MicrosoftWindowsServer' -Offer 'WindowsServer'
We can see that 2019-Datacenter is listed there.
For the Ubuntu version, we can use the following:
Get-AzVMImageSku -Location "westeurope" -PublisherName "Canonical" -Offer "UbuntuServer"
This lists the SKU of 19.04.
For our Windows VM, the URN for the latest version of that SKU would be MicrosoftWindowsServer:WindowsServer:2019-Datacenter:latest.
For our Ubuntu VM, the URN for the latest version of that SKU would be Canonical:UbuntuServer:19.04:latest.
Armed with our URNs, let’s create some VMs! The syntax we will be using is very simple compared to what you can do, but you won’t be expected to know all the complexities available for the exam. I want to use a cheap VM, so I’m going to use Standard_B1s, which is available in my subscription and desired region.
Within your already established and authenticated PowerShell session (make sure the context is set to your correct subscription as well by using Get-AzContext, and use Set-AzContext, passing in the subscription and tenant if needs be, should you need to change it):
- Open Visual Studio Code (VS Code), navigate to a sensible location (create a new folder if it makes sense to do so), and create a new file with the .ps1 file extension. Your file explorer might look something like this now:

Figure 2.4 – New directories and PowerShell scripts in VS Code’s file explorer
- Set up the variables we’re going to use:
$rgName = "RG-AZ-204"
$location = "westeurope"
$vmSize = "Standard_B1s"
$winVmName = "VM-WIN-WEU-C2-1"
$ubuVmName = "VM-UBU-WEU-C2-1"
$winURN = "MicrosoftWindowsServer:WindowsServer:2019-Datacenter:latest"
$ubuURN = "Canonical:UbuntuServer:19.04:latest"
$creds = (Get-Credential -Message "Admin credentials for the VMs:")
$text = "Hello, World!"
$userData = [System.Convert]::ToBase64String([System.Text.Encoding]::Unicode.GetBytes($text))
$tag = @{"chapter" = 2}
Most of these should already make sense to you by now, and you should be able to comfortably switch any names and the location to suit you (remember Windows’ 15-character limit for hostnames). The $creds variable will use Get-Credential to prompt for a username and password, which will be used for both VMs (otherwise, we would be prompted for each one individually). You can customize the $text variable to be whatever string you like. $userData converts the value of $text into a Base64 string, as that’s what the user data property requires – you’ll see what this looks like shortly. We’re also adding a variable containing the key-value pair for a tag we’re going to add to the resource group, with the name of "chapter" and the value of 2 (it’s lowercase for a reason – bear with me), just for some additional basic customization.
- Add code to create the resource group, the Windows VM, and the Ubuntu VM, making use of all the variables we just set up. Without adding any exception handling or anything else that you would usually add (for the sake of simplicity and readability), your script should look something like this:
# Variables
$rgName = "RG-AZ-204"
$location = "westeurope"
$vmSize = "Standard_B1s"
$winVmName = "VM-WIN-WEU-C2-1"
$ubuVmName = "VM-UBU-WEU-C2-1"
$winURN = "MicrosoftWindowsServer:WindowsServer:2019-Datacenter:latest"
$ubuURN = "Canonical:UbuntuServer:19.04:latest"
$creds = (Get-Credential -Message "Admin credentials for the VMs:")
$text = "Hello, World!"
$userData = [System.Convert]::ToBase64String([System.Text.Encoding]::Unicode.GetBytes($text))
$tag = @{"Chapter" = 2}
# Create resource group
New-AzResourceGroup -Name $rgName -Location $location -Tag $tag -Force
# Create Windows VM
New-AzVM -Name $winVmName -ResourceGroupName $rgName -Location $location -ImageName $winURN -Credential $creds -Size $vmSize -UserData $userData
# Create Ubuntu VM
New-AzVM -Name $ubuVmName -ResourceGroupName $rgName -Location $location -ImageName $ubuURN -Credential $creds -Size $vmSize -UserData $userData
- Open a new terminal window:

Figure 2.5 – Opening a new terminal session within VS Code
- If PowerShell isn’t your default terminal, switch to a PowerShell terminal, using the dropdown next to the plus sign next to the terminal window:

Figure 2.6 – Selecting a PowerShell terminal from a VS Code terminal window
- When you’re ready, run your script (make sure you have the correct path)!
- When prompted, due to our $creds variable using Get-Credential, input the desired admin username and password for the VMs.
- Once the script has finished, check in the Azure portal, and you should see your new resource group with the chapter 2 tag and the new VMs, along with their related resources.
- Click on one of the newly created VMs, and under Settings, go into the Configuration blade.
- Scroll down, and you can see our text in the User data field:

Figure 2.7 – The User data field showing our custom data
- Make a change to the $tag hashtable (we can capitalize the C in chapter), and then save and rerun your script again.
The script should complete much faster because ARM can see the resources already exist and the changes don’t require redeployment, so the changes are pushed rather than the resources being redeployed.
- Refresh your browser page and go back into the resource group to see the change in the tag.
- You can also verify the image that was used by using the following:
(Get-AzVM -ResourceGroupName "RG-AZ-204" -Name "VM-UBU-WEU-C2-1").StorageProfile.ImageReference
You can do the same using the Windows VM name and see that they have indeed used the image we specified with the URN.
- Delete the resource group and all the resources we just deployed with the following:
Remove-AzResourceGroup -Name "RG-AZ-204"
You will be prompted before it carries out the deletion, as we didn’t use -Force. This will take a few moments.
I used PowerShell for this example, but you can find the Bash equivalent within the GitHub repository at https://github.com/PacktPublishing/Developing-Solutions-for-Microsoft-Azure-AZ-204-Exam-Guide/tree/main/Chapter02/02-bash-script should you want to check that out.
Although understanding basic commands such as the ones we’ve used so far is useful for the exam, be aware that we could have also done the same thing with the REST APIs and the Azure client SDK. For the exam, you don’t need to go into the details of exactly how that could be done; just know that it’s an option. Being aware of how to provision resources using PowerShell and the CLI is important, but for more complex orchestration, ARM templates are the more pragmatic way to deploy repeatable infrastructure as code, which we will explore next.
Exploring ARM templates
In the previous chapter, we introduced Azure Resource Manager (often referred to as ARM), resource providers, and types, along with ARM templates. We went through a very basic example of an ARM template, highlighting a couple of the most basic elements. Let’s start off with an overview of all the elements you can use within an ARM template.
ARM template structure
Here is an empty template, showing all the main sections available:
{
    "$schema": "https://schema.management.azure.com/schemas/2019-04-01/deploymentTemplate.json#",
    "contentVersion": "1.0.0.0",
    "parameters": {},
    "functions": [],
    "variables": {},
    "resources": [],
    "outputs": {}
}
We will briefly cover each of these.
$schema (required)
This element defines the location of the schema that describes the version of the template language to be used. Some editors are only able to process older versions of the schema, whereas VS Code can use the latest version. Note the filename of deploymentTemplate – this shows that the schema being used is for resource group deployments. If we were intended to perform a subscription deployment, we would use a schema with the filename subscriptionDeploymentTemplate. For management group deployments, it would be managementGroupDeploymentTemplate, and for tenant deployments, it would be tenantDeploymentTemplate. When using VS Code, the ARM Tools VS Code extension listed in Technical requirements will populate the empty template, including pre-populating the $schema and contentVersion elements.
contentVersion (required)
This element helps to version your templates. Using versioning can help ensure the right template is being used for your deployments.
parameters (optional)
You’ll know from our first ARM template example in the previous chapter that this element allows you to specify input parameters for the template to use. Each parameter needs to have a name and type (the allowed types are array, bool, int, object, secureObject, secureString, and string). Other optional elements within a parameter are defaultValue, allowedValues, minValue, maxValue, minLength, maxLength, and description.
functions (optional)
This element allows you to create your own functions for your template to use, which will typically have complex expressions that you’d rather avoid having to type multiple times throughout a template. For example, you might define a function that takes a certain prefix for a resource name as its input parameter (functions can’t access template parameters, only the parameters defined by the function) and uses that to create a unique name to avoid naming conflicts. Each resource can then just call the function within its name declaration, passing in whatever prefix, and the function will make sure the name it outputs is unique and has that prefix. Each function needs to have a namespace defined (which can be whatever you want, helping you avoid naming conflicts), a name, along with an output type and output value. You can also have parameter types and values if you wish.
variables (optional)
This element allows you to create variables that your template can use. Unlike parameters, variables don’t need their type defined, as it will be inferred from the value of the variable. Another difference from parameters is that variables don’t have their value defined by input at deployment time. Variables are often used to simplify values in much the same way as functions, although variables don’t get called to provide an output as functions do – they resolve a value, and that value is immutable once resolved and can be referred to throughout the template.
resources (required)
This element – unsurprisingly – allows you to define the resources you want to deploy or update as part of the template deployment. The required resource elements are type, apiVersion, name, and often (but not always) location. From what we covered in the previous chapter, this shouldn’t come as a surprise. There are several other resource elements, depending on the resource type. You can also add conditions, explicit dependencies, tags, and more. One thing to note about the type and name elements is if the resource is a child of another resource, the type and name of the parent resource are included in those of the child resource. For example, a SQL database needs to be parented to a SQL server. You have two options for setting the name of the child resource:
- If the child resource is defined separately from the parent, you will need to add the parent’s type with a forward slash (/), followed by the child’s type. The same applies to name. For example, if the parent’s type is Microsoft.Sql/servers, then the type of the child database will be Microsoft.Sql/servers/databases. If the name of the parent resource is parentsqlsvr and you want the child’s name to be childsqldb, the name of the child resource will be parentsqlsvr/childsqldb.
Here is an example snippet:
{
"type": "Microsoft.Sql/servers",
"apiVersion": "2021-02-01-preview",
"name": "parentsqlsvr",
"location": "North Europe",
"properties": {}
},
{
"type": "Microsoft.Sql/servers/databases",
"apiVersion": "2021-02-01-preview",
"name": "parentsqlsvr/childsqldb",
"location": "North Europe",
"properties": {}
}
- If the child resource is deployed within the same template as the parent, you can also define the child resource within the parent resource definition, and just define the type and name of the child resource without adding the type or name of the parent, as they will be assumed from that of the parent. We will show this in the upcoming exercise.
outputs (optional)
This element allows you to return values from deployed resources. In our previous example, you may need to return resourceId for the SQL server. Outputs need to have a name and type, with other optional output elements. Here’s a basic snippet of JSON from our ARM template that will output resourceId for our SQL server:
"outputs": {
  "resourceidsvr": {
    "type": "string",
    "value": "[resourceId('Microsoft.Sql/servers', 'parentsqlsvr')]"
  }
}
You can see here that I’m using the resourceId() function. This is an example of an ARM template function. A link to further information on the functions available can be found in the Further reading section at the end of this chapter.
An element I haven’t mentioned is the apiProfile element, which allows you to define apiVersion for resource types in your template, so you don’t have to define apiVersion for each resource – just define that all Microsoft.Compute/virtualMachines resources should use a specific apiVersion, for example. This doesn’t come up in the exam, and it’s not something often used, but I thought I’d mention it because it could make your life a little easier.
Note that when you deploy an ARM template, ARM converts your template into REST API operations, which then get sent to the relevant resource provider. At the start of this section, I mentioned that ARM templates allow for more complex deployments of multiple resources. Armed (pun intended) with a better understanding of the structure of an ARM template, we can start exploring how to deploy multiple resources using ARM templates.
Deploying multiple resources
There are two approaches to deploying multiple resources – multi-tiered templates and nested templates. A multi-tiered template will deploy multiple resources – some potentially depending on others within the same template – within a single template. This is a common approach for less complex solutions because you can have a single file – ideally stored in a source control repository – that can deploy your entire solution to a resource group.
You could also have a subset of the resources in your solution stored in their own templates, with a parent template linking them all together. This allows for granular reuse of templates across multiple solutions, which is useful when certain resources need to have certain properties defined or they need to have additional resources linked to them, regardless of what solution is being deployed. Hard-coding full names of resources isn’t very scalable or repeatable for different deployments, so we’re going to look at both defining parameters at the command line and making use of parameter files.
With that out of the way, let’s go through a few key points to be aware of when deploying multiple resources via ARM templates.
Multi-tiered templates
As we already inadvertently discussed multi-tiered templates when we talked about parent-child resource relationships while going through the structure of an ARM template, we’ll look at those first. This example will deploy an App Service plan along with a web app, which will conditionally deploy a staging deployment slot if a production Boolean parameter is true. This way, we can also cover conditional resource deployments at the same time.
As this exam assumes some previous experience in this area, I’m not going to walk you through a step-by-step guide on how to create an ARM template. I will, however, give you a ready-made ARM template and point out some key elements. The ARM Tools extension allows you to create a .json file and type arm! to have it create the ARM template structure for you to use. You can also make use of Ctrl + spacebar to get helpful suggestions for resource types, API versions, and most of the other important properties you might need.
Let’s look at an ARM template and cover the important elements:
- Download the ARM template or copy and paste the file contents from the following repository location and save it as a .json file on your local machine: https://github.com/PacktPublishing/Developing-Solutions-for-Microsoft-Azure-AZ-204-Exam-Guide/tree/main/Chapter02/01-arm-template
For the appName value, I made use of the uniquestring() template function. This generates a deterministic string based on whatever string values we provide it. I provided the subscription ID and resource group ID as parameters to the function, ensuring that the 12-character string returned is unique for our subscription and resource group. If we did the exact same thing for another resource within the same subscription and resource group, using the same appPrefix, the name wouldn’t be unique, so we might want to include the deployment name or some other parameters to ensure that it’s truly unique. For this example, we’re fine without that. I added this string to the end of our appPrefix value.
Look through the rest of the template, where there shouldn’t be any real surprises. The creation of the dependsOn sections that implement the resourceId() function was simplified by the ARM Tools extension, which provides suggestions of applicable resources within the template. These suggestions were triggered with the keyboard shortcut Ctrl + spacebar. Based on my selection from the suggestions, the extension populated the function parameters for me. Note that we’re using the production parameter value for the condition controlling the deployment of the staging slot resource, which is a child of the app.
- Create a resource group using the CLI:
az group create --name "RG-AZ-204" --location "westeurope"
Alternatively, use PowerShell:
New-AzResourceGroup -Name "RG-AZ-204" -Location "westeurope".
- Deploy the template by navigating to the same directory as the ARM template and using the CLI:
az deployment group create --resource-group "RG-AZ-204" --name "MyDeployment_1" --template-file .web-app.json --parameters appPrefix="myprefix"
Alternatively, use PowerShell:
New-AzResourceGroupDeployment -Name "MyDeployment_1" -ResourceGroupName "RG-AZ-204" -TemplateFile .web-app.json -appPrefix "myprefix"
Note that you can see the resource ID of the web app as an output once deployment completes.
- Navigate to the Azure portal and find the resources within your resource group; check the app settings are there under the Configuration blade for your web app and that no deployment slots other than the default production one have been created as well. You can also view your deployment history from the Deployments blade of the resource group should you wish.
- Run the same deployment command – only this time, set the value of the production parameter to true ($true in PowerShell). This will deploy the staging slot to the web app.
- Create any kind of resource you like in the resource group.
- Run the same deployment command again, but this time, set the deployment mode to complete by adding -Mode complete in PowerShell or --mode complete in the CLI.
Note that the newly created resource was deleted. When you use complete mode, any resources that are present in the deployment scope that aren’t defined in the template are removed. The idea is that the ARM template defines what the environment should look like, and complete mode enforces that by ensuring only those resources in the template are present. The default deployment mode is incremental, which won’t affect resources in the template that don’t need changing, and any resources not in the template won’t be touched either.
- Clean up resources by deleting the resource group with the CLI:
az group delete --name "RG-AZ-204"
Alternatively, use PowerShell:
Remove-AzResourceGroup -Name "RG-AZ-204"
Nested and linked templates
When solutions become larger and more complex, it can often be more pragmatic to split parts of a solution into separate templates and then use another template that connects them all together. Nesting a template is when you have the contents of another template defined as a Microsoft.Resources/deployments type of resource within the main template, which then contains all the template contents of that child template. Here’s an example of a template being defined as a resource within another template:
"resources": [
    {
      "type": "Microsoft.Resources/deployments",
      "apiVersion": "2021-04-01",
      "name": "nestedTemplate1",
      "properties": {
        "mode": "Incremental",
        "template": {
          "$schema": "https://schema.management.azure.com/schemas/2019-04-01/deploymentTemplate.json#",
          "contentVersion": "1.0.0.0",
          "resources": [
            {
              "type": "Microsoft.Storage/storageAccounts",
              "apiVersion": "2021-04-01",
              "name": "[parameters('storageAccountName')]",
              "location": "West Europe",
              "sku": {
                "name": "Standard_LRS"
              },
              "kind": "StorageV2"
            }
          ]
        }
      }
    }
]
Linking a template is when you do the same thing, but instead of the template contents being in the main template, you provide the uniform resource identifier (URI) to a template file, whether that’s local or over the network. Here’s an example of a template being linked as a resource within another template:
"resources": [
    {
      "type": "Microsoft.Resources/deployments",
      "apiVersion": "2021-04-01",
      "name": "linkedTemplate",
      "properties": {
        "mode": "Incremental",
        "templateLink": {
          "uri":"https://mystorageaccount.blob.core.windows.net/AzureTemplates/newStorageAccount.json",
          "contentVersion":"1.0.0.0"
        }
      }
    }
]
So far, we’ve just been specifying parameters in the deployment command. When there are only a couple of possible parameters, this is usually fine. When the number of parameters increases, this approach becomes less practical. This is where parameter files can come in useful.
Parameter files
Parameter files can be used to define values for parameters in ARM templates, so you can have a set of parameters in one file that relates to a specific environment (development, for example) and another file with the parameters relevant to the production environment. You can then just reference the relevant file during deployment. The parameter file is another JSON file, and here’s an example for our ARM template, which I have called web-app.parameters.json:
{
    "$schema": "https://schema.management.azure.com/schemas/2019-04-01/deploymentParameters.json#",
    "contentVersion": "1.0.0.0",
    "parameters": {
        "production": {
            "value": false
        },
        "appPrefix": {
            "value": "myprefix"
        },
        "location": {
            "value": "westeurope"
        }
    }
}
If I wanted to use this file, I would remove my parameter arguments in the command lines and instead add --TemplateParameterFile <path to parameter file> in PowerShell or --parameters @{path to parameter file} in the CLI. I could conceptually have another file that has the production parameter set to true, along with changes to any of the other parameters, and just reference that file when I’m deploying to production.
Now that we’re able to deploy our infrastructure in a consistent way using ARM templates (as mentioned in the previous chapter, Bicep is another Microsoft tool you can use, but we won’t cover that, as it’s not yet part of the exam), let’s explore another topic. Having to manage and maintain full VMs, when your applications only use a subset of the services and resources from those VMs, can quickly become heavy in terms of maintenance, and potentially impact agility. Let’s look at how containers are changing the world in this space.
Understanding containers
When VM technology was introduced, you were able to run multiple VMs on the same physical hardware with resource isolation. This allowed for hardware virtualization – any communication with the host was through a hypervisor. VMs could offer immutability with VM images, so when you needed a new VM, you could use an existing VM image, and the environment would be consistent without all the previously required manual or scripted steps – great! With all the benefits that VMs bring, for certain workloads, they became somewhat heavy. Each VM has a full operating system kernel, all the relevant binaries, libraries, and applications, and anything else needed specifically for the application to run.
A Quick Stop for Some Terminology
Modern operating systems separate virtual memory into kernel space (which is used by the operating system kernel, drivers, and a few other things) and user space (which is where applications run). So, when I want to think about my application, I’m only concerned with the user space; when I want to think about the underlying operating system, I can be concerned with kernel space.
Containers came along (look up LXC – short for Linux Containers – for more information about Linux containers) providing operating system virtualization, which allowed us to run multiple isolated user space instances on the same host kernel. Each container has its own isolated set of processes and resources, without needing a full operating system kernel. The container runtime brokers the communication between each container and the shared host kernel. This allows us to create more lightweight, standardized, immutable environments, all able to share the same host kernel. As long as the host has a kernel that’s compatible with the container, I can take a container image and run it on any host machine and get the environment up and running, much faster than even a high-performance VM most of the time.
Building on this technology, application containers were introduced. While operating system containers would usually run multiple services, application containers were designed to only run what your application needs and only intended for a single service per container. Each component in your solution can have its own container, deployed independently, with its own configuration.
Docker
Docker is a popular containerization platform used for developing and running containers. Docker images are created using a Dockerfile, where you define what the container should do when it gets built, working in layers. You start with a base image, which might use another base image and make some changes. Once you have the base image, you might want to copy files to a location within the container, maybe build your application, and then run the application from the container, so it becomes a fully functional web server, with all the application dependencies but without the overhead of a full VM. A change made to a base image is considered a layer, and Docker combines the layers and runs the container. Containers are intended to be ephemeral – that is, they should be able to start up and run for as long as needed, then they can be stopped and destroyed until needed again, at which point a fresh new container with the exact same setup gets created. Container states are not persistent – any changes to the state of the container while it’s running won’t persist beyond the life cycle of the container by default (we’ll talk more about this later in this chapter).
There is much more to containers and even Docker architecture should you be interested. For the exam though, you only need a somewhat high-level awareness of what containers are and how to use Docker. Essentially, containers (Docker isn’t the only container runtime or platform out there, but it’s the platform referenced in the exam, hence its discussion here) become the packaged application distribution unit – if I want to build and run an application in an ephemeral, immutable, lightweight, and consistent way, I will package my code and any dependencies into a container image, knowing that it can run on any host with a compatible operating system kernel – no more cries of “It works on my machine!” For simplicity, the terms Docker images and Docker containers will be used throughout this section interchangeably with container images and containers.
Phew! That was a lot of theory! Let’s start creating and using containers. These steps will assume you have Docker Desktop installed, as per the Technical requirements section at the start of this chapter. You should have it running now:
- Open a new terminal session.
- Before building our own container image, pull down the official ubuntu image with the following:
docker pull ubuntu
Note that the first thing it says is Using default tag: latest. Every Docker image has a version tag associated with it. In this case, if we wanted to explicitly pull the latest ubuntu image, we could’ve used docker pull ubuntu:latest.
A Note on the Latest Tag
It’s important to understand that latest is simply the name of a tag. It doesn’t guarantee you will pull down the latest version of any specified image. A common practice when building an image is to create a versioned tag and a latest tag at the same time, but that may not always be the case.
- To list all your local Docker images, run the following command:
docker images
- Note that we now have the ubuntu:latest Docker image listed.
IMAGE ID shows the first few characters of the Secure Hash Algorithm 256-bit (SHA256) hash ID. Note the tiny size of the image as well.
- Let’s run the container interactively (using the -it switch) with the following:
docker run -it ubuntu:latest
Note that the prompt has changed to be in the context of the container.
Pulling Images
Although we pulled the image beforehand, you don’t have to. If you run a container from an image that you don’t have locally, Docker will look to pull the relevant image from – by default – Docker Hub. The Ubuntu image, for example, can be found here: https://hub.docker.com/_/ubuntu.
- If you are familiar with Linux, feel free to look around, and maybe create some files (they won’t exist once the container stops anyway, which we’ll demonstrate later in this chapter). If not, just print out the version of Ubuntu the container is running with:
cat etc/issue
This shows that you’re running a very lightweight Ubuntu container on your machine.
- Without exiting out of the interactive session or closing your existing terminal, open a new terminal session and run the following:
docker container ls
We can see that we are indeed running a container from the ubuntu:latest image.
- Close this extra terminal session when ready.
- Exit out of the interactive session with the following:
exit
- If we were to run the docker container ls command again, we would see no containers running. If the container is still running, stop it with the following command, using the first few characters from container id:
docker container stop <container id>
We could have also used docker ps as a shorter command to list our containers. The docker container ls and docker ps commands show running containers but not stopped containers. Whenever you see docker container ls commands such as the one in the next step, they could be swapped with docker ps.
- List all containers with the following:
docker container ls -a
- Note CONTAINER ID and remove the container with the following:
docker container rm <container id>
We could have also used docker rm <container id> as a shorter command.
Fun Fact
If you don’t give your container a name – which we didn’t – one will be created for you, randomly combining an adjective with the name of a scientist.
- Open VS Code if not already open and create a new folder for containers, with a subdirectory called hello-world.
- Within the hello-world directory, create a new text file called hello-world.txt, add a short sentence (I just used "Hello, World!" in mine), and then save the file.
- Within the same directory, create a new file called Dockerfile. There’s no file extension, just Dockerfile as the complete name of the file:

Figure 2.8 – The Dockerfile and the text file in the same new directory
- Open Dockerfile and specify that our container should use the ubuntu:latest base image that we just used by adding FROM ubuntu:latest. Save the file.
- From the terminal session already opened within the hello-world directory, build the container image from our Dockerfile and tag it as demo:v1 using the following:
docker build -t demo:v1 .
The full stop at the end is important, as it tells Docker to use the current directory as its context. Any COPY actions will use the current directory as the root directory.
- Check that our container image was built with the following:
docker images
This is now exactly the same as the ubuntu:latest container we looked at previously.
- When the container builds, have it copy the hello-world.txt file to its local root directory by adding COPY hello-world.txt / (the forward slash indicates that the root directory is the desired destination).
- With that file copied, let’s have it print out the contents of our text file by adding CMD ["cat", "hello-world.txt"]. Save the file.
- Your Dockerfile should look like this:
FROM ubuntu:latest
COPY hello-world.txt /
CMD ["cat", "hello-world.txt"]
To recap, this Dockerfile contains the definition for our Docker/container image. When we build from this Dockerfile, the latest version of the ubuntu base image is pulled (if not already cached), and then the text file is copied to the root directory within the container, which adds a second layer to the container. When we run a container using that image, the cat hello-world.txt command will run, which will output the contents of the text file. This is a very simple example, but I hope it helps those of you unfamiliar with containers.
- Build a container image just as before but this time with the demo:v2 tag by running the following:
docker build -t demo:v2 .
Note that this time we have [2/2] COPY hello-world.txt / in the output. This 2/2 indicates this is the second of two layers in that image. The CMD line doesn’t count as a layer because it’s an execution that only happens when the container is running; it’s not part of the image-building process.
- List the images as before with the following:
docker images
- Confirm that our latest image is listed. Run a container from it using the following:
docker run --rm demo:v2
We’re using --rm to automatically remove the container once it exits to keep things clean, but you don’t have to. You should see the contents of the text file output to the terminal window by the container.
In a very short time, we’ve created a new container from an ubuntu image and read the contents of a text file. If we had to power up a VM and have it run the same command, it’s not likely to have happened so fast, and certainly wouldn’t have been such a small image.
For a slightly more real-world example, we’re going to build and run an ASP.NET application with .NET 6.0, without needing any .NET SDK installed on our local machine. For this example, we’re going to use an existing GitHub repository, which has multiple samples and explanations that can be helpful for you. The purpose of this exercise isn’t to test your coding ability but rather to provide a good foundational knowledge of containers, so reusing an existing solution makes sense:
- Navigate your VS Code terminal to the containers folder you created during the last exercise and clone the repository with the following:
git clone https://github.com/dotnet/dotnet-docker.git demo-v3
- Once cloned, navigate to the demo-v3samplesaspnetapp directory within your terminal and the VS Code explorer.
- Examine the Dockerfile found within this directory.
Most of this file should make sense by now. To summarize, it will pull the .NET 6.0 SDK image from the Microsoft container registry rather than Docker Hub, giving it the build alias. It will set the working directory, creating the directory if it doesn’t exist, copy the solution and C# project files, and then run the dotnet restore command. Once that completes, it will copy the remaining files and runs the dotnet publish command. Finally, it will pull the ASP.NET 6.0 image from the Microsoft container registry, set the working directory and create it if needed, copying all the files from the publish location that build used, and ending with an instruction for the container to run the compiled binary, starting the web server.
- Build the Docker image with the following:
docker build -t demo:v3 .
At this point, we have a container image that could essentially be our packaged unit of software. Any machine with a compatible kernel (Linux or Windows with WSL) can now run a container from this image and the experience will be the same. This container contains all the binaries and anything else it needs for the application to run.
- Run a container from this image that will be removed when it stops, running it interactively and mapping port 81 on our local machine to port 80 in the container with the following:
docker run -it --rm -p 81:80 demo:v3
Note how quickly this container spun up from a container image and is now running as a web server – try achieving that same speed with a VM and VM image!
- From your chosen web browser, navigate to http://localhost:81/. Our container is running as a functional web server.
- Close the browser window and stop the container within the terminal using Ctrl + C.
The container (and therefore the web server) has now stopped and been removed. If we wanted to run it again, we would just use the docker run command, and it would run and be in the same initial state as last time. I say initial state because (as I’ve already mentioned) if you happen to make some changes to a container while it’s running interactively, once you stop that container and run again, the changes you make don’t persist – Docker images are immutable.
Having Docker container images locally is only useful for so long. At some point, you will likely need to share the images within your organization. Azure offers a managed, private Docker container registry service, where you can store and manage your Docker images in the cloud, ready to be used by other services, such as App Service, Batch, Service Fabric, and Kubernetes.
Managing container images in Azure Container Registry
I hope that by now you’re comfortable with the concept of container images and containers. A common development workflow includes making changes to source code and building a Docker image from your Dockerfile that copies files, and runs tests on and compiles your code, ready for a container to run from it. That built image gets pushed to a repository within a container registry, which can then be pulled from another machine or service and have a container instance created from it. Microsoft’s managed service for storing your images is called Azure Container Registry (ACR), which is available in three SKUs:
- Basic: Most appropriate for lower usage scenarios, such as learning and testing environments, due to the lower storage capacity and image throughput available with this SKU
- Standard: Suitable for most production scenarios, due to the increased storage and image throughput
- Premium: Increased storage and image throughput than the other SKUs but also adds other features, such as geo-replication
ACRs can store Docker container images, Helm charts, and images built to the Open Container Initiative (OCI) image specification. All SKUs offer encryption at rest for container images, regional storage (so that data is stored within the location the ACR was created), zone redundancy, and the ability to create as many repositories, images, layers, or tags as you want, up to the registry storage limit (although having too many can affect the performance of your registry).
In summary, an Azure container registry can contain one or more repositories, which can contain one or more image versions. A repository in this context is similar to a source control repository, storing versioned container images. Repositories relate to the name of your image and the version relates to the image tags. For example, in our last example, we created a demo:v3 tag; if that was pushed to ACR, the repository would be demo, and within that repository, there would be a v3 version, which is a snapshot of that image. You can also use repository namespaces to group images together. In the upcoming exercise, we will group our images in the demos repository namespace.
Let’s create our container registry in Azure. With more emphasis on the Azure CLI in the exam than PowerShell when it comes to containers, we’re going to start using the Azure CLI for the rest of this chapter. We started by showing you both to demonstrate that they can both be used to perform the same tasks. Personally, I prefer using PowerShell when more complex scripting is required but the Azure CLI for everything else. Also, for arguments that we’ve already covered, such as --name and --location, we will start using the short-form versions, -n and -l respectively:
- Create a resource group if you don’t already have one with the following:
az group create -n "<resource group name>" -l "<your region>"
- Create a new container registry, which will need to have a globally unique name, using the following:
az acr create --resource-group "<resource group name>" -n <registry name> --sku Basic
Instead of --resource-group, we could have also used -g. So, don’t be surprised to see that throughout the book instead.
- Once completed, open the newly created registry within the Azure portal.
- From the Overview blade, note the Login server value listed (<acr name>.acurecr.io). This is important because this is what we will use to log in and push images to.
- Go through the Networking, Replications, Content trust, and Retention blades, and you’ll see that these are some of the features offered only in the Premium SKU.
We’ve created container images and run them locally, and now we’ve created a cloud-based registry in which to store our container images. Let’s look at how we can use the Docker tools to push our container images to our new container registry.
Docker build and push
Let’s send our latest demo:v3 image to the container registry:
- First, log in to the registry with the following:
az acr login -n "<acr login server>"
When using the Azure CLI, you only need the name and not the full login server name. If you were using docker login, you would need the entire login server name.
- Create an alias for the demo:v3 image that has the fully qualified path to your registry, including the desired demos repository namespace, and give it the v1.0 tag with the following:
docker tag demo:v3 <registry name>.azurecr.io/demos/demo:v1.0
- List the local container images using the following:
docker images
Note that you have the newly created alias, which has the same IMAGE ID as the demo:v3 image. This is because it’s the same image, just with an alias containing the fully qualified name of your registry, plus the repository namespace.
- Push the image to your repository using the following:
docker push <registry name>.azurecr.io/demos/demo:v1.0
- Go back to your registry in the Azure portal and the Repositories blade. Note that we now have a demos/demo repository, and within that repository, we have a v1.0 tag.
- Click on the v1.0 tag, and note that it lists Docker pull command as well as the manifest, listing all the layers that the image uses and their hashes.
- Back in your terminal session, remove the fully qualified tag we just pushed with the following:
docker image rm <registry name>.azurecr.io/demos/demo:v1.0
We could have also used docker rmi <registry name>.azurecr.io/demos/demo:v1.0.
- Confirm that it has been removed with the following:
docker images
- List the repositories within your ACR with the following:
az acr repository list --name <registry name> -o tsv
- List the tags within your repository with the following:
az acr repository show-tags --name <registry name> --repository demos/demo -o tsv
- Pull and run a container locally from the image in your registry with the following:
docker run -it --rm -p 81:80 <registry name>.azurecr.io/demos/demo:v1.0
Note that it says the image can’t be found locally, so it downloads the image from your registry before running the container.
- Navigate to http://localhost:81 in your chosen browser to confirm that the container is running. We have now pulled our image from ACR and run a container locally using it.
- Stop the container with Ctrl + C.
So far, we have used the Docker CLI to build an image using our Dockerfile locally, then run another command to tag the image for a fully qualified alias, followed by another command to push the image to our ACR. While it’s important to understand the process, ACR provides a suite of features that can perform these tasks for you on a cloud-based agent in fewer steps. These are known as ACR tasks.
ACR tasks
Using a single ACR task command, the relevant files can get uploaded to the cloud, and an agent will build our image and, upon successful build completion, push that image to your registry. You don’t even need to have the Docker Engine installed locally.
There are several scenarios supported by ACR tasks:
- Quick tasks:
- This is what was just described – have your image built, tagged, and pushed from within the cloud.
- You can also run your image in a temporary container within ACR itself.
- Automatically triggered tasks – trigger tasks on one or more of these events:
- Source code update: When a commit is made to a specified Git repository, an ACR-created Webhook triggers a quick or multi-step task.
- Base image update: When a base image that’s stored in a public Docker or ACR repository, or one of your ACRs, is updated, a task can rebuild your image, ensuring that your image has the latest patches.
- Schedule: Set up one or more timer triggers to run container workflows on a defined schedule. The schedule is defined using the cron syntax.
- Multi-step tasks: Perform multiple build and push tasks in series or parallel.
Using the previously downloaded Dockerfile for the aspnetapp sample, let’s have ACR take our code, build and push an image, and then run a container, all without any of it happening on our local machine.
Build, push, and run quick tasks
Make sure you have your terminal session open in the directory we used before that contains the aspnetapp Dockerfile:
- Run the ACR build quick task using the following:
az acr build --image demos/demo:v2.0 --registry "<registry name>" --file Dockerfile .
Note that the output shows everything we saw locally and additional information, including runtime and build time dependencies.
- Confirm the new v2.0 tag is in your repository with the following:
az acr repository show-tags --name "<registry name>" --repository demos/demo -o tsv
- Run our latest image in a container from a cloud-based agent with the following:
az acr run --registry "<registry name>" --cmd '$Registry/demos/demo:v2.0' /dev/null
Using $Registry just states that the command should run from the registry. A context is required for this command, but using /dev/null allows us to set a null context, as it’s not required in this case.
- Stop the container with Ctrl + C, and then confirm locally that the image doesn’t exist and there are no containers running with the docker images and docker container ls -a (or docker ps -a) commands, which should be familiar by now.
- Go to the Azure portal and into the Tasks blade of your registry. From there, go to the Runs tab and look through the stream log outputs for each task (note that each is listed as Quick Task). Don’t worry about the latest showing as failed – that’s because we terminated it manually.
We could have also used the az acr task list-runs --registry "<registry name>" -o table command.
A link to further information on ACR tasks can be found in the Further reading section of this chapter. Now that we’ve seen how to build and store container images in our registry under our chosen repository, we should talk about running containers in Azure outside of the temporary container that az acr run provides.
The simplest and fastest way to run containers within Azure without needing to provision VMs or adopt a higher-level service is by using Azure Container Instances (ACI).
Running container images in ACI
ACI is a great solution for scenarios that can operate in isolated containers. If you want to use images from your ACR, you will need to enable the admin user on your ACR, which we’ll go through in the upcoming exercise.
ACI also has the concept of container groups, within which multiple containers share a life cycle, resources, network, and so on because they’ll be running on the same host. If you’re familiar with a Pod in Kubernetes, this is a similar concept. Multi-container groups currently only support Linux containers. One use case for this can be having a container for the frontend of an application, with another container for the backend within the same container group. The frontend will serve the web application, while the backend will be retrieving data, for example. Any containers within a container group share the same public IP address and port namespace on that IP address. Because of this, port mapping isn’t supported.
A single container instance is technically its own container group, isolated from all other container instances, so when you deploy a container instance, you’ll still see a reference to the containerGroups resource type. A link to further information on container groups within ACI can be found in the Further reading section of this chapter.
Creating a simple container instance
Let’s get started with a simple container that just runs our demo:v2.0 image:
- First, update the ACR to enable the admin user with the following:
az acr update -n "<acr name>" --admin-enabled true
Note that we’re using -n instead of --name. The short versions of arguments are available across most resource types.
- Go to the ACR within the Azure portal, and under the Access keys blade, note that the admin user is enabled with some credentials listed. Note also that the username is the same as the registry.
- Although we saw the credentials in the portal, get the password programmatically using the following command:
az acr credential show -n "<acr name>" --query "passwords[0].value"
- Copy the value to use shortly (depending on which type of terminal you’re using, feel free to assign the output of the command as a variable instead).
- Create a container instance using our demo:v2.0 image, with a public IP and DNS label that’s unique within the region to which we are deploying, with the following:
az container create -g "<resource group name>" -n "<desired container name>" --image "<registry name>.azurecr.io/demos/demo:v2.0" --cpu 1 --memory 1 --registry-login-server "<registry name>.azurecr.io" --registry-username "<registry name>" --registry-password "<password obtained in the previous step>" --ports 80 --dns-name-label "<unique DNS label>"
Being able to specify custom specifications of CPU and RAM granularly rather than by sizes like VMs makes container instances all the more compelling. We could have also set a restart policy with the --restart-policy argument, but the default of Always is fine for us. Also, note that we’re listing port 80 and not using 81:80, as we did previously – this is because within container groups, port mapping isn’t supported (and even a single container instance is in its own container group).
- Once completed, verify the provisioning state is Succeeded with the following:
az container show -g "<resource group name>" -n "<container instance name>" --query "provisioningState"
Feel free to check out our new container instance in the Azure portal.
- Obtain the fully qualified domain name (FQDN) for your container with the following:
az container show -g "<resource group name>" -n "<container instance name>" --query "ipAddress.fqdn"
- Navigate to the FQDN in your chosen browser, and you should see the same page we saw when running the container locally.
As we discussed previously, containers are immutable and stateless – if you make a change to a running container, when it restarts, those changes will not persist. If you want to persist the state of a container beyond its life cycle, you need to mount an external volume.
Mounting volumes to containers
We’re going to use an Azure file share for this, which only works for Linux containers:
- Create a new storage account in our resource group with the following:
az storage account create -n "<storage account name>" -g "<resource group name>" -l "<location>" --sku "Standard_LRS" --kind "StorageV2"
- Create a file share within that storage account with the following:
az storage share create -n "acishare" --account-name "<storage account name>"
If you get an authentication error during this command, you can get an access key for the storage account and provide that with the --account-key argument. The next step shows how to get the access key, so feel free to follow that and go back if needs be.
- Obtain an access key for the storage account with the following:
az storage account keys list -g "<resource group name>" -n "<storage account name>" --query "[0].value"
- Create a container with our newly created file share mounted as a volume using the following command:
az container create -g "<resource group name>" -n "demowithshare" --image "<registry name>.azurecr.io/demos/demo:v2.0" --dns-name-label "<unique DNS label>" --ports 80 --azure-file-volume-account-name "<storage account name>" --azure-file-volume-account-key "<storage account access key obtained in the last step>" --azure-file-volume-share-name "acishare" --azure-file-volume-mount-path "/acishare" --registry-login-server "<registry name>.azurecr.io" --registry-username "<registry name>" --registry-password "<registry password obtained previously>"
Note that the output mentions that the volume was successfully mounted.
- When completed, open the newly created container instance in the Azure portal, go to the Containers blade, then the Connect tab, and click Connect:

Figure 2.9 – Connecting to the container instance
- Create a new text file in the current directory with the following:
touch wontpersist.txt
- Confirm that it’s been created with the following:
ls
- Go into the newly created mount location from the container’s terminal session with the following:
cd ../acishare
- Confirm that there are no files in this location with the same ls command we just used.
- Create a new text file in this directory with the following:
touch persistent.txt
- Confirm that the file has been created with the ls command again.
- Stop the container from the Overview blade (you can use the CLI if you really want to).
- Navigate to our file share within the storage account, and note that persistent.txt is there.
- Start the container back up. Once it’s up and running, connect to it the same as before.
- Check that the wontpersist.txt file is no longer where we created it with the familiar ls command.
- Navigate to our mounted volume with the following:
cd ../acishare
- Confirm that the persistent.txt file we created last time did indeed persist beyond the container’s life cycle with the ls command.
- Clean up the resources created during this chapter by removing the resource group via the portal or using the CLI command:
az group delete -n "<resource group name>"
Having the ability to run containers within ACI can be extremely helpful when you have a workload that can run in an isolated container, allowing you to focus on designing and building your applications instead of managing the infrastructure that runs them. Hopefully, you can now see how ACI can greatly increase developer agility.
Summary
In this chapter, we built up our knowledge of some of the IaaS services that Azure has to offer. We went into detail about the design considerations when provisioning VMs, including programmatically obtaining image information. We then proceeded to provision a couple of VMs with both the Azure CLI and PowerShell. We covered one of the most fundamental and powerful deployment orchestration tools at your disposal with ARM templates, including the structure and more complex orchestration with multi-tiered templates, as well as nested and linked templates.
The last section of this chapter was all about containers – building container images and running containers from those images. With the fundamentals of containers out of the way, we looked at how ACR can help with the storage and maintenance of container images, followed by running containers within ACI, including the more advanced topic of mounting Azure file shares as volumes for persistent storage of containers.
In the next chapter, we will dive into Azure App Service web apps. We will go through an overview of the service, authentication and authorization, networking features, configuration options, monitoring, scaling, and deployment slots (which were briefly referenced earlier in this chapter).
Questions
- What does the Docker rmi my-image:latest Docker CLI command do?
- If your solution needs two containers within the same container group, which host operating system should you use?
- Linux
- macOS
- Windows
- Which element can you add to an ARM template to define apiVersion for all resources of a specific type, so that you don’t have to specify apiVersion for each resource?
- We know we can run Linux containers on a Windows machine; can we also run Windows containers on a Linux machine?
- What is the minimum number of containers you can have within a container group?
Further reading
- Read more about VM availability options here: https://docs.microsoft.com/azure/virtual-machines/availability.
- Read more about proximity placement groups here: https://docs.microsoft.com /azure/virtual-machines/co-location.
- Read about availability best practices for VMs here: https://docs.microsoft.com/azure/architecture/checklist/resiliency-per-service#virtual-machines.
- For information about Azure Load Balancer, visit this site: https://docs.microsoft.com/azure/load-balancer/load-balancer-overview.
- Further information on managed disks can be found here: https://docs.microsoft.com/azure/virtual-machines/managed-disks-overview.
- Read more about Azure DSC here: https://docs.microsoft.com/azure/virtual-machines/extensions/dsc-overview.
- Details of Azure VM sizes can be found here: https://docs.microsoft.com/azure/virtual-machines/sizes.
- Useful Azure documentation for developers can be found here: https://docs.microsoft.com/azure/developer/.
- Information on the VM serial console can be found here: https://docs.microsoft.com/troubleshoot/azure/virtual-machines/serial-console-windows.
- Information on ARM template functions can be found here: https://docs.microsoft.com/azure/azure-resource-manager/templates/template-functions.
- Learn more about Docker containers here: https://docs.microsoft.com/learn/modules/intro-to-docker-containers/.
- Further information on ACR tasks can be found here: https://docs.microsoft.com/azure/container-registry/container-registry-tasks-overview.
- Useful information on container groups within ACI can be found here: https://docs.microsoft.com/azure/container-instances/container-instances-container-groups.