
You now know the fundamental concepts, terminology, principles, and work processes surrounding digital audio editing, compositing, and synthesis, which allows you to create digital audio assets for your new media content. Now it is time to get into digital audio
data footprint optimization
and the way to go about getting the smallest possible digital audio file size for your audio assets, while at the same time getting the pristine audio playback quality results that you need for your interactive digital application development.
You’ll look at the primary considerations for optimizing your digital audio asset, including device compatibility (a baseline digital audio asset to gauge compression against each codec that you learned about in Chapter 4), optimizing digital audio usage (system memory and in network bandwidth considerations), and similar advanced topics on how digital audio is used.
Audio Optimization: Device Compatibility
Optimizing your digital audio assets for playback across the widest range of platforms, operating systems, and hardware devices is going to be easier than optimizing digital video or digital image assets. This is because there’s a wide range of display screen resolutions and aspect ratios compared to the more limited range of digital audio playback support (except for the latest Android hardware featuring 24-bit HD Audio playback compatibility).
People’s ears can’t perceive the same quality differences in digital aud
io that their eyes can perceive in digital images. There are two important “sweet spots” for digital audio support across hardware devices that you should target. A lower-quality audio (narration track or sound effects) use an 8 kHz or an 11.25 kHz sampling rate, with 8-bit, 12-bit, or 16-bit sample resolution.
Medium-quality audio (game music loops, longer sound effects, ambient background audio) use a 22.05 kHz or a 32 kHz sampling rate, with 12-bit or 16-bit sample resolution.
High-quality audio (albums, music for listening, film scores, etc.), including CD quality and HD quality audio, use 16-bit (CD quality) or 24-bit (HD quality) sample resolution at a 44.1 kHz or a 48 kHz sampling rate.
Ultra-high-definition audio, or UHD Audio, uses a 24/96 configuration, or a 24-bit resolution with a 96 kHz sample rate.
The best way to show this work process is by using a hands-on approach, so let’s get right into the optimization process!
Digital Audio Optimization: Work Process
The logical work process for optimizing a digital audio sample asset across hardware devices and using widely adopted open source content delivery platforms involves creating a 32-bit asset in Audacity and using a 44.1 kHz or a 48 kHz sampling rate, and then creating a baseline 16-bit uncompressed PCM format. You target 16-bit audio in this chapter, because all Android OS, Kindle, and HTML5 OS devices support 16-bit audio. If you’re targeting HD audio platforms and devices, you can perform this work process using 24-bit audio.
Baseline PCM File : Something to Measure Against
The first thing that you want to do is establish the “baseline” file size that you will measure your asset compression against using each of the major digital audio file formats. Fortunately, there’s an uncompressed file format called pulse-code modulation (PCM) that serves this purpose and provides you with an additional widely supported digital audio file format to use, if you need it, on any of the open publishing platforms (all of which will support PCM).
There is another important rationalization for exporting an uncompressed PCM baseline file, besides measuring compression against. When any of your compressed (lossy or lossless) assets are decompressed (decoded) into system memory, PCM represents a
memory footprint
that is needed to hold and play back the digital audio asset. So from a publishing and programming standpoint, you should also want to know how much
device memory
is needed to hold your application’s digital audio assets. This should be calculated by adding up all of your PCM file sizes.
Open your CH9.aud project file and the Stereo Track drop-down menu, as shown in Figure 12-1. Select Set Sample Format and set it to 16-bit PCM, or 24-bit PCM if you’re targeting HD Audio.
Figure 12-1.
Set Sample Format to 16-bit with Stereo Track menu
The next step is to use the Audacity File ➤ Export Audio menu sequence to export a WAV file if you are on Windows, or an AIFF file if you are on Mac OS X (see Figure 12-2).
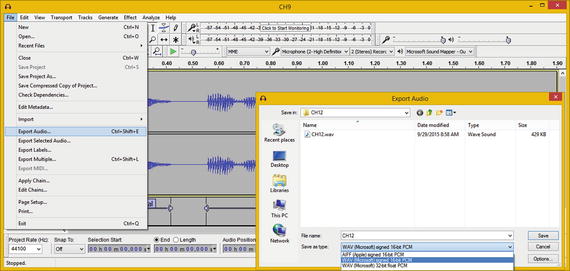
Figure 12-2.
Export baseline 16-bit PCM WAV or AIFF file format
Once you click the Save button, the Edit Metadata dialog appears for you to enter any metadata that you want included in your audio file (see Figure 12-3). The data is stored in each file format along with the audio data and it can be accessed in Android. This dialog appears for each audio format’s export.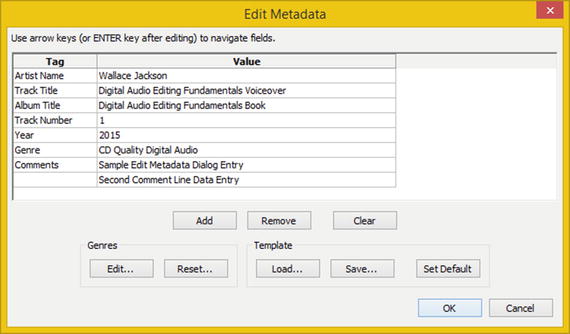
Figure 12-3.
The Audacity 2.1.1 Edit Metadata dialog
If you are wondering how your applications will read and support audio metadata if you choose to install the data in the audio file, Android Studio does support metadata retrieval with its MediaMetadataRetriever class, which developers utilize for this very specific purpose.
If for some reason your Android application needs to use
audio media metadata, you should use the Edit Metadata dialog along with the Android MediaMetadataRetriever class, which you can learn more about at developer.android.com/reference/android/media/MediaMetadataRetriever.html.
If you look at the CH12.wav 16-bit PCM file that you’ve saved out, you see that the file size is 428 KB. So your baseline uncompressed data and system memory footprint for a 2.48-second voice-over sample is 428 KB. You can use this number to determine the amount of compression that you will get with all the popular digital audio file formats you looked at in Chapter 4.
The next step is to go through the optimization process; that is, apply codec compression to your uncompressed (PCM) data using the different codecs supported in Android, Kindle, and HTML5. I am going to cover all the popular, open, digital audio formats.
Once that work process is completed, you are able to ascertain which resulting digital audio assets provide you with the highest quality digital audio playback in conjunctions with the lowest possible data footprint. Let’s get right to it!
Exporting Lossless Audio: FLAC Audio Format
The
first format that I am going to try out is the FLAC audio codec, because it uses lossless compression. This gives you a good idea of what kind of data footprint reduction you can get using compression, which does not throw away any of the original audio data. Using a lossless compression algorithm gives you as perfect a result as the 16-bit PCM WAV audio does! To do this, you’ll again use the File ➤ Export Audio menu sequence. This time, you’ll open the Save as type drop-down menu and select the FLAC Files format (see Figure 12-4).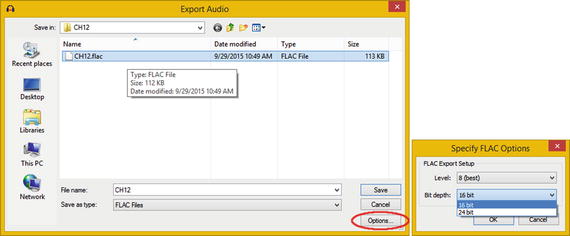
Figure 12-4.
Export Audio as FLAC format, in 16-bit at Level 8
I named the file CH12.flac and saved it
into my CH12 folder for this book. Notice that there are only FLAC files listed in the center area of the dialog. This is because now that you have selected the FLAC file format, this region in the dialog will only show FLAC files, and currently, there are none in the CH12 folder. Because I wanted to show file size for each format in Figure 12-4, I saved the file prior, so the size would be included in the screenshot, as well as the dialog settings and the options dialog (this way, I’m using only one screenshot rather than three
).
To set the FLAC codec options, click the Options button and set the quality Level to 8 (best) and the Bit depth to use 16-bit data resolution. Note under the Bit depth drop-down that you can also use this FLAC codec for lossless, 24-bit HD audio. (I placed the Export Audio and Specify FLAC Options dialogs in one unified screen to save on the number of screenshots that I’m using.)
Once you’ve output the CH12.flac digital audio asset, go into the file manager to look at the file size, or use the File ➤ Export Audio menu sequence and mouse over CH12.flac.
You see that it is 112 KB, reduced by more than 382%; 112 ÷ 428 = 0.261682, or only 26% as large as the PCM file was, or 100% – 26% = 74% less data. The 1/x (inverse) function on your calculator of 0.261682 gives you 3.82142857, an impressive 382.142857% data footprint reduction, with zero loss of data (quality). The FLAC format is good for use in Android Studio applications development, in conjunction with the PNG image format.
Next, let’s take a look at the other open source digital audio file format, Ogg Vorbis, to see if it can provide an even smaller data footprint. Since Ogg Vorbis is a lossy file format, it should give you an even smaller file size than the FLAC codec.
Exporting Lossy Audio: Ogg Vorbis Audio Format
Again, use a
File ➤
Export Audio work process to open the Export Audio dialog. Select the Ogg Vorbis Files option from the Save as type drop-down menu. I named the file CH12, which produces a CH12.ogg file name, and put it into the CH12 folder (see Figure 12-5). Click the Options button and select a Quality setting level between 0 and 10. I used the maximum setting of 10 to start with. During an actual data footprint optimization session, you will probably try several settings to see how the data footprint–to-quality trade-off is affected by the Quality slider setting.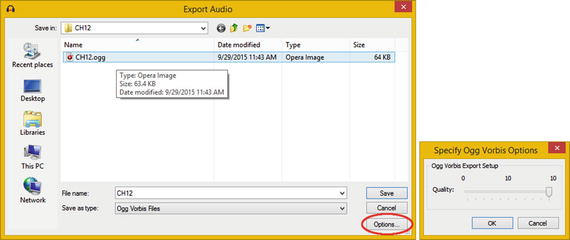
Figure 12-5.
Export Audio in Ogg Vorbis format at Quality of 10
Once you have output a CH12.ogg audio asset, take a look at its file size. You see that it is 64 KB, reduced by 669% in file size; 64 KB ÷ 428KB = 0.14953, which is 15% of your baseline 428 KB. The inverse of this is 6.6875, or a 669% data reduction. This OGG file is 85% smaller than your PCM file.
Next, let’s look at MP3, which is the most common lossy digital audio file format currently supported across publishing platforms. It should be quite interesting to see if MP3 can give you a smaller data footprint than the Ogg
Vorbis codec.
Exporting Lossy MP3 Audio: MPEG3 Audio Format
Use
you File ➤ Export Audio menu sequence again to bring up the Export Audio dialog. Set the Save as type drop-down selector to MP3 Files (see Figure 12-6). I named the file CH12 and selected the CH12 folder. Then I clicked the Options button to open a Specify MP3 Options dialog (shown on the right in Figure 12-6). I used the maximum Quality bit-rate setting of 320 kbps, which is a high-quality setting for digital audio data. I am trying to get a high-end baseline for MP3 compression and still compare what MP3 can do against an uncompressed PCM baseline. I also selected the Constant Bit Rate Mode, because it is the easiest to decode, and a Stereo Channel Mode, since the file is currently in a Stereo Track configuration.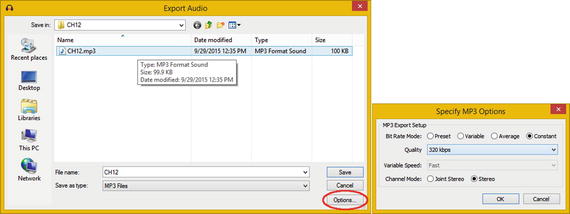
Figure 12-6.
Export Audio in MP3 format at Quality of 320 kbps
If you like, you can also try different Quality Bit Rate settings and the Variable and Average Bit Rate Modes to see how they affect the MP3 data footprint. If you decide to do this, differentiate your files from each other; simply name the file with the settings type in the file name. For example, a file with a 320 kbps Quality setting and a Variable Bit Rate Mode should be named CH12_320kbps_vbr.mp3.
This way, you can compare the audio file size of the MP3 and any other codec file format and do the simple math to figure out the percentage of the data footprint reduction relative to the different settings. You’ll do this next for the CH12_320kbps_cbr.mp3 file.
The CH12.mp3 file size is 100 KB, representing a 428% data footprint reduction. To calculate this, 100 KB ÷ 428 KB = 0.233644859, which is 23% of the original, uncompressed file size; 100% – 23% = 77% file size reduction.
If you use your 1/x (inversion) key on a calculator, you can get a percentage reduction coming from the other direction by inverting 0.2336449, which gives you 4.28. This means that you reduced the file size by 4.28 times, which equates to a 428% reduction.
Now that you have seen that your MP3 file size is larger than the Ogg Vorbis, let’s see how the MPEG4 AAC in M4A file format data compression can improve your file’s size-to-quality ratio compared to MPEG3. Since MPEG4 is more recent and uses a more advanced codec algorithm, M4A should provide a better file size–to-quality optimization ratio than either Ogg Vorbis or MP3 codecs.
Exporting Lossy M4A Audio: MPEG4 Audio Format
Follow the usual File ➤
Export Audio work
process to invoke the Export Audio dialog and select M4A (AAC) Files (FFmpeg) from the Save as type drop-down menu. If you did not install the LAME and FFMPEG libraries from Chapter 1, the file formats covered from here on out will not be available to you in Audacity 2.1. As usual, name the file CH12, which is named CH12.m4a by the Audacity Export Audio dialog after you click the Options button and open the Specify AAC Options dialog (see Figure 12-7). Click OK to set the maximum Quality of 500, and then click Save to save it in the CH12 directory. I’m betting that even using a Quality setting of 500, the MPEG-4 AAC codec is so advanced that it will give you a smaller file size than Ogg Vorbis did at 64 KB.
Figure 12-7.
Export Audio in M4A AAC format; set Quality to 500
Your CH12.m4a file size is 62 KB, representing 14% of the uncompressed data footprint, giving an 86% reduction. To figure this out, 62 ÷ 428 is 0.1449, or 13% of your original, uncompressed file size; 100% – 14% = 86% file size reduction. Invert the 0.1449 and you get 6.9, or an impressive 690% data footprint reduction.
Now that you have seen that your M4A AAC file size is the most impressive
data footprint reduction thus far, let’s see if the much more specialized AMR-NB (Narrowband) data compression codec will give you any further data footprint improvements over MPEG4 AAC.
Since this codec is optimized for voice, chances are the results are going to be significantly better than any that you have encountered thus far—so hold onto your hat! One thing to note about recording voices is that it does not require stereo.
Exporting Narrowband Audio: MPEG4 AMR Format
Even though
the
MPEG4 AMR-NB (Adaptive Multi-Rate Narrowband) codec and data format was originally designed (optimized) specifically for use with voice recording applications. However, there may be some other applications, for example, short-burst sound effects, that might obtain reasonable, if not fantastic, results by using this codec. As you know, any codec is simply a complex, mathematical algorithm, implemented using software. It doesn’t discriminate, so, the only way to really find out which codec will give you the best compression to quality result with any given asset is to run the original uncompressed audio data through the codec, and then see what happens, which is what you are seeing over the course of this chapter.
AMR-NB is supported in Kindle, Android OS, Tizen OS, iOS and popular open HTML5 OS platforms and HTML5 browser software, including Mozilla Firefox and Google Chrome. It is also used in Blackberry OS and QuickTime.
Follow the usual File ➤ Export Audio work process to invoke the Audacity Export File dialog. Select your AMR (narrow band) Files (FFmpeg) option from the Save as type drop-down menu. As usual, name the file CH12, which is named CH12.amr by the Exporter, after you click Save.
Save this file in your CH12 directory, or whatever your digital audio assets folder is named, and then click the Options button to open the Specify AMR-NB Options dialog (see Figure 12-8).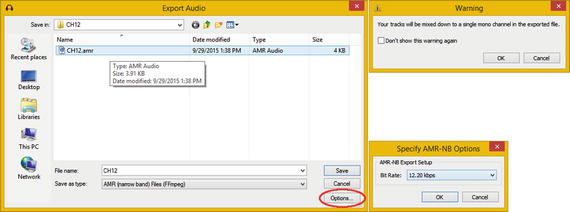
Figure 12-8.
Export Audio in AMR format; set Bit Rate to 12.20
I chose to use the 12.20 kbps Bit Rate setting to initially get the maximum quality results possible with this codec. Later I can try other settings for comparison purposes and put together a results table to see which is best.
Click Save and you should get a Warning dialog (see Figure 12-8) informing you t
hat your Stereo Track will be converted to a Mono Track. As you can see on the left of Figure 12-8, this is the smallest data footprint that you’ve obtained thus far, using only 4 KB of data.
Interestingly, when you play this AMR audio data sample, it still sounds a lot like the audio contained inside the other supported codec formats that you have generated thus far. The CH12.amr file size is 4 KB.
This represents more than a 99% data footprint reduction, some of which is from making a stereo data sample monoaural. To figure this out, 4 KB ÷ 428 KB = 0.00935. This is 0.94% of an original uncompressed file size; 100% – 1% = 99% file size reduction. If you invert 0.00934579, you get 107, which represents a 10,700% reduction in data footprint.
Exporting Audio for Windows: WMA Audio Format
Just in case
you are delivering
content on Windows OS, let’s cover WMA or Windows Media Audio, which is supported by the Windows Media Player. The last three formats that you are exporting in this chapter use the FFMPEG library that you installed in Chapter 1. The WMA format also uses the library, shown in a drop-down selector using an (FFmpeg) denotation. Follow a File ➤ Export Audio work process to invoke the Export Audio dialog and select WMA (Version 2) Files (FFmpeg) from the Save as type drop-down menu. As usual, name this file CH12, which is named CH12.wma. Save it into your audio assets folder (mine is a CH12 directory), and then click the Options button to open the Specify WMA Options dialog (see Figure 12-9). I chose to initially set my Bit Rate setting at the highest, 320 kbps. Click OK to set Quality. Click Save to export your CH12.wma file.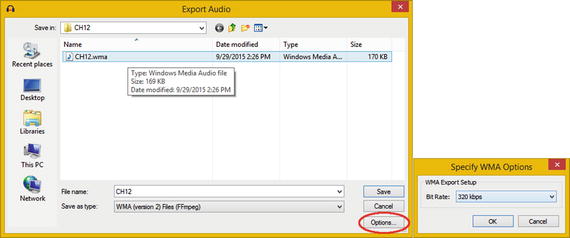
Figure 12-9.
Export Audio in WMA format, at Quality of 320 kbps
The CH12.wma file size is 170 KB, representing 40% of the uncompressed data footprint and giving you a 60% data reduction.
To figure this out, 170 ÷ 428 = 0.3972, or 40% of your original, uncompressed file size; 100% – 40% = 60% file size reduction. Invert the 0.39719626 and you get 2.517647, or a not-so-impressive 252% data footprint reduction.
Now that you’ve seen that your WMA file size has the least impressive data footprint reduction thus far, let’s fully compare all eight of the digital audio file formats that you generated. For my OS, it is the Windows Explorer file manager
.
The Audio Codec Results: Spanning 4 KB to 400 KB
As you can see in
Figure 12-10, I opened my CH12 folder in an operating system file management utility to get a comparison viewpoint of all of these digital audio files in one location.
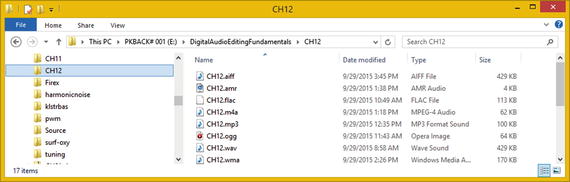
Figure 12-10.
Eight different exported digital audio formats
The AMR-NB codec, which is optimized for voice and uses a Mono Track, is the clear winner at 4 KB—more than one hundred times less data used to reproduce the voice-over.
For Stereo Track usage, MPEG-4 AAC and the open sourced Ogg Vorbis codec virtually tie for second place at around 64 KB. They both have widespread support in Kindle, Android, and HTML5, just as AMR-NB does, and are appropriate for use in other types of digital audio, such as music and sound effects.
Tied for third place at around 100 KB each are the MP3, which is lossy, and the FLAC, which is lossless. Between the two, I would opt for using FLAC, although the playback support for MP3 is more widespread.
Finally, in last place is Windows Media Audio (WMA) with a 170 KB data footprint. You can use for Windows Media Player, but be advised that these other digital audio data formats also work in Windows applications. I’d opt for MPEG-4 or Ogg Vorbis.
I am not including the baseline 428 KB AIFF (Mac OS X), or WAV (Windows) digital audio formats in this analysis, but if a storage data footprint isn’t an issue, they can be used with results as impressive as FLAC, as they give you a 100% quality reproduction of your digital audio sample data.
Summary
In this chapter, you looked at digital audio data footprint optimization concepts, principles, and techniques regarding eight primary digital audio formats, supported across all four of the key open new media content publishing platforms (HTML5, Android, Kindle, Java) that can decompress your digital audio assets created with Audacity 2.1.1.
You looked at how you should match the specifications for your digital audio assets to the hardware capabilities of your target hardware devices. For high-quality audio, this means using 24-bit 96 kHz audio for HD Audio devices or 16-bit 48 kHz audio to cover all mainstream audio hardware devices.
You learned how to use Audacity to export audio into six of the most widely utilized digital audio codec formats used in HTML5, Kindle, Java, and Android applications development today.
You learned how to calculate a data footprint reduction percentage, and applied this to the six different data formats to see a range of reductions from 60% to more than 99%, spanning FLAC, OGG, MP3, MPEG4, WMA, and AMR digital audio codecs.
In the next chapter, you learn about programming code to implement digital audio inside some of the most popular open source publishing platforms, including HTML5, Kindle, Android Studio, Java, and JavaFX.