
Now that you know about some of the different areas of digital audio, including MIDI, synthesis, digital audio recording/sampling, digital audio streaming, captive digital audio, and digital audio data file formats, the next step in the sampling process is to remove those
background noise
“artifacts” from the data sample that you created in Chapter 3. This is especially important when working with voice-overs and similar vocal-oriented samples, because you want it to be relatively quiet—except when the person is speaking, of course.
In this chapter, you learn about the noise removal algorithms in Audacity, which were recoded and taken to a new professional level in version 2.1. Noise reduction is a timely topic for Audacity 2 users.
Noise Removal: Algorithmic Processing
In this chapter, you delve into the process of background noise removal, which is the first step you generally take after sampling something. You’ll need extra waveform noise as an input to the noise reduction (noise removal) algorithm; this is something that you want to do before you trim the unused portions of your sample. You learn about trimming in the next chapter.
Background noise can come from a significant number of different sources, which is why professional recording studios have rooms with sound-absorbing foam on the walls and that use extremely expensive microphones on stands behind circular pop-screens that prevent vocal pops, like you have at the end of the word “fundamentals” in the current sample. The noise in my sample was recorded on a consumer-quality microphone.
Noise Reduction: Defining the Background Noise
If you play the CH3.aud digital audio sample created in Chapter 3, and you listen carefully, you can hear background noise.
This is especially evident at the beginning and the end of the data sample. If you do not have Audacity open, launch it and open the
CH3.aud project file
now, so that you can learn how to fix this problem using the Audacity noise reduction algorithm. It’s unprofessional to have background noise in the digital audio assets in any of your applications.
Now you begin to get experience in using your Audacity
Effect menu
to apply digital audio sample processing effects; in this case, to remove background noise.
The work process for removing noise in Audacity—perfect for use with voice-over tracks—involves using the vertical bar tool to select a portion of the audio sample that only has noise in it. The easiest way to do this with surgical precision starts with the Zoom tool. It is accessed by selecting the magnifying glass icon, which is next to the record button. Click the vocal waveform one or two times to zoom into the sample data so that you can see the voice data in the waveform, as shown in Figure 5-1.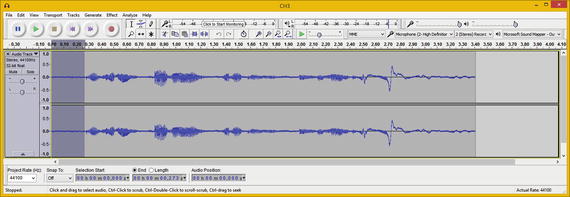
Figure 5-1.
Select an area with noise, using the vertical bar icon
The noise reduction algorithm uses the noise data that you select; the most logical sample is the data before the first word starts. The noise reduction algorithm can use it to develop algorithmic noise data “profiles” and then remove similar noise across your entire data sample.
After you define noise in the algorithm, the next step processes the entire waveform and removes similar noise data from your audio sample.
As you can see in Figure 5-1, I’ve zoomed in and selected a section of the sample data that has noise in it, using the vertical bar (waveform selection) tool, which is located right next to the record button.
Be careful not to select any portion of your sound wave that contains vocal content.
Next, in the Effect menu, select the Noise Reduction algorithm option, as shown in Figure 5-2.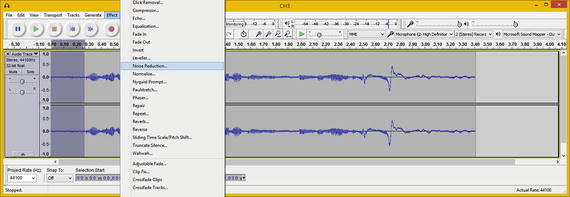
Figure 5-2.
Select the Effect menu
and Noise Reduction submenu
This opens the Noise Reduction dialog (see Figure 5-3), where you click the Get Noise Profile button. I selected only a quarter of a second of noise data, even though Step 1 of the dialog advises you to select a few seconds of isolated noise data, which may not be possible.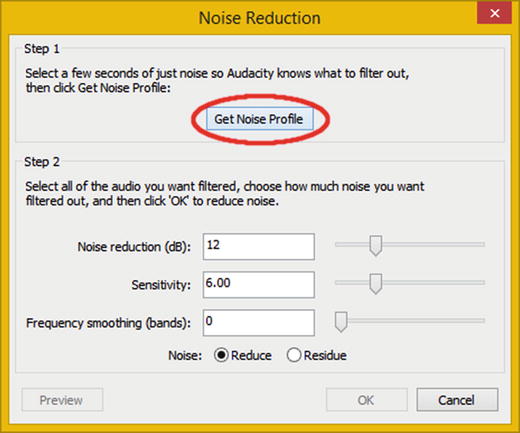
Figure 5-3.
Click the Get Noise Profile button
then click on OK
Fortunately, even a quarter-second of sample data at 44.1 kHz contains over 11,000 data samples of noise at a 32-bit resolution, so there are still trillions of bits of noise data. This is certainly enough for the algorithm to find a noise profile so that it can remove this data pattern from the rest of the data sample and (hopefully) leave the vocals intact.
Once you click Get Noise Profile, which gives the noise reduction algorithm the data it needs to process, the OK button becomes enabled. You then proceed to Step 2 to actually process the noise data and remove it from your vocal audio sample, hopefully in its entirety.
The Audacity noise reduction effect is really more like a filter in the way that it operates; it is worth the cost of Audacity 2.1 alone. Hey! Wait a minute! Audacity is free! Sorry about that, I forgot, as it certainly seems like paid software.
Noise Reduction: Removing the Background Noise
Make sure to deselect any selected portion of your sound wave before applying the noise reduction algorithm, because only the selected section will be processed. This is quite handy to know when selective noise reduction is what you want to achieve. I used the following default settings for my initial noise reduction algorithm “pass”: a Noise Reduction of 12 decibels, a Sensitivity of 6, and the Frequency smoothing bands at 0, as shown in Figure 5-3.
As you can see in Figure 5-4, the algorithm did a fairly good job of removing the background noise in my voice-over data sample.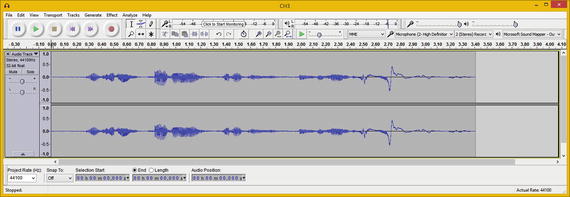
Figure 5-4.
Deselect the waveform
and apply the default setting
Play the audio sample using the green
play icon
in the control transport, seen in the top-left corner of Figure 5-4. Listen carefully for any background hiss. I don’t hear too much hissing in the first part of this sample; however, there is hissing in the second part (end) of the data sample.
To improve the noise reduction result, you may need more extreme settings than the defaults suggested by Audacity in this dialog. The process for doing this includes using the Edit ➤ Undo Noise Reduction menu sequence, and subsequently trying different decibels, sensitivity, and frequency smoothing settings in Step 2 of the Noise Reduction dialog.
Let’s go through the work process that I used to get better noise reduction results. The first thing I tried was a higher decibel setting, so I doubled the 12 decibels to 24.
I saved the different results using the lossless FLAC
audio data format so that you can hear the results that I hear as I refine these settings. I named the files CH5-decibel-sensitivity-smoothing.FLAC so that the audio file names show the actual dialog settings used.
I used FLAC because it is lossless, so you can reproduce the exact same data bytes that I have in my system by importing these files into Audacity 2.1.1 using the File ➤ Import ➤ Audio ➤ FLAC menu (and dialog drop-down setting) command sequence.
Using 24 decibels further reduced the noise level, but also introduced a slight chirping effect near the end of the sample. I decided to double this setting again, to the maximum 48 decibels setting, to see if this exacerbated the chirping and if it would also reduce background noise levels even further.
The 48 decibels setting did indeed remove more background noise, but the chirping effect on the word fundamentals remained the same, so I decided to stay at 48 decibels.
I then started to refine my default Sensitivity setting to see if I could get an even better result. I doubled this setting to 12 to see if it would reduce the chirping effect. The sample didn’t sound much different, so I maxed the setting out at 24.
The chirping sounded worse with decibels and sensitivity maxed out, so I tried the other extreme and set the Sensitivity to 0, which entirely turned off the noise reduction algorithm!
This setting tells the noise reduction algorithm the amount of sensitivity to apply to the data sample; that is, how sensitive the effects are to the sound wave. Since it’s called “Sensitivity,” this is logical, if you think about it. I found that a Sensitivity setting of 4 minimized the chirping effects.
Next, I started applying the Frequency smoothing bands settings (0 through 6). The more I increased the frequency smoothing, the more the vocals became “muddied”; thus, I decided to use a setting of 0 or 1. Frequency smoothing affects the
sharpness
(clarity) of a sound wave, just as smoothing (blur) does in a digital image.
You can see the different results by using the FLAC files that I include with this book, or you can simply try it out on your own vocal sample to get a feel for the settings.
Figure 5-5 shows my FLAC files for some of the primary noise reduction settings that I tried, which I exported as FLAC files, along with the original noisy source file as a baseline; you can see the amount of data that the noise reduction took out of the original sample, which came in at 316 kilobytes.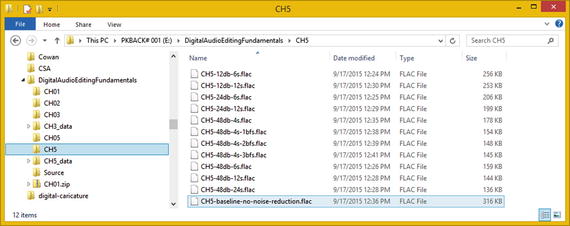
Figure 5-5.
Noise reduction data shown as numbers by using FLAC
This approach, which is a glimpse of things to come in Chapter 12, allows you to see how the amount of data removed by the noise reduction algorithm relates numerically across all of the settings.
This provides you with an alternate way of analyzing the result of the noise reduction algorithm, instead of looking at your sampled waveform data representation inside of Audacity.
Now that your waveform is cleaned up a bit, in the next chapter, you can learn how to trim away some of the unnecessary parts of the data sample.
Summary
In this chapter, you looked at digital audio sample noise-reduction concepts, principles, and work processes. You learned how to give the Audacity noise reduction algorithm a sample of your noise data and how to work with noise reduction decibel, sensitivity, and frequency smoothing band settings.
In the next chapter, you learn about digital audio sample editing, including scrubbing and trimming operations.