
You now have an understanding of how to use algorithmic tools in Audacity to not only process your audio sample data for what it sounds like, but also for visual analysis. Now it’s time to go back to what I call “manual editing tools,” given that the algorithms do the work for you once you direct them with a setting or two (or sometimes half a dozen). In this chapter, you will look at the concept of tracks, accessed using the
Tracks menu
in Audacity. You encountered the Label Track in Chapter 9, and you go over the other track types in this chapter.
Tracks in digital audio editing software provide similar functionality to layers in digital image compositing software, as they allow you to separate content (or features) into their own containers for more content editing workflow flexibility.
Layers in digital image compositing software allow you to create image composites. Similarly, tracks in audio software allow you to create digital audio composites.
You’ll finish looking at the
Label Tracks features first
, move on to Time Tracks, and then look at related features such as envelopes before you get into Stereo Tracks and Mono Tracks. You’ll discover how to work with tracks, from basics such as resizing to more advanced “moves” such as turning Stereo Tracks into Mono Tracks.
Audio Compositing and Utility Tracks
By adding either Stereo or Mono Tracks to your project, you can “composite,” or layer, digital audio assets together to create complex audio assets. For instance, you can add background music or sound effects and mix them in with your vocal tracks. There’s also what I call “utility” tracks, which allow you to add things like selection sets, labels, and envelopes to your Audacity project. These features are in Audacity’s Tracks menu.
Label Tracks : Text Label Subsample Selection
You already got a head start in Chapter 9, when you used the Analyze menu’s Regular Interval Labels function (see Figure 9-1) to create a Label Track. Let’s finish learning about this Label Track type by taking a look at the Tracks ➤
Edit Labels menu sequence
, which opens the Edit Labels dialog and allows you to do all the Label Track label editing in one central location. As you can see in Figure 10-1, there’s an extra vocal label, which is shown highlighted in the lower-right corner of Audacity. Click the 5 in the dialog, which selects this unused label entry, and click the Remove button to delete it from the Label Track view pane.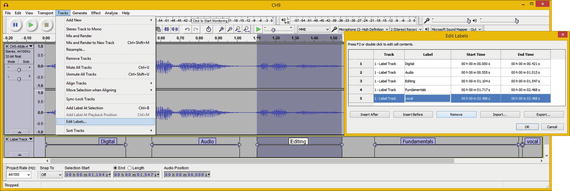
Figure 10-1.
Use the Edit labels dialog and delete vocal label
As you can see in Figure 10-2, the vocal label is gone. Also shown in Figures 10-1 and 10-2 is that if you click a label name, Audacity selects that label’s range (which I call a “selection set”) if you have set the
label range using dots and arrowheads, as you learned in Chapter 9.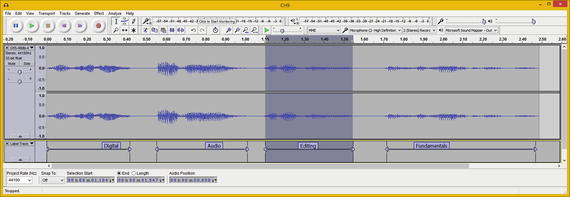
Figure 10-2.
Label can also be used for subsample selection set
Thus, you can use Label Tracks to define selection sets.
Time Tracks: Project Time or Rate (Pitch) Warping
Let’s look at another utility (tool) track in Audacity called a Time Track. Whereas the Label Track is logically at the bottom of your project, as shown in Figure 10-3, the Time Track should logically be placed at the top of the project. To create a Time Track, use the Tracks ➤ Add New ➤ Time Track menu sequence. Audacity automatically positions your Time Track at the top of the Audacity project.
Figure 10-3.
Use Tracks menu and Add New ➤ Time Track submenu
As you can see in Figure 10-4, the new Time Track, which is labeled at the left side of the track (as are the Stereo Track and the Label Track), is now at the top of your Audacity project
.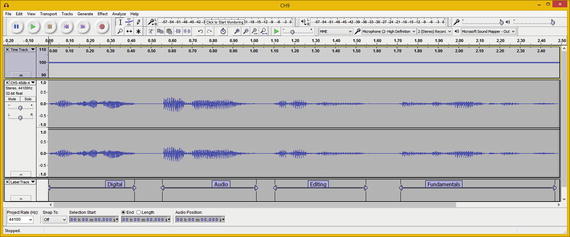
Figure 10-4.
A Time Track is added to the top of your project
Anything that you do in this Time Track affects your entire project, just like the Label Track. You can close a track at any time by clicking the X in the upper-left corner of the track. Click in the gray area at the left to select that track.
Resizing and Using a Time Track: Add a Pitch Shifting Envelope
To resize the Time Track, place your cursor on top of the line that divides the area between your Time Track and Stereo Track, until the cursor turns into a double-headed arrow, and then click and drag downward. To affect the Time Track control data, which is shown as a blue line in Figure 10-4, you use the
Envelope Tool
, which is shown circled in red in Figure 10-5.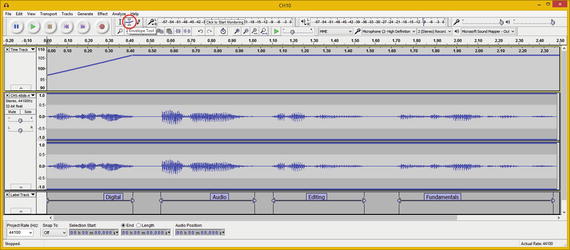
Figure 10-5.
Use the Envelope Tool to add control points to line
Click to insert a
control point on your left end of the Timeline, and then one at 0.40, and then drag the left control point down to a level of 97, as seen in Figure 10-5. This starts your sample at a higher pitch and then ramps it to normal, using a diagonal line.
Let’s do something complex with the tool, and chipmunk some of these samples, as is shown in Figure 10-6.
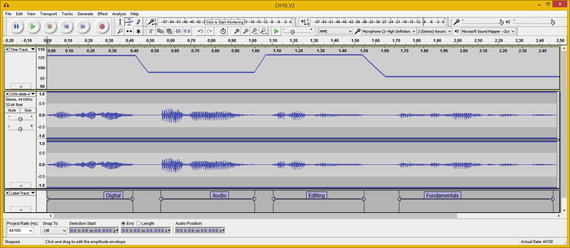
Figure 10-6.
Time Track envelope applying different pitch rates
As you can see in Figure 10-6, I added control points so that I could increase the playback rate (pitch), for some of the subsamples. I changed this rate during the periods of silence in between the subsamples, and then decreased the playback rate, which I did twice, using different pitch (rates) for each subsample. You can clearly see what I did by using the Envelope Tool in the Time Track. And now if you play the project, each subsample uses a different pitch.
You can also use the Envelope Tool in the Stereo or Mono Tracks; however, in these tracks, it affects the amplitude, not the frequency of the waveform! Let’s look at that next.
Using Other Track Envelopes: Control Amplitude, Not Frequency
As you can see in
Stereo Tracks
, you have the same control data ribbon, or spline, that you have in your Time Track. These blue lines appear whenever you select the Envelope Tool. You can manipulate them in the same way that you do in the Time Track: using control points that can be entered by clicking the line, or anywhere in the Track for that matter. In the Mono and Stereo Tracks, these control data lines control amplitude, so if you wanted to peak the volume for each of your subsample portions in your voice-over, it would look something like what’s shown in Figure 10-7.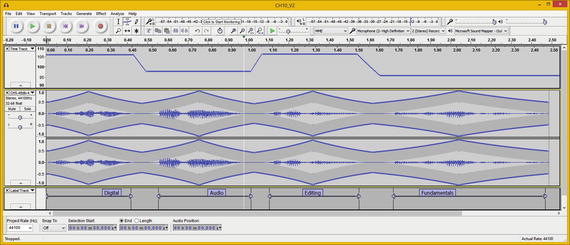
Figure 10-7.
Using Envelopes for Stereo Track to control volume
Next, let’s implement a different envelope configuration to provide the same effect that the Silence Audio Tool or Noise Reduction algorithm accomplished previously.
There are different approaches to achieving the same result using professional new-media content-production software packages. This is a third way to silence noise by using amplitude.
Using the amplitude envelope to turn down the volume between data samples effectively does the same thing that the tool-based and algorithm-based approaches did, so you can reduce noise by using an envelope, an algorithm, or a tool. Not bad for a fundamentals book, eh?
In Figure 10-8, you can see that I’ve aligned these envelopes, as well as the labels, across all four tracks. Also, notice in Figures 10-7 and 10-8 that if you put the cursor in the top time indicator bar (above all the tracks), it turns into a down arrow that indicates where you are in the project; the line attached to it is either white (see Figure 10-7) or yellow (see Figure 10-8).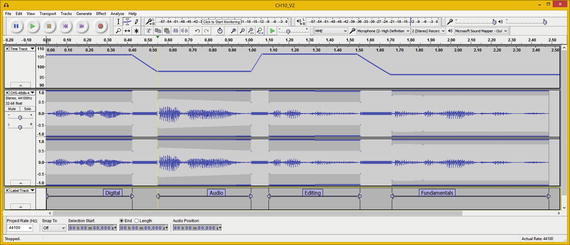
Figure 10-8.
Set Volume to 0 with an envelope between vocals
Audacity turns the line that’s attached to the green position indicator (down arrow) a yellow color if it is on the boundary of a selection set or in a control point position.
Mono Tracks : Some Audio Doesn’t Require Stereo
Since you have been using Stereo Tracks, let’s cover Monoaural, or
Mono Tracks
, first. The logical thing to look at initially is how to convert a Stereo Track into a Mono Track. The reason you want to do this is two-fold. First, although this isn’t a data footprint optimization chapter, having to compress, optimize, and store half of a data sample means a 100% reduction in any resulting file size, using any of the digital audio formats covered in Chapter 4. This savings simply can’t be ignored. The moral of the story is don’t use Stereo Tracks unless you absolutely have to for digital audio asset quality. The other reason is because Stereo Tracks are not really needed for things such as sound effects.
Stereo Track to Mono Track: Conversion Algorithm
To convert a Stereo Track to a Mono Track, click in the blank gray area at the far left of the Stereo track under the track settings. This selects your entire track, as shown in Figure 10-9. Notice that Audacity is now showing the Label Track selection set areas that you defined in the previous two chapters. Audacity is smart, as long as you set up the project correctly, which I have been showing you how to do.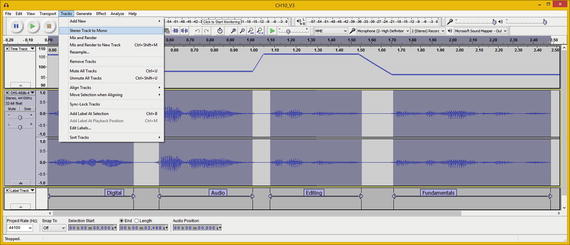
Figure 10-9.
Select Tracks ➤ Stereo Track to Mono
Now you are ready to combine these Stereo Tracks into one Mono Track. To do this, select Tracks ➤ Stereo Track to Mono, as shown in Figure 10-9.
Your stereo voice-over sample data is now mono voice-over sample data contained in a Mono Track, as shown
in Figure 10-10. Notice that this track sounds essentially the same if you play it back.
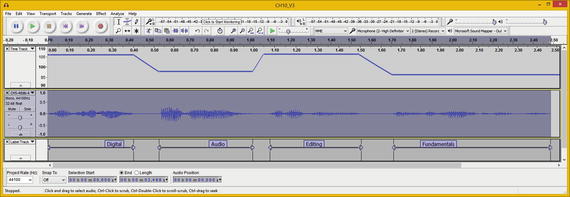
Figure 10-10.
Mono Track is the summary of Stereo Track data
If you click the left side of the Mono track, next to its track name area, your entire Mono Track should be selected. However, your selection sets are not individually shown as they were before, thus something has changed during this transition. Let’s investigate this further to see which of the selection sets, labels, or envelopes (volume) control data might have disappeared.
As you can see in Figure 10-11, your Label Track data is still intact, and if you click the label names in the selection set, the data is also still in place. However, if you click the Envelope Tool icon (shown selected in Figure 10-11), you’ll find that the envelope data was lost in the algorithmic combination of the tracks.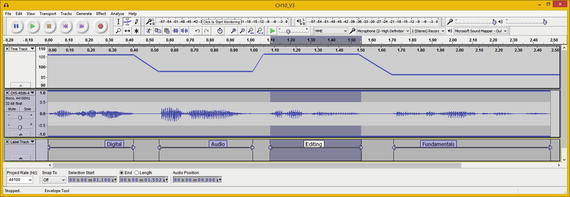
Figure 10-11.
You can still select Label Track
, but the envelopes are gone
Let’s hope that the Audacity Team is working on this!
Let’s take a look at some of the other important editing functions in the Tracks menu.
Track Resampling: Changing the Track Sampling Frequency
The other significant way to reduce the data footprint in your digital audio assets is to cut the
sampling frequency
in half, saving another 100% in data, because you are taking half as many data samples during each second. Using 22.05 kHz for voice-overs is very high quality; in fact, if you want to reduce the data footprint another 200%, you could resample to 11.25 kHz and still get a good voice-over reproduction.
You can resample audio data in Audacity on a track-by-track basis by using the Tracks ➤ Resample menu sequence. It is important that you set a starting sample rate of CD quality (44.1 kHz), or even THX quality (48 kHz), so that later you have plenty of source data for your resampling algorithm to work with. It also helps to resample to an even multiple of 2, 4, or 8, if possible. In this case, 4 × 11.25 = 44.1 and 2 ×22.05 = 44.1, so you have a perfectly even downsample scenario, allowing the algorithm to give you the best possible quality-level results.
Click the Mono Track name and select the Tracks menu. Then click the
Resample menu option
, selecting the 22050 sampling rate from the drop-down menu (see Figure 10-12). Click the OK button to resample the Mono Track at 22.05 kHz.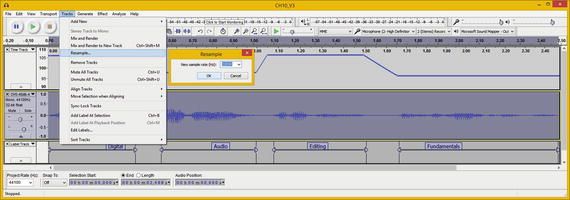
Figure 10-12.
Set new sample frequency using Tracks ➤ Resample
Next, let’s take a quick look at the Sort Tracks feature
.
Tracks Reordering: Using the Sort Tracks Submenu
By selecting Tracks ➤ Sort Tracks (see Figure 10-13), Audacity allows you to sort your tracks at any time, either by a data sample’s start time, which you would use if you had these four subsamples on their own tracks, or by Track Name. It doesn’t matter which tracks are selected because it sorts the tracks across your entire project. Let’s use the Sort Tracks by Name option to see how this function works on your current project. This gives you a new perspective of looking at your digital audio sample data, time warp (pitch rate) control data, and label data.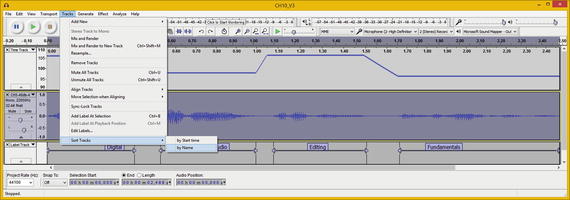
Figure 10-13.
Use the Tracks ➤ Sort Tracks ➤ by Name function
As you can see in Figure 10-14,
the current tracks have been sorted into a different order, with the sample waveform on top, the label selection sets underneath that, and the envelope control data underneath that. In this configuration, you can see that the control point relationship to the selection sets better, so I refined these even more using the track configuration; now the points and selection set lines align even better than before.
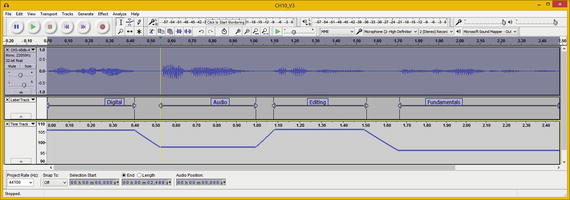
Figure 10-14.
Your tracks are now rearranged by track name
Now let’s return to the Stereo project version by using the Edit ➤ Undo menu sequence several times. Alternatively, you could simply open your CH10_V3.aud project.
It is important to note that Audacity 2.1 uses an undo queue, which keeps track of your “moves” and can undo whatever you have done as far back as you need to undo it, which can be quite handy. This is a feature in production software packages such as GIMP, Blender, Lightworks, and Inkscape, among others. These are all covered in my Android Studio New Media Fundamentals (Apress, 2015) title.
Next, let’s look at adding a new blank track and placing synthesized tone data into it. I’ll cover synthesis in Audacity, which is found in the Generate menu, in the next chapter.
Adding Tracks: Creating a New Track
First, select the
Label Track by clicking in the blank area at the far left of the track, so that your New Track is underneath it, since the labels are being used as selection set guides for the Stereo track above the Label Track. Then select Tracks ➤ Add New ➤ Mono Track (see Figure 10-15). This is how you add a blank track to a project, for any of the four track types, whenever you need to expand the complexity of your compositing.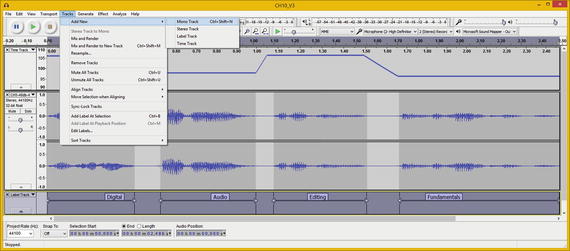
Figure 10-15.
Select the Label Track and add a new Mono Track
As you can see in Figure 10-16, the blank track is added underneath the Label Track. You can use the Generate ➤ DTMF Tones menu sequence to synthesize audio in this new track. I named the DTMF sequence telephonedialer, used 50% volume to composite the audio with the voice-overs, and used a one-half second duration with a sample rate duration setting of 22050 Hz. The resulting tones are seen in Figure 10-17.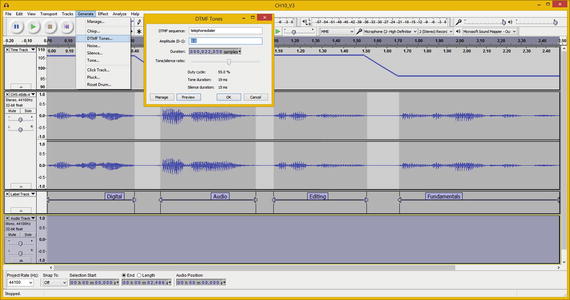
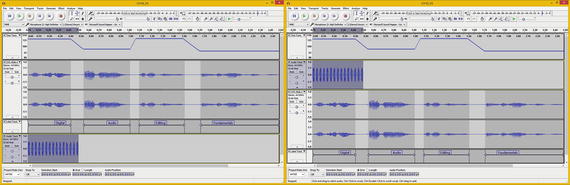
Figure 10-16.
A Mono Track will be added under your Label Track
Figure 10-17.
Drag the Mono Audio Track above your Stereo Track
Next, let’s look at how to reposition tracks so that the tone sequence aligns before the vocals start.
Dragging Tracks : Repositioning Your Track Order
You need to position the Mono Track before the Stereo Track in the audio composite. This is done using a drag-and-drop operation, as shown in Figure 10-17 (“before” the drag-and-drop is shown in the left screen; “after” is shown in the right screen).
To reposition tracks in this manner, you click the track name and information area, and drag the track up or down to reposition it. Now that your tracks are in the right order for using track alignment features, let’s take a look at that next.
Aligning Tracks : Using the Align Tracks Feature
Audacity has a number of useful track alignment features, which are located under the Tracks ➤ Align Tracks and Tracks ➤ Move Selection when Aligning menu sequences. They are self-explanatory, so be sure to play around with them. To invoke an alignment, select the tracks that you want to align (see the left screen in Figure 10-18) and select a track alignment option.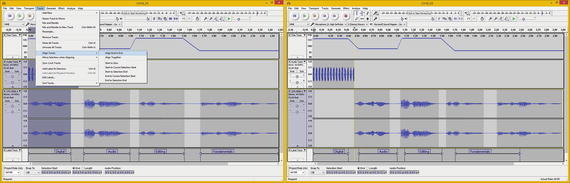
Figure 10-18.
Shift-select multiple tracks, and use Track Align
As you can see in the right-hand screen in Figure 10-18, the Align End to End function aligns the audio compositing project so that your Mono Track DTMF Tones plays back before any of your vocal samples are played.
Take a close look at the bottom of the right screen in Figure 10-18; a problem was introduced with the alignment of the Label Track. You need to drag the right (or left) dot for each of the selection set labels, and reposition them back underneath the subsamples in the Stereo Track. This lets you be more proactive with Audacity, so it’s a good thing.
To add a selection set label for the DTMF Tone Sequence, you want to use the selection (vertical bar) tool and then select the area of space where you want the selection set range to be defined, as shown at the bottom of Figure 10-19.
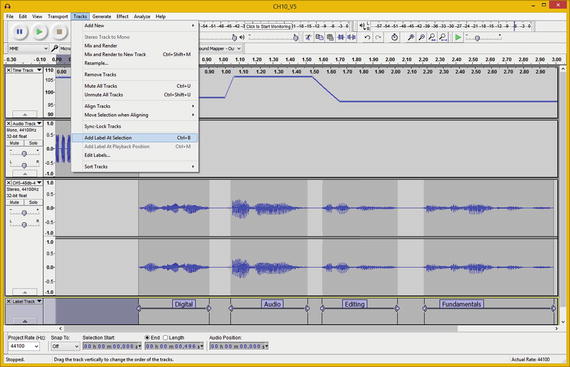
Figure 10-19.
Align selection set labels, and select left area
Next, select Tracks ➤ Add Label At Selection (see Figure 10-19). This tells Audacity to create the selection set label range and sets the dots and chevrons!
As you can see on the bottom-left of Figure 10-20, all that you have to do is type the DTMF Tone Sequence label, and the Label Track is upgraded to contain your
selection set for the DTMF Tone section that was added. You’re done once you adjust the envelope data.
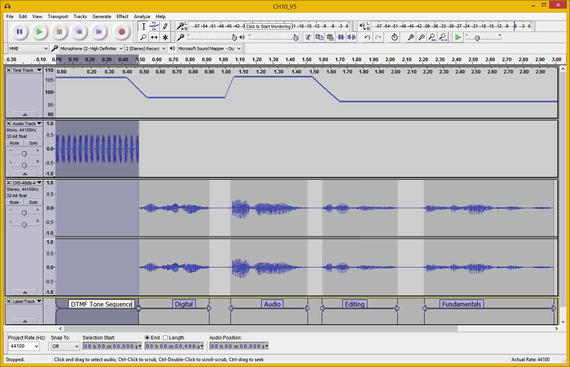
Figure 10-20.
Edit a text field for the new selection set label
You may have also noticed in Figure 10-20 that the data for the envelope control points has not been shifted over with the align tool, so you have to get some more practice with Audacity and move them 0.5 seconds to the right for each of the control points.
Once you have done this, your Audacity project should look like the one shown in Figure 10-21. I saved the project as CH10_V6.aud so that you have it in the book repository.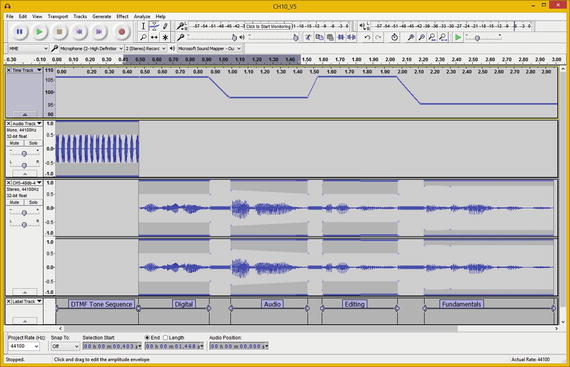
Figure 10-21.
Use an Envelope Tool to reposition control points
Make sure to get a good amount of practice with the tool collection on the Tracks menu, as tracks are the main way to separate your editing moves and sample data for your Audacity 2.1 projects.
Using all the tools that you’ve learned about thus far, such as envelopes, selection sets, algorithms, and so on, you should be able to assemble any audio composite that
you’ll need for your multimedia production and digital audio asset creation process.
Summary
In this chapter, you looked at how to create digital audio compositing projects by using the tracks features found in Audacity 2.1. You looked more closely at Label Tracks, added a Time Track, and converted a Stereo Track to a Mono Track. You added a new track with synthesized dial tones. You also learned how to manipulate tracks in different ways and how to align tracks to each other.
In the next chapter, you learn about digital audio synthesis tools in the Generate menu in Audacity 2.1.