
Now that you have learned how to composite digital audio tracks using Audacity’s Tracks menu, you should also take a look at the Generate menu, which allows you to synthesize digital audio using algorithms ranging from chirps and tones, to different types of noise, or even silence. There are even Generate menu plug-ins preinstalled in Audacity for metronome click tracks, plucked strings, and Risset Drum instruments. You already looked at the synthesis algorithm that generates DTMF Tones, so Audacity is fairly adept at synthesizing audio.
You will look at how to synthesize digital audio samples from scratch using these algorithms, as well as how to find, download, and install third-party generator algorithms to “buff out” your Audacity 2.1 Generator menu, which I’m sure you will want to do. In fact, let’s get greedy and do that first!
Installing Nyquist Generate Menu Plug-Ins
Before you learn to use all of these different audio synthesis tone generators in Audacity’s Generate menu, let’s go to the Audacity Team Wiki and download seven of the coolest tone generation plug-ins so that you have enhanced the synthesis capabilities of Audacity 2.1 installation by about 100%. These are located on the
Nyquist Generate Plug-Ins page
at
http://wiki.audacityteam.org/wiki/Nyquist_Generate_Plug-ins
.
If you scroll down this web page (see Figure 11-1), you’ll find a number of different Audacity Generate menu plug-ins that are free to download and install. This is exactly what you’re going to do to get all of these cool synths!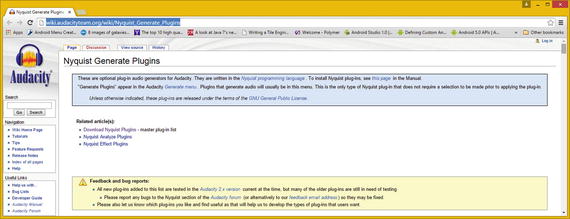
Figure 11-1.
Audacity Nyquist Generate Plugins download page
As you download each plug-in ZIP file, extract it to the Nyquest_Generate_Plug-Ins folder on your hard disk drive. Next, copy the .ny files to your AudacityPlug-Ins folder, as shown in Figure 11-2. I’m using Windows 8, so mine is in
C:Program Files(x86)AudacityPlug-Ins.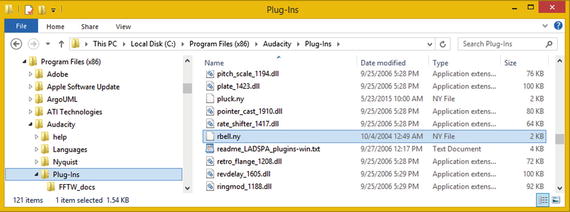
Figure 11-2.
The C:ProgramFiles(x86)AudacityPlug-Ins
folder
Let’s download and install seven plug-ins: Risset Bell (to go with the Risset Drum already in Audacity), the Explosion effect generator, KLSTRBAS, Tuning Fork (to go with the Metronome Click Generator), Oxygene Surf Generator, Harmonic Noise engine, and PWM (pulse-wave modulation).
Once these have been decompressed (unzipped), and copied into your Plug-Ins folder, launch Audacity, which finds the new Nyquist Audio Generator Plug-Ins and adds them to the Manage menu option in the Effect and Analyze menus, as well as the Generate menu.
Any menu that allows you to add a third-party algorithm features the Manage menu option. All three menus access the Plug-in Manager: Effects, Generators and Analyzers dialog, which is shown in Figure 11-3.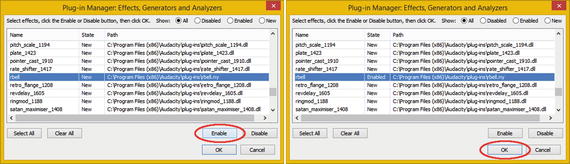
Figure 11-3.
Plug-in Manager: Effects, Generators and Analyzers
Find the Risset Bell plug-in that you just decompressed and copied. Select it (see the left screen in Figure 11-3) and click Enable so that it shows in your Generate menu (as seen in the right screen in Figure 11-3). Click the OK button and close the dialog.
When you look at the Generate menu, Risset Bell is now right next to Risset Drum; these two siblings are reunited in sonic harmony forever. This is shown highlighted in Figure 11-4 in the left of the screen. Generate plug-ins that are DLLs and come with Audacity appear at the top of the menu and Nyquist tone generators are on the bottom.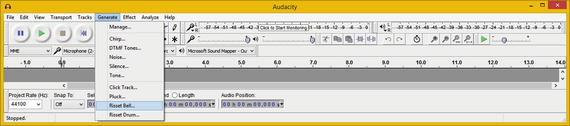
Figure 11-4.
Risset Bell Generator is now on your Generate menu
Now you’re ready to look at more than a half dozen of the 15 audio synthesis plug-ins installed on the Generate menu. If you plan to use Audacity for digital audio synthesis, there are many more of these plug-ins—so see if you can make your Generate menu as long as the Effect menu! You can also install third-party spectral analysis tools if you are into visual analysis (covered in Chapter 9).
Audacity Synthesizer: The Generate Menu
For the duration of this chapter, let’s get some practice using these useful and impressive Nyquist digital audio synthesizer plug-ins. You’ll look at how to create a new empty Stereo Track, how to use seven of the audio synthesis options, and see what these synthesized waveforms look like. I find this area of Audacity and digital audio editing a lot of fun, so I hope that you find it the same.
Virtual Surf Waveforms : Oxygene Surf Generator
The first thing that you need to do is create a Stereo Track so that there is somewhere for the synthesized audio to live. I normally use a Mono Track for sound effects, such as the Fire and Explosion generator, but some of these effects require a Stereo Track, such as the Oxygene Wave generator. All of them utilize a Stereo Track if it is present; I opted to use a Stereo Track so that you can see the Generate plug-ins that support it. If a Stereo Track is supported, the Left and Right Channel data samples will look different; if only Mono Tracks are supported, the Left and Right Channel data is identical.
Launch Audacity 2.1 and use the Tracks ➤ Add New ➤ Stereo Channel menu sequence to add an empty Stereo Track to your new digital audio synthesis project (see Figure 11-5).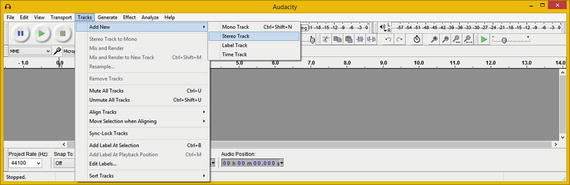
Figure 11-5.
Add a track using Tracks ➤ Add New ➤ Stereo Track
Next, select the Generate menu. Notice that it’s now much longer because you doubled the number of tone generator synthesizers.
Let’s start with a more relaxing Generate menu synthesizer—the David R. Sky Oxygene Surf generator. If you like Surf generators, there is also the LFO Surf generator by David R. Sky, which is more generic (no pun intended).
Select the Generate menu and the Surf [Oxygene] option, which opens the Surf [Oxygene] dialog (see Figure 11-6).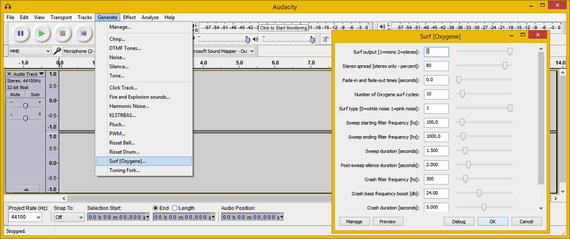
Figure 11-6.
Select the Generate ➤ Surf [Oxygene] menu sequence
I used the stereo Surf output option, with an 80% spread, 0 fade effect, 10 cycles, pink noise generation, 100 Hz start frequency and 1000 Hz ending frequency, 1.5 second sweep duration, 2 seconds of post-sweep silence, a 300 Hz Crash filter frequency, 24 decibels of Crash bass frequency boost, and a Crash duration of 5 seconds.
As you can see in Figure 11-7, the Oxygene Wave waveform synthesis signature is very unique and different across the two channels. Use the play button to preview crashing ocean waves!
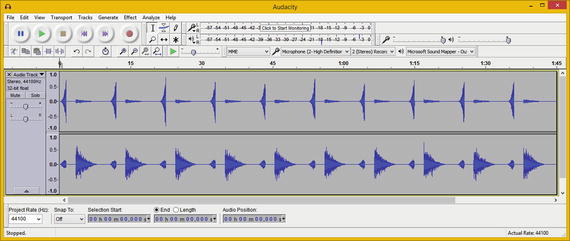
Figure 11-7.
Preview the Oxygene Wave Stereo Track audio sample
Next, let’s take a look at a more useful tone generator, Click Track, the virtual metronome for Audacity.
A Virtual Metronome: The Click Track Generator
If you’re recording your instrument and not your voice, Audacity has a useful Click Track (metronome) tone generator that comes preinstalled. You can utilize it to make sure that you are on a beat. It allows you to set the Tempo in BPM (beats per minute), the beats per measure (usually 4), the number of measures, the Click Track duration, and the metronome tone duration in milliseconds. You can also specify start time offset, click sound, click resonance, and click pitch, all of which you can see in the Click Track dialog shown in Figure 11-8.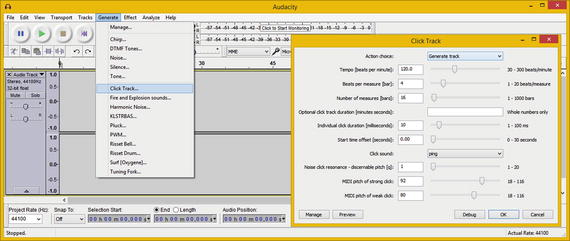
Figure 11-8.
Select the Generate ➤ Click Track menu sequence
I accepted the default setting values and clicked the OK button to generate the Stereo Click Track shown in Figure 11-9. Click the play button to preview the metronome click track now.
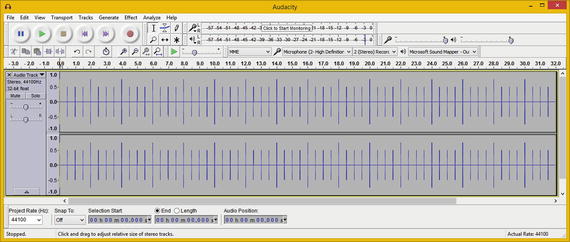
Figure 11-9.
Preview the Stereo Click Track audio data sample
It’s important to note that you can use a Mono
Track for this metronome click-track functionality. So if you’re going to use it when recording instrument performances, use the Tracks ➤ Add New ➤ Mono Track menu sequence, rather than using a Stereo Track, although that works as well.
Next, let’s look at another useful tone generator, David R. Sky’s Tuning Fork generator, the virtual tuning fork in Audacity.
A Virtual Tuning Fork: The Tuning Fork Generator
Before you
start recording instrumental music tracks in Audacity, you should use the Tuning Fork generator to make sure that your instruments are in tune. This tone generator allows you to set the Tone duration, which I set to 1.0 second; Constant volume or a fade out, which I selected to simulate a real-world tuning fork; and MIDI note or (optional) frequency. I used the default MIDI note of 69, as you can see in the Tuning Fork dialog in Figure 11-10. If you want to use a C note (music, not money) for a tuning fork, use a MIDI note value of 60.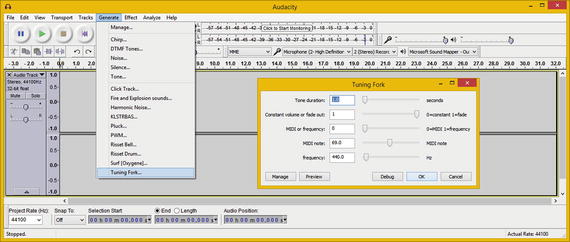
Figure 11-10.
Select the Generate ➤ Tuning Fork menu sequence
I accepted the default values and clicked the OK button to generate the Tuning Fork track shown in Figure 11-11. Click the play button to preview your tuning fork tone now.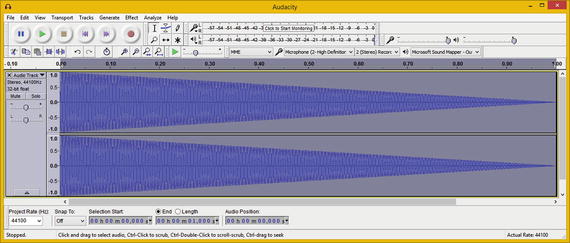
Figure 11-11.
Preview the Stereo Tuning Fork audio data s
ample
It’s important to note that you can use a Mono Track for this tuning fork track functionality. You can also delete it once you are finished using it, in order to save system resources such as memory and CPU processing cycles.
Next, let’s look at David R. Sky’s Fire and Explosion generator, a virtual
special effects shop in Audacity 2.1! You can use this FX tone generator to create special audio effects for your games.
Virtual Carnage: The Fire and Explosion Generator
The Fire and Explosion generator allows you to set the type of audio effect, sound duration, attack time in milliseconds, explosion decay in milliseconds, decay percentage, cut-off frequency, filter quality, Bass boost frequency and decibels, and clipping percentage. I used the defaults, as you can see in the Fire and Explosion dialog shown in Figure 11-12.
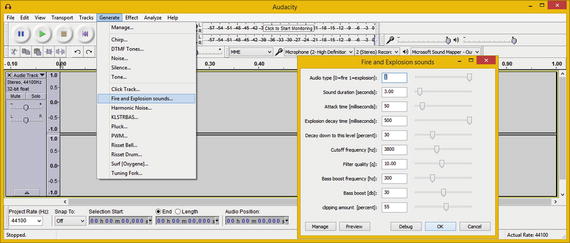
Figure 11-12.
Select your Generate ➤ Fire and Explosion sounds
I accepted the default setting values and clicked the OK button to generate the Explosion effect track (see Figure 11-13). Click the play button to preview th
e explosion effect.

Figure 11-13.
Preview the Stereo explosion audio data sample
Next, let’s look at Steven Jones’ KLSTRBAS generator, which stands for cluster bass.
Virtual Cluster Bass: The KLSTRBAS Generator
According to KLSTRBAS tone generator
author, Steve Jones: “KLSTRBAS generates dense sounds by combining several waveforms with a fixed frequency ratio between them. Early Roland drum machines created cymbal sound in part by combining multiple square waves with non-integral frequency ratios. The combined signal was then high-pass filtered to produce a very dense cluster of high frequency harmonics. The genesis of KLSTRBAS was a failed attempt to create cymbal sounds using this technique.”
As you can see in Figure 11-14, the KLSTRBAS dialog allows you to set your MIDI key (note value), Decay value, Fractional Decay value, Density value, Detune value, Flange value, and Wave table indicator value.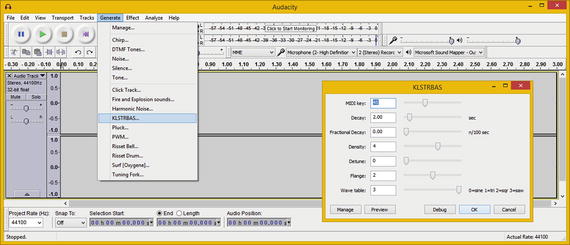
Figure 11-14.
Select the Generate ➤ KLSTRBAS menu sequence
The wave table indicator can be set to one of four value settings: 0 indicates a sine wave table, 1 indicates a triangle wave table, 2 indicates a square wave table, and 3 indicates a saw wave table.
As evident in the KLSTRBAS dialog, you have a great deal of variation in creating cool tones with this generator. I set the A3 note is the MIDI key, a 2-second decay, a fractional decay value of 0, a density value of 4, a detune value of 0, and a middle flange value of 2. I use the square (also called a pulse) wave table by specifying a value of 3.
I accepted the default setting values and clicked the OK button to generate the Cluster Bass data track (see Figure 11-15). Click the play button to preview the sample.
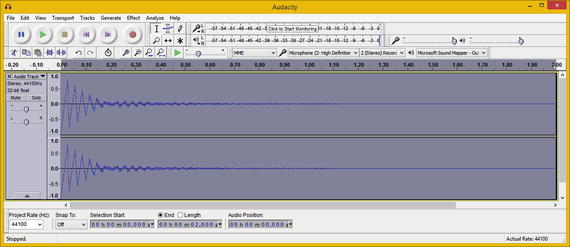
Figure 11-15.
Preview the Stereo Cluster Bass audio data sample
Next, let’s take a look at the harmonic noise generator.
Extraterrestrial Vocals: Harmonic Noise Generator
The harmonic
noise generator allows you to set a MIDI Note List and the Number of Harmonics to generate from this list. There are also Duration, Band Width, and Odd Harmonics Only options in the Harmonic Noise dialog (see Figure 11-16) to generate a very unique noise track.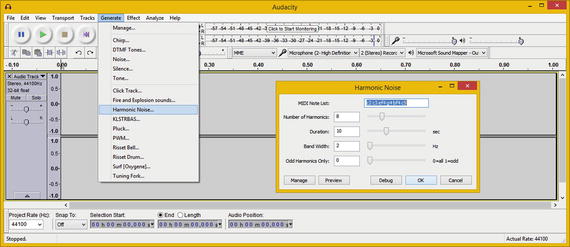
Figure 11-16.
Select a Generate ➤ Harmonic Noise menu sequence
I accepted the default setting values and clicked the OK button, generating the Harmonic Noise sample data track seen in Figure 11-17. Click the play button to preview the Harmonic Noise stereo sample, which you’ll see (and hear) is out-of-this-world extraterrestrial in nature. The waveforms even look like alien centipedes—and they sound even stranger than they look!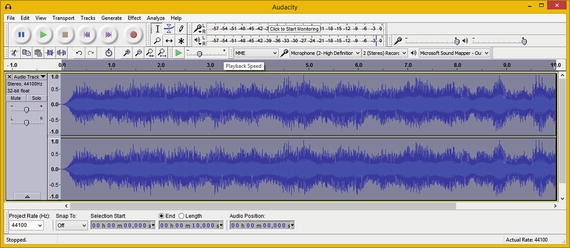
Figure 11-17.
Preview the Stereo Harmonic Noise audio sample
Next, let’s return to an audio tone generator that comes preinstalled in Audacity 2.1—the Pluck tone generator. No, not the Cluster Pluck generator; let’s keep it clean here. It’s just a simple pluck-string instrument
generator that can be used to simulate bass guitars, guitars, or even banjos, using the proper digital audio effects processing.
Virtual String Instrument: The Pluck Generator
The Pluck tone generator is much simpler
than the other audio synthesis algorithms you’ve seen in this chapter. It allows you to set Pluck MIDI Pitch, which defaults to middle C, as well as Fade-out type, which I set to gradual, because it’s more like what a plucked string does in real life. There is also Duration in seconds, which I set to 1.00 second. You can see these options in the Pluck dialog shown in Figure 11-18.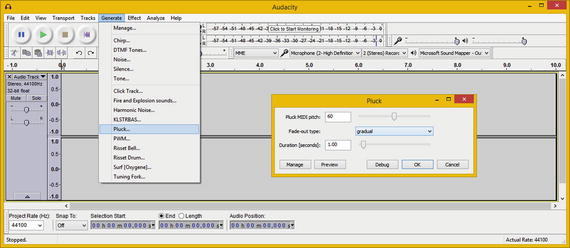
Figure 11-18.
Select the Generate ➤ Pluck menu sequence
I accepted the default setting values and clicked
the OK button, generating the Pluck sample data track shown in Figure 11-19. Click the play button to preview the Pluck stereo sample. I noticed a high level at the beginning of the sample, so I took a screenshot of the playback to show this.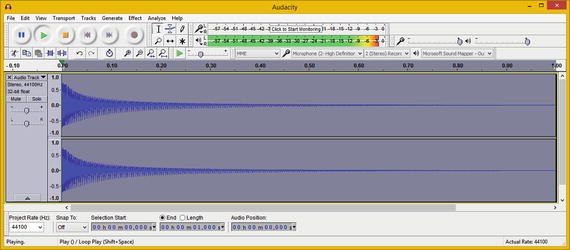
Figure 11-19.
Preview a Stereo Pluck digital audio data sample
This is most likely because a plucked string generates a high decibel level right after the string is released, generating all o
f its audio “power,” or its amplitude, at that initial point in time.
These Generate menu digital audio synthesizers, or waveform generation algorithms, bring a lot of power to your digital audio editing and compositing work process.
If you think “outside of the box” and utilize Audacity’s vast Effect menu in conjunction with the Analyze menu, you will be able to create any digital audio assets that you need fo
r your multimedia projects.
Summary
In this chapter, you looked at digital audio synthesis, known as tone generation in Audacity, using the Generator menu. First, you doubled the amount of tone generation algorithms in Audacity 2.1.1, and then you learned how and where to get even more of these Nyquist plug-ins.
After that, you looked at seven of the most useful tone generator algorithms available to Audacity. You explored their algorithm configuration dialogs and the resulting synthesized digital audio waveforms.
In the next chapter, you learn about digital audio data footprint optimization concepts, terms, and principles.