
Now that you have removed the noise from the background of your voice-over, it is time to look at how to trim it up so that the unneeded audio—such as the intro and exit unused dead space—can be eliminated. Doing this reduces the data footprint and makes the audio trigger with more surgical precision.
You’ll also look at how to extract individual words, in case you want to make a game where your character talks using individual words. And you’ll learn about “scrubbing” audio and how to play waveforms backward, among other fun endeavors.
Audio Sample Editing: Basic Techniques
In this chapter, I’ll show you some of the basic ways to extract the sound waves that you need to isolate and utilize in your multimedia production, whether that be creating podcast content, web sites, audio eBooks, Android applications, iTV shows, digital videos, or similar digital new media that incorporates digital audio in one way or another.
The primary reason to trim away any unused “dead space” in your samples is to increase your “response time” once you load your data samples into a sampler, sample playback software, or your own custom C, Java, JavaScript, or HTML5 code that triggers (play) your samples.
If you kept the dead space in the sample that you cleaned up in Chapter 5 (even though this dead space is now quiet and more professional), it will cause a delay if your data sample is triggered by the user interface in your web site, application, iTV program, or sample playback engine. This will seem less than professional to end users. Therefore, you need to isolate the usable parts of a sample and let the application using the sample control the timing (the dead space) among your different audio samples.
Trimming Digital Audio: Removing Unused Data
There are five digital audio editing icons on the right side of the Audacity window, located underneath the audio playback level meter that controls the cut, copy, paste, trim, and silence editing functions. Since the first logical step is to remove the dead space before and after your voice-over, let’s look at the trim tool first. Select the portion of the data sample that contains vocal data (see Figure 6-1) and click the Trim Audio icon (circled in red, with the tool tip pop-up shown on mouse-over).
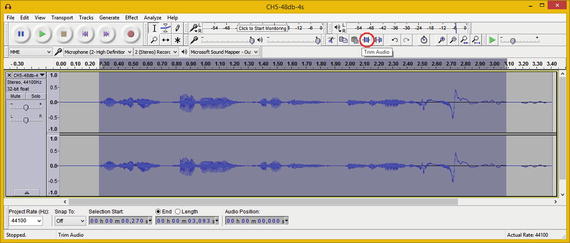
Figure 6-1.
Select the voice-over part of the vocal sample data
This removes the dead space; however, it still leaves the delay coming into your data sample, as you can see on the left of Figure 6-1 in light gray. To move your samples back to 0, go to Tracks ➤ Align Tracks ➤ Start to Zero, as shown in Figure 6-2. This eliminates the dead space coming into the data sample, so that when your application triggers the sample, audio playback response is immediate.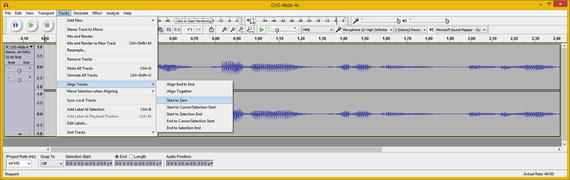
Figure 6-2.
Use Tracks ➤ Align Tracks ➤ Start to Zero function
Besides Noise Removal, which needs the noise data in the dead space (and why you did that process pre-trim), trimming your data sample is one of those things you do “up front” during your sample recording and editing work process. Now the voice-over of the book title can be triggered in a project and it will immediately say the book title when triggered.
Next, let’s drill down a level deeper to see how you can extract the individual words in the voice-over, in case you need finer control over each of the words spoken.
Extracting Audio: Selecting Sample Components
As you can see on the left side of Figure 6-3, you can select a portion of the waveform (in this case, the word audio) and click the play button in the transport (shown depressed) and play only the selected portion of the sample. You can tell that the data sample portion is playing by looking at the vertical bar (a playback head) in the middle of the selected area and the output level meters.
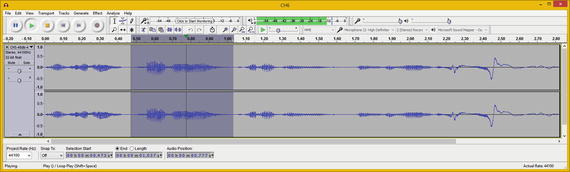
Figure 6-3.
Select the portion of the sample you want to play
Once you have fine-tuned your selection until it reaches the subsample result that you wanted to achieve, you can use another useful feature with this selection, which allows you to save this subsample as its own separate data sample.
You can record vocabulary for the application and apply noise reduction in one pass, and later simply use this select-and-export work process to create an audio data sample in any of a dozen data formats supported by Audacity 2.1.1 by using the LAME and FFMPEG libraries.
The menu sequence that you will use to achieve this result is the File ➤ Export Selected Audio work process, seen on the left side of Figure 6-4 and selected in light blue.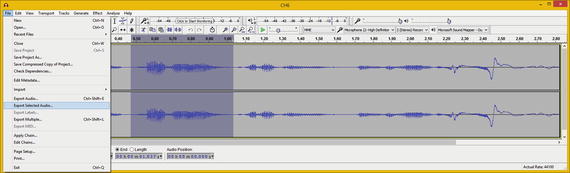
Figure 6-4.
Use File ➤ Save Selected Audio to create sub-sample
Once you select the menu sequence, you see the Export Selected Audio dialog, where you select the digital audio data format. As you can see in Figure 6-5, I’m using the FLAC audio format for the assets for the book, because it gives me 100% perfect reproduction of the waveforms used in this book, along with at least a 50% lower data footprint than what the uncompressed PCM format would give me. More on this later in Chapter 12.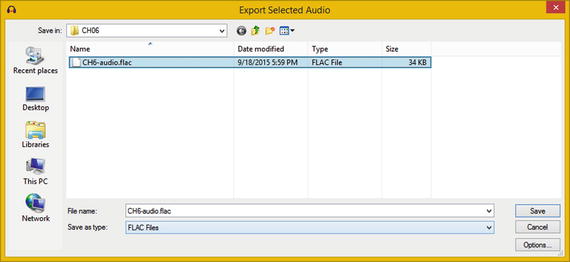
Figure 6-5.
Use Export Selected Audio dialog and name CH6-audio
Next, let’s take a look at another recent feature upgrade for Audacity 2.1—real-time, bi-directional, digital audio data sample scrubbing!
This is not really scrubbing (cleaning) the audio sample data, else I would have put it in the audio clean-up chapter! I think you will find this particular feature both useful as well as fun to use, as it allows fine-tuned sample playback control.
Scrubbing Digital Audio: Sample Playback Rate
Another feature that Audacity upgraded considerably in version 2.1 is real-time audio sample scrubbing, which now works forward as well as backward, so that you can play samples in reverse! This feature allows you to drag your cursor over the audio waveforms and see what they are, change the playback rate based on how fast you drag, and play them backward if you drag the cursor in that direction. To enable audio sample scrubbing in Audacity, all you have to do is hold down the Control (Ctrl) key on your keyboard, and click your left mouse button. As you can see in Figure 6-6, this turns on an Audacity transport Play button; to turn off this feature, simply click the (depressed) Play button. It’s as simple as that, and fairly fun to use. Try it now so that you can get used to this useful, real-time digital audio editor previewing tool.
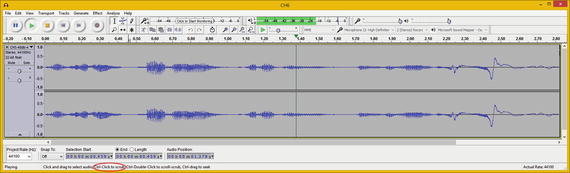
Figure 6-6.
Use Ctrl-Click to enable the data scrubbing function
Next, let’s take a look at how to re-arrange the order of the title of the book inside the voice-over waveform by using the cut, copy, and paste features in Audacity 2.1.1.
Rearranging Digital Audio: Cut, Copy, and Paste
Let’s pretend that the title of this book is “Editing Digital Audio: Fundamentals,” and that I recorded the vocal sample incorrectly. The work process for correcting this using Audacity editing tools involves selecting the word “Editing” with an even margin of silence around it, removing that section from the audio data sample, moving the cursor to time location 0.00, and pasting the section at the front of the voice-over sample.
Select the vocal portion representing the word “editing” and leave some of the silence margin on the right side (end) of the subsample, as shown selected in blueish-gray in Figure 6-7. Play the selected portion using the play button, and then click the scissor icon to remove the sample data.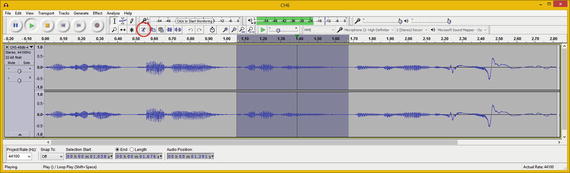
Figure 6-7.
Select a sample for the word “editing,” and preview
I circled the cut (scissor) tool in Figure 6-7. Figure 6-8 shows the result, with the insertion (position) bar sitting right where the editing vocal used to be.
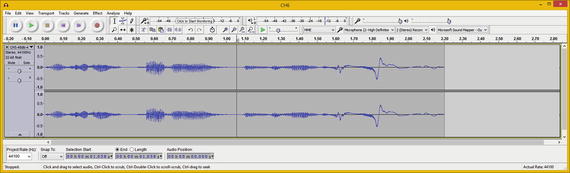
Figure 6-8.
Sample data for “editing” removed from data sample
The next step in the work process is to position the bar at position 0.00, which you can do by clicking the vertical bar tool. You can make sure that you’re at 0.00 by using the Edit ➤ Move Cursor ➤ to Track Start feature, seen in Figure 6-9 on the left-hand side of the screen.
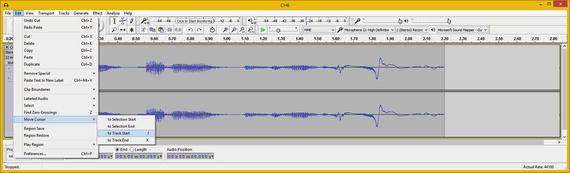
Figure 6-9.
Use the Edit ➤ Move Cursor ➤ to Track Start feature
The Move Cursor submenu options allow you to perform surgically correct edits, so familiarize yourself with them now so that you know where to find these basic but valuable tools for aligning your editing “moves.” Figure 6-10 shows the result of the work process. And now when you play the sample, it correctly states the “Editing Digital Audio Fundamentals” book title.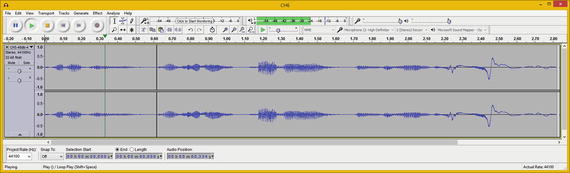
Figure 6-10.
Vocal is now “Editing Digital Audio Fundamentals”
Practice using these fundamental digital audio editing tools in Audacity, because this forms a foundation for the workflow in your digital audio work process as a multimedia producer or a digital audio engineer.
Summary
In this chapter, you looked at digital audio data-editing–related concepts and principles, such as trimming audio samples, extracting audio subsamples, and rearranging audio subsamples. You also looked at how your resolution, color channels, color depth, and alpha channel can contribute to data footprint reduction.
In the next chapter, you learn about manual digital audio sample editing concepts, techniques, and work processes.