
6. Creating Your Own Monster Island
What You’ll Be Doing
![]() Create your own monster with 123D Sculpt+
Create your own monster with 123D Sculpt+
![]() Download, install, and use Binvox
Download, install, and use Binvox
![]() Use MCEdit to import your monster
Use MCEdit to import your monster
![]() Resize and rotate your monster
Resize and rotate your monster
As you saw in Chapter 5, “Modifying a 3D World,” not every 3D object that you download or create is saved as an .stl or .schematic file. There are dozens and dozens of file formats that exist for 3D models, and not all of them are compatible with MCEdit, which means you can’t directly import them into a Minecraft world.
Fortunately, one of the most popular 3D model file formats, .obj, is 100% compatible with MCEdit…if you know how to properly convert it for use with MCEdit. And that’s exactly what you’re going to learn in this chapter, along with how to use a special tool for creating 3D models.
The steps in this chapter might seem a little overwhelming at first, but if you read carefully and actually perform the steps, you’ll find that they’re not all that difficult. As with baking a recipe or assembling a piece of furniture, they key is to follow the steps in the right order. Do that, and you’re going to discover a fast and easy way to add some amazing creations to your Minecraft worlds. And it all starts with a fun app for iPad and Android tablets called 123D Sculpt+.
Tip
123D Sculpt+–for tablets only
If you don’t have access to a tablet, feel free to skip this chapter. Unfortunately, Autodesk hasn’t yet released a version of 123D Sculpt+ for Windows and Mac computers. It only works on iPads and Android tablets. However, it might at some point be released for Windows and Mac computers, so be sure to keep an eye out at www.123dapp.com for updates to the 123D Sculpt+ application.
Monster Making for Beginners
Creating a monster is super-easy if you’ve got 123D Sculpt+ installed on your iPad or Android tablet. Links to the App Store or Google Play can be found at http://www.123dapp.com/sculptplus (scroll all the way to the bottom of the page) to download the free app to your tablet. Once it’s installed, you should see an app icon like the one shown in Figure 6.1.

123D Sculpt+ on iOS and Android
Screenshots of 123D Sculpt+ in this chapter are taken from the iOS version running on an iPad. The app looks and works the same on Android tablets, minus a few subtle visual differences due to the way the two tablets display information (such as fonts and buttons). The design tool, however, works the same, so Android users shouldn’t have any trouble finding and using the same tools and buttons shown here in the iPad version.
If you’ve ever used clay to mold and shape something with your hands, then you won’t have any problem understanding the main use of 123D Sculpt+. This app lets you create 3D models by dropping a “lump” of clay on the screen and then offering you various tools to shape the “clay” and add details. Of course, you do all this on the touchscreen, using your fingers.
After opening the Sculpt+ app, you see a series of buttons (as shown in Figure 6.2) near the top that offer you the ability to view 3D models created by other Sculpt+ users. You can tap the Popular button to see what Sculpt+ users believe to be some of the best creations or use the Featured and Recent buttons to find current designs. The Search allows you to use keywords to find 3D models that fit your interests. If you find something you like, you can save a copy to your tablet and make changes to it (such as changing colors) if you like.

But the real power of Sculpt+ is that it allows you to make your own models, and to do that, you need to tap the Create button at the bottom of the screen. After you tap the Create button, you’re given three choices, as shown in Figure 6.3.

The Build from Scratch option is the most basic starting point, offering up clay models in various shapes such as body, head (bust), and a few others. These clay shapes are pretty generic, as you can see in Figure 6.4. The “clay” has no details other than just the basic shape of an object.

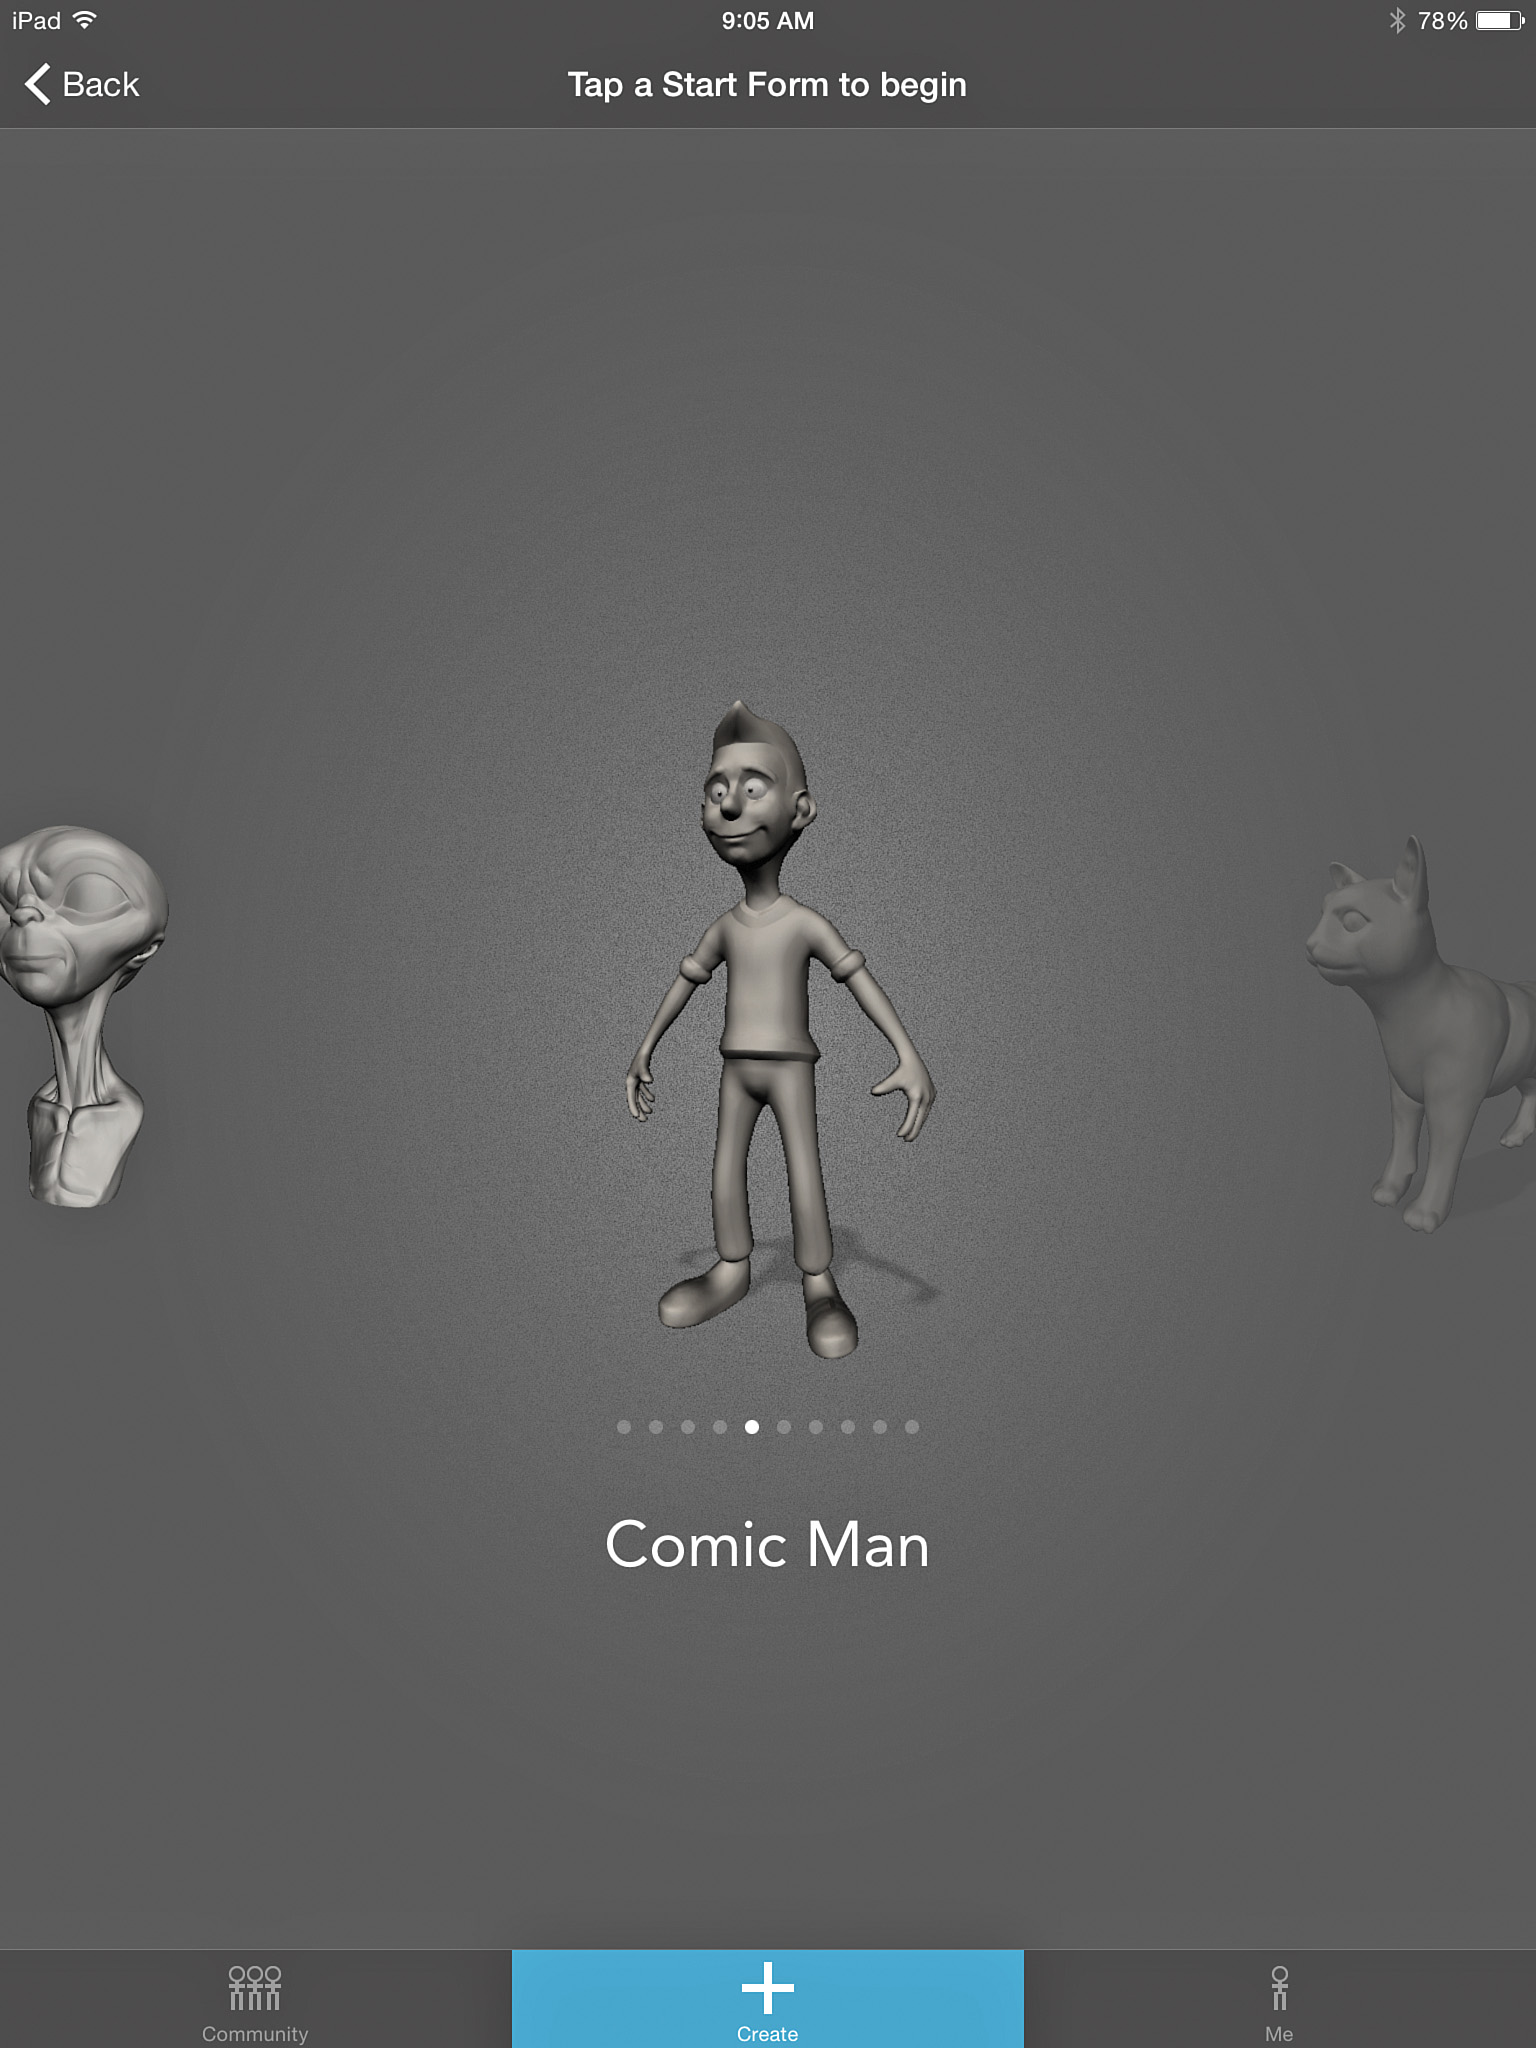
The other two options, Ready to Sculpt/Paint and Ready to Pose offer up detailed 3D models that have already been sculpted in digital clay. These two options are actually great starting places as all the detail work has already been done, and you can just modify the colors and poses. Figure 6.5, for example, shows a cartoonish male figure that you can select after tapping the Comic Man option displayed on the screen. The figure starts out colorless and standing in a rather boring pose.
While you can certainly choose one of the predesigned options, I highly encourage you to test the Build from Scratch option and start with a clean model that lacks details. If you select the Biped object, you get all the tools shown in Figure 6.6 for modifying it.

All those blue dots are joints you can tap in order to move part of the model. Figure 6.7 shows that I’ve selected the Rotate button and tapped on the shoulders to move the arms (like a zombie lurching toward you).

If you tap on a button and then tap the Help button, you get a more detailed description of how to use a particular tool, as shown in Figure 6.8.

You can shrink, enlarge, rotate, and “mold” the clay with the buttons along the bottom, and you can also add new appendages or features with the Create button. It will probably take you some time to figure out every tool and how it can best be used to add details to your model, so be sure to spend some time with each button and play with your model to see what you can create. When you’re done, you tap the Bake button to make a permanent 3D model like the one in Figure 6.9. Once you have this baked model, you can further sculpt it and paint it.

123D Sculpt+ colors don’t matter to MCEdit
Remember that any colors you apply to your 3D model in 123D Sculpt+ will not carry over into Minecraft. MCEdit will import your design, but you’ll have to use its Select tool and Fill With tool to apply colors to various Minecraft blocks.
The Sculpt button allows you to add fine features such as noses or warts or claws, but once again, keep in mind that most fine details do not carry over into a Minecraft world since your design will be made of hundreds—or maybe even thousands—of blocks. A wart may look funny on your monster’s face, but it might not be large enough to be made out of a block or two that visitors to your world will be able to distinguish.
One tool that can make a huge impact is the Pose button. Tap this button and then tap on various locations of your model, and you’ll be able to drag your finger and move a leg or arm or other appendage anywhere you like. Figure 6.10 shows that I’ve moved the creature’s left arm up in a threatening manner.

When you’re done posing, sculpting, and coloring your model, you tap the Share and Make button (in the bottom-right corner). This button offers four options, as you can see in Figure 6.11.

In this case, you want to press the Export Mesh button.
Printing and sharing options with 123D Sculpt+
By tapping the Publish button you can share your design with other Sculpt+ users. The Share Image button allows you to post a photo of your design to Facebook or Twitter or email it to a friend. The 3D Print option allows you to order a plastic model of your design from a company called Sculpteo (www.sculpteo.com). This costs money, but it’s a fun way to get a physical 3D version of your very own creature to set on your desk.
Tap the Export Mesh button, and you’ll see a screen like the one in Figure 6.12.

Notice that the Email option is selected; you’ll need to provide an email address the app can use to send the model’s file as an attachment. You can modify the name of your object by tapping in the My Sculpture box and typing a new name, such as MyMonster, as shown in Figure 6.13.

Tap the Export Now button, and your tablet’s email app will open and allow you to select a recipient for your file, as shown in Figure 6.14. Tap Send button, and your model is sent! Keep in mind that the file being sent is not an .stl or .schematic file; it’s an .obj file.

Next, you need to download the model’s .obj file to a computer where you’ll be performing the next part of the process—using the Binvox tool to convert your model to a .schematic file that will work with MCEdit.
Using Binvox
As you read in Chapter 5, Binvox might be a little different from most of the applications you probably use regularly. It’s a command-line tool, which means you need to type text to tell the tool to perform its duties. Command-line tools typically have very little in the way of graphics or buttons or sounds. Command-line tools like Binvox may not be eye-catching, but they’re sometimes the only option you have to perform certain tasks on files. In this case, Binvox will convert the .obj file that was emailed from Sculpt+ into a .schematic file.
Before you can use it, you need to download and install the Binvox application. To do this, point a web browser to http://minecraft.gamepedia.com/Programs_and_editors/Binvox#Download, scroll down a bit until you find the Download section, and click on the vox_package.zip link for Windows or the binvox link for Mac, as shown in Figure 6.15.

When you click this link, a zipped file that contains the Binvox files is downloaded to your computer, as shown in Figure 6.16. You can save the file anywhere you like but be sure to make note of where it is saved at the moment because you’re going to be moving the contents of the zipped file shortly. (I saved it to the Desktop, but you can put it wherever you like, such as in the Downloads folder or My Documents, for example.)

Once the Binvox zipped file is saved, click on the Start button and then choose Computer, as shown in Figure 6.17.

Double-click on the hard drive (the C: drive) for your computer and create a folder called vox_package, as shown in Figure 6.18.

Next, double-click the vox_package.zip to open it up. Then click the Extract All Files button, as shown in Figure 6.19.

When the Extract Compressed (Zipped) Folders dialog appears (see Figure 6.20), click the Browse button and find the vox_package folder you created on the C: drive and click Extract.

Double-click the zipped file that contains the 3D model you created in 123D Sculpt+. Click the Extract button, as shown in Figure 6.21, and extract these files to the same vox_package folder you created on the C: drive.

At this point, you have a vox_package folder stored on your Windows computer’s C: drive. It contains the Binvox files and your 3D model files from Sculpt+. Now it’s time to use Binvox to convert the .obj file to a .schematic file.
Converting with Binvox
With the vox_package folder on your computer’s C: drive, it’s now time to run the Binvox command-line tool. To do this, click again on the Start button, type command in the text box at the bottom (see Figure 6.22), and press Enter. (You can also type cmd in the text box if command doesn’t open up the windows seen in Figure 6.23.)

The Command Prompt window appears, as shown in Figure 6.23.

Your screen may appear a bit different than the one shown here because you’ll be logged in as a different user (with a different username). Notice that Figure 6.23 shows C:UsersJames> with a blinking cursor after the >. (Where my Command Prompt window says James, yours will have your username.) This bit of text simply describes the current folder. In this case, I’m not interested in looking in my James folder, and you’re not interested in looking in the folder that has your username, either. We both need to be using the vox_package folder created in the previous section. Getting there requires a little bit of typing.
First, you need to change to the root of the C: drive—the highest point of everything stored on the hard drive of the computer. To get there you simply type the following:
cd
Then you press the Enter key. The Usersusername part disappears, and you’re left with simply C:>, as shown in Figure 6.24.

Remember that you created a vox_package folder on the C: drive, and getting there requires a little more typing:
cd vox_package
Then press Enter. The Command Prompt screen now shows your location as the vox_package folder (see Figure 6.25).

Now that you’re here, all that’s left to do is run the Binvox tool. Back in Chapter 5, I showed you that simply typing binvox at the command prompt displays a list of helpful instructions. Feel free pull up those instructions if you like.
To convert your .obj model, you need to know the filename of the 3D model. If you can’t remember it, type dir at the command prompt, and you get a list of all the files in the vox_package folder, including your 3D model file, as shown in Figure 6.26. (In my case, it’s called MyMonster.obj.)

Once you have the filename, type the following at the prompt:
binvox –t schematic filename.obj
Instead of filename, though, you type the name of your own 3D model file. Keep in mind that it is case-sensitive, so you need to type uppercase and lowercase letters exactly as they appear in the filename. In my case, I typed the following, as shown in Figure 6.27:
binvox –t schematic MyMonster.obj
Press the Enter key after you’ve typed in this command, and then you can sit back as the conversion process starts. This process can take anywhere from 8 to 10 minutes, depending on the complexity of your model. You’ll see a stream of numbers scrolling up on the Command Prompt window, as shown in Figure 6.28. This means Binvox is doing its job.

At some point in the conversion, a small screen appears near the Command Prompt window, as shown in Figure 6.29. Don’t touch the keyboard or click on anything. Just let it keep going.

When the conversion process is done, the Command Prompt window shows the word “done” all by itself on the last line, as shown in Figure 6.30.

If you type dir at the command prompt now, you see a new file in the listing that has the .schematic file type, as shown in Figure 6.31. If you see that file, you’re ready to import it with MCEdit.

You can keep that file where it is or copy it elsewhere, but you need to be sure it’s located on the computer where you have Minecraft and MCEdit installed. Once you are sure that the file is in a safe and appropriate spot, you can open up MCEdit and get ready to import your design into a Minecraft world.
Placing a Monster with MCEdit
By this point, you should be very comfortable using MCEdit to import .schematic files into your Minecraft worlds. I’m not going to go over all those steps again here, so please refer to Chapters 2, “Creating Your Own Castle,” and 4, “Getting Lost (in a Maze),” if you need help with the Import option.
You have learned how to use Tinkercad to define the size of an imported object. You do this by specifying how many millimeters are equal to 1 block in the Minecraft game. The default is 1mm = 1 block, and if you leave this default, a 50mm-tall object created in Tinkercad will be 50 blocks tall in your world.
With 123D Sculpt+, you didn’t have an opportunity to define the height of your object, did you? Some applications allow you to define the height, length, and width of objects you create, but not all of them do. This often doesn’t become apparent until you import an object into Minecraft with MCEdit and discover that the imported object is so large you can’t fit it anywhere! Figure 6.32 shows an imported creature (surrounded by the green box) that is way too big for the island.

In such a case, you need a tool to reduce the size of the imported object. One way to do it is to use the Scale Factor box (visible in Figure 6.32). A value of 1.0 means actual size, so if you type in a value of 0.5, the imported object will be cut in half (because 0.5 = 50%, 0.25 = 25%, and 0.10 = 10%), as shown in Figure 6.33. This is better, but the model is still too large.

Figure 6.34 shows the Scale Factor set to 0.3. But as you can see, there’s still a slight problem.

With Tinkercad, your imported object is always right-side up, but depending on what you created with the Sculpt+ app, your imported object may not necessarily be standing on two legs (or four…we are talking about a monster, right?). Take a look at Figure 6.34, and you’ll notice that the creature is not exactly standing on solid ground.
Fortunately, MCEdit has a fix. You click on the screen to place your model as close as possible to its final resting place. (Don’t worry: If you miss, it’s easy to fix, as you’ll see shortly.)
Once the object is placed in your world, click the Rotate, Roll, and Mirror buttons until you get the model properly oriented. This may require some experimenting with different clicks. Rotate moves the object so that it moves through various north, west, east, or south facings with each click. Mirror simply changes whether the object faces forward or backward, and Roll rotates the object around like the hands on a clock, to 12, 3, 6, and 9 positions (or 0-, 90-, 180-, and 270-degree positions).
Figure 6.35 shows a creature standing on his own two legs. The problem now is that he’s standing in water.

You need to nudge the creature back a little bit to get him on dry land. Easy!
To move your object around, click and hold down the Nudge button (just below the Rotate, Roll, Flip, and Mirror buttons) and then use the WASD keys to move the object. Each tap on one of the WASD keys will move the object forward, left, right, or back. Click on the Import button when you’re done to lock in the object and then click the MCEdit menu to save your changes.
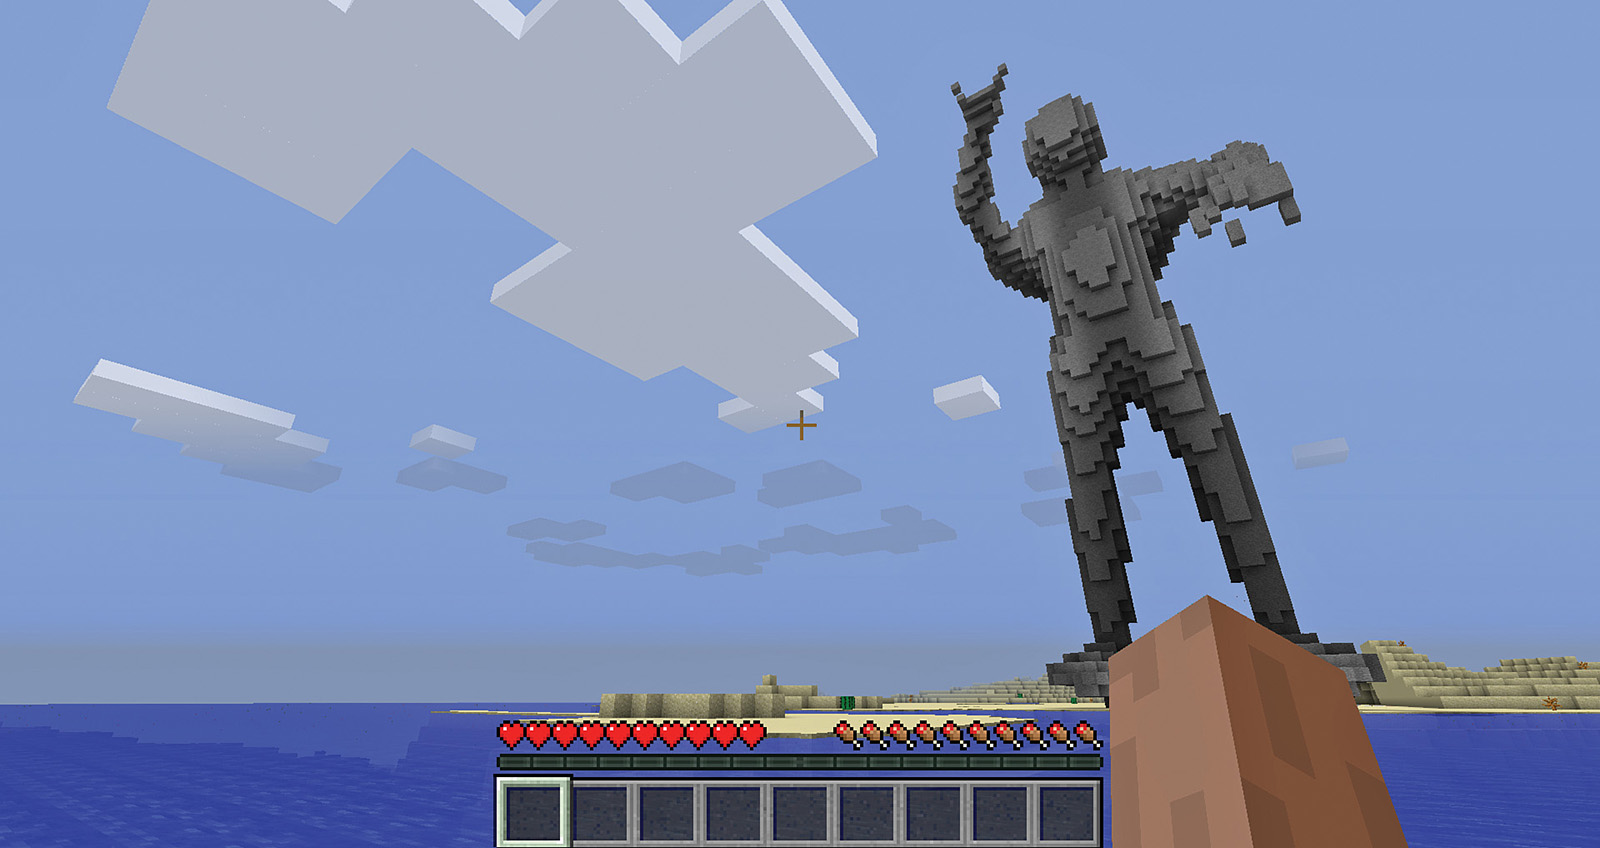
Figure 6.36 shows the monster nudged right into place on the shore of the island, ready to scare off invaders.

Now all that’s left to do is close down MCEdit and open up that world in Minecraft to see the new addition. As you can see in Figure 6.37, the stone guardian is doing his job perfectly, greeting friendlies and hopefully scaring off bad guys.
Up Next…
So far, the projects in this book have involved viewing a structure or animal or other imported object on your computer screen. The objects you see on the screen are also flat… two dimensional. How would you like to be able to see your Minecraft worlds as if you were actually standing in the game, looking at your surroundings with your own two eyes? That distant mountain range would actually look far away, and those nearby trees would look close enough to reach out and touch.
In the next chapter, you’re going to discover a simple and inexpensive method that will let you share your favorite scenes from your favorite Minecraft worlds in wonderful 3D!