Chapter 5: Modernizing SOAP Services
SOAP (short for Simple Object Access Protocol) is an XML-based protocol for accessing web services over HTTP. SOAP web services started gaining traction somewhere in the early first decade of the 21st century. Numerous standards were developed, especially in the following decade, which allowed the overall web services to mature, especially the SOAP-style web services. Some of the notable ancillary standards designed to support these SOAP web services are Universal Description, Discovery and Integration (UDDI), Message Transmission Optimization Mechanism (MTOM), WS-Attachments, WS-Security, WS-Trust, and WS-Policy. Many organizations still support SOAP web services because of SOAP's long history (after all, history is relative!) and the development and support of these standards by major software vendors.
Though the new development of web services has given way to REST-style services, SOAP services continue to provide many essential business functions. There are often external consumers who access these business functions.
Meanwhile, as the migration of these SOAP-based assets to REST-based assets continues to happen in the background, there is still a large requirement to expose SOAP services as APIs. API Connect (APIC) can help do precisely that, with considerable ease. In this chapter, you will learn various techniques using APIC to accomplish the goal of exposing SOAP web services as APIs. There are two main patterns for exposing SOAP services as APIs. You will learn both patterns in this chapter. These patterns are as follows:
- Exposing a SOAP service as a SOAP proxy: This use case is mostly for the service consumers/clients that continue to use the SOAP protocol.
- Exposing a SOAP service as a REST proxy: This use case handles the scenario where consumers/clients have already modernized their services and are using XML/JSON with a REST architectural style pattern.
After you have finished going through this chapter, you should become comfortable with the following:
- Understanding APIC's capabilities with respect to SOAP web services
- Creating a SOAP Proxy API using a Web Services Description Language (WSDL) using out-of-the-box (OOTB) features of APIC
- Creating a REST Proxy API using a WSDL using OOTB features of APIC
- Developing an understanding of the many APIC policies that are automatically generated because of exposing a SOAP service as a SOAP/REST Proxy API
Technical requirements
The steps discussed in this chapter are built upon the installation of the APIC Designer and APIC LTE environment covered in Chapter 4, API Creation. They also use two publicly available SOAP services: the Calculator service (used for building a SOAP API proxy) and the Account service (used for building a REST API proxy). You should ensure the following:
- Access to these services is not blocked by your machine's firewall or corporate network. The service endpoints are as follows:
- Calculator service: http://www.dneonline.com/calculator.asmx
- Account service: https://apictutorials.mybluemix.net/AccountService
- Service definitions (WSDL files) for these services are downloaded to your local workstation. You can download service definitions from the following URLs:
You can test these services using a SOAP testing tool such as SoapUI. Go ahead and import these WSDL files in SoapUI and send example requests. Your results should look like Figure 5.1 and Figure 5.2.

Figure 5.1 – Example test case for the Calculator service
And here is the output for the Account service:

Figure 5.2 – Example test case for the Account service
Before we go into building SOAP and REST API proxies on top of our simple Calculator SOAP service, let's discuss the support for the SOAP protocol in APIC V10.
SOAP capabilities in APIC
APIC supports exposing existing SOAP services as either SOAP or REST proxy APIs. The basic requirement for the services to be exposed is that those services should support Web Services Basic Profile 1.1 – Second Edition.
To create a SOAP API definition, you will need access to an existing SOAP web service. This existing web service can have a WSDL that can be defined either by a single standalone WSDL (we will be using this in our examples) or by a WSDL file that references other WSDL files and/or schemas.
Note
For standalone services definitions that have no external dependencies, such WSDLs can be directly loaded from a directory to create the SOAP API definition.
For service definitions that have dependencies on other WSDLs and schemas, you will need to create a ZIP archive of the main service definition and all its dependencies and then load the ZIP file to create the SOAP API definition.
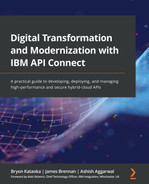
APIC provides API generation patterns that take care of generating either SOAP or REST API proxies from a provided SOAP service definition (standalone or otherwise). You will cover how to use these patterns and techniques to generate SOAP/REST API proxies in the following sections, starting with generating a SOAP API proxy from an existing SOAP service. But before deep diving into a couple of these patterns, let's quickly look at all the proxy patterns supported by APIC v10. To do that, log in to your API Designer and after performing the initial steps of selecting your workspace and logging into your LTE cloud environment with shavon/7iron-hide credentials, go ahead and Add a new API. Your screen should look like Figure 5.3.
Let's take a quick walk-through of the Select API type landscape and all the options that are made available by APIC here. We will stay with the Open API 2.0 tab for now.
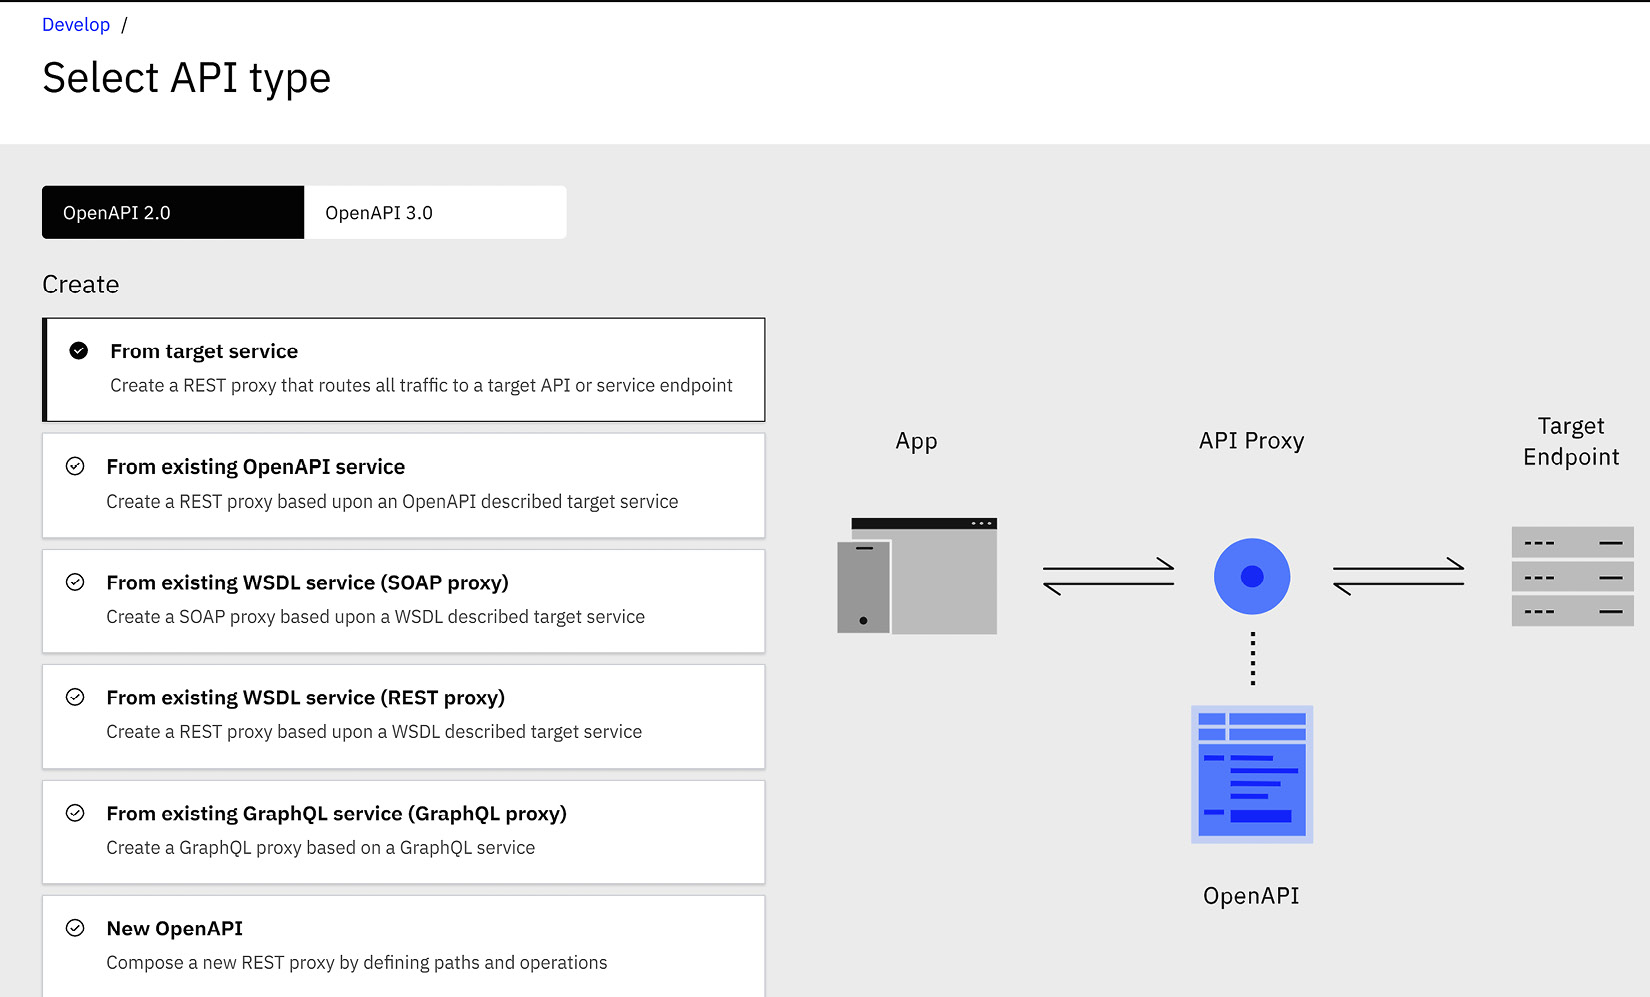
Figure 5.3 – API creation patterns
As is apparent, there are a number of options made available by APIC to accommodate various API patterns. Let's take a quick overview of some of the important ones before we go into discussing a couple of them in detail:
- From target service: Use this to build an API proxy definition from the ground up. The most common use case is when you have a target service URL available, and it is to be exposed through a custom schema that is different from the schema exposed by the target service. The target service could be a REST, SOAP, MQ, or database endpoint. This option is most suitable when custom processing logic needs to be applied before invoking the target service and/or the target service is not described by a standardized schema.
- From existing OpenAPI service: Use this to expose an OpenAPI-based REST service. You can import an existing YAML, JSON, or XML OpenAPI definition. Of course, you will still be building the API proxy implementation using various policies and other constructs in the Gateway tab. This pattern is most often used to proxy target services that have a defined OpenAPI definition, which is mostly the case with mature service organizations.
- From existing WSDL service (SOAP proxy) and From existing WSDL service (REST proxy): Use this to expose a SOAP service as a SOAP or REST proxy. As discussed at the beginning of this chapter, this is the primary focus of service modernization exercises, that is, to use an existing SOAP-based asset and make it available to consumers as either a REST API proxy or a SOAP API proxy. We will be discussing this in detail in the following two sections of this chapter.
- From existing GraphQL service (GraphQL proxy): You will learn about this in detail in Chapter 9, Building a GraphQL API.
- New OpenAPI: You use this to create a draft API definition. Note that this draft definition does not have any target service attached to it. It is simply a definition and requires configuring any associated Policies and target services. Depending upon what tool is used to create the API definition, the definition is either stored on the management server (if API Manager is used) or the workspace directory specified when you logged into API Designer.
Note
The From target service, From existing OpenAPI service, and New OpenAPI options are available for both OpenAPI 2.0 and OpenAPI 3.0 Proxy types.
For the From existing OpenAPI service option, you can only create an OpenAPI 2.0 proxy if your target OpenAPI is described by OpenAPI 2.0 specification. Similarly, you will only be able to create an OpenAPI 3.0 proxy if your target OpenAPI is described by an OpenAPI 3.0 specification. Creating an OpenAPI 2.0 proxy using an OpenAPI 3.0 specification or vice versa is not permitted. You can experiment with various example definitions at https://github.com/OAI/OpenAPI-Specification/tree/master/examples.
Now that we have explored the various API proxy patterns available in APIC, it is time to look at the patterns that will help us in our service modernization efforts. You will soon appreciate the ease with which APIC helps us proxy our SOAP-based services either as a SOAP or REST proxy.
Creating a SOAP proxy that invokes a SOAP service
Consider a scenario where you want to expose an existing SOAP service where requests from API consumers are forwarded, as-is, to that SOAP service. This pattern of API/service interaction is depicted in Figure 5.4:
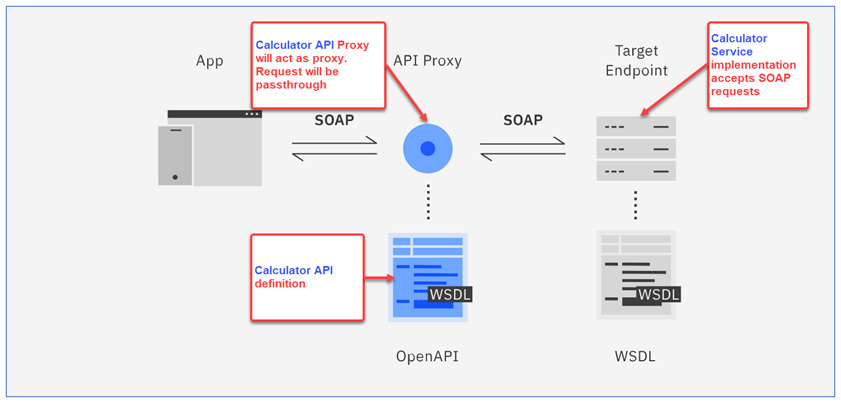
Figure 5.4 – API proxy/SOAP service interaction
We will now explore this pattern in detail by creating a simple SOAP API proxy that will expose a SOAP-based target service (Calculator service). To complete the rest of this section, ensure that you have read the Technical requirements section of this chapter. We will be using a service definition that is completely defined in a single file.
Creating a SOAP proxy
By now, you should already have become comfortable with starting your LTE environment, opening the API Designer, connecting to your workspace, and finally, connecting your API Designer to your running LTE server. We will hence start with the process of creating a new API:
- In the Develop APIs and products tile of API Designer, click Add then select API.
- In the Select API type view, select From existing WSDL service (SOAP Proxy). Review the diagram displayed to the side of the Select API type view. Click Next.
- In the File upload view, upload the Calculator service definition that was downloaded and saved by you as part of the technical requirements. The system should validate the service definition and display a success message. Click Next.
- In the Select Service view, the Calculator service should be auto-selected for you as that is the only service defined in the service definition file. Click Next.
- In the Info section, review all the details that are populated by APIC. You can change Base path in this section. For now, accept the default values and click Next.
- In the Secure section, unselect CORS (more about this in Chapter 7, Securing APIs) and select Activate API. The effect of the Activate API option is that APIC will automatically create a draft Product, add this API to that Product, and publish the Product to the sandbox Catalog so that the API is available for testing. Click Next. This should create your API definition.
- On the Summary page, you should see important information about your API proxy. Make a note of the Client ID and Client secret values. You will be using them shortly to test your API proxy and if for some reason you forget to make a note of these values, we will explore a way to recover them from the API definition.
Before we go about testing our SOAP API proxy, let's review all the considerable work that was done behind the scenes by APIC to expose the provided SOAP service as an API.
Review SOAP Proxy configuration
To fully appreciate the work done by APIC in mapping the WSDL definition to an OpenAPI-based definition, it is imperative that you review the various mappings. In brief, the mappings are done so that each WSDL portType is mapped to API Path, each path has a POST Operation, and each Operation contains Parameters that are mapped to Input message type, and Response that are mapped to Output message type. You will now review the calculator API's configuration. This will give you an in-depth understanding of the APIC's API generation process:
- APIC creates a set of API Operations based on the portType section in the WSDL document. For each operation in the WSDL portType, the API definition creates a matching API operation. The API Paths correspond to the names of the operations. You can review this mapping of WSDL portType to API Paths in Figure 5.5:

Figure 5.5 – Mapping of WSDL operations to API Paths
The HTTP method is always set to POST (SOAP services do not use HTTP methods of GET, PUT, or DELETE). Go ahead and click on one of the Paths and review the Operations section of Edit Path view. You will notice an operation with the name POST. Click on Operation POST.
APIC has done tremendous work in the background. For each API operation, it has mapped WSDL input and output types to request and response messages. Navigate to the Calculator API | Design | Paths (in the left menu) | /Add path | Operations | POST | Path Parameters type AddInput and Response schema AddOutput (Figure 5.6). Path Parameters are related to API requests and Responses are related to API responses. You will review the schema definitions for AddInput and AddOutput objects in the next step.

Figure 5.6 – Mapping WSDL Message Types to API Parameters/Responses
- Navigate to the calculator API | Design | Definitions (in the left menu). Review the AddInput and AddOutput schemas, as shown in Figure 5.7.
Figure 5.7 – Path Parameters/Responses Definitions
These steps should have helped you develop a good understanding of the behind-the-scenes work done by APIC in exposing your SOAP-based target service as a SOAP API proxy. Before we proceed to test the API, we should review two more important items. These are the Gateway tab and Endpoint tab of our API proxy.
Go ahead and click on the Gateway tab. You should see nothing but a single Invoke policy. This is because we are exposing our SOAP target service as a SOAP API proxy. There is no translation of data required. Requests from the API consumer are passed as-is to the backend service and the responses from the backend service are sent to the API consumer, again without any translations. All this work can be carried out by a single Invoke policy. You will soon see the difference (in the next section) in the Gateway tab of a REST API proxy that proxies a SOAP backend service.
Lastly, you should look at the Endpoint tab. Earlier in this section, we mentioned that Client ID and Client secret values can be retrieved from the API definition. You can retrieve these values from the Endpoint tab.
Having now built your SOAP API proxy and reviewed the configuration generated behind the scenes, it is time to test this API proxy.
Testing the SOAP Proxy
There are multiple ways to test your API. You can either use the SoapUI tool or the test tool built into API Designer/API Manager. You will be using the SoapUI tool for this test. Through this test, you will explore how the API's base path and path values are mapped to the actual URL. You will also be able to make a comparison between the API URL and the service URL. This test is divided into two parts. Part one will test the SOAP service by directly calling the service URL. This will ensure that there is required connectivity to the backend SOAP service and give us a glimpse of the response (to make a later comparison) returned by the SOAP service. Part two will test your SOAP API proxy. The highlight of your API proxy test will be to compare the responses produced by the two test cases and to see the Client ID and Client Secret security in action.
Testing the SOAP service
Open your SoapUI tool and create a new SOAP project. You can give this project any name. The initial WSDL value will be http://www.dneonline.com/calculator.asmx?wsdl. SoapUI should create a project based on this service.
Run a quick test by invoking the SOAP service directly. Refer to Figure 5.1. You should be able to get a valid response from the Add operation.
Testing the SOAP API Proxy
Using the same SoapUI project, change your testing endpoint URL.
Your URL consists of the following parts:
- API base url: https://localhost:9444/localtest/sandbox/ (provided to you when you started your LTE environment).
- API base path: /calculator (available in the Design|General|Base Path section).
- API path: /Add (available in the Design|Paths section).
- Complete URL: You can construct the complete API URL as API base URL + API base path + API path, that is, https://localhost:9444/localtest/sandbox/calculator/Add.
Add this new endpoint to your SoapUI project as shown in Figure 5.8. But before you can send a request to this APIC endpoint, you have to do a couple of things.
- First, add Client ID security to your SoapUI request. This can be done by adding a new header, X-IBM-Client-Id (it's worth mentioning that the Client ID is mapped to parameter name X-IBM-Client-Id in the Security Schemes section of your API. You can give any header name, but it is recommended to use X-IBM-Client-Id for the sake of standardization). The value for this header is available in the Endpoint tab of your API.
- To enable rapid testing, APIC auto-publishes your Product to a Target Product (Calculator auto product) and a Test application (Sandbox Test App). Refer to Figure 5.8.

Figure 5.8 – Auto-publishing Preference
- Now you are ready to test your API. Send a request to this new endpoint. You should see a response, as shown in Figure 5.9.

Figure 5.9 – SOAP API proxy test
- You should take time to test other operations as well. Make sure that you change the API URL as you test other service operations. With this test you should now be able to identify the key elements of an API URL, a simple method to enforce security on your API, and an API proxy that sits in front of a SOAP service.
This section covered in detail the facilities available in APIC to expose an existing SOAP-based service as a SOAP API proxy. This ability to expose an existing service as an API, without much effort, can help you on your modernization journey. Many of your API consumers who continue to use SOAP services will be able to consume your APIs with ease. But as their modernization efforts continue and they move from SOAP services to REST services, so will you have to evolve your API endpoints. To accommodate these consumers, you will need to expose your SOAP services as REST API proxies. This is exactly what we will cover in the next section.
Create a REST proxy that invokes a SOAP service
In the previous section, we looked at the method of exposing an existing SOAP service as a SOAP API proxy. That method works for our consumers who are still using SOAP services. But we should also cater to the demands of our more modern or evolving consumers who have shifted to REST services. Continuing our journey, let's now explore the methods in APIC to make available a sample SOAP service as a REST proxy API and satisfy our more modern consumers. APIC provides simple methods to expose an existing SOAP service as a REST API. Let's dive into learning these methods.
Creating a REST proxy
Similar to the starting steps that you took while creating a SOAP proxy earlier, go ahead and start your LTE environment, open API Designer, connect to your workspace, and connect to your LTE environment. After that, follow these steps:
- In the Develop APIs and products tile of API Designer, go to Add | API. In the Select API type view, select From existing WSDL service (REST Proxy). Review the diagram displayed on the side of the Select API type view (Figure 5.10).
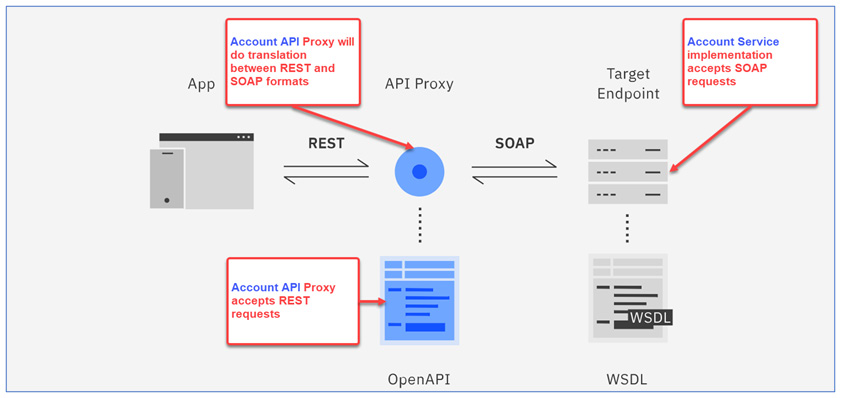
Figure 5.10 – REST proxy to SOAP service pattern
There are two main things to note. One is that requests received by API Gateway are RESTful in nature; that is, they will accept either JSON or XML payloads. Second, the requests going to the backend service are of the SOAP type. Click Next.
- In the File upload view, upload the Account service definition that was downloaded and saved by you as part of the Technical requirements section. The system should validate the service definition and display a success message. Click Next.
- In the Select Service view, Account service should be auto-selected for you as that is the only service defined in the service definition file. You will notice that there is only a single operation defined in this service. Compare this with the Calculator service, which had four operations (Add, Subtract, Multiply, Divide) defined in its WSDL file. Click Next.
- In the Info section, review all the details that are populated by APIC. You can change Base path in this section. You can change the Base path value to /accounts. For now, accept the other default values and click Next.
- In the Secure section, as done previously, unselect CORS and select Activate API. Click Next. You have now created your proxy API definition.
It is time to review the configuration that is generated by APIC to make this conversion between REST and SOAP possible. You are just going to observe how this differs compared to the SOAP proxy to SOAP service configuration.
Review the REST proxy configuration
The configuration of the newly created REST proxy is quite different from the SOAP proxy. This is obvious from the fact that our proxy is no longer a SOAP passthrough type. There are a number of extra actions that our proxy now performs:
- Message translation: It now consumes a JSON REST message instead of an XML SOAP message, and then does a JSON request translation to SOAP. It then performs the same actions in reverse, that is, a SOAP response coming from the backend service is translated to a JSON response sent to the proxy consumer.
- Support for multiple HTTP methods (GET and POST): It now supports a GET HTTP method along with a POST method. We will shortly see how it does that and all the configuration required to support these methods.
Through the next steps, you will now review the generated REST proxy and observe the important elements of its configuration:
- Open your Proxy API in API Designer. Click on the API's Design tab and then on the Paths section (in the left menu). Since there is only one operation defined in your WSDL, there is a single Path that is, /getBalance. You use this Path value while constructing your Proxy's URL and use it for your Proxy testing.
- In the Paths section, click on /getBalance and explore the Operations section. You will observe two HTTP methods, POST and GET.
- Click on the GET operation. It is important to carefully go through the Path Parameters and Responses sections.
The Path Parameters section is where the request's incoming parameters are defined. Incoming requests can contain data in query, path, header, form data, and body. You will see a single arg0 query parameter defined. This matches our simple service that only accepts one parameter, arg0, as part of the SOAP request body.
The Responses section is where the response schema is mapped to various HTTP status code values. The system has mapped HTTP 200 code to getBalanceResponse_element_tns schema and HTTP 500 to the CommonFault schema. It is important that you go through these schemas. You can review these schemas by going to the API's Design tab and clicking on Definitions.
Navigate to the /getBalance Path | POST Operation. You will observe that the main difference (compared to the GET operation) is in the Path Parameters section. The POST operation's Path Parameters contains a request parameter that is in the body of the request and its type is getBalance_element_tns. This is in line with the nature of the HTTP method. Data should now be sent in the request body instead of the query parameter (as was the case with the GET method request). There are no changes to the Responses section.
Having now reviewed the Paths configuration, let's take a tour of the Gateway tab (Figure 5.11) of the generated Proxy. It is important to carefully review the Table 5.1. It will give you an in-depth understanding of the generated configuration that facilitates the mapping of a REST proxy to a backend SOAP service. You will immediately observe that this generated configuration is much different and more complex than the SOAP proxy configuration. The SOAP proxy configuration was a simple passthrough with no translation of schema or the protocol itself. On the other hand, the REST proxy needs to perform a schema translation from JSON/REST to XML/SOAP and a method translation from GET/POST (REST) to POST (SOAP), hence the complexity.
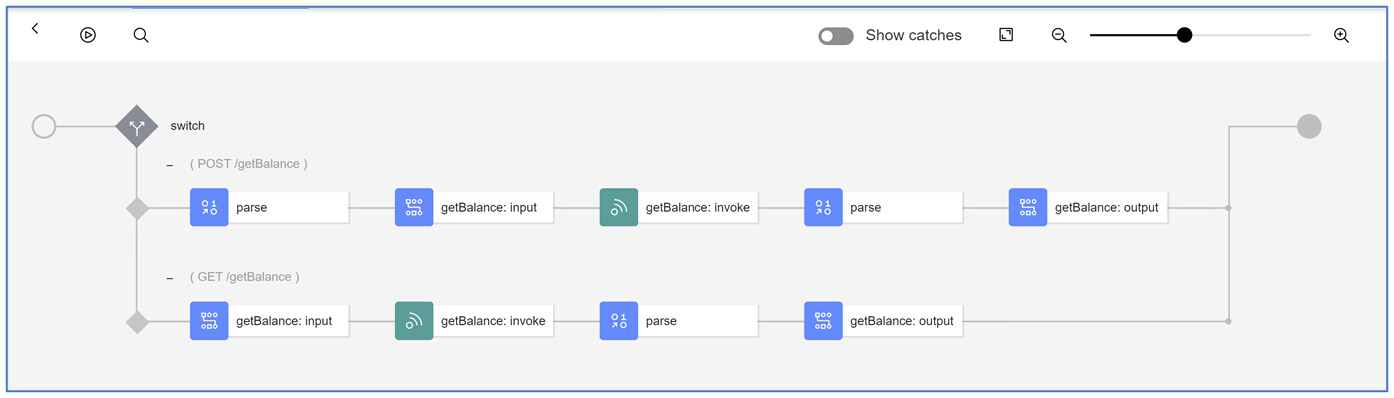
Figure 5.11 – Gateway tab of REST to SOAP Proxy


Table 5.1 – Policy details of the Account service
Tip
You can write conditions scripts in the Switch policy using JSONata functions, numeric operators, comparison operators, and functional expressions. This is applicable for API Gateway only. There are many expressions supported, such as $httpVerb() and $operationPath(). $httpVerb() that map to the request.verb context variable and $operationPath() that maps to the api.operation.path context variable.
You will see more examples of Switch condition scripts in Chapter 6, Supporting FHIR REST Services.
That was a great deal of insight into all the nut and bolts of proxy configuration generated for you by APIC. You can now try to expand on this information by changing this configuration to use Catalog Properties and redesigning the schema for proxy JSON responses. Catalog Properties are available in your API's Gateway tab. As another learning exercise, you can generate a more complex configuration by using the Calculator service to generate a REST proxy. With all this learning behind you, it is time to test the REST proxy.
Testing the REST Proxy
It is time to test the REST proxy. You will use the Test tab to test the REST endpoint. The endpoint will remain the same for GET and POST method invocations:
- Go to your proxy Test tab.
- Select the GET method URL in the URL selection drop-down box. You will notice that the testing facility has automatically populated various Parameters, such as Accept, APIm-Debug, and X-IBM-Client-Id. Refer to Figure 5.12.
- Create a query parameter, arg0, in the same request and assign this parameter a value of 12345. Refer to Figure 5.12.
- After you have done the required preparation, go ahead and Send the request. You should receive an HTTP 200 message and a valid response.

Figure 5.12 – GET request for the REST Proxy
- You will test the POST method now. Change the Request URL to the POST method URL. Delete the arg0 query parameter from the Parameters tab. Construct a simple JSON request payload in the Body tab. Refer to Figure 5.13.
- Click Send. You should receive an HTTP 200 message and a valid response. This test helped you to understand the method of testing a REST proxy, along with the method of passing the request data to a POST method of a REST proxy.

Figure 5.13 – POST request for REST Proxy
This section covered in detail the process of creating a simple REST proxy, configuring it, and testing it. You also reviewed the difference in complexity of REST proxy configuration and SOAP proxy configuration. Your configuration exploration took you into the depths of how the Path Parameters section is mapped to various incoming request attributes (query, headers, form data, body) and the ways of accessing those attributes in the Map policy of the Gateway tab.
Chapter 4, API Creation, and this chapter have given you a good overview of various development concepts of API development. They should have also laid a solid foundation for working with APIC LTE and API Designer. The next couple of chapters will build upon this foundation. Chapter 6, Supporting FHIR REST Services, will utilize the concepts covered so far to teach you how to build advanced FHIR (an extremely important healthcare interoperability standard) services. Chapter 7, Securing APIs, will cover one of the most important aspects of software development, and that is security. But before we take on those advanced concepts, let's wind up this chapter with a short summary.
Summary
The focus of this chapter was to cover in detail two different methods of modernizing your SOAP-based legacy assets. Method one was about exposing these assets via a SOAP proxy. Method two was about exposing them as a REST proxy. The techniques discussed in this chapter helped you quickly expand your company's API repository while making it easier for your existing customers to make use of your SOAP-based business functionality.
There are other legacy assets or non-SOAP assets that can be modernized too. These non-SOAP assets could be your messaging infrastructure (MQ) or your databases. You can use advanced APIC policies such as the GatewayScript policy to make connections to your backend servers.
Though it is now easier, with all the tools and flexibility at our disposable, to create APIs, the question that you should answer before embarking on your API'fication is if the functionality that you intend to make available as an API is even qualified to be one. API candidates (only from a modernization perspective) should be carefully weighed. Each organization builds their own API candidate selection criteria. Some common ones worth mentioning are the reusability score, granularity of business function, and consumer maturity index. Not all integration modernization problems can be solved using an API.
Make sure you remember Maslow's hammer:
APIC is most definitely a hammer, but not everything is a nail. Use the hammer judiciously!
In the next chapter, we will see how to develop REST APIs that support FHIR.