Chapter 14: Building Pipelines for API Connect
You have been learning over the past few chapters how to develop and manage APIs using the API Manager. Your journey toward digital transformation and modernization has been greatly enhanced by using API Connect's capabilities. As you are speeding through development, there is one more critical aspect of developing with agility, and that is DevOps CI/CD (Continuous Integration/Continuous Deployment).
Perhaps you have already integrated a DevOps process within your organization. Even if you have, this chapter will provide you with the details on how to integrate API Connect into the flow. DevOps is an ever-evolving practice. Whether you have DevOps implemented or not, this chapter will be of great value.
In this chapter, we're going to cover the following main topics:
- Introducing pipelines
- Choosing between CLIs or Platform API interface use
- Testing and monitoring hooks
- Using Git as your SCM
- Constructing the Jenkins pipeline
- Working on an API Connect sample pipeline
There is much to learn and investigate but, by the end of this chapter, you will have learned the following new skills:
- An understanding of how pipelines work and how they enhance agility, testing, and deployment.
- You will have learned how to use the apic developer toolkit CLI and the API Connect platform APIs in DevOps scenarios to upload APIs and deploy them to multiple environments. You will learn how to log on to environments, run the publish CLI command, and execute platform APIs to accomplish the same task.
- Integrating APIs and Products into Git to serve as an SCM environment. You will learn some basic Git commands to add, commit, and branch code.
- Lay out a plan to build your DevOps Pipeline with API Connect
You'll be learning about a lot of new tooling to accelerate your digital transformation, so let's get started to see how it's done.
Technical requirements
With this chapter, you will be referencing a number of DevOps tools as well as some open source projects. Minimally, you will need to have access to the APIC CLI toolkit as well as access to GitHub, a Jenkins server implementation, and RedHat Ansible. You learned about the APIC CLI in Chapter 2, Introducing API Connect. Your API Connect API Manager must have installed the test and monitor feature, either during initial installation or added on afterward.
You will find an API and product file as well as a Jenkinsfile in GitHub using the following URL: https://github.com/PacktPublishing/Digital-Transformation-and-Modernization-with-IBM-API-Connect/tree/main/Chapter14
As you have progressed from Chapter 13, Using Test and Monitor for Unit Tests, you have some unit tests to incorporate into the pipelines defined in this chapter. These tests will make your learning of pipelines more realistic and valuable to your company.
Let's begin with an introduction to pipelines.
Introducing pipelines
When you think of a pipeline, you may envision a pipe where liquid flows from one end to another. When put into the context of developing applications, the pipeline is divided into segments of the pipe where activities are performed and then passed downstream. Now, if you think of your current Software Development Lifecycle (SDLC), you probably know the set of steps. If these steps are merely handoffs to another person or team to perform, you can envision the velocity of execution. It could be very slow and may take days. If you have to fill out service tickets to initiate the next task, it may be even longer. Your pipeline should be efficient and expedient. To put it into API Connect terminology, how will you develop APIs and ensure they are properly versioned, built, and deployed to a test server? How will you ensure the APIs are tested before deploying to a QA environment and finally released to production? Those are the steps you should envision in your API Connect pipeline.
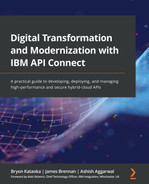
Figure 14.1 provides a visual depiction of those stages. This will be the pipeline that you will be building in this chapter.
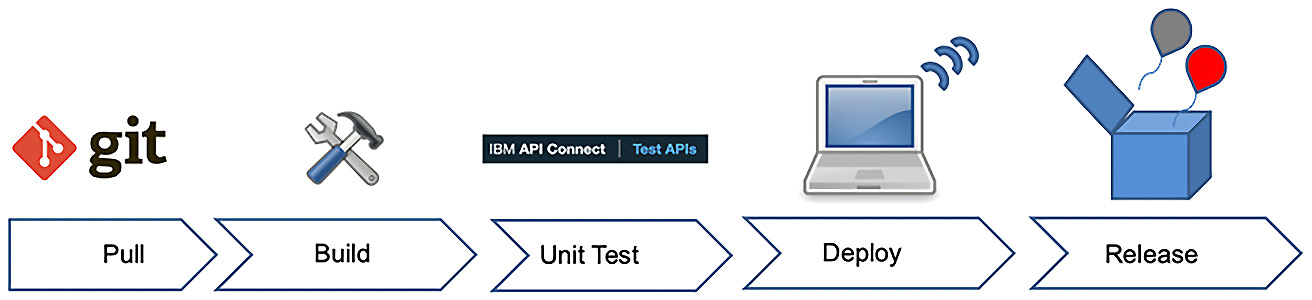
Figure 14.1 – Creating a pipeline
As you can see, there are five stages in your pipeline. Each stage performs some steps to validate the integrity of the pipeline. If a step fails, you can determine whether it's a soft failure or something that requires total rejection of the stage. Let's briefly describe the stages.
- Pull: In this stage, there is an assumption that you have developed your API/Product and have checked it into source control. In this example, it is Git. You'll be checking out your code from Git.
- Build: In this stage, you are initiating your first deployment to a test environment on API Connect. This could be a separate environment or merely a different catalog within API Connect.
- Unit Test: After deployment, you will want to ensure the code deployed minimally passes basic Unit testing. This will minimally ensure your build was properly deployed and that your code is functioning. Of course, you could have created extensive steps to also validate other business functions. That is up to you.
- Deploy: After successful unit testing, the deploy step will move your implementation to either a new environment or a different catalog designated for QA testing. Optionally, you can add another testing stage. If the deployment fails, your pipeline puts out an error message and it terminates the processing.
- Release: When the appropriate party determines that your API is ready to be implemented in production, the release stage will manage those steps
As you review these stages, you will probably see where you can incorporate API management and governance. Now that you have an idea of what stages you need to implement, now is a good time to learn what API Connect capabilities are available to help build the steps within the stages.
Choosing between CLIs or Platform API Interface use
In Chapter 2, Introducing API Connect, you were introduced to the API Connect Toolkit CLIs. As you may recall from there, the CLIs provide you with the ability to create APIs and Products as well as publish the APIs to a catalog. There is also another method for performing similar publishing functionality, and that is with the Platform APIs provided with API Connect.
Since you will be using the CLI for your pipeline in this chapter, you'll learn about the CLI calls first.
Using the CLIs
Although you learned about the CLI commands in Chapter 2, Introducing API Connect, a quick refresher here is appropriate. When you look at the stages for the pipeline, the Build stage will be invoking the steps to interface with API Connect. These are the CLI commands that you will be using in our pipeline:
- apic login: This is how it is used:
apic login --username <username> --password <password>
--server < api-manager host > --realm provider/
default-idp-2
- apic logout: This is how it is used:
apic logout --server <api-manager host>.com
- apic publish: This is how it is used:
apic products:publish <yourProduct.yaml> -c <sandbox>
-o <your org> -s <api-manager host>
Initially, you may also require the apic:identity-provider CLI command to determine appropriate user credentials:
apic identity-providers:list --scope admin --server <api-manager host >
There are other CLI commands you may want to add in the future, but for now, these are the only ones that are needed for this chapter.
Let's now move on and learn about Platform APIs so that you have the knowledge to choose the feature you would like to use that is most appropriate for your future DevOps pipeline.
Using the Platform APIs
When you are working with any of the web user interfaces (Cloud Admin or API Manager), they are actually utilizing APIs to perform all the tasks you initiate. Those APIs are the Platform APIs. The Platform API interface is constructed when API Connect is initially installed.
When you are creating and managing APIs within API Connect, there will be situations where you have repetitive tasks performed by various roles. These tasks can be added to your DevOps pipeline if you so desire. In this chapter, you will learn what you need to do to execute one of these tasks. For more information on the available APIs, you can visit the following website and peruse the offerings:
https://apic-api.apiconnect.ibmcloud.com/v10/.
The best way to learn about the platform APIs is to learn by example. You'll learn that next.
Platform API execution
For all the interactions with the API Manager interface, you will require the logon credentials. Since we are invoking APIs, you will need to acquire the necessary Client ID and the secret to invoke your app. Here are the steps to do this:
- You will need to log in to the server. The apic login is required to establish a connection to the API Connect server with the proper credentials to make updates to API Connect:
apic login --username admin --server cloud-admin-
ui.apicisoa.com --realm admin/default-idp-1
Enter your API Connect credentials
Password?
Once you are logged in to cloud-admin successfully, you need to create a consumer application so you can make API calls to the Platform API interface. You do that by registering the app.
- You must create an application and also get set a client ID and secret. Registering a new application will require you to create a JSON file that provides the details of the application. That includes setting your own client ID and secret. You need to create an input file to pass with the API call. This input file should be created in JSON format. In this example, you can name the file app1.json. Refer to the following code:
{
"name": "app1book",
"client_id": "app1bookid",
"client_secret": "app1booksecret",
"client_type": "toolkit"
}
Once the file is created, you will run the registration:create command, passing in the server you are interfacing with and the name of the JSON file you just created.
- You first need to ensure you are authorized to issue these commands to API Connect. Therefore, you must register with API Connect the credentials that you created in step 2. Issue the apic registration:create command as follows:
apic registrations:create --server [your cloud
adminserver] app1.json
A successful response will list out the newly created application name and internal identifier of the application registration. Refer to the following code:
app1book [state: enabled]
https://[your cloudadmin
server/api/cloud/registrations/e40dbb1a-de6a-48c1-
ba9a-a094b1cc3cb9
You don't have to save the internal identifier. It's for internal reference only.
You will use client_id and client_secret from step 2 in the next step. You should save the client ID and secret for future use.
- Now that you have registered your application, the next thing that is required is a bearer token. This token can be used for multiple platform API calls until the token expires (28,800 seconds). The OAuth token is acquired by calling the URL https://[apimserver]/api/token and passing in the relevant information to obtain a bearer token. The data within brackets should be replaced with the proper information for your environment. Using the curl command, you will make a call to the server requesting a token, as follows:
curl -v -k -X POST -d '{"username": "[username]",
"password": "[****]", "realm": "provider/default-idp-
2", "client_id": "[app1bookid]", "client_secret":
"[app1booksecret]", "grant_type": "password"}'
-H 'Content-Type: application/json'
-H 'Accept: application/json'
https://[apimserver]/api/token
If successful, you will receive a bearer token that must be included with any Platform API call. A successful message is similar to the following:
{
"access_token":
"eyJhbGciOiJSUzI1NiIsInR5cCI6IkpXVCIsImtpZCI6IjMyNjQ0O
UE4RUFFMEQ5Mjk2RTM4MkYwREQ4RUFGRDVDODc2QTI0QUIifQ.
[…]
-WW_KSdie6Cy6UnEveNWASVDuBg6a6tIXqCTopnPv_5dB-
qk6IFYivAtaZW2rYtDkf6VdMu58cbu6DDBy7UMA7YbsFSdXTwjwvlA
fbY9GDAL4XhqzlLkI5vkm3NdVz0REv_FJxNd5iV1b1TM4nVXO63rEB
Ltc-_hUNBxHfPJwuIHBNo6Qh9d2np3CG1KqSE3Ue5cSoMQIwTXU
AwwPn8oGa2k2lhNeCBxE2kbqYDTHEcBwQZUAV_Q",
"token_type": "Bearer",
"expires_in": 28800
}
Now that you have a token, you can proceed to call the platform APIs. The steps you just learned will need to be done regardless of which Platform API you wish to call. Next, you'll learn how to use the publishing Platform API.
Calling the publish Platform API
In the pipeline, we will be cloning a GitHub repository and publishing a product and its APIs to a target environment for user testing. With the publish API, you have two choices of where to publish. You can post to a catalog or space:
- POST /catalogs/{org}/{catalog}/publish
- POST /spaces/{org}/{catalog}/{space}/publish
Each POST will require a payload. Since you will be uploading files in a multipart form to API Connect, there is a requirement to properly label the file type you are uploading. Here is how you do it:
- For a product, the part name is product, and the content type is application/yaml or application/json.
- For the OpenAPI(s), the part name is openapi, and the content type is application/yaml or application/json.
You can download the basic-product and basic-test files from the GitHub repository for this chapter to use with this example. This curl command uses the -F argument to produce the MIME content from the files referenced by pathnames following the @:
curl -v -k -X POST
-F "product=@/home/[user]/jenkins/workspace/basic-
product_1.0.0.yaml;type=application/yaml"
-F "openapi=@/home/[user]/jenkins/workspace/basic-
test_1.0.0.yaml;type=application/yaml"
-H "Authorization: Bearer [GENERATED TOKEN]"
-H 'Accept: application/json'
https://[apimserver]/api/catalogs/[organization
name]/[catalog]/publish
If the command was successful, you should receive a 201 HTTP return code.
Now you have seen two ways in which to publish APIs for your DevOps pipeline. You will be using the toolkit CLIs in the pipeline instead of the Platform APIs, but now you have the additional knowledge of how to use Platform APIs if you find the need to use them instead of the toolkit CLIs.
As you may very well know, constructing a DevOps pipeline may require additional functionality, such as setting up environments, opening up a firewall, and running backups. You can learn how you can automate those tasks with the help of Ansible automation, which is covered next.
Understanding Ansible automation
You might wonder what is Ansible and why Ansible is being discussed in this chapter. Infrastructure as code is becoming a go-to strategy to reduce time to delivery and downtime attributed to human errors. Having infrastructure as code enforces standardization and reduces time spent by resources to handle mundane and repeatable tasks.
Ansible automation is an automation platform that provides enterprise-wide capabilities to automate many repetitive and often manual IT tasks. Being agentless, it is a terrific solution for an organization wishing to automate and free up resources instead of spending countless hours doing tasks manually. While many organizations use Ansible for infrastructure provisioning (which is great), there are so many other areas that can tap into this automation capability, such as security, network configuration, patch management, and, of course, DevOps and DevSecOps.
Digital transformation and modernization may take you down the road of containerization and definitely DevOps. Ansible will a perfect tool to assist with this integration. Because it is agent-less, your company doesn't have to be concerned about applying third-party agents and maintaining them. Ansible works with SSH and a configuration server that triggers the automation tasks. These tasks are built with what are called playbooks.
You'll learn how to create a playbook in this chapter, but we will not be incorporating Ansible in the overall pipeline example. However, it will be beneficial to understand where it can fit within your pipeline so that when you are ready to build your own DevOps pipeline, you will know its capabilities. The following is a quick introduction to Ansible that will show you just how easy it is to incorporate Ansible:
- Install Ansible first. You can follow the instructions from this web page:
https://docs.ansible.com/ansible/latest/installation_guide/intro_installation.html.
- Assuming you have installed it on a Linux workstation, navigate to /etc/ansible and create a file named hosts. Here is an example of it:
[rhelservers]
192.168.168.220
192.168.168.221
[webservers]
192.168.168.13
192.168.168.14
[jenkinsnodes]
192.168.168.14
You can see three groups in the example. Groups are demarcated with brackets and provide an informative name for the servers that fall into that group category. The first group, rhelservers, identifies which servers have RedHat Linux installed or targeted to be installed. webservers identifies which servers will contain webservers. The last group is jenkinsnodes. Jenkins utilizes these nodes to allow the execution of stages and steps so you don't overload the Jenkins primary server. When using the API Connect toolkit CLI to execute commands to manage API Connect, you will need to install the apic command on each Jenkins node. Just imagine you have 20 nodes. If new apic releases are provided each quarter, that means each quarter you will have to update 20 servers. That's a lot of extra work! This is where an Ansible playbook is a solution.
- Using an editor, create an Ansible playbook using the following example:
---
# Ansible playbook to distribute apic toolkit to
Jenkins Nodes
- hosts: jenkinsnodes
become_user: root
tasks:
- name: copy apic toolkit file and set permissions
copy:
src: /Users/[your userid]/Downloads/apic
dest: /usr/local/bin/apic
- name: Changing permission of
"/usr/local/bin/apic", adding "+x"
file: dest=/usr/local/bin/apic mode=a+x
- name: verify version
shell: "apic version"
- Next, you run the playbook by typing the command ansible-playbook apicdeploy.yml:
ansible-playbook apicdeploy.yml
The playbook will run and show successful tasks in green. Red symbolizes errors, and gold represents tasks that made successful updates.
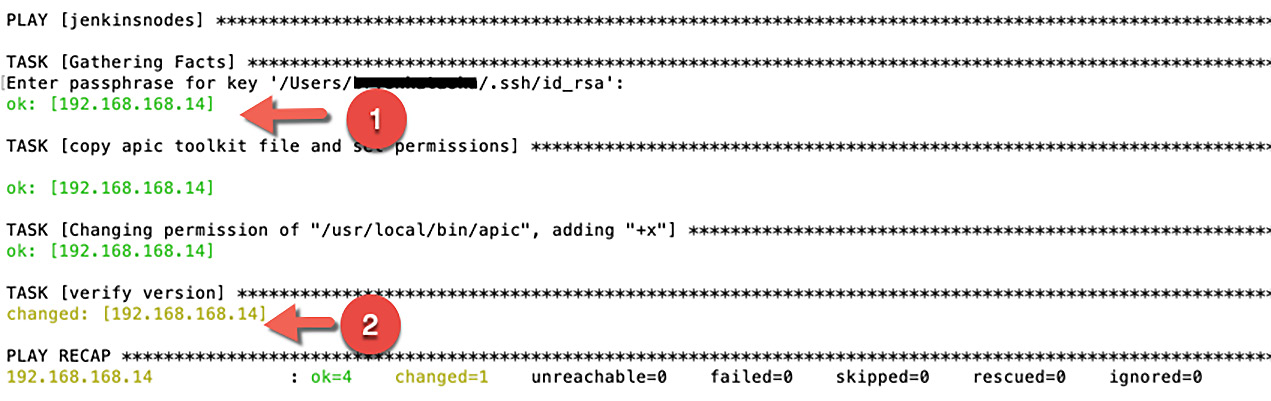
Figure 14.2 – Ansible playbook showing successful execution
As shown in Figure 14.2, a green OK represented by the number 1 signifies the task that you defined was executed successfully. A gold change symbol, shown by the number 2, represents that something on the target got updated and sets the status to changed.
So, you have now seen a simple use of Ansible. As you might imagine, there are many other situations where you might use Ansible. Here are just a few suggestions on where it can be utilized:
- Installing operating systems or patches
- Applying security patches
- Updating network firewalls
- Building containers
- Performing backups
- Orchestrating API Connect Platform APIs
There are more beyond these. You should consider as much automation as possible to reduce wasted resource time and also reduce errors. Playbooks are easy to build and can be executed throughout your organization.
Tip
The API Connect Toolkit should be installed on the slave machines for Jenkins pipeline execution. If you have a large number of slave machines, using Ansible to distribute new versions of the toolkit and ensuring it is made properly executable and placed in the proper directory for execution is a good idea. Using Ansible to deploy to Windows and Mac slave devices is also possible.
The final capability that you need to learn is how to incorporate your user test cases into your pipeline. This is accomplished by generating hooks into your test cases and we will explore that next.
Testing and monitoring hooks
In Chapter 13, Using Test and Monitor for Unit Tests, we learned how to use the API Connect's Test and Monitor add-on feature that generated unit tests automatically for your APIs. Having the ability to create test cases is valuable to the overall success of your DevOps process. In the pipeline shown previously in Figure 14.1, there is one stage where you execute test cases. You will be utilizing the test cases from Test and Monitor to validate your APIs. Running test cases validates that your unit test ran successfully and allows you to promote to the next stage of deployment.
In order to make those test cases available for inclusion in your DevOps pipeline, you will need to generate hooks for the specified test cases. Here is how it is done:
- Click on Test APIs on your API Manager user interface, shown as follows:
Figure 14.3 – Selecting Test APIs on API Manager
This will launch a new browser tab with the Test APIs panel. As you recall, this screen from Chapter 13, Using Test and Monitor for Unit Tests, is where you test your APIs. You should have already set up a project from Chapter 13, Using Test and Monitor for Unit Tests, called Member API for your test cases. If you haven't set up the Member API project already, you should create one. Otherwise, you can jump to step 7.
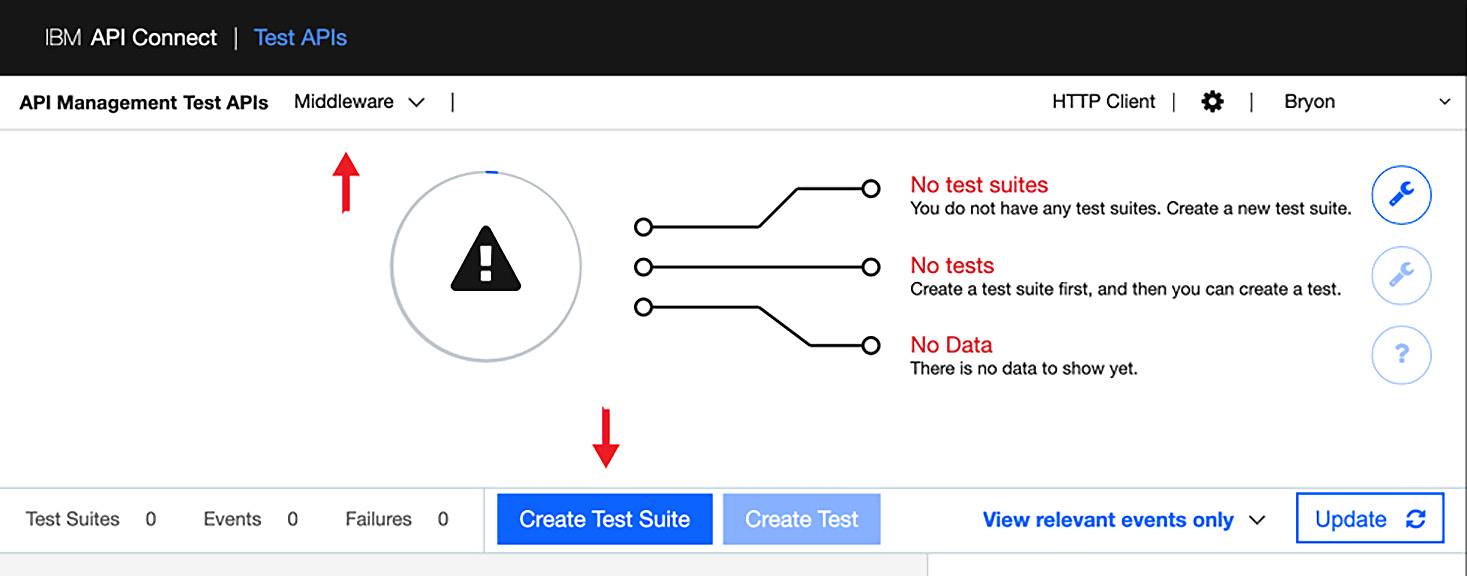
Figure 14.4 – Creating a Test Suite for your unit tests
Click on the Create Test Suite button as shown in the preceding screenshot.
- Fill out the Test Suite details with a test suite name for a Member API and then click the checkmark.
Once completed, you will be presented with an updated panel shown as follows:
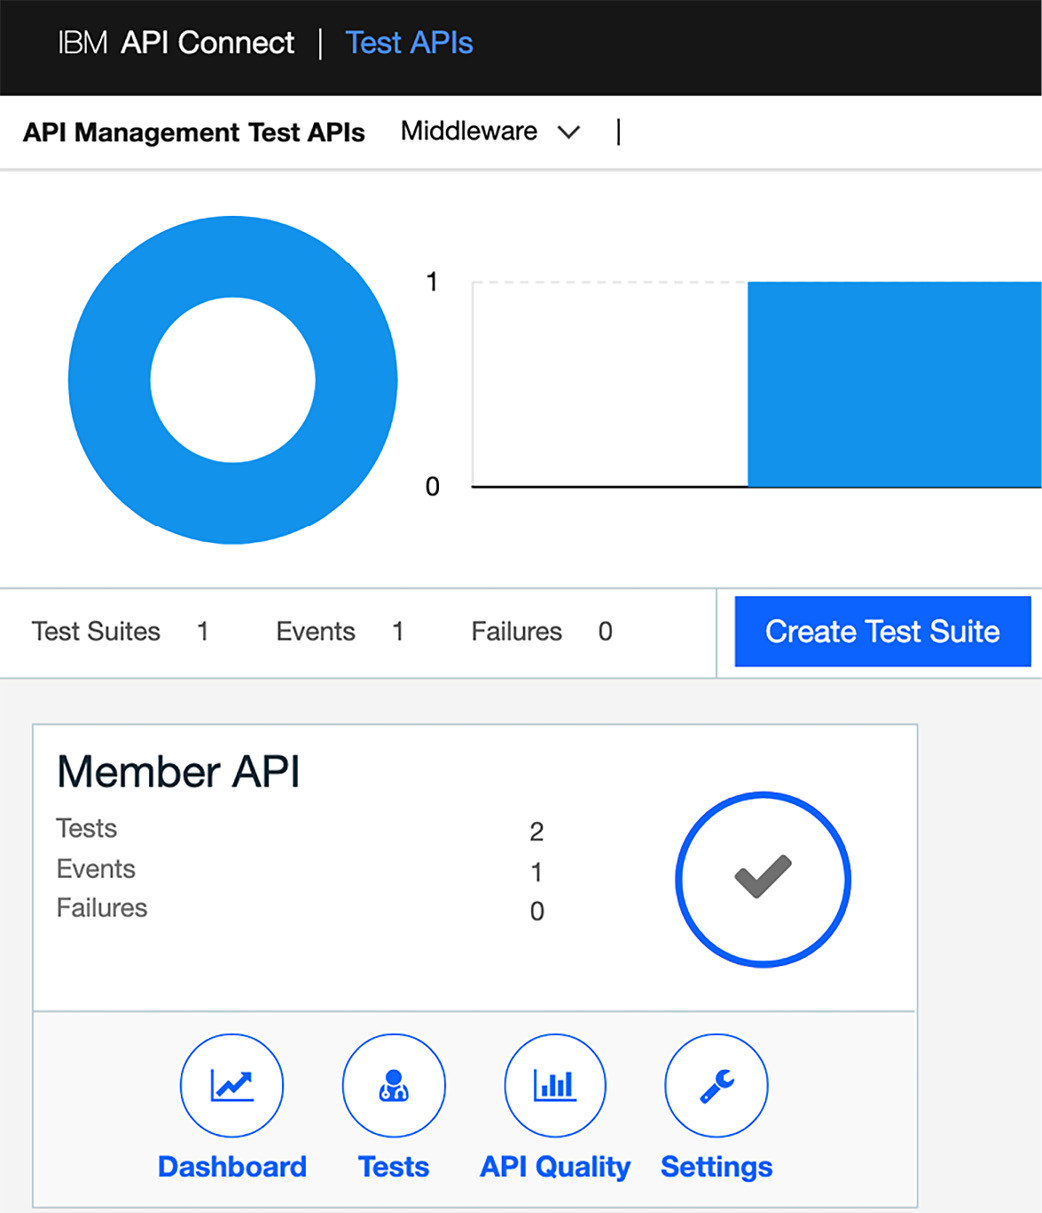
Figure 14.5 – A new Test Suite is created
Figure 14.5 shows the Member API details that may have been created in Chapter 13, Using Test and Monitor for Unit Tests. If you are just creating it for the first time, the values for Tests, Events, and Failures will be different. You will need to create the tests using the guidance set out in Chapter 13, Using Test and Monitor for Unit Tests. Assuming you have completed those steps and are working with a validated unit test project, you can now begin generating your hooks.
- In the upper-right corner is a gear icon. This is where you can generate your test hooks. Click on the gear icon to invoke a new page.

Figure 14.6 – Click on the gear to show the API Hooks option
On the left-hand side of the page, you will see the API Hooks menu item with two choices – HOOKS and KEYS. The center pane indicates the provider organization you are generating hooks for and gives you the option to update the time zone.
- On the left side menu, click on HOOKS and the API Hooks panel is presented.
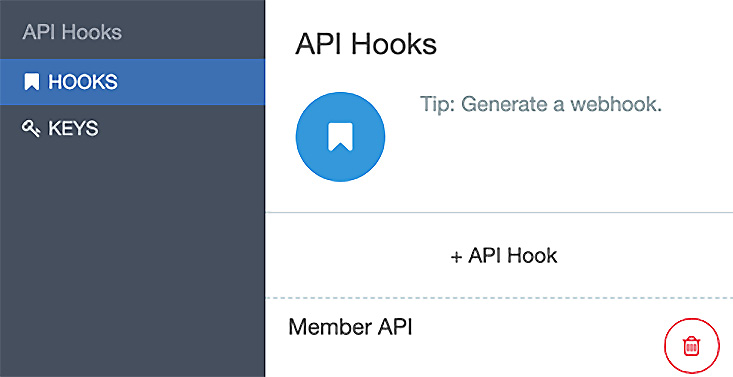
Figure 14.7 – Click on + API Hook to create the hook
When you click on + API Hook, you can add the hook as shown in the following screenshot:
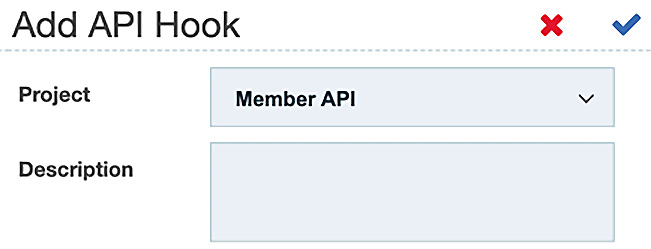
Figure 14.8 – Adding the API Hook
Since Member API was the project you created, this will default as the project. Click the checkmark to create the hook. A new URL is presented that you can copy for future reference.

Figure 14.9 – Keep the Hook URL for future reference
You will be using this Hook URL later when we start incorporating unit tests within our pipeline. For now, copy the URL and save it.
- Click the closing x and see how it lists your Member API hook.

Figure 14.10 – The Member API hook is now registered for use
Now that you have the URL, you can generate an API Key and Secret.
- Now, click on KEYS under the API Hooks menu on the left pane, as shown here:
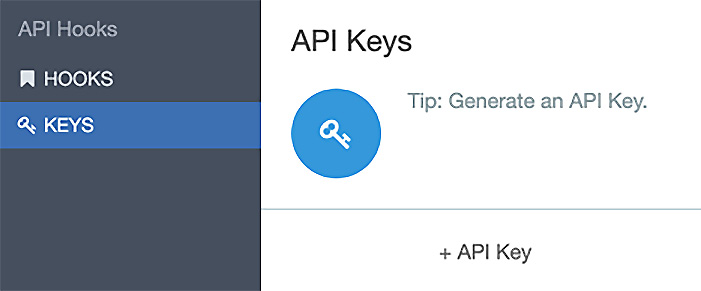
Figure 14.11 – API Keys will provide you with a Key and Secret
You will notice the + API Key button. When you click on that, you will be provided with a new Key and Secret.
- When you click on + API Key, a new popup will be displayed.
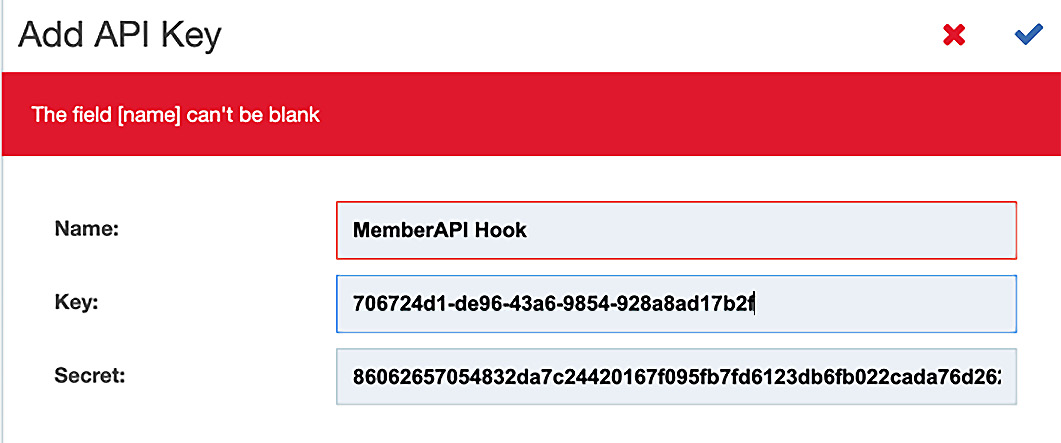
Figure 14.12 – Capturing the Key and Secret for your hook
You will need to provide a name (MemberAPI Hook) and copy the Key and Secret fields so that you can use them when we execute our unit tests within the pipeline. Click on the checkmark to continue.
The original screen reappears and now you will see the key displayed, as follows:
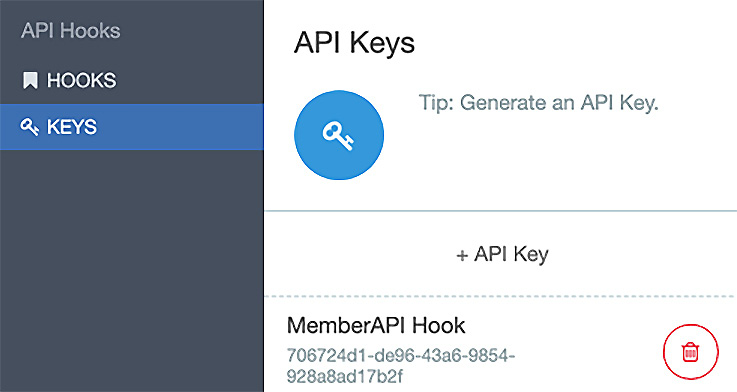
Figure 14.13 – MemberAPI Hook Key created
We have created everything we need to invoke the unit test. We have a URL, the key, and the secret. Now you should run a quick test to verify that the test API exists.
- Initiate a terminal or command session and execute the following curl command using the format shown here:
curl -X GET
-H X-API-Key:{API-Key}
-H X-API-Secret:{API-Secret}
<API-Hook-URL>/tests
You will set two headers representing X-API-Key and X-API-Secret. Use the URL that you generated earlier and append /tests to the path. An example of the output is shown as follows:
curl -k -X GET -H X-API-Key:706724d1-de96-43a6-9854-
928a8ad17b2f
-H X-API-
Secret:86062657054832da7c24420167f095fb7fd6123db6fb022
cada76d262a2e5cb8
https://hub.apicisoa.com/app/api/rest/v1/68d05760-
98be-4ee6-b9a4-d4d188d31ee3867/tests
[{"testId":"5be8d8ab-cd85-4357-914d-cea2fc0096f4",
"testName":"getMember_success",
"testDescription":"",
"lastModified":"2021-03-27T16:29:57Z",
"authorName":"John Apic",
"tags":[]},
{"testId":"2fea53bc-ae07-4755-a0f7-
b42a5ec5f699","testName":"addPatient_success","testDes
cription":"Send successful test request to the Member
API","lastModified":"2021-03-
28T16:45:21Z","authorName":"John Apic","tags":[]}
The output that is provided shows you the number of tests available for your project. The last thing you should verify is that the tests actually execute.
- To run the actual tests, you will use the same URL, Key, and Secret and just change the path from /test to /test/run. Execute the following curl command using API-Key and API-Secret:
curl -X POST -k
-H X-API-Key:706724d1-de96-43a6-9854-928a8ad17b2f
-H X-API-Secret:86062657054832da7c24420167f095fb7fd6123db6fb022
cada76d262a2e5cb8
-H Content-Type:application/json
-d "{options: {allAssertions: false,JUnitFormat:
true},variables: {}}"
https://hub.apicisoa.com/app/api/rest/v1/68d05760-
98be-4ee6-b9a4-d4d188d31ee3867/tests/run
Upon execution, you should get test results similar to the following:
<testsuite name='Member API' tests='1' disabled='0'
errors='0' failures='0' timestamp='2021-03-29T18:31Z'
time='0'>
<testcase name='getMember_success'
classname='5be8d8ab-cd85-4357-914d-cea2fc0096f4'
time='1' />
You can see that there are no errors reported, meaning your test was successful.
Now that you have performed all the necessary steps to add a unit test stage within the pipeline, it's time to explore how to pull your APIs from version control. It is important to have a secure repository for your software revisions. You'll use Git for that purpose.
Using Git as your SCM
There have been many version control systems used in corporate environments. They usually required a centralized server and developers would develop code and check in the code when the code was complete. Examples include Subversion and Team Foundation Server (now called Azure DevOps server). Often, the check-in happened after various deployments have already occurred. Even with more rigid procedures of code check-ins, having a centralized server could lead to a loss of agility if the version control server was down.
In 2005, Linus Torvalds authored Git to support the mass Linux open source community after their version control system became commercialized. Given that the open source community was distributed, a version control system that was fully distributed, simple in design, and allowed parallel branches was needed. And thus, Git became a reality.
Git is very powerful and has many options. You'll be introduced to the features that we will be using in the pipeline next.
Git capabilities
Minimally, you should know the capabilities of Git so you know how to incorporate it within your DevOps pipeline. As a developer, you should understand how to use Git to ensure you are able to create and modify code while maintaining the integrity of the main branch. The features you should be capable of doing are as follows:
- Create and configure a local Git repository: git init, git config.
- Add files to your local repository: git add [file].
- Associate a remote repository (an example is GitHub): git config –global user.username [github username], git remote add origin [url for your github repository].
- Commit your files with minimal documentation: git commit -m "description".
- Pull and push changes to your remote repository: git push origin master.
- Rebase your repository: git rebase master.
- Create branches and merge branches: git branch [new branch name], git checkout [branch name], git merge [branch name].
- Clone the repository: git clone -b [branch] [user credentials] [location].
Figure 14.14 shows, at a high level, the activities you will perform when interfacing with a Git repository:
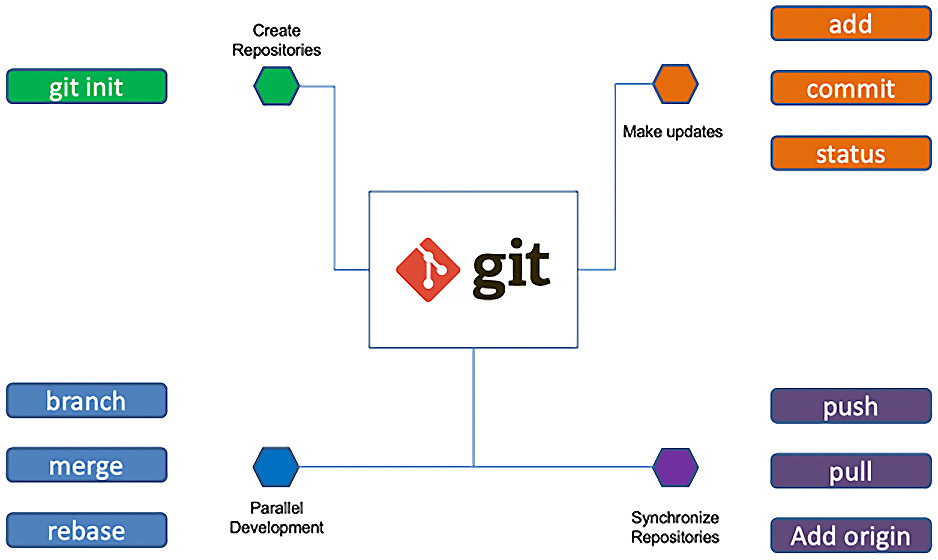
Figure 14.14 – Basic Git capabilities you should learn
As you can see in Figure 14.14, git is supporting all the capabilities necessary to work within teams. You can create multiple repositories and allow multiple developers to branch code streams, merge changes, and rebase. When you need to synchronize your local repository with GitHub, you have the ability to push, pull, and add from the origin.
Now that you have reviewed how a developer interacts with Git, you are ready to move on to your pipeline construction using Jenkins.
Constructing the Jenkins pipeline
With all the background information, you are ready to start developing the pipeline stages required for your Jenkins pipeline. While we are utilizing Jenkins to implement our DevOps pipeline, you should be aware that other products can perform similar tasks that you may come across. Since API Connect runs on top of RedHat OpenShift, you should be aware that Tekton provides a cloud-native, open source CI/CD platform that makes it easier to deploy across multiple clouds. Tekton runs using Kubernetes so it is a natural fit for companies moving to containers and microservices. To learn more about Tekton, you can visit the following URL: https://www.openshift.com/learn/topics/pipelines.
While there are choices in terms of CI/CD, you will be learning how to implement using Jenkins in this chapter. Let's review some of the Jenkins configurations and prepare you for building the Jenkins pipeline.
Jenkins in a nutshell
Jenkins is an open source CI/CD automation tool built on Java. Learning Jenkins will help you build and test your APIs and make it easier to deliver software easier and more often. Jenkins will help you build, test, stage, publish, and deploy all the way up through production.
When you install Jenkins, you will immediately become aware of the many plugins built to run on Jenkins. These plugins will help Jenkins integrate with various tools, such as Git and Ansible. Refer to the following screenshot:
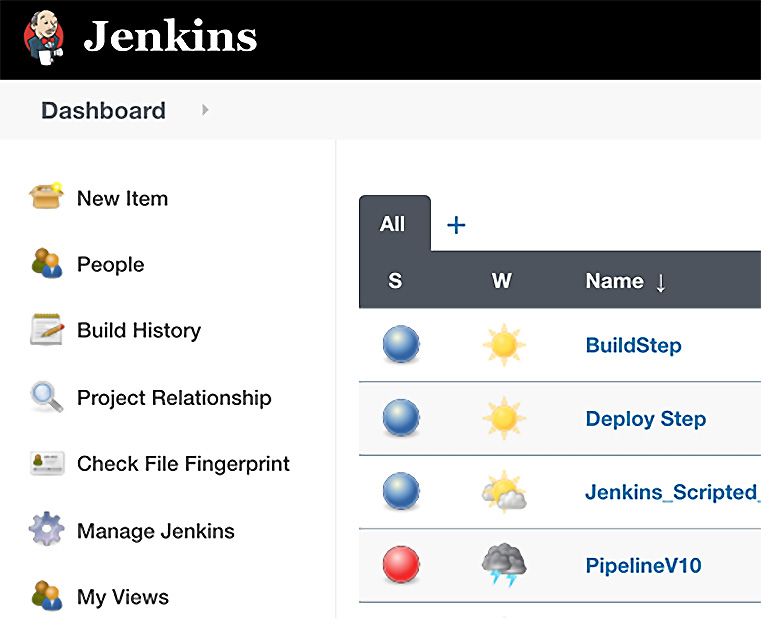
Figure 14.15 – Jenkins Dashboard
When you install Jenkins, you install the master server first. From within the master server, you can perform all CI/CD stages, but that could eventually tax the system. It is the master server that schedules jobs, records build results, and provides status. To alleviate that concern, you can create additional server nodes (called slaves) that work on the build stages. When building your pipeline, you can direct execution to specific nodes. The master server will dispatch builds to the additional node and monitor the execution of the builds on those nodes.
With Jenkins, you create various stages of your builds that run either on the master or one of the nodes. Within each stage, you define a number of steps to accomplish.
In Figure 14.16, you see a Build step. In this step, you can define what you want Jenkins to do.

Figure 14.16 – The Build step defines the task to execute
In Figure 14.16, you see Jenkins executing a shell script running three shell commands (echo, pwd, and date). The Build step was initially created by clicking on New Item shown in Figure 14.15. Within a stage, you can create simple commands or complex processing. The combination of the stages and steps creates what is called a Jenkinsfile.
To start putting your pipeline together, you will need to decide between the two methods of coding your Jenkinsfile. You have a choice between the scripted or declarative methods to create your Jenkinsfile. Let's understand each of these next.
Exploring the scripted and declarative methods
There are two methods for creating a Jenkinsfile. The scripted method allows you to use the Jenkins user interface to build your pipeline scripts. Scripted development is built using the Groovy language. It is very strict in following Groovy syntax, but that is great for complex pipelines. In a scripted pipeline, you declare stage blocks that demarcate the stage that Jenkins will be processing. For instance, you can create a build, test, and deploy stage and execute the steps within each stage. Stage blocks can be combined or kept separately.
The node block tells Jenkins where to execute the steps. You can see in the following scripted pipeline that there are four stages defined and each has a node block that specifies that it should be delegated to run on the node named JenkinsNode:
stage('Build') { // for display purposes
node("JenkinsNode") {
echo "calling apic";
sh "apic version"
}
}
stage('Test') {
// Run the test
node("JenkinsNode") {
echo "Run Unit Test";
}
}
stage('Deploy') {
// Deploy
node("JenkinsNode") {
echo "Deploy to QA environment";
}
stage('Release') {
// Release
echo "Release to Production"
}
As you can see, the script is self-documenting.
The declarative method is very similar to the scripted methods but provides more flexibility as it is not as strict as Groovy. In fact, using the declarative method allows you to utilize Git to store your Jenkinsfile and process your pipeline-like code if you so wish.
The declarative method utilizes blocks just like the scripted method, but with the declarative method, you wrap your execution steps within a pipeline block. In the next section, we will learn how to utilize the declarative method.
Perhaps the best way to learn how to integrate API Connect is to actually work through a pipeline in Jenkins. We'll do that next.
Working on an API Connect sample pipeline
For you to build a pipeline in Jenkins, it's a good idea to identify the stages you want to initiate. For this simple sample pipeline, you will be creating a Jenkinsfile that does the following:
- Clones a repository from Git to a workspace on Jenkins server
- Utilizes the API Connect toolkit CLIs to log on to the target servers
- Publishes the product to the Sandbox catalog
- Runs unit tests on the deployed product
- Publishes the product to the Q&A catalog
Although this is a simple example, you should be able to add additional stages and steps to suit your environment.
The Jenkinsfile is provided for your review in the book's GitHub repository here: https://github.com/PacktPublishing/Digital-Transformation-and-Modernization-with-IBM-API-Connect/blob/main/Chapter14/Jenkinsfile.
You will be working with Jenkins, and with customizable software packages, there is some initial configuration that needs to be conducted. You will learn that initial configuration next.
Jenkins housekeeping
Assuming you have access to a Jenkins instance, there are a few housekeeping tasks you need to initiate to ensure Jenkins will execute this example. If you do not have access to Jenkins, that is alright. You can read through the section and review the screenshots to have a good understanding of what needs to be done.
First, you should ensure you have loaded the Jenkins plugin for Jenkins pipelines. If you haven't installed the Pipeline plugin, do the following:
On the Manage Jenkins page for your installation, navigate to Manage Plugins. Find Pipeline Plugin from among the plugins listed on the Available tab. Select the checkbox for the Pipeline plugin.
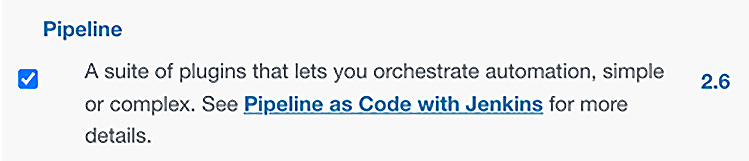
Figure 14.17 – Installing the Pipeline plugin
Select either Install without restart or Download now and install after restart. The Pipeline plugin installation automatically includes all necessary dependencies. Then, simply restart Jenkins.
With the plugin installed, you can now begin the process of building your pipeline.
You also need to set credentials to your remote GitHub repository so your script can make the connection without having the credentials visible. You have to set that up using Credentials within Jenkins. You get to that section by clicking on your username in Jenkins and then it should appear on the left. Refer to the following screenshot:
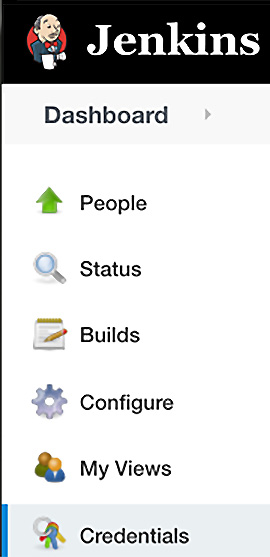
Figure 14.18 – Adding credentials to Jenkins
When you complete this task, you can then reference the credentials in your pipeline using the Jenkins withCredentials function, as shown in the following example:
withCredentials([[$class: 'UsernamePasswordMultiBinding',
credentialsId: 'github-credentials-repo-book',
passwordVariable: 'password', usernameVariable: 'user']])
With that housekeeping task completed, you can now proceed to build the Jenkins pipeline.
Building a Pipeline item
With the plugin loaded, you are now able to create a new item and choose Pipeline to begin setting up your pipeline:
- Click on New Item and a new page will display:
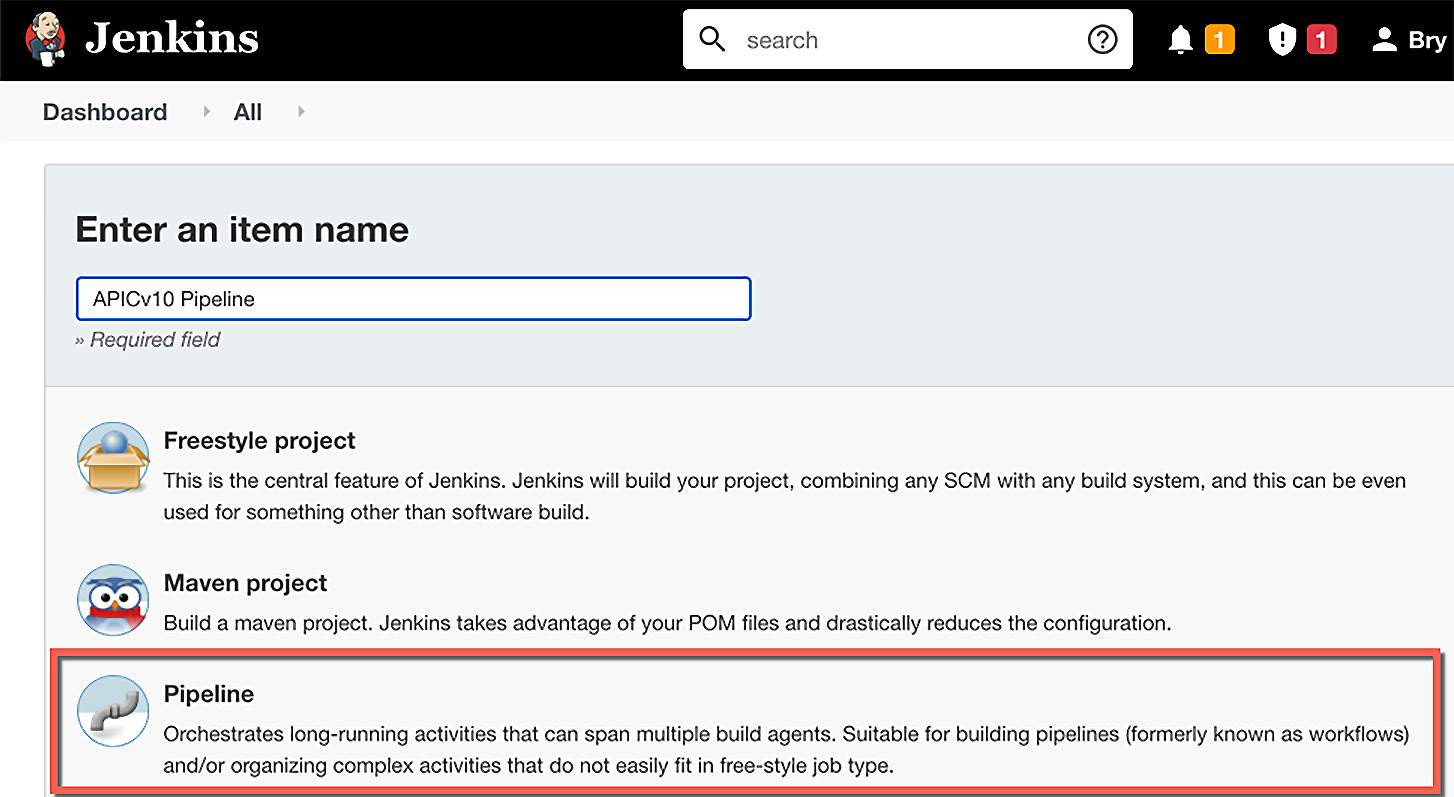
Figure 14.19 – Creating the Jenkins Pipeline
You begin by providing an item name. As shown in Figure 14.20, APICv10 Pipeline was entered. You will want to select the Pipeline project plugin that you installed. If Pipeline is not visible, scroll until you find it. Select it and click OK at the bottom of the page.
- Once the page refreshes, you will see the new project in Dashboard:
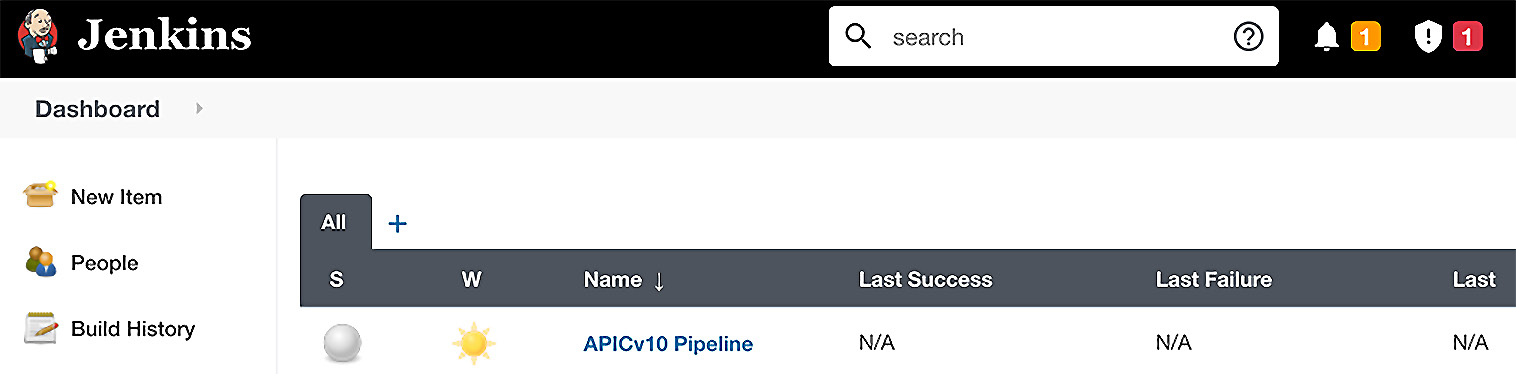
Figure 14.20 – The new pipeline is created
From this point forward, you will be working exclusively within the Project pipeline. Now you need to configure the project to utilize Pipeline as Code by referencing your GitHub repository and providing your credentials.
- Click on your project to enter configuration mode. The screen will bring up the configuration panel. When you create the Pipeline, you have the capabilities to configure various options. For the simple case that you are working on, the only important option is setting the GitHub project where you will store your resources. Scroll down to the Pipeline section and choose the Pipeline script from SCM, shown as follows:
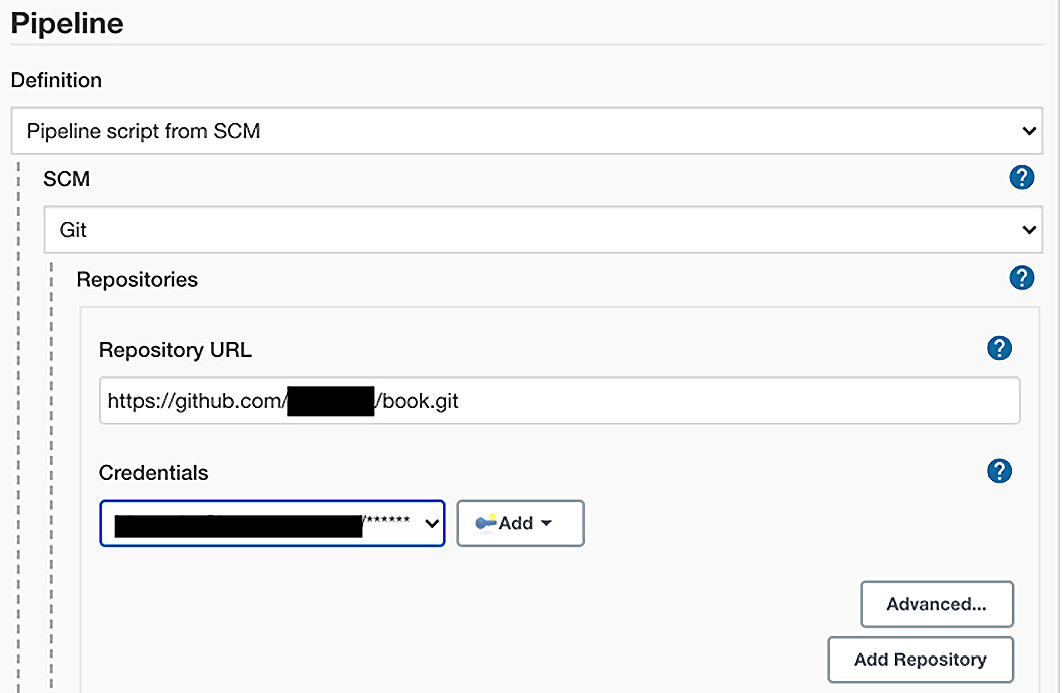
Figure 14.21 – Pipeline as code setup with GitHub
As shown in Figure 14.21, you will have to choose Git from the SCM dropdown and provide your Repository URL and Credentials details. Repository URL follows the format of https://github.com/[your userid]/[project].git.
- Click Apply and then Save. You are now ready to learn about configuring your Jenkinsfile to execute the requisite stages for your DevOps pipeline.
You should take some time to map out the steps you will be needing to build your pipeline. To sum up, here is what you need to consider:
- Plan on creating in your Jenkins workspace a folder to check out your Git resources using the Git clone command.
- Determine which catalog you will publish to as your Dev environment.
- Determine the apic CLI commands to issue to perform the step within your Jenkins stage.
- Capture the test URL that you will use to perform the unit test.
- Plan on what action you will take in the event of a failure.
These steps were considered when the Jenkinsfile was created so you will be able to observe how this is done by reviewing the Jenkinsfile provided. Let's see that next.
Review of the Jenkinsfile
In this section, you'll be walked through the key steps within the Jenkinsfile. You can download the Jenkinsfile from the book's repository on GitHub and follow the steps during this walk-through. The key areas are as follows:
- GitCheckout: You will be executing the following shell command that will run git clone in your workspace:
def GitCheckout(String workspace, String url, String
branch, String credentialsId) {
withCredentials([[$class:
'UsernamePasswordMultiBinding', credentialsId:
'github-credentials-repo-book', passwordVariable:
'password', usernameVariable: 'user']]) {
int urlDelim = url.indexOf("://")
String gitUrlString = url.substring(0, urlDelim + 3) +
""${user}:${password}"@" + url.substring(urlDelim
+3);
//Fetch Jenkins workspace
directoryName = sh (
script:""" basename ${workspace} """,
returnStdout: true
)
//Clean up old workspace so you can populate with
updated GitHub resources
sh """
cd ${workspace}
cd ..
rm -fr ${directoryName}
mkdir ${directoryName}
cd ${directoryName}
git clone -b ${branch} ${gitUrlString} ${workspace}
"""
}
}
Once the workspace is loaded, you will need to prompt the user for the target environment. That is accomplished by bringing up a prompt:
def environmentChoices =
['Dev','Test','Stage'].join(' ')
def environment = null
environment = input(message: "Choose the publishing
target environment ?",parameters: [choice(choices:
environmentChoices, name: 'Environment')
])
The input function allows the user to select among the three defined environments where they wish to run the build and deploy functions. As shown in the preceding code, the catalogs in API Connect are titled Dev, Test, and Stage.
- The next key step is the logon to API Connect. You need to log on to API Connect in order to execute the apic CLI commands:
def Login(String server, String creds, String realm){
def usernameVar, passwordVar
withCredentials([[$class:
'UsernamePasswordMultiBinding', credentialsId:
"${creds}", usernameVariable: 'USERNAME',
passwordVariable: 'PASSWORD']])
{
usernameVar = env.USERNAME
passwordVar = env.PASSWORD
sh "apic login --server ${server} --username
${usernameVar} --password ${passwordVar} --realm
${realm}"
}
}
You can see the Login command being issued through a shell. The credentials are pulled from the Jenkins credential vault so they are not visible. server and realm are pre-loaded from a properties file that is downloaded from GitHub.
- If the logon is successful, and assuming we chose Dev as the target environment, the next key step is the publish stage:
def Publish(String product, String catalog, String
org, String server, String space = ""){
echo "Publishing product ${product}"
if (!space.trim()) {
def status = sh script: "apic products:publish
${product} --catalog ${catalog} --org ${org} --
server ${server}", returnStatus: true
if (status == 0) {
return status
}
}
else {
def status = sh script: "apic products:publish
--scope space ${product} --space ${space}
--catalog ${catalog} --org ${org} –server
${server}", returnStatus: true
if (status == 0) {
return status
}
}
}
As can be seen from the preceding code, you can publish to a Catalog or a Space. Again, the parameters are pre-set from earlier loads of property files. returnStatus:true returns irrespective of whether the script was successful.
- The final key stage is running the unit tests that were created in Chapter 13, Using Test and Monitor for Unit Testing:
def Runtest(String apikey, String apisecret, String
testurl) {
echo "Publishing product on ${testurl}"
def status = sh(script: 'curl -k -X POST
-H X-API-Key:706724d1-de96-43a6-9854-928a8ad17b2f
-H X-API-
Secret:86062657054832da7c24420167f095fb7fd6123db6fb022
cada76d262a2e5cb8 -H Content-Type:application/json
-d " { "options": {"allAssertions":
true,"JUnitFormat": true},"variables": { string:
string, }}" https://hub.apicisoa.com/app/api/rest/
v1/68d05760-98be-4ee6-b9a4-d4d188d31ee3867/tests/
run',
returnStatus: true)
if (status == 0) {
return status
}
As shown in the preceding code block, the Runtest function executes the unit test that was created. The values for X-API-Key and X-API-Secret, as well as the test URL, are shown for presentation purposes only. Normally, they would be shown as the passed-in parameters apikey, apisecret, and testurl.
That completes the Jenkinsfile walk-through. You were able to review a working Jenkinsfile that executes the build, test, and deploy stages and the APIC CLI commands used for each. There are plenty of other stages and steps you can add to the pipeline, such as implementing life cycle management and publishing to production, but they can be added in the future.
Summary
Building a DevOps pipeline is a key component in driving digital transformation. In this chapter, you learned about a number of products that help drive your DevOps initiative. You learned about Git and how it manages version control and participates in Pipeline as Code. You also learned that you can use a tool such as Jenkins to drive your DevOps. Jenkins provides many features and multiple plugins that help make the effort easier. A critical component of the API Connect DevOps process involves using the API Connect CLIs. You learned that those commands need to be installed on all Jenkins nodes and that a tool such as Ansible Automation could help manage the updates to the CLI.
From a publishing standpoint, you also learned that you can use the Platform APIs that come with API Connect. What you learned about the Platform APIs is an alternative way to run an APIC configuration. Whenever you see a feature within the API Manager GUI, you now know that there is a supporting Platform API that can be used for your own purposes. A sample was shown so you know how to execute them.
Finally, you learned how to build a Jenkins pipeline and incorporate the CLIs to deploy your products to multiple catalogs. In addition, you learned how to incorporate API Test hooks that were generated using API Connects Test and Monitor. With a working Jenkinsfile model, you are now ready to embark on your own DevOps pipeline for your company.
Coming up next is how you can utilize and customize the analytics generated in API Connect. Equally as important as analytics is customizing the Developers Portal. You will learn about these two topics in the next chapter.