Chapter 12: User-Defined Policies
API Connect (APIC) is designed to provide a user-friendly, drag and drop experience for creating APIs within the Assembly screen of the graphical user interface (GUI). This provides a very efficient means to create, expose, and secure your APIs without having to know all of the underlying details. In most cases, the work is done for you under the hood. APIC provides a plethora of policies that can be used within the processing of your API requests and responses, ranging from transformations to custom code (XSLT or GatewayScript), to validation policies. Although this drag and drop functionality provides a simple interface to get your APIs created quickly, there may be times when you might feel a little restricted and want to customize your own policies. Perhaps you have a set of built-in policies that you use throughout many of your APIs and would like to package up as one reusable policy. Or maybe you are very familiar with the DataPower product itself and how to develop services. Knowing that your API runtime is actually a DataPower gateway, you might be tempted to use the built-in DataPower capabilities within your APIs. All of this customization is possible in APIC by using user-defined policies (UDPs). These customizable policies provide you with the ability to create your own APIC policies that will show up on the palette for use when developing your APIs.
Throughout this chapter, you will learn the different types of UDPs that are available, their different use cases, and how to configure and install them.
In this chapter, we will cover the following topics:
- Introduction to user-defined policies
- Creating a new user-defined policy
- Implementing your new policy in the Designer
- Deploying your policy
By the end of this chapter, you should have all of the knowledge required to create your own UDPs and make them available to be used within other APIs in your organization.
Technical requirements
The examples presented in this chapter will require an installation of API Connect or LTE to configure your own custom policies. For configuring your global UDPs you will also require access to a DataPower Gateway. An intermediate to advanced level of experience of working with the DataPower Gateway and service development will be required to follow along and build your own UDPs, which will involve using the built-in DataPower functionality.
The configuration files created within this chapter can be found in the GitHub repository here: https://github.com/PacktPublishing/Digital-Transformation-and-Modernization-with-IBM-API-Connect/tree/main/Chapter12.
Understanding user-defined policy types
Before we dive into the configuration of user-defined policies, it is important to understand the different types available, as they are quite different in their use cases, configuration, and implementation. There are two different types of UDPs that you can create, which will provide a level of customization that should satisfy most, if not all, of your requirements when the built-in policies just won't do the trick:
- Catalog scoped user-defined policies: This UDP is defined at the Catalog level and is only available to APIs within that Catalog. Only built-in APIC policies can be used within this type of policy.
- Global scoped user-defined policies: Once created, this type of UDP is available for use within all Catalogs and Provider Organizations. This type of UDP can also incorporate DataPower functionality.
Throughout this chapter, we will discuss these two types of UDPs along with each of their particular use case, benefits, and, of course, how to configure them.
Creating catalog scoped user-defined policies
As you continue down your API development path, you might find that you and other developers within your organization continuously use the same set and sequence of policies within all, or many, of your APIs. Perhaps this is a standard laid down in your development organization that all APIs must implement. To ensure consistency and increase efficiency, reusability is always a good choice. Creating a Catalog scoped UDP will allow you to wrap all of these built-in APIC policies in one reusable policy that will show up on the assembly palette when developing APIs within the defined catalog. Remember, a Catalog scoped UDP can only use built-in APIC policies and is only available to APIs with the defined Catalog.
Before defining a UDP, you would likely want to design and test the policy flow that you want to make reusable. To demonstrate this, let's take a look at an example UDP for our healthcare organization that we might want to build. For this example, we have identified a common logging framework that we would want to use for every API we create within our Catalog. For our logging, we want to first redact some sensitive data that we cannot log. From there, we can send the logging data to be logged. Finally, we have some custom logging that we implement via a custom GatewayScript. This custom code will utilize an input parameter named env to make some logging decisions, such as the logging destination. This parameter will be passed into the UDP for each implementation.
To begin creating your new UDP, you will first need to create and test an actual implementation of the sequence of policies you wish to incorporate. To do this, you will create a sample API, configure the policies, and finally test to be sure you have achieved the expected results. For our implementation, we have created the policy flow shown in Figure 12.1:

Figure 12.1 – Policies for custom logging flow
In our example policy flow shown in Figure 12.1, we have the following policies that will execute in order:
- log-gather – A log policy set to gather-only that will gather all logs
- redact – A redact policy that is configured to redact sensitive data
- log-send – A log policy set to send-only that will log the redacted log data
- GatewayScript-CommonLogging – A custom GatewayScript that expects a parameter to be passed in and logs to a remote log server
You have now established a working model for your custom flow. Your next step in the process will be to build your configuration .yaml file that you will use to configure your custom policy.
Building your UDP .yaml file
Now that you have your assembly representing the common flow that you want to make reusable, you can start to build your .yaml file that will define your UDP. The .yaml file that you will build will consist of six sections, which we will discuss in detail now.
Specification version
The first line of your .yaml file will be the specification version section. This is a one-line section where you add the specification version as follows:
policy: 1.0.0
Information section
The next section will be your information section. In this section, you will provide some basic information about your UDP, such as name, title, version, and description of your UDP, as well as the contact information for the developer or support resources. The following is the format for this section, with the information provided for our example UDP:
info:
title: Redact and Log
name: redactlog
version: 2.0.0
description: Redact sensitive CC and custom data and log
contact:
name: Jim Brennan
url: https://github.com/apic
email: [email protected]
Attach section
The next section in this file will specify which types of APIs this UDP can be used for, such as rest or soap. At least one type is required here, but both can also be included. The format for this section is as follows and shows that both rest and soap types can be used for this UDP:
attach:
- rest
- soap
The gateways section
The gateways section will specify to which API gateway this UDP can be applied. This value will specify the type of API gateway and not the name of your gateway service itself. The possible options for this section are micro-gateway, datapower-gateway, and datapower-api-gateway. These values will specify the type of gateway that you have implemented in your catalog.
The format of this section as well as the values for our example UDP are as follows:
gateways:
- datapower-api-gateway
The properties section
The properties section will now begin to define more of the implementation of your UDP. Specifically, this section will define any and all parameters that can, or must, be provided when using this particular UDP. If you recall in our example, we had a GatewayScript that requires a parameter named env to be passed into it. It is in this section that you define such parameters. Here, you will define each parameter, providing its name, properties, and whether or not it is required.
Let's now take a look at the format of this section by showing how this would be represented in our example UDP, which requires one parameter of the string type:
properties:
$schema: 'http://json-schema.org/draft-04/schema#'
type: object
properties:
env:
label: Environment
description: Runtime Environment
type: string
required:
- env
The values for the $schema and type fields are static and will remain the same for all of your UDPs.
The following fields will be specific to your particular UDP definition and defined parameters. You can define one or more parameters within the properties section.
- Properties: <name of parameter> Specify the name of the parameter you are defining. This will be the name referenced at runtime when accessing the parameter.
- label: The display name you wish to give your parameter. This value will show in the assembly when implementing and configuring the UDP.
- description: A brief description of the parameter.
- required: A list of all the defined parameters that are required when implementing this UDP.
Assembly section
Until now, we have defined mostly metadata regarding our UDP, which included the name of the UDP, where it can be used, and what is required when using it. It is here in the assembly section that we define the implementation. More specifically, we define the policies and their configuration here. If you recall at the beginning of this chapter, before we began building the .yaml file, we discussed building the actual implementation of your soon-to-be UDP by creating and testing an example of the assembly in a test API. That is essentially our working model that will be used to create a reusable artifact. Our example in Figure 12.1 showed our logging flow that we would like to make into a reusable policy. It is the result of this working configuration that will provide us with the assembly section for our UDP.
If you go back to this working example in the Gateway tab where you created the flow, you can click on the </> icon, which will show you the implementation .yaml file for this API. If you scroll down to the assembly section of this .yaml file, you will find all you need for the assembly section of your UDP .yaml file. You can simply copy this section from here and paste it right at the end of your UDP .yaml file.
Figure 12.2 shows the source for our example that we configured and showed in Figure 12.1. Note that the entire configuration for this flow is contained within this assembly section as well as the actual GatewayScript itself.
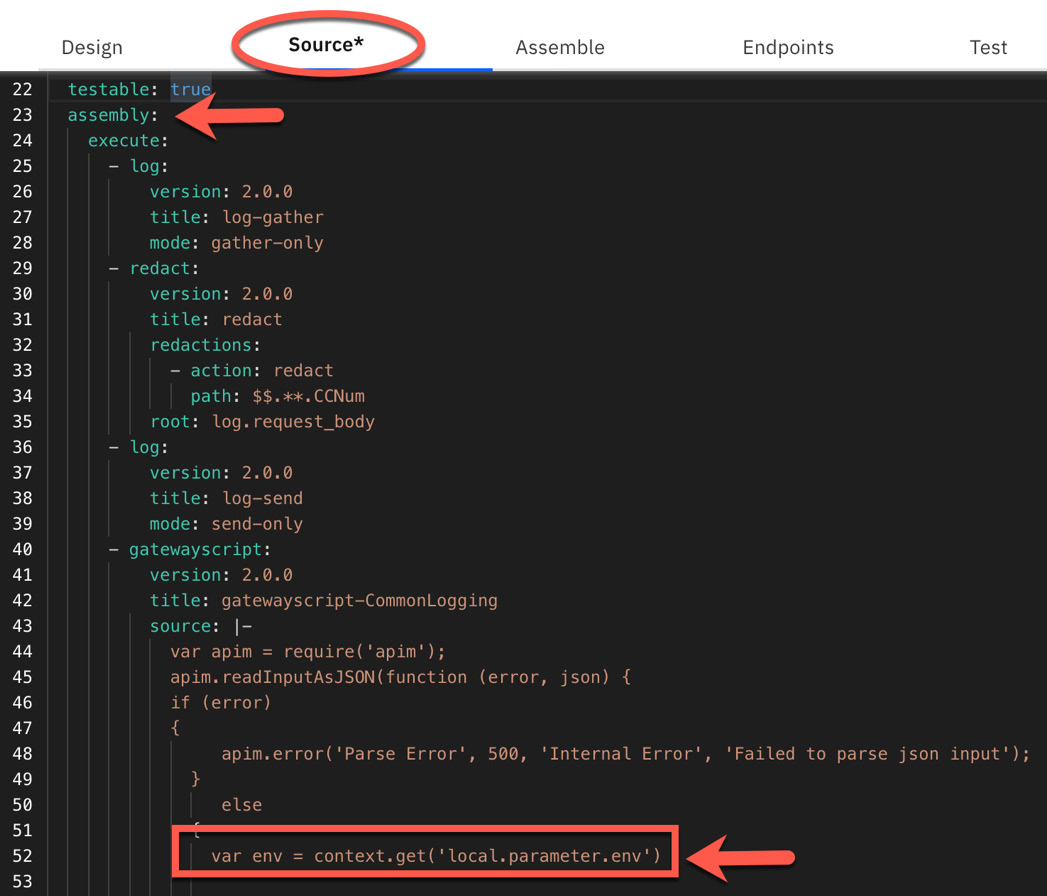
Figure 12.2 – Assembly section of the working policy flow
You will also notice in this GatewayScript the reference to the env parameter that is required to be passed in, as shown in the preceding screenshot.
Completed .yaml
And there you have it! A completed .yaml file that fully encapsulates all of the components required to wrap an entire assembly flow into one reusable policy. The following code block shows the completed .yaml file with the contents of the assembly section omitted for brevity:
policy: 1.0.0
info:
title: Redact and Log
name: redactlog
version: 2.0.0
description: Redact sensitive CC and custom data and log
contact:
name: Jim Brennan
url: https://github.com/apic
email: [email protected]
attach:
- rest
- soap
gateways:
- datapower-api-gateway
properties:
$schema: 'http://json-schema.org/draft-04/schema#'
type: object
properties:
env:
label: Environment
description: Runtime Environment
type: string
required:
- env
assembly:
Now that we have completed the .yaml file that defines our UDP, it is almost time to implement it. The final step for preparing your configuration file is to simply generate a .zip file containing your .yaml file. For our example, we created a logging_UDP.yaml file and zipped it into a logging_UDP.yaml.zip file. Now we are ready to implement our custom UDP!
Installing your UDP
As we stated at the beginning of this chapter, a catalog UDP has two limitations. First, it must only use policies and functionality available within APIC. Second, it must be implemented at a catalog level. Given that it must be implemented at the catalog level, you must perform the following steps for every catalog where you wish to have this UDP visible:
- From within the API Manager home screen, navigate to the Manage catalogs | <catalog name> | Catalog settings tab. From this screen, click the Gateway services link on the left navigation menu to bring you to the configured gateway services for this catalog.
- For the gateway service as regards for which you wish to implement this UDP, click the ellipses to the right of it and click View policies, as shown in the following screenshot:
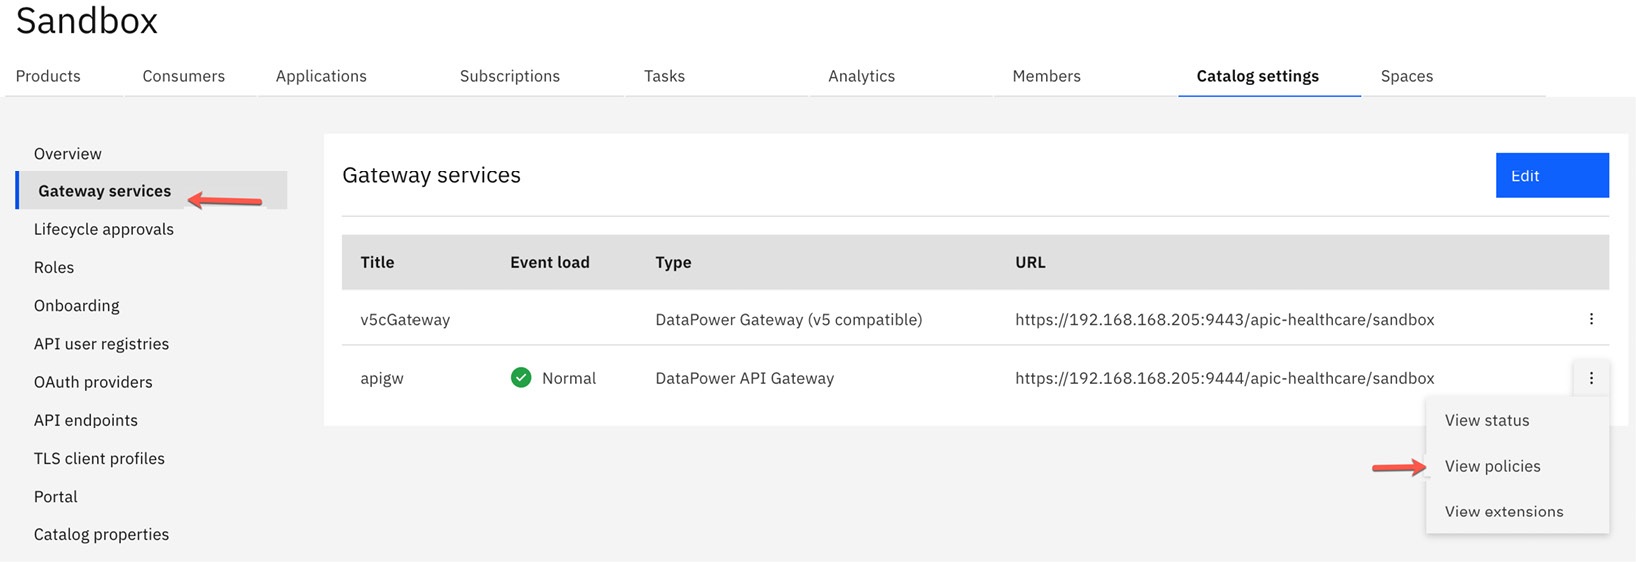
Figure 12.3 – Selecting the gateway service to implement the UDP
- You should now be presented with every built-in and custom user-defined policy available to this catalog and gateway service. In the top right of the main screen, click the Upload button to upload your new UDP.
- You should now be looking at an Import policy screen where you can simply drag your .zip file, which contains your .yaml file, into the top box on the screen, as shown in the following screenshot:

Figure 12.4 – Uploading the UDP configuration file
Alternatively, you can click the top box to navigate to your local filesystem and upload the file. Once the file is uploaded, click the Upload button to complete the installation.
- You will now be brought back to the Policies screen where you should see your new UDP at the top of the list. The following screenshot shows our new UDP, named redactlog, successfully installed:
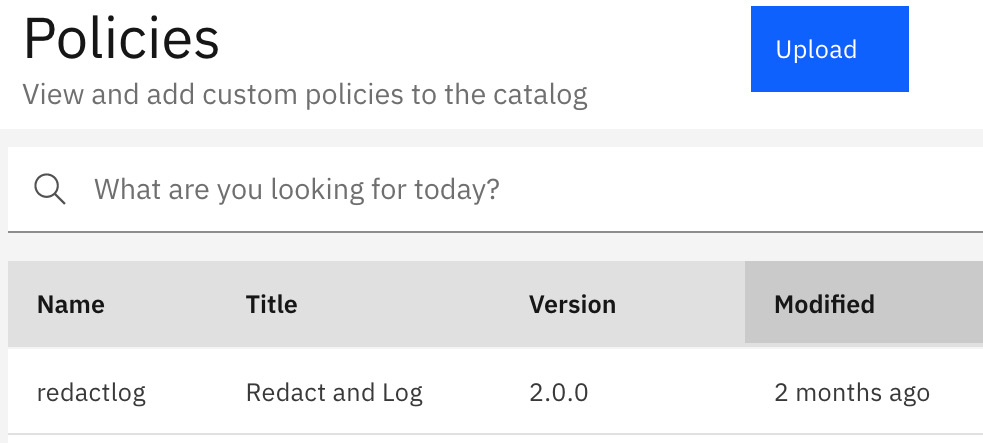
Figure 12.5 – UDP successfully installed
You have now successfully installed your custom UDP in your APIC catalog and it is available for use. Let's now take a look at how we can implement this in your APIs within the catalog.
Implementing your UDP
Now that you have your UDP successfully installed, let's take a look at how we can use and test this new custom policy in our API flow. If you create a new or go to an existing API within the catalog where you installed your UDP, you can navigate to the Gateway tab as if you were creating your policy flow for your API assembly.
Something with which you are familiar with is the built-in policies available that you can drag onto the palette to create your assembly. If you scroll to the bottom of these available policies on the left, you should see the User Defined category with your newly created UDP listed there. You can now drag this custom policy onto your palette in your assembly, as you would any built-in policy. Figure 12.6 shows our newly created UDP, which requires a parameter to be passed in. As you can see, once this is dragged onto the palette, you are prompted for the parameter value on the right side of the page. The value entered here will be passed to the policy that can be accessed at runtime by the policy configuration.
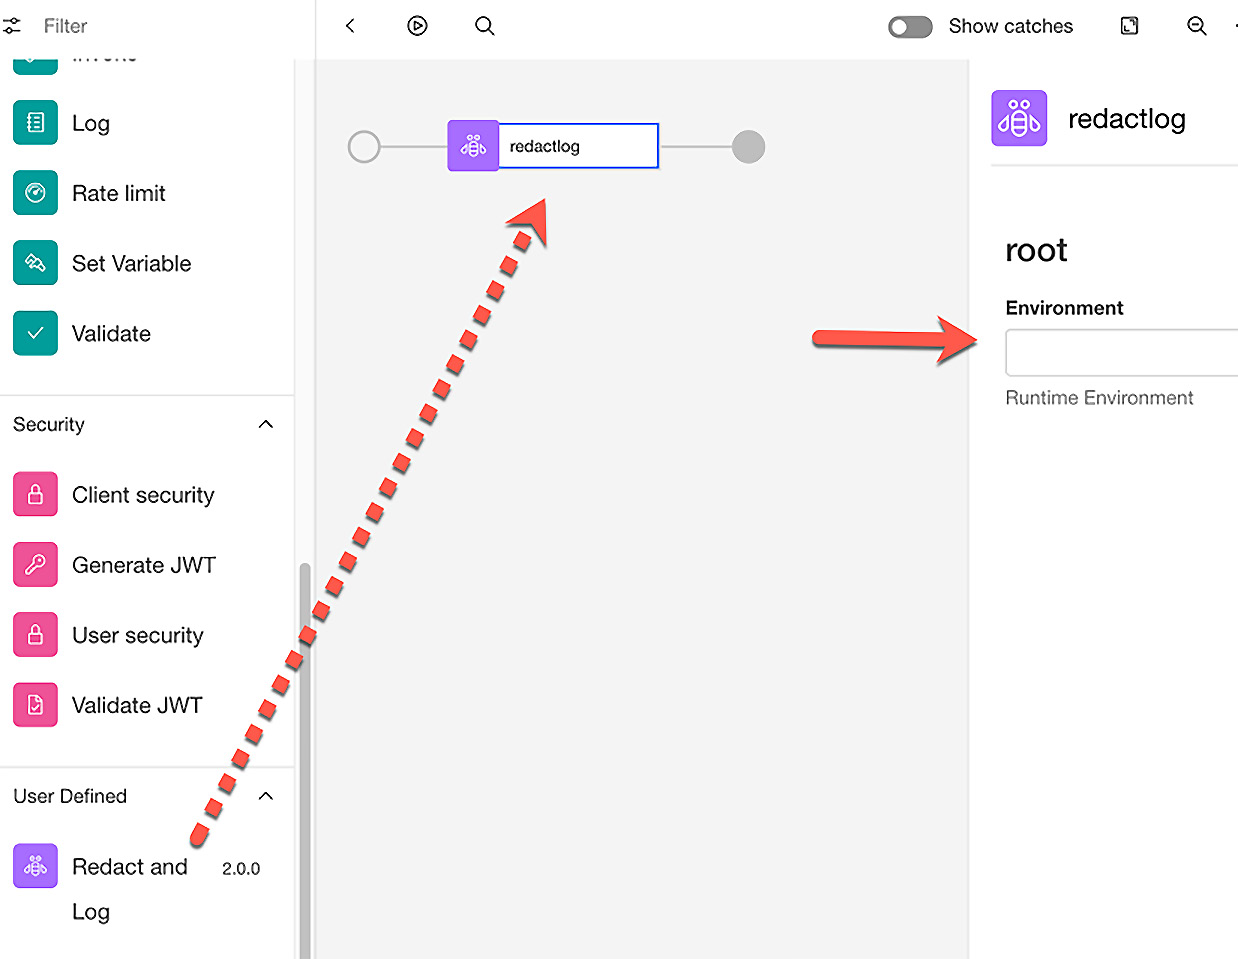
Figure 12.6 – Implementing the UDP in your API assembly
And there you have it! You have taken a sequence of several policies and wrapped them into one reusable policy available to all APIs within the catalog. You have now seen how you can create custom, reusable policies as well as how to configure them to accept parameters that can be utilized by the underlying configuration. This feature can prove very beneficial by allowing custom configurations to become reusable assets, thereby reducing development and testing time, as well as providing consistency in your API quality.
Now that you know how to create a catalog UDP, the next step is to take a look at the second type of UDP, the global UDP, which can be shared across any Provider Organization and utilize not only APIC features but also the built-in DataPower functionality.
Global scoped user-defined policy
As you should be aware by now, APIC uses a DataPower Gateway as its runtime for your APIs. Many API developers using APIC often have previous DataPower development experience and naturally ask the question "Why can't I use any of the robust features and functionality that the DataPower product offers?" This is a legitimate question, and many developers will take it upon themselves to create separate services on DataPower to implement this functionality, but this is not the way you should accomplish this. Much like you saw in the previous section of this chapter, APIC provides a way to package all of your DataPower-specific functionality into one shareable policy that can be shared and reused by all of your APIs by simply dragging it onto the assembly flow like any other policy. Unlike the Catalog UDP we discussed in the previous section, any global UDP created will be available to any API being developed in any Provider Organization.
In this section, we will walk you through how this is accomplished by providing a real working example. Keep in mind that a strong working knowledge of DataPower configuration is strongly recommended when venturing into this area.
Planning your global UDP
As a savvy DataPower developer, you might now be chomping at the bit ready to create your DataPower policies, rules, and actions on your DataPower device to be shared and used across your APIs. This is not necessarily the case with global UDPs. You are not creating DataPower configs the way you would for a DataPower service; however, you will create specific DataPower assembly objects that can implement certain DataPower functionality.
To make it clear as to what you can and cannot do within a global UDP, let's take a look at the specific objects that are created on your DataPower gateway service when creating a global UDP.
These steps are not required for creating your UDP; however, they will provide you with a better understanding of what is created for you, an understanding of what is available to you, and finally, the command-line interface (CLI) commands required for your UDP. If you have access to a DataPower Web GUI, you can simply log in and create an Assembly Function object. As you can see in Figure 12.7, you will provide a name for your Assembly Function as well as the ability to complete the Title, Description, Scope, and Parameters fields to be passed to it. All of these parameters will be discussed further when we configure our UDP configuration file.
From here, you will want to create a new Assembly object by clicking the + symbol as shown in Figure 12.7:

Figure 12.7 – Creating an assembly function in DataPower
Then, your assembly object definition will simply require a name and the creation of a rule, as shown here in Figure 12.8:

Figure 12.8 – Assembly object creation
From your Assembly configuration, clicking the + symbol will allow you to create a new rule for your Assembly. Within your rule configuration, you will specify which actions you would like to configure within your Assembly.
As you can see in Figure 12.9, by clicking the + symbol next to the API actions field, you will be presented with a list of actions to select from. Note that not all actions presented are valid for this configuration. You should only select from the Assembly actions.

Figure 12.9 – Selecting actions for the rule
Once you select the action to implement within your rule, you will configure the specific parameters for that action. To implement most DataPower-specific functionality, you would select the GatewayScript action and implement this functionality within a GatewayScipt file. The following screenshot shows how this can be configured:

Figure 12.10 – Configuring Assembly GatewayScript Action
You can add multiple actions to your rule in the same way you did when configuring the Assembly GatewayScript action.
This process of creating these DataPower objects is not necessarily what you would do when configuring your global UDP; however, it is a good way to get a better understanding of what objects will be created for your global UDP as well as the CLI commands generated for them. This will come in handy in the next section, where we discuss the format and syntax of the actual UDP configuration file.
Creating a UDP configuration file
Much like the catalog UDP, we will need a configuration file that will define the complete UDP. For a global UDP, we will need to create this using DataPower CLI commands in a specific format that will ultimately be uploaded to your APIC environment. If you are familiar with DataPower CLI commands, this will look very familiar to you. If you are not, don't worry; there is a simple method for generating them (hint, you just did it in the previous section when creating DataPower objects!).
Since the configuration file for a global UDP is more DataPower specific, you will not create a .yaml file; you will be creating a .cfg file that DataPower will understand. The sections that you will define in this file might start to look familiar to you as they will be the CLI commands that would be used to generate the DataPower objects we discussed previously. In fact, if you are familiar with the DataPower filesystem and config files, you can actually copy these CLI commands from the .cfg file on DataPower after you create the objects within the DataPower Web GUI.
For now, let's take a look at the contents of a .cfg file for a global UDP. Let's take an example where we would want to set a variable and then generate a digital signature for the incoming request message for our API.
To begin our configuration file, we will define the actions required to accomplish the set variable and the digital signature. Let's take a look at the configuration of the set variable action first. If you refer back to Figure 12.9, where we showed all the available actions for a global UDP, you will see Assembly Set Variable Action listed. In our example scenario, we want to set a variable named env, with the value being specified when implementing the UDP in your assembly. This will be our first action in our configuration file and is defined as follows:
assembly-setvar udp-dsig-setvar_1.0.0_set-variable_0
reset
title "set-variable"
correlation-path "$.x-ibm-configuration.assembly.
execute[0]"
variable
action set
name "env"
type string
value "$(local.parameter.environment)"
exit
exit
In this configuration CLI, most of it is static values, with a few values you have to provide, such as the name of the action, title, correlation-path, the name of the variable to set, and the value of the variable. In this example, you can see that the value will be passed in as a parameter from the API configuration.
Our next action to define will be the action to generate a digital signature for our request message. Since APIC does not provide this ability, we will have to utilize the DataPower functionality to accomplish the digital signature generation. If you refer back to Figure 12.9, you will notice that there is no action available to generate a digital signature. As we mentioned earlier, you will need to rely on implementing most DataPower functionality within your GatewayScript itself. In our example, we would utilize the crypto function, createSign(), to generate the digital signature. Since GatewayScript and the available functions for DataPower functionality are vast, we will not be covering that in the book. A working knowledge of this topic is strongly recommended before implementing this functionality.
For now, let's assume we have created a GatewayScript file named digitalSig.js that contains the functionality to digitally sign the incoming message. Within our .cfg file, we must now define this action much as we did for our set-variable action. The following CLI is used to accomplish this:
assembly-gatewayscript udp-dsig-setvar_1.0.0_gatewayscript_1
reset
title "gatewayscript"
correlation-path "$.x-ibm-configuration.assembly
.execute[1]"
gatewayscript-location temporary:///filestores
/extensions/gateway-extension/digitalSig.js
exit
As you can see in the CLI shown for the GatewayScript action, you need to provide the title, correlation-path, and location fields of your GatewayScript file. When you deploy your global UDP, you will provide the GatewayScript file within the package that will be deployed to the temporary:///filestores/extenstions/gateway-extensions directory. This is the directory you will provide in your configuration file.
Now that you have provided the configuration for your actions, you need to define the additional objects within the assembly. Again, these will be the same objects that we demonstrated within the DataPower Web GUI previously. Next, we will define the API rule, which will list the actions previously defined in the order in which they should execute. The CLI for this configuration is as follows:
api-rule udp-dsig-setvar_1.0.0_main
reset
action udp-dsig-setvar_1.0.0_set-variable_0
action udp-dsig-setvar_1.0.0_gatewayscript_1
exit
The next section in the configuration defines the assembly that will simply contain a reference to the API rule defined previously as follows:
assembly udp-dsig-setvar_1.0.0
reset
rule udp-dsig-setvar_1.0.0_main
exit
The final section of our configuration is the assembly function. This is where you define the actual UDP and the information that will be displayed on the API assembly. This is where you will provide a title and summary to be displayed as well as define any input parameters. In our example, we require one input parameter, so we will need to define that here. The following commands define this assembly function for our example:
assembly-function "udp-dsig-setvar"
reset
summary "udp-dsig-setvar_1.0.0"
title "udp-dsig-setvar_"
parameter
name "environment"
description "Runtime Environment"
value-type string
exit
assembly udp-dsig-setvar_1.0.0
exit
As you can see, we are defining a UDP named udp-dsig-setvar, which requires a parameter named environment to be passed, which is of the string type.
There you have it. That is the entire .cfg file required for our custom global UDP. We can save this file to our local filesystem with a .cfg extension to be used when packaging up our global UDP to be published to our API gateway.
The next step in making our global UDP available for use in your APIs is to package up all of the artifacts and publish the UDP. In the next section, we will demonstrate exactly how we can accomplish this.
Packaging and publishing your global UDP
Now that you have all of the components for your global UDP, you will need to package them up into a .zip file to be published to your API gateway. To do this, simply create a .zip file that contains the .cfg file as well as all the requisite policy implementation files. In our example, we would include the .cfg file and the GatewayScript file.
Once you have all of your required artifacts in one .zip file, you are ready to deploy this to your API gateway. Since this is a global UDP and not specific to any Provider Organization or Catalog, we will publish this to our API gateway via the Cloud Manager UI. Once signed into the Cloud UI, click the Configure Topology tile on the home screen. This will bring you to your availability zone, where you will see all services registered. We are interested in gateway services, so click the ellipses to the right of your gateway service and click Configure gateway extensions, as shown in Figure 12.11:
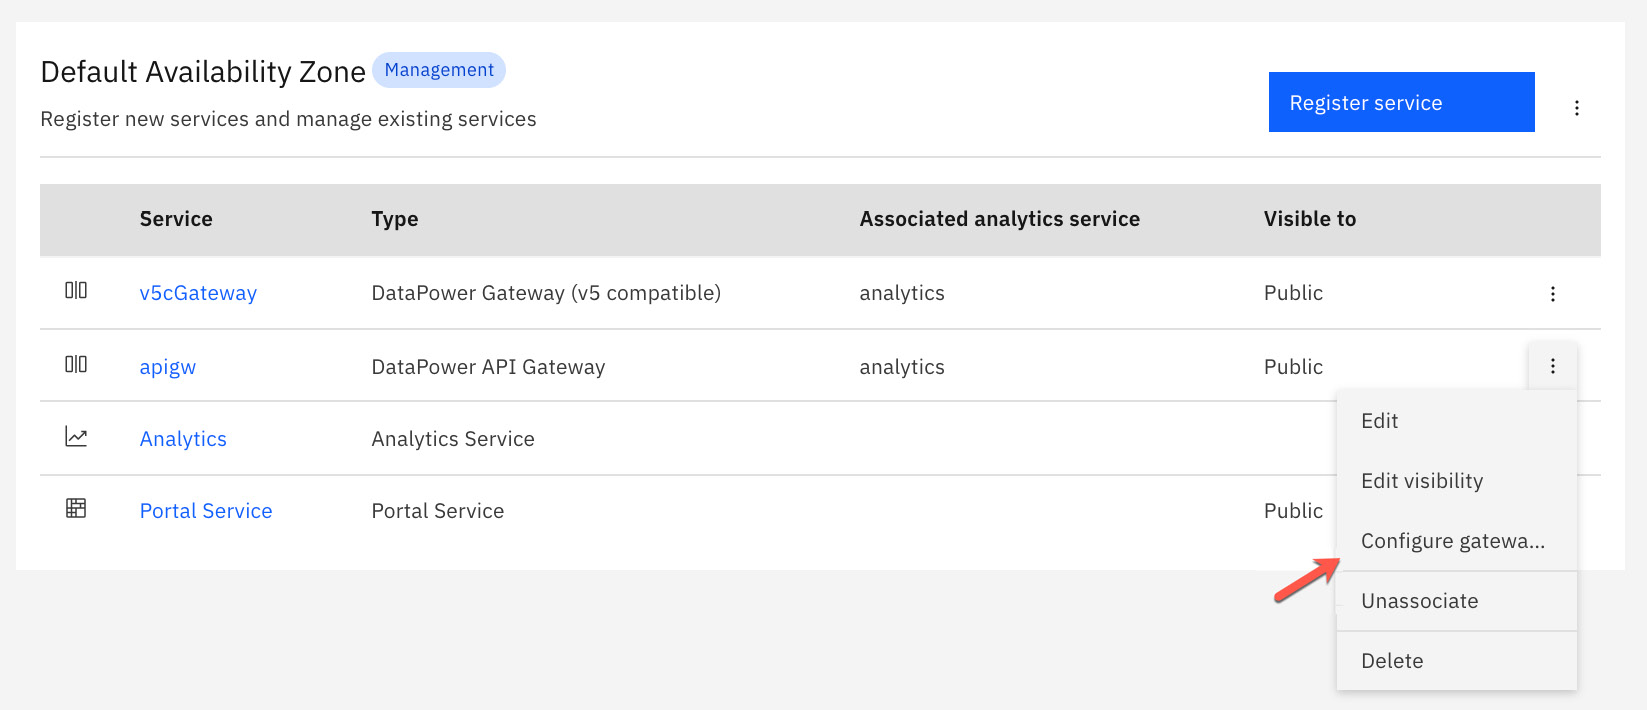
Figure 12.11 – Configure gateway extension
From here, on the next screen, click the Add button, which will bring you to a screen where you can either drag your .zip file you created to the screen or upload it, as shown in the following screenshot:

Figure 12.12 – Uploading the .zip UDP configuration
Clicking the Save button completes the configuration and brings you back to the Configure Gateway Extensions screen, where you should now see a gateway extension configured.
Note
There can only be one .zip gateway extension file uploaded to a given gateway service. If more UDPs are required, the gateway extension must be deleted and all UDPs should be configured in one .zip file.
Your new global UDP is now configured in APIC; however, it is not immediately uploaded to the gateway service and installed. To have this take effect immediately, you can log in to your DataPower device in the configured APIC domain and navigate to API Connect Gateway Service. The easiest way to find this is to type API Connect Gateway Service in the search field and click it when it appears. From this screen, you can disable and then enable the API Connect Gateway Service to force a refresh and bring in your newly created UDP. Once the gateway service is enabled, you should see the new UDP in the dropdown next to the User-defined policies field. You can now select this and click the add button, as shown in Figure 12.13:
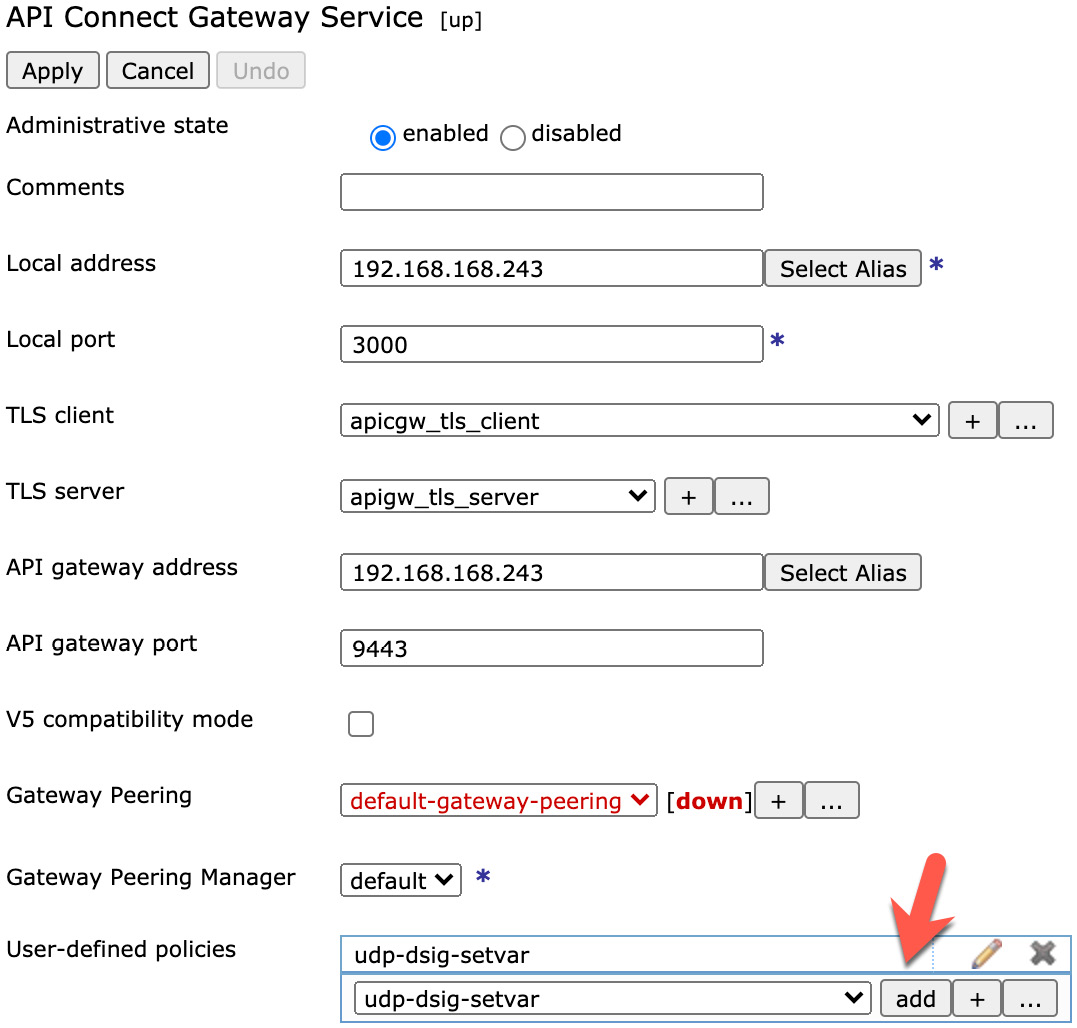
Figure 12.13 – Adding a UDP to a gateway service in DataPower
Once you have added the UDP to your gateway service, you can apply the changes and save the configuration.
Your new global UDP is now configured, installed, and ready for use. If you configure an API in any Provider Organization or Catalog, the new UDP should appear in the Policies palette within the Gateway tab. Figure 12.14 shows our new UDP available and being used in the assembly. Note the required parameter that we configured in our configuration file.

Figure 12.14 – Global UDP available in the Policies palette
You have now seen how you can configure a global UDP and hopefully understand its benefits. Much like a catalog UDP, it can package up one or more actions or policies in a single policy, which will be shareable. The additional benefits of the global UDP are that it can utilize DataPower-specific functionality and is shared across all Provider Organizations and catalogs.
Summary
Having the ability to create, package, and share common functionality across your organization provides many benefits. Not only does it save time in development, but it provides a high level of confidence that it's been thoroughly tested as well as providing consistency. APIC provides the ability through the use of user-defined policies to combine as much functionality as desired into one shareable policy. With the flexibility of Catalog UDPs and global UDPs, you can choose what type of functionality you wish to incorporate and the scope of users that you wish to share the UDP with.
Throughout this chapter, you learned the benefits and differences of each type of UDP as well as how to configure and install them. Through the use and experimentation of these policies, you will certainly learn the endless possibilities, flexibility, and benefits of them.
At this point, you should have a good understanding of how to build some basic and advanced APIs using the features provided in the APIC product. Our next chapter will discuss how you can use some built-in features to perform unit tests that can also be incorporated into your DevOps pipeline.