Chapter 11: API Management and Governance
It was inevitable that we would eventually have to get to that oh-so dreaded word governance. You might cringe a little thinking about all the red tape and processes that seem to just slow our productivity and time to market. Although governance is important to all software development, it is even more so when we are implementing our API strategy. In the past, developing software had its process to follow from the design phase to code and unit testing, to QA testing, and finally production. Once it hit production, as long as it worked no one seemed to really know or care what process was followed to get there. As long as it worked. We are in a very different world now with our API strategy and digital transformation. Just having software that works is not enough. If your APIs are not easily searchable, discoverable, and consumable, it doesn't really matter that they work. Imagine shopping on Amazon but nothing is categorized and when you search for a product, it doesn't get a search hit on what you were looking for. Then, when you find a product you want, there is no description for it. And finally, you go to make a purchase and the item has been discontinued! That would indeed be a frustrating process and Amazon would likely not be around much longer.
So, what is governance and how is it going to save the day for us here? Webster defines it as "the act or process of governing or overseeing the control and direction of something." Well, that doesn't tell us much except that we need someone to oversee our process. But what process? Who is defining this process? Who is implementing and following the process? What happens if the process isn't followed? So many questions here to answer and, hopefully, you'll find all of the answers within this chapter as we cover the what, the who, and the how of our API governance strategy.
This will be accomplished by discussing the following topics:
- Understanding the API and product lifecycle
- Assigning roles
- Managing versions
- Segregating environments
- Applying standards
Technical requirements
To fully implement the governance processes discussed within this chapter, you should have a fully functional API Connect installation to work with. Even if you do not, this chapter will provide you with the understanding of the who, what, and how of the governance process that will be critical in providing a successful framework for your digital transformation.
Understanding the API and product lifecycle
As new APIs are developed, existing APIs are modified, and legacy APIs are retired, they will be brought through a continuous lifecycle that will continue as the API is modified due to bug fixes or enhancements. This process will continue on until the API is eventually retired. Following the same process for all of your APIs is critical to the success of your API strategy. In this section, we will discuss the lifecycle process, who will implement it, and how.
The "what" of the lifecycle
When we talk about API governance, we must first understand exactly what we are governing. For the most part, we are governing the movement of our APIs and products as they move through the different phases of the API lifecycle, which includes your software development lifecycle (SDLC) environments. This is such a critical component to understand and govern as this will directly impact how our products are made available to the end consumers as well as how and when they will become unavailable.
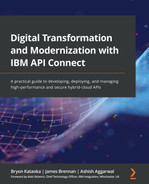
There are essentially four stages of our product lifecycle that they will move through—Stage, Published, Deprecated, and Retired. Although there is a logical succession of these phases, these are not always one-direction movements as they move from Stage to Retired. It is entirely possible that you may have a deprecated or retired product that you want to republish. Or maybe a published product that goes right to retired. Different circumstances will bring about different movements of your products. Figure 11.1 shows this product lifecycle and all of the possible movements from one stage to another. Also, note at which stages the product is visible and available in the developer portal.
Info
You can find additional details about the lifecycle in the IBM documentation: https://www.ibm.com/docs/en/api-connect/10.0.1.x?topic=products-product-lifecycle.
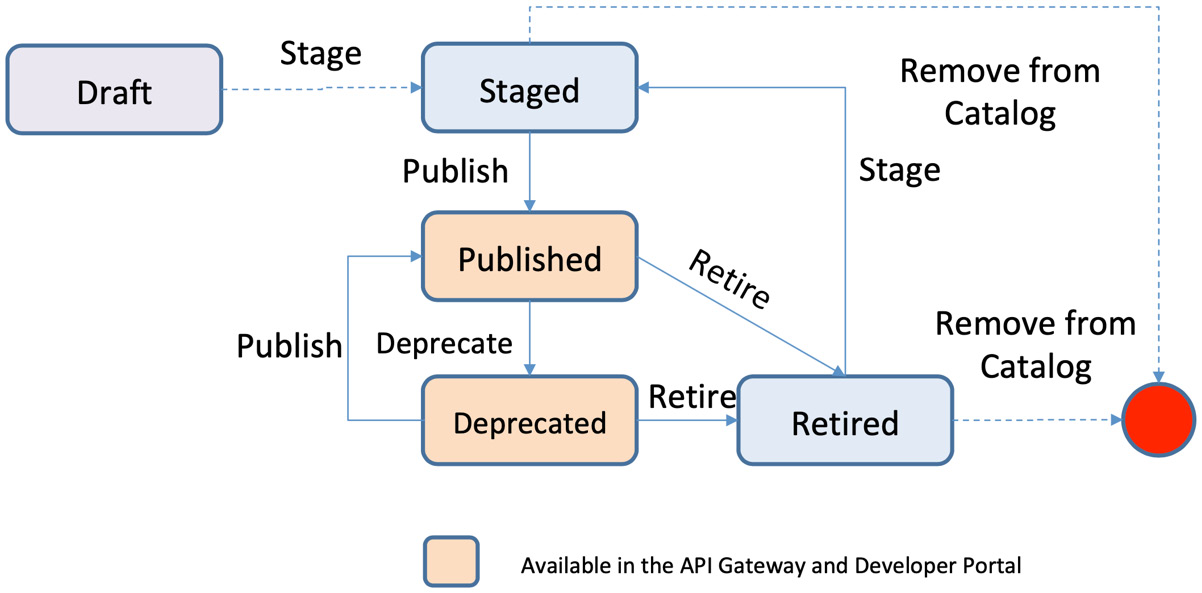
Figure 11.1 – Product lifecycle
In an ideal world, your products will move smoothly in a defined and deliberate manner through the following states:
- Draft: The initial state of your API and product as you begin developing them.
- Staged: A pre-published state where the product is not published to a particular Catalog and hence, not present within the portal. This state is merely a waiting state waiting to be published.
- Published: This is the state where your product is ready to be subscribed to and consumed. Once published, your product, and the APIs within, are made available in the portal.
- Deprecated: A state that a product should be in before retired, signifying to the current consumers that this will soon be retired and no longer available. In this state, the current consumers will still be able to invoke the APIs within the product but no new subscribers are allowed.
- Retired: The product is no longer visible within the developer portal and the APIs can no longer be invoked.
- Deleted: Technically not a state but the product is removed from the Catalog.
Of course, we rarely work in an ideal world so we must be prepared for the exceptions. This is why Figure 11.1 shows alternate paths from different states. Let's suppose you have a deprecated or retired version of a product that has been replaced with a newer version. Suddenly you realize that the newer version has some issues and you need to bring back the deprecated or retired version. From either of these two states, you can bring your product back to a published state. From there, you can then take your initial published product straight to a retired state.
You have now seen the lifecycle that your APIs and products will follow as they move from development through retirement. You might imagine when newer versions of your products come about how this will flow, but this doesn't all happen by itself. There is no magic here, so let's take a look at how this all happens.
The "how" of the lifecycle
As you develop new, and update existing, APIs and add them to your products, they must be published to make them visible to consumers to subscribe to and invoke. By now, you should already know how to stage and publish your product, which is what you would do for the initial version. Once you start introducing subsequent versions, your process will change.
Let's take an example of an API named Member API, which is contained within the Member product in our example health care organization. We have developed, staged, and published version 1.0.0 of this product to our Production Catalog. It is now time to create a new version of this API and product.
To create a new version of this API, you will follow the following steps:
- Navigate to the Develop APIs and products screen in API Manager and make sure you are on the APIs tab. From here, you will locate your current version of your API.
- Click the ellipsis on the far right of that row, and select Save as New Version. Figure 11.2 shows us creating a new version of our Member API.

Figure 11.2 – Save as New Version
- As you are prompted for the new version, you will enter the next version number and click on Submit. In our Member API example, we created a new 1.0.1 version. You can now see this in Figure 11.3:

Figure 11.3 – Version 1.0.1 created
- Once you have your new version created, you can modify it with the required changes.
- Once your changes are complete, you will need a new version of your product as well since that is what our consumers will subscribe to. You can follow the same procedure that we followed for creating a new version of your API for the product.
You will notice that when you create a new version of your product from the current version, the current API also comes along with it. You will need to remove this version from the product and add the new version. This is accomplished by navigating to the API and product development page, going to the Products tab, and clicking the product and version you want to edit. Once you have selected the product and version you want to work with, you will click the API's link on the left of the page. You will see that the new version of your product has the previous version of the API still in it. Clicking the Edit button will then bring you to a screen where you can unselect the old version of the API and select the newer version of the API as shown in Figure 11.4. Once these changes are made, clicking Save will complete the change.

Figure 11.4 – Select a new version of the API within the product
You now have a new version of your API and product that is ready to stage. As you have done before, you can now stage this version of your product to the appropriate Catalog. As with all of your APIs and products, be sure to download and add this to your source control management system.
At this point, you should have a current, published version of your product and a staged version of your newest version. You could just go ahead and publish your staged version and then deprecate your current version in two separate steps but you do have a simpler option available. If you navigate to the Catalog where you have your products, you should see each version of the product and its current state. In our Member API product example, we have a published Member version 1.0.0, and a staged Member product version 1.0.1 in our Production Catalog. At the far right of each product row, you can click the ellipsis of your published product and see all of the available options, including three that can be used to change the state of the product, which are Deprecate, Retire, and Supersede. You will also see a Replace option but that technology will not change the current state. Figure 11.5 shows these options for our published Member product version 1.0.0:

Figure 11.5 – Product options from within the Catalog
The Deprecate and Retire options should be self-explanatory but the option we are interested in here is the Supersede option. This is the one option that we can use to publish our staged version and deprecate our current version because that is exactly what this option does. It will publish the chosen superseding product, giving it the same visibility options as the superseded product. It will then deprecate the superseded product. Once a product is superseded, all current subscribers can continue to consume the APIs within the product, however, no new subscribers will be allowed. Although this is a convenient, one-click option to publish one version and deprecate the current version, it should not be used if your new version's interface has major changes as it could have a negative impact on your existing consumers.
If you go ahead and click the Supersede option for your published version of the product, you will then be asked to select which version of the product you want to supersede this version. Again, the version selected will become the published version and the version to supersede will become deprecated. Figure 11.6 shows us selecting version 1.0.1 of our Member product to supersede our published version 1.0.0:

Figure 11.6 – Superseding Member product 1.0.0
Clicking the Next button will then bring you to a screen showing the superseded and the superseding products. From this screen, you will also select which plans you will want to migrate to the superseding product. In Figure 11.7, you can see that we selected the default-plan that was used in our superseded version to migrate:

Figure 11.7 – Select plans to migrate to superseding product
Clicking on the Supersede button from this screen will complete your supersede operation. You will be brought back to the Catalog page showing all of the current products where you started. You will need to click the refresh icon to see the products reflecting their new states, as shown in Figure 11.8, where our Member 1.0.0 product is in a deprecated state and our Member 1.0.1 product is now published:
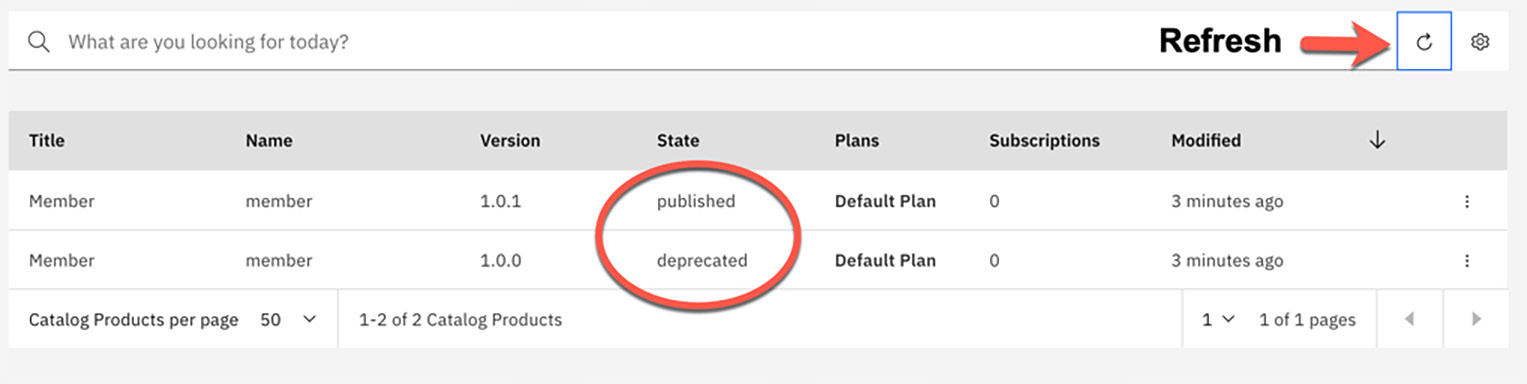
Figure 11.8 – Member products after superseding
You can continue to use this option each time a new version of your API and product comes out, but your list of deprecated products will just keep growing. Eventually, you will need to remove some of the older versions. You can do this by using the Retire option you saw earlier in the product options from within your Catalog. As a good housekeeping rule, you should only keep one API in each state. Before retiring a product version, you should make sure that all consumers subscribed to that version of the product are notified as this version will no longer be accessible.
To retire a version of your product, you would simply select the Retire option next to the product in the Catalog screen as shown in Figure 11.9.

Figure 11.9 – Retire a product version
You will then be shown a confirmation screen where you will confirm that you want to retire this product. Once the product is retired, all subscriptions to it become inactive and it is removed from the developer portal.
In Figure 11.9, note the options available for the product version that is currently in a deprecated state. From this state, you can also choose to republish this product if you wish.
As you can see, the products in a retired state will still show in your Catalog within API Manager so you must again stay diligent and delete them when you are sure that they are no longer needed. This is the final stage in the API and product lifecycle. Once you delete a product, it is removed from only the Catalog. The product and APIs within it still exist, however they are no longer part of a Catalog. If this product was again needed, you would need to re-stage it to the Catalog and start the lifecycle over again.
In this section, we demonstrated the API lifecycle showing the APIs and products moving freely with a simple click of an option to bring them to the next state. In a development environment, this may be the most efficient way to migrate from state to state as there will likely be many changes to a particular API throughout the development process.
As you move through higher environments such as quality assurance (QA) and production, you will most likely not allow a developer to move an API and product through the different states without approvals. This is why you have the ability to require approvals at each stage of the lifecycle. In the next section, we will discuss this process.
API lifecycle approvals
As we have already mentioned, as part of your governance process, you should have some approval process when migrating a product from one state to another. The required approvals for the different states will likely be different for each environment. API Connect provides the ability to define which state of a product will require approval by Catalog. To view and edit the required approvals for a specific Catalog, from within API Manager you should navigate to Manage Catalogs | <Catalog name> | Catalog settings and click the Lifecycle approvals tab on the left navigation menu. By default, there are no approvals enabled for a new Catalog and you will see a message indicating that when you first view this screen, as shown in Figure 11.10:

Figure 11.10 – Lifecycle approvals screen
You will also notice a toggle for switching Task self approval on and off. With this option set to on, it allows the task originator to approve the task. Again, this may be desirable in lower environments for efficiency, but will most likely be off for your higher environments.
To enable specific approvals for this Catalog, you will click on the Edit button, as shown in Figure 11.10, which will present a screen with a list of tasks that you can select to require approval for. As mentioned earlier, there are no tasks requiring approval by default so none of the tasks shown will be checked. Figure 11.11 shows this screen, where we selected all tasks to require approval:
Figure 11.11 – Select required lifecycle approvals
You may need to only select a few of these as well. This will be dictated by your approval process defined for this particular Catalog. Clicking on the Save button will save these selections and return you to the lifecycle approval screen showing the tasks that now require approval. You can now see in Figure 11.12 that all of our lifecycle tasks require approval:

Figure 11.12 – Required lifecycle approvals
Now that you have established which tasks require approvals, and who can provide them, whenever a task that requires approval is submitted, the task is queued up in the Catalog until it is approved.
Let's take a look at a new version of our Member product V1.0.3 that we have created and staged to our Production Catalog. Since approvals are enabled for this state, the product will be placed in a pending state. It will also be placed in the Production Catalog's tasks. You can view all tasks awaiting approval by navigating to Manage Catalogs | <Catalog name> and clicking the Tasks tab. From here, a user with the appropriate approval permissions can click the ellipsis to the right of the approval task and click Approve. Figure 11.13 shows our product member:1.0.3 being approved:

Figure 11.13 – Approving a stage request
This same process will be followed for each task that requires approval. As you can see in Figure 11.13, you can also choose to Decline the approval request. The stages of the API and product lifecycle that you will require approval for will depend on your overall governance strategy and how much control and how many checkpoints you will require. This will most likely also vary by environment since lower environments will usually require fewer controls.
We have now covered the API and product lifecycle from end to end and demonstrated how it is executed in API Connect. With this knowledge, you should now be capable of moving your APIs and products through each state from stage to deletion with the ability to re-stage or publish from almost any other state. We also showed how you can require approvals for each of these stages of the lifecycle by Catalog. But who will provide the approvals and how do you delegate the permissions to do so? Now that you know the what and the how, let's take a look at the who.
Roles
With all of the continuous work involved with developing APIs, migrating them to a different environment, and approvals, it is essential that you define who will be performing each task in the lifecycle. Assigning roles for individuals and groups will provide a fluent process with appropriate checks and balances throughout. In this section, we will discuss the different roles that can be established and assigned.
The "who" of the lifecycle
We have discussed the entire API and product lifecycle in the previous section, including what it is and how to move your APIs and products through these stages and states. Before we talk about who will perform these steps along the way, we must discuss who can do what within your API Connect environment. That is, what permissions are given to who. This is a major part of our governance process as it enforces the separation of duties throughout your lifecycle and management process.
As with any governance process, it is only as good as how well it is enforced. You can have the best processes defined; however, if they are not enforced at each step along the way, it is likely to fall apart. You wouldn't want to have the same person or group performing every task within our process. This could lead to disorganization and a total breakdown of your standardized process. To avoid this, we must assign roles for all things from the Cloud Manager to the API manager, to the developer portal. Again, this is at the heart of your governance process, so you should give careful consideration to which roles and responsibilities will be given to specific people and groups. Throughout this section, we will be discussing roles and permissions separately, where roles are the high-level classification for a given user and permissions are the capabilities the role will provide to the user. Let's take a look at the different areas' roles and the permissions they provide through our API Connect components.
Cloud Manager roles
When we talk about the API Connect topology and components, the cloud manager is at the core of everything. This is where your underlying runtime/services, provider organization, user registries, and many other critical components are defined and managed. Because of this, the number of groups and people that can make these changes should be limited. Of course, you can – and should – also segregate the roles and responsibilities within the cloud manager by providing different roles to different users. Let's take a look at the different roles available within the cloud manager.
By default, there are six different roles within the cloud manager that a user can be assigned. Within each of these roles, six different permissions are granted. Of course, you have the ability to create your own custom roles and change the defaults, however, the default roles will typically provide all of the different roles with the appropriate permissions that you will need. It will at least be a good start as you separate your user and group responsibilities and permissions.
To view, edit, and add roles, you can log into the cloud manager and navigate from the home screen to Configure Cloud and click the Roles link on the left sidebar menu. Figure 11.14 shows the default roles with the Administrator role showing the permissions granted to this particular role. Each role can be expanded to show the permissions assigned to that particular role.
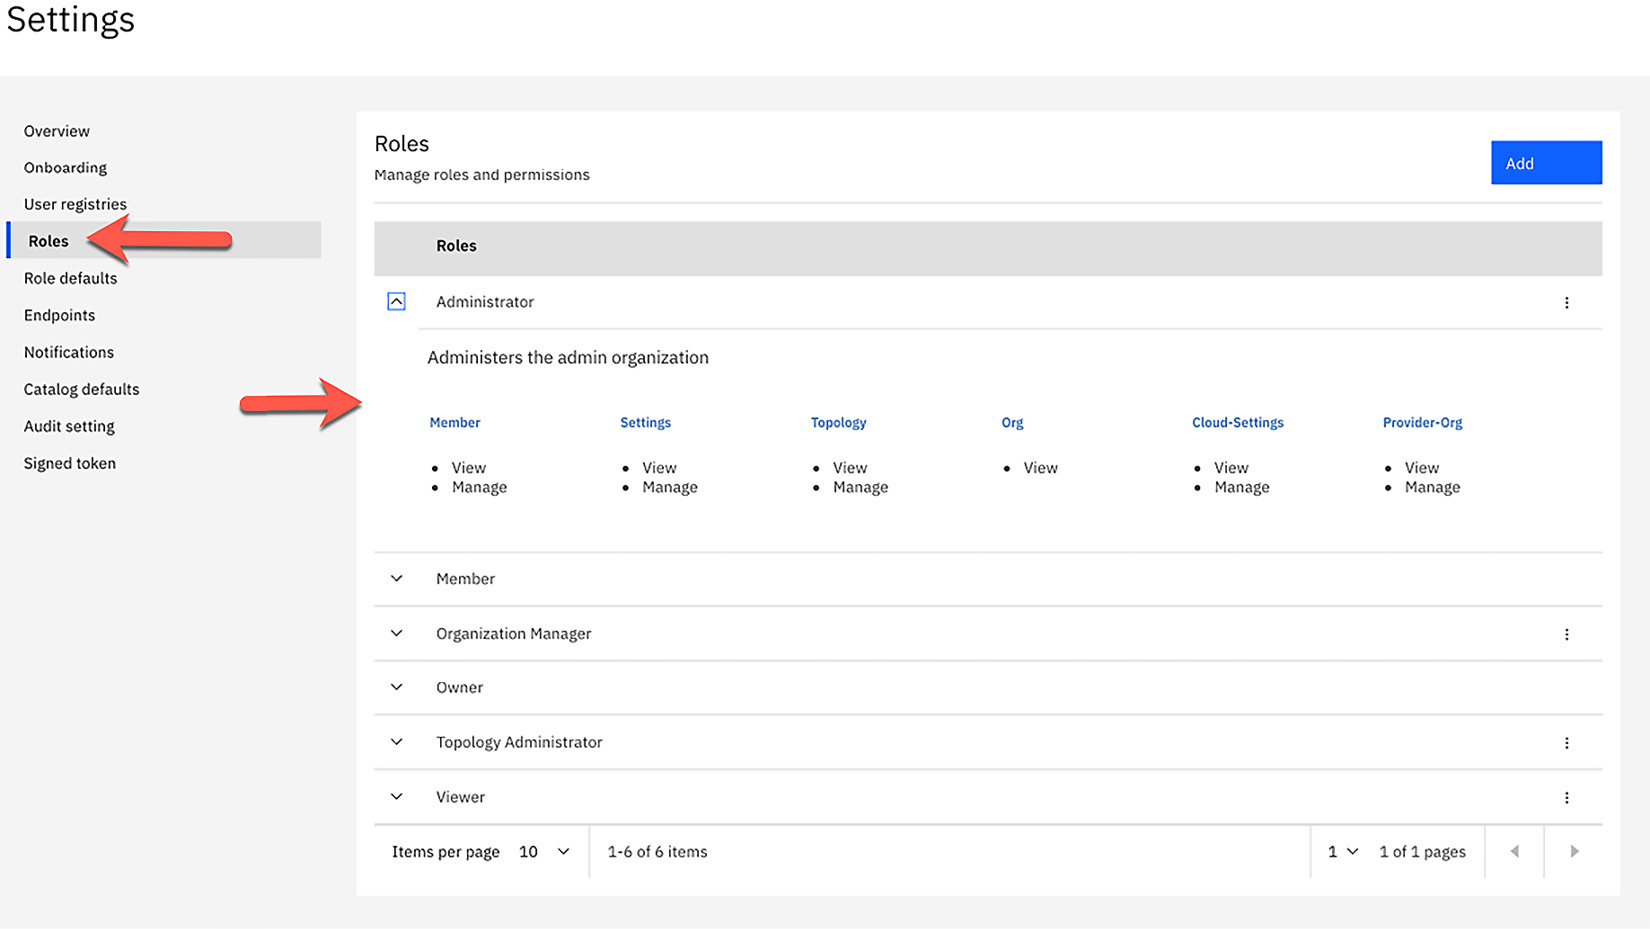
Figure 11.14 – Cloud Manager default roles
To add a new role, you can simply click the Add button, provide a name for your new role, and assign the permissions. Again, it is likely that the default roles will suffice, however, if you need to create a new role, it is this simple. You can also edit the current roles by clicking the ellipsis to the right of the role and selecting Edit. From here, you can edit the permissions assigned to the role. You can also delete a role by clicking the ellipsis and clicking Delete.
Now that you can see all of the default roles and permissions, what do they actually mean? Knowing the different roles available is helpful but it is the permissions assigned to each role that really dictates what a user can do. As we mentioned earlier, there are six different permissions available. These are as follows:
- Cloud Settings
- Member
- Org
- Provider-Org
- Settings
- Topology
If these available permissions look a little familiar to you, they should. Each permission listed correlates to a specific link or option within the cloud manager UI. A complete listing of permissions and descriptions can be found on the IBM documentation site:
Understanding the default roles provided and the granularity of permissions available is key when determining who will perform each task within your cloud manager. You want to be sure to provide the proper role(s) to each user to enable them to do the job assigned, but also be cautious not to provide permissions that will allow them to perform actions that they should not do. If you think about the criticality of all of the settings and configuration in the cloud manager, you will begin to realize the impact on the entire API Connect infrastructure, hence the reason for strict access controls to be in place and enforced.
Next, we come to API Manager roles and their permissions.
API Manager roles
As critical as the Cloud Manager roles are, the tasks performed within it are, for the most part, set it and forget types of tasks. Tasks like configuring your gateway services, user registries, and provider organizations are done at the initial configuration and setup and are rarely modified. It is in the API manager that your day-to-day operations and work happens. This is where the API lifecycle is managed. So, when we talk about governance, we need to focus largely on governing the API lifecycle and the groups that will implement, enforce, and approve each step within. This again will come down to assigning proper permissions to each user so that they can perform the assigned task, while restricting them from having permissions for any others.
Within API Manager, there are seven different roles defined by default. Again, it is likely that you will find one of these roles suitable for each user, however, you can create additional roles if needed. Just like you saw with the cloud manager roles, each role within API Manager has an assigned set of permissions. Because there can be so much happening within API Manager, there is an extensive list of permissions available that can be assigned to roles. This list can also be found in Table 4 on the IBM documentation website where you can see a complete description and the capabilities of each, as well as the roles that have them assigned:
The seven different roles provided correlate to a group that will likely perform different tasks within API Manager in order to provide a separation of duties and controls throughout. To see the available roles and the corresponding permissions, from within the API Manager home screen, click the Manage settings tile and then click the Roles link in the left navigation menu. Figure 11.15 shows the default roles available:

Figure 11.15 – API Manager default roles
Clicking on each role will display the set of permissions assigned to it. As with the cloud manager, you can also edit or delete each role that is not immutable by clicking the ellipsis to the right of it. You can also add new roles by clicking the Add button on this screen.
As you can see, each role name is fairly descriptive, depicting the type of role and responsibility any user assigned will have. Let's take a look at each role and its capabilities:
- Developer: This will be the role assigned to the developers that are creating the APIs. This role provides permissions to view everything within API Manager as well as to manage permissions for all things related to API and product development such as product creation and approvals, subscriptions and approvals, and so on. It is important to note that if a user is defined at the provider org level, that user will have these permissions for all Catalogs within the provider org. If the user is only a member of a Catalog or space, the permissions will only apply to that particular Catalog or space.
- API Administrator: As its name implies, this role should be assigned to the user(s) who will manage the API and product lifecycle. This role provides full permissions to all products as well as approvals; however, it only has view access to non API/product settings such as Topology, Settings, Org, and so on. Typically, a user assigned this role would be responsible for publishing, approving, and managing the entire API and product lifecycle.
- Community Manager: Users assigned this role are generally responsible for managing the relationship between the provider organization and the consumers of the APIs. This role will provide view privileges to everything within API Manager as well as permissions to manage tasks that relate to the consumer/developers such as the consumer org, subscriptions, subscriptions, and so on.
- Administrator: This role has the same set of permissions as the Owner (explained ahead). This is another role that can be assigned to someone who is required to have full permissions within the organization.
- Member: A member of the provider org will have view permissions for the organization only.
- Viewer: This is a role assignment for a user that should only have view permissions for all things within API Manager.
- Owner: As its name implies, this role is assigned to the person who was assigned as the organization owner when the organization was created. This role will have full permissions to access everything within the organization.
The seven roles available within API Manager, as well as any custom roles you might create, are available to assign to any user within the given provider organization. As you add members to your provider organization, you will assign one or more of these available roles. The roles assigned at the provider organization level will be applicable to that user in all Catalogs within the provider organization. You can, however, add additional roles for a given user at the Catalog level, but you cannot remove roles for a user that were assigned at the provider organization for a specific Catalog. It is also possible to add a member to a specific Catalog and not at the provider organization level, which will then provide the opportunity to assign roles only for that given Catalog.
As you can see, the default roles provided cover most roles that you will need within your organization. These will likely change for each environment as you will likely not want the same permissions for your development environment as you would for your production environment. As you define the different responsibilities and workload segregation within your organization, you will likely apply many of these default roles to your users, and if you do not find one that fits your exact needs, you can always edit these roles, or create new ones. At this point, you should have a good idea of what user roles are available in API Manager as well as how they can be assigned to provide the proper restrictions and permissions to each user and group that will play a part in your API lifecycle.
Now that we have discussed how to manage user roles and permissions for your cloud manager and API Manager, there is only one piece left to discuss. That is our developer portal. In the next section, we will cover in the same level of detail the available roles and permissions, as well as the user responsibilities for each within your developer portal.
Developer portal roles
As we move into discussing the different roles and permissions applicable to the developer portal, we should take a moment to step back and think about what the developer portal is, what types of tasks are performed, and who is involved in performing these tasks. As you know, the developer portal is where you socialize all of your APIs and products to be discovered. This is where consumers/developers will go to discover and subscribe to your products. With that understanding, it is safe to assume that the major actor in the developer portal will be the developer. Hence the name developer portal! By developer, we mean the developer of the applications that will be subscribing to and consuming your APIs and products. Developers will also require the ability to perform work within their developer organization such as building applications. Of course, you will have the person or people that will administer the portal itself. Other than that, there will not be the need for many more additional roles within the developer portal.
Let's take a look at the small set of default roles and permissions available.
So, when we talk about roles and permission, we are talking primarily about how they pertain to the members within the consumer organizations.
There are a total of four default roles available within the developer portal and only eight different permissions available. Again, for a complete list and explanation of these permissions, please refer to Table 5 in the IBM documentation site mentioned earlier in this chapter. The four roles available are as follows:
- Owner: This is the role assigned to the user assigned as the owner of the consumer organization. This user is specified when the consumer organization is created within API Manager for the specific Catalog. As the owner, this user will administer the consumer organization, therefore will have full permissions to it.
- Administrator: This role can be granted to a user when inviting them to the consumer organization from within the developer portal. This user will be responsible for administering the consumer organization, therefore will have the same permissions as the owner role.
- Developer: This role is intended for the developer who will be responsible for apps within the consumer organization. This role will provide view and manage permissions for application development as well as view permissions for everything else within the consumer organization.
- Viewer: As its name implies, this user will only have view permissions to everything within the consumer organization.
Of the four roles available, one is automatically assigned when creating the consumer organization. That is the owner role. Once the consumer organization is created, the owner can invite additional members to it. This is accomplished within the developer portal by clicking the consumer organization name in the top-right corner and then selecting My organization, as shown in Figure 11.16:

Figure 11.16 – Navigating to My organization
This will bring you to the organization settings, where you can click the Invite button to invite new members. You will then be presented with a form where you will enter the email address of the member to invite and select the role that you wish to assign to this new member. As you can see in Figure 11.17, there are three roles available to select from:
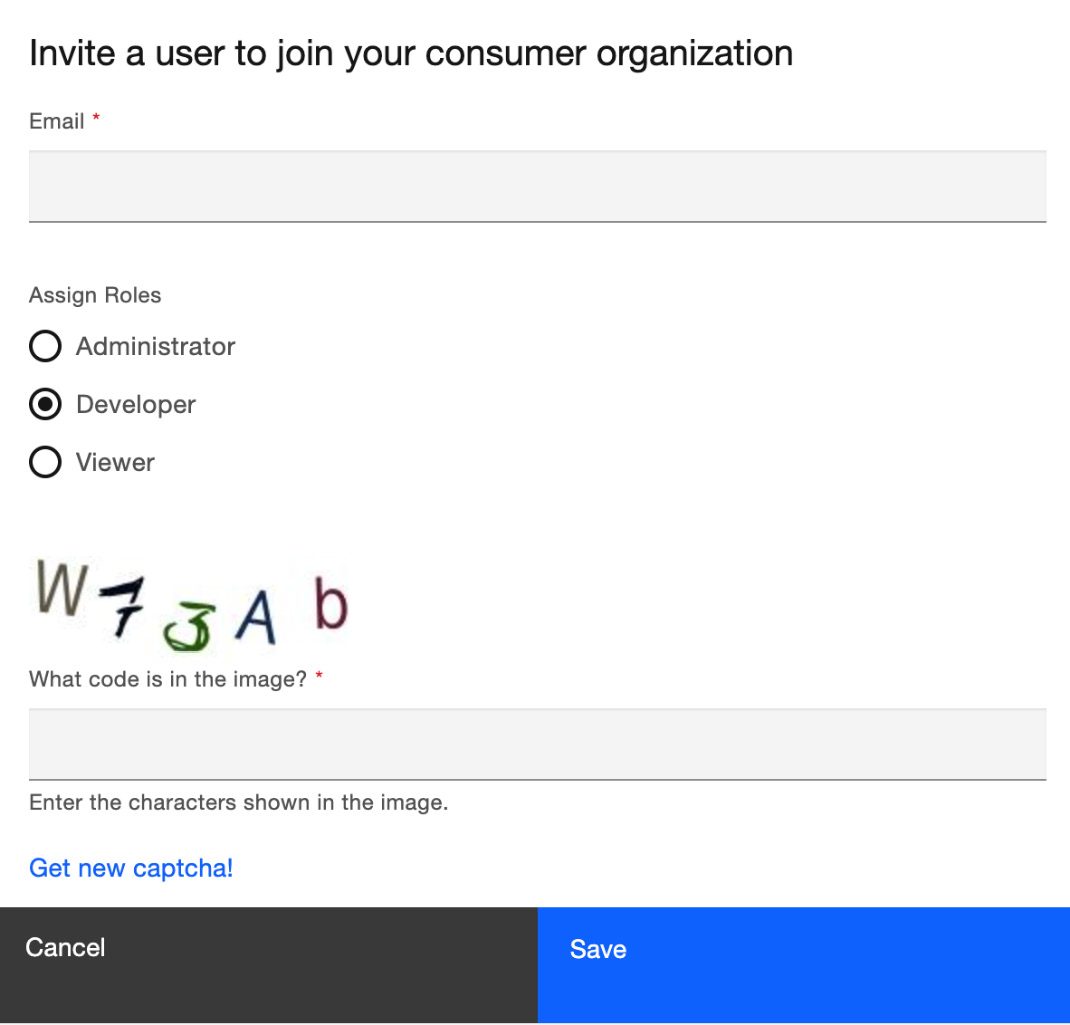
Figure 11.17 – Inviting a new consumer org member
Once you complete the form, including the captcha, click on Save, and an invitation will be sent to the new member. Once the invitation is accepted, the new member will be included in the consumer organization with the role and corresponding permissions selected.
You have now seen how to assign permissions to users within your cloud manager, API Manager, and developer portal by using pre-defined and custom roles. This will establish the "who" in your governance process. Let's now drill down a little deeper into how you can establish and maintain a meaningful versioning scheme that can also be enforced by using the roles defined for each user and group.
Managing versions
API development is typically not a set it and forget it type of process. As bugs are discovered and new features are introduced to your APIs, you will need to roll out a new version of them. Since you are likely dealing with many consumers of your APIs, both internally and externally, you would not expect them to just adopt this new version as soon as you roll it out. Of course, each consumer will have their own quality assurance process and timeline so you will need to leave prior versions accessible for each consumer until they adopt the most current one. Also, some versions may have a direct impact on consumers, such as an interface change, which would require them to make a change to adopt this new version, while other versions may only be an implementation change where the consumers are not directly impacted.
Understanding that changes to your APIs are likely and versioning them is critical, we must realize that a consumer does not subscribe to an API itself, rather to a product that is published. Because of this, we must not only version our APIs as we make changes, but we also need to version our products appropriately. So, when we think about it, when an API changes, so does the product that it belongs to. A product version can change when one of the APIs contained within it changes, or perhaps a new API is added, or an old one is removed. With all of this in mind, it is critical to pay extra attention to which APIs will be a part of which product.
Sticking with the theme of planning ahead, versioning is yet another area that will greatly benefit from a little pre-planning before you even begin coding your APIs. As mentioned earlier, you should think about how your APIs will be included in products so that you are versioning them at the product level. You will want to package all APIs in a single product as an offering of related APIs, however, keep in mind that if one of the APIs changes, the product version will also change. Because of this, you might think about keeping the number of APIs within a product to a minimum. You wouldn't want to ask many consumers to constantly adopt a new version of a product when the APIs that they use are rarely changing.
Version numbering scheme
Another thing you should establish before developing your APIs is the versioning methodology or scheme. I'm sure you have seen versions of software that follow different patterns. Some have a single dot in the version (n.n), some have two (n.n.n), and some may even have three dots (n.n.n.n).
This is not just some random versioning format that has been implemented, but a well-thought-out scheme where each dot says something about that version. They could represent a major release, a minor release, or a bug fix.
For example, a simple one-dot scheme might simply be <major>.<minor>, where a two-dot scheme could be <major>.<minor>.<fix>, and finally a three-dot scheme could be <release>.<major>.<minor>.<fix>.
Also, keep in mind that it will be extremely useful for the consumers to be able to identify whether your new version contains an interface change or just an implementation change. Or, whether it is backward compatible with the prior version. This would give them a good idea of whether they need to make a change on their end. So perhaps only a major version change would contain an interface change and all others would be implementation only. Which scheme is right for your organization is a decision you should make based on factors such as how often you are pushing out major and minor updates, whether your consumers are all internal or external, and maybe just the level of complexity you wish to manage to provide a more granular versioning scheme. How you choose to version your APIs is completely up to you but keep in mind that the more dots you have in your versions, the more granular they will be, hence the more versions to manage at one time. You might notice that the API Connect product itself uses the two-dot versioning scheme.
So how many versions should you keep around? That question has an it depends answer. It depends on how many levels are in your version numbering scheme, how many consumers you have, and how quickly they can migrate to the new versions. A general rule of thumb is to keep three of the most granular versions for each of the higher-level versions. So let's say you have a simple one-dot versioning scheme that represents <major>.<minor>. In this case, you will keep three major versions, and then three minor versions for each major version. This would give you a total of nine versions in production at a given time. If you extrapolate that out to the two- and three-dot approach, you can see how you would have a lot of versions to manage at a given time.
Now that you have decided on your versioning scheme, you have to think about how to implement it in your API and product lifecycle. Again, we must think of the implementation with the consumer in mind. We wouldn't want to just retire a version of a product without a proper warning and opportunity for the consumers to test and adopt the new version. If you recall our API and product lifecycle we discussed in this chapter, you know that there are basically two states that our products can be in where a consumer can consume the APIs within. These are the published and deprecated states. So, when we say that a good rule of thumb is to keep a maximum of three versions for each level in your versioning scheme, we mean in a consumable state. If you are following this three-version rule of thumb, you might have one version in a published state, one in a superseded state, and one in a deprecated state.
Versioning scheme for a healthcare organization
Let's take the fictional healthcare organization we created in earlier chapters and suppose we created and published an API named Member API. We will be following the default two-dot versioning scheme as <major>.<minor>.<fix>. This will mean that our first version of this API is created as 1.0.0. Now, the time comes where a bug is discovered and we need to implement a fix.
You already know how to create a new version of your API and product so once you do that, you can straight away publish your product if you want to have two versions in the published state. As you will recall from the Understanding the API and product lifecycle section, if you are planning on deprecating the current version, you can also use the Supersede option to publish your new version and deprecate the existing one.
As time goes by, so will bug fixes and updates to our APIs as we follow our versioning scheme and communicate these changes to our consumers. Following our API and product lifecycle, they would go from published to deprecated and finally retired. Taking a look at Figure 11.18, you can see our Member API has gone through a couple of revisions and updates and now has three different versions. We have 1.0.2 as our most recent version in a published state, version 1.0.1 is our n-1 version, also in a published state, and version 1.0.0 is in a deprecated state.
As mentioned in the previous section, we will need to eventually retire some of the older versions to make room for the newer ones. Recall that we had advised a maximum of three versions under each of the higher versions in our versioning scheme. As we hit our limit for a particular version branch, we wouldn't want to just retire that version without any warnings to our consumers. We also wouldn't want to have consumers adopting a particular version of an API just before we retire it. This is why we need to deprecate versions as they come closer to being retired. When we deprecate a version, we notify current consumers that it will soon be retired and do not allow new consumers to use it. But when do we deprecate a version? If we take our limit of three versions per higher version, as a particular version becomes the third and final version, this is when we would want to deprecate it. So, we would have the most current version, the n-1 version, and lastly, we would have our deprecated version.
Figure 11.18 shows our Member API with three different versions. Since we have hit our maximum number of versions for our 1.0 branch, we have version 1.0.2 being the current version, version 1.0.1 is our n-1 version, and version 1.0.0 is our deprecated version.

Figure 11.18 – Member API with three versions
Of course, when our next version comes along, we would retire our version 1.0.0 and all other versions would move up one level, making room for our new and current version.
As you establish your versioning scheme and procedure, you will most likely not want to enforce it within your development environment as you will be making many changes to your APIs as you develop, publish, and test. If we were to apply versioning to every change, imagine the version you would ultimately go to production with. The same applies to your other non-production environments. As you go through your SDLC process for a change to your APIs, the outcome should be a single new, tested version in your production environment. The fact is, your versioning is really for your consumers, who will only see the APIs and Products in your production environment where you should be diligent about reflecting every change as a new version. To account for this churn in your non-production environments, API Connect provides an option at the Catalog level named Production mode. This setting can be found by navigating from the home screen in API Manager to Manage Catalogs | <Catalog> | Catalog settings, as shown in Figure 11.19:

Figure 11.19 – Production mode within a Catalog
As you can see, this is an option with an On/Off toggle switch. When this option is set to Off, your APIs can be published even if there are conflicts. For example, you can repeatedly publish the same API with the same version over and over. You can see how this option would be needed for your non-production environments. Conversely, when this option is in the On position, you must resolve all conflicts before the API and product can be published. This would then prohibit you from publishing APIs and products with the same name and version as an already published API or product. You can see how this stringent enforcement would be desirable for a production environment. Of course, there might be situations where you would like to overwrite an existing version. For example, you may have APIs that are strictly internal with only one consumer so this can be managed with the same version.
We have discussed several different versioning schemes in this section and demonstrated one in particular. As each organization is different in its own way, you may choose to adopt one of these options or possibly create your own. For example, you may only have a handful of consumers that are all internal so your versioning scheme may not need to be very granular. In this case, you may choose the simple one-dot versioning or maybe even just overwrite the same version with your changes. Or, perhaps you are following a specification, as we saw with FHIR in Chapter 6, Supporting FHIR REST Services, where the version of your API represents the actual FHIR version you are following. Or, maybe you will use a hybrid of them. The point is, your versioning scheme should be consistent, representative of the types of changes, and easily communicated and understood by your consumers. As with all governance, you must come up with a plan that works for your organization and follow it.
Segregating environments
In the beginning stages of your digital transformation journey with API Connect,you will be having discussions about vendor products, licensing, physical hardware, and so on. All of this will be dependent on how many different environments you have within your SDLC. Each environment will have its own set of requirements, such as the number of servers required, high availability, and security. As you know, each environment will serve a different purpose within the SDLC, but should not have a physical dependency or interaction with other environments. That is, each environment should be its own self-contained, independent entity.
When we talk about environments being independent and isolated, this could mean different things for different environments. For example, you may only require a logical separation between your development and QA environments where they share resources, whereas your production environment will likely be physically isolated from all other environments. You might also have a performance test environment that will need to be more production-like so that you can get more realistic performance metrics when running your tests. Or, maybe you might have an entirely segregated PCI environment where it is on separate hardware segregated on an isolated network. The point is, you will need to segregate your environments from each other in one way or another. Let's take a look at the different ways we can segregate each environment from the others.
Logical segregation
Let's face it, having all of your environments physically segregated so that no one environment can interfere with another sounds ideal. I'm sure you have had your share of experiences where a developer is trying something new in the development environment that brings down the entire infrastructure or its runtime halts all QA testing. Or maybe there is a performance test being conducted that is meant to push the limits of the infrastructure and that brings down all other environments. As much as it would be nice to not have to worry about this, the reality is, standing up separate hardware, acquiring new licensing, and managing separate infrastructures for each environment can get very costly. This is why you will likely combine some of your lower environments into one single API Connect installation and provide logical segregation so that each environment can act and perform independently.
As we covered the logical components of your API Connect environment in Chapter 3, Setting Up and Getting Organized, you saw how we create logical segregation at several different levels. As a refresher, take a look at Figure 11.20, which shows how the API Connect environment is organized within each provider organization.
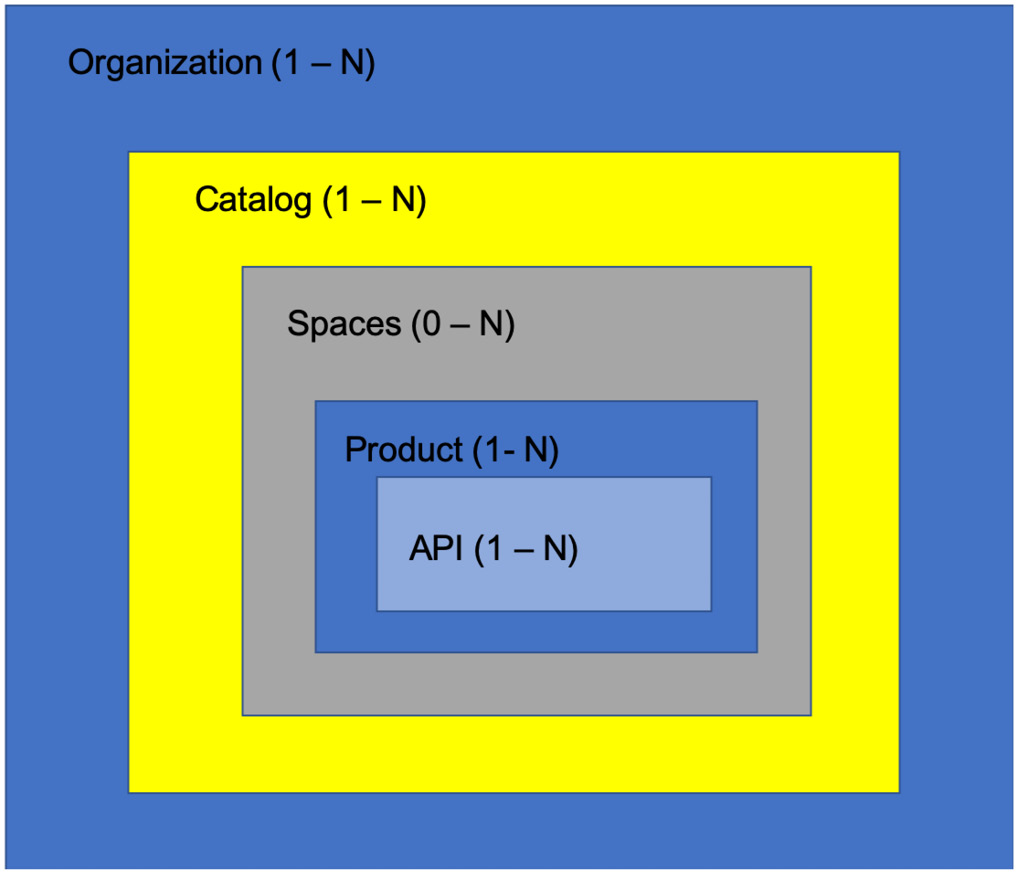
Figure 11.20 – API Connect organization structure
Each layer shown in Figure 11.20 depicts another level of isolation and segregation. Of course, you are not likely to name your products and APIs by the environment, so we are talking about provider organizations, and Catalogs when discussing opportunities for environment segregation.
At the topmost level of our hierarchy shown in Figure 11.20, is the provider Organization. We know that you can configure multiple provider organizations within one cloud manager, so this is your highest level of segregation that you can have within one API Connect installation or cloud manager. At this level, you assign a single provider organization owner who has total control over the provider organization setup, who invites members, creates Catalogs, and so on. At this high level in the hierarchy, you can choose to create a provider organization for each environment, or you can configure this at the top level of your organization. You may also configure separate provider organizations for subsidiaries or branches of your company. The important thing to remember when making this decision is that at the highest level of isolation within the cloud manager, members of one provider organization cannot view or manage anything within another provider organization, including Catalogs, spaces, products, and APIs. This level of isolation should help guide you in making your decision as to how you want to organize and configure your provider organizations.
Moving on to the next layer in our organization, we look at the Catalog. You can have one or more Catalogs within a provider organization. You can also provide user access and permissions at the Catalog level, as well as specifying the API lifecycle approval process as we have seen. Since you also configure your gateway service at this level, any runaway API running on one environment will not impact the gateway or runtime on another. Unless, of course, it is exhausting resources at the hardware level, impacting everything on the physical hardware. So as you can see, the entire product and API lifecycle from development to publishing is isolated from all other Catalogs. Even the developer portal is logically segregated by Catalog where consumer organizations can be created, apps developed, and products subscribed to, all by Catalog. Of course, there is only one developer portal, but a user will only see one Catalog at a time as if it's a separate developer portal entirely. With the level of control and segregation of the access, permissions, and API lifecycle the Catalog provides, this would be a convenient level to configure your environments that require logical separation. Creating a separate environment or Catalog for each of your lower environments under one provider organization would certainly satisfy the logical segregation you might be looking for.
Throughout this and the previous chapter's discussions on topics such as API development, the developer portal, the API and product lifecycle, users, roles and permissions, and gateway services, we noted how each can be set up and controlled down to the Catalog or space level. Components that are not overridden at this level, such as user registries, will be inherited from the provider organization.
At the lowest level of this structure, we have spaces. Although spaces are another level of isolation within the Catalog, they inherit most of their configuration from the Catalog itself. Most importantly, the developer portal. Because of this, spaces would not be a good candidate for isolating your different environments. You can refer to Chapter 3, Setting Up and Getting Organized, to learn more about spaces.
What's New in V10.0.1.5?
There are new capabilities introduced in v10.0.1.5 that provide more flexibility with Catalogs and spaces. Visit What's new in the latest release (Version 10.0.1.5): https://www.ibm.com/docs/en/api-connect/10.0.1.x?topic=overview-whats-new-in-latest-release-version-10015.
As you are digesting the different options presented here to logically segregate your environments, let's think about one more option, which is a hybrid approach. Until now, we have been talking about one layer of segregation, which is the environment within our SDLC. Mostly, this logical separation is for our lower environments, which would not include production because we will likely have some physical segregation for that. So, we are dividing our environments into production and non-production for obvious reasons. What if we take that one step further and divide our non-production environments as well? As we mentioned, your development environment will likely have fewer controls, more changes, and more issues. Because of this, you might think about separating your development and testing environments from each other. This is where a hybrid approach might come in handy. Perhaps you might provide this development and testing environment at the provider organization level, and then the different environments within them at the Catalog level. Figure 11.21 shows how that might look:

Figure 11.21 – Provider org and Catalog environment segregation
We have presented different levels of logical segregation for each environment within our SDLC, which will satisfy all the appropriate logical segregation for the entire API lifecycle. So, which one should you use? There is not a one-size-fits-all answer here. It is entirely up to you. You must decide which level of segregation fits into your organization. API Connect provides different options and much flexibility for you to fit your needs. With this comes decision-making on how to make this segregation work for your organization.
Physical segregation
Of course, logical segregation is not always the answer for all environments. Remember the cowboy developer experimenting with some new idea that is consuming all of the machine's resources? Or maybe just a small piece of code going into an infinite loop! Either way, any new and untested piece of code has the ability to wreak havoc on the hardware and infrastructure it resides in. And your code is not fully tested until it goes through your entire testing process, including performance testing. The point is, any of your lower environments have the potential to inflict unintended harm on the environment impacting all other environments on the shared infrastructure. This is why we wouldn't want to cohabitate our production environments with our lower environments. Besides, your production environment is likely to be more robust, providing high availability, failover, and security from a physical network perspective.
Physical segregation might also be required for other environments where you will need a production-like configuration such as for performance testing where you want to see how the environment will behave under a production load. Or, perhaps you have an entirely isolated production environment that is more secure, such as for PCI processing. Or, maybe a separate internal and external facing environment. There are many situations where logical segregation will not suffice.
Physical segregation of your environments provides the benefits of complete isolation where it shares nothing with any other environment. Although this may be necessary for some environments, it does come at a cost. Basically, this is a new installation of API Connect. This not only requires new licensing but think about the entire planning process when setting up a new API Connect installation. You will require new hardware, a new network and DNS configuration, new certificates, and the resources to perform the initial install and configuration. Although this sounds like a lot of work, it is necessary to achieve complete segregation for your most critical environments.
As we conclude this section on environment segregation, you can see that you have several options, each with its own set of pros and cons. Understanding the cost and benefit of each along with your hardware requirements will help guide you through planning and implementing your own environment segregation strategy. Keep in mind that you can certainly mix and match these as you see fit. For example, you could use Catalogs to segregate your pre-production environments within one provider organization and have a completely new installation of APIC for your production environment. This would give you the cost-effectiveness and simplicity of managing multiple environments within one API installation for non-production while providing the reliability and physical segregation required for a production environment.
Let's take a look at a high-level table of pros and cons for each method of segregating your environments.

Once you have your segregation strategy established, you must establish a set of standards to configure and manage each environment. In the next section, we will discuss the types of standards you should establish, as well as the importance of them.
Applying standards to your API environment
Up to now, we have discussed the governance process for organizing and managing your API lifecycle, including roles and permissions, approvals, and environment setup. These are all critical to the governance process, but they are mostly enforced by the initial configuration of your API Connect environment. That is, once you decide on how to implement these, and configure your installation appropriately, the restrictions put in place will enforce the rules. As you know, your API factory is a living and ever-changing cycle. Over time, you will be creating new APIs and changing existing ones. As this happens, there are certain aspects of the configuration that are not as easily controlled. These are the standards that should be established, monitored, and enforced to make your API organization a success.
As we have mentioned before, API creation is very different from our old application development where we could just develop some code or application and as long as it served its purpose, everyone was happy. If you think about some of your old running code in your production environment today, does anyone really know or care what you named your modules or functions within? Comments and descriptions were only helpful to someone debugging your code. In the API world, this all changed. Of course, your API still needs to work as designed, but there is just as much focus on the discoverability of your APIs. Are they easily searched? Are they self-descriptive? Are they grouped logically? Unlike your traditional application code, your APIs and products are all on display for the world (or at least your consumers) to see! Your thought process needs to be more consumer-centric. Because of this, you need to keep your API house clean by applying and enforcing some strict standards. Let's take a look at some standards to think about when developing your APIs.
Discoverability
Keeping the consumer-centric theme in mind, you need to think about how the consumer can discover your APIs. Of course, they will be published to the developer portal within a product, but you cannot expect a consumer to scroll through all products and APIs to find the one they need. Consumers will likely be using the search feature within the developer portal to discover the APIs that might suit their needs. This search functionality is only as good as the metadata associated with your APIs; specifically, the description you provide when creating your APIs. Although this is an optional field when creating your APIs, it should be a hard requirement for you to always provide a complete description, keeping in mind keywords and phrases that might be used in a consumer's search criteria.
In addition to consumers discovering your APIs and products via the search feature, they also have the ability to filter APIs and products by category. Adding categories to each of your products and APIs will make it much easier for your consumers to narrow their search results by category to see any and all products and APIs that may be of use to them in a specific category. Again, the easier it is to discover your products and APIs, the more successful you will be.
As you begin developing your APIs and adding them to your plans, it is important to take the time to consider this logical grouping of APIs in your products. With the consumer in mind, think about how this grouping would be useful and make sense to them. Consider the logical grouping of your APIs within a product somewhat of a logical category in and of itself. As your consumers search for and discover your products, they would likely find more than one API within a product useful if they are logically grouped together. Think about the different types of use cases each consumer might have, how different APIs fit into that, and also how your versioning strategy could coincide with the product as a whole.
Naming standards
Defining, implementing, and enforcing naming standards within application development has always been a challenge. We define a set of loose standards, which are more like guidelines, but then rarely enforce them. Again, since you are advertising your products and APIs, it is a good idea to at least have some consistency, as well as conveying meaningful information within the name.
It is likely that most, if not all of your APIs will be RESTful APIs. Since your API name will become part of the URI used to invoke it, and REST has a strict URI naming convention, there is no need to come up with your own naming convention for your API names.
A major part of the REST architectural style is the emphasis on HTTP methods. The method used to invoke a REST service will dictate the action of the verb that is to be taken. Think about the GET, PUT, POST, and DELETE methods and how they describe the verb or action of the request. Since the verb is already built into the HTTP method, there is no need to specify it within the API. So if you had an API that provided the ability to get some data, you would not use the verb get within the API name because that would become part of the request URI itself. Instead of naming an API getPatientInfo , you might just call it patientInfo or just patient. You see, the REST guidelines for URIs focus more on the noun than on the verb. There is much more to REST naming conventions that can be found on the internet for your reading pleasure. One very informative article can be found at https://restfulapi.net/resource-naming/.
The point here is not to go into the complete REST naming convention but to understand how your API name makes its way into the URI itself, so when naming your APIs, you should consider the URI guidelines.
Aside from having an already established naming convention to help guide your API names, how you name your APIs and products should be more about providing short, yet descriptive names for them. And just as important, be consistent with the names themselves. Of course, you should be consistent with the case convention used within your names, but more importantly be consistent with naming your resource or noun your API deals with. For example, if you have a hotel organization and some APIs refer to people staying in the hotel as guests and some APIs refer to them as customers, it will become difficult for potential consumers to see all within a single search as they may be searching for one or the other.
In addition to the REST naming conventions that specifically deal with the HTTP request/response conventions, you also need to consider the OpenAPI Specification, which defines the standard for interface to these RESTful APIs. The OpenAPI Specification is meant to provide a language-agnostic interface to your APIs. Having this specification is critical to providing all consumers, computer and human, with a way to easily identify the capabilities of your APIs. This specification covers many aspects of your API interface, including documentation, metadata, data types, and so on. This specification should guide you to develop and implement many standards within your API development and implementation process.
The latest OpenAPI Specification can be found at https://swagger.io/specification.
As you work your way through establishing your naming conventions for your organization's products and APIs, you will hopefully take some help from other architectural standards such as REST, as well as deriving some from your particular industry. Whatever way you come up with your naming standards, the most important part is being consistent with them and finding a way to enforce them through a strict approval process throughout your API lifecycle.
In this section, we have introduced the concept of applying standards throughout your API environment, development, and lifecycle process. As we have only presented a few important standards to consider, there will likely be many more that your organization will want to implement. This may be driven by existing standards throughout your organization or perhaps new standards that you see as important and beneficial. No matter how many or how few standards you implement, it is critical to have a set of standards that makes for a well-structured, stable environment and process. This list may evolve as your API environment and process matures. The most important part of standards is that they are followed and enforced.
Summary
As we conclude this chapter on the dreaded governance word, you should now have a better understanding of the what, how, and who of the governance process. You now know what you have to govern, how to accomplish it, and who should govern the process. Possibly one of the most important takeaways that you hopefully got from this chapter is the why. We all have heard that governance is important and I'm sure most would agree with it.
As we have pointed out throughout this chapter, the need for strict standards and governance within your API environment is more critical than ever. Hopefully, with these guidelines, examples, and explanations, the word governance is not as scary and dreaded as it once was. If defined and configured properly, it will become part of the everyday life of your API lifecycle and you will see the benefits of having a clean API house where your consumers can discover, subscribe, and consume your APIs easily.