
In this recipe, we will implement a lighting pass that reads in the G-Buffer attributes while processing each light. The lights will be rendered using a light volume, where appropriate, in order to process only those pixels that lie within the bounds of the light. By utilizing an additive blend state, we can accumulate the light contribution for each light. When rendering many lights, it becomes important that we are only performing the expensive lighting operations on pixels that are actually affected by the current light. By implementing light volumes that approximate the light's range, shape, and attenuation, we can improve performance by utilizing the culling and clipping features of the graphics pipeline to limit the operations to pixels that require them.
A point light represents a light positioned in space with a limited range, and emits light equally in all directions. With this type of light, we are able to easily represent its area of effect with a bounding sphere, using the light position and range to translate and scale the sphere, accordingly. Our recipe will accept a mesh to be used for this purpose; this could be a simple box, sphere, or any other mesh.
Ambient and directional lights are both global lights that are rendered using a screen-aligned quad. The difference between the two is that the ambient light does not have a direction and, therefore, can be applied directly to the diffuse albedo stored in the G-Buffer without computing the angles between the light, surface, and eye, or calculating specular highlights.
We will make use of the HLSL functions we created in the previous recipe Reading the G-Buffer, along with the screen-aligned quad implementation.
We'll begin by creating the HLSL shaders that will read the G-Buffer and output the contribution of light based on a simple Blinn-Phong lighting model.
- Create a new HLSL file named Lights.hlsl and add the G-Buffer texture references and functions that we created in the previous recipe to read the G-Buffer attributes.
- Add the following additional HLSL structures:
struct LightStruct { float3 Direction; uint Type; // 0=Ambient, 1=Direction, 2=Point float3 Position; float Range; float3 Color; }; cbuffer PerLight : register(b4) { LightStruct LightParams; }; struct PixelIn // Same as SA Quad { float4 Position : SV_Position; float2 UV : TEXCOORD0; }; - We need a new simple vertex shader that accepts the default vertex structure for rendering meshes, and outputs only the position and a UV coordinate based upon the final normalized device coordinate. This shader will be used to render any light volume meshes:
PixelIn VSLight(VertexShaderInput vertex) { PixelIn result = (PixelIn)0; vertex.Position.w = 1.0f; result.Position = mul(vertex.Position, WorldViewProjection); // Determine UV from device coords result.UV.xy = result.Position.xy / result.Position.w; // The UV coords: top-left [0,0] bottom-right [1,1] result.UV.x = result.UV.x * 0.5 + 0.5; result.UV.y = result.UV.y * -0.5 + 0.5; return result; } - As we will be supporting multiple light types with multiple pixel shaders we will split our light calculations into the following two functions. The first calculates the final light contribution from the lighting inputs and G-Buffer attributes. The second will prepare the light inputs: to eye vector, to light vector, half vector for Blinn-Phong, distance, and the light attenuation factor:
// Basic Lambert and BlinnPhong light contribution float3 LightContribution(GBufferAttributes attrs, float3 V, float3 L, float3 H, float3 D, float attenuation) { float NdotL = saturate(dot(attrs.Normal, L)); if (NdotL <= 0) discard; // discard as no impact float NdotH = saturate(dot(attrs.Normal, H)); // Lambert diffuse float3 diffuse = NdotL * LightParams.Color * attrs.Diffuse; // BlinnPhong specular term float specPower = max(attrs.SpecularPower,0.00001f); float3 specular = pow(NdotH, specPower) * attrs.SpecularInt * LightParams.Color; return (diffuse + specular) * attenuation + attrs.Emissive; } // Prepares the LightContribution inputs void PrepareLightInputs(in float3 camera, in float3 position, in float3 N, in LightStruct light, out float3 V, out float3 L, out float3 H, out float D, out float attenuation) { V = camera - position; L = light.Position - position; D = length(L); L /= D; H = normalize(L + V); // Simple light attenuation attenuation = max(1-D/light.Range, 0); attenuation *= attenuation; } - We can then define the pixel shaders for each of the light types. The following snippet of code supports a point light:
float4 PSPointLight(in PixelIn pixel) : SV_Target { float4 result = (float4)0; result.a = 1.0f; GBufferAttributes attrs; ExtractGBufferAttributes(pixel, Texture0, Texture1, Texture2, TextureDepth, attrs); float3 V, L, H; float D, attenuation; PrepareLightInputs((float3)0, attrs.Position, attrs.Normal, LightParams, V, L, H, D, attenuation); result.xyz = LightContribution(attrs, V, L, H, D, attenuation); return result; } - The directional light simply overrides the
L(to light) vector and sets the attenuation back to1.0f(no fall off).float4 PSDirectionalLight(in PixelIn pixel) : SV_Target { ... PrepareLightInputs((float3)0, attrs.Position, attrs.Normal, LightParams, V, L, H, D, attenuation); L = normalize(-LightParams.Direction); H = normalize(L + V); attenuation = 1.0f; result.xyz = LightContribution(attrs, V, L, H, D, attenuation); return result; } - And lastly, we have our simple ambient light pixel shader.
float4 PSAmbientLight(in PixelIn pixel) : SV_Target
{
...
    result.xyz = attrs.Diffuse * LightParams.Color;
    return result;
}
We are now ready to move onto creating the
LightRendererclass in our C# project, define some lights, and hook up the G-Buffer - First let's add the following C# light type enumeration and PerLight constant buffer structure for use in our renderer.
public enum LightType : uint { Ambient = 0, Directional = 1, Point = 2, } [StructLayout(LayoutKind.Sequential)] public struct PerLight { public Vector3 Direction; public LightType Type; public Vector3 Position; public float Range; public Color4 Color; } - Declare the
LightRendererclass and add the following private and public member fields:public class LightRenderer: Common.RendererBase { #region Initialized by CreateDeviceDepenedentResources // PerLight constant buffer Buffer perLightBuffer; // Light texture and its RTV and SRV Texture2D lightBuffer; RenderTargetView RTV; public ShaderResourceView SRV; VertexShader vertexShader; PixelShader psAmbientLight; PixelShader psDirectionalLight; PixelShader psPointLight; RasterizerState rsCullBack; RasterizerState rsCullFront; RasterizerState rsWireframe; // Additive blend state BlendState blendStateAdd; // Depth stencil states DepthStencilState depthLessThan; DepthStencilState depthGreaterThan; DepthStencilState depthDisabled; // Read-only depth stencil view DepthStencilView DSVReadonly; #endregion // Initialized by caller public List<PerLight> Lights { get; private set; } public BoundingFrustum Frustum { get; set;} public ConstantBuffers.PerObject PerObject { get; set;} public Buffer PerObjectBuffer { get; set; } ... } - And then add the following constructor and additional field members:
MeshRenderer pointLightVolume; ScreenAlignedQuadRenderer saQuad; GBuffer gbuffer; public LightRenderer( MeshRenderer pointLightVolume, ScreenAlignedQuadRenderer saQuad, GBuffer gbuffer) { this.Lights = new List<PerLight>(); this.pointLightVolume = pointLightVolume; this.saQuad = saQuad; this.gbuffer = gbuffer; } - Now within the light renderer's
protected override void CreateDeviceDependentResources()method, we will initialize the necessary Direct3D resources. First we use the G-Buffer depth buffer to determine the width/height and initialize the read-only Depth Stencil View (DSV).... RemoveAndDispose(ref <all disposable resources>); var device = this.DeviceManager.Direct3DDevice; int width, height; SampleDescription sampleDesc; // Retrieve DSV from GBuffer, extract width/height then // create a new read-only DSV using (var depthTexture = gbuffer.DSV.ResourceAs<Texture2D>()) { width = depthTexture.Description.Width; height = depthTexture.Description.Height; sampleDesc = depthTexture.Description .SampleDescription; // Initialize read-only DSV var dsvDesc = gbuffer.DSV.Description; dsvDesc.Flags = DepthStencilViewFlags.ReadOnlyDepth | DepthStencilViewFlags.ReadOnlyStencil; DSVReadonly = ToDispose(new DepthStencilView(device, depthTexture, dsvDesc)); } // Check if GBuffer is multi-sampled bool isMSAA = sampleDesc.Count > 1; - Next, we define the light render target texture and its Render Target View (RTV) and Shader Resource View (SRV). This is done exactly as we have done within the recipe Filling the G-Buffer.
// Initialize the light render target
var texDesc = new Texture2DDescription();
texDesc.BindFlags = BindFlags.ShaderResource | BindFlags.RenderTarget;
...
texDesc.SampleDescription = sampleDesc;
texDesc.Format = Format.R8G8B8A8_UNorm;

lightBuffer = ToDispose(new Texture2D(device, texDesc));

// Render Target View description
var rtvDesc = new RenderTargetViewDescription();
...
RTV = ToDispose(new RenderTargetView(device, lightBuffer, rtvDesc));

// SRV description
var srvDesc = new ShaderResourceViewDescription();
...
SRV = ToDispose(new ShaderResourceView(device, lightBuffer, srvDesc));
- To allow rendering multiple lights onto each other, we will use additive blending. The following code snippet shows how to initialize this blend state:
// Initialize additive blend state (assuming single RT)
BlendStateDescription bsDesc = new BlendStateDescription();
bsDesc.RenderTarget[0].IsBlendEnabled = true;
bsDesc.RenderTarget[0].AlphaBlendOperation = BlendOperation.Add;
bsDesc.RenderTarget[0].SourceAlphaBlend = BlendOption.One;
bsDesc.RenderTarget[0].DestinationAlphaBlend = BlendOption.One;
bsDesc.RenderTarget[0].BlendOperation = BlendOperation.Add;
bsDesc.RenderTarget[0].SourceBlend = BlendOption.One;
bsDesc.RenderTarget[0].DestinationBlend = BlendOption.One;
bsDesc.RenderTarget[0].RenderTargetWriteMask = ColorWriteMaskFlags.All;
blendStateAdd = ToDispose(new BlendState(device, bsDesc));
Note
As more lights overlap, it is quite possible for the accumulated light value to exceed the maximum
1.0fsupported by aUNormformat. In order to support High Dynamic Range (HDR), a larger bits-per-element format is required, and if you continue using aUNormformat, scaling will also be necessary. - Next, we have our rasterizer states. These are required so that we can easily control whether it is the front face or back face of the light volume that will be culled.
// Initialize rasterizer states
RasterizerStateDescription rsDesc = new RasterizerStateDescription();
rsDesc.FillMode = FillMode.Solid;
rsDesc.CullMode = CullMode.Back;
rsCullBack = ToDispose(new RasterizerState(device, rsDesc));
rsDesc.CullMode = CullMode.Front;
rsCullFront = ToDispose(new RasterizerState(device, rsDesc));
- We now need to create three depth stencil states.
// Initialize depth state
var dsDesc = new DepthStencilStateDescription();
dsDesc.IsStencilEnabled = false;
dsDesc.IsDepthEnabled = true;
// Less-than depth comparison
dsDesc.DepthComparison = Comparison.Less;
depthLessThan = ToDispose(new DepthStencilState(device, dsDesc));
// Greater-than depth comparison
dsDesc.DepthComparison = Comparison.Greater;
depthGreaterThan = ToDispose(new DepthStencilState(device, dsDesc));
// Depth testing disabled
dsDesc.IsDepthEnabled = false;
depthDisabled = ToDispose(new DepthStencilState(device, dsDesc));
- Finally, we create the
PerLightconstant buffer and initialize our shaders.// Buffer to light parameters perLightBuffer = ToDispose(new Buffer(device, Utilities.SizeOf<PerLight>(), ResourceUsage.Default, BindFlags.ConstantBuffer, CpuAccessFlags.None, ResourceOptionFlags.None, 0)); ... // Compile and create the vertex shader using (var bytecode = ShaderBytecode.CompileFromFile(@"ShadersLights.hlsl", "VSLight", "vs_5_0", shaderFlags, EffectFlags.None, null, includeHandler)) vertexShader = ToDispose(new VertexShader(device, bytecode)); // Compile pixel shaders using (var bytecode = ShaderBytecode.CompileFromFile(@"ShadersLights.hlsl", "PSAmbientLight", "ps_5_0", shaderFlags, EffectFlags.None, null, includeHandler)) psAmbientLight = ToDispose(new PixelShader(device, bytecode)); ... psDirectionLight ... psPointLight - Like the
GBufferclass, we need to be able to bind, unbind, and clear the lighting render target. The following code snippet shows these methods:public void Bind(DeviceContext1 context) { context.OutputMerger.SetTargets(DSVReadonly, RTV); } public void Unbind(DeviceContext1 context) { context.OutputMerger.ResetTargets(); } public void Clear(DeviceContext1 context) { context.ClearRenderTargetView(RTV, new Color(0,0,0,1)); } - To complete the
LightRendererclass, we implement the abstractDoRendermethod. This begins by retrieving the device context and backing up the current context state so that we can restore it after rendering the lights. - We then assign the G-Buffer SRVs, set the Output Merger blend state, retrieve the camera parameters from the frustum, and then iterate over each of the lights.
// Retrieve device context var context = this.DeviceManager.Direct3DContext; // backup existing context state int oldStencilRef = 0; Color4 oldBlendFactor; int oldSampleMaskRef; using(var oldVertexLayout = context.InputAssembler.InputLayout) using(var oldPixelShader = context.PixelShader.Get()) using (var oldVertexShader = context.VertexShader.Get()) using (var oldBlendState = context.OutputMerger .GetBlendState(out oldBlendFactor, out oldSampleMaskRef)) using (var oldDepthState = context.OutputMerger .GetDepthStencilState(out oldStencilRef)) using (var oldRSState = context.Rasterizer.State) { // Assign shader resources context.PixelShader.SetShaderResources(0, gbuffer.SRVs.ToArray().Concat(new[] { gbuffer.DSSRV }).ToArray()); // Assign the additive blend state context.OutputMerger.BlendState = blendStateAdd; // Retrieve camera parameters SharpDX.FrustumCameraParams cameraParams = Frustum.GetCameraParams(); // For each configured light for (var i = 0; i < Lights.Count; i++) { ... see next step } // Reset pixel shader resources (all to null) context.PixelShader.SetShaderResources(0, new ShaderResourceView[gbuffer.SRVs.Count + 1]); // Restore context states context.PixelShader.Set(oldPixelShader); context.VertexShader.Set(oldVertexShader); context.InputAssembler.InputLayout = oldVertexLayout; context.OutputMerger.SetBlendState(oldBlendState, oldBlendFactor, oldSampleMaskRef); context.OutputMerger .SetDepthStencilState(oldDepthState, oldStencilRef); context.Rasterizer.State = oldRSState; } - For each of the lights in the previous
forloop, we need to first choose the correct shader based on the type of light, and updateperLightBufferwith the current light's parameters. As our G-Buffer has been stored in view-space, we will transform the light parameters into the same space using thePerObject.Viewmatrix before updating the constant buffer resource.PerLight light = Lights[i]; PixelShader shader = null; // Assign shader if (light.Type == LightType.Ambient) shader = psAmbientLight; else if (light.Type == LightType.Directional) shader = psDirectionalLight; else if (light.Type == LightType.Point) shader = psPointLight; // Update the perLight constant buffer // Calculate view space position and direction Vector3 lightDir = Vector3.Normalize(Lights[i].Direction); Vector4 viewSpaceDir = Vector3.Transform(lightDir, PerObject.View); light.Direction = new Vector3(viewSpaceDir.X, viewSpaceDir.Y, viewSpaceDir.Z); Vector4 viewSpacePos = Vector3.Transform(Lights[i].Position, PerObject.View); light.Position = new Vector3(viewSpacePos.X, viewSpacePos.Y, viewSpacePos.Z); context.UpdateSubresource(ref light, perLightBuffer); context.PixelShader.SetConstantBuffer(4, perLightBuffer); - Now we check whether the light needs to be rendered full screen using the screen-aligned quad, or only the region defined by a light volume. In our implementation, directional and ambient lights will always be applied to the full G-Buffer (that is rendered fullscreen). For a point light, we only want to use the full G-Buffer if the bounding sphere is clipping the near- and far-clip plane of the frustum.
// Check if the light should be considered full screen bool isFullScreen = light.Type == LightType.Directional || light.Type == LightType.Ambient; if (isFullScreen || (cameraParams.ZNear > viewSpacePos.Z - light.Range && cameraParams.ZFar < viewSpacePos.Z + light.Range)) { // Use SAQuad to process entire G-Buffer context.OutputMerger.DepthStencilState = depthDisabled; saQuad.ShaderResources = null; saQuad.Shader = shader; // Set appropriate light shader saQuad.Render(); } else // Render volume (point light) { ... see next step } - In the case above, when the camera is not fully enclosed by the point light's volume, we need to scale and position the volume mesh for the light (for example, a sphere). Prior to rendering the mesh, we determine whether to cull front or back faces, and whether to perform a greater-than/lesser-than depth test.
// Set appropriate shader context.PixelShader.Set(shader); context.VertexShader.Set(vertexShader); MeshRenderer volume = pointLightVolume; // Prepare world matrix Matrix world = Matrix.Identity; world.ScaleVector = Vector3.One * light.Range; world.TranslationVector = Lights[i].Position; volume.World = world; var transposed = PerObject; // Transpose PerObject matrices transposed.World = volume.World; transposed.WorldViewProjection = volume.World * PerObject.ViewProjection; transposed.Transpose(); context.UpdateSubresource(ref transposed, PerObjectBuffer); if (cameraParams.ZFar < viewSpacePos.Z + light.Range) { // Cull the back face and only render where there is // something behind the front face. context.Rasterizer.State = rsCullBack; context.OutputMerger.DepthStencilState = depthLessThan; } else { // Cull front faces and only render where there is // something located in-front of the back face. context.Rasterizer.State = rsCullFront; context.OutputMerger.DepthStencilState = depthGreaterThan; } volume.Render(); - This completes the
LightRendererclass. The following code snippet shows how you might use this with the G-Buffer and render the result to screen:// Initialize light renderer and lights var lightRenderer = ToDispose(new LightRenderer(sphereRenderer,saQuad, gbuffer)); lightRenderer.Initialize(this); // Define lights lightRenderer.Lights.Add(new PerLight { Color = new Color4(0.2f, 0.2f, 0.2f, 1.0f), Type = LightType.Ambient }); lightRenderer.Lights.Add(new PerLight { Color = Color.Red, Position = new Vector3(0, 8, 1), Range = 10, Type = LightType.Point }); // Fill G-Buffer ... gbuffer.Unbind(context); // Lighting pass context.PixelShader.SetConstantBuffer(0, perObjectBuffer); // Prepare perObject for use in LightRenderer perObject.ViewProjection = viewProjection; ... perObject.InverseProjection = Matrix.Invert(projectionMatrix); lightRenderer.PerObject = perObject; lightRenderer.PerObjectBuffer = perObjectBuffer; // Assign the Frustum (from projection matrix) lightRenderer.Frustum = new BoundingFrustum(projectionMatrix); // Clear the render target, bind, render, unbind lightRenderer.Clear(context); lightRenderer.Bind(context); lightRenderer.Render(); // Render lights lightRenderer.Unbind(context); // Restore default render targets context.OutputMerger.SetRenderTargets(this.DepthStencilView, this.RenderTargetView); // Render the light buffer using SA-Quad's default shader saQuad.Shader = null; // use default shader saQuad.ShaderResources = new[] { lightRenderer.SRV }; saQuad.Render();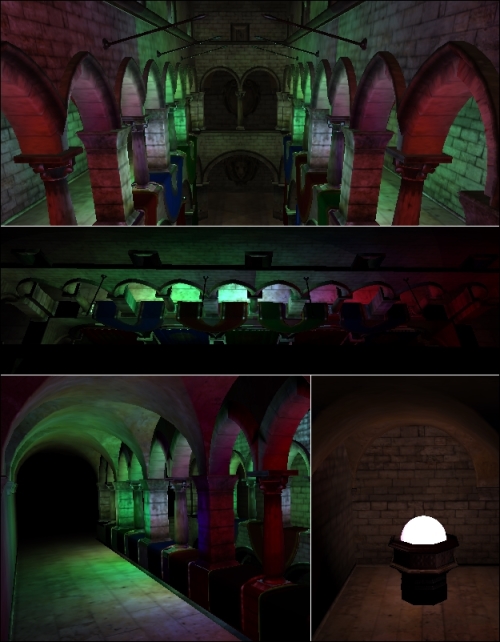
Final result of the lighting pass
The previous screenshot shows the resulting output with 14 point lights and a single ambient light.
In this recipe, we have implemented a method for culling light volumes based on their depth in order to only render where the light is likely to have an impact upon the final rendering result. The following diagram shows four objects: A, B, C, and D, lit by three point lights: 1, 2, and 3:
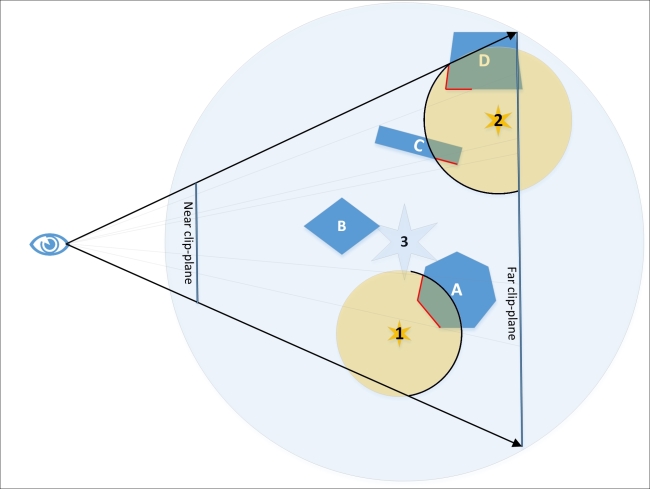
A diagram showing how light volumes are rendered. The outlined halves of light 1 and 2 represent the faces that are rendered, while the outlined portions of A, C, and D represent which pixels will be affected after the depth tests.
The area of each light's volume that will be rendered is determined as follows:
- The first light is within the frustum near and far clip planes; therefore, we choose to cull the front faces and set the depth test so that the light volume fragments will only render if they have a depth greater than the contents of the depth buffer at that point, that is, render when there is something in front of the back faces of the light volume. The highlighted portion of object A shows the area of the G-Buffer that will have lighting applied for the first light.
- The second light on the other hand partially lies beyond the far clip plane; therefore, we choose to cull the back faces and set the depth test so that the light volume fragments will only render if they have a depth lesser than the contents of the depth buffer at that point, that is, render when there is something behind the front faces of the light volume. The highlighted portions of objects C and D show the areas of the G-Buffer that will have lighting applied for this light.
- The third light fully encloses the frustum; therefore, we use a fullscreen quad to process the entire buffer, applying lighting to all four objects. There is no depth test in this instance.
By using this approach, it is clear that the number of fragments that need to be processed by the pixel shader are greatly reduced for the first two lights. The last light, however, potentially wastes time processing pixels that have no content. This could be addressed by using the stencil buffer when rendering the geometry into the G-Buffer and enabling stencil testing within the subsequent lighting pass. By using the stencil buffer, we could exclude any portions of the screen that do not have anything rendered or that we do not want to participate in the lighting pass. A prime example is the skybox of outdoor scenes, where potentially a large portion of the screen does not require any lighting operations. As with render targets, the depth buffer cannot be bound for reading and writing at the same time. In order for us to use the depth buffer from the G-Buffer stage as both, an SRV to retrieve position information and for depth testing, we have created a read-only DSV using DepthStencilViewFlags.
dsvDesc.Flags = DepthStencilViewFlags.ReadOnlyDepth;
There are of course many ways to optimize the rendering of lights for deferred rendering. One is to use the rasterizer stage's scissor test, allowing a region of the screen to be enabled to render while culling anything that would be rendered outside this region. Another approach for efficient lighting is tiled deferred rendering, where the screen is divided into imaginary tiles. Lights that impact a specific tile are grouped and processed together (also known as light binning).
- Overview of a number of different deferred rendering techniques along with example code can be found in Deferred Rendering for Current and Future Rendering Pipelines by Andrew Lauritzen, Beyond Programmable Shading, SIGGRAPH 2010, July 2010 at http://visual-computing.intel-research.net/art/publications/deferred_rendering/
- Stencil buffer for deferred lights at http://www.altdevblogaday.com/2011/08/08/stencil-buffer-optimisation-for-deferred-lights/
- Light Indexed Deferred Rendering at https://code.google.com/p/lightindexed-deferredrender/
- Performance comparison of light indexed deferred rendering and tiled deferred rendering at http://mynameismjp.wordpress.com/2012/03/31/light-indexed-deferred-rendering/