8. Generating Artifacts
Introduction
As we saw in Chapter 2, a key task that domain-specific languages can be used for is to generate code and other artifacts. In this chapter, we’ll review styles of artifact generation that can be used with DSLs and then look at a specific worked example of using the default artifact generation system supplied with the DSL Tools. Then we’ll review in detail the syntax used by that system. Finally, for those interested in deeply customizing the artifact generation system, we’ll look at its implementation architecture and three customization examples.
Historically, artifact generation has typically been spoken of simply as code generation. The analogy is often drawn between the move from assembly code to high-level third-generation languages and the move from those languages to domain-specific languages. However, the current reality is a world where software-intensive systems are composed of a much more diverse group of artifacts than ever before, only some of which would traditionally be recognized as source code. Others might be configuration files, either for packaged applications or middleware, and others might be the content of databases, both schema and raw data.
Consequently, although DSLs can be seen as a more abstract form of source code in a compiler-like tool chain for custom code in a solution, they can also be used to configure applications and middleware as well as to initialize and populate databases. The benefits of using DSLs in these situations are also varied. In some cases, raising the level of abstraction is an adequate benefit itself. In others, complex relationships must be maintained, and a graphical DSL brings order and visual understanding to data that would otherwise need more expert interpretation even if the abstraction level is only minimally affected.
Nonetheless, it is still true that software systems are principally developed in a world where the simple text file dominates. Whether to store source code, or to persist a scripted means of setting up the data in some more complex piece of software or database, the ability for a set of text files to be managed together in a single version control system means that this style of working is unlikely to disappear for some time; indeed, the rise of XML as the de facto standard structured data representation language has probably ensured the endurance of this approach for the foreseeable future.
Consequently, the single most important transformation that can be applied to a DSL is to produce another artifact as a simple text file, whether that is source code, database script, or the persisted representation of a different DSL.
We can see this clearly at work in our example from Chapter 2. If we examine the scenarios around the IssueProject DSL, we can see that there are two primary pieces of artifact generation applied to it. First, code is generated to improve the domain-specific API for manipulating Issue data within the database. We’ll look much more deeply at how that is achieved in this chapter. Second, scripts can be generated from this DSL to populate a production SQL Server Issues database with the settings described by a particular instance document. This is an interesting case, because the DSL also has custom code added to it to allow a database to be configured directly from the tool. Why would a DSL provide two such apparently redundant methods of working? The answer is that although the direct database connection-based tools are convenient for running a quick test or updating a staging version of a database, it is unlikely that the user of a DSL would have such direct access to a production server. It would also not be sensible for an organization to operate without a scripted install for a database that was important to its working practices in order to be able to build servers from scratch. The generation of such scripts for administrators thus complements convenience tools aimed more at developers, and is a useful pattern.
Artifact Generation Styles
Before looking in detail at the code generation associated with the Issue Project DSL from Chapter 2, we’ll review a range of techniques that can be used to generate artifacts and discuss their pros and cons.
Extensible Stylesheet Language Transformations
One method is to simply transform the persisted representation of a DSL directly to the desired artifact. Given that DSLs are typically persisted as XML, the natural tool for this task is XSLT. Here’s a fragment of a class design DSL:
<class namespace="Foo" name="Bar" access="family">
<property name="Height" type="System.String" access="public"
modifier="sealed" />
</class>
Here’s a matching XSLT stylesheet to transform the class design DSL into C# code:
<?xml version="1.0" encoding="UTF-8" ?>
<xsl:stylesheet version="1.0" xmlns:xsl="http://www.w3.org/1999/XSL/
Transform">
<xsl:output method="text" />
<xsl:template match="class">
namespace <xsl:value-of select="@namespace"/>
{
<xsl:apply-templates select="@access"/> partial class
<xsl:value-of select="@name"/>
{
<xsl:apply-templates select="property"/>
}
}
</xsl:template>
<xsl:template match="property" xml:space="preserve">
private <xsl:value-of select="@type"/> _<xsl:value-of
select="translate(@name,
'ABCDEFGHIGKLMNOPQRSTUVWXYZ',
'abcdefghijklmnopqrstuvwxyz')"/>;
<xsl:apply-templates select="@access"/> <xsl:value-of
select="@type"/> <xsl:value-of select="@name"/>
{
get
{
return _<xsl:value-of select="translate(@name,
'ABCDEFGHIGKLMNOPQRSTUVWXYZ',
'abcdefghijklmnopqrstuvwxyz')"/>;
}
set
{
_<xsl:value-of select="translate(@name,
'ABCDEFGHIGKLMNOPQRSTUVWXYZ',
'abcdefghijklmnopqrstuvwxyz')"/> = value;
}
}
</xsl:template>
<xsl:template match="@access">
<xsl:choose>
<xsl:when xml:space="preserve"
test="./parent::*[@access='public']">public</xsl:when>
<xsl:when xml:space="preserve"
test="./parent::*[@access='family']">protected</xsl:when>
<xsl:when xml:space="preserve"
test="./parent::*[@access='private']">private</xsl:when>
<xsl:when xml:space="preserve"
test="./parent::*[@access='assembly']">internal</xsl:when>
<xsl:when xml:space="preserve"
test="./parent::*[@access='familyandassembly']">protected internal</xsl:when>
</xsl:choose>
</xsl:template>
</xsl:style>
And now here’s the output generated from applying the stylesheet to the DSL fragment above:
namespace Foo
{
internal partial class Bar
{
private System.String _height;
public System.String Height
{
get
{
return _height;
}
set
{
_height = value;
}
}
}
}
An important aspect of the DSL Tools is that the default serialization mechanism uses XML formats that are simply specified and as natural a match as possible to the domain model. The details of model serialization were discussed in Chapter 6. However, while these domain-specific, simple XML formats mean that XSLT-based transforms are certainly possible with the DSL Tools, there are several issues that make them far from ideal.
The first thing to note is that there’s quite a lot more code generated than the terse DSL serialization syntax; this code generator has some decisions baked into it:
• It provides backing store for all properties using a field with the property name prefixed with an underscore and transformed to lowercase (we’d have liked to use camel-case1 to follow .NET conventions, but the XSLT for camel-case is rather extensive for an example).
• It generates partial classes—a sensible extensibility plan for any C# code generator.
• It provides both a getter and a setter for each property.
The generator also has to transform from the language-agnostic accessibility level “assembly” in the DSL to the matching C# term “internal.”
Even for this tiny fragment, it can be seen that the XSLT is nontrivial—largely because artifact generation tends to require rich string-manipulation features such as the lowercase function (and in a more realistic example, a camel-casing function). The XSLT template can be somewhat simplified using the Microsoft XSLT engine’s ability to inject custom functions into a transform. If the type of the property were expressed in the XML as a cross-reference (especially one that doesn’t use XML’s rather weak built-in IDREF mechanism), or the DSL is spread across multiple files, the XSLT code rather quickly becomes relatively hard to create and maintain. One distinct advantage of XSLT transforms, however, is that they are extremely quick to run. The latest version of Visual Studio contains an XSLT debugger that can make working with such transforms much less of a chore than it used to be, although the pattern-matching style of design required to create XSLTs is not to every developer’s taste.
Tip: Use XSLT for model file migration
One use of XSLT that we’ve found very useful is migrating model files from one version of a DSL to another—typically, a lot of the XML hasn’t changed, so you can make use of the identify transform mechanism in XSLT and simply specify transformations for the modified elements.
Making Use of the Domain-Specific API
When we create a language with the DSL Tools, we are automatically provided with a domain-specific API for manipulating instances of that language in memory. For example, in the IssueProject DSL, we are provided with an API that has a ProjectDefinition class, which has an IssueDefiniton sub-object and a Milestones collection where the details of individual Milestones can be accessed and manipulated.
Let’s see how we can use that API as another way to generate artifacts.
First, we’d need to use the API to load the model into memory. As we saw in Chapter 3, model instances live inside a Store instance, so we need to initialize a store and then load the model. Here’s some example code to do just that:
Store store = new Store(typeof(ProjectDefinitionDomainModel));
using (Transaction t =
store.TransactionManager.BeginTransaction("Deserialize", true)
{
ProjectDefinition def =
ProjectDefinitionSerializationHelper.LoadModel(
store,
"MyProjectDefinition.pdef",
null,
null);
t.Commit();
}
First, a Store object is initialized using the type of the DomainModel object that we want the store to be able to hold. A Transaction is then started in which to perform the load, because we will necessarily be modifying the Store as part of loading it with elements in the file. This is a transaction specifically for deserializing a model file, so we’ll pass true to the isSerializing parameter. Finally, the static ProjectDefinitionSerializationHelper class is used to read the file according to the serialization scheme defined along with the language. This helper class is also generated as part of the API to a model in the SerializationHelper.cs file.
All well and good; we now hold a ProjectDefinition reference called “def,” which we can use to examine the model we’ve loaded. Let’s start by producing code for accessing specific issues in the issues database. In the database, the data representing an individual issue is normalized heavily, as is usual in a relational database application supporting online transactions. One of the key features supported by this normalization is the ability for an issue to have values for one or more custom fields defined on a per-project basis. This gives a degree of flexibility for customers of the database without the need to modify the database schema itself and is a common technique. The tables that support this are shown in Figure 8-1. The Projects table holds a row for every project that has been instantiated, and there is then a row in the ProjectCustomFields table for each custom field defined for that project. Each issue created (with its own row in the Issues table) can then have a set of rows in the ProjectCustomFieldValues table that specifies a value for each custom field.
Figure 8-1. Database tables for an issue and its custom fields
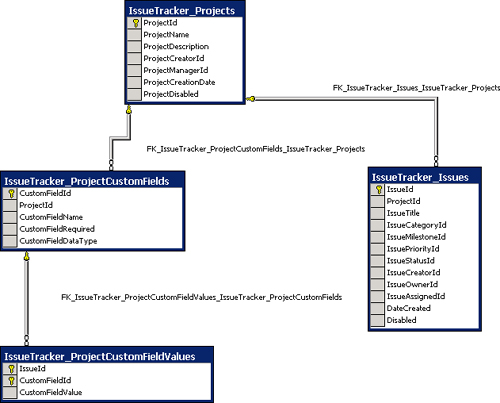
This structure is efficient and flexible, but doesn’t make for pleasant client programming. For example, to create an issue with values for all of its properties, both normal and custom, a record must be created in the Issues table, and then a further set of records must be created in the CustomProperty Values table, one for each custom value that is defined for the project.
If you are a developer trying to produce a program to manipulate Issues in the context of a specific project with a defined set of custom fields, then all of this database complexity is really implementation detail that you may well have little interest in. A rather basic example of an API that would be more productive for such a developer wishing to create an issue without regard to its implementation details might look like the following:
public IssueId CreateIssue(ProjectMilestone issueMilestone,
ProjectUser creator, ProjectUser initialOwner,
string someCustomProperty, bool anotherCustomProperty)
{
// Some implementation
}
To generate such a domain-specific API, we need to do two things.
• Write out code for the standardized part of the method that is tied to the fixed part of the database schema for Issue.
• Write out code for the part of the issue that is custom for this project.
To do the first of these, we’ll effectively just be outputting a standard piece of text. For the second, we’ll need to traverse the set of custom fields in the IssueDefinition part of the ProjectDefinition model. It’s worth noting that to execute this task, the DSL author is focusing on two domain-specific APIs at the same time—first, there’s the domain-specific API she is trying to generate code for that will be incorporated into some aspect of the running Issue Tracking application (or tools that interoperate with it); second, there’s the domain-specific API onto the IssueProject DSL that she’s using to read the model file. It is often the case, as it is here, that both these levels of modeling share many concepts (issues, in this small example) and consequently it’s equally common to find yourself thinking about the wrong level from time to time. The need for tool authors to manage this mental complexity (which only expands when programs are part of an even longer tool chain across more levels of abstraction) seems to be inherent in the domain-specific development approach.
Here’s some code that emits both the standardized and custom parts of the method for the CreateIssue ( ) method just proposed, given a ProjectDefinition.
using System;
using StringHelpers;
public void GenerateCreateIssue(ProjectDefinition definition)
{
Console.WriteLine("public IssueId CreateIssue(ProjectMilestone
issueMilestone,");
Console.WriteLine("ProjectUser creator, ProjectUser initialOwner");
foreach (CustomField field in
definition.IssueDefinition.CustomFields)
{
Console.Write(", " + field.Type.FullName +
" " + StringHelper.ToCamelCase(field.Name));
}
Console.WriteLine(")");
Console.WriteLine("{");
Console.WriteLine(" // Some implementation");
Console.WriteLine("};");
}
Thanks in large part to the model’s domain-specific API, this is pretty straightforward code. It makes the assumption that the code generation output is going to be written to the console, but it could have equally been coded to direct the output to another device or direct it to some user-specified place. The structure of the code is very simple, and there is an easy-to-read match between collections in the data structures of the domain-specific API and iteration in the control logic. First the standard code is written out, and then one extra comma-preceded method parameter is written for each CustomField in the model. Finally, the standard close bracket and method body are written; of course, in reality, the method body would also be custom. Because this is just standard .NET code, it is trivial to invoke custom methods such as the helper to convert a string to its camel-cased equivalent. We’ve chosen to present this code in C#, but of course it would be very similarly expressed in any procedural language.
However, it does have some flaws. The code to be generated is hard-coded in individual strings. Where this is in large blocks, it’s quite easy to read, as in the first two lines of the sample just presented. However, looking at the line inside the foreach loop, it is less easy to pick out what the shape of the generated code will be. Experience has shown that when editing a large volume of such code, the visual noise of the Console.WriteLine (or equivalent) statements, and especially the extra quotation marks and brackets, is very distracting and often leads to small errors. This is particularly the case when strings with quotation marks of their own are being generated, because a lot of character escaping may be necessary.
In normal coding projects, it would be a best practice to move strings into resource files, but in the case of code generation, it would actually detract seriously from the maintainability of the code. Generated code is not usually localized, and even well-chosen resource identifiers would make divining the code to be generated more troublesome from an inspection of the code. More importantly, when the code to be generated needs to change slightly, it is very frequently the case that the logic surrounding it must change as well. For example, if it was decided to switch the custom parameters to a params array of some standard Parameter type, then the logic in the line of code inside the foreach loop would be entirely incorrect; simply changing a resource would not be sufficient. Consequently, if this approach is taken to code generation, it is usually necessary to ship the source code of the generator in order to allow for small modifications to both logic and strings.
A variation on this approach is to use the CodeDOM instead of writing out the generated code directly. The CodeDOM is a standard facility of the .NET framework that allows an abstract syntax tree for languages to be created and then transformed into a variety of procedural language syntaxes. Here’s a snippet of CodeDOM code to create the abstract syntax for a property definition:
CodeMemberProperty rootElement = new CodeMemberProperty();
rootElement.Name = "Height";
rootElement.Type = CodeTypeReference(typeof(float)));
rootElement.Attributes = MemberAttributes.Private;
rootElement.HasSet = false;
rootElement.HasGet = true;
rootElement.GetStatements.Add(
new CodeMethodReturnStatement(
new CodeFieldReferenceExpression(
new CodeThisReferenceExpression(),
"height")));
If translated to C#, this snippet would generate the following code:
private float Height
{
get
{
return this.height;
}
}
As you can see, this is extremely verbose code for such a simple piece of output. It has one great advantage—it can be transformed into C#, Visual Basic, or any other language for which a CodeDOM is implemented. However, that advantage is usually greatly outweighed by the fact that the code to create the abstract syntax tree is so far removed from the generated code that small modifications become relatively major pieces of work. While libraries can be built up to simplify this code, in practice we’ve found that the CodeDOM is only suitable for generating small quantities of code.
A Template-Based Approach
You’ll notice that the way we worked out the preceding code generation schemes followed a simple process. We gave an example of the desired code to be generated and then worked out an algorithm to generate it. It turns out that there is a well-known pattern for code generation that supports this process more explicitly while still making best use of the domain-specific API—parameterized template-based generation. Here’s a fragment of a parameterized template for generating the CreateIssue sample from the previous section:
public IssueId CreateIssue(ProjectMilestone issueMilestone,
ProjectUser creator, ProjectUser initialOwner
<#
foreach (CustomField field in
definition.IssueDefinition.CustomFields)
{
#>,<#=field.Type.FullName#>
<#=StringHelper.ToCamelCase(field.Name)#>
<# } #>
)
{
// Some implementation
}
The key to this technique is that the elements outside of the control markers (<# and #>) are rendered directly to the output file, whereas code within the markers is evaluated and used to add structure and dynamic behavior. Where control structures such as the foreach loop above surround non control areas, the enclosed non-control area is subject to the control structure, in this case repeating it once for each iteration of the loop.
This technique has been used very successfully in a wide range of products, perhaps most widely in Microsoft’s dynamic website rendering technology, Active Server Pages. It is the principal artifact-generation technology used by the DSL Tools, and we refer to it as text templating.
You can see from the preceding example that the template is based on a copy of the expected output. Points of variability based on the underlying model are then analyzed, and control code is inserted at those points. Where the text is not dependent on the model, it is simply left as a copy of the desired code to be generated and so is very readable.
A great advantage of this technique is that it can be a gradual process. Minimal parameterization can occur to prove a generation strategy and then the fine detail can be parameterized later. For example, in the preceding code, all parameters could initially be given the generic type object as a first step on the way to parameterization.
The readability of this template is not perfect, but it is a lot closer to the desired output than any other methods we’ve looked at. Its readability can also be enhanced greatly by some judicious code colorization in an editor to separate the control code from the literal text.
Tip: Get a template editor
You can download colorizing code editors for the DSL Tools’ text templates from various third-party community sites.
Complex Relationships and Round-Tripping
The techniques for managing the transformation from a model to an artifact described so far all have one thing in common—they presuppose that the transformation is one of taking a model in a given state and producing the matching artifact. But what if a developer modifies the artifact after generation? Should the model synchronize to the changes in the generated artifact? What if a whole new version of the artifact is retrieved from source code control? What if the model is generative of two artifacts and one is changed in a way that clashes with the other? What if a part of an artifact that has no representation in a model is changed, such as a comment? These problems are often grouped together under the heading round-tripping.
The DSL Tools do not currently provide direct support for round-tripping, because the complexities typically outweigh the benefits for all but a small subset of DSLs. For the majority of DSLs, we’ve found that text templating is a more productive solution.
It is, however, possible to layer such round-tripping facilities on top of the domain-specific APIs that the DSL Tools provide if there is a requirement to do so. Indeed, the class designer and distributed system designers included in Visual Studio 2005 include just these types of features. Detailing exactly how to go about implementing similar facilities is well beyond the scope of this book, but let’s look at what needs to be taken into account in order to assess the level of complexity for anyone wishing to tackle such a project.
Dealing with complex relationships between models and their artifacts typically involves further new techniques for artifact generation. The two key complexities we’ve identified here are
• Data loss—Models typically don’t represent every detail of the generated artifact, as we’ve seen, with much of the fine detail being stored as boilerplate. If this boilerplate is changed in the artifacts, then the changes need to be preserved in some way.
• Ripple effects—When an artifact is changed, propagating that change to a model can make it necessary to regenerate other artifacts. It is very common for artifacts to support a much wider set of valid edits than would ever be generable from the model. If the changes in the original artifact didn’t respect the exact schema of the model-artifact mapping, then the manually edited artifact and the newly generated ones may well clash.
Because there is a clear outcome, the artifact generation techniques presented previously can generally be initiated by a simple user command. The model is not changed, but the artifact is changed. However, complex generation typically requires more complex trigger points because the consequences of changes to models and artifacts can have ripple effects on others. This can mean reacting to changes in models and artifact files. There are standard .NET and Visual Studio SDK techniques for noticing changes in artifact files. Reacting to changes in models can be accomplished via the DSL Tools’ APIs using a combination of rules and events. We’ll look at both of these concepts and how they can be used in Chapter 10.
Regardless of the way in which the synchronization process is triggered, being able to react in detail to changes in artifacts requires that some kind of parser for each artifact type involved is available. This need not be a formal parser in all cases, because only some aspects of the artifact may be interesting to the tool chain. For example, perhaps a regular expression to pick out the names of C# classes and methods might be adequate for populating certain DSLs.
Once an artifact has been parsed, what kind of transformation should be performed and what other actions should be taken? In our previous example techniques, the one-way mapping between model and artifact has been specified using relatively simple code, either in XSLT or control structures in regular C# or in a template. Complex mappings between several models and artifacts are hard to specify in this manner unless there is no data loss allowed, which is rarely possible if artifact editing is permitted. Unfortunately, specifying two simple mappings, one for each direction, does not typically work well, because there is nowhere in the models to store the parts of the artifacts that were generated from boilerplate. The one-way techniques are a formal description of how to produce the desired output, given a set of input; for two-way mappings, a formal description of the relationships between the model and artifacts is more useful. This relationship description can then be processed to decide what actions to take when a change occurs at either end. To be successful with processing when it is an artifact that changes, it would generally be necessary to have a complete parse of the artifact.
A secondary question then arises: Should the artifact side of such a relationship description (or relationship model) be directly expressed in terms of the syntax of the artifact? This would entail the relationship model describing a transformation not just between two types of model, but between two modeling technologies as well—the parse trees of the artifact and the DSL model. Instead, it might be preferable to create a DSL model of the parse tree of the artifact and then describe the relationships using only model technology. However, creating such a model for every artifact type (as well as the parser) is an extra cost that must be borne.
In the wider modeling field, various approaches to transformation have been proposed, including the Query View Transformation (QVT) initiative from the Object Management Group. However, designing a workable transformation algorithm is unfortunately not the entirety of the problem. When such complex transformations are triggered in the context of a modern IDE, the issue of managing the end user’s experience of the transformation must also be tackled.
If the effects of a transformation ripple out to artifacts that the user hasn’t yet edited, it may be necessary to invoke source code control mechanisms to make the change. If the source code control operation is unsuccessful (perhaps another user has the file in question locked), then decisions must be taken. Should the artifact be left in an inconsistent state with the model and potentially other artifacts, or should the entire set of changes be abandoned? It seems we must implement an overarching transactional mechanism to handle such failure states gracefully and to enforce that synchronizations work as atomic operations.
We’ve seen that in many useful transformations, a lot of unchanging boilerplate code must be generated that is not affected by the content of models. Consequently, any transformation scheme has to be able to store and produce this type of output in artifacts. A synchronization scheme also needs to decide what happens when an end user makes a change in a part of an artifact that was generated from boilerplate rather than from a transform of a piece of model data. For example, imagine a template that generates C# classes but does not add the partial keyword to those classes. A user needs to add an extra piece to the class and so adds the partial keyword in to the generated class definition. The generative model has no place to store this extra information—it has no concept of classes being either partial or not. But the boilerplate in the transformation has not changed, and the next time the synchronization happens the user’s change will be lost. If this type of change to generated files is to be respected, then there is a need to delineate the editing of boilerplate from the model-generated aspects. This can be achieved either by only allowing boilerplate to be edited inside a template that is part of the generation mechanism or by marking the output file with separate areas for generated code and user-editable boilerplate.
From this discussion, we can see that complex relationships will necessarily be significantly more costly to implement than one-way generation. What would be indicators that such an investment might be worthwhile in your DSL project? The Class Designer DSL that is part of Visual Studio 2005 was deemed to be such a case. Here the visual language is very, very close to the textual language. The two are so close, in fact, that they can almost be viewed as different syntaxes to the same parse trees (though one is a subset of the other, because class designer does not concern itself with method bodies). In fact, in the class designer, the two models are close enough that the class structure data itself is never persisted in model format. Instead, only the diagram layout is persisted and everything else is derived directly from the actual code every time the diagram is opened.
In similar cases where models and artifacts are either isomorphic or very close to being so, some of the issues outlined here become less problematic because there is either no data loss or a very well-defined loss between the two sides.
Given that we believe that the majority of DSLs are a significant abstraction over their generated artifacts, as opposed to being close to them, simple text templating is a natural choice as a default generation mechanism for the DSL Tools. As with most features of Visual Studio, a significant aim of the tool is to support high-productivity ways of working. We’ve found that template-based generation ideally supports such productivity through an iterative development process based on a gradual transition from static artifacts to parameterized templates.
We’ll look in detail at the syntax for text templates a little later, but first let’s investigate this development process from the standpoint of our CJKW developer, Devika, and see how she goes about iteratively developing generated code that meshes with the predominantly manually written code of the Issue Tracker application.
The Templatization Process
The last project that Devika worked on used the CJKW Issue Tracking system in the healthcare domain, installing a system to help a local hospital management authority manage bugs in its IT projects. On that project, Devika spent a good deal of time writing reports and utilities to work with the particular project customization scheme that the health authority used. This scheme added two custom fields to issues.
• ClinicalSignoffRequired—Whether this issue must be approved by the clinical supervision team before it is closed.
• ClinicalSignoffReceived—Whether this issue has received clinical supervision sign-off.
Because the authority was particularly concerned with the quality of clinical systems, an extra stage in the bug management process of all of the authority’s IT projects existed. The project manager reviewed all incoming bugs and decided whether they needed sign-off from a team of clinicians assigned to consult on new IT projects. If they did, he set the Clinical-Sign-offRequired flag. If this flag was set, then the ClinicalSignoff-Received flag also had to be set before an issue could be closed. The authority found that this process brought user acceptance much closer to their development process and caught many problems before systems were deployed. They wanted a bug-tracking system to support this process and were delighted that CJKW’s system could adapt so easily.
Consequently, while on the project, Devika added hand-customized extras to the Issue Tracker application’s standard business logic and data access layer code to manipulate issues with these two extra fields seamlessly using the same code techniques that the application used to manage issues with the standard set of properties. This saved her lots of repetitive coding; as we’ve seen, in Issue Tracker, custom fields must normally be manipulated separately from the Issues they are associated with.
In the Issue Tracker business logic layer, classes are provided for each of the principal database entities. The classes allow instances of entities to be managed in memory. The data access layer provides methods to query for and retrieve collections of these entities. The entities can then be modified in memory and changes updated back to the database. In some cases, this is achieved using a Save() method on an entity class; in other cases, a specific data access layer method must be called to perform the update.
For example, here’s the minimal code needed to create a new issue and its associated custom fields, and to save them to the database:
public static void
CreateNewHealthIssue(string title,
int categoryId,
int milestoneId,
int priorityId,
int statusId,
int assignedUserId,
int ownerUserId,
string creatorName,
bool clinicalSignoffRequired)
{
Issue newIssue = new Issue(0,
HealthProjectId,
title,
categoryId,
milestoneId,
priorityId,
statusId,
assignedUserId,
ownerUserId,
creatorName);
newIssue.Save();
CustomFieldCollection fields =
CustomField.GetCustomFieldsByProjectId(HealthProjectId);
foreach (CustomField field in fields)
{
if (field.Name == "ClinicalSignoffRequired")
{
field.Value = clinicalSignoffRequired.ToString();
}
}
CustomField.SaveCustomFieldValues(newIssue.Id, fields);
}
In this code, a regular issue is being created, and then the clinical-Sign-OffRequired parameter’s value is set. The data access layer provides methods to get the project’s collection of CustomFields and then to set them back with actual values on a per Issue basis. The clinicalSignoffReceived flag is ignored here, because it never makes sense to set it to anything but its default when an Issue is created. We’ll see later how this different treatment of the two custom fields has consequences for code generation.
We’ve omitted the database transaction-handling code from this method in order to keep the size down, but clearly, because two database operations are being used to create a single logical item, it is important that either both succeed or that neither succeed.
Rather than just having a library of methods like the preceding code to manipulate Issue objects and their CustomFields together, Devika packaged up functionality similar to this in a custom derived HealthIssue class. This enabled her and her team to simply create and work with HealthIssue objects in exactly the same way that they would normally work with Issue objects and made the two custom fields indistinguishable from the other fields on Issue. Figure 8-2 shows these classes.
Figure 8-2. The Issue and derived HealthIssue classes in the Issue Tracker business logic layer

Now, as she works with Archie, Devika thinks that she can generalize the approach of creating custom derived entity classes for any deployment of the Issue Tracker application using some code generation from the domain-specific languages they are building.
The First Cut Template
Devika examines the code in her derived HealthIssue class and starts to think about parameterizing it. She’ll obviously need to change the name—she can probably derive that from the name of the project that it’s being used in. She’ll need fields and matching properties to represent every custom field defined. That looks like everything to her, at first examination, so she goes ahead and creates her first text template:
<#@ template inherits=
"Microsoft.VisualStudio.TextTemplating.VSHost.
ModelingTextTransformation"#>
<#@ output extension=".cs" #>
<#@ issueProjectModel processor="IssueProjectsDirectiveProcessor"
requires="fileName='HealthProject.issueProj'"
provides="IssueProjectModel=IssueProjectModel" #>
using System;
using System.Collections.Generic;
using System.Text;
<#
foreach (Project project in this.IssueProjectModel.Projects)
{
#>
namespace <#= project.CodeGenNamespace #>
{
public class <#= project.Name #>Issue :
ASPNET.StarterKit.IssueTracker.BusinessLogicLayer.Issue
{
<#
// Generate member fields for custom fields
foreach ( IssueField customField in project.CustomFields )
{
#>
private <#= FieldTypeToType(customField.Type) #>
_<#=customField.Name.ToLower() #>;
<#
}
#>
<#
// Generate Properties for custom fields
foreach ( IssueField customField in project.CustomFields )
{
#>
public <#= FieldTypeToType(customField.Type) #>
<#= customField.Name #>
{
get { return _<#= customField.Name.ToLower() #>; }
set { _<#= customField.Name.ToLower() #> = value; }
}
<#
}
#>
<#
}
#>
}
}
<#+
#region Helper methods for code generation
private static string FieldTypeToType (FieldType modelType)
{
switch (modelType)
{
case FieldType.Boolean : return "bool";
case FieldType.String: return "string";
case FieldType.Float: return "float";
case FieldType.Double: return "double";
case FieldType.Int32: return "int";
case FieldType.Int16: return "short";
default: return "string";
}
}
#endregion
#>
This template starts with some directives; these are the three lines beginning with the delimiter “<#@.” Directives provide processing instructions to the underlying engine that executes text templates, and this template uses three.
<#@ template inherits=
"Microsoft.VisualStudio.TextTemplating.VSHost.
ModelingTextTransformation"#>
The template directive specifies general processing options for a text template. An individual template can broadly be thought of as a class with the usual .NET characteristics of properties, fields, and methods, and this directive is used here to specify that this template inherits from a standard class provided by the DSL Tools for building text templates that access model files.
<#@ output extension=".cs" #>
The output directive specifies the type of file that the text template will produce—here, it’s producing a C# file.
<#@ issueProjectModel processor="IssueProjectsDirectiveProcessor"
requires="fileName='HealthProject.issueProj'"
provides="IssueProjectModel=IssueProjectModel" #>
The issueProjectModel directive is specific to templates that work with the model files produced by the IssueProject designer. Here, it specifies that the “HealthProject.issueProj” model should be loaded into the member variable “IssueProjectModel” within this template.
One point to note here is that this use of the directive ties the template file to a particular model instance. We’ll see techniques later in the chapter to allow the logic of a template to be split into multiple files to avoid this pitfall.
Next come some using statements taken directly from the example code, followed by the following control statement:
<#
foreach (Project project in this.IssueProjectModel.Projects)
{
#>
The “<# ... #>” delimiters denote a control block whose content is used to control the flow of processing of the template rather than being written as output of the template. In this case, a foreach loop is being initiated. Everything in the template following this block will be repeated for each iteration of the loop until a matching control block with the closing brace of the loop is encountered, thus:
<#
}
#>
Here the loop is being controlled by the set of Projects read in from the model file and exposed via the property IssueProjectModel, which was added with the issueProjectModel directive described earlier. The local variable “project” is now available to all control code nested within this structure, just as if all of the control code had been written in a single method in a regular piece of C# code.
Tip: Use C# or Visual Basic in templates
Template logic isn’t tied to C#; if you’re more comfortable with Visual Basic, then you can use that for the control logic in your templates.
Next, the namespace for the generated code is written out, followed by a class declaration for the new custom derived Issue type. The name of the class is generated using another type of control block called an expression block, delimited with “<#= ... #>.” This type of control block evaluates the expression it contains and converts the result to a string that it writes directly to the output of the template. Here, the name of the Project being processed is being catenated with the word “Issue.”
To generate both a C# field and a matching property for each defined custom field of the project, the same nested loop is then used twice in succession within control blocks to loop over the CustomFields collection on the Project. To calculate the C# type that must be used for each of the values of the FieldType enumeration used in the model, a switch statement is the obvious choice. However, repeating this switch statement every time it is needed would be cumbersome. What is needed is to encapsulate this small piece of reusable code within a method. The expression block
<#= FieldTypeToType(customField.Type) #>
is used in several places to emit the correct type into the template output. This method is defined at the end of the template file in a further kind of block called a class feature block.
A class feature block is delimited with “<#+ ... #>.” Class feature blocks can best be explained by saying that they allow you to add extra methods to the template, just as if the template were a C# class. In fact, it allows any valid .NET class members to be added to the template, such as fields, properties, or even nested classes.
<#+
#region Helper methods for code generation
private static string FieldTypeToType (FieldType modelType)
{
...
}
#endregion
#>
Devika saves the template and sets the “Custom Tool” property on the template file to be “TextTemplatingFileGenerator.”
This custom tool is provided with the DSL Tools and instructs Visual Studio to process the template file using the text templating engine, adding the template output as a subordinate file nested under the template itself.
Devika then picks “Run Custom Tool” from the context menu on the template and observes the results. A new node appears in the solution explorer underneath the template containing the template output.
Looking at the code, Devika realizes she can generate more than a simple derived class with fields and properties. She needs a custom constructor and a version of the Save() method that actually updates the database with her custom fields. She also wants to allow custom fields that have their AlwaysRequired flag set to False to be represented by C# 2.0 nullable2 values so there is always a value available to represent “unspecified.” She updates her template to be as follows:
<#@ template inherits="Microsoft.VisualStudio.TextTemplating.VSHost.
ModelingTextTransformation" debug="true"#>
<#@ output extension=".cs" #>
<#@ IssueProject processor="IssueProjectDirectiveProcessor"
requires="fileName='Ch8.1.issueproj'" #>
using System;
using System.Collections.Generic;
using System.Text;
<#
foreach (Project project in this.IssueProjectModel.Projects)
{
#>
namespace <#= project.CodeGenNamespace #>
{
public class <#= project.Name #>Issue :
ASPNET.StarterKit.IssueTracker.BusinessLogicLayer.Issue
{
<#
// Generate member fields for custom fields
foreach ( IssueField customField in project.CustomFields )
{
#>
private <#= GetFieldType(customField) #>
_<#=customField.Name.ToLower() #>;
<#
}
#>
<#
// Generate Properties for custom fields
foreach ( IssueField customField in project.CustomFields )
{
#>
public <#= GetFieldType(customField) #> <#= customField.Name #>
{
get { return _<#= customField.Name.ToLower() #>; }
set { _<#= customField.Name.ToLower() #> = value; }
}
<#
}
#>
public new bool Save()
{
// Save the standard Issue part
base.Save();
// Save the custom fields for the issue.
CustomFieldCollection fields =
CustomField.GetCustomFieldsByProjectId(ProjectId);
foreach (CustomField field in fields)
{
<#
foreach ( IssueField customField in project.CustomFields )
{
#>
if (StringComparer.Ordinal.Compare(field.Name,
"<#= customField.Name #>") == 0)
{
<#
if (!customField.AlwaysRequired ||
customField.Type == FieldType.String)
{
#>
if (this.<#= customField.Name #> != null)
{
<#
this.PushIndent(" ");
}
#>
field.Value = this.<#= customField.Name #>;
continue;
}
<#
if (!customField.AlwaysRequired ||
customField.Type == FieldType.String)
{
this.PopIndent();
#>
}
<#
}
}
#>
}
CustomField.SaveCustomFieldValues(this.Id, fields);
}
public <#= project.Name #>Issue( int id,
int projectId,
string title,
int categoryId,
int milestoneId,
int priorityId,
int statusId,
int assignedId,
int ownerId,
string creatorUsername<#
// Add extra parameters
foreach ( IssueField customField in project.CustomFields )
{
#>,
<#= FieldTypeToType(customField.Type) #>
<#= customField.Name.ToLower() #><#
}
#>
)
: base(id, projectId, title, categoryId, milestoneId,
priorityId, statusId, assignedId, ownerId, creatorUsername)
{
<#
// Populate member fields
foreach ( IssueField customField in project.CustomFields )
{
#>
_<#= customField.Name.ToLower() #> =
<#= customField.Name.ToLower() #>;
<#
}
#>
}
<#
// Close the class and namespace
#>
}
}
<#
}
#>
<#+
#region Helper methods for code generation
private static string FieldTypeToType (FieldType modelType)
{
switch (modelType)
{
case FieldType.Boolean : return "bool";
case FieldType.String: return "string";
case FieldType.Float: return "float";
case FieldType.Double: return "double";
case FieldType.Int32: return "int";
case FieldType.Int16: return "short";
default: return "string";
}
}
private static string GetFieldType(IssueField field)
{
return FieldTypeToType(field.Type) +
((field.AlwaysRequired ||
field.Type == FieldType.String) ? string.Empty : "?");
}
#endregion
#>
Note: We’ve again taken the liberty of omitting database transaction code for the sake of brevity.
Devika now has a template that adds a custom constructor and Save() method to her specialized Issue class. She regenerates the template output once more with the Health model and inspects the code. Here’s the output:
using System;
using System.Collections.Generic;
using System.Text;
namespace Healthcare.IssueTracker.BusinessLogicLayer
{
public class HealthcareProjectIssue :
ASPNET.StarterKit.IssueTracker.BusinessLogicLayer.Issue
{
private bool _clinicalsignoffrequired;
private bool? _clinicalsignoffreceived;
public bool ClinicalSignoffRequired
{
get { return _clinicalsignoffrequired; }
set { _clinicalsignoffrequired = value; }
}
public bool? ClinicalSignoffReceived
{
get { return _clinicalsignoffreceived; }
set { _clinicalsignoffreceived = value; }
}
public new bool Save()
{
// Save the standard Issue part
base.Save();
// Save the custom fields for the issue.
CustomFieldCollection fields =
CustomField.GetCustomFieldsByProjectId(ProjectId);
foreach (CustomField field in fields)
{
if (StringComparer.Ordinal.Compare(field.Name,
"ClinicalSignoffRequired") == 0)
{
field.Value = this.ClinicalSignoffRequired;
continue;
}
if (StringComparer.Ordinal.Compare(field.Name,
"ClinicalSignoffReceived") == 0)
{
if (this.ClinicalSignoffReceived != null)
{
field.Value = this.ClinicalSignoffReceived;
continue;
}
}
}
CustomField.SaveCustomFieldValues(this.Id, fields);
}
public HealthcareProjectIssue (int id,
int projectId,
string title,
int categoryId,
int milestoneId,
int priorityId,
int statusId,
int assignedId,
int ownerId,
string creatorUsername,
bool clinicalsignoffrequired,
bool clinicalsignoffreceived
)
: base(id, projectId, title, categoryId, milestoneId,
priorityId, statusId, assignedId, ownerId,
creatorUsername)
{
_clinicalsignoffrequired = clinicalsignoffrequired;
_clinicalsignoffreceived = clinicalsignoffreceived;
}
}
}
Note that the optional ClinicalSignoffReceived field is now stored using a Nullable<bool> using the bool? syntax. This has been accomplished by adding a richer utility method for property type creation. Also, in the Save() method, the optional field’s value is only written to the database if it is non-null.
There also is an extra level of indenting here for the optional field’s database transfer. This is accomplished using the PushIndent()/PopIndent() template methods in the case where the extra if statement is generated.
Devika now takes a moment to compare her generated code with the code she’d previously hand-written.
Generation-Specific Model Data
Apart from a few coding standards and commenting issues that she makes a mental note to address later, Devika finds two main functional differences.
• In the hand-written code, the second custom field, Clinical-SignoffReceived, is not a parameter to the constructor. Its initial value is always false because sign-off is never received until an issue has been in existence for some time.
• The first custom field, ClinicalSignoffRequired is initialized to the database in the Save() method even if its value is false, which the database would return as a default in any case. This is creating an unnecessary round-trip to the database in many cases.
Devika decides that the second issue can wait until they have some performance data from the application, because she doesn’t want to optimize prematurely. However, she knows that the first problem is more serious, because it could lead to bugs where developers construct an issue that is instantly signed off and thus misses out an important stage in the client’s workflow. She goes to talk to her architect, Archie, and together they realize that they need to add some code generation-specific data to the IssueProject model to denote whether custom fields should be initialized in constructors. Archie and Devika are discovering a common pattern here. When you want to generate real artifacts that are complete and don’t require amending by humans to be put into production, you often need to add rather detailed model information that is specific to your code generation scenario. In this case, Archie and Devika agree to just add an IsConstructorParameter to the IssueField domain class.
Tip: Consider separating domain data from artifact generation data
There’s a balance to be struck here. If too much code generation-specific information is visible front and center in the model, it can make it harder for domain experts to digest and work with models. At the opposite extreme, a specific, separate code generation model can be created that merely references the “pure” domain model. In the typical case where only one set of artifacts is being generated from a model, we’ve found that a separate model is overkill, although we have sometimes moved code generation data into child domain classes of the ones that hold the “pure” domain model.
Now that Devika has more data to work with, she amends the constructor generation part of her template:
public <#= project.Name #>Issue (int id,
int projectId,
string title,
int categoryId,
int milestoneId,
int priorityId,
int statusId,
int assignedId,
int ownerId,
string creatorUsername<#
// Add extra parameters
foreach ( IssueField customField in project.CustomFields )
{
if (customField.IsConstructorParameter)
{
#>,
<#= FieldTypeToType(customField.Type) #>
<#= customField.Name.ToLower() #><#
}
}
#>
)
: base(id, projectId, title, categoryId, milestoneId,
priorityId, statusId, assignedId,
ownerId, creatorUsername)
{
<#
// Populate member fields
foreach ( IssueField customField in project.CustomFields )
{
if (customField.IsConstructorParameter)
{
#>
_<#= customField.Name.ToLower() #> =
<#= customField.Name.ToLower() #>;
<#
}
else // Is not a constructor parameter, use the default.
{
#>
_<#= customField.Name.ToLower() #> =
<#= customField.InitialValue #>;
<#
}
}
#>
}
Devika flips the IsConstructorParameter property of the Clinical-SignoffReceived IssueField in her Health model, regenerates the template output, and gets code that is functionally identical to her hand-written code.
You can see that Devika’s process of iterating on the template is enabling her to gradually move from a minimal generation experience to a richer, more mature one. In practice, such iterations may also be staged across releases into production of a DSL, gradually adding further parameterization to make using the model more valuable and requiring less extra code to be hand-written.
Starting to Build a Library
To start testing her template code more thoroughly, Devika runs it against a whole batch of IssueProject model files that she and Archie have been working on. She notices that she’s copying and changing her template every time she uses a different model file, which doesn’t seem right to her. She has a look at some of the DSL Tools’ standard templates and sees that they typically use just a short template that simply specifies the model file to be loaded and then use an include directive to pull in the standard part of the template. She reworks her template into two files and checks the standard part into the IssueProject Visual Studio project. Here’s what her header template now looks like:
<#@ issueProjectModel processor="IssueProjectsDirectiveProcessor"
requires="fileName='HealthProject.issueProj'"
provides="IssueProjectModel=IssueProjectModel" #>
<#@ include file="GenCustomIssue.tt" #>
The include directive simply inserts the contents of another template file at the point where it is located in the file. Devika’s included template, “GenCustomIssue.tt,” is simply a copy of her previous template with the issueProjectModel directive removed—everything else is standard, regardless of the model used. It does occur to Devika that if she needs to reuse her FieldTypeToType() method from another template that also deals with custom fields, then she could split the class feature block it lives in into its own include file and gradually start to build up a library of useful functions. All in all, Devika feels she’s done a good day’s work.
In this section, we’ve seen Devika starting from an existing artifact, adding some parameterization, and getting a working template. She then added more control structures to the IssueProject DSL definition and data to drive those structures in order to get a more refined artifact that more closely matched her needs. She ended up generating code that was every bit as clean and usable as hand-written code. Finally, she turned her code into a reusable library piece that could be included in any Visual Studio project using the IssueProject DSL.
Syntax of a Text Template
In the previous example, we watched Devika use several of the features of the text templating system; let’s look at the whole feature set a bit more closely.
Directives
Directives have the following syntax:
<#@ directiveName parameter="Value" parameter2="Value2" #>
Directives provide instructions to the templating engine and come in two flavors, built-in and custom. The built-in directive types are described next.
Template Directive
<#@ template inherits="MyNamespace.MyBaseClass" language="C#"
culture="en-US" debug="false" hostspecific="false" #>
The template directive specifies general transformation options for this text template.
The inherits parameter specifies the base class to use for the class representing the template. The default is Microsoft.VisualStudio.Text Templating.TextTransformation. A custom base class Microsoft.Visual-Studio.TextTemplating.VSHost.ModelingTextTransformation is provided with the DSL Tools that works together with custom directives to make it easy to read in and process model files. Custom base classes must themselves ultimately be derived from Microsoft.VisualStudio.TextTemplating. TextTransformation.
The language parameter specifies which programming language is used in code inside control blocks. The supported languages are "VB" and "C#", where "VB" denotes Visual Basic.NET. The default is "C#". It’s important to note that the language used in control blocks has no impact whatsoever on the language of any code generated by the template. Visual Basic control code can be used to generate C# (or indeed any) output and vice versa.
The culture parameter specifies which .NET culture is used to format the values evaluated from expression control blocks. The standard .NET “xx-XX” specifier must be used, for example, “en-GB” for British English.
The debug parameter allows text templates to be debugged while under development. Under the covers, the code within the control blocks is consolidated into a class that is compiled and executed. The debug parameter places the generated code in a file on disk rather than working wholly in memory. We’ll see more of the execution architecture of the text templating engine later on.
Tip: Debug code can fill up your temp directory
This debug code can be found in the logged-in user’s temporary directory and will not be deleted by the text templating system. When the debug flag is used repeatedly on a large set of templates, the temp directory can quickly fill up with these files; this can slow down some operations in Windows.
The hostspecific parameter causes the template to have a Host property added to it that can be accessed from template control code. This Host property is a reference back to the application hosting the text transformation engine and is used in specialist scenarios where the engine itself is being reused. We’ll look at the architecture of the text transformation system at the end of the chapter. In typical uses of the DSL Tools, this parameter would never be set to true.
Output Directive
<#@ output extension=".cs" encoding="utf-8"#>
The output directive specifies the style of output of the template. Both the file extension (including its “.” prefix) and the character encoding of the output file can be specified. Specifying the character encoding in the output directive will guarantee the encoding of the output over and above any other factors that might otherwise influence it, such as the encoding of processed model files. The default encoding is UTF-16.
Assembly Directive
<#@ assembly name="System.Drawing.dll" #>
The assembly directive allows control code in a template to use classes from another assembly. It is the direct equivalent of adding a reference to an assembly to a Visual Studio project. For example, if you wanted to construct a bitmap on the fly and then emit a base 64 encoded representation of that bitmap into a resource file, then you’d need to add an assembly reference to System.Drawing. The assemblies System.dll and mscorlib.dll are implicitly included by the engine and never need to be specified.
Import Directive
<#@ import namespace="System.Collections.Generic" #>
The import directive allows control code in a template to reference types without fully qualifying their names. It is the direct equivalent of a using statement in C# or an import statement in Visual Basic. This shouldn’t be confused with simply adding using statements to the boilerplate of the template if you happen to be generating C# code, as in our example.
Include Directive
<#@ include file="FileToInclude.tt" #>
The include directive allows a text template to be broken down into multiple files. The content of the included file is inserted into the template exactly at the same point in the template file where the directive is itself located. The search path for include files starts next to the top-level template that is being transformed. From then on, the path depends on the file extension of the template. The registry key HKEY_LOCAL_MACHINESOFTWAREMicrosoftVisualStudio8.0TextTemplatingIncludeFolders <FileExtension> contains a list of text values named Include0 to Include<N> that specify the paths to search when templates are run inside Visual Studio.
Custom Directives
Custom directives are the route for DSL authors to add their own code into the text templating process. They typically add .NET members to the template, often to enable the template code to access external data such as model files. In the DSL Tools, custom directives are usually associated with a particular DSL designer. Their supporting code is called a directive processor, which is created as part of the DSL solution. Directive processors are small code plug-ins that specify a named set of directives that they handle and the parameters that they can process. Here’s an example of a custom directive:
<#@ issueProjectModel processor="IssueProjectsDirectiveProcessor"
requires="fileName='HealthProject.issueProj'"
provides=IssueProjectModel=IssueProjectModel" #>
This custom directive causes the template to load the “HealthProject.issueProj” model file and emits a .NET property into the template called IssueProjectModel that references the root of that model file in memory.
This directive uses a special pattern of syntax called the Requires/Provides pattern. It’s a rather clumsy syntax, but it allows a lot of richness to be packed into a single line directive. Let’s examine this directive piece by piece.
<#@ issueProjectModel processor="IssueProjectsDirectiveProcessor"
The text templating engine finds a directive processor as specified by the processor argument and enquires if it supports the named directive. Directive processors are free to support as many named directives as they choose, and directive names only have to be unique within a particular directive processor. Directive processors are registered with Visual Studio using the registry, and we’ll see more of them later in the chapter.
requires="fileName='HealthProject.issueProjects'"
The requires parameter specifies a list of named sub-parameters that this processor requires to complete its processing, and optionally, their values. The list is semicolon-separated within the double-quotation marks of the whole requires parameter, and sub-parameter values are enclosed by single quotation marks. Here’s a more complex example:
requires="subParam1;subParam2='Value2';subparam3='Value3'"
If, as in the first sub-parameter of this second example, the value of the parameter is not specified, then Visual Studio (or whatever process is hosting the text templating engine) is asked to try to find an appropriate value for the parameter for this specific instance of the directive. Unfortunately, Visual Studio does not currently have a general mechanism for supplying such values, so this facility is of very limited use.
provides="IssueProjectModel=IssueProjectModel"
The provides parameter specifies a list of named sub-parameters that the directive processor will emit as named elements into the template for use by control code. Once again, this is a semicolon-delimited list, but in this case the values of the sub-parameters are not enclosed in single quotes. The sub-parameter names specify default names for elements emitted into the template by the directive processor, and their optional values specify that the template author would like to substitute a different name instead of that default. In fact, the entire provides parameter is entirely optional, because defaults will be used if it is not supplied. However, it is often included in templates purely as documentation to readers of templates about the elements they can expect to find added to the template. In this example, a .NET property named IssueProjectModel is being added to the template. If, instead, the provides parameter had been specified as
provides="IssueProjectModel=Model"
then a property named Model would have been added to the template.
This facility is key in allowing multiple directive processors to be used in the same template that would otherwise cause a clash. This allows templates to be written that combine multiple model files or compare model files to give a representation of difference. Here’s an example of this in practice:
<#@ issueProjectModel processor="IssueProjectsDirectiveProcessor"
requires="fileName='HealthProject.issueProjects'"
provides="IssueProjectModel=Model" #>
<#@ issueProjectModel processor="IssueProjectsDirectiveProcessor"
requires="fileName='HealthSubProject.issueProjects'"
provides="IssueProjectModel=SubModel" #>
These two directives will cause the template to have both a Model and a SubModel property, allowing data from the two to be combined in the template output.
Control Block Types
Apart from directives and boilerplate text that is copied directly to the template output, the remainder of template files consists of control blocks. We saw all three types of control blocks used in our scenario with Devika, but it’s worth pointing out a few extra details.
As a reminder, the three types of control blocks are discussed below.
Standard Control Block
<# ... #>
A standard control block introduces control statements into a template. All of the code inside all of the control blocks in a single template (including the code added to the template with any include directives used) forms the content of a single method added to the template. This means that any variables declared inside standard control blocks must be uniquely named across the entire template. If you’re building up a library of template fragments to be included in other templates, this can lead to surprising errors. One technique that can be used to combat this in library templates is to catenate a standard string (perhaps the name of the template include file) to all variable declarations within each template file to avoid clashes. However, the best way to avoid such clashes is to put most repetitive code either inside class feature control blocks or to create your own template base class derived from ModelingTextTransformation to contain this code.
As well as properties and other members added by custom directive processors, the template has a small set of utility methods provided on its base class, TextTransformation, which can be used in control blocks.
Write() and WriteLine() methods are provided to allow code to be emitted directly to the template output. There are variants of both these methods taking a simple string and a standard .NET format string and params argument array pair. Generally, use of these methods is a poor substitute for using boilerplate text in a template and hinders readability. However, if the template’s control logic is dense with a very small piece of text output needed in the middle of it, then a judicious call to WriteLine() can avoid the visual clutter of toggling in and out of a control block. These methods are also useful for porting across code from legacy code generators.
Error() and Warning() methods are provided so that control logic can flag errors to the template user. There’s a set of indentation management methods which we’ll discuss shortly and finally, the GenerationEnvironment-StringBuilder property allows direct access to the intermediate value of the template output as it is being built.
A key point to note is that the DSL Tools also provide a more specific derived template base class, ModelingTextTransformation, which provides a Store property. This allows access to a single shared modeling store that all model files used within a template are loaded into. Templates that wish to manipulate the models they load, for example, to merge two model files, can start a transaction against this store in the normal way without fear of impacting the models on disk or any models that are currently open in designers.
Class Feature Control Block
<#+ ... #>
A class feature control block adds methods, properties, fields, or nested classes to the template. This is the best way to add reusable pieces of template, because they can be embedded within parameterized methods and thus any local variables they declare won’t clash with other templates; however, it is still advisable to use very explicit method names to avoid clashes. Class feature control blocks must be placed at the end of each template file, and after the first such block is introduced, no further standard control blocks may be used. This restriction allows boilerplate text to be embedded within a method in a class feature block unambiguously, like this:
<#+
public void GenerateEmptyClass(string name)
{
#>
public partial class <#= name #>
{
// Some class content
}
<#+
}
#>
This code allows you to call GenerateEmptyClass from any other control block anytime you want to generate a class. However, the class, as specified, will always be emitted with the same level of indentation in the generated code. If you’re trying to generate an embedded class, for example, this may not be what you want. We’ve found that a best practice is to format generated code exactly as you would format hand-written code, wherever that is possible, because it greatly aids debugging. To help with that, the TextTransformation class provides three methods and a property to manage indentation.
public void PushIndent(string indent);
public string PopIndent();
public void ClearIndent();
public string CurrentIndent { get; }
The class manages a string buffer that every output line is prefixed with. This buffer is managed as a stack, so, for example, successive calls to
PushIndent(" ");
will gradually indent lines further and further to the right using a tab character with PopIndent() doing the opposite.
Expression Control Block
An expression control block simply evaluates the expression it contains and then calls the standard .NET method ToString() on the result. If the type of the result supports a ToString() overload that takes an IFormatProvider interface, then that version is used, supplying the culture of the template as an argument; if not, the vanilla version is used. An instance-based method is used to make this decision, meaning that expression control blocks can’t be used inside static methods declared in a class feature block. Hence it is a good idea to only use instance methods in class feature blocks.
Problems of Large-Scale, Real-World Artifact Generation
Generation from large models using large and complex sets of templates brings with it complexities that need to be managed.
The options available to the DSL author for controlling this complexity depend on what facilities are available in the artifact’s native format for division across multiple files. In the case of C#, the partial keyword can be used to great effect. If such a solution is available, then to avoid creating huge output files, it is usually advisable to run multiple smaller templates against the same model file. A suitable scheme for dividing up these templates must then be found. For example, the DSL Tools themselves use many templates to generate a large number of files. Its templates are divided up functionally, with design surface code separate from domain model code and the latter separate from IDE integration code.
Large models also typically have complex domain models underlying them. These domain models will typically be optimized either for ease of understanding in the model explorer of their designer or for ease of mapping to their visual representation. Neither of these schemes may be ideal for artifact generation. One slight disadvantage of the template scheme is that it is inherently linear in nature. If the model structure is mismatched with the internal structure of artifacts that must be generated, then the control blocks and expression blocks in templates can very often be filled with complex expressions to retrieve the data required from the model.
Tip: Create a data structure optimized for code generation at the beginning of a template
We’ve found that the best mitigation for this problem is to take the trouble to produce a reorganized data structure at the top of a template. This new data structure uses standard .NET collections and structures, and consolidates the job of gathering together and aggregating dispersed data from across the model in a manner optimized for the job of traversing it to produce template output.
Very often this data structure can itself be reused across a range of similar templates. This produces a template organized into a data-gathering phase and an output phase that is then relatively simple because it traverses the pre-prepared data structures with simple expressions.
When output formats for artifacts do not natively support being constructed from multiple files, a two-stage approach can provide another solution. Let’s take the example of the web.config file for our Issue Tracker system. web.config files are simple XML files and don’t support any standard mechanism for inclusion. However, we can create a master text template that stitches together the output of several other templates to produce a consolidated file. Here’s an example of such a master template:
<#@ output extension=".config" #>
<configuration>
<#@include file="AppSettings.config" #>
<#@include file="System.Web.Config" #>
<#@include file="Locations.config" #>
</configuration>
Any of the three included component .config files could be either the generated output of another template or a simple text file. In the case of a simple text file, that part of the file is then free to be manually edited, thus combining manual editing with code generation in the same output file. One further problem remains, however, with this approach—the template transformations must be executed in the correct order to produce the correct output. The DSL Tools V1 do not have a pre-canned solution to this problem, providing only the “Transform All Templates” button inside Visual Studio. When there are only a few files involved that are not often changed, the manual approach of running the templates in the correct order may suffice, but when the problem grows and this becomes unmanageable, a custom solution must be developed. A custom command can be developed as part of a DSL designer that invokes the text templating engine in the correct sequence; we’ll see how to do this shortly.
The master template approach just outlined brings many further file types into the realm of the generable, but it is not suitable for all file types. Where a file is a complex and perhaps unpredictable mixture of manually editable sections and sections that it would be desirable to code generate, then the current version of the text templating engine does not have a clear answer. In those cases, there may be no alternative but building a full parser for the artifact and coupling that to your designer using the Visual Studio SDK in order to be able to watch changes to the artifact and merge generated sections and hand-edited ones. This is not a trivial undertaking, and it may be that using generated code only as a one-shot starting point for manual editing of this kind of file is the best that can be achieved with a practical amount of investment for most projects.
Advanced Customizations
If you find you need to tailor the artifact generation system to your exact needs, there are a variety of customization points available:
• The text templating system can be embedded into other tools outside of Visual Studio that you ship with your DSL using a mechanism called custom hosting.
• Custom data can be imported into a text template for processing using a custom directive processor.
• The text templating system can easily be invoked inside Visual Studio to build a custom orchestration system.
We’ll look at these three extensibility points in turn but first, in order to understand how they fit into the bigger picture, let’s take a tour through the implementation architecture of the text templating system.
Text Templating Architecture
The text templating engine (Microsoft.VisualStudio.TextTemplating. dll) is the heart of the text templating system. It is in charge of processing the contents of a text template and producing appropriate output. The engine is designed to be a passive component existing within a host environment; the host must provide it with the template text and do something with the output that the engine produces. Any other information the engine needs, such as how to find any files that get included into a template, must also be provided to it by the host. This information is provided by way of a callback mechanism implemented by the host, which we’ll see described in detail when we look at custom hosting.
A typical text template execution sequence can be seen in Figure 8-3 and looks like this:
• The host reads in a template file from disk.
• The host instantiates a template engine.
• The host passes the template text to the engine along with a callback pointer to itself.
• The engine parses the template, finding standard and custom directives and control blocks. In this case, the template directive specifies a base class and there is a single custom directive, itemDirective.
• The engine asks the host to load the directive processors for any custom directives it has found. In this case, the Item Directive Processor is loaded.
• The engine produces in memory the code for the skeleton of a Transformation class, derived ultimately from TextTransformation. This template has specified the derived ModelingTextTransformation.
• The engine gives directive processors a chance to contribute code to the Transformation class for both class members and to run in the body of the Initialize() method. The item directive processor has added a single member, model, to store some root MEL of type Model. It has also added code in the Initialize() method to set up that member variable using the LoadModel() method. Note that the filename is hard-coded as a literal in the contributed code because it comes from the item directive’s requires parameter.
• The engine adds the content of class feature blocks as members to the Transformation class, thus appearing to allow methods and properties to be “added to the template.” There are none specified in this template.
• The engine adds boilerplate inside Write statements and the contents of other standard control blocks to the TransformText() method. This template has a simple for loop controlling how often the “Name: ” boilerplate is written.
• The engine compiles the Transformation class into a temporary .NET assembly.
• The engine asks the host to provide an AppDomain in which to run the compiled code.
• The engine instantiates the Transformation class in the new AppDomain and calls the Initialize() and TransformText() methods on it via .NET remoting.3
• The Initialize() method uses code contributed by directive processors to load data specified by the custom directives into the new AppDomain. In this case, the LoadModel() method loads “foo.model” into a store and returns the root element to populate the model member.
• The TransformText() method writes boilerplate text to its output string, interspersed with control code from regular control blocks and the values of expression control blocks. Here the “List of items” header is first written out, followed by the foreach statement from the control block. The loop contains the “Name: ” boilerplate followed by the value obtained by evaluating the expression block item.Name.
• The output string is returned via the engine to the host, which commits the generated output to disk.
Figure 8-3. The implementation architecture of the text templating system

Now we’ll look at how this overall architecture impacts three kinds of customization.
Custom Hosting
The text templating engine is deliberately designed to be hosted in a variety of processes. Clearly, Visual Studio is its natural home, but it takes no dependencies on Visual Studio or indeed the modeling components of the DSL Tools. It achieves this by having no understanding of its outside environment, instead relying on its host to provide it with all of the information it needs to do its job. This allows it to be integrated into other tools in a tool chain that works with your DSL designer, for example, an advanced UI application for configuring how templates are applied to models in a large-scale development scenario. This technique is called custom hosting.
As well as the host that is integrated into Visual Studio, the DSL Tools supply one custom host out of the box, the command-line text templating tool TextTransform.exe, which can be found in the directory <%Program-Files%>Common FilesMicrosoft SharedTextTemplating1.1. This tool allows text template transformation to be easily incorporated into automated scripts and processes such as software build systems. It has options for specifying all of the important configuration information needed to successfully run a text template, such as paths to find included sub-templates, referenced assemblies, and directive processors.
Tip: Use DslTextTransform for transforming .dsl models
Because the set of parameters to TextTransform.exe can be somewhat intimidating, the DSL Tools provide a small wrapper script, DslTextTransform.cmd, to set them up for you. It’s also a good idea to provide a similar script for use with your own DSLs. You can find DslTextTransform.cmd in the <%Program Files%>Visual Studio 2005 SDK 2006.09VisualStudioIntegrationToolsBin directory.
If TextTransform.exe proves insufficient, you can host the template processor in your own application by simply instantiating the class Microsoft.VisualStudio.TextTemplating.Engine and calling its single method:
public string ProcessTemplate(string content,
ITextTemplatingEngineHost host);
As you can see from this method, the template engine really has no notion of the external environment it is living in. It simply takes a text string containing the template contents and processes it to return another text string containing the processed output. It is entirely the responsibility of the host to decide which template files to process, from where, and what to do with the output once received. Of course, it is not possible to process a template without finding out interesting things about the hosting environment, for example, where to retrieve a file that has been included with a <@# include #> directive. The host must also provide this type of information via the ITextTemplatingEngineHost callback interface:
public interface ITextTemplatingEngineHost
{
// Methods
object GetHostOption(string optionName);
bool LoadIncludeText(string requestFileName,
out string content,
out string location);
void LogErrors(CompilerErrorCollection errors);
AppDomain ProvideTemplatingAppDomain(string content);
string ResolveAssemblyReference(string assemblyReference);
Type ResolveDirectiveProcessor(string processorName);
string ResolveParameterValue(string directiveId,
string processorName,
string parameterName);
string ResolvePath(string path);
void SetFileExtension(string extension);
void SetOutputEncoding(Encoding encoding, bool fromOutputDirective);
// Properties
IList<string> StandardAssemblyReferences { get; }
IList<string> StandardImports { get; }
string TemplateFile { get; }
}
This interface provides included files, paths for referenced assemblies, general paths, and the location of assemblies implementing specific directive processors. It also allows the host to provide any arguments for directive processors not already provided inline in the template. It also allows hints in a template on what file extension and file encoding to use for output to be passed out to the host and allows the host to inject standard assembly references and import statements into the processing pipeline. It further allows the host to provide a mechanism for the template processing engine to log errors and warnings it encounters during its processing and to supply values for any standard configuration options that the engine requires.
Most importantly, this interface allows the host to specify the .NET AppDomain that should be used as the execution context for the template transformation class.
.NET is not by nature a scripting or interpretive environment, so to make this process work, the transformation class has to be run through the C# or VB.NET compiler (depending on the language used in the control code). This compilation process produces a standard .NET assembly that must be loaded; then the transformation class can be instantiated and the method called. The AppDomain forms the environment in which to load the generated assembly and run the method. The text templating host that is built into Visual Studio with the DSL Tools chooses to use a separate AppDomain from that used by the rest of Visual Studio in order to provide a measure of isolation of this compiled-on-the-fly code and to allow the AppDomain to be conveniently discarded. Discarding the AppDomain is occasionally necessary, because .NET does not allow the unloading of assemblies before AppDomain termination; consequently, with each new compiled template (and thus new assembly), a small amount of system memory is used up that cannot otherwise be recovered. Any custom text templating host must decide on a strategy for dealing with this gradual accumulation of memory.
The text templating engine provides a helper class AssemblyCache that can be instantiated remotely inside any AppDomains you create to help you monitor how many transformation assemblies are present and how old they are.
Tip: Use the walkthroughs
The DSL Tools documentation has a very comprehensive walkthrough of building your own custom host in the section entitled “Walkthrough: Creating a Custom Text Template Host.”
Custom Directive Processor
Earlier in the chapter, we discussed how the directive processor generated as a standard part of a DSL can be used with a custom directive in a template to read in model files and add .NET properties to the template to access the root of that model file, for example:
<#@ issueProjectModel processor="IssueProjectsDirectiveProcessor"
requires="fileName='HealthProject.issueProjects'"
provides="IssueProjectModel=IssueProjectModel" #>
If you need to process other kinds of data within a template, for example, to combine model data with an XML file that you don’t have a DSL for, you can add further custom directive processors to bring that data into the environment of the template for processing.
As we’ve seen in the architecture section, a text template is converted into a .NET class ultimately derived from the abstract class TextTransformation, called the transformation class. This class is compiled and run in the host-supplied AppDomain via an override of the following methods:
public abstract void Initialize();
public abstract string TransformText();
It is this latter method that returns the string text that forms the output of the processing engine.
Now that we know the mechanism by which templates run in the engine, we can deal with how to load data into them. The canonical behavior for a directive processor is to add a property to the transformation class that transparently allows code in the template to access the data. To realize this, directive processors are given an opportunity to inject code into the transformation class. The principal task when creating a custom directive processor is to decide what this code should be and to parameterize it with the parameters supplied by the custom directive that invokes the directive processor. As discussed, this code may likely be running in a clean AppDomain and so cannot directly rely on the current in-memory data held by the rest of Visual Studio; instead, it must be able to initialize the data from scratch. There are a couple of strategies for achieving this.
• Inject code that contains a call to data-loading code using a parameter such as a filename taken from the custom directive.
• Use the parameters from the custom directive to acquire the data and then serialize it into a blob; inject code that contains the blob and a call to deserialize it.
Either of these strategies can be augmented by various caching techniques or special code to communicate between AppDomains to retrieve data. These techniques are beyond the scope of this book, but in any case, they can only be a backup to the fundamental requirement to be able to load the data in a clean AppDomain.
Again, the DSL Tools documentation is helpful in this area, and the walkthrough “Creating a Custom Directive Processor” explains in detail the process for creating a directive processor that uses the first strategy just mentioned to load an XML file and provide its DOM as a parameter.
It’s worth noting that if you are only concerned with running your templates inside one particular host, you can set the hostSpecific parameter on your <#@template #> directive and acquire a reference in the template’s AppDomain to the instance of the host object in the original AppDomain. This can make data acquisition a little easier. For example, a template that is coupled to the Visual Studio host supplied with the DSL Tools can use this mechanism to acquire the Visual Studio DTE object in the template and thus write templates that interact with the project system and the many other objects available via DTE. Here’s an example:
<#@ template debug="true" hostspecific="true" #>
<#@ output extension=".txt" #>
<#@ assembly name="EnvDTE" #>
<#@ import namespace="EnvDTE" #>
Get the names of the projects in the Debugging solution from Dte
<#
DTE dte = ((IServiceProvider)this.Host).GetService(typeof(DTE))
as DTE;
if (dte != null)
{
foreach (Project project in dte.Solution.Projects)
{
#>
Project: <#= project.Name #>
<#
}
}
#>
The preceding simple template produces the following output when run in a typical DSL Tools Debugging project:
Get the names of the projects in the Debugging solution from Dte
Project: Debugging
Remember that use of this mechanism will couple your templates to a particular host and preclude their use, for example, with the command-line TextTransform.exe tool.
Custom Orchestration
The final area of customization we’ll examine is in many ways the simplest conceptually, but it requires quite a lot of custom code. It’s quite a common scenario to want to invoke a text template to create a file at a different level of granularity than that provided by the DSL Tools in Visual Studio. The default mechanism by which text templating is invoked in the IDE is by setting the “Custom Tool” property in the IDE on a template file to “TextTemplatingFileGenerator” as we saw Devika do earlier in the chapter. This causes the output of the template to be added to the project as a dependent file nested beneath the template file in a 1-1 relationship. This is a very easy way to quickly add templates to a solution and have issues such as source control handled automatically for the new file, but the single template/single generated file restriction can be quite limiting. For example, if you have a class design DSL, it would probably be a best practice to generate one C# class file for each class defined in your model. This can’t be achieved using the default mechanism and requires custom code. This scenario doesn’t require a custom host, because you’d typically run it from inside Visual Studio. You can find a complete worked example of this approach in the project called “GenClass” in the “Chapter 8” folder of the web code download.
In this example, we’re adding a custom menu command to generate one class file for each class in a model, which is based on the standard class design template supplied with the DSL Tools. You could also couple this type of code to the save event on a DSL model using DTE’s event model.
The details of how to set up a custom command are covered in Chapter 10, but the upshot is that when the menu item for the command is selected, a method in the CommandSet class is called. Here’s a very basic implementation of such a method:
internal virtual void OnMenuGenerateClasses(object sender, EventArgs e)
{
DTE dte = this.ServiceProvider.GetService(typeof(DTE)) as DTE;
if (dte == null)
{
throw new InvalidOperationException("Failed to retrieve DTE.");
}
Project project = dte.ActiveDocument.ProjectItem.ContainingProject;
if (project == null)
{
throw new InvalidOperationException("Failed to retrieve project.");
}
ITextTemplating templatingService =
this.ServiceProvider.GetService(typeof(STextTemplating))
as ITextTemplating;
if ( templatingService == null)
{
throw new InvalidOperationException(
"Failed to retrieve Text Templating service.");
}
// Retrieve the text of the template from a resource.
// The template could alternatively be loaded from disk.
string baseTemplate = VSPackage.GenIndividualClass;
if (!string.IsNullOrEmpty(baseTemplate))
{
// If the generated code directory doesn't exist then create it
string genCodeDir = Path.Combine(
Path.GetDirectoryName(project.FullName), "GeneratedCode");
if (!Directory.Exists(genCodeDir))
{
Directory.CreateDirectory(genCodeDir);
}
if (!Directory.Exists(genCodeDir))
{
throw new InvalidOperationException(
"Failed to create generated code directory.");
}
templatingService.BeginErrorSession(); // Avoid duplicate errors
if (this.CurrentDocData != null)
{
foreach (ModelClass eachClass in this.CurrentDocData.Store.
ElementDirectory.FindElements<ModelClass>())
{
// Replace the marker text in the template with the name
// of the class to generate and the model file to load
string specificTemplate = baseTemplate.Replace(
"@@CLASSNAME@@",
eachClass.Name);
specificTemplate = specificTemplate.Replace(
"@@MODELFILE@@",
dte.ActiveDocument.FullName);
string output = templatingService.ProcessTemplate(
"", specificTemplate, null, null);
string filePath = Path.Combine(genCodeDir,
eachClass.Name + ".cs");
using (StreamWriter writer = new StreamWriter(filePath))
{
writer.Write(output);
writer.Flush();
}
// If this is a new file then add it to the project
try
{
project.ProjectItems.AddFromFile(filePath);
}
catch // Ignore add failures
{
}
}
}
templatingService.EndErrorSession(); // Avoid duplicate errors
}
}
First, the services necessary to run the command are set up using Visual Studio’s standard service provider mechanism.
The built-in Visual Studio host exposes a service containing a simple API to call the template engine on demand via the service identifier STextTemplating. Note that the service is immediately cast to its interface when it is returned.
public interface ITextTemplating
{
string ProcessTemplate(string inputFile,
string content,
ITextTemplatingCallback callback,
IVsHierarchy hierarchy);
void BeginErrorSession();
bool EndErrorSession();
}
The ProcessTemplate() method runs the text template provided in its content parameter and returns its output. There are three optional parameters to this method:
• inputFile—Provide the file path of the template to allow it to be shown in error messages generated by processing the template.
• hierarchy—Provide a Visual Studio SDK hierarchy object to cause any referenced assemblies in the template to be resolved using the Visual Studio project system’s standard assembly reference mechanism.
• callback—Provide this to be notified of errors and any file extension or encoding options requested by the template.
Errors and warnings will be raised to the Visual Studio errors window automatically. If you’re going to make multiple calls to the Process-Template() method, you can bracket them with calls to BeginErrorSession() and EndErrorSession(), and any non-unique error messages will be skipped; this is a very handy feature, because errors in repeatedly applied templates tend to lead to a lot of confusing duplicate messages.
In this example, the text for the template is being stored in a .resx resource file and is retrieved using Visual Studio’s strongly typed resource wrapper mechanism. It could equally be stored on disk somewhere under your DSL’s installation directory and loaded as required.
The template being loaded here has the following content:
<#@ template inherits="Microsoft.VisualStudio.TextTemplating.VSHost.
ModelingTextTransformation" debug="true"#>
<#@ output extension=".cs" #>
<#@ GenClass processor="GenClassDirectiveProcessor"
requires="fileName='@@MODELFILE@@';name='@@CLASSNAME@@'" #>
namespace ClassGen.Output
{
public class <#= this.ModelClass.Name #>
<#= this.ModelClass.Superclass != null ?
" : " + this.ModelClass.Superclass.Name :
"" #>
{
#region Members
<#
foreach (ModelAttribute attribute in this.ModelClass.Attributes)
{
#>
private <#= attribute.Type #> <#=attribute.Name #>;
<#
}
#>
#endregion
#region Operations
<#
foreach (ClassOperation operation in this.ModelClass.Operations)
{
#>
public void <#=operation.Name #> (<#= operation.Signature #>)
{
}
<#
}
#>
#endregion
}
}
This is a fairly standard text template that simply writes out a basic skeleton for a C# class making the assumption that it has the reference to the class as a member of the template in its ModelClass property. The item to note is the GenClass custom directive, which has two requires parameters with odd-looking tokens supplied as values.
Going back to the command code, the next actions are to create a directory to generate code into, start an error session to avoid duplicate errors, and loop over each ModelClass found in the model of the current document.
Having got an individual ModelClass, the code then replaces the tokens in a copy of the template text with the filename of the current document and the name of the ModelClass. The templating service is then called to process this individualized template, and the output is written to an appropriate file. Finally, the file is added to the Visual Studio project; in a more complete implementation, the DTE API should be used to ensure that source code control is integrated into this scenario, checking out the file if necessary before generation.
The trick of doing a token replacement on the template text has provided an individual directive specifying a ModelClass by name for each call to the templating service, but one final piece is still needed to connect that up to the ModelClass property on the template.
To achieve this, the custom directive processor in the solution is amended to take an extra requires parameter, “name” and to provide the ModelClass property. The implementation for the extra code contributed by this directive processor simply searches the loaded model for a ModelClass instance whose Name domain property matches the passed-in name parameter and sets the backing store for the property accordingly. Here’s the code that declares the property and its backing store:
protected override void GenerateTransformCode(
string directiveName,
StringBuilder codeBuffer,
CodeDomProvider languageProvider,
IDictionary<string, string> requiresArguments,
IDictionary<string, string> providesArguments)
{
base.GenerateTransformCode(directiveName,
codeBuffer,
languageProvider,
requiresArguments,
providesArguments);
// TODO: This would be better done using CodeDOM in a production
// designer in order to support Visual Basic.
// Add ModelClass property's backing store
codeBuffer.AppendLine("private ModelClass _" +
providesArguments["ModelClass"] + ";");
// Add ModelClass property
codeBuffer.AppendLine("public ModelClass " +
providesArguments["ModelClass"] + "{ get { return _" +
providesArguments["ModelClass"] + " ; } }");
}
Although this isn’t the easiest code to read, you can see that the provides-Arguments dictionary is being used to specify the name of both the property and its backing store. This allows the directive to be used more than once in a single template without name clashes.
Finally, here’s the code that initializes the backing store:
protected override void GeneratePostInitializationCode(
string directiveName,
StringBuilder codeBuffer,
CodeDomProvider languageProvider,
IDictionary<string, string> requiresArguments,
IDictionary<string, string> providesArguments)
{
base.GeneratePostInitializationCode(directiveName,
codeBuffer,
languageProvider,
requiresArguments,
providesArguments);
// Initialize the ModelClass property
codeBuffer.AppendLine(@"foreach (ModelClass eachClass in
this.Store.ElementDirectory.FindElements<ModelClass>())");
codeBuffer.AppendLine(@"{");
codeBuffer.AppendLine(@" if (StringComparer.Ordinal.
Compare(eachClass.Name,
""" + requiresArguments["name"] + @""") == 0)");
codeBuffer.AppendLine(@" {");
codeBuffer.AppendLine(@" this._" +
providesArguments["ModelClass"] +
" = eachClass;");
codeBuffer.AppendLine(@" break;");
codeBuffer.AppendLine(@" }");
codeBuffer.AppendLine(@"}");
}
This code is placed in an override of GeneratePostInitializationCode(), because by this time the store will have been initialized and the model file loaded by the base class.
The requiresArguments dictionary is used to acquire the name parameter that was replaced in the template with the name of the current class being processed. All of the instances of ModelClass in the store are then searched to find one element matching this name, and the field is initialized.
Tip: Use the CodeDOM to emit code in custom directive processors
It’s interesting to note that we’re using one of our other styles of code generation here inside the directive processor customization, namely, simply writing out code as strings using AppendLine() methods. In this case, (which is slightly mind-boggling because it is a piece of code generation used inside the infrastructure of a larger piece of code generation!), the CodeDOM would actually be the best approach, because the amount of code needed is quite small and there is a strong requirement to support C# and Visual Basic so that this processor can be used with templates that use either as their control language.
This example adds the useful facility of writing out one file per class in the model, but it’s also easy to see how this technique could be expanded to support generation of files that have dependencies in their generation order—or perhaps to support scenarios where text templates are constructed on the fly from a selection of common template fragments.
Summary
In this chapter, we saw that textual artifact generation is a key task required in domain-specific development.
We then reviewed approaches to artifact generation—at the level of the relationship between the model and the artifacts as well as at the level of the mechanics of performing the transformation.
We then looked at DSL Tools V1’s template-based, forward-only approach to generation and worked through an example of the incremental templatization process that it enables.
Next, we reviewed the text templating constructs and syntax in detail, looking particularly at the importance of directives and the types of control block.
We reviewed some of the issues raised by working with large models, large sets of templates, and diverse artifact output types.
Finally, we investigated three areas of code customization for the text templating system: custom hosting, custom directive processors, and orchestration, using the simple Visual Studio hosted API to the text templating system.