
Now that you’ve assembled a rough cut of your movie, it’s time to start trimming clips and cutting the movie down to make it tight and enjoyable to watch. The editing techniques in this chapter apply to both video and audio clips, including photos (which were rendered as video clips when you added them to the Timeline) and songs you import from iTunes.

I want to point out that this chapter differs from the rest in this book because I can’t show you how I edit every clip in my movie. Instead, learn about iMovie’s different editing techniques from my examples, so that you can apply them to your own footage. View a rough cut of the scene I used while writing this chapter at www.necoffee.com/imovievqs/ (click the Examples link).
iMovie uses an intuitive editing style Apple calls Direct Trimming, which lets you hide the frames you don’t want to use.

![]() Drag to hide frames, then release the mouse button.
Drag to hide frames, then release the mouse button.

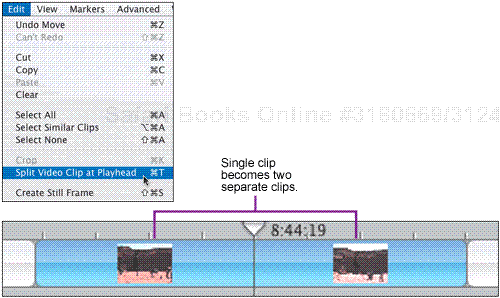
You can also split clips, just as if you were slicing a strip of film with a razor blade. I often split clips when I know I don’t need an entire section, but don’t want to click and drag with Direct Trimming.

![]() Choose Split Video Clip at Playhead from the Edit menu.
Choose Split Video Clip at Playhead from the Edit menu.
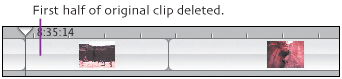
I wanted only the second portion of this clip to appear in my movie, so here I’ve deleted the first segment. I find that splitting clips and deleting segments (or moving them to the Shelf) is often a faster way of trimming my footage.
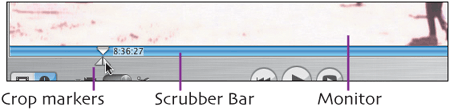
In addition to editing directly in the Timeline, you can use the Monitor’s Scrubber Bar to select a range of frames, then crop or trim the clip. This approach can also be used when editing clips that are still on the Shelf.
![]() Select a clip, position the mouse pointer just below the Scrubber Bar, and click to position the crop markers.
Select a clip, position the mouse pointer just below the Scrubber Bar, and click to position the crop markers.
![]() While still pressing the mouse button, drag the crop markers to select a range of frames.
While still pressing the mouse button, drag the crop markers to select a range of frames.
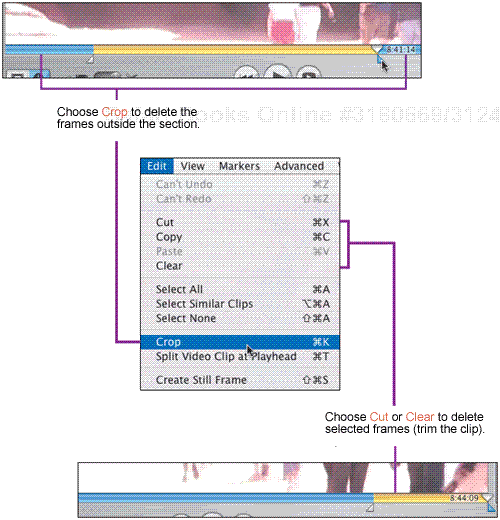
![]() Choose one of the following options from the Edit menu:
Choose one of the following options from the Edit menu:
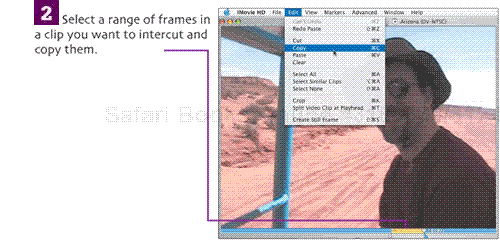
Just like working in a word processor, you can copy and paste frames or entire clips. I use copy and paste when I want to create a new clip out of a selection of frames without breaking up the original clip, in case I want to use the footage somewhere else while I’m editing.
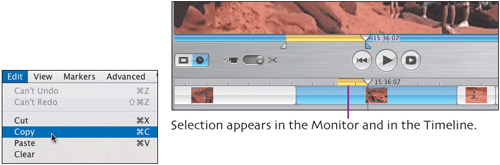
![]() Select a range of frames within a clip and choose Copy from the Edit menu.
Select a range of frames within a clip and choose Copy from the Edit menu.
![]() Choose Paste from the Edit menu.
Choose Paste from the Edit menu.
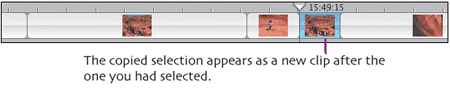
If no clip is selected before pasting, the new clip appears at the Playhead location, even if that’s in the middle of another clip.

Before pasting

After pasting
A common device in movies is to intercut a clip into a scene so that the audio continues to play while the video from a new clip is shown. In iMovie, this is accomplished by pasting a clip over another clip.

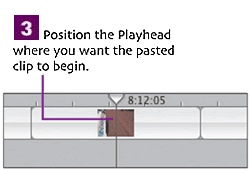
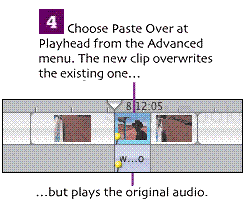

Original clip

Pasted clip
Original clip
In addition to the footage you imported from your camcorder, and photos you imported from iPhoto, iMovie supports blank clips that can be used as placeholders or just a solid screen of black (or a color you choose; see the extra bits on page 45).
You may not need to use blank clips, but I’m covering them here because you’re likely to create one accidentally in the Timeline Viewer: I frequently go to drag the edge of a clip and miss by a few pixels, and accidentally drag the entire clip; I end up with sporadic sections of blank footage in my movie. Here’s how to work with (or delete) them.
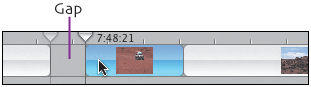
![]() In the Timeline Viewer, drag a clip to the right to expose a gap between clips. During playback, the gap appears as solid black footage.
In the Timeline Viewer, drag a clip to the right to expose a gap between clips. During playback, the gap appears as solid black footage.


![]() Press
Press ![]() and click the gap to bring up the contextual menu, then choose Convert Empty Space to Clip.
and click the gap to bring up the contextual menu, then choose Convert Empty Space to Clip.


You’ve trimmed, split, and cropped a clip to the point where its pieces are strewn all over. Unfortunately, a scene you need is one you had thrown away early in the editing process.
One option is to go digging through the Trash, but it may contain just fragments of your clip that were thrown away. Instead, turn to iMovie’s tool of last resort: the Revert Clip to Original command.
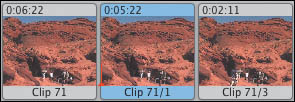
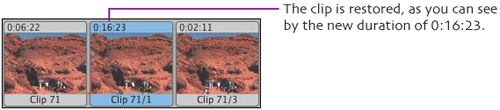
![]() Clip 71 was split into multiple pieces, and Clip 71/2 is missing entirely. Select a clip fragment that you want to restore.
Clip 71 was split into multiple pieces, and Clip 71/2 is missing entirely. Select a clip fragment that you want to restore.
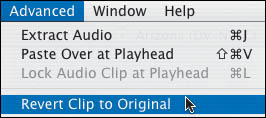
![]() Choose Revert Clip to Original from the Advanced menu.
Choose Revert Clip to Original from the Advanced menu.
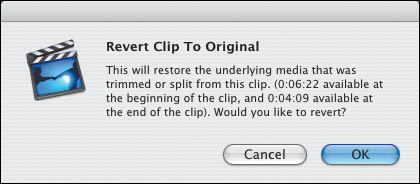
![]() iMovie tells you how the clip will be affected. Click OK.
iMovie tells you how the clip will be affected. Click OK.
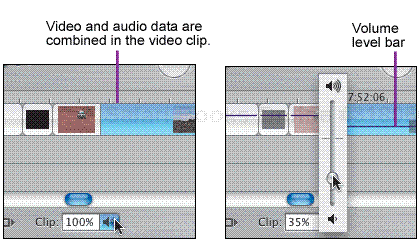
Do you have a clip whose volume is too loud or faint? You can change the volume for the entire clip, or for sections within the clip.
In this case, the clip includes loud road noise. One option is to decrease the volume for the entire clip (right), but I’d rather fade the volume down at the beginning, then bring it back up at the end of the clip (below).
Select a clip, and then drag the Volume slider (or type a number into the field) to change the audio level for the entire clip.
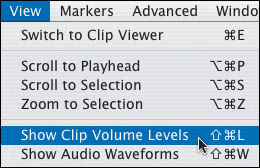
![]() To fine tune the volume in a clip, choose Show Clip Volume Levels from the View menu.
To fine tune the volume in a clip, choose Show Clip Volume Levels from the View menu.
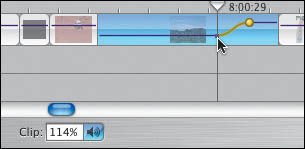
![]() Click a point on the volume level bar to set a volume marker.
Click a point on the volume level bar to set a volume marker.
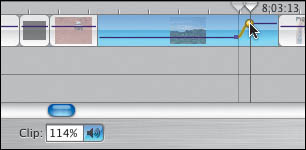
![]() Drag the marker to a new level. The curve here indicates a gradual rise in volume.
Drag the marker to a new level. The curve here indicates a gradual rise in volume.
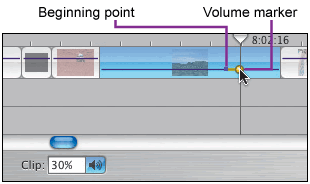
![]() Drag the beginning point left or right to set the time it takes for the volume change to occur.
Drag the beginning point left or right to set the time it takes for the volume change to occur.
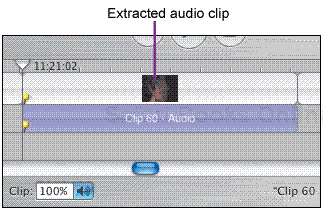
For more control when editing audio, extract a clip’s audio track.
![]() Select a video clip.
Select a video clip.
![]() Choose Extract Audio from the Advanced menu to create a new clip on the upper audio track.
Choose Extract Audio from the Advanced menu to create a new clip on the upper audio track.
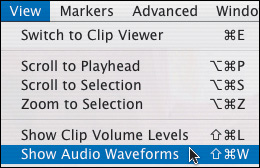
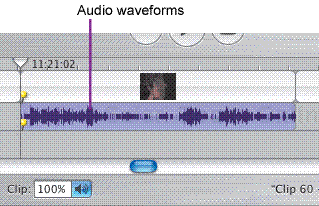
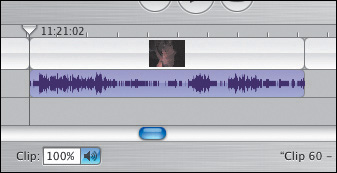
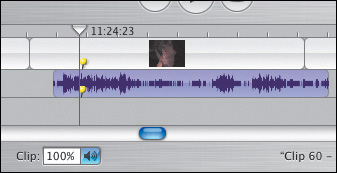
It’s easier to edit audio clips when you can see the audio waveforms. Choose Show Audio Waveforms from the View menu.
The waveforms display the peaks and valleys of the sound levels, letting you easily split a clip just before someone starts speaking. (This approach is also great for isolating loud, unexpected sounds, such as a cough or sneeze in the background, and editing the volume to minimize the noise.)
Extracted audio clips automatically lock to their video clips to keep the audio and video synchronized.
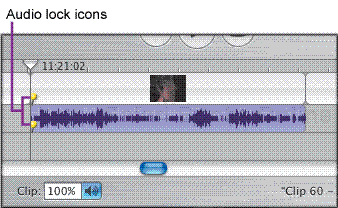
To free the extracted audio, click the audio clip and choose Unlock Audio Clip from the Advanced menu.
Lock icons removed
Now you can move the audio clip independently. This is helpful when you want to add the background noise of one video clip to another clip in order to maintain a consistent audio evironment.

After repositioning the clip, choose Lock Audio Clip at Playhead from the Advanced menu. As you edit other clips in the movie, the audio remains attached to this new position.
One irritating thing about clips edited by Direct Trimming is that sometimes you may want some footage that occurs later in the clip. You could split the clip instead (see page 35), but that doesn’t help you if you’ve already used Direct Trimming. Instead, duplicate the clip by choosing Copy and then Paste from the Edit menu. You can then change the trimming on the duplicate clip to display the other scene.
As you drag the edge of a clip, the Monitor displays the frame that corresponds to the cursor’s location.
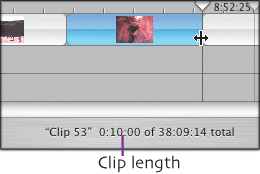
When dragging a clip’s edge, look to the information line below the Timeline to see the clip’s new length. If I know I want a clip to last exactly 10 seconds, for example, that’s where I look; the timecode near the Playhead indicates the time relative to the entire movie.
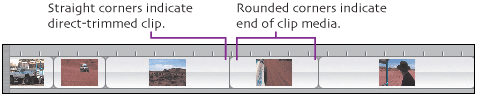
After splitting a clip, each section still contains all of the original footage. Use Direct Trimming to reveal it if you need to.
If no clip is selected and you choose Split Video Clip at Play-head, only the video clip under the Playhead gets split; audio clips not selected remain intact.
Initially, the crop markers appear at the far left edge of the Scrub-ber Bar. Click and drag anywhere under the bar to activate the crop markers; you don’t have to drag them from the left side.
To deselect frames without applying any edit to them, click another clip or click at the top of the Timeline. You can also choose Select None from the Edit menu.
Consider renaming your newly pasted clip, since it will share the original clip’s name.
I mentioned this in Chapter 4, but it’s worth repeating: don’t empty iMovie’s Trash until you’ve finished your project. This ensures that you won’t permanently delete a clip you might need later.
iMovie HD features unlimited undos, which means you can experiment with edits and then go back several steps.
Another way to encourage experimentation is the Save Project As command, located under the File menu. This creates a duplicate of your iMovie project; if you don’t like the direction the duplicate is taking you, simply delete it and return to the original project. Be aware, however, that each saved copy of your iMovie project takes up as much hard drive space as the original.
To remove a volume marker, click it and then press
 .
.You can have as many audio edits as will fit within the clip.
When Show Clip Volume Levels is enabled and you want to select a clip, be sure to click somewhere other than the volume level line to prevent adding an unintended volume marker.
Audio waveforms appear only on audio clips, not on video clips. Sometimes it’s worth extracting the audio to use the waveforms as guides while editing.
Use the Zoom slider to zoom in on a clip in the Timeline Viewer to see more waveform detail. For an even closer look, select the audio clip and press the
 or
or  key to temporarily enlarge or diminish the waveforms.
If you delete an extracted audio clip, the sound isn’t gone forever. The original audio is still embedded in the video track, but it’s set to zero. Select the video clip and increase the volume level. You can then extract the audio again later, if you wish.