
Chapter 12. Extending Calculations
As you’ve seen in the past three chapters, FileMaker’s calculation functions can do everything from text processing to financial analysis. Since calculations show up in so many different places in FileMaker, you might want to use the same calculation more than once. It would be a shame to have to type it in every time—and then make changes in several places the next time you need to modify it. In fact, a creative person like you may need a unique calculation to do something FileMaker, Inc. never thought of.
For these situations and more, FileMaker provides two ways to extend the calculation system. The first, called Custom Functions, lets you design your own calculation functions using the same syntax you use to create a calculation. You can then use these functions in any calculation in the same FileMaker file.
The second way is more complex, and thus more powerful. You (or someone you hire) can create a FileMaker plug-in in a programming language like C++. The plug-in also adds new functions to FileMaker’s Specify Calculation window. The difference is that those functions can do anything a programmer wants them to do.
Note
To create custom functions or plug-ins, you need FileMaker Pro Advanced (a special version of FileMaker that has extra tools for developers). You can find out more here: www.filemaker.com/products/index.html. Once you’ve defined a custom function, though, it can be used in any version of FileMaker. Read on to find out more.
Custom Functions
Often, you need to use a particular calculation more than once. Perhaps you have several tables that hold information about people and you want to write that “Full Address” calculation only once, then use it in each table. Or you might find yourself wondering why FileMaker doesn’t have a function to do some incredibly useful thing. Maybe you frequently need to calculate your custom sprockets’ weight, and FileMaker (for some reason) doesn’t have a MySprocketWeight function. In all these cases, you can define your own functions to get the job done.
Defining a Custom Function
To get started, you add a new function that can calculate the radius of a circle. You may not actually need to calculate radii in your own databases much, but this example illustrates important concepts common to creating any custom function.
Note
If you don’t have the FileMaker Advanced edition, you’ll have to sit these next few exercises out, as explained in the previous Note.
In FileMaker Pro Advanced, choose File → Define → Custom Functions.
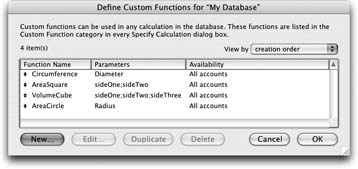
You see the window shown in Figure 12-1. If you’ve never created your own function before, the list is blank, but not for long.
Figure 12-1. The Define Custom Functions window is where you go to create your own functions. It shows a list of custom functions that are already defined. You also get buttons to edit, duplicate, or delete a custom function, or to make a new one. As usual, you can sort the list by making a choice from the ‘View by” pop-up menu. Finally, when you’re all done, click OK to save all your changes, or Cancel to close the window and forget any changes you’ve made.Click the New button.
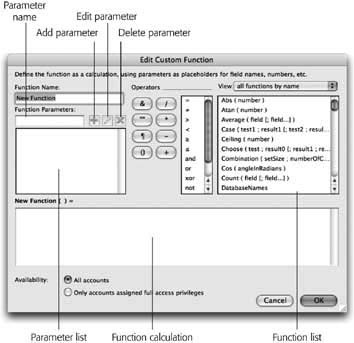
The Edit Custom Function window appears. You can see it in Figure 12-2.
In the Function Name box, type Circumference.
You’ve just given your function a name, which you’ll call upon later when you want to use this function in calculations.
In the Function Parameters box, type diameter.
Most functions need parameters (Section 9.2.4), and this box is where you tell FileMaker which parameters your function needs. If you have more than one parameter, you must enter them one at a time.
Click the Add Parameter button (see Figure 12-2).
FileMaker moves “diameter” into the parameter list. This action means “diameter” is now officially a parameter of the Circumference function.
Figure 12-2. The Edit Custom Fuction window is where you actually define the function. It looks a lot like the Specify Calculation dialog box you’ve seen so much of lately. But instead of fields, it has a list of Function Parameters (it’s empty right now). Aside from this distinction, it also works a lot like the Specify Calculation dialog box.Note
When you add more than one parameter to the parameter list, you can use the arrow icon by each item to move it up or down in the list. The order here is important: It determines the order in which you want the parameters to pass to the function (Section 9.3.1.1).
From the View pop-up menu (above the function list), choose “Trigonometric functions.”
The function list changes to show just the relevant options.
In the function list, double-click the Pi function, then click the * operator button (or type *).
The function calculation area now reads: Pi *.
Finally, in the parameter list, double-click diameter.
FileMaker adds the word diameter to the end of the calculation: Pi * diameter.
When you’re done, click OK, and then OK again to close the Edit Custom Function and Define Functions dialog boxes. The database has a brand new function called Circumference. You can see your handiwork in the Specify Calculation dialog box’s Functions list.
Editing Custom Functions
You probably feel like a pro at the Define Custom Functions window already, since it works a lot like other FileMaker dialog boxes. But even you could end up with a custom function that needs adjustment or repair. To edit an existing custom function, either double-click its name, or select it from the list and click Edit. In the Edit Custom Function window (Figure 12-2), you can modify the definition of a function as follows:
To change its name, just type a new name in the Function Name box.
You can also add new parameters, just like you added the “diameter” parameter in the Circumference function. If you no longer need a function parameter, select it and click the Delete Parameter button.
To change a parameter’s name, you must first select it in the parameter list. When you do, FileMaker puts the parameter in the Parameter Name box, where you can edit it. When you’re done, click the Edit Parameter button to apply your change to the one in the list.
You can also reorder parameters by dragging them up or down in the list.
If you click Duplicate, FileMaker makes an exact copy of the selected function. Finally, if you don’t need a function anymore, select it and click Delete.
Warning
Be careful adding, reordering, or deleting parameters to an existing function. If the function is being used in a calculation somewhere, that calculation breaks because it no longer passes the right parameters back to the function. On the other hand, it’s safe to rename a function or its parameters. FileMaker fixes any existing calculations when you do.
Recursion
As described in the box on Section 12.1.3.1, you can create custom functions that call other custom functions, creating whole strings of mathematical wizardry that perform to your exact specifications. Even more interesting, a custom function can use itself, a technique known as recursion. With recursion, you can create calculations that repeat a process over and over again until they reach a result—called iterative calculations.
Tip
Recursion is a notoriously complicated topic, and many very capable FileMaker developers are stymied by it. Fortunately, recursion is rarely the only solution to a given problem, so you can certainly get by without it. (For example, consider using a script instead.)
Imagine you need a function that removes duplicate lines from a list. For example, if a field contains a list of colors, you want a new list with each unique color name, even if it appears in the original list several times. You can’t do that with a normal calculation, because you just don’t know how many words you need to pull out. A recursive function solves the problem by repeating its work until it takes care of all items (colors).
While the concept of a recursive function is simple, creating one can be tricky. To implement a recursive function, you’re best off tackling the calculation in three distinct steps. First, solve the initial problem; second, call that first formula over and over again (that’s the recursive part); and third, tell the formula how to stop.
Tip
If you’re having trouble getting through the following recursion example on your own, you can download a sample database from the ‘Missing CD” page at www.missingmanuals.com.
Step 1: solve the first case
Rather than think about how to solve the entire problem, just figure out how to deal with the first line in the list. If you have a field called List, for example, and you want to make sure the first line appears only once in the list, you can use this calculation:
LeftValues ( List ; 1 ) & Substitute ( List ; LeftValues(List; 1) ; "" )
Suppose List contains:
Red
|
Green
|
Orange
|
Red
|
Orange
|
Yellow
|
The Substitute part of this expression does the lion’s share of the work, so start with that to figure out how the formula works. The Substitute function sees that “Red” is the first item in List and takes it out of the field everywhere it occurs. If Substitute were the whole shooting match, “Red” would disappear entirely from List. But the “LeftValues ( List; 1) &” piece of the expression also notices that “Red” is the first item in List and it puts “Red” back at the top of the list, then repeats all the other items in List. Here’s the result you’d see if you made a calculation field with the formula above:
Red
|
Green
|
Orange
|
Orange
|
Yellow
|
Now you’re ready to move on to the rest of the function, where you call the same action over and over again, and things start to get interesting.
Step 2: assume your function already works, and use it
You’re ready to take the recursion leap of faith. A recursive function, by definition, calls itself. So at some point, it depends on its own resources to work. But when you’re writing the recursive custom function, it obviously doesn’t work yet. You’ll be at a total impasse if you don’t assume it already works and just get on with writing.
So since you’re writing a new custom function called RemoveDuplicates, write its syntax as if you already have a function called RemoveDuplicates that does what you want. If such a function did exist, you could use it in the above calculation like this:
	LeftValues ( List ; 1 ) & RemoveDuplicates ( Substitute(List;
	LeftValues(List; 1); "") )
This new version removes the first item from the list, then sticks it in front of the result of the RemoveDuplicates function, and then works its way through the list. Think of it this way: You removed duplicates of the first item from the list using the Substitute function, and RemoveDuplicates removed the rest.
So far, so good. Keep going to make sure RemoveDuplicates work for the rest of the calculation.
Step 3: find a stopping point
You now have two of the three critical components of a recursive function: You’re manually doing the first part of the job, and you’re telling recursion to do the rest. If you leave the function like this, though, you’re in trouble. If RemoveDuplicates calls RemoveDuplicates, which in turn calls RemoveDuplicates (ad infinitum), you have a problem. This function just keeps going forever.
Note
When you work on recursive functions, you inevitably create such loops accidentally. When you do, you see FileMaker think for several seconds, then give up and return invalid (a question mark). If FileMaker seems to be hung, give it some time. It gives up eventually.
To avoid ending up in a loop, you need to figure out when to stop calling RemoveDuplicates. Think about what happens after this function calls itself several times. Each time it’s called with a slightly smaller list than the time before (because the first item—along with any copies of it—have been removed). Eventually it’s going to get called with just one item (or zero items). When that happens, you no longer need the services of RemoveDuplicates. Instead, you can just return that last word by itself since it obviously has no duplicates. You use an If function to help the recursion figure out when to stop. The final function looks like this (with comments added):
	// Start the result with the first item in the list
	LeftValues ( List ; 1 ) &

	// If there are more items in List…
	If ( ValueCount(List) > 1;
       // …then remove duplicates from the remaining items
       RemoveDuplicates ( Substitute(List; LeftValues(List; 1); "") );
	   // …otherwise we're done
	   ""
	)
Now, all you have to do is create the RemoveDuplicates custom function shown above. RemoveDuplicates needs one parameter defined, which is a reference to the field from which you’re sifting duplicates. A descriptive name, like “theField,” helps you remember what this parameter does. Finally, create a calculation field using your new custom function and create a reference to the field containing the list of duplicated values.
Note
RemoveDuplicates works great for finding unique values in a list, so long as the last item in the list has a ¶ (paragraph return) following it. You can adjust for lists that don’t have a trailing ¶ by adjusting your calculation field slightly:
RemoveDuplicates ( list & "¶" )
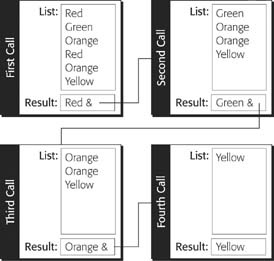
Figure 12-3 illustrates an example of a recursive calculation calling the RemoveDuplicates custom function to remove all duplicate colors it finds on the list. (It takes four iterations to remove all the duplicates and return a unique instance of each item in the list, in the order in which they occur.)
Plug-ins
Some things just can’t be done (or can’t be done well) using calculations and custom functions. When you run into this situation, you may consider looking into plug-ins, which are tiny applications that live inside FileMaker to help it do some specific task that it can’t do on its own.
Many plug-ins focus on doing certain things: process a credit card transaction; create charts; perform certain jobs based on a schedule; or interact with special devices like cameras, barcode readers and so on. Although plug-ins work through calculation functions, scripts, which the next section covers, generally control them.
Some plug-ins, though, are perfect candidates for calculations. Plug-ins can convert, resize, and otherwise modify images in container fields; or perform complex mathematical, scientific, or financial calculations that would be difficult or inefficient in a calculation. Although this book doesn’t cover any specific plug-ins, this section shows you how to access the functions any plug-in you install provides.
Installing Plug-ins
A plug-in comes in a file bearing a special FileMaker Plug-in icon (shown in Figure 12-4). In order to use plug-ins, FileMaker needs to load them (that is, it has to put the plug-in code into its own memory). Every time you launch the program, it searches for plug-ins in a folder called Extensions inside its own folder, and loads all that it finds.

Installing a plug-in is thus a simple matter of making sure it’s in the right folder:
On Windows, it’s typically C: → Program Files → FileMaker → FileMaker Pro 8 → Extensions.
On Mac OS X, it’s usually here. Applications → FileMaker Pro 8 → Extensions.
Note
If you’re using FileMaker Pro Advanced, the FileMaker folder is called FileMaker Pro 8 Advanced, not FileMaker Pro 8.
Once you’ve found the folder, just drag the plug-in file into it and restart FileMaker. You won’t see anything on your screen to let you know it worked. To see which plug-ins FileMaker has actually loaded, you need to visit the application preferences (FileMaker Pro → Preferences on Mac OS X, Edit → Preferences on Windows). In the Preferences window, click the Plug-ins tab, or look to Figure 12-5.
Once you’ve installed plug-ins, you can use their functions from the External functions section of the list in the Specify Calculation dialog box (Section 9.2). For details on how to use these functions, consult their developer’s manuals or Web sites.

Old and New Plug-ins
There are actually two kinds of plug-ins for FileMaker: older FileMaker 4-style plug-ins and newer FileMaker 7/8-style plug-ins. FileMaker 8 works with both types of plug-ins, but it’s a good idea to ask your plug-in provider which type you’re getting, since the FileMaker 4 plug-ins have limited abilities:
The functions provided by FileMaker 4 plug-ins always expect one parameter. Even if the function doesn’t need a parameter, you have to pass “”, which is just an empty parameter. If the function really needs more, consult the documentation that came with the plug-in to find out how to accommodate it.
This single parameter’s type is always text in a FileMaker 4 plug-in’s function. If you want to pass a date, time, timestamp, or number, you have to convert it to text first, using GetAsText.
FileMaker 7/8 plug-ins give you a lot more options. Functions can have as many parameters as their creator cares to give them. They can also deal with all data types, including pictures, movies, and files stored in container fields.
Finding Plug-ins
Most FileMaker developers lack the know-how to build their own plug-ins. Although you can hire a programmer to make one to your specifications, you can often find one on the market that already does what you want. To help you hunt them down, FileMaker, Inc. has a plug-in registry on its Web site. Just visit www.filemaker.com/plugins/index.html to access the site.
You can also visit the more prolific FileMaker plug-in vendors’ Web sites:
24U Software; www.24usoftware.com
New Millennium Communications; www.nmci.com
Troi Automatisering; www.troi.com
Waves in Motion; www.wmotion.com
New vendors come up with great products all the time. Use your favorite search engine or try FileMaker’s Web site for new plug-ins:
| http://www.filemaker.com/plugins/all.html |
Creating Your Own Plug-ins
If you’re feeling adventurous (or have helpful programmer friends), you can create your own plug-ins. To do that, you first need FileMaker Advanced (it’s the only version of FileMaker that includes the Plug-in Software Development Kit or SDK). You also need a C++ development environment. In Windows, you’re best off with Visual C++ or Visual Studio.NET. On Mac OS X, you can use CodeWarrior (www.codewarrior.com) or XCode (included with Mac OS X 10.3). The Plug-in SDK includes sample projects for each of these environments—and sample plug-in code—to get you started.