
Chapter 9. Introduction to Calculations
Fields and layouts form the basis of every database: You can’t have a FileMaker database without them. Using just what you know so far, you can build all kinds of useful systems that store data, from an address list to a catalog of products.
But if you want to do the really useful stuff with your data—total an invoice, analyze trends, compare figures—you need specific tools. For those tasks, FileMaker provides Calculation fields and a whole drawer full of functions that let you examine, compare, and combine field values. And calculations aren’t just limited to number-crunching tasks. You can use them to find out about the computer your database is running on, track who’s logged into the system, monitor their privileges, and then perform logical tests based on what you find. You’ll start by learning how FileMaker handles calculations, and then you’ll see how some common functions can take your database up to a new level of power.
Understanding Calculations
A calculation is a mathematical formula: It shows how different things combine to come up with an answer. But even if you hated algebra class, don’t close the book yet! Instead of the Xs, Ys, and Zs of the math world, FileMaker lets you use your own fields to supply your formula with data—a much more intuitive approach.
FileMaker calculations can also do more than just math. For starters, you can do calculations on time, date, timestamp, container, and text fields, too. (See the box on Section 9.2 for an example.) Way back in Chapter 3, you learned that FileMaker can create calculation fields (Section 3.2.6.5). Calculation fields work just like any other FileMaker field, except that you can’t type data into them. Instead, they use a calculation to determine their own value.
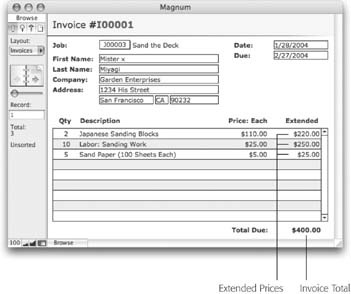
You can use a calculation field just like any other field: Put it on a layout, use it in Find mode, and even use it in other calculation fields. But as a calculation field, its value always stays up-to-date automatically. If the price or quantity changes, the calculation updates the data in your field without your doing anything. Figure 9-1 shows where calculation fields could benefit your invoices layout.
Furthermore, calculations aren’t limited to working inside fields. Once you understand the basic concept of calculations, you gain all kinds of new FileMaker skills. For example, you can use calculations with the Records → Replace Field Contents command (Section 2.3). Instead of replacing the data in every record with the same value, the calculation can produce a unique value for each record. You can start using the Auto-Enter Calculation and Validation Calculation field options, making those features much more powerful. Scripts, as you’ll learn in Part 5, use calculations a lot. And finally, if you’re using FileMaker Advanced, you can use calculations to create custom menus and custom menu commands (Section 19.5.3).
Creating a Calculation
A simple example speaks more loudly than several pages of explanation, so you start off by adding a calculation to an existing number field to the database you built in Chapters 7 and 8. As your database now stands, when you add line items to an invoice, you have to type the quantity, price for each item, and the extended price, as shown in Figure 9-1. But since the extended price is always the price times the quantity, why not let FileMaker handle the repetitive work while you do the creative stuff?
Note
To work through the examples in this chapter, you can download the Customers database from the “Missing CD” page at www.missingmanuals.com.
Here’s how you add a calculation to a number field:
In the Customers database, choose File → Define Database, and make sure you’re on the Fields tab. From the Table pop-up menu, choose Line Items.
That’s the table with your Extended Price field in it.
In the field list, select the Extended Price field. From the Type pop-up menu, choose Calculation; then click Change.
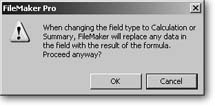
FileMaker warns you that when it converts the field, it changes (read: deletes) any information already in the field. See Figure 9-2.
Figure 9-2. This warning is serious. Your new calculation overwrites existing data. But even if you write a calculation, there’s a way out, so long as you haven’t OK’d the Define Database dialog box. Just click its Cancel button and you’ll get the chance to discard all the changes you’ve made in the dialog box.Click OK.
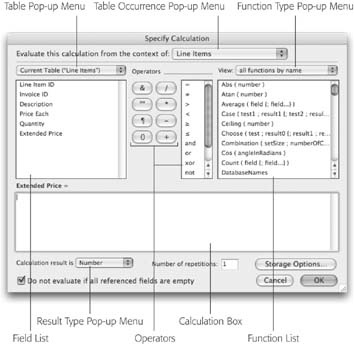
As shown in Figure 9-3, FileMaker asks you what calculation you have in mind.
In the Calculation Box, type Price Each * Quantity .
The calculation box holds the calculation itself. In this case, you’ve just added a brand-new calculation that multiplies the contents of the Price Each by the contents of the Quantity field.
In the Define Database window, click OK, and then OK again.
You’re now back in your database. Switch to the Invoices layout and add a line item. You see that the Extended Price field updates automatically to reflect the proper price.
The Structure of a Calculation
If you accidentally mistyped or misspelled a field name in the example above, you already know that FileMaker is a little picky about how you create a calculation. Clearly, syntax (the order of elements and the punctuation in your calculation) matters. Still, a calculation is really just text, arranged in a specific order. Here you learn the basic parts of a calculation through a couple of examples.
Tip
Calculations are often called calcs for short, or formulas. Although there are some slight differences between a calculation and a formula, people usually use the terms interchangeably. Note: Sometimes, a formula is so useful, or common, that FileMaker defines it as a reusable formula, also known as a function (Section 9.3.1.5).
A calculation can be short and simple:
Pi * Diameter
Or it can be more complicated:
	Case ( Shape = "Circle" ; Pi * (Diameter/2) ^ 2 ;
	Shape = "Rectangle" ; ShapeLength * Width ;
	)
Note
FileMaker won’t let you name a field the same thing as an existing function. The field containing the length of a rectangular object has the unwieldy name “ShapeLength” to avoid confusion with FileMaker’s Length function. The field name “Width” is fine, because there’s no Width function.
In fact, calculations can be really long and complicated if you need them to be—up to 30,000 characters. Practically speaking, the only limit on the complexity of a calculation is your patience for creating it.
Regardless of its complexity, a calculation, or formula, is made up of three different elements: field references, constants, and operators. In the first example, “Pi” is a constant, “*” is an operator, and “Diameter” is the name of a field. The second example uses a function, called a case statement. In that example, “Shape” and “Diameter” are field references, “Circle” and “2” are constants, and “=,” “*,” and “^” are operators.
Field references have values that FileMaker replaces in the formula once it goes to work on your formula. First, all the values are replaced, then the operators tell FileMaker what to do to those values, and finally, FileMaker returns a result in your field.
You’ll see these terms again in the next few chapters. Here are some helpful definitions:
Field References are just what they sound like. They refer FileMaker to data that’s in the field you’re referring to. Since the data inside those fields may change on each record in your database, the values that get replaced in each record are different and may yield a different result.
Constants stay the same each time FileMaker does the calculation. See Section 9.2.2 for details.
Operators tell FileMaker how to treat the values in the calculation. See Section 9.2.2.2 for a listing of operators and what they do.
FileMaker has more than 180 defined Functions that you can use as shortcuts when you create your formulas. You learn about some of the most common functions later in this chapter. Chapter 11 introduces you to more advanced functions, and in Chapter 12 you learn how FileMaker Advanced lets you create your own reusable functions, called Custom Functions.
Each calculation has a Result. This result is, in a sense, the “answer” to the calculation. The result of the first calculation above is the circumference of the circle. The second calculation is a little more complex: Its result is the area of a circle or a rectangle, depending on the value in the Shape field. (Don’t worry if this calculation doesn’t make sense to you. It will before too long.)
The result of a calculation has a type (just like every field has a type). The type can be any of the standard field types—Text, Number, Date, Time, Timestamp, or Container—or a type called Boolean. A Boolean value has only two possible results: yes or no. (Chapter 10 goes into more detail about calculations and data types.)
Note
Sometimes people call a Boolean value “True or False” or “One or Zero” instead. Which term you use doesn’t matter much if you just remember that there is a yes-like value and a no-like value.
Fields
The most exciting thing about calculations is learning all the new things you can do with the fields that hold all your data. But the underlying principle is simple: When you reference a field in a calculation, FileMaker takes the data stored in the field and uses its value when it determines the calculation’s result. For example, if a field has this calculation:
First Name & " " & Last Name
When FileMaker performs (or evaluates) the calculation, it replaces the First Name and Last Name field names with the person’s first and last names from a given record. The field type determines the value’s type: A number field has a number value; a text field has a text value; and so forth.
Note
FileMaker uses the value stored in (not displayed in) a field. So if you have a number field with 3.1415926 as the stored value, and you’ve formatted the field on the layout to display only two decimal places, FileMaker uses all seven digits of the stored value to do its math. If you don’t want it to use all those digits, use the Round function (Section 9.3.1.1).
Constants
As handy as it is to refer FileMaker to a field to find the values in your calculations, you don’t want to have to store everything in fields just to use it in a calculation. When a value is going to be the same for every record, it’s time to call in a constant. You simply include that value right in the calculation.
Number constants
Sales tax is one of the most common constants. If you need to add sales tax to your order, you can just type the percentage right in the calculation, since it’s the same for everybody:
Order Total * 1.0625
You can enter numbers in any of the formats supported by number fields:
37
.65
28.3
6.02E23
Text constants
You can also use a constant to have FileMaker plunk some text in with your results. If you want a text value instead of a number, put it in quotes:
Age & " years old"
Everything within the quote marks is a text constant (some people call it a string as in “string of characters”). Those quote marks are very important (see box “Quotes in Quotes”). Suppose you have a field called First Name, and a calculation like this:
"This is my First Name"
The quote marks enclose the text that is also a field name, so the result of this calculation is always (constantly) “This is my First Name.” FileMaker makes no connection whatsoever between the First Name field and the words “First Name” in the text, because the text is in quote marks.
Forgetting quote marks around a text string, or putting them in the wrong place, can make FileMaker whiny. If you make the following calculation:
"This is" my First Name
FileMaker throws up a warning message that says, “The specified field could not be found,” when you try to click OK to close the Define Database dialog box. The characters “my First Name” are highlighted in your calculation so you can tell exactly which part of the calculation confuses FileMaker. Move your quotes appropriately, and FileMaker stops telling you that it can’t find your field reference. Here’s the correct answer:
"This is my " & First Name
Operators
If a calculation could only contain one thing, it wouldn’t be much good: How often do you want to calculate a field value, number, or text value you already know? The power of calculations comes from their ability to combine different values to come up with a new and interesting value. This situation is where operators come in. An operator takes the values on either side of it (the operands) and does something (operates) with them.
A special symbol or word stands for each operator. This calculation uses the + (addition) operator:
3 + 2
In this case, the + operator is given 3 and 2 as operands. When the calculation evaluates, the operator and its operands combine to produce a single value.
Operators come in three flavors:
Mathematical and logical operators combine two values into one. The + operator is a good example; It takes two number values and adds them together. Its resulting value is the sum of the two numbers.
Comparison operators compare two values. For example, the = operator tells you if two values are exactly the same. This kind of operator always produces a Boolean value.
Parenthesis operators are used to group parts of a calculation together. Remember your 8th grade math teacher carrying on about the “order of operations”? FileMaker remembers too, and it uses those same rules to figure out how to evaluate calculations. If the rules don’t work for you, parentheses let you take more control.
Note
Two buttons in the Operators section of the Specify Calculation window aren’t really operators at all. The ¶ is a special character that tells FileMaker you want a new line in your calculation result and the quote marks are for entering text values, as explained in the box above.
Mathematical operators
The most obvious use for a calculation is to do a little math. Maybe your database of products includes fields for dimensions (Length, Width, and Height) and you want to know the volume. This calculation does the trick:
Length * Width * Height
It consists of three field values and two copies of the * (multiplication) operator. The result is just what you’d get if you used a calculator to multiply the three field values together.
FileMaker includes operators for basic math:
+ for addition
- for subtraction
* for multiplication
/ for division
^ for exponentiation (“to the power of” a value)
The concatenation operator
While the mathematical operators combine numbers, the & (concatenation) operator works with text. It hooks together two text values:
Length & " inches"
If the Length field contains 36, the result of this calculation is 36 inches.
Comparison operators
You often need to compare two values to learn about them. For example, you may need to add an additional shipping charge if the total weight of an order is more than 20 pounds. All comparison operators result in a Boolean value (Section 6.6.1.1).
FileMaker can compare things in several ways:
= tells you if two values are the same.
≠ or <> tells you if the two values are different.
> tells you if the first value is bigger than the second.
< tells you if the second value is bigger than the first.
≥ or >= tells you if the first value is bigger than or equal to the second.
≤ or <= tells you if the second value is bigger than or equal to the first.
Logical operators
The logical operators evaluate values and come up with a Boolean (Yes/No) result (Section 6.6.1.1). Unlike the other operators, most of them are recognizable words.
The and operator tells you if both values are Yes. The calculation below uses the and operator. It evaluates to Yes if the length is more than 3 and the height is more than 5.
Length > 3 and Height > 5
The or operator tells you if either value is Yes. The or calculation below evaluates to Yes if the length is more than 3 or the height is more than 5.
Length > 3 or Height > 5
The xor operator’s function is as offbeat as its name. It stands for exclusive or. The xor operator tells you when only one of your two choices is Yes. Put another way, if you find yourself thinking, “I want one of two things to be true, but not both of them,” then xor saves the day. For instance, you may want to track whether you’ve billed a customer or you’ve marked her character rating below 3. That formula would look like this:
Invoice Sent = Yes xor Character Rating < 3
The last logical operator, not, stands alone: It only works on one value, not two like every other operator. It simply reverses the Boolean value that comes after it. So the calculation below would evaluate to Yes if the length is not more than 3.
Not Length > 3
Note
The comparison and logical operators are usually used with the logical functions. Those are covered in Chapter 10.
The ^ Operator
The last—and probably least used—operator is the exponentiation, or ^ operator. This lets you calculate exponents:
Pi * Radius ^ 2
This calculation uses the exponentiation operator and squares the value in the Radius field.
Parentheses
FileMaker uses standard mathematical rules to decide in what order to evaluate things. The order of evaluation is exponentiation, then multiplication/division, then lastly addition/subtraction. If you need FileMaker to do part of your calculation first, before moving onto any other operators, put it in parentheses. The parentheses tell FileMaker to treat everything between them as a single unit.
In the calculation below, FileMaker multiplies 3 and 2 before adding 4, and gives you a result of 10.
4 + 3 * 2
Even though the + operator comes first in the calculation, FileMaker follows the order of calculation. If you want to add 4 and 3 before multiplying, you need to use parenthesis:
(4 + 3) * 2
Thus, it sees that it needs to multiply 2 by the value of (4+3). You can see the value of parentheses in calculations like the one below, which calculates the interest on the sum of the balance and service charge. Without the parentheses, FileMaker would calculate the interest on only the service charge and then add that to the balance due, with an entirely different result:
(Balance Due + Service Charge) * Interest Rate
Functions
Values, fields, and operators alone make for a pretty powerful combination. But if you stop there, you’ve only scratched the surface. The meat of calculations is found in the Function list (which you saw back in Figure 9-3). A function is simply a predefined formula, and FileMaker’s list covers most common calculation purposes. If you find a function that already does what you want to do—like average all invoices over a specific time period—use it. When you add these tried-and-true formulas to your calculations, you save time and even help prevent errors.
For example, if you didn’t know about functions, you could find your average with a series of fields. First, you’d need to define a calculation field to total all the invoices in your found set. Then you’d need another field to count the invoices in the set and a third one that divides the first field by the second. It would work, but it’d be clumsy and inefficient, since you’ve created at least two fields that you didn’t really need.
Because you often need to find averages, FileMaker gives you a function that handles the math in a given field. All you have to do is tell FileMaker which field you want to average. The function takes care of figuring out the total of the found set and how many records there are. It looks like this:
Average ( Invoice Total )
The word “Average” is the function’s name. “Invoice Total” is a reference to a field. This field reference is called a parameter. Parameters tell the function how to perform its specific calculation. The Average function has only a single parameter, but many functions have two or more.
Parameters are always enclosed in parentheses. (A few functions—most notably, Random—don’t need any parameters, so you leave the parentheses off all together.) When there’s more than one parameter, they’re separated by a semicolon, as in the Date function below:
Date ( Month ; Day ; Year )
FileMaker has more than 180 functions, divided into 16 groups, as described below. Later in this chapter, you learn how to use some of the more common functions. (Functions come into play in Chapters 10 and 12, as well.)
Note
FileMaker has a lengthy help file (Ctrl-? Or ⌘-?) that lists each function and some sample uses. If you want to explore a function that isn’t covered here, open Help, then type in the function’s name.
Text functions
Dozens of text functions let you work with text values. You can compare them; convert them into other types (like numbers); split them up in various ways; count the number of letters, words, or lines; change case; and replace parts of them with new text values. If you’re trying to slice, mix, or examine words, look here first.
Text formatting functions
Text formatting functions let you adjust the font, size, style, and color of all or part of a text value. For instance, you could make the account balance for a customer turn red if it’s over $100.
Number functions
Number functions do everything with numbers—from the mundane (rounding) to the esoteric (combinatorics). In between, you can get rid of the decimal part of a number, calculate logarithms and square roots, convert signs, generate random numbers, and perform modulo arithmetic.
Date functions
Date functions make working with dates a breeze. You can safely create date values without worrying about the computer’s date settings. You can also pick date values apart (for example, get just the month from a date), convert day and month numbers into proper names, and work with weeks and fiscal years.
Time functions
Time functions are few: They create time values from hours, minutes, and seconds, and split times up into the same parts. You use these values most frequently when you’re trying to find out how long something took. For instance, if you bill your services hourly, you can create Start Time and Finish Time fields. Then, in a Duration field, you can subtract Finish Time from Start Time to find out how long you worked on a project.
Timestamp functions
There’s only one Timestamp function: It lets you build a timestamp value from a separate date and a time. If you’re creating your own data, you already know that FileMaker needs both a date and a time for a valid Timestamp field and you’ve planned accordingly. But you may receive data from an outside source in which the date and time aren’t already in a single field. No problem, just use the Timestamp function.
Aggregate functions
Aggregate functions calculate statistics such as average, variance, and standard deviation. They can also count things, sum things, and find minimums and maximums. By definition, aggregate functions gather up multiple values and find results based on the group as a whole. (See the box below for more detail.)
Summary functions
There’s only one Summary function—GetSummary. Its sole purpose is to let you use the value of a summary field (Section 6.9) in your calculations. In the olden days, before FileMaker was the robust relational database it is now, the GetSummary function was the best way to sort and summarize certain kinds of data. Now that FileMaker is relational, you use calculations through table occurrences to do that work, as you saw in the last chapter.
Note
GetSummary is included in FileMaker 8 so that files created in older versions still work. Nowadays, though, GetSummary serves primarily as a way for one FileMaker developer to ridicule another as in, “Get a load of that guy. He thinks he’s a hotshot, but his database is spilling over with GetSummary functions.”
Repeating functions
Repeating functions work with repeating fields, and some of them work with related fields as well (see Part 4). You can make non-repeating fields and repeating fields work together properly in calculations, access specific repeating values, or get the last non-empty value. Since repeating fields have limited uses in these days of related tables within files, so do these functions. However, there are a few valid uses, as you’ll learn in Chapter 11.
Financial functions
Financial functions make the MBAs in the audience feel right at home. Calculate present value, future value, net present value, and payments. Non-MBAs could calculate the cost of competing loans with these functions.
Trigonometric functions
Trigonometric functions, on the other hand, bring back terrible memories from high school math. If you’re making a business-related database, don’t worry; you don’t even have to look at these functions. But engineers and scientists will know what to do with this bunch: sine, cosine, and tangent. They can also convert between radians and degrees. And because everybody has trouble remembering it, you get Pi out to 400 decimal places.
Logical functions
Logical functions are a powerful grouping. These functions can make decisions based on calculated values (if the due date is more than six months ago, double the balance due); functions to evaluate other calculations inside your calculations; functions to figure out if fields are empty or contain invalid data; performance enhancing functions to define and use variables (Section 11.3); and functions to perform lookups inside calculations (Section 11.2.1.3). Chapter 11 is where you learn when and how to use these big dogs of the function world.
Get functions
Get functions pull up information about the computer, user, database, or FileMaker Pro itself. They make up the largest group (70 in all). You can, for example, find out the computer’s screen resolution, the current layout’s name, the computer’s network address, the current user’s name, or the size of any database window. This list just scratches the surface, though. If you’re looking for information about the current state of FileMaker, the computer, or the user, you can probably find it with a Get function.
Design functions
Design functions tell you about your database’s structure. You can get a list of tables, fields, layouts, or value lists; or details about any of these items. You won’t need most of these functions until you become an advanced database designer indeed. But one notable exception is ValueListItems, which gives you a list of the values in a value list, separated by paragraph breaks.
Custom functions
If you have FileMaker Advanced, you can create your very own custom functions and have them show up on the list. Once you have them, you (or anyone you let define fields in your database) can choose them just like the built-in functions. (See Chapter 12 for details on creating and using custom functions.)
External functions
If you’re not using plug-ins or FileMaker Server, your External functions category is empty. If you’ve installed any plug-ins (“mini-programs” that add extra features to FileMaker), they probably brought along some functions for their own use. FileMaker stores them in this category. FileMaker Server also uses plug-ins, ironically to help you update your third-party plug-ins. (External plug-ins are covered on Section 12.2.)
Expressions
Expression is a fancy name for a subsection of a calculation—one or more fields, functions, or constants, each connected with operators. When you made the first calculation in this chapter (Section 9.1.1), you multiplied the contents of the field called Price Each by the contents of the field called Quantity. That’s a calculation, but it’s also an example of an expression.
An expression always reduces to a single value when you combine its individual values according to the operators. If you can’t boil it down to a value, it’s not an expression. That’s an important point, because it means you can use expressions as function parameters (Section 9.3.1.3) just like any individual values—fields and constants. When used in a function, these expressions are called sub-expressions.
Here are some examples of expressions:
The following is a simple expression, which reduces to the value 6.
3 + 3
Below is a more complex expression. It might turn into something like “Miller, Thomas J.”
Last Name & ", " & First Name & " " & Middle Initial & "."
The following calculation is a function and it’s an expression, because it reduces down to a single value.
Average(L1 * W1 * H1 ; L2 * W2 * H2 ; L3 * W3 * H3)
But if you look at just the stuff in parentheses, you have this:
L1 * W1 * H1 ; L2 * W2 * H2 ; L3 * W3 * H3
That’s not an expression because it doesn’t reduce down to one value. It has three expressions in all, each separated by a semicolon. Each expression reduces to a single value—three values in all—which become parameters passed to the Average function.
You can put any valid expression in place of a parameter in a function. In the trade, that’s called nesting expressions. For example, the expression 3 + 3 above could be rewritten like this:
(1 + 1 + 1) + 3
In this case, the sub-expression (1 + 1 + 1) has replaced the original value 3. The whole thing is a new expression, and it contains one sub-expression. This idea comes in particularly handy when you work with functions. Instead of using individual fields or constants in a function, you can pass along whole expressions. You can even nest functions within other functions (Section 11.3.2.2).
Creating a Calculation Field
The invoice line items now calculate their extended prices automatically, because you created a calculation at the beginning of the chapter to handle that. But you still have to add up the extended price of each line item and enter the total amount due on the invoice itself. Another calculation solves this problem.
In the Customers database, choose File → Define → Databases and go to the Fields tab. From the Table pop-up menu, choose Invoices.
The field list shows all the fields in the Invoices table.
Select the Total Due field in the list.
The Field Name, Type, and Comment at the bottom of the window update to show information about this field.
From the Type pop-up menu, choose Calculation, and then click the now highlighted Change button. When FileMaker asks if you’re sure you want to make this change, click OK.
The Specify Calculation dialog box pops up. (See Section 9.2 for details on its many features.)
From the “Evaluate this calculation from the context of” pop-up menu, choose Invoices.
The Invoices table has multiple occurrences on the graph, but Invoices is the one that models your ER diagram. And it’s the one that’s directly attached to the line items you’re totaling up. (See Section 8.3.2 to learn about a context.)
From the View pop-up menu (above the function list), choose Aggregate Functions.
The function list now shows just the functions FileMaker uses to calculate various kinds of totals and averages. You’re looking for the Sum function.
Double-click the “Sum ( field {; field…} )” function in the list.
FileMaker copies the full function example into the calculation box. To save you an extra step, it even selects everything between the parentheses. The next thing you type or click becomes the first parameter to the function.
Tip
Anything within curly braces in a function is optional. In the Sum function above, you could reference several fields that all get summed up into one glorious total. But that doesn’t make sense when you’re trying to summarize line items on an invoice, so you’re just replacing all the highlighted material with a single field reference.
From the pop-up menu above the field list, choose Line items. Then, in the list of line item fields, double-click the Extended Price field.
FileMaker adds this field to the calculation, placing it between the parentheses that surround the parameters to the Sum function. Your calculation should now read:
Sum ( Line Items :: Extended Price )
Tip
If you prefer the keyboard, you can use the Tab key to move from the calculation box to the field list, then the operator list, then the function list. Once you’re in one of these lists, use the up and down arrow keys to select an item (or type the first few letters of the item’s name). Finally, press the Space bar to add the selected item to the calculation box.
From the “Calculation result is” pop-up menu, choose Number .
This calculation is based on number fields and produces a number too.
Click OK.
If you’ve done everything right, the Specify Calculation window disappears.
Your Total Due field should now work perfectly. Since you modified an existing field that’s already on your layout, you don’t need to do anything else. Every layout that shows the Line Items::Extended Price now shows the new calculated value.
Switch to the Invoices layout to try for yourself. As you change the Price Each or Quantity fields on a line item, the Extended Price field changes automatically to reflect the correct total.
The Specify Calculation Dialog Box
As you saw in the steps on the previous pages, whenever you create a new calculation field, FileMaker shows the Specify Calculation window (Figure 9-4). This window is where you tell it what calculation to use. This window is loaded with options, making it seem a bit daunting—but all those buttons are there to help you. FileMaker shows you the table occurrences, fields, operators, and functions, and all you have to do is point and click to build any calculation you have in mind.
Once you learn how this box works, you can write calculations like a pro without memorizing complicated functions and or typing out long field names. The following pages give you a guided tour of each element in the window.

Table occurrence context
This pop-up menu lists every occurrence of the current table—the one you’re adding a field to—on the relationship graph. In the last chapter, you learned that FileMaker sees your entire database from the perspective of one table occurrence at a time. This list is where you tell FileMaker how to view the database when it evaluates this calculation. (If the calculation doesn’t reference any related data, you can skip this menu.)
Field list
Since most calculations include fields, and field names are often long and hard to remember, FileMaker lets you pick field names from a list. The Table pop-up menu shows every table occurrence in the graph. The list below it shows the fields in the selected table occurrence. A calculation can refer to any field in the database: FileMaker follows the appropriate relationships if you use related fields.
If you’ve jumped right in and started making perfect calculations every time, you can skip this bit of arcana. But if FileMaker throws up a warning dialog box every time you try to make a halfway complex calculation, or if the syntax seems fine, but you just aren’t getting the math to work out right, you might have to try thinking like FileMaker thinks. To understand how fields, constants, functions and operators come together to produce a single result, you have to think very logically and in a straight line that inexorably leads to the end of a problem. When FileMaker evaluates a calculation, it looks for something it can do to simplify it-fetch a field value, perform a function, or evaluate an operator.
The calculation shown here has a function (Average), several operators (* and &), a constant (“cubic inches”) and six fields (L1, W1, H1, L2, W2, H2). You might think the Average function is the right place to start, because it comes first. But you quickly realize that you can’t compute the average until you figure out what its parameters are by performing the multiplication. The * operators multiply values on either side to produce a new value-but FileMaker needs to replace these fields with their values before it can do anything else.
In Step #1, FileMaker identifies six fields. Step #2 shows how the calculation looks once FileMaker replaces them with values.
Now the * operators are all surrounded by values, and FileMaker is ready to do some multiplication (Step #3). Step #4 shows the calculation once all the multiplication is finished.
At last the Average function has two parameters (Step #5), which is just what it needs, so FileMaker performs this function and the new calculation looks like Step #6.
There are no more fields to replace and no more functions to perform, but there’s one last operator. The & operator takes two text values and puts them together, but this & operator has a number on one side. FileMaker notices this fact in Step #7 and fixes it in Step #8. Finally, the & operator is evaluated and Step #9 shows the calculation result.
If you apply the concepts outlined here to your problem calculations-find the answer to each step, then plod along to the next one-you can always figure out where your calculation has gone astray.

If you want to put a field in the calculation itself, just double-click its name in the list, and FileMaker does the typing for you. See step 7 on Section 9.3.1 for a prime example of when not to type a long field name.
Note
When you double-click a field from the list of table occurrences, you create what FileMaker calls a “fully-qualified field reference,” which contains the Table name, two colons, and the Field name (Invoices::InvoiceID). Because you might have similar field names in several tables, a fully-qualified name makes sure you reference the right one.
Operators
To help you remember all those operators, FileMaker shows them in the Operators area. Eight buttons represent the most common operators—just click one to insert it. Other operators appear in a scrolling list, which requires a double-click.
Function list
Some functions are so short and sweet that it’s faster to type them than to hunt through this very lengthy list. Or you may come to memorize the functions you use most often. But you can’t beat the Function list for convenience. It shows every function FileMaker understands and all the parameters each function expects, in the right order. (See the box on Section 9.3.1.1 for more detail.)
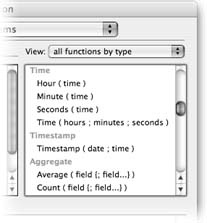
As usual, double-click a function to add it to the calculation. If you don’t fancy an alphabetical list of every function, you can narrow down your choices using the View pop-up menu. You can pick a specific function type and see a list of just those functions. The pop-up menu also includes three special categories. The first, “all functions by type” reorganizes the functions in the list. You can see the effect in Figure 9-5.
Result type
Just as you specify field types when you define fields (Section 3.2.6, you also specify result types for your calculations. You use the Result Type pop-up menu to tell FileMaker what kind of data this field holds. You can easily figure out result type. If you’re using a text calculation, your result is probably going to be text. If it’s a number calculation, the result type is number. Surprisingly though, you can also make calculations that are container types (Section 10.5).
Calculation box
Your calculation itself goes in the Calculation box in the middle of the window (it has the field name above it as a label). You can type right into the calculation box if you’re a codehead, but mere mortals usually use the field list, operators, and function list and let FileMaker assemble their calculations for them. When you’re getting started, you probably mostly point and click, but as you get more familiar with formulas and functions, you start typing more often. Most people end up using a hybrid of typing and clicking to create their calculations.
Repetitions
Like any field, a calculation field can be a repeating field (Section 3.3.4.2). FileMaker provides this option for the rare occasion when you need to calculate repeating fields. Suppose you have a repeating field that holds five quantities, and another with five prices. You can write a calculation that multiplies the two fields, and turn on this box. FileMaker takes care to match all the repetition numbers for you, so the third repetition of the calculation multiplies the third price and the third quantity, for instance. (You’re more likely to have related tables, and use a standard single calculation to do the totals, but the option to calculate on repetitions is there if you need it.)
When you define calculation fields (like the Extended Price and Total Due fields in this chapter), you may notice a longwinded checkbox labeled “Do not evaluate if all referenced fields are empty.” FileMaker always turns this option on when you first specify a calculation. Here’s what it does:
Say you create a new invoice record. It’s completely empty, no line items yet. If the Total Due field’s “Do not evaluate when all referenced fields are empty” checkbox is turned on, that field is also completely blank, as shown here. After all, there are no referenced fields (line items), so FileMaker skips the calculation, as the checkbox says.
To be perfectly accurate, however, the value of total due isn’t a blank oblivion, it’s zero dollars and zero cents, or $0.00. And indeed, if you turn the “Do not evaluate” option off, FileMaker goes through the calculation even when the invoice’s fields are empty. For a newly created invoice, FileMaker shows the correctly formatted Total Due result—$0.00. You’re free to choose whichever result you prefer.
There are other types of calculations where you’d want FileMaker to keep its paws off empty fields, though. Suppose you had a calculation like this:
Height & " inches"
If FileMaker evaluates that calculation and the Height field is empty, the result is " inches,” which is pretty meaningless. In cases where something is worse than nothing, the “Do not evaluate if all referenced fields are empty” option saves you from worry.

Auto-Enter Calculations
Calculation fields are fantastic—they save time and ensure error-free results. But they have one serious limitation: You can’t change their values. Of course you can adjust the calculation itself, but sometimes a field needs the capacity to override its calculated value on a record-by-record basis.
For example, it would be nice if your invoice’s Date Due field automatically showed a date 30 days after the date of the invoice itself. But sometimes you might want to make an invoice due earlier or later, based on special circumstances (like a holiday). If you make the Date Due field a calculation field, you don’t have this flexibility. The solution is to use a normal Date field with an Auto-Enter calculation (see box on Section 9.5).
Like all the Auto-Enter options (Section 3.3), an Auto-Enter calculation automatically fills in a field’s value, but leaves it changeable. You can get all the accuracy and time savings of a calculation field, plus the power to change your mind. Here’s how to put it to use:
Bring up the Define Database window and switch to the now-familiar Fields tab. From the Table pop-up menu, choose Invoices.
The fields from the Invoices table appear.
Select the Date Due field in the list and click Options.
The Field Options dialog box makes an appearance.
On the Auto-Enter tab, turn on the Calculated Value checkbox.
The Specify Calculation window appears. It looks just like it did before, but this time you’re not creating a calculation field. Instead, you’re specifying the calculation used to determine the auto-enter value.
Create the calculation Date + 30 .
You can use any method you want to build this calculation: Click the field and operators, or type them. Notice that the calculation result is set to Date, and there’s no pop-up menu to allow you to change that. Your calculation must resolve to a valid date, or FileMaker will squawk at you.
Click OK three times to dismiss all the dialog boxes.
You return to the database itself.
Now you can create a new invoice and test out your field. When you enter a Date for the invoice, the Date Due field updates instantly with the date 30 days from now. Notice that you can still change the Date Due field if you want.
Validate Data Entry with a Calculation
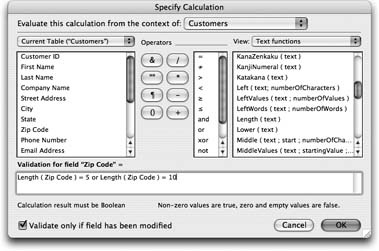
In Chapter 3 you were introduced to several ways to validate data entered into a field. But what if the Validation tab in the Field Options dialog box doesn’t have a checkbox to meet your needs? For example, you might want to use validation on the Zip Code field in the Customers table. A valid Zip Code has either five characters or 10 characters (in other words, it can look like this: 90210, or this: 902101100). The closest validation option you’ll find is “Maximum number of characters”—close, but not right.
This situation is just the kind where the “Validate by calculation” option comes in handy. Your job is to create a calculation with a Boolean result. It should return True when the data is valid, and False otherwise. Here’s how it works:
View the field definitions for the Customers table (In File → Define Database). Select the Zip Code field and click Options.
The Field Options dialog box pops up.
Click the Validation tab, and turn on “Validate by calculation.”
The Specify Calculation window appears, ready for you to enter your validation calculation.
Auto-Enter calculation fields don’t act exactly like other calculation fields. If you change the invoice date, the due date doesn’t update to reflect the change. Instead, it keeps its original value, as in the example on the previous page. That’s normally the way Auto-Enter calculations work: Once the field gets a value, the calculation never changes it. It only acts when the field is empty.
Often, though, you don’t want this behavior. Instead, you want it to change the field value every time any field used in the calculation is changed, just like a normal calculation. You can easily get this modified behavior by turning off the “Do not replace existing value of field (if any)” checkbox in the Field Options dialog box (shown here). When you turn this checkbox is off, FileMaker dutifully updates the field value whenever the calculation evaluates—in other words, when any field it uses changes.
Which option you should choose depends on the situation. For the Date Due field, you probably want to turn this option off. After all, if you’re changing the date of an invoice, it’s reasonable to assume you want to rethink the due date as well.
But suppose you have a database of products, and you use an Auto-Enter calculation to copy the distributor’s product code into your internal product code field. If you then change the internal product code to something unique to you, you probably don’t want it to change again if you switch to a different distributor. In that case, you would leave the “Do not replace existing value (if any)” option turned on, ensuring that once you’ve put in your own special value, it never changes.

From the View pop-up menu, choose “Text functions.”
The function list updates to show just the text functions.
In the function list, double-click “Length (text).”
The function appears in the calculation box. Notice that “text” is already highlighted, ready to be replaced. The Length function returns the length of a text value. You use it here to see how many characters are in the Zip Code field
In the field list, double-click the Zip Code field.
FileMaker puts this field inside the parentheses, where it becomes the parameter to the Length function. Now that you have a function to tell you how long the Zip code is, you need to use the comparison operator to compare it to something.
Click to the right of the closing parenthesis. Then, in the operators list, double-click =.
FileMaker adds the comparison operator (=) to your calculation.
After the = operator, type 5 .
Your calculation compares the length of the Zip code to the value 5. If they’re equal, it returns True. But you also want to accept a Zip code with 10 characters.
In the operator list, double-click or.
The “or” operator is added to the end of the calculation. Remember that this operator connects two Boolean values and returns True if either value is true. Next, you set up the second value.
Double-click the Length function again, then double-click the Zip Code function again, and then double-click the = operator.
This second check should also compare the length to some other value.
In the calculation box, type 10 .
Your calculation is complete. It should look like the one in Figure 9-6.
Click OK, then OK again, and then a third time.
You’re now back in your database and ready to test. Try giving a customer a few different Zip codes and make sure the validation works.
Most validations occur as soon as you leave the field, even if you’re just moving to another field in the record. But some validation types—including most validation calculations—don’t happen until you exit the record.
Tip
If you’re dying to know what determines when your validation occurs, here’s the skinny: If, when validating a field, FileMaker looks at the data only in the field itself, it performs the validation immediately. If it has to look at data in other fields or other records, then it waits until you commit the record before validating.
Replacing Data Using a Calculation
You can use calculations productively with the Records → Replace Field Contents command. This command tells FileMaker to visit every record in the found set, replacing the contents of one field with something new. When you first saw this command in Chapter 2, you entered a single value in every record. Sometimes, though, it’s more useful to have FileMaker use a calculation to figure out what should go in each record.
Tip
Replace Field Contents is a huge time saver, but since it works on a found set of records, you can’t undo it. Improperly used (bad calculation or the wrong found set), it can be destructive. See Section 19.1.1.5 to learn how the Data Viewer in FileMaker Advanced helps you preview the results of a calculation before you make that one-way trip through the Replace Field Contents dialog box.
Imagine you attended the International Private Investigators conference in South Dakota, where you picked up 73 business cards you’d like to add to your database. Rather than type them yourself, you told your 13-year-old nephew you’d give him a gumball for each card he typed in. After the cards are tossed and the gum given, you discover he has an aversion to the Shift key—none of the names are capitalized.
You could go through all the records one by one, fixing the capitalization and regretting the cost of the gumballs. But if you use the Replace Field Contents command, you can do all your records with just one command, using a calculation. You use the Proper function, which capitalizes the first letter of each word it encounters. Here’s how:
From Browse mode, click the First Name field.
The Replace Field Contents command operates on the field you’re in when you run it. So click to start in the correct field first.
Choose Records → Replace Field Contents. In the Replace Field Contents window, select the “Replace with calculated result” radio button.
As soon as you make this choice, your old friend the Specify Calculation window appears.
Choose “Text functions” from the View pop-up menu (above the function list).
The list updates to show only text functions.
Double-click “Proper ( text )” in the function list.
FileMaker inserts the Proper function in the calculation box. Since it has only one parameter, it’s already selected. You just have to tell it what text to perform its magic on.
Double click the First Name field in the field list.
FileMaker inserts First Name as the parameter for the Proper function.
Click OK to close the Specify Calculation dialog box. Then, in the Replace Field Contents window, click Replace.
Notice—and beware—that the Cancel button in this dialog box is automatically highlighted. If you hit Enter too quickly, or accidentally click Cancel, you have to start all over, because the dialog box doesn’t remember your calculation. It’s worth taking an extra second to make sure you’re clicking the appropriate button.
If you have a lot of records, you see a progress dialog box. Normally, though, the replacement happens quickly enough that you don’t even notice.
Comments
Everything you can put in a calculation has some kind of value…unless it’s a comment. Comments are chunks of text whose sole purpose is to help guide you through long calculations. Professional database developers, like all good programmers, provide lots of comments for the benefit of people who might work on the computer code months or years later. Once you’ve a few sets of parentheses or nested function calls, you may have trouble understanding even your own FileMaker calculation when you have to go back and make changes. When it evaluates the calculation, FileMaker ignores all comments completely—it’s as if they weren’t there. (But you’ll be glad they are.)
You can use two different styles for your comments. First, any text that comes after two consecutive slash marks (//) is considered a comment. This kind of comment goes all the way to the end of the line.
	// this is a comment
	3.14 * Diameter // and so is this
A comment is also any text that comes between the symbols /* and */. This symbol pair comes in handy in two places. It saves typing if you need to type a long comment across multiple lines:
	/* this is a comment that runs across multiple
	lines. To make life easier, you can use the second
	comment style */
Also, this comment style lets you add comments within a line:
3 /*sprocket size*/ * 10 /*sprocket count*/ * 57 /*tooth count*/
In addition to comments, you can—and should—use white space to make your calculations easier to read. Calculations don’t have to be strung together in one long line, even though that’s the way FileMaker does it in the Specify Calculation dialog box. Press the Return key or Space bar to add space anywhere, except in a field name, function name, text constant, or number. Comments and white space can make a world of difference. Here’s a long calculation that doesn’t make use of either:
	Let([NewText = ":" & Path & ":"]; Case(Item < 0; Let( [TextLen =
	Length(NewText); Pos = Position(NewText; ":"; TextLen; Item - 1) + 1; Len=
	Position(NewText; ":"; TextLen; Item) - Pos ]; Middle(NewText; Pos; Len));
	Let( [Pos = Position(NewText; ":"; 1; Item) + 1; Len= Position(NewText; ":";
	1; Item + 1) - Pos ]; Middle(NewText; Pos; Len))))
Ten points to the first person who can make sense of that mess. Now here’s the same calculation, written with more care:
	// Parsing is easier if we can be sure we have delimiters
	// on both ends of the text
	Let( [NewText = ":" & Path & ":"];
		Case(
			// If the item number is negative, we count from the end
			Item < 0;
			Let( [TextLen = Length(NewText);
				Pos = Position(NewText; ":"; TextLen; Item - 1) + 1;
				Len= Position(NewText; ":"; TextLen; Item) - Pos ];
				Middle(NewText; Pos; Len)
			);
			// If the item number is positive, we count from the
			// beginning
			Let( [Pos = Position(NewText; ":"; 1; Item) + 1;
				Len= Position(NewText; ":"; 1; Item + 1) - Pos ];
				Middle(NewText; Pos; Len)
			)
		)
	)
It may not be a picnic to run through in your head, but it’s a lot easier to follow than before.