
11. Color Pickers
—Basic scientific fact
I remember my first color computer; it was a Macintosh IIcx and was purchased with the help of my Uncle David. Moving from a Macintosh Plus to a Macintosh IIcx was an incredible experience. Not only did I have a faster computer that was truly expandable (via NuBus slots—remember those), but also I could finally program in color!
So here I am, programming in color, making icons, color tables, simple games, and utilities. The first thing I learned to do programmatically was how to let the user choose the color she wanted for any particular need. The Macintosh OS has had a system color picker since Color QuickDraw, now called the color panel. With OS X, it is better than ever although a bit light on documentation as of this writing.
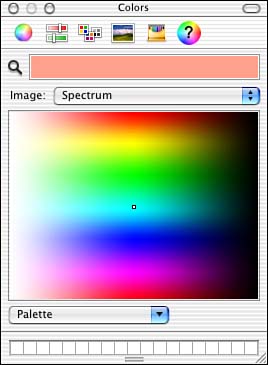
Figure 11.1 shows the system color panel with the Color Wheel color picker selected. To clarify, the color panel is the entire window that manages the individual color pickers. The color wheel is one such color picker—one of many such color pickers.
Figure 11.1. The standard system color panel showing the Color Wheel color picker.
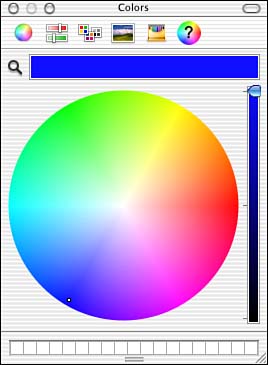
The color panel is usually displayed in relation to a font choice or in a drawing program to choose the color of a paintbrush or other such tool. Once displayed, the color panel displays all available color pickers as icons along the top of its window. Figure 11.1 shows the following color pickers: color wheel, color sliders, color palettes, image palettes, crayons, and MyColorPicker—the one we will examine in this chapter. Custom color pickers live in the /Library/ColorPickers folder, whereas system color pickers (the ones from Apple) usually live in the /System/Library/ColorPickers folder. Color picker names always end in .colorPicker.
An application programmer need not worry about how the user chooses to pick her color in the color panel. The application programmer merely asks the color panel for a color. The user can then move back and forth between color pickers to get just the right color. When all is said and done, the color panel returns the chosen color to the calling application. You can also easily limit the types of color panels that are displayed depending on the types of colors your application supports. For example, you choose to only show color pickers that support RGB or CMYK color modes. Refer to Apple's documentation on using color wells and color panels for more information on using these at the application level.
Let's look at the results of this chapter.
The Result
Figure 11.2 shows MyColorPicker as the current color picker in the color panel. The window behind the color panel is the main window of our test application. This application is a simple Cocoa application that contains a window with a color well. There is no supporting code other than what was supplied by the Cocoa Application project template. The color well, when clicked, automatically displays the color panel, which displays the currently selected color in it. This application provides a quick and easy way to display the color panel during development.
Figure 11.2. The MyColorPicker color picker being used in our test application.
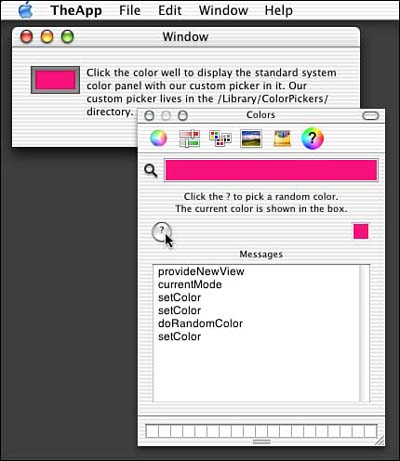
MyColorPicker is very much a test bed color picker. It does not provide any remarkable way to choose a color. What it does do, however, is track the color picker messages that it handles as the user interacts with it. It also provides a way to choose a random color by clicking the ? button and displays it in the small square to the right of the window. The large color box across the top and the magnifying glass tool (just below the color picker icons) are provided by the color panel itself. This is also true for the color wells at the bottom of the window, which are used to store your favorite colors via drag and drop.
Let's look at the project.
The Project
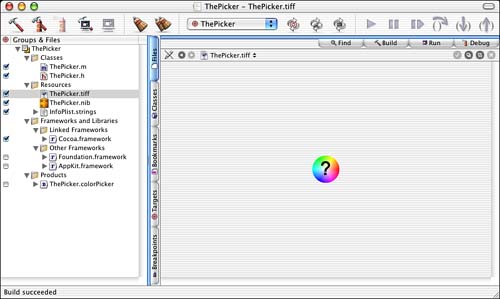
Figure 11.3 shows the MyColorPicker project in Project Builder. The project was started using the Cocoa Bundle template in the New Project Assistant and then edited appropriately. Note that the project has only a few files. ThePicker.m and ThePicker.h contain all the code for the color picker itself. ThePicker.tiff contains the icon used to represent our color picker in the color panel. ThePicker.nib contains the user interface elements that make up our color picker.
Figure 11.3. The MyColorPicker project.
The Project Settings
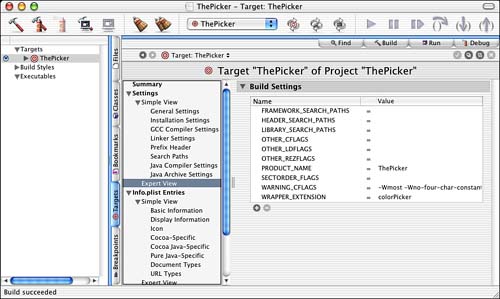
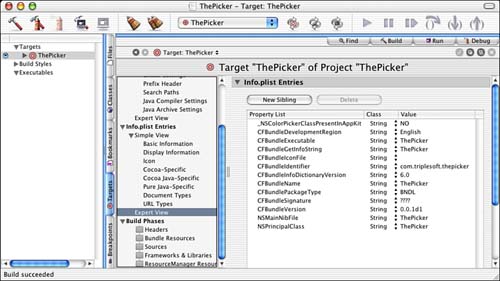
The Target settings in Figure 11.4 are straightforward. Make note that the WRAPPER_EXTENSION is set to colorPicker. All color pickers must end in this suffix to be recognized as such. This is nothing new if you've been following along in previous chapters.
Figure 11.4. The MyColorPicker Target settings.
The InfoPlist entries in Figure 11.5 bring a few new items to the table, however. Note the _NSColorPickerClassPresentInAppKit entry, which is used internally to the color picker implementation. Note also that the NSMainNibFile entry is ThePicker, which refers to ThePicker.nib. The NSPrincipalClass is also ThePicker, which is the name of our NSColorPicker subclass that we will see shortly.
Figure 11.5. The MyColorPicker InfoPlist entries.
The Nib File
The ThePicker.nib file is shown in Figure 11.6 as it appears in Interface Builder. The File's Owner is our ThePicker class and the items in our NSWindow are connected to its IBOutlets accordingly. Although you cannot see it in this picture, the ? button is also connected to an IBAction in ThePicker, -doRandomColor:.
Figure 11.6. The MyColorPicker ThePicker.nib file.
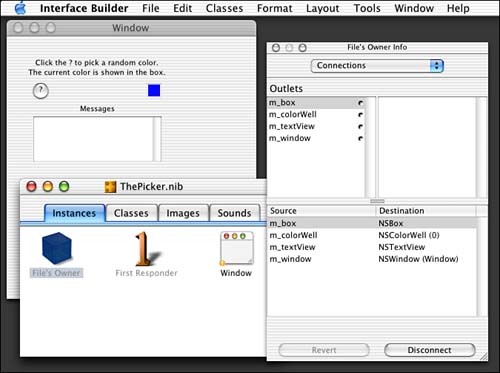
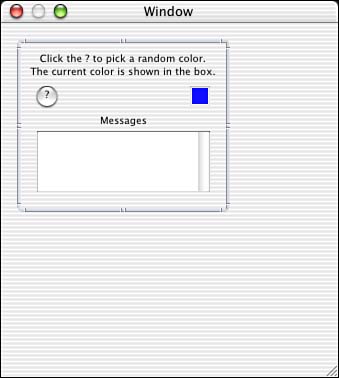
Note that the user interface layout, as shown in Figure 11.7, is straightforward, but there is one key that you need to be aware of. The items in the user interface are encompassed by an NSBox, outlined in the picture. This box allows us to easily refer to a group of items in the user interface in one fell swoop and pass them to the color panel. The NSBox is the parent view of the other items; where the box goes, they go—always as a group. This technique can be used in a variety of programs—wherever groups of controls need to be managed, moved, or swapped in and out. The use of a tabs metaphor works similarly under the hood.
Figure 11.7. The MyColorPicker user interface layout in ThePicker.nib file
Note
You don't have to worry too much about the size of your NSBox and items. The color panel will resize itself to fit whatever items you have in the box.
In fact, there is another way to do this entirely without using NSBox at all.
Interface Builder now allows you to create windowless views, which are great for this type of thing. Simply drag a view (custom or otherwise) into your nib file's main window (as if you were dragging a window), and it will “just work.”
Let's look at the source code.
The Source Code
I will admit it, once MyColorPicker got working, I looked at the pieces and it all seemed to fit together; however, getting to that point was a difficult task. There are practically no examples or good documentation for creating a color picker as of this writing. The only other color picker I found was a shareware program that did not have source code available. Trial and error and a few well-placed emails and postings got this project working.
Listing 11.1 shows the interface for ThePicker. ThePicker is a subclass of NSColorPicker and implements the NSColorPickingCustom protocol. You might recall that a protocol is a way to create methods to be implemented without being related to or dependent on any specific class. NSColorPicker is an abstract super class that implements two such protocols: NSColorPickingDefault and NSColorPickingCustom. The NSColorPickingDefault protocol provides basic, default behavior for a color picker. The NSColorPickingCustom protocol provides custom, implementation-specific behavior. Because NSColorPicker already adopts the NSColorPickingDefault protocol and we are a subclass of NSColorPicker, we only need to additionally adopt the NSColorPickerCustom protocol.
Listing 11.1. ThePicker Interface in ThePicker.h
#import <Cocoa/Cocoa.h>
@interface ThePicker : NSColorPicker <NSColorPickingCustom>
{
IBOutlet NSWindow *m_window;
IBOutlet NSBox *m_box;
IBOutlet NSTextView *m_textView;
IBOutlet NSColorWell *m_colorWell;
NSColor *m_color;
}
-(IBAction)doRandomColor:(id)sender;
-(void)logText:(NSString *)theString;
@end
Note that ThePicker contains some IBOutlets to manage our user interface elements. It also tracks the current color being displayed as an NSColor. There is also an IBAction to handle the clicking of the ? button to create a random color and a -logText: method to allow the tracking of the messages as they pass through.
NSColorPickingDefault
First let's look at the methods that are implemented as part of the NSColorPickingDefault protocol. Note that there are other NSColorPickingDefault protocol methods that we need not worry about in this project. You can find them documented in NSColorPanel.h.
Listing 11.2 shows the -initWithPickerMask:colorPanel: method. This method is called to initialize our picker. It allows us to check the mode in which the color panel is being displayed. If we do not support the mode that the color panel requests, we do not initialize our super class. Also, we are not displayed as a potential color picker in this case. Because we only support RGB mode colors—the most common—we check for that in the mask parameter. The owningColorPanel parameter is the color panel itself. This is stored by the NSColorPicker super class and can be accessed later, as we will do, via NSColorPicker's -colorPanel method. Note that we also initialize the random number seed so that when we choose a random color later on, it truly is random.
Listing 11.2. ThePicker -initWithPickerMask:colorPanel: Method in ThePicker.m
- (id)initWithPickerMask:(int)mask colorPanel:(NSColorPanel *)owningColorPanel
{
if (mask & NSColorPanelRGBModeMask) { // we only support RGB mode
[super initWithPickerMask:mask colorPanel:owningColorPanel];
}
srandom(time(0)); // init random number seed
return self;
}
Listing 11.3, the -provideNewButtonImage method, is called when the color panel needs the image used to represent our color picker to the user. This is the ThePicker.TIFF file shown in Figure 11.3. We simply allocate a new NSImage with the contents of the TIFF file. This method contains many nested references, but essentially—once we get the NSBundle based on our class—we can pull the image resource from it and use that to initialize the NSImage.
Listing 11.3. ThePicker -provideNewButtonImage Method in ThePicker.m
- (NSImage *)provideNewButtonImage
{
return [[NSImage alloc] initWithContentsOfFile:
[[NSBundle bundleForClass:[self class]]
pathForImageResource:@"ThePicker"]];
}
Note
Note that these methods are called before our interface has been created. Given that, there are no calls to the -logText: method that you will see in later code.
NSColorPickingCustom
Now let's look at the methods that are implemented as part of the NSColorPickingCustom protocol. Note that there are other NSColorPickingCustom protocol methods that we need not worry about in this project. You can find them documented in NSColorPanel.h.
The -setColor: method in Listing 11.4 is called whenever the color panel needs to tell our color picker that it needs to display a new color. For example, if the user uses the magnifying glass tool (shown in Figure 11.2) to choose a color from the screen, the color panel will send the -setColor: message to the currently displayed color picker. In our case, we -retain the new color, -release the old, and copy the new to our instance variable. We also set the color of the color well in our user interface (the small square on the right) to the new color. It is up to the color picker to take the new color and display it in whatever way is deemed appropriate for the user interface. For example, a color picker with sliders might set all the slider values to designate the values other red, green, and blue components of the newly chosen color.
Listing 11.4. ThePicker setColor Method in ThePicker.m
- (void)setColor:(NSColor *)color
{
[self logText:@"setColor
"];
[color retain];
[m_color release];
m_color = color;
[m_colorWell setColor:m_color];
}
The -currentMode method in Listing 11.5 is used to report the mode that your color picker operates. This should be a unique value for your color picker. We defined ThePickerMode to be 100 elsewhere in the ThePicker.m file. You need to pick a unique number that is not the same as any of the standard color pickers defined in NSColorPanel.h. There is no way to register your number with Apple as far as I can tell. But it seems that color pickers aren't the most popular items to implement anyway, so you should be safe picking an obscure number. Pick the last three digits of your phone number plus 100 to be safe!
Listing 11.5. ThePicker -currentMode Method in ThePicker.m
- (int)currentMode
{
[self logText:@"currentMode
"];
return ThePickerMode;
}
The -supportsMode: method in Listing 11.6 is a corollary to -currentMode. You should return YES if you support the mode passed in the mode parameter; otherwise return NO.
Listing 11.6. ThePicker –supportsMode: Method in ThePicker.m
- (BOOL)supportsMode:(int)mode
{
[self logText:@"supportsMode
"];
return (mode == ThePickerMode);
}
The -provideNewView: method in Listing 11.7 is an important one. This method returns the NSBox that we discussed earlier in Figure 11.7. Whenever the color panel needs the view to display for a color picker, it calls this method. If this is the first time the method has been called, we attempt to load the nib file and then simply return the m_box instance variable, which will be automatically initialized during the load. Otherwise, we just return the previously initialized m_box.
Listing 11.7. ThePicker –provideNewView: Method in ThePicker.m
- (NSView *)provideNewView:(BOOL)initialRequest
{
if (initialRequest) {
if ([NSBundle loadNibNamed:@"ThePicker" owner:self]) {
[self logText:@"provideNewView
"];
return m_box;
} else {
NSBeep();
NSRunAlertPanel(@"Error", @"Couldn't load nib.",
@"OK", @"", @"");
}
}
return m_box;
}
Note
Learn from my mistake! For whatever reason, call it brain fatigue, I was returning NIL at the end of the -provideNewView: method unless it was the initial request. I couldn't figure out for the life of me why my color picker would not display properly most of the time. Once I realized I needed to always return the view from this method, my problem was solved. It just goes to show you that even simple bugs can be brutal to find.
Stragglers
Let's look at our stragglers. We have a few last methods to examine.
The -doRandomColor: method in Listing 11.8 is called when the user clicks the ? button. The first thing that this method does is create a new NSColor object using the SSRandomFloatBetween inline static function to generate its individual color components. Remember SSRandomFloatBetween from Chapter 10, “Screen Effects”? Remember our initialization of the random number seed in Listing 11.2? We then call the -setColor: method of the color panel returned by the -colorPanel method. Remember that the color panel is saved by our NSColorPicker super class in the -initWithPickerMask: colorPanel: method in Listing 11.2. In turn, our own -setColor: method, in Listing 11.4, is called.
Listing 11.8. ThePicker –doRandomColor: Action Method in ThePicker.m
static __inline__ float SSRandomFloatBetween(float a, float b)
{
return a + (b - a) * ((float)random() / (float) LONG_MAX);
}
-(IBAction)doRandomColor:(id)sender
{
NSColor *theColor;
[self logText:@"doRandomColor
"];
theColor = [NSColor colorWithCalibratedRed:SSRandomFloatBetween(0.0, 1.0)
green:SSRandomFloatBetween(0.0, 1.0)
blue:SSRandomFloatBetween(0.0, 1.0)
alpha:SSRandomFloatBetween(0.0, 1.0)];
[[self colorPanel] setColor:theColor];
}
The -logText: method in Listing 11.9 is a utility method used to display the name of the method being called in the Messages display. It merely accepts an NSString parameter and appends it to the NSTextView instance variable, m_textView.
Listing 11.9. ThePicker –logText: Method in ThePicker.m
-(void)logText:(NSString *)theString
{
// Append the text to the end of the text view and scroll it into view
NSRange theEnd = NSMakeRange([[m_textView string] length], 0);
[m_textView replaceCharactersInRange:theEnd withString:theString];
theEnd.location += [theString length];
[m_textView scrollRangeToVisible:theEnd];
}
I told you that there wasn't much to it once you saw it all together.
Try This
This is a simple color picker; it picks the color by choosing random values for the various color components. Let's see how we can spruce it up a bit.
Store a colorful image in the color picker and display it in the view. If the user clicks on the image, the pixel at the point that is clicked is sampled for the color and that color is made current. Your image can be anything you like. In fact, Figure 11.8 shows how the Image Palettes color picker works.
Figure 11.8. The Image Palettes color picker.
Allow the user to choose a random color that weighs more toward red, green or blue. You can provide a pop-up button to allow the choice of which direction to weigh. You can then simply multiply the value of the chosen component (red, green, or blue) by a specific amount to make the color weigh in that direction. Maybe even allow the user to choose the weighting amount as well.
Conclusion
Well you've done great so far! Color Pickers are a fun type of code to write. You can provide all sorts of different schemes for choosing colors. Think about it and try to come up with the next great color picking mechanism. We have RGB, we have image palettes, and we've got color wheels; what's next? You decide!