
![]() To monitor performance, use NetWare Remote Manager (NoRM). You can also use the legacy server console utility
To monitor performance, use NetWare Remote Manager (NoRM). You can also use the legacy server console utility MONITOR.NLM.
![]() To optimize server performance, use NoRM to change server parameters. You can also use the legacy server console
To optimize server performance, use NoRM to change server parameters. You can also use the legacy server console MONITOR.NLM or set parameters individually using SET commands from the server console.
![]() You can manage a virtual memory swap file using NoRM.
You can manage a virtual memory swap file using NoRM.
![]() To see a history of errors that have occurred with the server, volume, or TTS, use a text editor or
To see a history of errors that have occurred with the server, volume, or TTS, use a text editor or EDIT.NLM to read the error log files: SYS$LOG.ERR, VOL$LOG.ERR, TTS$LOG.ERR, BOOT$LOG.ERR, and ABEND.LOG.
![]() The Logger utility captures server messages to a separate screen on the NetWare server console so that you can read them for diagnostic purposes. You can also dump the buffered Logger data to a file for offline diagnosis.
The Logger utility captures server messages to a separate screen on the NetWare server console so that you can read them for diagnostic purposes. You can also dump the buffered Logger data to a file for offline diagnosis.
![]() OES NetWare includes the NetWare Java Virtual Machine v1.4.2 to run Java applications or applets on a server, including the graphical server interface.
OES NetWare includes the NetWare Java Virtual Machine v1.4.2 to run Java applications or applets on a server, including the graphical server interface.
![]() To use an uninterruptible power supply (UPS) to protect the server from power outages, use
To use an uninterruptible power supply (UPS) to protect the server from power outages, use UPS_AIO.NLM or third-party UPS-management software.
![]() To protect the server and network from virus infections, use virus-scanning software, assign executable files the Execute Only or Read-Only attributes, and warn users against loading files from external sources.
To protect the server and network from virus infections, use virus-scanning software, assign executable files the Execute Only or Read-Only attributes, and warn users against loading files from external sources.
![]() To keep faulty NLMs from corrupting server memory, you can load them in a protected address space using either NoRM or the
To keep faulty NLMs from corrupting server memory, you can load them in a protected address space using either NoRM or the PROTECT load command from the server console.
![]() If you are unsure of a server’s name, you can display it with the
If you are unsure of a server’s name, you can display it with the NAME console utility.
![]() To display the server’s hardware information, use the links in the Manage Hardware section of NoRM. Legacy server console utilities are also available, including
To display the server’s hardware information, use the links in the Manage Hardware section of NoRM. Legacy server console utilities are also available, including CONFIG, CPUCHECK, and LIST DEVICES from the server console.
![]() To determine which version of NetWare is running on a server, look in the header of NoRM. Legacy options for this information include the General, Server Information tab of the Server object in ConsoleOne, and the
To determine which version of NetWare is running on a server, look in the header of NoRM. Legacy options for this information include the General, Server Information tab of the Server object in ConsoleOne, and the VERSION console command.
![]() To view a list of the server’s volumes and the name spaces they support, open the Volumes page in NoRM or use the
To view a list of the server’s volumes and the name spaces they support, open the Volumes page in NoRM or use the VOLUMES console command.
![]() To bring down the server, use the
To bring down the server, use the DOWN console command.
![]() To reboot the server, use the
To reboot the server, use the RESTART SERVER console command.
![]() Keep abreast of current patches and updated modules by checking http://support.novell.com regularly.
Keep abreast of current patches and updated modules by checking http://support.novell.com regularly.
![]() To control the server from a workstation, use Console Screens in NoRM or the RConsoleJ utility in ConsoleOne. More information on RConsoleJ is provided in Chapter 4, “OES Management Tools.”
To control the server from a workstation, use Console Screens in NoRM or the RConsoleJ utility in ConsoleOne. More information on RConsoleJ is provided in Chapter 4, “OES Management Tools.”
![]() To control server startup activities, use the server startup files:
To control server startup activities, use the server startup files: AUTOEXEC.NCF and STARTUP.NCF. (Edit these files by using EDIT.NLM or NWCONFIG.)
![]() To manage workstation connections, open the Connections page in NoRM. You can also use the legacy console utility
To manage workstation connections, open the Connections page in NoRM. You can also use the legacy console utility MONITOR.NLM.
![]() To monitor or modify a server’s time, use the
To monitor or modify a server’s time, use the TIME, SET TIME, and SET TIME ZONE console commands.
![]()
TIMESYNC.NLM manages time synchronization between servers in an eDirectory tree.
![]() To unload or display currently loaded NLMs, open the Modules page in NoRM. You can also use the
To unload or display currently loaded NLMs, open the Modules page in NoRM. You can also use the UNLOAD and MODULES console commands.
![]() To add a new hard disk or replace an existing one, use the Partition Disks screen in NoRM. Alternatively, you can use the NSS Management Utility (
To add a new hard disk or replace an existing one, use the Partition Disks screen in NoRM. Alternatively, you can use the NSS Management Utility (NSSMU.NLM) from the server console.
![]() CD-ROMs will mount as network volumes automatically when they are inserted into the OES NetWare server’s CD-ROM drive.
CD-ROMs will mount as network volumes automatically when they are inserted into the OES NetWare server’s CD-ROM drive.
![]() To list networks, use the
To list networks, use the DISPLAY NETWORKS console command.
![]() To list servers in a given tree, open the Known Servers page in iMonitor. To see all servers that can be contacted via SLP, use
To list servers in a given tree, open the Known Servers page in iMonitor. To see all servers that can be contacted via SLP, use DISPLAY SERVERS.
![]() To configure protocols, choose Configure Internetworking in NoRM, or use
To configure protocols, choose Configure Internetworking in NoRM, or use INETCFG.NLM.
![]() To configure IPX, AppleTalk, and TCP/IP protocols, choose Configure Internetworking in NoRM or use
To configure IPX, AppleTalk, and TCP/IP protocols, choose Configure Internetworking in NoRM or use INETCFG.NLM.
![]() To execute protocol configuration commands made using
To execute protocol configuration commands made using INETCFG.NLM, use the INITIALIZE SYSTEM and REINITIALIZE SYSTEM console utilities.
There are many tasks associated with managing an OES NetWare server—from monitoring performance to adding or changing server hardware, to accounting for customer usage. OES NetWare brings a new management paradigm to many of these standard operations. This chapter presents you with recommended processes for performing server maintenance and management. As you will see, many of these options are now web-based, using oneNet management tool such as NetWare Remote Manager (NoRM). The move is definitely toward remote, clientless management tools that give you all the power of NetWare’s traditional console-based utilities. However, when appropriate, the tried-and-true NetWare methods are provided as well. Specific administrative tasks covered in this chapter include
![]() Monitoring and optimizing server performance
Monitoring and optimizing server performance
![]() Performing regular server maintenance
Performing regular server maintenance
![]() Installing or replacing server hardware, such as hard disks and network boards
Installing or replacing server hardware, such as hard disks and network boards
![]() Working with CD-ROMs as network volumes
Working with CD-ROMs as network volumes
![]() Managing startup files
Managing startup files
![]() Synchronizing time between all the network servers
Synchronizing time between all the network servers
The behavior of an OES NetWare server is configured and managed through the use of console utilities and NetWare Loadable Modules (NLMs). NoRM exposes these tools for use from a remote workstation. Similarly, ConsoleOne provides RConsoleJ to make the server console accessible from any workstation on your LAN/WAN.
Console utilities are used to change or view some aspect of the OES NetWare server. They ship as part of the core operating system. Console commands are accessible either directly from the console or remotely through NoRM or RConsoleJ.
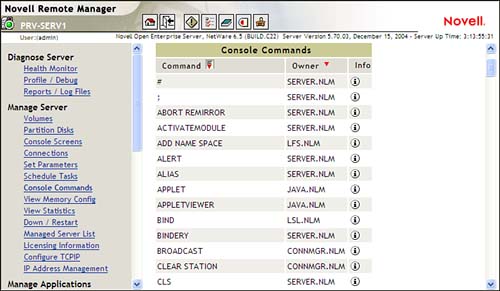
To see a list of all supported console commands, select the Console Commands option in NoRM or type HELP at the server console. Figure 5.1 shows the NoRM Console Commands page. To see a brief description and example of any console command, select the Information link next to the command in NoRM or type HELP at the server console. Appendix C, “OES Console and SET Commands,” contains a comprehensive list of OES NetWare console commands.
A NetWare Loadable Module is at its most basic a program that runs on NetWare. When loaded, an NLM becomes part of the NetWare OS. NLMs can be dynamically loaded and unloaded. Many NLMs are automatically installed and loaded with OES NetWare. Others are optional and can be loaded as needed. Four of the most common types of NLMs are listed in Table 5.1.
Table 5.1. Common Types of Loadable Modules
|
TYPE OF MODULE |
EXTENSION |
DESCRIPTION |
|---|---|---|
|
Loadable Module |
|
Changes or adds functionality to the server. This includes most applications and services that run on the NetWare OS kernel. |
|
Name Space module |
|
Allows the operating system to store Macintosh, Windows 2000/XP, Windows 9x, or NFS files, along with their unique file formats, long filenames, and other characteristics. |
|
LAN driver |
|
Permits NetWare to communicate with a network board installed in the server. |
|
Storage drivers |
|
These drivers are associated with the NetWare Peripheral Architecture (NPA) used to drive specific storage devices and host adapters. The Host Adapter Module (HAM) is used to drive specific host adapter hardware. The Custom Device Module (CDM) is used to communicate with a specific storage device such as a hard disk, which is connected to the host adapter. |
NLMs can open their own status screens on the server console when they are loaded. You can view the status screens that are active on your server by selecting Console Screens from NoRM (see Figure 5.2).
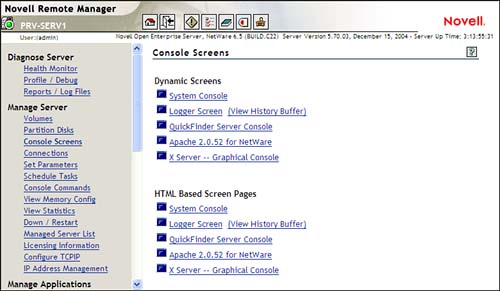
If you are at the server console directly or using an RConsoleJ session, you can toggle through the status screens by using Alt+Esc from the server console. Use Ctrl+Esc to pull up a list of available screens similar to what you can see from NoRM. For more information on RConsoleJ, refer to Chapter 4.
To load an NLM, you can type the name of the NLM on the server console. However, it is often more convenient to use the List Modules link in NoRM. Enter the full name, including path, to the NLM you want to load in the dialog box and click Load Module. Check Display System Console for Module to view the system console while the NLM loads to make sure it loads properly.
Similarly, you can unload NLMs that are not required for the operation of the NetWare operating system by typing UNLOAD < module > at the server console. Using NoRM, you can select an NLM from the list of loaded modules in List Modules and click Unload. This option is not available for kernel-level NLMs such as SERVER.EXE or NSS.NLM.
TIP
NoRM has the capability to define groups of servers and create a custom home page from which those servers can be managed. Select the Configure New Group option in NoRM and you can select the server(s) that you want included as part of a management group. After these groups are created, it’s easy to move from server to server as necessary to perform your administrative tasks.
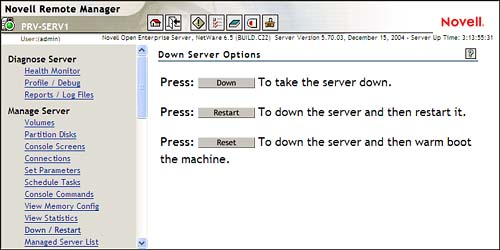
If you need to shut down or restart your OES NetWare server, first notify users so that they have time to save their work and close any files they are using on that server. After this is done, select Down/Restart in the navigation pane in NoRM (see Figure 5.3):
Tip
You can send a broadcast message to all users attached to a server by selecting the Connections link in NoRM. Type your message into the Broadcast Message field and click Send.
![]() Down—This option shuts down the server and returns the server console to a DOS prompt. From the DOS prompt, you can turn off the computer, reboot it, or restart the server. This is equivalent to typing
Down—This option shuts down the server and returns the server console to a DOS prompt. From the DOS prompt, you can turn off the computer, reboot it, or restart the server. This is equivalent to typing DOWN from the server console.
![]() Restart—This option unloads and then automatically reloads the NetWare operating system without returning to DOS first. This command is equivalent to typing
Restart—This option unloads and then automatically reloads the NetWare operating system without returning to DOS first. This command is equivalent to typing RESTART SERVER from the server console.
![]() Reset—This option not only shuts down the server and returns it to DOS, but also performs a reset of the computer hardware (warm reboot). If your server is configured to load automatically on boot up, OES NetWare will automatically reload after the hardware has rebooted. This is equivalent to typing
Reset—This option not only shuts down the server and returns it to DOS, but also performs a reset of the computer hardware (warm reboot). If your server is configured to load automatically on boot up, OES NetWare will automatically reload after the hardware has rebooted. This is equivalent to typing DOWN from the server console and then performing a “three-finger salute” (Ctrl+Alt+Del) to reset the hardware.
OES NetWare includes an updated Java Virtual Machine (JVM) for NetWare, version 1.4.2, which makes it possible for Java-based applications and applets to run better than ever. The JVM is installed automatically during the OES NetWare installation and it is used to support graphical server interface, the Apache Web Server, and Tomcat Servlet container. To load an external Java application on your OES NetWare server, complete the following steps:
1. Copy the application or applet files, typically a .JAR file, to the default Java directory on the server. The default directory is SYS:JAVALIB. This directory is included in the CLASSPATH environment variable, so the server will be able to find the application or applet without users having to specify the path.
2. Specify a runtime compiler for the server to use. This will improve the performance of Java-based applications. OES NetWare ships with the HotSpot runtime compiler.
3. Java is loaded by default when OES NetWare loads. If it has been unloaded for any reason, you can restart Java by loading JAVA.NLM on the server. After JAVA.NLM is loaded, you can view Java information from NoRM by selecting Java Application Information under the Manage Applications heading (see Figure 5.4).
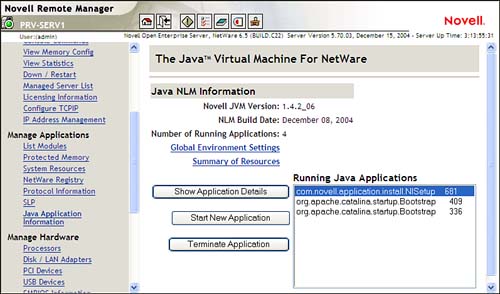
4. You can start a new Java applet by selecting Start New Application and typing the APPLET <html_file> command, substituting the applet’s filename for <html_file>.
5. To execute a Java-based application, the command you type depends on how you want the application to run. Use one of the following commands, substituting the application’s name for <class>:
![]()
JAVA <class>—Use this load format if the application doesn’t require user input, or if it runs in a graphical user interface.
![]()
JAVA –NS <class>—Use this load format if the application is text based and requires user input. This will launch a separate console screen for the Java application you are loading.
Tip
You can view detailed statistics on any Java application running on OES NetWare by clicking Show Application Details in NoRM.
You can also terminate a Java process from NoRM for any reason from the Java Application Information screen—select the application from the list of running Java applications and click Terminate Application. Click OK to confirm that this application should be unloaded. This is equivalent to typing JAVA –KILL <id> at the server console, substituting the ID of the Java process you want to terminate for <id>. The ID of the Java process is listed next to the process on the Java Application Information screen.
In the preceding sections, you saw how NoRM permits you to manage almost any aspect of an OES NetWare server from any workstation with browser access to the network, even over the Internet. The following sections review several of the other types of day-to-day server-management tasks you need to perform on an OES NetWare network.
Protecting the server is a very important safeguard that cannot be overlooked. Damage to the server can affect the entire network. The activities covered in the following sections can help you protect your server.
If the server is in an exposed public area where anyone can have access to it, accidents can—and will—happen. For example, someone might unplug the power cord or turn off the server, thinking it had been left on accidentally. For this reason, all file servers should be stored in a locked room. OES NetWare makes this much easier with its comprehensive remote-management tools. Because of this, you should strongly consider removing keyboards and monitors from the servers. This eliminates a major access point for mischief and mistakes.
Today, it is fairly common to purchase customized rack-mountable hardware for your server. This way, many servers can be located in a fairly limited area, with isolated and protected power sources and climate control to keep everything cool. When possible, this type of configuration further limits physical problems that might affect your network.
If you have been around computers for any period of time, you know the chaos that can be caused by a sudden loss of electrical power. An uninterruptible power supply (UPS) helps mitigate this risk by providing a battery-based power backup for your server. When power is lost, the UPS seamlessly takes over and provides power for a time sufficient to enable you to close things down gracefully.
Several UPS manufacturers provide NetWare-compatible software for their products. However, if your UPS does not come with NetWare software, you can try UPS_AIO.NLM, which allows NetWare to communicate with a UPS attached to a serial port on the server. Complete the following steps to use UPS_AIO.NLM to link your UPS to your OES NetWare server using a serial port:
1. Attach the UPS to the server using the manufacturer’s instructions.
2. Load the UPS hardware driver on the server.
3. Load an AIO device driver on the server. AIOCOMX.NLM is the default driver that comes with NetWare.
4. Load UPS_AIO.NLM on the server, specifying the correct options in the UPS_AIO options format (see Table 5.2).
Table 5.2. UPS_AIO Options
|
OPTION |
DESCRIPTION |
|---|---|
|
|
The time, in seconds, that the server will run on battery power before shutting down. Default: 300. Value: Minimum 30 seconds (no maximum). |
|
|
The time, in seconds, before the system sends a message to users about the approaching shutdown. Default: 5. Value: Minimum 0 (no maximum). |
|
|
The time, in seconds, between broadcasts. Default: 30. Value: Minimum 20 (no maximum). |
|
|
The AIO device driver type. See the manufacturer’s documentation for the type. Default: 1 (AIOCOMX). Value: 1, 2, or 3. |
|
|
The AIO board number. If you use AIOCOMX, the board number is displayed when you load AIOCOMX. If you use another driver, see the manufacturer’s documentation for the number. Default: 0. |
|
|
AIO port number. If you use AIOCOMX, the port number is displayed when you load AIOCOMX. If you use another driver, see the manufacturer’s documentation for the number. Default: 0. |
|
|
Sets normal RS232 signaling state to High. Use the High setting only if your system uses high values instead of low values to determine whether the power is low. See the manufacturer’s documentation for more information. Default: none. |
Tip
If you want the UPS to be configured the same way every time the server is rebooted, put LOAD UPS_AIO.NLM in the server’s AUTOEXEC.NCF file. Be sure to include the appropriate options (see Table 5.2).
When configured as noted here, your UPS can communicate with your OES NetWare server through the server’s serial port.
To help isolate your users from the effects of hard disk problems, the OES NetWare offers several powerful storage options, including disk mirroring and duplexing, software RAID support, Storage Area Network (SAN) support with NetWare Cluster Services, and iSCSI. NetWare storage options are discussed in more detail in Chapter 10, “OES NetWare File Storage and Management.”
Unfortunately, software viruses are a fact of life. Fortunately, the specialized nature of the NetWare architecture has made it resistant to virus infection at the operating system level. That doesn’t mean, however, that a NetWare server can’t host a virus and play a part in its propagation around your network.
The best way to fight the continually shifting assault of viruses is to use a third-party virus-scanning solution to detect and clean network files if they become infected. This solution should also support automatic scanning of web-based files and email to create a more robust protective barrier.
Because of the rate at which new viruses are being created, keep your virus solution current with both software updates and virus pattern files. Virus scanning won’t do much good if it is incapable of detecting the virus that hits your system.
NetWare does offer some protection against viruses infecting executable files through the use of the Execute Only file attribute. You can also remove the Modify right from the directory that contains the executable files and make executable files Read-Only. This will prevent viruses from modifying a file to attach themselves to it. For more information on NetWare file system rights, see Chapter 7, “Users and Network Security.”
With NetWare, a server-mounted CD-ROM can appear as any other NetWare NSS volume. Users on the network can access the CD-ROM just like any other volume, except that it is read-only. For more information on NSS, see Chapter 10.
NetWare automatically uses CDROM.NLM to mount CD-ROMs as NetWare volumes when they are inserted into the server’s CD-ROM drive. It supports High Sierra, ISO 9660, and HFS (Apple) extensions for Macintosh clients, and the appropriate support module will be auto-loaded with CDROM.NLM (for example, CD9660.NSS). CDROM.NLM is loaded automatically when the server starts.
When it’s loaded, you can use the Volumes page in NoRM to view the CD-ROM volume; it’s listed as an active volume on the server. You can dismount and mount the CD-ROM just like any other volume on the server.
Because NLMs load as part of the operating system, it is possible for a misbehaving NLM to cause problems in a server’s memory. It could corrupt its own memory space or overwrite memory being used by another process, causing a server ABEND, or Abnormal END. An ABEND is a serious error from which the server cannot always recover without your help.
NLMs from Novell should not require that you load them in protected address spaces, but NLMs that execute external applications, including the NetWare JVM, load in protected memory automatically to protect the server from those external applications. If you have an NLM that you don’t trust, it is possible to test it in NetWare’s protected address space.
You can load an NLM into a protected address space from NoRM by doing the following:
1. Select the Protected Memory link under Manage Applications in NoRM. This screen also gives you a view of applications operating in protected memory and settings for memory protection SET parameters.
2. Select one of the following options:
![]() Load NCF file protected—Many third-party applications will create an NCF script to load the necessary modules. Use this option to make sure all modules loaded from the specified NCF file are loaded into protected memory.
Load NCF file protected—Many third-party applications will create an NCF script to load the necessary modules. Use this option to make sure all modules loaded from the specified NCF file are loaded into protected memory.
![]() Load module protected—Use this option to load a single NLM into protected memory.
Load module protected—Use this option to load a single NLM into protected memory.
3. Enter the full name, including path, of the module or NCF file that you want to load in the appropriate field, and then select the corresponding button.
When loaded in this fashion, the NetWare kernel will be protected from any misbehavior of the module loaded into protected memory space.
When you monitor the server’s performance, you look for key indicators that the server is functioning at an optimal level. Some of the things you should monitor include the utilization percentage of the server’s processor, the number of cache buffers and packet receive buffers being regularly used, and the server’s memory allocation.
Every network has different needs and usage patterns. By default, server parameters are set so that the server will perform well on most networks. In addition, the server is self-tuning, meaning that it will gradually adjust itself over time to accommodate changing usage patterns. However, you should be aware of what constitutes “normal” for your server(s). That way, you can effectively plan for future network and server needs as well as notice any unusual changes that might indicate a potential problem.
The best way to do this is to regularly review NoRM’s Health Monitor (see Figure 5.5). Health Monitor is broken down into major groupings of server health. Selecting a link in Health Monitor takes you to more specific information about the current state of the server with regard to that category.
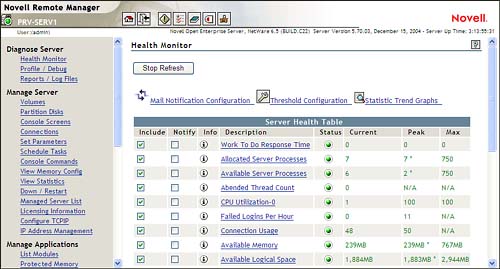
Health Monitor also enables you to set thresholds for server performance that can generate automated alerts to the administrative staff when these thresholds are passed.
Server parameters, also called SET parameters, control the OES NetWare server environment. They enable you to set Maximum, Minimum, and Threshold levels for many aspects of the server’s internal operations. Appendix C contains a comprehensive list of OES NetWare SET parameters and more information on configuring thresholds and alerts.
You can use NoRM to adjust SET parameters by selecting the Set Parameters link, as shown in Figure 5.6. This can also be done from the server console with MONITOR.NLM. SET parameters come in two types: persistent and nonpersistent. Persistent SET parameters maintain their state even if the server is shut down. Nonpersistent SET parameters reset to their default value when the server restarts. You place nonpersistent SET parameters in your AUTOEXEC.NCF and/or STARTUP.NCF, so they are set automatically to the value you want when the server starts.
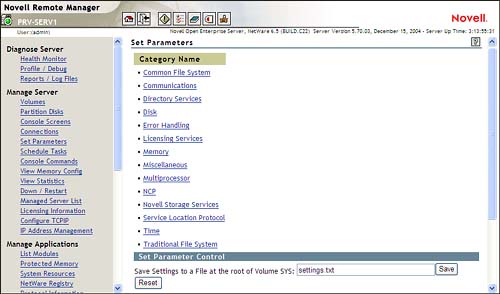
After OES NetWare is installed, it will optimize itself over a period of time by leveling adjustments for low-usage times with peak-usage bursts. Over a week or two, the server will settle on an optimal setting for each SET parameter. However, if you already know where the server should be set, or if you are not satisfied with the server’s self-tuned settings, you can configure any SET parameter manually.
The following sections describe some of the ways to monitor and optimize your server’s performance.
Running out of cache memory is one of the biggest causes of poor server performance in a NetWare environment. Fortunately, using the NSS file system provides a completely redesigned caching system that eliminates most of the cache monitoring with which you may be familiar.
NSS introduces a much simplified caching system with only two cache pools to worry about: the OS pool and the NSS pool. The OS pool, as its name implies, is used to supply the memory needs of all OS-related processes, including packet receive buffers. The NSS pool is used for everything else, including directory, files, server applications, and so on.
When OES NetWare is installed, the total available cache memory is balanced between the OS and NSS cache pools. The default balance is 60% NSS pool and 40% OS pool. You can change this setting from NoRM by selecting Set Parameters, Novell Storage Services, NSS Cache Balance Percent. The NSS system will automatically reallocate memory between the two pools to keep them functioning at an optimal level.
You can review the current server statistics related to cache memory through the following links in NoRM’s Health Monitor. If you are familiar with it, you can also set these values using MONITOR.NLM from the server console:
![]() Cache performance—This link provides both a textual and graphic overview of memory allocation on the server to which you are attached through NoRM. It also provides links to specific memory allocations within the general pools. The Available Memory link brings you to this same page.
Cache performance—This link provides both a textual and graphic overview of memory allocation on the server to which you are attached through NoRM. It also provides links to specific memory allocations within the general pools. The Available Memory link brings you to this same page.
![]() Available ECBs—Event Control Blocks (ECBs) are another name for packet receive buffers. You can get an overview of ECB allocation from this page. It also lists all modules currently assigned ECBs. The Packet Receive Buffers link brings you to this same page.
Available ECBs—Event Control Blocks (ECBs) are another name for packet receive buffers. You can get an overview of ECB allocation from this page. It also lists all modules currently assigned ECBs. The Packet Receive Buffers link brings you to this same page.
If the server seems to be slowing down or losing workstation connections, see how many ECBs are allocated and how many are being used. You might need to increase the minimum and/or maximum numbers of packet receive buffers.
To do this from NoRM, select Set Parameters, Communications and scroll down to the Minimum and Maximum Packet Receive Buffers settings. You can also decrease the New Packet Receive Buffer wait time.
After a couple of days of average network usage, check to see how many packet receive buffers are being allocated and compare that with the maximum number. If the two numbers are the same, increase the maximum value by 50 buffers. Continue to monitor the buffers periodically and increase the maximum value until the allocated number no longer reaches the maximum.
OES NetWare includes support for virtual memory to help utilize memory more efficiently. Any modules that are loaded in protected memory will utilize virtual memory. With virtual memory, data that hasn’t been accessed recently can be moved back to disk, where it is temporarily stored in a swap file. When the data is requested again, it is restored in memory. Data in the swap file can still be accessed more quickly than from its permanent location on the disk, while at the same time enabling existing RAM to be used more efficiently. This helps reduce the possibility of encountering low memory conditions on the server.
A swap file is created automatically for the SYS volume. You can create additional swap files for each volume if you want. The swap files don’t necessarily need to reside on the volume for which they’re designated, but it’s a good idea to have one swap file per volume.
View, create, and delete swap files from NoRM’s Health Monitor by clicking Virtual Memory Performance, To Swap File Information. This will open the Swap File Configuration utility (see Figure 5.7).
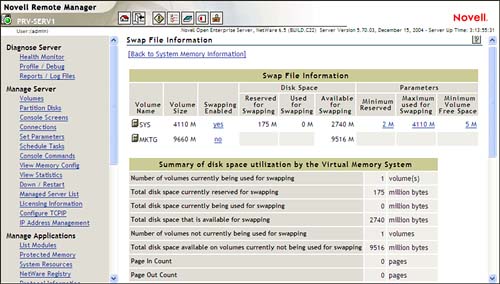
To create a new swap file, select the No link in the Swapping Enabled column next to the volume for which you want to create a swap file. If you don’t specify any parameters, this will create a swap file with a minimum size of 2MB and a maximum size of the entire volume size, and will leave a minimum of 5MB of free space on the volume. However, you can set any of these parameters as you see fit by typing the value you want into the appropriate field.
To delete a swap file from a volume, select the Yes link in the Swapping Enabled column next to the volume for which you want to delete the swap file and select Disable.
You can monitor several error log files to determine whether your network has generated any error messages. They are a valuable source of information and clues when troubleshooting a network or server problem.
You can view the principal log files with NoRM by selecting Reports/Log Files (see Figure 5.8).
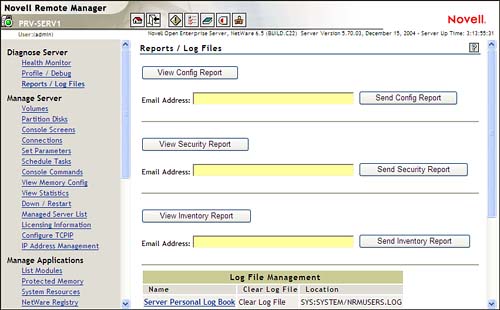
You have access to the following information from this screen:
![]() View Config Report—This option enables you to generate and view a NetWare Server Configuration report. This report can help you diagnose problems with your server that might be caused by improper NLM versions. You can print this report from your browser. Clicking Send Config Report will generate a Config report and email it to the specified email address. The Config report contains the following:
View Config Report—This option enables you to generate and view a NetWare Server Configuration report. This report can help you diagnose problems with your server that might be caused by improper NLM versions. You can print this report from your browser. Clicking Send Config Report will generate a Config report and email it to the specified email address. The Config report contains the following:
![]() Basic server configuration information
Basic server configuration information
![]() A listing of all modules currently loaded on the server
A listing of all modules currently loaded on the server
![]() LAN driver configurations
LAN driver configurations
![]() Storage device configuration
Storage device configuration
![]() Statistics for all mounted volumes
Statistics for all mounted volumes
![]() A listing of all primary server configuration files
A listing of all primary server configuration files
![]() A listing of current
A listing of current SET parameter settings
![]() A listing of the contents of
A listing of the contents of SYS:SYSTEM
![]() A listing of the boot directory (
A listing of the boot directory (C:)
![]() View Security Report—This option enables you to generate and view a Server Security report. This report can help you monitor potential security risks to a server. To see all the available information, you must be logged as an Admin user. Clicking Send Security Report will generate a Security report and email it to the specified email address. The Security report contains the following:
View Security Report—This option enables you to generate and view a Server Security report. This report can help you monitor potential security risks to a server. To see all the available information, you must be logged as an Admin user. Clicking Send Security Report will generate a Security report and email it to the specified email address. The Security report contains the following:
![]() General security-related information
General security-related information
![]() Trustee assignments for all mounted volumes
Trustee assignments for all mounted volumes
![]() Trustee assignments to the common folders on volume Sys
Trustee assignments to the common folders on volume Sys
![]() Information for all protocols loaded on the
Information for all protocols loaded on the server
![]() View Inventory Report—This option enables you to generate and view a NetWare Server Inventory report. Clicking Send Inventory Report will generate an Inventory report and email it to the specified email address. This report can take a while to create, so it is automatically saved on the server where you can view it at a later time. This report contains the following information:
View Inventory Report—This option enables you to generate and view a NetWare Server Inventory report. Clicking Send Inventory Report will generate an Inventory report and email it to the specified email address. This report can take a while to create, so it is automatically saved on the server where you can view it at a later time. This report contains the following information:
![]() Links to volume-specific reports
Links to volume-specific reports
![]() Storage resource management information about the files on the server volumes
Storage resource management information about the files on the server volumes
![]() A list of key statistics
A list of key statistics
![]() Various profiles of the files
Various profiles of the files
![]() A list of all the trustee assignments for each volume
A list of all the trustee assignments for each volume
![]() Log File Management—The links in this table enable you to view and clear several of the log files available on the server. Simply click the log’s filename to view the log. Restart the logging by clicking Clear next to the log you want to clear. The following logs are available:
Log File Management—The links in this table enable you to view and clear several of the log files available on the server. Simply click the log’s filename to view the log. Restart the logging by clicking Clear next to the log you want to clear. The following logs are available:
![]() Server Personal Log Book—Stored at
Server Personal Log Book—Stored at SYS:SYSTEMNRMUSERS.LOG, this log functions as a journal to enable you to keep track of changes made to the server or any other information you might want to keep around.
![]() System Error Log—Stored at
System Error Log—Stored at SYS:SYSTEMSYS$LOG.ERR, this log file stores all messages sent to the System Console and Logger screens.
![]() Abend Log—Stored at
Abend Log—Stored at SYS:SYSTEMABEND.LOG, this log file tracks any ABENDs that occurred on the server. Because of the robust recovery features in OES NetWare, you might not be aware that the server has had a problem unless you view this file.
![]() Server Health Log—Stored at
Server Health Log—Stored at SYS:SYSTEMHEALTH.LOG, this log file tracks the change in health status as they are reported by the semaphore (traffic light) in NoRM (Green, Yellow, Red).
There are a few other log files of which you should be aware. You can view these logs in NoRM by selecting the Volumes link, selecting the volume on which the log is stored—typically SYS: or C:—and then browsing to the file you want to view. The error log files you should keep in mind include the following:
![]()
BOOT$LOG.ERR—This file, which is stored in the SYS:SYSTEM directory, logs all the errors that occur during server startup.
![]()
LOGGER.TXT—Many of the console messages that were formerly sent to the server console are now sent to a new Logger screen available in OES NetWare. All Logger screen messages are maintained in a buffer, so you can scroll up and down the logger screen as needed. You can dump the Logger buffer file to C:NWSERVERLOGGER.TXT by pressing F2 while in the Logger screen. Other Logger options can be seen by pressing F1 in the Logger screen.
![]()
VOL$LOG.ERR—This file logs error messages for a volume and is used only with traditional NetWare volumes. Each volume has its own log file, which is stored at the root of the volume. Any errors or messages that pertain to the volume are stored in this file.
![]()
TTS$LOG.ERR—This file logs all data that is backed out by the NetWare Transaction Tracking System (TTS) and is used only with traditional NetWare volumes. This file is stored in the SYS volume. To allow this file to be created, use MONITOR.NLM to turn the TTS Abort Dump Flag parameter to On.
To limit the size of SYS$LOG.ERR and BOOT$LOG.ERR, select Set Parameters, Error Handling from NoRM and change the appropriate log file parameters. You can also set these parameters from the server console with MONITOR.NLM:
![]() Server log file state—This parameter defines what should happen if the server log reaches its size limit. Valid options are 0–2; default is 2:
Server log file state—This parameter defines what should happen if the server log reaches its size limit. Valid options are 0–2; default is 2:
![]() 0—Takes no action (logging will effectively stop)
0—Takes no action (logging will effectively stop)
![]() 1—Clears the log file (all previously saved data is lost)
1—Clears the log file (all previously saved data is lost)
![]() 2—Renames the log file and starts a new one
2—Renames the log file and starts a new one
![]() Server log file overflow size—This parameter sets the maximum size for
Server log file overflow size—This parameter sets the maximum size for SYS$LOG.ERR in bytes.
![]() Boot error log file state—This parameter defines what should happen if the boot error log reaches its size limit. Valid options are 0–3; default is 3:
Boot error log file state—This parameter defines what should happen if the boot error log reaches its size limit. Valid options are 0–3; default is 3:
![]() 0—Takes no action (logging will effectively stop)
0—Takes no action (logging will effectively stop)
![]() 1—Clears the log file (all previously saved data is lost)
1—Clears the log file (all previously saved data is lost)
![]() 2—Renames the log file and starts a new one
2—Renames the log file and starts a new one
![]() 3—Causes a new log file to be created every time the server is rebooted
3—Causes a new log file to be created every time the server is rebooted
![]() Boot error log file overflow size—Sets the maximum size for
Boot error log file overflow size—Sets the maximum size for BOOT$LOG.ERR in bytes.
To limit the size of VOL$LOG.ERR and TTS$LOG.ERR on traditional NetWare volumes, select Set Parameters, Traditional File System from NoRM and change the appropriate log file parameters. You can also set these parameters from the server console with MONITOR.NLM:
![]() Volume log file state—This parameter defines what should happen if the server log reaches its size limit. Valid options are 0–2; default is 2:
Volume log file state—This parameter defines what should happen if the server log reaches its size limit. Valid options are 0–2; default is 2:
![]() 0—Takes no action (logging will effectively stop)
0—Takes no action (logging will effectively stop)
![]() 1—Clears the log file (all previously saved data is lost)
1—Clears the log file (all previously saved data is lost)
![]() 2—Renames the log file and starts a new one
2—Renames the log file and starts a new one
![]() Volume TTS log file state—This parameter defines what should happen if the TTS log reaches its size limit. Valid options are 0–2; default is 2:
Volume TTS log file state—This parameter defines what should happen if the TTS log reaches its size limit. Valid options are 0–2; default is 2:
![]() 0—Takes no action (logging will effectively stop)
0—Takes no action (logging will effectively stop)
![]() 1—Clears the log file (all previously saved data is lost)
1—Clears the log file (all previously saved data is lost)
![]() 2—Renames the log file and starts a new one
2—Renames the log file and starts a new one
![]() Volume log file overflow size—This parameter sets the maximum size for
Volume log file overflow size—This parameter sets the maximum size for VOL$LOG.ERR in bytes.
![]() Volume TTS log file overflow size—This parameter sets the maximum size for
Volume TTS log file overflow size—This parameter sets the maximum size for TTS$LOG.ERR in bytes.
Using these log files, you can keep a pretty close eye on events related to your NetWare storage environment.
From time to time, you might find you need to perform some type of maintenance on your server. For example, you might need to add a new hard disk, load the latest patches (bug fixes or enhancements) on the server, or clear a workstation connection. The following sections explain how to do some of these common maintenance tasks.
Just about all the server information you will ever need is available in NoRM. Utilities with identical functionality are also available from the server console. Table 5.3 lists the types of information about the server you can see and the console utilities you can use to display that information.
Table 5.3. How to Display Server Information
|
TYPE OF INFORMATION |
NORM PAGE |
CONSOLE UTILITIES |
|---|---|---|
|
Server name |
Header Frame |
NAME, CONFIG |
|
Tree name |
Access Tree Walker |
CONFIG |
|
Network board info |
Disk/LAN Adapters |
CONFIG |
|
Storage devices |
Disk/LAN Adapters |
LIST STORAGE ADAPTERS |
|
Loaded NLMs |
List Modules |
MODULES |
|
Processor speed |
Processors |
SPEED, CPUCHECK |
|
Processor status |
Processors |
DISPLAY PROCESSORS |
|
Version number |
Reports/Log Files, View Config Report |
VERSION |
|
Current |
Set Parameters |
DISPLAY ENVIRONMENT |
|
|
Set Parameters |
DISPLAY MODIFIED ENVIRONMENT |
|
Mounted volumes |
Volumes |
VOLUMES |
No software product is going to be perfect, no matter how thoroughly it has been tested. And because of today’s tight development schedules and competitive marketplace, the reality is that there is already a list of known defects before the product even ships. OES NetWare is the most thoroughly tested and most stable product ever to be released by Novell, but that doesn’t mean that unforeseen flaws or unexpected behaviors won’t crop up.
To fix these problems, Novell releases software patches and updated modules that can be installed on your NetWare server. When tested, OES NetWare patches will be rolled into a support pack. Not all individual patches or updates are needed for every customer, but support packs usually contain enough fixes that they are a good idea for the majority of OES NetWare users.
All NetWare patches come with installation instructions and an automated installation routine to make sure all the files get to the right places.
Novell releases support packs, patches, and updates in a variety of ways. The best way to keep track of the recommended updates is through Novell’s minimum patch list. Individual patches are available from Novell’s Support website, and all patches and updates are also included on the Support Connection Library—a collection of CDs regularly produced by Novell Technical Services and sent to subscribers.
Note
Novell’s minimum patch list is located at http://support.novell.com/produpdate/patchlist.html. Individual patches are available from Novell’s Support website at http://support.novell.com.
Some types of server maintenance require that you break a workstation’s connection to the server or that you prevent users from logging in while you’re completing the maintenance task. Use the utilities listed in Table 5.4 to perform these tasks.
Table 5.4. Ways to Monitor Workstation Connections
|
TASK |
NORM PAGE |
CONSOLE UTILITY |
|---|---|---|
|
See connected workstations. |
Connections |
MONITOR |
|
See open files. |
Connections (select a connection) |
MONITOR (select a connection) |
|
Clear connections. |
Connections |
MONITOR (press Del) |
|
Prevent user login. |
None (use iManager— User Management) |
DISABLE LOGIN |
|
Reenable login. |
None (use iManager— User Management) |
ENABLE LOGIN |
When you start up or reboot the NetWare server, its boot files execute in the following order:
1. The DOS system files load, including CONFIG.SYS and AUTOEXEC.BAT, which sets up a basic environment and can be set to execute SERVER.EXE automatically.
2. SERVER.EXE runs the NetWare operating system on the computer, which turns the computer into the NetWare server. NWSERVER.EXE is located in the NWSERVER directory.
3. STARTUP.NCF, which is stored in the Boot partition with SERVER.EXE, automates the initialization of the NetWare operating system. It loads disk drivers, name space modules to support different file formats, and may execute some SET parameters that modify default initialization values.
4. AUTOEXEC.NCF, which is stored in SYS:SYSTEM, loads the server’s LAN drivers, sets time parameters, specifies the server name and ID (formerly the IPX internal net number), mounts volumes, and then performs optional activities—such as loading application or utility NLMs you specified to load automatically and executing additional SET parameters.
5. Additional .NCF files, if they’ve been created, can be called from the AUTOEXEC.NCF file or executed from the server’s console. They are normally stored in SYS:SYSTEM.
The STARTUP.NCF and AUTOEXEC.NCF files are created automatically during the installation process. They contain commands that reflect the selections you made during installation. Several other .NCF files are created during the OES NetWare installation or when other services are installed.
You can edit these .NCF files after installation to add new commands or modify existing ones. Table 5.5 describes the utilities you can use to edit the STARTUP.NCF and AUTOEXEC.NCF files.
Table 5.5. Tools for Editing .NCF files
|
TOOL |
DESCRIPTION |
|---|---|
|
Text editor |
Any text editor can be used to modify an |
|
|
A text editor on the server that enables you to edit the files manually. Type |
|
A file that enables you to modify the same options you set during installation. Automatically updates the appropriate file with the new information you’ve specified. Also enables you to edit the files by choosing NCF files options manually. |
|
|
|
A file that enables you to add, delete, or modify |
Warning
When using a text editor, make sure you save the NCF file as a plain text document to prevent any formatting characters from being inserted, and be sure the .NCF extension is preserved.
There are several ways to modify .NCF files, both from the server console and from a client workstation. Furthermore, any server-based method can be accessed remotely through RConsoleJ in ConsoleOne.
Although time synchronization is vital to the proper function of Novell eDirectory, it does not implement time synchronization. Rather, eDirectory requires the underlying Network Operating System (NOS) platform to provide a fully time-synchronized environment in which eDirectory can operate.
Novell implemented a proprietary time sync model for NetWare with the release of NetWare 4. However, because eDirectory is now used across multiple NOS platforms, it must be able to synchronize time with non-NetWare servers and/or networks. To do this, Novell has extended the NetWare time sync modules to support an industry standard time synchronization protocol known as Network Time Protocol (NTP).
There are four types of timeservers supported in an OES NetWare environment:
![]() Single Reference—Uses its own internal clock, or an external time source, to determine network time. This eDirectory time is then communicated to Secondary timeservers and network clients. The Single Reference timeserver is the master source for network time.
Single Reference—Uses its own internal clock, or an external time source, to determine network time. This eDirectory time is then communicated to Secondary timeservers and network clients. The Single Reference timeserver is the master source for network time.
![]() Reference—Uses its own hardware clock, or an external time source, to determine network time. Reference servers replace the Single Reference timeserver in more complex network environments. The reference server participates with other timeservers in a voting process to determine a consensus time. When a reference server is used, NetWare uses a hybrid time sync strategy. However, as you’ll see, other participants in the time synchronization process will converge toward the reference server time.
Reference—Uses its own hardware clock, or an external time source, to determine network time. Reference servers replace the Single Reference timeserver in more complex network environments. The reference server participates with other timeservers in a voting process to determine a consensus time. When a reference server is used, NetWare uses a hybrid time sync strategy. However, as you’ll see, other participants in the time synchronization process will converge toward the reference server time.
![]() Primary—Name notwithstanding, a Primary timeserver does not generate network time. Primary timeservers participate in a polling process with other primary servers and the reference server. During the polling process, each Primary timeserver votes on the correct network time. From this process, a consensus network time emerges. Each Primary timeserver synchronizes its internal clock to the consensus network time and helps distribute that time to all interested parties.
Primary—Name notwithstanding, a Primary timeserver does not generate network time. Primary timeservers participate in a polling process with other primary servers and the reference server. During the polling process, each Primary timeserver votes on the correct network time. From this process, a consensus network time emerges. Each Primary timeserver synchronizes its internal clock to the consensus network time and helps distribute that time to all interested parties.
![]() Secondary—Secondary timeservers receive network time from Single Reference, Reference, Primary, or other Secondary timeservers. Secondary timeservers are slaves that do not participate in the time polling process, but simply receive and pass on the consensus network time.
Secondary—Secondary timeservers receive network time from Single Reference, Reference, Primary, or other Secondary timeservers. Secondary timeservers are slaves that do not participate in the time polling process, but simply receive and pass on the consensus network time.
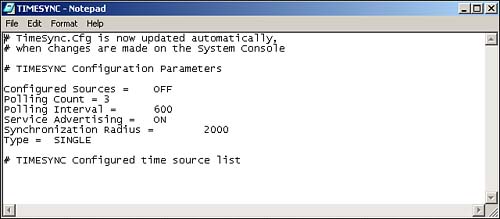
The choice of a time synchronization strategy is largely dependent on the size and complexity of your network. You have your choice of a default strategy, appropriate for smaller networks, or a more complex Time Provider Group strategy, which is more efficient in a large network environment. Configuring either of these environments is done with the TIMESYNC.CFG file, as shown in Figure 5.9. TIMESYNC.CFG is stored in SYS:SYSTEM.
The default time synchronization strategy is suitable for smaller networks with fewer than 30 servers in the network and no WAN connections. The default time synchronization strategy uses SAP in an IPX environment and SLP in an IP environment to locate and query the Single Reference server. Figure 5.10 shows a default time sync configuration.
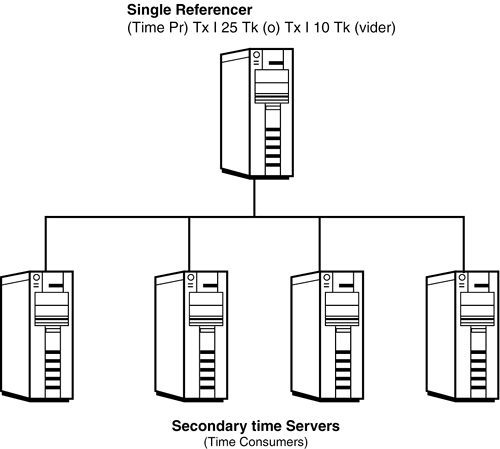
Under the default strategy, the first server installed into an eDirectory tree is designated as a Single Reference timeserver. All subsequent servers installed into the tree are designated as Secondary timeservers. In this scenario, the Single Reference server defines the network time and responds to all queries regarding network time. Obviously, as the network grows and/or WAN links are added, this single source for network time will become a bottleneck. If this Single Reference server has to be contacted across a WAN link, this time synchronization method will also add unnecessary traffic to expensive WAN links.
More complex environments should implement a Time Provider Group (TPG), or groups. A TPG consists of a centrally located reference server and between two and seven primary servers that will distribute the network time to all servers in the network, as shown in Figure 5.11. This strategy spreads the task of distributing network time out across multiple servers. It also makes it possible to limit the amount of time synchronization traffic that needs to traverse costly WAN links.
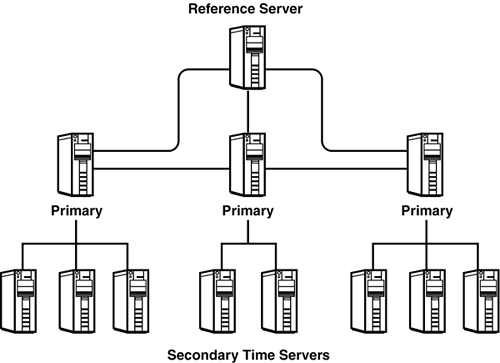
In a well-designed network environment, it is easy to determine the optimal locations for the various timeservers. The reference server should exist at the hub of the network, perhaps at a corporate headquarters to which all satellite or branch offices are connected. The reference server will normally receive its time from a highly accurate external time source such as an atomic clock, radio clock, or Internet time source. These time sources can be contacted through dial-up connections or across the Internet.
Primary servers should be strategically placed at the largest branches and distribute time information to secondary servers at their own site as well as any small satellite sites in their area.
In addition to these synchronization strategies, you will have to decide on automatic or manual advertisement of time synchronization. The following describes the advantages and disadvantages of each method:
![]() Automatic advertisement—By default, OES NetWare advertises its configuration automatically using SLP in TCP/IP networks or SAP in IPX networks. The advantage of automatic advertisement is ease of implementation. Timeservers will communicate without any intervention from the administrator. However, this background communication consumes network bandwidth, which can be a big issue on WAN links and other slow network connections.
Automatic advertisement—By default, OES NetWare advertises its configuration automatically using SLP in TCP/IP networks or SAP in IPX networks. The advantage of automatic advertisement is ease of implementation. Timeservers will communicate without any intervention from the administrator. However, this background communication consumes network bandwidth, which can be a big issue on WAN links and other slow network connections.
![]() Manual advertisement—Also known as configured lists, the administrator manually defines the source of network time for each server in its
Manual advertisement—Also known as configured lists, the administrator manually defines the source of network time for each server in its TIMESYNC.CFG file. Reference and Single timeservers can get their time from either their internal clocks or from an authoritative time source, such as an atomic clock, radio clock, or Internet time source.
Your choice of advertisement method depends on how much you want the network to do automatically, at the expense of some network bandwidth.
TIMESYNC.NLM is responsible for all time sync operations that take place in the NetWare environment. It loads automatically when the server starts. At that time, TIMESYNC.NLM reads the TIMESYNC.CFG file to determine how it should act. You can modify TIMESYNC.CFG settings through NoRM by selecting SET Parameters and clicking Time. Eight of the parameters are set when the server is installed and will seldom have to be modified:
![]()
TIMESYNC configuration file
![]() Start of daylight saving time
Start of daylight saving time
![]() End of daylight saving time
End of daylight saving time
![]() Daylight saving time offset
Daylight saving time offset
![]() Daylight saving time status
Daylight saving time status
![]() New time with daylight saving time status
New time with daylight saving time status
![]() Time zone
Time zone
![]() Default timeserver type
Default timeserver type
The remaining parameters are used to configure and reset the time sync environment. They are outlined in Table 5.6.
Table 5.6. TIMESYNC.CFG Parameters
|
PARAMETER |
DEFAULT |
VALUES DESCRIPTION |
|---|---|---|
|
Configured sources |
OFF |
Set ON if a list of time sources is used. |
|
Polling count |
3 |
Defines how many time packets to exchange during time polling cycle. Increasing this number adds network traffic needlessly. |
|
600 sec |
Defines the time to wait between time polling cycles. This value should be the same for every server in the tree. |
|
|
RESET |
OFF |
Resets internal time sync variables and clears the configured server list. |
|
Restart flag |
OFF |
Restarts the time sync service. Similar to unloading and reloading |
|
Service advertising |
ON |
Determines whether SAP/SLP advertisement will be used. Turn this off when using configured lists. |
|
Synchronization radius |
2000 msec |
Defines how close a server’s time has to be to network time to be considered in sync. |
|
Time adjustment |
[+ | -]hh:mm:ss [AT date and time] |
Schedules a time adjustment on a Single, Reference or Primary timeserver. |
|
Time sources |
Timeserver to query |
Configured list of timeservers that this server will query for network time. Multiple time sources can be configured so that if one does not respond, the server will query the next on the list. |
|
Type |
Single, Reference, Primary, Secondary |
Defines the type of timeserver. |
The first decision you need to make when integrating TIMESYNC and NTP environments is the direction of the time flow. Do you want NTP to receive time from TIMESYNC or vice versa? Both options are equally valid, but some environments lend themselves more to one method over another. The random mixing of NetWare and NTP servers is not recommended.
Novell time sync experts recommend using NTP over WAN links and then letting the NetWare TIMESYNC environments at each site receive their time by NTP. To configure TIMESYNC to receive time from NTP, edit the TIMESYNC.CFG file on the reference or single server and change the time source to point to an NTP server.