The DOM very rarely makes sense, especially when it comes to namespaces. If you want to retain your sanity, avoid it. | ||
| --Michael Kay | ||
It simply isn’t possible to write a book about XML while avoiding the DOM, or Document Object Model. The truth is that the DOM won’t lead you down the path to insanity, although I can certainly respect Mr. Kay’s opinion since I’ve struggled with the DOM myself from time to time. For this reason, you shouldn’t think of the DOM as the end-all tool to XML processing for the Web. It’s just one of many tools that you should have in your XML development arsenal, ready to engage when needed. This hour explores the DOM and the basics of how it is used. In doing so, you learn how it provides a set of interfaces that can be used to represent an entire XML document programmatically. This hour discusses
What the Document Object Model is
The interfaces that make up the DOM
How to build programs that traverse the DOM
How to access specific data inside an XML document using the DOM
How to modify an XML document using the DOM
If you’re a seasoned HTML or JavaScript expert, you might already be familiar with the Document Object Model, or DOM. When you’re creating dynamic web pages, it’s common to access elements on a web page from JavaScript using the DOM. The principles involved are basically the same for accessing XML documents using the DOM.
The DOM is a standard method for exposing the elements in a document as a data structure in your programming language of choice. In other words, the DOM provides access to all the pieces and parts of a web page or XML document. A program, called a DOM parser, reads through the XML code in a file (or from some other source of input), and provides a data structure that you can access from your application. In the XML world, the DOM parser can also write its data structure out as XML so that you can save any changes that you make to the data structure.
Like XML itself, the DOM is a standard developed by the World Wide Web Consortium (W3C). Most of the details of how the DOM works are left up to the specific implementations. It’s important to understand that there are multiple levels of the DOM. DOM level 1 is concerned with basic XML and HTML. DOM level 2 adds specifications for XML namespaces, Cascading Style Sheets (CSS), events, and various traversal schemes. DOM level 3, which is currently still in the works, will round out its XML coverage, include support for more user interface events, and support XPath (see Hours 11, “Getting Started with XSL,” and 12, “Transforming XML with XSLT,” for more on XPath). This hour focuses on how to use level 1 of the DOM since it is the most widely implemented. You can find the DOM specifications online at http://www.w3.org/DOM/.
The DOM is really a collection of programming interfaces (you learn about each interface in the DOM a bit later), all of which extend a basic interface called Node. The DOM represents an XML document as a tree structure, where each “thing” in the document is a node on the tree. Each node is associated with an interface that is more specific than the generic Node interface. Some nodes are elements, others are attributes, and still others are comments. Each interface has its own properties and methods.
For example, the top-level node in the DOM model is a Document object. It can have exactly one Element object as a child (the root element of the document), one DocumentType object, and one DOMImplementation object. When you’re dealing with XML, the various interfaces supplied correspond to the structural entities in XML documents. If you’re dealing with XHTML (or HTML), then interfaces associated with them are also included in the DOM hierarchy.
Let’s look at a simple XML document and then look at how that document is represented by the DOM. An excerpt from the document is provided in Listing 16.1, and the DOM representation appears in Figure 16.1.
Example 16.1. A Simple XML Document
 1: <?xml version="1.0"?>
 2:
 3: <vehicles>
 4:   <vehicle year="2004" make="Acura" model="3.2TL">
 5:     <mileage>13495</mileage>
 6:     <color>green</color>
 7:     <price>33900</price>
 8:     <carfax buyback="no" />
 9:   </vehicle>
10:
11:   <vehicle year="2005" make="Acura" model="3.2TL">
12:     <mileage>07541</mileage>
13:     <color>white</color>
14:     <price>33900</price>
15:     <carfax buyback="yes" />
16:   </vehicle>
17:
18:   ...
19: </vehicles>
As you can see, the DOM representation of the document mirrors the structure of the XML document. Figure 16.1 contains a subset of the interfaces available in the DOM. For example, the dealership node expresses the element interface (Element), and the vehicle attribute nodes express the attribute interface (Attribute).
The implementation of the DOM in a particular language is referred to as a language binding. The language binding is the set of objects native to the language in question that implements each of the interfaces in the DOM specification. When a DOM parser parses an XML document, it copies the document’s data and structure into a data structure implemented using the language mapping associated with the parser.
The DOM specification includes bindings for Java and ECMAScript. ECMAScript is the standardized version of JavaScript managed by Ecma International (http://www.ecma-international.org/). Developers can create language bindings from the DOM to their language simply by following the IDL (Interface Definition Language) in the DOM specification. Beyond Java and JavaScript (ECMAScript), other DOM data bindings readily exist such as bindings for the Python programming language that has grown in popularity for web development.
By the Way
Ecma International was originally known as ECMA, which stood for European Computer Manufacturers Association. The name change came about to reflect the fact that the organization had expanded to a more international focus.
The language mapping is the most important part of the DOM specification. It is not concerned with the actual act of parsing the document. As long as a valid DOM tree is generated by the parser, it can work in any way that the developer of the parser chooses. You can find more information about DOM language bindings at http://www.w3.org/DOM/Bindings.
After the parser has created the DOM tree, you can begin using the DOM to access the document within your application. In many cases, you’ll use other libraries that accept the DOM tree as input. You will be able to obtain the object that represents the DOM tree from the parser and then pass it along to whatever method uses it. For example, you might have a program that applies styles to a document using XSLT that accepts a parsed DOM tree as input. Alternatively, you can write your own programs that access the data in a document using the DOM. That’s what the examples later in this hour will do.
As I’ve already mentioned, in order to comply with the DOM, an implementation must include the interfaces required by the DOM specification. Each of the interfaces is associated with a particular type of node found in a DOM tree. Rather than listing and describing all of these interfaces, I’m going to focus on the interfaces that you will use most frequently in the course of writing applications that use the DOM. Later in the lesson you’ll work through a sample application that uses several of these interfaces.
The Node interface is the interface from which all other interfaces are derived. Regardless of whatever else a particular entity in a DOM tree is, it’s still a node. The Node interface exposes some attributes and methods that are shared by everything that’s in a DOM tree. These attributes and methods are largely associated with keeping track of the parents, siblings, and children of the node. Nodes also have attributes that contain their names, values, and a pointer to the document with which they are associated.
The Document interface is the root node of a DOM tree. There’s one important thing to point out here: the document node in a DOM tree is not the root element of the XML document—it’s one level above that. Every document has one child element node that contains the root element of the XML document. Document nodes have other attributes that are associated with the document itself, rather than with the root element. That’s why a DOM tree has one more level in its hierarchy than an XML document.
In addition to the root level element of the document, the document node also contains a pointer to a DocumentType node and a DOMImplementation node. Neither of these nodes are commonly referenced on programs which use the DOM, so I’m not going to discuss them individually. For more information, check out the DOM specification at http://www.w3.org/DOM/DOMTR.
The Element interface represents an element in an XML (or HTML) document. The only attribute specific to an element node is the tag name (of course, it inherits all of the attributes of a standard node as well). It includes methods that enable you to retrieve, add, and remove attributes from the element. It also enables you to retrieve child elements that have a specific name. (You can already fetch all of the children of an element using the methods it inherits from the Node interface.)
The Attr interface represents an attribute of an element. Despite the fact that they inherit the Node interface, they are not actually nodes on the DOM tree because they are not children of an element. Rather, they are part of the element itself. What this means in practical terms is that any methods inherited from the Node interface that deal with traversing the DOM tree return null (nothing). You can’t fetch the parents, siblings, or children of an attribute, because in terms of the DOM, they don’t have any of those things.
Attributes have three properties—a name, a value, and a Boolean flag indicating whether or not the attribute was explicitly included in the document that was parsed. They have no methods specific to themselves.
The NodeList interface is different from the other interfaces I’ve discussed so far. It’s not a pointer to an entity in a DOM tree; rather, it’s an abstract data structure that enables DOM implementations to handle collections of nodes. For example, if you call the method of the Element interface that returns all the children of an element with a particular name, the collection of child elements is returned as a node list (NodeList). You can then iterate over the node list and extract all of the element nodes from it. The only interface it must implement is one that returns items by index. Its only attribute is the size of the collection. Using the size and the method, which returns items, you can iterate over the members of the collection.
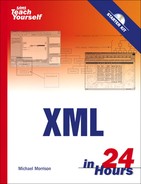
Before you get into the specifics of how to use the DOM to access XML data, it’s worth taking a quick look at how you can access an XML document from within a web page without any programming at all. More specifically, I’ll be taking advantage of some features specific to Microsoft Internet Explorer (versions 5 and above). Internet Explorer has some XML-related features that make it uniquely suited for certain XML tasks. Thanks to a feature called XML data binding, you can include an XML document within your HTML document or provide a link to an external XML document, and then bind its data to visual HTML elements on the web page. Internet Explorer will automatically parse that XML document and insert its contents into the appropriate HTML elements. Listing 16.2 contains a web page that demonstrates XML data binding.
By the Way
Mozilla Firefox supports a similar form of XML data binding through a technology called XBL (eXtensible Binding Language). Data bindings in FireFox work similarly to those in Internet Explorer, except that Firefox relies on XBL to handle the binding specifics.
Example 16.2. An HTML Page That Binds XML Data to Table Cells
 1: <html>
 2:   <head>
 3:     <title>Vehicles</title>
 4:   </head>
 5:
 6:   <body>
 7:     <xml id="vehicles" src="vehicles.xml"></xml>
 8:
 9:     <h1 style="background-color:#000000;
10:       color:#FFFFFF; font-size:20pt; text-align:center;
11:       letter-spacing: 12pt">Used Vehicles</h1>
12:     <table align="center" border="2px" datasrc="#vehicles">
13:       <tr>
14:         <td><span datafld="year"></span></td>
15:         <td><span datafld="make"></span></td>
16:         <td><span datafld="model"></span></td>
17:         <td><span datafld="mileage"></span></td>
18:         <td><span datafld="color"></span></td>
19:         <td><span datafld="price"></span></td>
20:       </tr>
21:     </table>
22:   </body>
23: </html>
The code for this web page is quite short when you consider that it is extracting XML data from an external file and displaying it in table cells. The key to the code is the <xml> tag (line 7), which is part of an XML feature called data islands. Data islands allow you to link to or embed XML data directly within an HTML document. In this case, the file vehicles.xml is linked into the HTML document. You can then use data binding to wire the XML data to HTML elements. The primary binding occurs on line 12 when the datasrc attribute is matched up with the id of the <xml> tag from line 7. From there, all you have to do is associate each XML element with an HTML <span> tag within the table. This takes place on lines 14 through 19 via the datafld attribute, which references each specific XML element (see Listing 16.1 for a recap of the elements in the vehicles.xml document).
The end result of this code is the XML data being arranged in a table within the web page, as shown in Figure 16.2.
Although data binding essentially results in a straight “data dump” into HTML elements, it is nonetheless a very quick and easy way to access XML data from within an HTML web page. However, you’ll likely want to get dirty with a little programming and the DOM to really get the most out of web-based XML documents.
For the sake of simplicity, the remaining examples in this hour are written in JavaScript. One of the huge advantages of the DOM is that the interfaces that make up the DOM are basically the same regardless of whether you write your program in Java, C++, Visual Basic, JavaScript, Perl, or any other language with a DOM implementation. JavaScript programs that are run within the context of a web browser are interpreted (so they don’t have to be compiled) and don’t have a lot of overhead or structure that require a lot of knowledge beforehand in order to be understood. In other words, you can hit the ground running with JavaScript and the DOM pretty quickly.
It turns out that perhaps the trickiest part of DOM programming with JavaScript is initially loading the document into memory so that you can access it programmatically. No one has settled on a standard approach for initially loading an XML document, so we’re unfortunately left dealing with different approaches for different browsers. Following is the code to load an XML document into Internet Explorer:
var xmlDoc;
xmlDoc = new ActiveXObject("Microsoft.XMLDOM");
xmlDoc.load("condos.xml");
As this code reveals, you must first create an ActiveX object (Microsoft.XML.DOM) and then call the load() method on the object to load a specific XML document. Okay, that technique is pretty straightforward, right? Problem is, it won’t work in Firefox. Following is the equivalent code for loading an XML document in Firefox:
xmlDoc = document.implementation.createDocument("", "", null);
xmlDoc.load("condos.xml");
This code is obviously different from the Internet Explorer version, or at least the creation of the xmlDoc object is different. If you want your pages to work on both major browsers, and I’m sure you do, you’ll need to include code to conditionally load the XML document differently based on the browser. Here’s the code to pull off this feat:
if (window.ActiveXObject) {
  xmlDoc = new ActiveXObject("Microsoft.XMLDOM");
  xmlDoc.load("condos.xml");
}
else {
  xmlDoc = document.implementation.createDocument("", "", null);
  xmlDoc.load("condos.xml");
}
This code takes advantage of the fact that Firefox doesn’t have an ActiveXObject in the window object that represents the browser. You can therefore use the presence of this object as the basis for using the Internet Explorer approach to loading an XML document. If the object isn’t there, the Firefox approach is used.
When the XML document is loaded, you can move on to processing the XML data. However, there is one more browser inconsistency to deal with. The inconsistency has to do with how the two major browsers load XML documents. You will typically create a JavaScript function that processes XML data, and you’ll likely want this function to get called right after loading the documents. Following is the code to handle calling a function named printRootNode() upon loading the XML document condos.xml:
if (window.ActiveXObject) {
  xmlDoc = new ActiveXObject("Microsoft.XMLDOM");
  xmlDoc.load("condos.xml");
  printRootNode();
}
else {
  xmlDoc = document.implementation.createDocument("", "", null);
  xmlDoc.load("condos.xml");
  xmlDoc.onload = printRootNode;
}
This is basically the same code you just saw with a couple of extra lines that call the printRootNode() function a bit differently for each browser. You now have the framework for an HTML page that can load an XML document and call a JavaScript function to get busy processing the document data.
When you have the xmlDoc variable set with the newly loaded XML document, you’ll likely want to call a function to start processing the document. In the previous code a function named printRootNode() is called presumably to print the root node of the document. This function is actually just the starting point for printing all of the nodes in the document. Let’s look at a script that prints out the names of all of the nodes in the document tree. Listing 16.3 contains the code for a complete web page containing such a script.
Example 16.3. An HTML Page That Prints All of the Nodes in an XML Document
 1: <html>
 2:   <head>
 3:     <title>Condominium List</title>
 4:     <script type="text/javascript">
 5:       var xmlDoc;
 6:       function loadXMLDoc() {
 7:         // XML loader for IE
 8:         if (window.ActiveXObject) {
 9:           xmlDoc = new ActiveXObject("Microsoft.XMLDOM");
10:           xmlDoc.load("condos.xml");
11:           printRootNode();
12:         }
13:         // XML loader for other browsers
14:         else {
15:           xmlDoc = document.implementation.createDocument("", "", null);
16:           xmlDoc.load("condos.xml");
17:           xmlDoc.onload = printRootNode;
18:         }
19:       }
20:
21:       function printRootNode() {
22:         printNode(xmlDoc);
23:       }
24:
25:       function printNode(node) {
26:         document.write("<span style='font-weight:bold'>Node name: " +
27:           node.nodeName + "</span><br />
");
28:         if (node.nodeValue != null)
29:           document.write("Node value: " + node.nodeValue + "<br />
");
30:
31:         for (var i = 0; i < node.childNodes.length; i++)
32:           printNode(node.childNodes[i]);
33:       }
34:     </script>
35:   </head>
36:
37:   <body onload="loadXMLDoc()">
38:   </body>
39: </html>
Let’s look at this script in detail. First off, notice that virtually all of the script code is located in functions in the head of the document, which means that it doesn’t automatically get executed. However, the loadXMLDoc() function gets called in the <body> tag thanks to the onload attribute (line 37). This is all it takes to get the code started processing the XML document.
By the Way
When you include JavaScript code on a page, any code that’s not inside a function will be executed as soon as the browser interprets it. Code placed in a function is only executed when the function is called.
The loadXMLDoc() handles the XML document loading task you learned about earlier and then calls the printRootNode() function to start printing the nodes (lines 11 and 17). The printRootNode() function is really just a helper function used to start printing the nodes (lines 21 through 23). It is necessary because the real function that prints the nodes, printNode(), requires an attribute but there is no good way to pass along an attribute in the Firefox version of the load routine (line 17). So, you have to print the root node using the printRootNode() function, and from there on the printNode() function takes over.
By the Way
Most scripts that interact with an entire XML document tree start at the root node and work their way down the tree, as shown in this example.
The rest of the code inside the script tag is inside the printNode() function, and is executed when the printNode() function is called by printRootNode(). As you know, a document node provides all of the methods of the Node interface as well as those specific to the document interface. The printNode() function will work with any node, including a document node; it is called and passed the xmlDoc variable as its argument to print the root node.
You may be wondering exactly how the printNode() can print an entire document tree when it is only called and passed the root node. The answer has to do with a common programming technique called recursion. Recursion is to tree-like data structures what loops are to list data structures. When you want to process a number of similar things that are in a list, you simply process them one at a time until you’ve processed all of the items in that list. Recursion is a bit more complex. When you’re dealing with tree-like data structures, you have to work your way down each branch in the tree until you reach the end.
Let’s look at an example not associated with the DOM first. When you want to find a file on your computer’s hard drive manually, and you have no idea where it is located, the fastest way to find it is to recursively search all of the directories on the hard drive. The process goes something like this (starting at the root directory):
Is the file in this directory? If so, we’re finished.
If not, does this directory contain any subdirectories? If not, skip to step 4.
If there are subdirectories, move to the first subdirectory and go back to step 1.
Move up one directory. Move to the next subdirectory in this directory, and skip to step 1. If there are no additional subdirectories in this directory, repeat this step.
That’s one recursive algorithm. The most important thing to understand about recursion is that all of the items being processed recursively must be similar enough to be processed in the same way.
This helps to explain why all of the interfaces in the DOM are extensions of the basic Node interface. You can write one recursive function that will process all of the nodes in a DOM tree using the methods that they have in common. printNode() is one such function
First, let’s examine the function declaration. You’ve already seen a few functions, but let’s back up and clarify how functions work in JavaScript. In JavaScript, you indicate that you’re creating a function by using the function keyword. The name of the function is supplied next, followed by the list of arguments accepted by the function. The name of this function is printNode(), and it accepts one argument, which is given the name node. This argument is intended to be a node that’s part of a DOM tree. Within the function, you can use the name argument to refer to the node that is passed into the function.
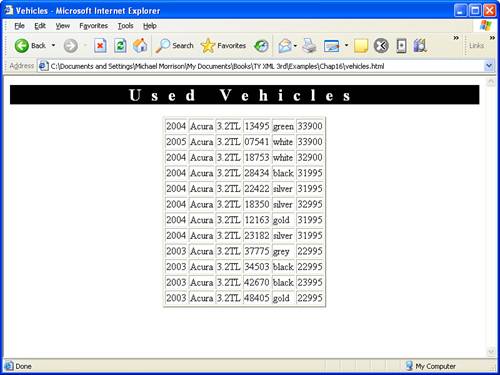
In the body of the function, the first thing that happens is the nodeName property of the node currently being processed is printed (lines 26 and 27). If a node value exists, it is printed next (lines 28 and 29). Then, the function loops over the children of the node currently being processed and calls the printNode() function on each of the children (lines 31 and 32). This is where the recursion comes in. The same function, printNode(), is called repeatedly to process every node in the tree. Figure 16.3 contains this page, as viewed in Internet Explorer.
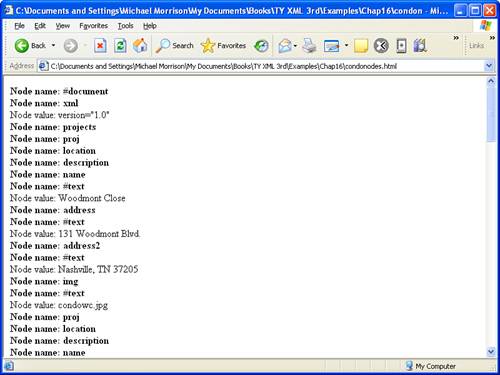
Figure 16.3. The output of a function that prints the names and values of all of the nodes in a DOM tree.
By the Way
It’s worth mentioning that recursion is both a powerful and dangerous programming technique. It’s not difficult at all to accidentally create a recursive function that calls itself repeatedly and never stops. You should exercise great care when writing recursive functions. Having said that, recursive functions can be very valuable when processing tree-like structures such as XML documents.
This example is based on the condos.xml document from the previous hour, which is partially shown in Listing 16.4.
Example 16.4. The condos.xml Example XML Document
 1: <?xml version="1.0"?>
 2:
 3: <projects>
 4:   <proj status="active">
 5:     <location lat="36.122238" long="-86.845028" />
 6:     <description>
 7:       <name>Woodmont Close</name>
 8:       <address>131 Woodmont Blvd.</address>
 9:       <address2>Nashville, TN 37205</address2>
10:       <img>condowc.jpg</img>
11:     </description>
12:   </proj>
13:   <proj status="active">
14:     <location lat="36.101232" long="-86.820759" />
15:     <description>
16:       <name>Village Hall</name>
17:       <address>2140 Hobbs Rd.</address>
18:       <address2>Nashville, TN 37215</address2>
19:       <img>condovh.jpg</img>
20:     </description>
21:   </proj>
22:   ...
23:   <proj status="completed">
24:     <location lat="36.091559" long="-86.832686" />
25:     <description>
26:       <name>Harding Hall</name>
27:       <address>2120 Harding Pl.</address>
28:       <address2>Nashville, TN 37215</address2>
29:       <img>condohh.jpg</img>
30:     </description>
31:   </proj>
32: </projects>
Hopefully this code allows you to make sense of the output shown in Figure 16.3. For example, the printed XML data that is partially visible in the figure corresponds to the first project in the condos.xml document, which appears in lines 4 through 12.
Printing all of the nitty-gritty details of an XML document is certainly interesting but it isn’t exactly practical. What is more practical is printing the contents of an XML document but in such a way that it is more accessible to the person viewing the resulting web page. If you recall from the previous hour, you saw a cool sample page that showed how to map condominium projects on a custom map in Google Maps. The condominium data is the same data you just saw in Listing 16.4. You can use JavaScript and the DOM to print a formatted listing of this data that could potentially be used to provide a directory of condominium projects. This is an example of how the exact same XML data can be manipulated through different technologies to provide surprisingly different views.
The code that prints the condominium listing is structured roughly similar to the example you saw in the previous section that printed all of the nodes of a document. However, in this case there is no recursion because you aren’t “walking” the document tree. Instead, you pluck out nodes of a particular type and then print them. For example, you know that all nodes corresponding to the <name> tag contain project names. So, to print the name of a project just grab the array of <name> tags and print each of them out. This technique is used to print the name, address (two lines), and image for each condominium project.
Listing 16.5 contains the complete code for the condominium list example web page.
Example 16.5. An HTML Page That Prints the Condominium Document as a Formatted List
 1: <html>
 2:   <head>
 3:     <title>Condominium List</title>
 4:     <script type="text/javascript">
 5:       var xmlDoc;
 6:       function loadXMLDoc() {
 7:         // XML loader for IE
 8:         if (window.ActiveXObject) {
 9:           xmlDoc = new ActiveXObject("Microsoft.XMLDOM");
10:           xmlDoc.load("condos.xml");
11:           printCondos();
12:         }
13:         // XML loader for other browsers
14:         else {
15:           xmlDoc = document.implementation.createDocument("", "", null);
16:           xmlDoc.load("condos.xml");
17:           xmlDoc.onload = printCondos;
18:         }
19:       }
20:
21:       function printCondos() {
22:         var nameNodes = xmlDoc.getElementsByTagName("name");
23:         var addrNodes = xmlDoc.getElementsByTagName("address");
24:         var addr2Nodes = xmlDoc.getElementsByTagName("address2");
25:         var imgNodes = xmlDoc.getElementsByTagName("img");
26:         for (var i = 0; i < nameNodes.length; i++) {
27:           document.write("<div style='font-family:arial; font-weight:bold;
28:             color:maroon'>" + nameNodes[i].firstChild.nodeValue +
29:             "</div>");
30:           document.write("<div style='font-family:arial'>" +
31:             addrNodes[i].firstChild.nodeValue + "<br />");
32:           document.write(addr2Nodes[i].firstChild.nodeValue + "</div>");
33:           document.write("<img src='" + imgNodes[i].firstChild.nodeValue +
34:             "' alt='" + nameNodes[i].firstChild.nodeValue + "' /><hr />");
35:         }
36:       }
37:     </script>
38:   </head>
39:
40:   <body onload="loadXMLDoc()">
41:   </body>
42: </html>
This code starts out familiar in that it relies on the loadXMLDoc() function to load the condos.xml document (lines 9, 10, 15, and 16), as well as calling the printCondos() function to print the relevant document content (lines 11 and 17). The printCondos() function is where all the action takes place.
The printCondos() function starts off by extracting four arrays of nodes from the XML document (lines 22 to 25). Each of these arrays corresponds to a certain tag in the document. For example, the project names that are coded using the <name> tag in the XML document are grabbed as an array of nodes by calling the DOM’s getElementsByTagName() function (line 22). The name of the tag is passed into the function, and the result is an array containing elements that match that tag name.
After the four arrays of elements are extracted, a loop is created that iterates through each element and prints it to the page (lines 26 through 35). Even the image associated with each condo is printed, and its resulting HTML <img> tag is coded to include the project name in the required alt attribute so that when you hover the mouse over the image in a web browser the name of the project will appear. Speaking of viewing the page in a web browser, Figure 16.4 shows the results of this script in Mozilla Firefox.
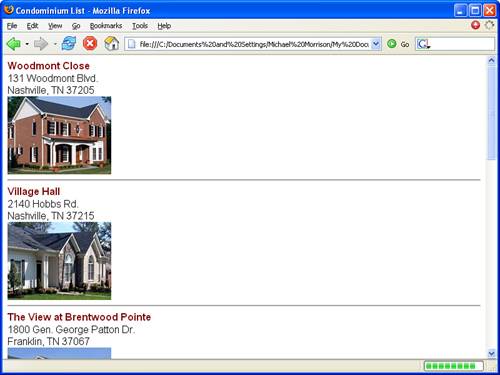
The figure reveals how the condominium list is formatted on an HTML page as a vertical sequence. You could just as easily modify the script so that the condos are arranged in a table or in some other layout that suits your particular needs. The point is that the DOM allows you to access the XML data and render it to an HTML web page any way you want.
Not only does the DOM enable you to access an XML data structure in a number of ways, but it also enables you to alter an XML data structure. Rather than providing you with another lengthy program example that explains how to alter the DOM tree, I’ll just show you some specific examples that demonstrate how such tasks are performed. Note that if you were using a language other than JavaScript, you could store the updated DOM tree on disk once the tree has been updated. However, JavaScript runs within the context of a web browser and has no access to the file system, so any changes you make to a DOM tree in a JavaScript program will be lost as soon as you leave that page.
First, let’s look at how you can access a specific node in a tree. In the earlier examples in this hour, you saw how to iterate over all of the children of a particular node. You will probably want to be more specific when you’re updating the tree. The key method in taking more exacting control of the document tree is the item() method of the NodeList interface. When you call the item() method and supply it with an index, it returns the node associated with that index. Let’s say you have the document node of a DOM tree assigned to the variable xmlDoc. To access the root level element of the document, you can use the following code:
xmlDoc.childNodes.item(0);
Or, if you prefer, simply
xmlDoc.childNodes.firstChild;
In order to be valid XML, you can have only one element at the top level of your tree, so when you want to add a node, you need to add it to the root element. You can assign the root element to a variable like this:
var root = xmlDoc.childNodes.firstChild;
After you’ve done that, you can add an element as its child. However, first you’ll need an element node. You can create one using the document object, like this:
var newElement = xmlDoc.createElement("automobile");Then, you can add it to your tree, like this:
root.appendChild(newElement);
If you want, you can then add an attribute to the node you just inserted into the tree:
var attr = doc.createAttribute("make");
attr.text = "Suburu";
root.childNodes.lastChild.setAttributeNode(attr);
First, you create an attribute just like you created the element before. Then you set its value, and finally you add it to the element you just added to the tree. Note that the lastChild() method is used to access the node you just added. Because you just appended the node to the tree, you know that it’s the last child of the root element. It’s just as easy to update and remove items in the DOM. To update the attribute you just added, you just need to access it in the DOM tree and change its value, like so:
root.childNodes.lastChild.setAttribute("make", "BMW");As you can see, there’s a method specifically used to update a named attribute. To remove that attribute, just call the following method:
root.childNodes.lastChild.removeAttribute("make");Now let’s look at updating and removing elements themselves. There are two ways to do so—you can replace child nodes or remove them. First, let’s look at replacing them. In order to replace an element, you’ll need to create a new element to put in place of the old one, and then call the method that swaps them:
var replacementElem = xmlDoc.createElement("customer");
var oldNode = root.replaceChild(replacementElem, root.childNodes.lastChild);
As you can see, to replace a child of a node, you just have to pass in the new node and a reference to the node that will be replaced. The node that was replaced is assigned to the variable oldNode—if you want to do something else with it. Removing a node is even easier:
var anotherOldNode = root.removeChild(root.childNodes.lastChild);
The node that was removed is assigned to the variable anotherOldNode.
Hopefully this brief introduction to document tree manipulation has given you some ideas about how to go about using the DOM to tinker with your own XML documents.
The DOM is a W3C standard that describes how the structure of XML and HTML documents can be expressed as a native data structure within various programming languages. The DOM standard is language neutral, and implementations exist for a number of languages, including JavaScript, Java, C++, Perl, and Visual Basic. In this hour, you learned about the various interfaces that make up the DOM and how you can access data stored within the DOM structure from JavaScript. Even though the syntax of the language you use with the DOM might differ significantly from the syntax used in these JavaScript examples, the means of accessing the DOM will be basically the same. On the other hand, you may be quite content to stick with JavaScript as your language of choice for interacting with the DOM.
Why don’t some of the example programs in this hour work in Mozilla Firefox and Opera? | |
Unfortunately, some advanced XML features such as XML data islands and data binding vary from browser to browser, and aren’t even supported in some browsers. This hour focuses on the Internet Explorer version of data islands and data binding. Mozilla Firefox has similar features although they are coded a little differently, while Opera has no support for either feature. | |
Can large documents create performance issues when I use the DOM? | |
Yes. As you know, DOM parsers create a data structure that contains all of the data in an XML document, which means that all of the data is loaded into memory at once. If your XML document is really large (in comparison to the amount of RAM in the computer that your application runs on), performance issues can arise. In those cases, it may make more sense to use a SAX parser because it does not deal with the document as a whole. SAX is covered in the next hour, “SAX: The Simple API for XML.” |
The Workshop is designed to help you anticipate possible questions, review what you’ve learned, and begin learning how to put your knowledge into practice.