
Important
You cannot build a secure system until you understand your threats. It’s as simple as that.
Regrettably, a great deal of software is designed in ad hoc fashion, and security is often a victim of the chaos. One way to help provide structure to the design phase is to create threat models for your applications. A threat model is a security-based analysis that helps people determine the highest level security risks posed to the product and how attacks can manifest themselves. The goal is to determine which threats require mitigation and how to mitigate the threats. The whole point of threat modeling is to get you to think about the security of your application in a relatively formal way. Much has been written about threats but little about threat modeling. In my experience, a team that creates a threat model for its application understands where the product is most vulnerable and chooses appropriate techniques to mitigate threats, which leads to more secure systems.
A member of the press asked me this question a few days after the Windows Security Push in February and March of 2002: what was the most important skill our team taught developers, testers, and designers? Without hesitating, I mentioned that we taught developers to trace every byte of data as it flows through their code and to question all assumptions about the data. For testers, it was data mutation, which we’ll cover in Chapter 19. And for designers it was analyzing threats. In fact, during the Windows Security Push (and all pushes that followed at Microsoft), we found that the most important aspect of the software design process, from a security viewpoint, is threat modeling.
The overriding driver of threat modeling is that you cannot build secure systems until you evaluate the threats to the application with the goal of reducing the overall risk. The good news is that threat modeling is simple and enjoyable, but it does require significant time investment to get right. And for the lazy designer, threat modeling can form the basis of the security section of the design specifications!
Performing threat modeling also offers other benefits, including these:
Threat models help you understand your application better. This is obvious. If you spend time analyzing the makeup of your application in a relatively structured manner, you cannot help but learn how your application works! I’ve lost count of how many times I’ve heard the phrase "Oh, so that’s how it works!" during a threat-modeling session!
Threat models help you find bugs. All groups I’ve worked with track how bugs are found, and lately many have added a new value to the "How Found" field of their bug databases: Threat Model. If you think about it, it makes sense. You can find bugs by looking at code, and you can find bugs by testing the application. In addition, you can find bugs by looking at the design of the application critically. In fact, we’ve discovered that about 50 percent of the bugs found are through threat analysis, with the other 50 percent comprising bugs found during test and code analysis.
You’ll also find complex design bugs that are not likely to be found in any other way. Multistep security bugs where several small failures combine to become one large disaster are best found using threat analysis techniques.
Threat models can help new team members understand the application in detail. There’s always a time lag between a new member of the development team joining the group and that person becoming 100 percent productive. Because a threat model is such a well-researched work, it can serve as a vehicle to expedite the learning curve.
Threat models should be read by other product teams that build on your product. I’ve seen in at least two instances a team developing a product—let’s call it product B, which relies on product A—think that product A mitigated a certain type of threat when in fact it did not. The product B team found this out by reviewing the threat model for product A. You should consider adding a section to the threat model outlining such threats—threats that affect other products—so that other product teams that rely on your product don’t have to wade through massive threat models to determine what affects their products.
Threat models are useful for testers, too. Testers should test against the threat model, which will help them develop new test tools. As I will outline in Chapter 19, you can use threat models to drive well-designed security test plans.
Analyzing threats can be a great deal of work, but it’s important that you spend time in this phase. It’s cheaper to find a security design bug at this stage and remedy the solution before coding starts. You must also keep the threat model current, reflecting new threats and mitigations as they arise.
The threat-modeling process is as follows:
Assemble the threat-modeling team.
Decompose the application.
Determine the threats to the system.
Rank the threats by decreasing risk.
Choose how to respond to the threats.
Choose techniques to mitigate the threats.
Choose the appropriate technologies for the identified techniques. (I’ll cover choosing appropriate technologies in the "Security Techniques" section, which follows the "Choose Techniques to Mitigate the Threats" section.)
You might need to perform the process a couple of times because no one is clever enough to formulate all the threats in one pass. In addition, changes occur over time, new issues are learned, and the business, technical, and vulnerability landscape evolves. All of these have an impact on the threats to your system. Figure 4-1 shows the process.
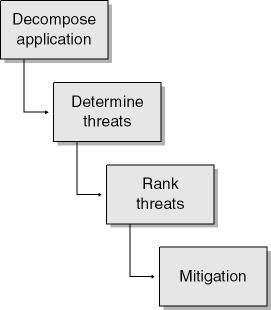
Let us look at each part of this process.
The first step is to gather together people from the product group to perform the initial threat analysis process. Have one person lead the team; generally, this person is the most security-savvy person of the team. By "security-savvy" I mean able to look at any given application or design and work out how an attacker could compromise the system. The security person may not be able to read code, but they should know where other products have failed in the past. This is important because threat modeling is more productive when people have an appreciation of how to attack systems.
Make sure at least one member from each development discipline is at the meeting, including design, coding, testing, and documentation. You’ll get a broader view of the threats and mitigation techniques with a broader group. If you have people outside your immediate team who are good with security, invite them—fresh eyes and questions about how things work often lead to interesting discoveries. However, don’t have more than ten people in the room, or the meeting will slow to a standstill ad you’ll make little progress. I’ve also found it useful to invite a marketing or sales person, not only to get input but also to educate. Having the sales force on your side is always a good idea because they can explain to your clients what you’re doing to make the system secure. (While it’s not critical that they are at each meeting, at least you can point out to them that they were invited the next time they complain about "not being part of the process!")
Before the threat-modeling process is under way, it’s important to point out to all the attendees that the goal is not to solve problems at the meeting but to identify the components of the application and how they interact and, eventually, to find as many security threats as possible. The design and code changes (and arguments) are made in later meetings. However, some discussion of mitigation techniques is inevitable; just don’t let the conversation get too far into the details or, as we say at Microsoft, into a "rat hole."
Also, the first meeting should use a whiteboard and later be transcribed to an electronic form for further analysis and review.
Important
Do not try to fix problems and supply solutions during the threat-modeling meetings. The purpose of the meeting is to find threats, not fix them. Based on my experience, many threat-modeling meetings don’t start looking for threats at the first meeting, let alone solutions!
Once the first edition of this book was published and many people began threat modeling in earnest, it became clear that successful threat modeling requires a more structured approach than simply "thinking up threats." To succeed with such a simplistic approach requires a great deal of expertise or at least a detailed understanding of how hackers operate. Don’t get me wrong: understanding how vulnerabilities manifest themselves and how hackers work is useful, but we have to realize that not everyone is a security expert. In addition, "thinking up threats" is too random.
Before I delve into the more formal process of threat modeling, allow me to give a little history about how we arrived at the process. A small group of us within Microsoft got together in November 2001 to discuss how to make threat modeling a little more structured, and with help from some application-modeling experts, we arrived at the conclusion that having a data flow diagram, or some other structured diagram, in place prior to threat modeling was of utmost help. Our view was reinforced in early 2002 when Microsoft engaged @stake (http://www.atstake.com), a security research and consulting company, to perform security reviews of various Microsoft technologies. The @stake threat models included data flow diagrams as a critical component of decomposing the application prior to performing the threat analysis process.
At the same time, the Microsoft SQL Server team started a large-scale security push, but rather than performing code reviews from the outset, they spent one month simply working on threat models. As you can probably guess, the SQL Server team understands data. After all, SQL Server is a database, and it made perfect sense for the team to model their application by using data flow diagrams (DFDs). This strengthened our belief that formal decomposition techniques, such as DFDs, are useful when threat modeling. We slightly extended DFDs to include assumptions about the data and trust boundaries. After all, security bugs are often caused by incorrect assumptions about the data, especially as the data crosses from untrusted to trusted boundaries.
In this section, I’ll show how to use DFDs to decompose an application into its key components before getting started on threat modeling. I’m not wedded to DFDs as a decomposition technique for threat analysis. Parts of the Unified Modeling Language (UML)—most notably, activity diagrams—lend themselves well to the task as they capture processes in a way that is very similar to DFDs. However, UML activity diagrams focus on flow of control between processes, rather than on the flow of data between processes, which DFDs illustrate. It’s a similar concept, but not identical.
More Information
It is not the purpose of this book to teach you how to create DFDs or how to use UML. There are plenty of good reference books on the subject—some are listed in the bibliography.
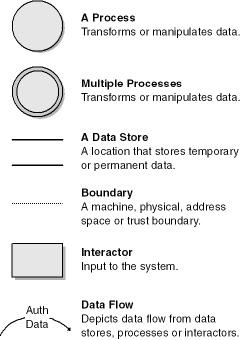
The guiding principle for DFDs is that an application or a system can be decomposed into subsystems, and subsystems can be decomposed into still lower-level subsystems. This iterative process makes DFDs useful for decomposing applications. Before we get started, you should know the basic symbols used when creating DFDs. Figure 4-2 shows the most common symbols.
The first phase of decomposition is to determine the boundaries or scope of the system being analyzed and to understand the boundaries between trusted and untrusted components. DFDs define the reach of the application using a high-level context diagram. If you do not define the scope of the application, you’ll end up wasting a great deal of time on threats that are outside scope and beyond the control of your application. Note that a context diagram has only one process and usually no data stores. Think of it as the 32,000 ft. view—users interacting with the system, not minutiae. Once this phase is complete, you drill down to lower levels by using level-0, level-1, and level-2 diagrams, and so on, as outlined generically in Figure 4-3.
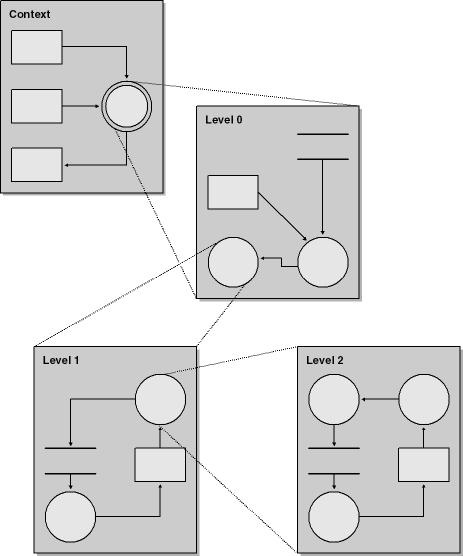
Figure 4-3. The general concept of data flow diagrams—drilling down from a context diagram to lower level data flow diagrams.
Rather than explain DFD theoretically, let’s get started with a sample application. The example we’ll use in this chapter is a simplified, Web-based payroll application.
Tip
I created the DFD diagrams in this chapter by using the Data Flow Diagram template in Microsoft Visio Professional 2002.
Figure 4-4 shows a context diagram for the sample payroll application.
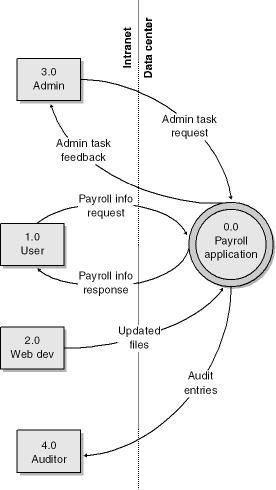
When defining the scope of the DFD, consider the following points:
Ignore the inner workings of the application. At this stage it does not matter how things work; we are defining scope, not functional details.
To what events or requests must the system respond? For example, a stock market Web service could receive requests for a stock quote based on a ticker symbol.
What responses will the process generate? In a stock quote example, the Web service could provide a time and a quote, including current ask and bid prices.
Identify the data sources as they relate to each request and response. Some data sources are persistent (files, registry, databases, etc.), and others are short-lived or ephemeral (cache data).
Ascertain the recipient of each response.
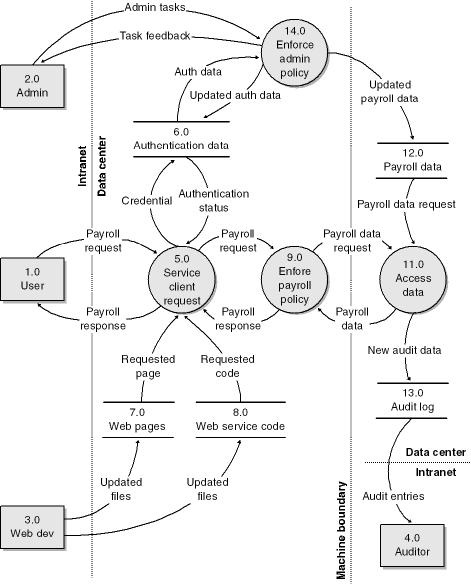
Each process in Figure 4-4 in turn comprises one or more processes and will need to be decomposed accordingly. Figure 4-5 shows a level-1 diagram for the application.
There are some simple rules you should follow when creating and naming the entities in a DFD:
A process must have at least one data flow entering and one data flow exiting.
All data flows start or stop at a process.
Data stores connect a process with a data flow.
Data stores cannot connect together; they must pass through a process.
Process names are verbs and nouns, or verb phrases (for example, Process Stock Symbol, Evaluate Exam Grade, and Create Audit Entry).
Data flow names are nouns or noun phrases (for example, Stock Price, Exam Score, and Event Audit Data).
External entity or interactor names are nouns (for example, Stock Broker and Exam Candidate).
Data store names are nouns (for example, Realtime Stock Data, Exam Result Data, and Audit Log).
Eventually, you get to a point where you understand the composition of the application. Generally, you should have to dive down only two, three, or four levels deep if all you are doing is threat modeling. I’ve seen some DFDs that went eight levels deep, but they were for application design, not threat modeling. Just go deep enough to understand your threats; otherwise, people will turn off threat modeling very quickly when they think they must spend two months just doing the DFDs! I’ve also seen some great threat models that use only a level-1 DFD.
Important
Do not fall into analysis paralysis when threat modeling—just go deep enough to determine the threats. Analysis paralysis is a term given to the situation where a team of otherwise intelligent and well-meaning people enter into a phase of analysis that ends only when the project is canceled.
Figure 4-6 shows a high-level physical view of the payroll sample application, including the key components and the core users—or, in threat-modeling parlance, actors—of the solution.
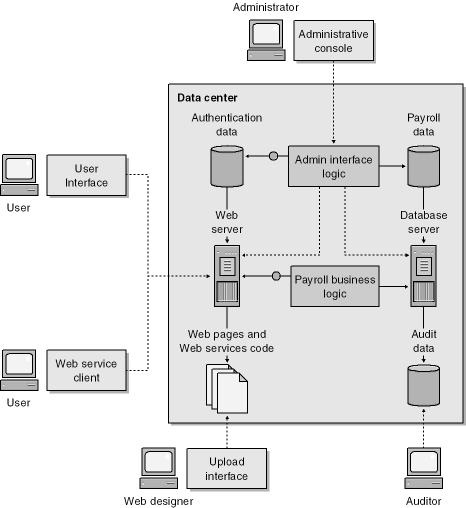
The main components of this application are outlined in Table 4-1.
Table 4-1. Main Components and Users of the Sample Payroll Application
|
Component or User |
Comments |
|---|---|
|
User |
The users are the main customers of this solution. They can review their payroll data, look at their electronic pay stubs going back at least five years, and review tax information. The users access their data through two possible means: a Web page or a Web service client. There are no restrictions on which users can use which technology. |
|
Administrator |
The administrators manage the system; they check the health of the servers, as well as manage the authentication and payroll data. Note that administrators cannot manage the payroll data directly; rather, the data is provided to the administrators by the Payroll department. |
|
Web designer |
The Web designers maintain the Web application source code, including the Web pages and the Web service code. |
|
Auditor |
The auditor’s role is simply to review the audit logs to determine whether there has been any suspicious activity. |
|
User interface |
The user interface is HTML-based and is the primary access point to the system for users. |
|
Web service client |
An optional interface is the Web service client that returns raw unformatted payroll data to the user. |
|
Administrative console |
The administrative interface allows an administrator to manage the servers and data that make up the application. |
|
Upload interface |
Web designers work on local copies of the code that makes up the application, and they upload changes and code or pages through this Web-based interface. |
|
Web server |
The Web server is simply a computer running a Web server. |
|
Web pages |
The Web pages support the primary interface to the system: a Web-based solution that includes dynamic pages, static pages, and images, all of which is maintained by the Web designers. |
|
Web service code |
Web service code supports the secondary interface to the system: the Web service. Once again, this code is maintained by the Web designers. |
|
Authentication data |
Authentication data is used to determine whether all the users are who they say they are. |
|
Payroll business logic |
The payroll business logic component takes requests from the user and determines the appropriate data to display to the user. |
|
Admin interface logic |
This component determines what is rendered on the administrative user interface. It maintains all the rules about who can do what with the data. |
|
Database server |
The database server accesses and manipulates the payroll information and generates audit data. |
|
Payroll data |
Read by the database server, this is the critical portion of the application and provides the user with payroll and tax information. |
|
Audit data |
Written by the database server, this data keeps track of everything that happens to the audited payroll data. |
The next step is to take the identified components from the decomposition process and use them as the threat targets for the threat model. The reason you analyze the application structure is not to determine how everything works, but rather to investigate the components, or assets, of the application and how data flows between the components. The components or assets are often called the threat targets. Before I dive into how to determine the threats to the system, let’s look at a way of categorizing threats. This becomes useful later because you can apply certain strategies to mitigate specific threat categories.
When you’re considering threats, it’s useful to look at each component of the application and ask questions like these:
Can a nonauthorized user view the confidential network data?
Can an untrusted user modify the patient record data in the database?
Could someone deny valid users service from the application?
Could someone take advantage of the feature or component to raise their privileges to that of an administrator?
To aid asking these kinds of pointed questions, you should use threat categories. In this case, we’ll use STRIDE, an acronym derived from the six threat categories on the following page.
Spoofing identity
Spoofing threats allow an attacker to pose as another user or allow a rogue server to pose as a valid server. An example of user identity spoofing is illegally accessing and then using another user’s authentication information, such as username and password. A good real-life example is an insecure authentication technique, such as HTTP Authentication: Basic and Digest Access Authentication (RFC2617). If Fletcher can view Blake’s username and password in the HTTP Authorization header, he can replay the username and password to access secured data as if he were Blake.
Examples of server spoofing include DNS spoofing and DNS cache poisoning. A good example of this is a reported vulnerability in Apple Computer’s SoftwareUpdate software. Read about the vulnerability at http://news.com.com/2100-1001-942265.html if you’re unfamiliar with the concepts of attacking DNS servers; the article includes a useful overview of DNS spoofing and DNS cache poisoning.
Tampering with data
Data tampering involves malicious modification of data. Examples include unauthorized changes made to persistent data, such as that held in a database, and the alteration of data as it flows between two computers over an open network, such as the Internet. A real-life example includes changing data in a file protected with a weak ACL, such as Everyone (Full Control), on the target computer.
Repudiation
Repudiation threats are associated with users who deny performing an action without other parties having any way to prove otherwise—for example, a user performing an illegal operation in a system that lacks the ability to trace the prohibited operations. Nonrepudiation is the ability of a system to counter repudiation threats. For example, if a user purchases an item, he might have to sign for the item upon receipt. The vendor can then use the signed receipt as evidence that the user did receive the package. As you can imagine, nonrepudiation is important for e-commerce applications.
Information disclosure
Information disclosure threats involve the exposure of information to individuals who are not supposed to have access to it—for example, a user’s ability to read a file that she was not granted access to and an intruder’s ability to read data in transit between two computers. The spoofing example shown earlier is also an example of an information disclosure threat because to replay Blake’s credentials, Fletcher must view the credentials first.
Denial of service
Denial of service (DoS) attacks deny service to valid users— for example, by making a Web server temporarily unavailable or unusable. You must protect against certain types of DoS threats simply to improve system availability and reliability. A very real example of this includes the various distributed denial of service attacks (DDoS), such as Trinoo and Stacheldraht. You can learn more about these attacks at http://staff.washington.edu/dittrich/misc/ddos/.
Note
Denial of service attacks are problematic because they are reasonably easy to achieve and can be anonymous. For example, Cheryl, a valid user, will not be able to place an order by using your Web-based sales application if Lynne, a malicious user, has launched an anonymous attack against your Web site that consumes all your CPU time. As far as Cheryl is concerned, your Web site is unavailable, so she might go elsewhere, perhaps to a competitor, to place her order.
Elevation of privilege
In this type of threat, an unprivileged user gains privileged access and thereby has sufficient access to compromise or destroy the entire system. Elevation of privilege threats include those situations in which an attacker has effectively penetrated all system defenses and become part of the trusted system itself, a dangerous situation indeed. An example is a vulnerable computer system that allows an attacker to place an executable on the disk and then to wait for the next person to log on to the system. If the next user is an administrator, the malicious code also runs as an administrator.
More Information
It is important to think about vulnerabilities according to both cause and effect. STRIDE is a good effect classification. However, you should also categorize vulnerabilities according to their cause. This second classification eventually becomes a long list of things to avoid when coding or designing, which can be immensely useful, especially to junior programmers.
Note
The concepts of STRIDE and DREAD (which is covered later in this chapter) were conceived, built upon, and evangelized at Microsoft by Loren Kohnfelder, Praerit Garg, Jason Garms, and Michael Howard.
As you may have noted, some threat types can interrelate. It’s not uncommon for information disclosure threats to lead to spoofing threats if the user’s credentials are not secured. And, of course, elevation of privilege threats are by far the worst threats—if someone can become an administrator or root on the target computer, every other threat category becomes a reality. Conversely, spoofing threats might lead to a situation where escalation is no longer needed for an attacker to achieve his goal. For example, using SMTP spoofing, an attacker could send an e-mail purporting to be from the CEO and instructing the workforce to take a day off for working so well. Who needs to elevate their privilege to CEO when you have social engineering attacks like this!
Now let’s turn our attention to the process of determining the threats to the system. We’ll use what are called threat trees, and we’ll see how we can apply STRIDE to threat trees.
More Information
Other examples of threat analysis include Operationally Critical Threat, Asset, and Vulnerability Evaluation (OCTAVE) from the Software Engineering Institute at Carnegie Mellon University. You can find more information about OCTAVE at http://www.cert.org/octave.
A well-known method for identifying possible failure modes in hardware is by using fault trees, and it turns out this method is also well-suited to determining computer system security issues. After all, a security error is nothing more than a fault that potentially leads to an attack. The software-related method is also often referred to as using threat trees, and some of the best threat tree documentation is in Edward Amoroso’s Fundamentals of Computer Security Technology (Prentice Hall, 1994). Details about Amoroso’s book can be found in the bibliography of this book.
The idea behind threat trees is that an application is composed of threat targets and that each target could have vulnerabilities that when successfully attacked could compromise the system. The threat tree describes the decision-making process an attacker would go through to compromise the component. When the decomposition process gives you an inventory of application components, you start identifying threats to each of those components. Once you identify a potential threat, you then determine how that threat could manifest itself by using threat trees.
Let’s look at a couple of simple examples of threat trees, as this is the best way to illustrate their usefulness. If you cast your mind back to the sample payroll data flow diagram, you’ll remember that the user’s payroll data is transmitted from the Web server computer to the employee’s computer (or, more accurately, transmitted by the service client request process). That portion of the application is shown in the Figure 4-7.
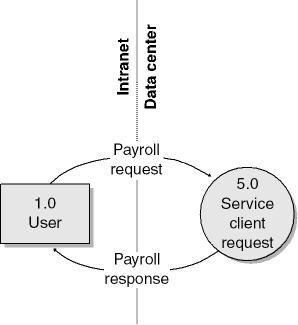
Figure 4-7. Portion of the Level-1 DFD showing user and Web server interaction using the service client request process.
Think for a moment about the payroll data that flows between the user (an employee) and the computer systems inside the data center and back. It’s sensitive data, confidential between the company and the user—you don’t want a malicious employee looking at someone else’s payroll information, which means that the solution must protect the data from prying eyes. This is an example of an information disclosure threat. There are a number of ways an attacker can view the data, but the easiest, by far, is to use a network protocol analyzer, or sniffer, in promiscuous mode to look at all the data as it travels between the unsuspecting target user’s computer and the main Web server. Another attack might involve compromising a router between the two computers and reading all traffic between the two computers.
Figure 4-8 shows a threat tree outlining how an attacker could view another user’s confidential payroll data.
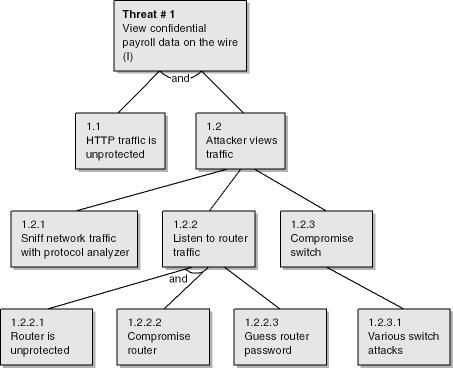
Figure 4-8. Threat tree to view sensitive user payroll data as it travels from the server to the client computer.
The top shaded box is the ultimate threat, and the boxes below it are the steps involved to make the threat a reality. In this case, the threat is an information disclosure threat (indicated by the (I) in the box): an attacker views another user’s payroll data. Note that a threat should relate directly to a threat target identified in the decomposition process. In this example, it’s the payroll response from the 5.0 service client request process to 1.0 user.
Important
A threat should relate directly to a threat target identified in the decomposition process.
Notice that for this threat to become a real exploit, the HTTP traffic must be unprotected (1.1) and the attacker must actively view the traffic (1.2). For the attacker to view the traffic, he must sniff the network (1.2.1) or listen to data as it passes through a router (1.2.2) or switch (1.2.3). Because the data is unprotected, the attacker can view the data in cases 1.2.1 and 1.2.2, because it’s common for HTTP traffic to be unprotected. However, for the sample application, we don’t want "all-and-sundry" to be reading confidential data. Note that for the router listening scenario (1.2.2) to be real, one of two facts must be true: either the target router is unpatched and has been compromised (1.2.2.1 and 1.2.2.2 must both be true) or the attacker has guessed the router administrative password (1.2.2.3). The tying of two facts together in the first scenario is symbolized by the small semicircular link between the two nodes. You could also simply add the word and between the lines as we’ve done in the figure.
Although trees communicate data well, they tend to be cumbersome when building large threat models. An outline is a more concise way to represent trees. The following outline represents the threat tree in Figure 4-8.
1.0 View confidential payroll data on the wire
    1.1 HTTP traffic is unprotected (AND)
        1.2 Attacker views traffic
            1.2.1 Sniff network traffic with protocol analyzer
            1.2.2 Listen to router traffic
                1.2.2.1 Router is unpatched (AND)
                1.2.2.2 Compromise router
                1.2.2.3 Guess router password
        1.2.3 Compromise switch
            1.2.3.1 Various switch attacks
You can make a couple of small additions to threat trees to show the most likely attack vectors. First, use dotted lines to show the least likely attack points and solid lines for the most likely. Second, place circles below the least likely nodes in the tree outlining why the threat is mitigated. Figure 4-9 illustrates the concept.

Note that you should not add the mitigation circles during the threat-modeling process. If you do, you’re wasting time coming up with mitigations; remember that you’re not trying to solve the issues at the threat-modeling sessions. Rather, you should add this extra detail later, in other meetings, once the design starts to gel.
There is an interesting effect of adding the "dotted-lines-of-most-resistance" to threat trees: they act as a pruning mechanism. Take a look at Figure 4-11. You’ll notice that subthreat 3.2 is unlikely because one side of the AND clause for subthreats 3.2.1 and 3.2.2 is unlikely. For the threat to be realistic, both sides of an AND clause must be true. This means you can perform "tree-pruning," which makes focusing on the real issues much easier.
You need to track more than just the title and type of a threat; you should also determine and record all the items in Table 4-2.
Table 4-2. Items to Note While Threat Modeling
|
Item |
Comments |
|---|---|
|
Title |
Be reasonably descriptive, but don’t say too much! The threat should be obvious from the title—for example, "Attacker accesses a user’s shopping cart." |
|
Threat target |
Which part of the application is prone to the attack? For example, the threat targets in the sample payroll application include the payroll request data flow (1.0È5.0) and the process that enforces administration policy (14.0). |
|
Threat type or types |
Record the type of threat based on the STRIDE model. As we’ve seen, a threat can fall under multiple STRIDE categories. |
|
Risk |
Use your preferred method of calculating risk. Make sure you are consistent. |
|
Attack tree |
How would an attacker manifest the threat? Keep the trees simple. If you go too deep, you’ll just get lost! |
|
Mitigation techniques (optional) |
How would you mitigate such a threat? If a mitigation technique is already employed, make a note of it; otherwise, move on to the next threat. Remember that you’re not trying to solve the issue during the threat-modeling session. You should also note how difficult the threat is to mitigate; some problems are easier to mitigate than others. Having an idea of mitigation difficulty helps in prioritization. I’ll discuss some mitigation techniques later in this chapter. |
|
Mitigation status |
Has the threat been mitigated? Valid entries are: Yes, No, Somewhat, and Needs Investigating. |
|
Bug number (optional) |
If you use a bug-tracking database, keep track of the bug number. Note that your threat-modeling database or tool should not be a replacement for the bug database. There’s nothing worse than having duplicate documentation regarding bugs and one set of documentation becoming outdated. Capture just enough about the threat during the threat-modeling process, and maintain your bug-tracking database. |
Important
Threat modeling should list all interfaces to the system, regardless of whether they are published.
Once you’ve created threat trees and captured the threats, you need to determine the most important threats so that you can prioritize your work. Work out which issues to investigate first by determining the risk the threat poses. The method you use to calculate risk is not important, so long as you are realistic and consistent.
A simple way to calculate risk—let’s abbreviate it in this case as RiskCO—is by multiplying the criticality (damage potential) of the vulnerability by the likelihood of the vulnerability occurring, where 1 is low criticality or likelihood of occurrence and 10 is high criticality or likelihood of occurrence:
RiskCO = Criticality * Likelihood of Occurrence
The bigger the number, the greater the overall risk the threat poses to the system. For example, the highest risk rating possible is 100, which is a result of the greatest criticality rating, 10, multiplied by the greatest likelihood rating, also 10.
Another way to determine risk, derived from work at Microsoft, is to rank bugs by using a method called DREAD. (I’ll refer to it as RiskDREAD in calculations.) This alarmist, but appropriate, name is an acronym from the following terms:
Damage potential
How great can the damage be? Measure the extent of actual damage possible with the threat. Typically, the worst (10) is a threat that allows the attacker to circumvent all security restrictions and do virtually anything. Elevation of privilege threats are usually a 10. Other examples relate to the value of data being protected; medical, financial, or military data often ranks very high.
Reproducibility
How easy is it to get a potential attack to work? Measures how easy it is to get a threat to become an exploit. Some bugs work every time (10), but others, such as complex time-based race conditions, are unpredictable and might work only now and then. Also, security flaws in features installed by default have high reproducibility. High reproducibility is important for most attackers to benefit.
Exploitability
How much effort and expertise is required to mount an attack? For example, if a novice programmer with a home PC can mount the attack, that scores a big fat 10, but a national government needing to invest $100,000,000 to mount an attack is probably 1. In addition, an attack that can be scripted and used by script kiddies is a big fat 10, too. Also consider what degree of authentication and authorization is required to attack the system. For example, if an anonymous remote user can attack the system, it ranks 10, while a local user exploit requiring strong credentials has a much lower exploitability.
Affected users
If the threat were exploited and became an attack, how many users would be affected? This measures roughly what percentage of users would be impacted by an attack: 91–100 percent (10) on down to 0–10 percent (1). Sometimes the threat works only on systems that have installed a certain option or set some configuration state in a specific way; again, estimate impact as best you can. Server and client distinction is very important; affecting a server indirectly affects a larger number of clients and, potentially, other networks. This will inflate the value compared to a client-only attack. You also need to think about market size and absolute numbers of users, not just percentages. One percent of 100 million users is still a lot of affected people!
Discoverability
This is probably the hardest metric to determine and, frankly, I always assume that a threat will be taken advantage of, so I label each threat with a 10. I then rely on the other metrics to guide my threat ranking.
You determine a DREAD rating by averaging the numbers (adding the numbers and dividing by 5, in other words). Once you’ve calculated the risk of each threat, sort all the threats in descending order—threats with a higher risk at the top of the list and lower-risk threats at the bottom. Here’s an example.
Threat #1: Malicious user views confidential on-the-wire payroll data.
8 Damage potential: Reading others’ private payroll data is no joke.
10 Reproducibility: It is 100 percent reproducible.
7 Exploitability: Must be on subnet or have compromised a router.
10 Affected users: Everyone, including Jim the CEO, is affected by this!
10 Discoverability: Let’s just assume it’ll be found out!
RiskDREAD: (8+10+7+10+10) / 5 = 9
One a scale of one to ten, 9 is a serious issue. This threat should be addressed as soon as possible, and the solution should not go live until the threat is correctly mitigated.
Important
Some teams I have worked with also factor in the cost and effort to mitigate the threat. Of course, your users don’t care how much it takes to fix, they simply don’t want to be attacked! Remember that!
Another approach that is flexible is to examine various aspects of a threat or vulnerability and then view these aspects in the context of your implementation. This approach is very similar to one developed by Christopher W. Klaus, founder of Internet Security Systems, for use in rating vulnerabilities found by their products. Here are some questions to ask:
Is it a local or remote threat? Can an attacker launch the attack without first needing to obtain local access? Obviously, remote threats are worse than local threats.
What are the consequences of the threat? Immediate escalation of privilege? If so, to what level? Is it an information disclosure issue? Information disclosure that might lead to escalation of privilege?
Is some action required to cause the attack to succeed? For example, an attack that always succeeds against any server is worse than one that requires the administrator to log on.
This approach allows you to build a severity matrix that will help you prioritize how to deal with the issues you uncover.
To bring it all together, you can determine the threat targets from functional decomposition, determine types of threat to each component by using STRIDE, use threat trees to determine how the threat can become a vulnerability, and apply a ranking mechanism, such as DREAD, to each threat.
Applying STRIDE to threat trees is easy. For each system inventory item, ask these questions:
Is this item susceptible to spoofing?
Can this item be tampered with?
Can an attacker repudiate this action?
Can an attacker view this item?
Can an attacker deny service to this process or data flow?
Can an attacker elevate their privilege by attacking this process?
You’ll notice that certain data flow diagram items can have certain threat types. Table 4-3 outlines them.
Table 4-3. Relating DFDs and STRIDE Threat Categories
|
Threat Type |
Affects Processes |
Affects Data Stores |
Affects Interactors |
Affects Data Flows |
|---|---|---|---|---|
|
S |
Y |
Y | ||
|
T |
Y |
Y |
Y | |
|
R |
Y |
Y |
Y | |
|
I |
Y |
Y |
Y | |
|
D |
Y |
Y |
Y | |
|
E |
Y |
Some of these table entries require a little explanation:
Spoofing threats usually mean spoofing a user (accessing her credentials, which is also an information disclosure threat), a process (replacing a process with a rogue, which is also a data-tampering threat), or a server.
Tampering with a process means replacing its binary image or patching it in memory.
Information disclosure threats against processes means reverse engineering the process to divulge how it works or to determine whether it contains secret data.
An interactor cannot be subject to information disclosure; only data about the interactor can be disclosed. If you see an information disclosure threat against a user, you’re probably missing a data store and a process to access that data.
You cannot deny service to an interactor directly; rather, an attacker denies service to a data store, data flow, or a process, which then affects the interactor.
Repudiation threats generally mean a malicious user denying an event occurred. Attacks could be due to actions taken by the user, disrupting audit and authentication data flow on the wire or in a data store.
You can elevate privilege only by taking advantage of a process that grants or uses higher privilege. Simply viewing an administrator’s password (information disclosure) does not grant extra privilege. However, do not lose sight of the fact that some attacks are multistep attacks and viewing an administrative password is a privilege elevation if a vulnerability exists such that the password can be replayed.
In the following tables—Table 4-4 through Table 4-9—we’ll look at some threats to the sample payroll application. Figure 4-8 and Figure 4-10 through Figure 4-14 (which appear after the tables) illustrate the threat trees for the threats described in Table 4-4 through Table 4-9.
Table 4-4. Threat #1
|
Threat Description |
Malicious user views confidential on-the-wire payroll data |
|---|---|
|
Threat Target |
Payroll Response (5.0 È1.0) |
|
Threat Category |
Information disclosure |
|
Risk |
Damage potential: 8 Reproducibility: 10 Exploitability: 7 Affected users: 10 Discoverability: 10 Overall: 9 |
|
Comments |
Most likely attack is from rogue user using a protocol analyzer, because it’s an easy attack to perform; the attack is passive and cheap in terms of time, effort, and money. The switch threat is important because many people think switched networks are secure from sniffing attacks when in fact they are not. If you think they are, take a look at "Why your switched network isn’t secure" at http://www.sans.org. |
Table 4-5. Threat #2
|
Threat Description |
Attacker uploads rogue Web page(s) and code |
|---|---|
|
Threat Target |
Web Pages (7.0) and Web service code (8.0) |
|
Threat Category |
Tampering with data |
|
Risk |
Damage potential: 7 Reproducibility: 7 Exploitability: 7 Affected users: 10 Discoverability: 10 Overall: 8.2 |
|
The installation tool always sets a good authentication and authorization policy. Therefore, the only way to upload Web pages through weak security is because of administrative configuration errors. (We doubt personnel would be bribed.) |
Table 4-6. Threat #3
|
Threat Description |
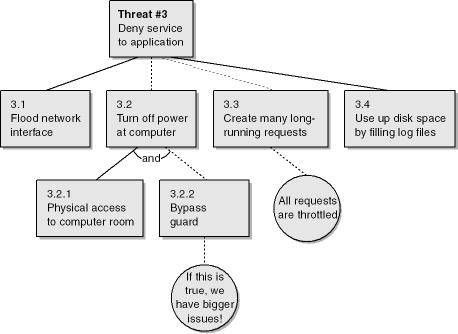
Attacker denies service to application |
|---|---|
|
Threat Target |
Service client request process (5.0) |
|
Threat Category |
Denial of service |
|
Risk |
Damage potential: 6 Reproducibility: 6 Exploitability: 7 Affected users: 9 Discoverability: 10 Overall: 7.6 |
|
Comments |
Other parts of the application could be attacked using denial of service attacks; however, the Web server that holds the process client request process is on the front line and therefore easier to attack. We feel that if we secure this portion of the application, the risk of other processes being attacked is tolerable. Subthreat 3.3: this is similar to the Cartesian join problem. Cartesian joins result in a database query returning every possible combination of all tables accessed in the SQL query. For example, a Cartesian join of three tables—one with 650,000 rows, another with 113,000, and the last with 75,100—would result in potentially 5,516,095,000,000,000 rows returned to the user, unless, of course, appropriate mitigation steps are taken. Subthreat 3.4: using up disk space is seen as a real threat. If the application that manages the access data process (11.0) has no spare disk space, it cannot run, because it creates numerous temporary files. Because all requests are logged to a text-based log file (13.0), an attacker could send millions of requests (perhaps by using a distributed denial of service attack) and flood the disk drive until it has no space left, at which point the application would fail. |
Table 4-7. Threat #4
|
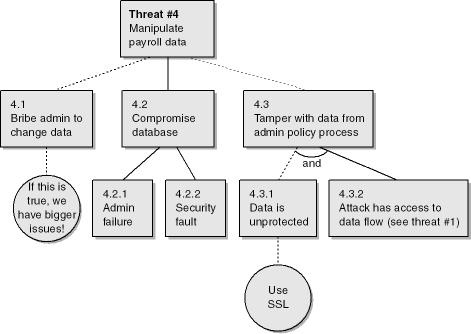
Threat Description |
Attacker manipulates payroll data |
|---|---|
|
Threat Target |
Payroll data (12.0) |
|
Threat Category |
Tampering with data and potentially information disclosure |
|
Risk |
Damage potential: 10 Reproducibility: 5 Exploitability: 5 Affected users: 10 Discoverability: 10 Overall: 8 |
|
Comments |
Threat 4.3 concerns accessing the updated payroll data as it travels across the network from the administrative console (2.0) to the admin policy process (14.0) and then to the payroll data store (12.0) As you can see from the data flow diagram in Figure 4-5, there are two machine boundary transitions. |
Table 4-8. Threat #5
|
Threat Description |
Attacker elevates privilege by leveraging the service client request process |
|---|---|
|
Threat Target |
Service Client Request (5.0) |
|
Threat Category |
Elevation of privilege |
|
Risk |
Damage Potential: 10 Reproducibility: 2 Exploitability: 2 Affected Users: 1 Discoverability: 10 Overall: 5 |
|
Comments |
The threat target in question runs in a Web server process, and the code runs in the Local System context. This means that any malicious code executing in the context of the Web server is Local System on the computer also. Reproducibility and exploitability are low because the only realistic way to exploit this is for the attacker to take advantage of a security vulnerability in the Web server process. The low affected users count is because only this server is affected, although one could argue that everyone could be affected by this if an attacker compromised the server. |
Table 4-9. Threat #6
|
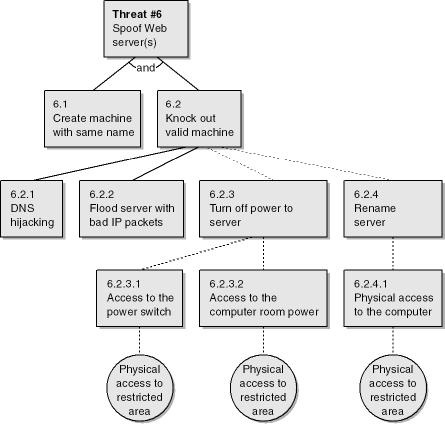
Threat Description |
Spoof computer executing the process client request process |
|---|---|
|
Threat Target |
Service client request (5.0) |
|
Threat Category |
Spoofing |
|
Risk |
Damage potential: 10 Reproducibility: 2 Exploitability: 2 Affected users: 8 Discoverability: 10 Overall: 6.4 |
|
Comments |
Knocking the valid machine from the network means either physically doing so (by renaming it or turning off its power) or using attack techniques to make it inaccessible (via DNS hijacking or flooding the computer). |
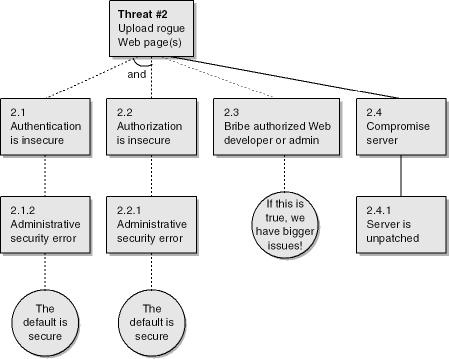

How do you arrive at an overall risk rating, based on the likelihood that one or more subthreats become attacks? When considering the overall threat rating using your rating system of choice, you must consider the most likely path of attack (or, in other words, the path with the least resistance). Take a look at the threat tree in Figure 4-10. It could be viewed that subthreat 2.3 is low probability, and hence low risk, because the employees have discretion, are trusted, and are educated on security matters when they join the company. So what is the chance that the system is left vulnerable because of administrative errors? You might determine once again that the chance is small because although administrators make mistakes, you have built-in checks and balances and have taught the administrators security techniques and the importance of security.
All this leaves an unpatched server as the most likely candidate for the attack because of the possibility of zero-day attacks, or attacks that occur on the same day a vulnerability is found in a product because someone rapidly creates an exploit program.
It is this path of least resistance that leads to a threat’s DREAD rating.
Important
Look for the path of least resistance in the threat trees. This does not mean attackers will not follow other paths—they will—but they are more likely to take the easy route.
Let’s go over the threat-modeling process one more time to make sure it’s well understood.
Step 1
Decompose the application into threat targets by using an analysis method such as data flow diagrams. In the case of DFDs, the threat targets are every data source, process, data flow, and interactor or actor.
Step 2
Using STRIDE, identify threats for each of the threat targets. These serve as the roots for the threat trees; there is one tree per threat goal.
Step 3
Build one or more threat trees for each threat target, as appropriate.
Step 4
Using DREAD or some other threat ranking method, determine the security risk for each threat tree.
Step 5
Sort the threats in order from highest to lowest risk.
Once you’ve done this, your next step is to determine how you deal with the threats, and that’s our next topic.
You have four options when considering threats and how to mitigate them:
Do nothing.
Inform the user of threat.
Remove the problem.
Fix the problem.
The first option, doing nothing, is rarely the correct solution because the problem is latent in the application, and the chances are greater than zero that the issue will be discovered and you will have to fix the problem anyway. It’s also bad business and bad for your clients because you might be putting your users at risk. If for some reason you decide to do nothing, at least check whether the feature that is the focus of the threat can be disabled by default. That said, you ought to consider one of the following three options instead.
The second alternative is to inform the user of the problem and allow the user to decide whether to use the feature. An example of this can be found in Microsoft Internet Information Services (IIS): a dialog box appears if an administrator opts to use basic authentication, warning the administrator that user’s passwords are not encrypted on the wire unless protected by some other means, such as SSL/TLS.
Like Option 1, this option can also be problematic: many users don’t know what the right decision is, and the decision is often made more difficult by convoluted text, written by a technical person, appearing in the warning dialog box. Creating useful security dialogs and documentation is outlined in Chapter 24. In addition, an administrator might be able to access a feature in a manner that bypasses the warning dialog box. For example, in the basic authentication scenario just mentioned, an administrator can use scripting languages to enable basic authentication, and no warning is presented to the administrator.
Remember that users will learn to ignore warnings if they come up too often, and they usually don’t have the expertise to make a good decision. This approach should be taken only when extensive usability testing says that enterprises and users will require the function in a risky manner.
If you decide to warn the user about the feature in your documentation, remember that users don’t read documentation unless they must! You should never warn the user only in the documentation. All such warnings should be logged, auditable events.
I’ve sometimes heard development teams say that they have no time to fix a security problem, so they have to ship with the security flaw. This decision is wrong. There is still one last drastic option: pull the feature from the product. If you have no time to fix the problem and the security risk is high enough, you really should consider pulling the feature from the product. If it seems like a hard pill to swallow, think of it from your user’s perspective. Imagine that it was your computer that just got attacked. Besides, there’s always the next version!
This is the most obvious solution: remedy the problem with technology. It’s also the most difficult because it involves more work for the designers, developers, testers, and, in some cases, documentation people. The rest of this chapter deals with how to use technology to solve security threats.
The next phase is to determine how to allay the threats you’ve identified. This is a two-step process. The first step is to determine which techniques can help; the second step is to choose the appropriate technologies.
Techniques are not the same as technologies. A technique is derived from a high-level appreciation of what kinds of technologies can be applied to mitigate a threat. For example, authentication is a security technique, and Kerberos is a specific authentication technology. Table 4-10 lists some of the techniques you can employ to mitigate the threats in the STRIDE model.
Table 4-10. Partial List of Technology-Based Threat Mitigation Techniques
|
Threat Type |
Mitigation Techniques |
|---|---|
|
Spoofing identity |
Appropriate authentication Protect secret data Don’t store secrets |
|
Tampering with data |
Appropriate authorization Hashes Message authentication codes Digital signatures Tamper-resistant protocols |
|
Repudiation |
Digital signatures Timestamps Audit trails |
|
Information disclosure |
Authorization Privacy-enhanced protocols Encryption Protect secrets Don’t store secrets |
|
Denial of service |
Appropriate authentication Appropriate authorization Filtering Throttling Quality of service |
|
Elevation of privilege |
Run with least privilege |
In this section, we’ll examine the security techniques listed in Table 4-10 and related technologies available to you as designers and developers. Please note that I won’t explain each technology in great detail. Plenty of available texts—including many listed in this book’s bibliography—do a great job of explaining how these technologies work.
Also note that when designing a secure system, you must first analyze your existing security mechanisms. If the existing mechanisms are vulnerable to attack, the mechanisms should be either redesigned or removed from the system. Developers should not be encouraged to continue using mechanisms that are weak or flawed. Of course, I realize that some mechanisms are in the system for backward compatibility, but writing secure code requires tough choices, and one of these choices is to not support flawed mechanisms.
Authentication is the process by which an entity, also called a principal, verifies that another entity is who or what it claims to be. A principal can be a user, some executable code, or a computer. Authentication requires evidence in the form of credentials, and evidence can be in many forms, such as a password, a private key, or perhaps, in the case of biometric authentication, a fingerprint.
Many authentication protocols are available to you in Windows. Some are built into the product, and others require you to use building blocks in the operating system to create your own system. The schemes include the following:
Basic authentication
Digest authentication
Forms-based authentication
Passport authentication
Windows authentication
NT LAN Manager (NTLM) authentication
Kerberos v5 authentication
X.509 certificate authentication
Internet Protocol Security (IPSec)
RADIUS
Note that some authentication schemes are more secure than others. In other words, as an application developer, you will be able to place more trust in the user’s credentials when using some authentication schemes rather than others. For example, Basic authentication is much weaker than, say, Kerberos, and you should keep this in mind when determining which assets need protecting. Also, some schemes authenticate clients, and others authenticate servers. It’s vitally important you understand this when considering the threats. For example, Basic authentication does not authenticate the server, only the client. Table 4-11 shows which protocols authenticate the client and which authenticate the server.
Table 4-11. Client and Server Authentication Protocols
|
Protocol |
Authenticates Client? |
Authenticates Server? |
|---|---|---|
|
Basic |
Yes |
No |
|
Digest |
Yes |
No |
|
Forms |
Yes |
No |
|
Passport |
Yes |
No |
|
NTLM |
Yes |
No |
|
Kerberos |
Yes |
Yes |
|
X.509 Certificates |
Yes |
Yes |
|
IPSec |
Yes (computer) |
Yes (computer) |
|
RADIUS |
Yes |
No |
Basic authentication is a simple authentication protocol defined as part of the HTTP 1.0 protocol defined in RFC 2617, which is available at http://www.ietf.org/rfc/rfc2617.txt. Although virtually all Web servers and Web browsers support this protocol, it is extremely insecure because the password is not protected. Actually, the username and password are base64-encoded, which is trivial to decode! In short, the use of Basic authentication in any Web-based application is actively discouraged, owing to its insecurity, unless the connection is secured between the client and server using SSL/ TLS or perhaps IPSec.
Digest authentication, like Basic authentication, is defined in RFC 2617. Digest authentication offers advantages over Basic authentication; most notably, the password does not travel from the browser to the server in clear text. Also, Digest authentication is being considered for use by Internet protocols other than HTTP, such as LDAP for directory access and Internet Message Access Protocol (IMAP), Post Office Protocol 3 (POP3), and Simple Mail Transfer Protocol (SMTP) for e-mail.
There is no standard implementation of forms-based authentication, and most sites create their own solutions. However, a version is built into Microsoft ASP.NET through the FormsAuthenticationModule class, which is an implementation of the IHttpModule interface.
Here’s how forms-based authentication works. A Web page is presented to the user, who enters a username and password and hits the Submit or Logon button. Next, the form information is posted to the Web server, usually over an SSL/TLS connection, and the Web server reads the form information. The Web server then uses this information to make an authentication decision. For example, it might look up the username and password in a database or, in the case of ASP.NET, in an XML configuration file.
For example, the following ASP code shows how to read a username and password from a form and use it as authentication data:
<%
    Dim strUsername, strPwd As String
    strUsername = Request.Form("Username")
    strPwd = Request.Form("Pwd")
    If IsValidCredentials(strUserName, strPwd) Then
        ' Cool! Allow the user in!
        ' Set some state data to indicate this
    Else
        ' Oops! Bad username and password
        Response.Redirect "401.html"
    End If
%>
Forms-based authentication is extremely popular on the Internet. However, when implemented incorrectly, it can be insecure.
Passport authentication is a centralized authentication scheme provided by Microsoft. Passport is used by many services, including Microsoft Hotmail, Microsoft Instant Messenger, and numerous e-commerce sites, such as 1-800-flowers.com, Victoria’s Secret, Expedia.com, Costco Online, OfficeMax.com, Office Depot, and 800.com. Its core benefit is that when you use your Passport to log on to a Passport service, you are not prompted to enter your credentials again when you move on to another Passport-enabled Web service. If you want to include Passport in your Web service, you need to use the Passport Software Development Kit (SDK) from http://www.passport.com.
ASP.NET includes support for Passport through the PassportAuthenticationModule class. Microsoft Windows .NET Server can log a user on using the LogonUser function, and Internet Information Services 6 (IIS 6) also supports Passport as a native authentication protocol, along with Basic, Digest, and Windows authentication and X.509 client certificate authentication.
Windows supports two major authentication protocols: NTLM and Kerberos. Actually, SSL/TLS is also an authentication protocol, but we’ll cover that later. Authentication in Windows is supported through the Security Support Provider Interface (SSPI). These protocols are implemented as Security Support Providers (SSPs). Four main SSPs exist in Windows: NTLM, Kerberos, SChannel, and Negotiate. NTLM implements NTLM authentication, Kerberos implements Kerberos v5 authentication, and SChannel provides SSL/TLS client certificate authentication. Negotiate is different because it doesn’t support any authentication protocols. Supported in Windows 2000 and later, it determines whether a client and server should use NTLM or Kerberos authentication.
By far the best explanation of SSPI is in Programming Server-Side Applications for Microsoft Windows 2000 (Microsoft Press, 2000), by Jeffrey Richter and my friend Jason Clark. If you want to learn more about SSP, refer to this excellent and practical book.
The NTLM protocol is supported by all current versions of Windows, including Windows CE. NTLM is a challenge-response protocol used by many Windows services, including file and print, IIS, Microsoft SQL Server, and Microsoft Exchange. Two versions of NTLM exist: version 1 and version 2. Version 2, introduced with Windows NT 4 Service Pack 4, offers one major security benefit over NTLM version 1: it mitigates "man-in-the-middle" attacks. Note that NTLM authenticates the client to the server—it does not verify the server’s authenticity to the client.
Kerberos v5 authentication was designed at Massachusetts Institute of Technology (MIT) and defined in RFC 1510, available at http://www.ietf.org/rfc/rfc1510.txt. Windows 2000 and later implement Kerberos when Active Directory is deployed. One of the major advantages Kerberos offers is mutual authentication. In other words, the client’s and the server’s authenticity are both verified. Kerberos is generally considered a more secure protocol than NTLM, and in many cases it can be quicker.
Refer to one of my previous books, Designing Secure Web-Based Applications for Microsoft Windows 2000 (Microsoft Press, 2000), for an easy-to-understand explanation of how Kerberos works and how to work with server identities by using service principal names (SPNs).
The most pragmatic use of X.509 certificates today is SSL/TLS. When you connect to a Web server with SSL/TLS using HTTPS rather than HTTP or to an e-mail server using SSL/TLS, your application verifies the authenticity of the server. This is achieved by looking at the common name in the server’s certificate and comparing this name with the host name your application is connecting to. If the two are different, the application will warn you that you might not be communicating with the correct server.
As I pointed out, SSL/TLS, by default, authenticates the server. However, there is an optional stage of the SSL/TLS handshake to determine whether the client is who it says it is. This functionality is supported through client authentication certificates and requires the client software to have access to one or more X.509 client certificates issued by an authority trusted by the server.
One of the most promising implementations of client certificates is smartcards. Smartcards store one or more certificates and associated private keys on a device the size of a credit card. Windows 2000 and later natively support smartcards. Currently Windows supports only one certificate and one private key on a smartcard.
For more information on X.509 certificates, client authentication, the role of trust, and certificate issuance, refer to Designing Secure Web-Based Applications for Microsoft Windows 2000 (Microsoft Press).
IPSec is a little different from the protocols mentioned previously in that it authenticates servers only. Kerberos can also authenticate servers to other servers, but IPSec cannot authenticate users. IPSec offers more features than simply authenticating servers; it also offers data integrity and privacy, which I’ll cover later in this chapter. IPSec is supported natively in Windows 2000 and later.
Many server products, including Microsoft Internet Authentication Service (IAS), support the Remote Authentication Dial-In User Service (RADIUS) protocol, the de facto standard protocol for remote user authentication, which is defined in RFC 2058. The authentication database in Windows 2000 is Active Directory.
Once a principal’s identity is determined through authentication, the principal will usually want to access resources, such as printers and files. Authorization is determined by performing an access check to see whether the authenticated principal has access to the resource being requested. Some principals will have more access rights to a resource than other principals do.
Windows offers many authorization mechanisms, including these:
Access control lists (ACLs)
Privileges
IP restrictions
Server-specific permissions
All objects in Windows NT and later can be protected by using ACLs. An ACL is a series of access control entries (ACEs). Each ACE determines what a principal can do to a resource. For example, Blake might have read and write access to an object, and Cheryl might have read, write, and create access.
More Information
ACLs are covered in detail in Chapter 6.
A privilege is a right attributed to a user that has systemwide implications. Some operations are considered privileged and should be possible only for trusted individuals. Examples include the ability to debug applications, back up files, and remotely shut down a computer.
More Information
Chapter 7, covers privilege designs.
IP restrictions are a feature of IIS. You can limit part of a Web site, such as a virtual directory or a directory, or an entire Web site so that it can be accessed only from specific IP addresses, subnets, and DNS names.
Many servers offer their own form of access control to protect their own specific object types. For example, Microsoft SQL Server includes permissions that allow the administrator to determine who has access to which tables, stored procedures, and views. COM+ applications support roles that define a class of users for a set of components. Each role defines which users are allowed to invoke interfaces on a component.
Numerous networking protocols support tamper resistance and data privacy. Tamper resistance refers to the ability to protect data from being deleted or changed either maliciously or accidentally. If Blake orders 10 dump trucks from Luke, he doesn’t want an attacker to modify the order en route to Luke to 20 dump trucks. Privacy means that no one else can read the order Blake has placed with Luke; only the two parties can read the message. The most common tamper-resistant and privacy-enhanced protocols and technologies in Windows are the following:
SSL/TLS
IPSec
DCOM and RPC
EFS
SSL was invented by Netscape in the mid-1990s. It encrypts the data as it travels between the client and the server (and vice versa) and uses message authentication codes (MACs) to provide data integrity. TLS is the version of SSL ratified by the Internet Engineering Task Force (IETF).
As I’ve mentioned, IPSec supports authentication, encryption for data privacy, and MACs for data integrity. All traffic traveling between the IPSec-secured servers is encrypted and integrity-checked. There’s no need to make any adjustments to applications to take advantage of IPSec because IPSec is implemented at the IP layer in the TCP/IP network stack.
Distributed COM and remote procedure calls support authentication, privacy, and integrity. The performance impact is minimal unless you’re transferring masses of data. See Chapter 16, for much more detail.
Included with Windows 2000 and later, the Encrypting File System (EFS) is a file-based encryption technology that is a feature of the NT File System (NTFS). While SSL, TLS, IPSec, and DCOM/RPC security concerns protecting data on the wire, EFS encrypts and provides tamper detection for files.
The best way to protect secret information is not to store it in the first place. Allow your users to provide the secret data, as needed, from their memories. If your application is compromised, the attacker cannot gain access to the secret data because you don’t store it! If you must store secret data, secure it as best as you can. This is a very difficult problem, so it’s the subject of Chapter 9.
Privacy, sometimes referred to as confidentiality, is a means of hiding information from prying eyes and is often performed using encryption. To many users, privacy and security are synonymous. The process of hashing involves passing data through a cryptographic function, called a hash or digest function. This process yields a small—relative to the size of the original data—value that uniquely identifies the data. Depending on the algorithm used, the value’s size is usually 128 bits or 160 bits. Like your thumbprint, a hash tells you nothing about the data, but it uniquely identifies it.
When a recipient receives data with a hash attached, he can verify that the data has not been tampered with by computing a hash of the data and comparing the newly created hash with the hash attached to the data. If the two hashes are the same, the data was not tampered with. Well, actually that’s not quite correct. An attacker might have changed the data and then recalculated the hash, which is why MACs and digital signatures are important.
When a MAC is created, the message data and some secret data, known only to the trusted parties (usually the originator and the recipient of the message), are hashed together. To verify the MAC, the recipient calculates the digest by hashing the data and the secret data. If the result is the same as the MAC associated with the message, the data has not been tampered with and the data came from someone who also knew the secret data.
A digital signature is somewhat similar to a MAC, but a secret shared among many people isn’t used; instead, the data is hashed, and a private key, known only to the sender, is used to encrypt the hash. The recipient can verify the signature by using the public key associated with the sender’s private key, decrypting the hash with the public key, and then calculating the hash. If the results are the same, the recipient knows that the data has not been tampered with and that it was sent by someone who has the private key associated with the public key.
Windows offers Cryptographic API (CryptoAPI) as a means for users to add royalty-free cryptographic support—including encryption, hashing, MACs, and digital signatures—to their applications.
More Information
Encryption, hashes, and digital signatures are discussed in Chapter 8.
The aim of auditing, also called logging, is to collect information about successful and failed access to objects, use of privileges, and other important security actions and to log them in persistent storage for later analysis. Windows offers logging capabilities in the Windows event logs, the IIS Web logs, and numerous other application-specific log files, including the SQL Server and Exchange log files.
Important
It is imperative that all log files be secured from attack. You should include a threat in your threat model outlining the likelihood and impact of the log files being read, modified, or deleted and of the application failing to write log records.
Filtering means inspecting data as it’s received and making a decision to accept or reject the packet. This is how packet-filtering firewalls work. Many IP-level denial of service threats can be mitigated through the use of a packet-filtering firewall.
Throttling means limiting the number of requests to your system. For example, you might allow only a small number of anonymous requests but allow more authenticated requests. You would do this because an attacker might not attempt to attack you if she needs to be identified first. It’s important that you limit anonymous connections.
Quality of service is a set of components that allow you to provide preferential treatment for specific types of traffic. For example, you can allow favored treatment to streaming media traffic.
You should always run with just enough privilege to get the job done, and no more. An entire chapter—Chapter 7—is dedicated to this subject.
Table 4-12 describes ways to mitigate the subset of threats identified earlier in this chapter.
Table 4-12. Applying Mitigation Technologies to the Payroll Application
|
Threat |
STRIDE |
Techniques and Technologies |
|---|---|---|
|
Viewing on-the-wire payroll data |
I |
Use SSL/TLS to encrypt the channel between the server and the client. Could also use IPSec. |
|
Upload rogue Web pages or Web service code |
T |
Require strong authentication for the Web developers. Provide strong ACLs on the files so that only Web developers and administrators can write or delete the files. |
|
Attacker denies service to application |
D |
Use a firewall to drop certain IP packets. Restrict resources used by anonymous users (such as memory, disk space, and database time). Finally, move the log files to another volume. |
|
Attacker manipulates payroll data |
T & I |
Protect the updated payroll data traffic by using SSL/TLS or DCOM/RPC with privacy, depending on the network protocol used. This will mitigate the information disclosure threat. SSL/TLS also provides message authentication codes to detect data-tampering attacks. DCOM/RPC also provides integrity checking when the privacy option is selected. IPSec could also be considered. |
|
Elevate privilege by leveraging the service client request process |
E |
Run the process following the guidelines of least privilege. If the process is compromised, the code cannot gain extra capabilities. |
|
Spoof Web server |
S |
The simplest solution is to use either SSL/TLS, which will allow the client software to authenticate the server, if the client is configured to do so. Corporate policy dictates that all clients must do so. Also, Kerberos authentication could be used. Kerberos provides mutual authentication of the server and client. |
As you can see, security technologies are determined only after analyzing the threats to the system. This is much better and more secure than adding security features in an ad hoc and random fashion.
Important
Building secure systems is a complex matter. Designing secure systems by using threat models as the starting point for the overall architecture is a great way to add structure and discipline and to overcome chaos when building such systems.
Table 4-13 describes common threats you’ll come across when designing your applications, possible mitigation technologies, and some of the disadvantages of using each mitigating technology, assuming the major advantage of each is the mitigation of the threat to some degree. The entries in the table are neither prescriptive nor exhaustive; their purpose is to whet your appetite and give you some ideas.
Table 4-13. Some Common Threats and Solutions
|
Threat |
Threat Types |
Mitigation Technique(s) |
Issues |
|---|---|---|---|
|
Access to or modification of confidential HTTP data. |
T & I |
Use SSL/TLS, WTLS (wireless TLS), or possibly IPSec. |
Need to set up the HTTP server to use a private key and a certificate. Configuring IPSec can also be a cumbersome process. Large performance hit when establishing the connection. Small performance hit for rest of the traffic. |
|
Access to or modification of confidential RPC or DCOM data. |
T & I |
Use integrity and privacy options. |
Might require code changes. Small performance hit. |
|
Read or modify e-mail-based communications. |
T & I |
Use Pretty Good Privacy (PGP) or Secure/ Multipurpose Internet Mail Extensions (S/MIME). |
PGP is not easy to use. S/MIME can be hard to configure. |
|
A device that contains confidential data might be lost. |
I |
Use personal identification number (PIN) on device. Lock out after too many attempts. |
Don’t forget the PIN! |
|
Flood service with too many connections. |
D |
Provide throttling based on, perhaps, IP address. Require authentication. |
IP address checking will not work correctly through proxies. Need to give users accounts and passwords. |
|
Attacker attempts to guess passwords. |
S, I & E |
Use increasing delays for each invalid password. Lock out after too many attempts. Support strong passwords. |
Attacker might create a DoS attack by guessing and then force the account to lock out so that a valid user cannot access her account. In which case, lock the account out for a small amount of time, say, 15 minutes. Need to add code to enforce password strength. |
|
Read confidential cookie data. |
I |
Encrypt cookie at the server. |
Need to add encryption code to the Web site. |
|
Tamper with cookie data. |
T |
MAC or sign cookie at the server. |
Need to add MAC or digital signature code to the Web site. |
|
Access private, secret data. |
I |
Don’t store the data in the first place! Or perhaps try using an external device to store the data. If that won’t work, consider hiding the data on a best effort basis, leveraging the operating system. Use good access control lists. |
Can be a difficult problem to solve. Refer to Chapter 9 for information. |
|
Attacker spoofs a server. |
S |
Use an authentication scheme that supports server authentication, such as SSL/TLS, IPSec, or Kerberos. |
Configuration can be time consuming. |
|
Attacker posts HTML or script to your site. |
D |
Limit what can be posted using regular expressions. |
Need to define appropriate regular expressions and determine what is valid input. Refer to Chapter 10 for information. |
|
Attacker opens thousands of connections but does nothing with them. |
D |
Expire oldest connections, using a scoring algorithm. Admin connections do not time out. |
You’ll waste time perfecting the scoring algorithm. |
|
Unauthenticated connection can consume memory. |
D |
Require authentication. Treat unauthenticated connections with dis-dain; never trust them. Be aggressive, and never allocate lots of resources to an unknown connection. |
Need to support authentication and impersonation in your application. |
|
Your data packets can be replayed. | T, R, I & D |
One approach is to use SSL/TLS, IPSec, or RPC/DCOM privacy to hide data. However, you can also enforce a packet count or timeout on the packets. Do this by appending a time-stamp to the packet in the clear text and hashing the timestamp with the MAC on the packet. When the recipient software receives the packet, it can determine whether the packet is time worthy. |
Can be tricky to get right. But it’s worth the effort! |
|
Attacker attaches debugger to your process. |
T, I & D |
Restrict which accounts have the SeDebugPrivilege privilege. |
Refer to Chapter 7 for more information. |
|
Attacker gains physical access to hardware. |
S, T, R, I, D & E |
Physical security. Encrypt sensitive data, and do not store key on the hardware. |
Never a fail-safe solution. |
|
Attacker shuts down your process. |
D |
Authenticate all admin-istrative tasks. Require local administrator group membership to shut process down. |
Need to perform Windows NT style access checks in code. Refer to Chapter 23, to learn about checking for group membership correctly. |
|
Attacker modifies configuration data. |
S, T, R, I, D & E |
Authenticate all connections accessing the data. Strong ACLs on the data, and support digital signatures. |
Signing the data can be time consuming and difficult to implement. |
|
Error message leaks too much information and helps an attacker learn what to do next. |
I |
Don’t tell the attacker too much. Give a brief synopsis of the error, and log the real error in a log file. |
Valid users get poor messages, which might lead to support phone calls. |
|
In a shared workstation environment, an attacker accesses or uses data cached by a previous user. |
T & I |
Don’t cache sensitive data—for example, anything provided to the user using SSL/ TLS or IPSec. |
Can inconvenience valid users. |
|
A malicious user accesses or tampers with lookup data on the Web server. |
T & I |
Use file-based encryption, such as EFS. Make sure the encryption keys are secure from attack. |
Keeping the encryption keys secure is a complex task. EFS in a domain environment is more secure than in a stand-alone environment. |
There is no doubt in my mind that threat modeling is of utmost importance when designing systems. Without a threat model in place, you cannot know if you have mitigated the most pressing threats to your applications. Simply playing "Buzzword Bingo" by liberally scattering security technologies around your application will not make it secure—the technologies might be inappropriate and fail to mitigate threats correctly. I also have no doubt that if you expend the effort and build up-to-date and accurate threat models, you will deliver more secure systems. Our experience has shown us that about half of your security flaws will be determined from threat modeling because they find different threats than those found through code review alone.
The process is simple: assemble the team, decompose the application (for example, using DFDs), determine the threats to the system by using threat trees and STRIDE, rank the threats using techniques such as DREAD, and then choose mitigation techniques based on the STRIDE category.
Finally, threat models are a critical component of a sound security development process. At Microsoft, we are mandating threat models as part of the design phase sign-off criteria.