
Core Active Directory administration focuses on key tasks that you’ll perform routinely with Active Directory directory service, such as creating computer accounts or joining computers to a domain. In this chapter, you’ll learn about the tools you can use to manage Active Directory as well as about specific techniques for managing computers, domain controllers, and organizational units.
Several sets of tools are available for managing Active Directory, including graphical administration tools, command-line tools, and support tools.
The Active Directory administration tools are provided as snap-ins to the Microsoft Management Console (MMC). The key tools you’ll use to manage Active Directory are:
Active Directory Users And Computers. Used to manage users, groups, computers, and organizational units
Active Directory Domains And Trusts. Used to work with domains, domain trees, and domain forests
Active Directory Sites And Services. Used to manage sites and subnets
Active Directory Schema. Used to view and work with the definitions of object classes and their attributes
Group Policy Object Editor/Group Policy Management Console. Used to manage group policy settings
Resultant Set Of Policy. Used to view current policy for a user on a system and to plan policy changes
Security
Windows Firewall can affect remote administration with some MMC tools. If Windows Firewall is enabled on a remote computer and you receive an error message stating that you don’t have appropriate rights, the network path isn’t found, or access is denied, you might need to configure an exception on the remote computer for incoming Transmission Control Protocol (TCP) port 445. You can resolve this problem by enabling the Windows Firewall: Allow Remote Administration Exception policy setting within Computer ConfigurationAdministrative TemplatesNetworkNetwork ConnectionsWindows FirewallDomain Profile. Alternatively, type the following at a command prompt on the remote computer: netsh firewall set portopening tcp 445 smb enable. See Microsoft Knowledge Base Article 840634 for more details (http://support.microsoft.com/default.aspx?scid=kb;en-us;840634).
If you’re running Microsoft Windows Server 2003, you can add the related snap-ins to any updateable console or access the tools directly on the Administrative Tools menu. If you’re using another computer with access to a Windows Server 2003 domain, the tools won’t be available until you install them. One technique for installing these tools is covered in the section entitled "Tools and Configuration" in Chapter 1, but you could also create a software installation package for the tools that would be distributed and installable through Active Directory.
For Windows Server 2003, these tools have been enhanced to allow you to perform tasks that you couldn’t perform with the original Windows 2000 toolset. You can now perform the following actions:
Select multiple resources individually. Hold down the Ctrl key and then click the left mouse button on each object you want to select.
Select a series of resources at once. Hold down the Shift key, select the first object, and then click the last object.
Drag resources to new locations. Select the objects you want to move and press and hold down the left mouse button while moving the mouse.
Edit and set properties of multiple resources. Select the objects you want to work with, right-click, and then select the operation, such as Add To Group, Disable Account, or Properties.
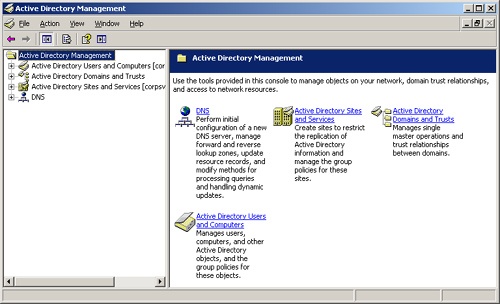
With Windows Server 2003 R2, the Active Directory Management console is available. This console, shown in Figure 7-1, includes the following snap-ins: Domain Name System (DNS), Active Directory Sites And Services, Active Directory Domains And Trusts, and Active Directory Users And Computers.
Tip
You might prefer to use Active Directory Management rather than the individual consoles. If so, when I say to start one of the other consoles, you would start this console instead. To work with a particular snap-in, you simply expand the related node in Active Directory Management.
Another Active Directory administration tool you might want to use is the Active Directory Schema snap-in. You use Active Directory Schema to manage and modify the directory schema, such as might be necessary if you want to create custom attributes for user accounts. If you have loaded the AdminPak (as discussed in the section of Chapter 1 entitled "Tools and Configuration"), you can add the Active Directory Schema snap-in to an MMC by completing the following steps:
Open the Run dialog box by clicking Start and then selecting Run.
Type mmc in the Open text box and then click OK. This opens the MMC.
In MMC, select File, and then select Add/Remove Snap-In. This opens the Add/Remove Snap-In dialog box.
In the Standalone tab, click Add.
In the Add Standalone Snap-In dialog box, select Active Directory Schema and then click Add.
Click Close and then click OK.
Right-click Active Directory Schema in the console tree and then select Change Domain Controller. This displays the Change Domain Controller dialog box.
In the Change Domain Controller dialog box, the information for the current domain controller (the one that you’re logged in to in the default domain) should be provided automatically. Click OK, or enter the necessary information to access a different domain controller in another domain and then click OK. You can now view and manage the Active Directory schema for the domain.
Several tools are provided to let you manage Active Directory from the command line. You can use:
ADPREP. Prepares a Windows 2000 forest or domain for installation of Windows 2003 domain controllers (DCs). Use adprep /forestprep and adprep /domainprep to prepare a forest or a domain, respectively.
Security
For Windows Server 2003 SP1 or later, a domain’s group policy isn’t automatically updated. You must use the command adprep /domainprep /gpprep to prepare Group Policy for the domain. This modifies the access control entries for all Group Policy Object (GPO) folders in the SYSVOL directory to grant read access to all enterprise domain controllers, which is required to support Resultant Set of Policy for site-based policy. Because this security change causes the NT File Replication Service (NTFRS) to resend all GPOs to all DCs, you should only use adprep /domainprep /gpprep after careful planning.
DSADD. Adds computers, contacts, groups, organizational units, and users to Active Directory. Type dsadd objectname /? at the command line to display help information on using the command, such as dsadd computer /?.
DSGET. Displays properties of computers, contacts, groups, organizational units, users, sites, subnets, and servers registered in Active Directory. Type dsget objectname /? at the command line to display help information on using the command, such as dsget subnet /?.
DSMOD. Modifies properties of computers, contacts, groups, organizational units, users, and servers that already exist in Active Directory. Type dsmod objectname /? at the command line to display help information on using the command, such as dsmod server /?.
DSMOVE. Moves a single object to a new location within a single domain or renames the object without moving it. Type dsmove /? at the command line to display help information on using the command.
DSQUERY. Finds computers, contacts, groups, organizational units, users, sites, subnets, and servers in Active Directory using search criteria. Type dsquery /? at the command line to display help information on using the command.
DSRM. Removes objects from Active Directory. Type dsrm /? at the command line to display help information on using the command.
NTDSUTIL. Allows the user to view site, domain, and server information, manage operations masters, and perform database maintenance of Active Directory. Type ntdsutil /? at the command line to display help information on using the command.
Many Active Directory tools are provided in the support toolkit. A list of some of the most useful support tools you can use to configure, manage, and troubleshoot Active Directory is shown in Table 7-1.
Table 7-1. Quick Reference for Active Directory Support Tools
Support Tool | Executable Name | Description |
|---|---|---|
Active Directory Service Interface Edit | ADSIEDIT.msc | Accesses and edits the Active Directory Services Interface for domain, schema, and configuration containers |
Active Directory Administration Tool | Ldp.exe | Performs Lightweight Directory Access Protocol (LDAP) operations on Active Directory |
Active Directory Replication Monitor | Replmon.exe | Manages and monitors replication using a graphical user interface (GUI) |
Directory Services Access Control Lists Utility | Dsacls.exe | Manages access control lists for objects in Active Directory |
Distributed File System Utility | Dfsutil.exe | Manages the Distributed File System (DFS) and displays DFS information |
DNS Server Troubleshooting Tool | Dnscmd.exe | Manages properties of DNS servers, zones, and resource records |
Move Tree | Movetree.exe | Moves objects from one domain to another |
Replication Diagnostics Tool | Repadmin.exe | Manages and monitors replication using the command line |
Security Descriptor Check Utility | Sdcheck.exe | Checks access control list propagation, replication, and inheritance |
Security ID Checker | Sidwalker.exe | Sets access control lists on objects previously owned by moved, deleted, or orphaned accounts |
Windows Domain Manager | Netdom.exe | Allows domain and trust relationships management from the command line |
Active Directory Users And Computers is the primary administration tool you’ll use to manage Active Directory. You use this utility to handle all user, group, and computer-related tasks and to manage organizational units.
You can start Active Directory Users And Computers by selecting its related option on the Administrative Tools menu. You can also add Active Directory Users And Computers as a snap-in to any console that can be updated. To do that, follow these steps:
By default, Active Directory Users And Computers works with the domain to which your computer is currently connected. You can access computer and user objects in this domain through the console tree, as shown in Figure 7-2. However, if you can’t find a domain controller or if the domain you want to work with isn’t shown, you might need to connect to a domain controller in the current domain or a domain controller in a different domain. Other high-level tasks you might want to perform with Active Directory Users And Computers are viewing advanced options or searching for objects.
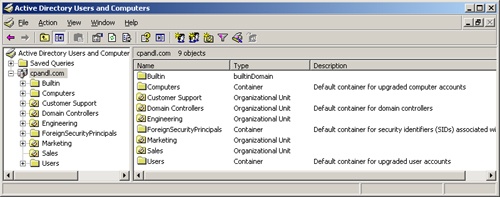
Figure 7-2. When you’re working with Active Directory Users And Computers, you can access computer and user objects through the console tree.
When you access a domain in Active Directory Users And Computers, you’ll note that a standard set of folders is available. These folders are:
Saved Queries. Contains saved search criteria so that you can quickly perform previously run Active Directory searches.
Builtin. The list of built-in user accounts.
Computers. The default container for computer accounts.
Domain Controllers. The default container for domain controllers.
ForeignSecurityPrincipals. Contains information on objects from a trusted external domain. Normally, these objects are created when an object from an external domain is added to a group in the current domain.
Users. The default container for users.
Active Directory Users And Computers has advanced options that aren’t displayed by default. To access these options, select View and then select Advanced Features. You now see the following additional folders:
LostAndFound. Contains objects that have been orphaned. You can delete or recover them.
NTDS Quotas. Contains directory service quota data.
Program Data. Contains stored Active Directory data for Microsoft applications.
System. Contains built-in system settings.
You can also add folders for organizational units. In Figure 7-2, four administrator-created organizational units are in the cpandl.com domain: Customer Support, Engineering, Marketing, and Sales.
Connecting to a domain controller serves several purposes. If you start Active Directory Users And Computers and no objects are available, you can connect to a domain controller to access user, group, and computer objects in the current domain. You might also want to connect to a domain controller when you suspect replication isn’t working properly and want to inspect the objects on a specific controller. After you’re connected, you’d look for discrepancies in recently updated objects.
To connect to a domain controller, complete the following steps:
In the console tree, right-click Active Directory Users And Computers. Then select Connect To Domain Controller.
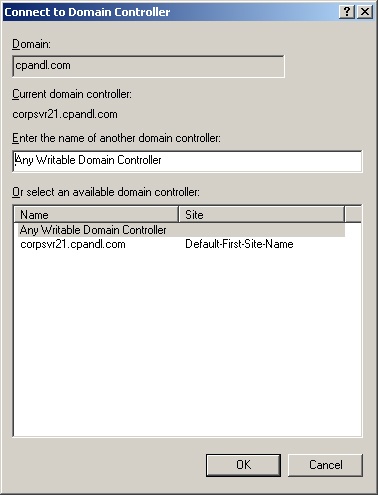
You’ll see the current domain and domain controller you’re working with in the Connect To Domain Controller dialog box shown in Figure 7-3.
The Or Select An Available Domain Controller list box lists the available controllers in the domain. The default selection is Any Writable Domain Controller. If you select this option, you’ll connect to the domain controller that responds to your request first. Otherwise, choose a specific domain controller to connect to. Click OK.
In Active Directory Users And Computers, you can work with any domain in the forest, provided you have the proper access permissions. You connect to a domain by completing the following steps:
In the console tree, right-click Active Directory Users And Computers. Then select Connect To Domain.
The Connect To Domain dialog box displays the current (or default) domain. Type a new domain name and then click OK. Or click Browse, select a domain in the Browse For Domain dialog box, and then click OK twice.
Active Directory Users And Computers has a built-in search feature that allows you to find accounts, shared resources, and other directory objects. You can easily search the current domain, a specific domain, or the entire directory.
You search for directory objects by completing the following steps:
In the console tree, right-click the current domain or a specific container that you want to search. Then select Find. This opens a Find dialog box similar to the one shown in Figure 7-4.
Use the Find selection list to choose the type of search. The options include:
Users, Contacts, And Groups. Search for user and group accounts, as well as contacts listed in the directory service
Computers. Search for computer accounts by type, name, and owner
Printers. Search for printers by name, model, and features
Shared Folders. Search for shared folders by name or keyword
Organizational Units. Search for organizational units by name
Custom Search. Perform an advanced search or LDAP query
Common Queries. Search quickly for account names, account descriptions, disabled accounts, nonexpiring passwords, and days since last logon
Use the In selection list to choose the location to search. If you right-clicked a container, such as Computers, this container is selected by default. To search all objects in the directory, select Entire Directory.
Type your search parameters and then click Find Now. As shown in Figure 7-5, any matching entries are displayed in the Find view. Double-click an object to view or modify its property settings. Right-click the object to display a shortcut menu that you can use to manage the object.
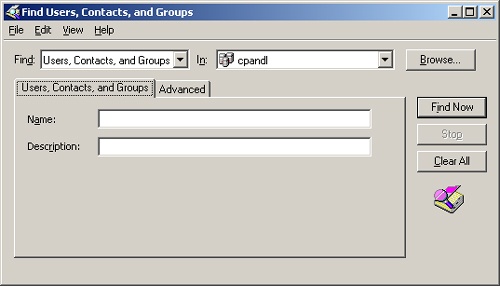
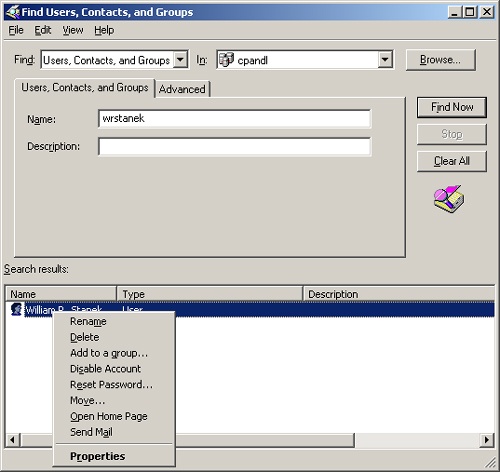
Figure 7-5. Matching objects are displayed in the Find view, and you can manage them by right-clicking their entries.
Note
The search type determines which fields and tabs are available in the Find dialog box. In most cases, you’ll simply want to type the name of the object you’re looking for in the Name field. But other search options are available. For example, with printers, you can search for a color printer, a printer that can print on both sides of the paper, a printer that can staple, and more.
Computer accounts are stored in Active Directory as objects. You use them to control access to the network and its resources. You can add computer accounts to any container displayed in Active Directory Users And Computers. The best containers to use are Computers, Domain Controllers, and any organizational units that you’ve created.
Note
Microsoft Windows 95 and Microsoft Windows 98 computers access the network as Active Directory clients but don’t have computer accounts. To learn more about accessing Active Directory domains, see the section entitled "Working with Active Directory Domains" in Chapter 6.
The easiest way to create a computer account is to log on to the computer you want to configure and join a domain, as described in the section entitled "Joining a Computer to a Domain or Workgroup," later in this chapter. When you do this, the necessary computer account is created automatically and placed in the Computers folder or the Domain Controllers folder, as appropriate. You can also create computer accounts in Active Directory Users And Computers before you try to install the computer.
Using Active Directory Users And Computers, you can create computer accounts by following these steps:
In the Active Directory Users And Computers console tree, right-click the container into which you want to place the computer account.
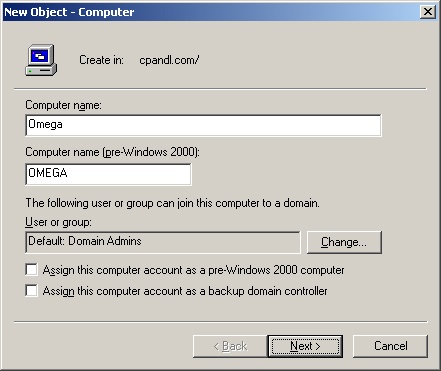
Select New and then select Computer. This starts the New Object - Computer wizard shown in Figure 7-6. Type the client computer name.
By default, only members of Domain Admins can join computers to the domain. To allow a different user or group to join the computer to the domain, click Change. Then use the Select User Or Group dialog box to select a user or group account.
If Windows NT systems can use this account, select Assign This Computer Account As A Pre-Windows 2000 Computer.
Click Next twice and then click Finish.
You can view and edit computer account properties by completing the following steps:
Open Active Directory Users And Computers. In the console tree, expand the domain node.
Select the container or organizational unit in which the computer account is located.
Right-click the account you want to work with, and then select Properties. This displays a Properties dialog box that allows you to view and edit settings.
If you no longer need a computer account, you can delete it permanently from Active Directory. Or, you can temporarily disable the account and later enable it to be used again.
To delete, disable, or enable computer accounts, complete the following steps:
Open Active Directory Users And Computers.
In the console tree, select the container in which the computer account is located. Then right-click the computer.
Select Delete to delete the account permanently and then confirm the deletion by clicking Yes.
Select Disable Account to temporarily disable the account, and then confirm the action by clicking Yes. A red circle with an X should indicate that the account is disabled.
Select Enable Account to enable the account so that it can be used again.
Computer accounts have passwords, just like user accounts. Unlike user accounts, however, computer account passwords are managed and maintained automatically. To perform this automated management, computers in the domain store a computer account password, which by default is changed every 30 days, and a secure channel password for establishing secure communications with domain controllers. The secure channel password is also updated by default every 30 days, and both passwords must be synchronized. If the secure channel password and the computer account password get out of sync, the computer won’t be allowed to log on to the domain and a domain authentication error message will be logged for the Netlogon service with an event ID of 3210 or 5722.
If this happens, you’ll need to reset the computer account password. One way to do this is to right-click the computer account in Active Directory Users And Computers and select Reset Account. You then need to remove the computer from the domain (by making the computer a member of a workgroup or another domain) and then rejoin the computer to the domain. The Windows Support Tools, discussed in Chapter 1, include the NETDOM command-line utility. This utility can be used to reset a computer’s password. See Microsoft Knowledge Base Article 325850 for more details (http://support.microsoft.com/default.aspx?scid=kb;en-us;325850).
For a member server, you can reset the computer account password by completing the following steps:
Log on locally to the computer.
At a command prompt, type netdom resetpwd /s:ServerName /ud:domainUserName /pd:* where ServerName is the name of the domain controller to use to set the password, domainUserName specifies an administrator account with the authority to change the password, and * tells NETDOM to prompt you for the account password before continuing.
Type your password when prompted. NETDOM will then change the computer account password locally and on the domain controller. The domain controller will then distribute the password change to other domain controllers in the domain.
Restart the computer.
For domain controllers, you must perform additional steps. After you log on locally, you must stop the Kerberos Key Distribution Center service and set its startup type to Manual. After you restart the computer and verify that the password has been successfully reset, you can restart the Kerberos Key Distribution Center service and set its startup type back to Automatic.
Computer accounts are normally placed in the Computers, Domain Controllers, or customized organizational unit containers. You can move an account to a different container by selecting the computer account in Active Directory Users And Computers, pressing and holding down the left mouse button while moving the mouse, and then releasing the mouse button when you’ve dragged the account to the new location.
The following steps describe another technique you can use to move computer accounts:
Open Active Directory Users And Computers.
In the console tree, select the container in which the computer account is located.
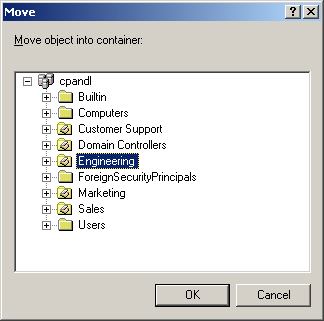
Right-click the computer account you want to move, and then select Move. This displays the Move dialog box shown in Figure 7-7.
In the Move dialog box, expand the domain node and then select the container to which you want to move the computer. Click OK.
As the name indicates, you use Computer Management to manage computers. When you’re working with Active Directory Users And Computers, you can open Computer Management and connect to a specific computer directly by right-clicking the computer entry and selecting Manage on the shortcut menu. This launches Computer Management and automatically connects to the selected computer.
Joining a computer to a domain or workgroup allows a Windows NT, Windows 2000, Microsoft Windows XP, or Windows Server 2003 computer to log on and access the network. Windows 95 and Windows 98 computers don’t need computer accounts and don’t join the network using this technique. With Windows 95 and Windows 98, you must configure the computer as an Active Directory client. For details, see the section of Chapter 6 entitled "Installing Active Directory Clients."
Before you get started, make sure that networking components are properly installed on the computer. These should have been installed during the setup of the operating system. You might also want to refer to Chapter 16, for details on configuring Transmission Control Protocol/Internet Protocol (TCP/IP) connections. TCP/IP settings must be correct and permit communications between the computer you’re configuring and a controller in the domain. If Dynamic Host Configuration Protocol (DHCP), Windows Internet Name Service (WINS), and DNS are properly installed on the network, workstations don’t need to be assigned a static IP address or have a special configuration. The only requirements are a computer name and a domain name, which you can specify when joining the domain.
Real World
Windows Server 2003 automatically grants the Add Workstations To The Domain user right to the implicit group Authenticated Users. This means that any user who logs on to the domain as a User and is authenticated can add workstations to the domain without needing administration privileges. However, as a security precaution, the number of workstations any such user can add to the domain is limited to 10. If an authenticated user exceeds this limit, an error message is displayed. For Windows NT workstations, this message states The Machine Account For This Computer Either Does Not Exist Or Is Unavailable. For Windows 2000 and Windows XP workstations, this message states Your Computer Could Not Be Joined To The Domain; You Have Exceeded The Maximum Number Of Computer Accounts You Are Allowed To Create In This Domain. Although you can use the Ldp.exe tool from the Windows Server 2003 Support Tools to override the default limit on the number of computers an authenticated user can join to a domain (as set by the ms-DS-MachineAccountQuota attribute), this isn’t a good security practice. A better technique, and a more appropriate technique where security is a concern, is to precreate the necessary computer account in a specific organizational unit (OU) or to grant the user the advanced security privilege Create Computer Objects in a specific OU.
During installation of the operating system, a network connection was probably configured for the computer. Or you might have previously joined the computer to a domain or workgroup. If so, you can join the computer to a new domain or workgroup by completing the following steps (which are nearly identical for configuring Windows 2000 Professional, Windows 2000 Server, Windows XP Professional, and Windows Server 2003):
Log on to the workstation or server you want to configure.
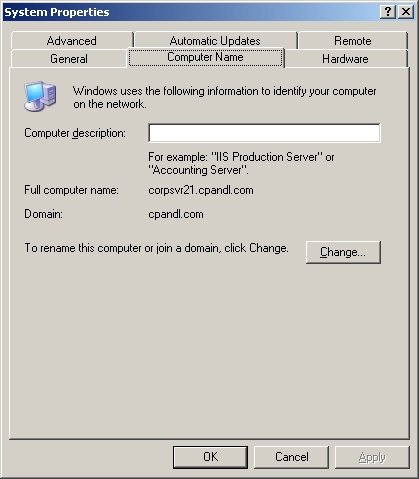
Access Control Panel and then double-click System. In the System Properties dialog box, click the Computer Name tab as shown in Figure 7-8.
Click Change.
To rename the computer, type a new name in the Computer Name field, such as Zeta.
To join a new domain, in the Member Of panel select Domain and then type the local part of the domain name, such as SEATTLE for the domain seattle.microsoft.com.
To join a new workgroup, in the Member Of panel select Workgroup and then type the workgroup name, such as TestDevGroup.
If you made changes, click OK. When prompted, type the name and password of a user account with administrator permission to make these changes. Click OK again.
The changes are made and a new computer account is created, as necessary. If the changes are successful, you’ll see a confirmation dialog box to this effect. Click OK to reboot the computer.
If the changes are unsuccessful, you’ll see either a message informing you that they’re unsuccessful or a message telling you that the account credentials already exist. This problem can occur when you’re changing the name of a computer that’s already connected to a domain and when the computer has active sessions in that domain. Close applications that might be connecting to the domain, such as Windows Explorer accessing a shared folder over the network. Then repeat this process.
Domain controllers perform many important tasks in Active Directory domains. Many of these tasks were discussed in Chapter 6.
You install a domain controller by configuring Active Directory on a member server. Later, if you don’t want the server to handle controller tasks, you can demote the server. It will then act as a member server again. You install or demote servers following a similar procedure, but before you do, you should consider the impact on the network and read the section of Chapter 6 entitled "Understanding the Directory Structure."
As that section explains, when you install a domain controller you might need to transfer operations master roles and reconfigure the global catalog structure. Also, before you can install Active Directory, DNS must be working on the network and you must convert the Active Directory data drive to NTFS file system 5.0 or later. Converting drive formats is covered in the section entitled "Converting a Volume to NTFS" in Chapter 11. Similarly, before you demote a domain controller, you should shift any key responsibilities to other domain controllers. This means moving the global catalog off the server and transferring any operations master roles, if necessary. You must also remove any application directory partitions that are on the server.
Real World
It’s important to point out that in Windows Server 2003, it’s no longer necessary to demote a domain controller to rename it. You can rename a domain controller at any time. The only problem is that the server is unavailable to users during the renaming process and you might need to force a directory refresh to reestablish proper communications with the server. You can’t, however, move a domain controller to a different domain. You must demote the domain controller, update the domain settings for the server and its computer account, and then promote the server to be a domain controller once more.
To install or demote a domain controller, complete the following steps:
Log on to the server you want to reconfigure.
Click Start and then select Run.
Type dcpromo and then click OK. This starts the Active Directory Installation Wizard.
If the computer is currently a member server, the wizard takes you through the steps needed to install Active Directory. You’ll need to specify whether this is a domain controller for a new domain or an additional domain controller for an existing domain.
If the computer is currently a domain controller, the Active Directory Installation Wizard takes you through the process of demoting the domain controller. After it’s demoted, the computer acts as a member server.
Caution
Demoting the server using DCPROMO gracefully transfers any roles held by the server. Microsoft Knowledge Base article 332199 describes how to force demotion using dcpromo /forceremoval. However, if you use dcpromo /forceremoval, the FSMO roles of the demoted server are left in an invalid state until they are reassigned by an administrator. If you force demote a domain controller and the demotion fails or you are unable to demote a server, the domain data may be in an inconsistent state. See Microsoft Knowledge Base article 216498 for details on how to resolve this issue (http://support.microsoft.com/default.aspx?scid=kb;en-us;216498).
Real World
An alternative technique for installing domain controllers is to do so from backup media. This option is new for Windows Server 2003. To install a domain controller from backup media, you create a backup of the System State data of a domain controller and restore it on a different server running Windows Server 2003. When you create a domain controller from backup media, you eliminate the need to replicate the entire directory database over the network to the new domain controller. This can really save the day when you have bandwidth limitations or the directory database has thousands of entries.
You can use Active Directory Users And Computers to view or change the location of domain-wide operations master roles. At the domain level, you can work with roles for relative ID (RID) masters, primary domain controller (PDC) emulator masters, and infrastructure masters.
Note
Operations master roles are discussed in the section of Chapter 6 entitled "Understanding Operations Master Roles." You use Active Directory Domains And Trusts to set the domain naming master role and Active Directory Schema to change the schema master role. The fastest way to determine the current FSMO for all roles is to type netdom query fsmo at a command prompt.
You can view the current operations master roles by following these steps:
Open Active Directory Users And Computers.
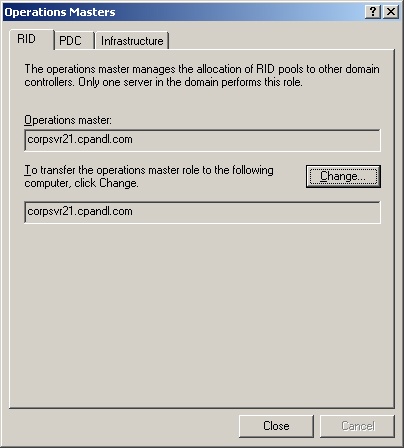
In the console tree, right-click Active Directory Users And Computers. On the shortcut menu, point to All Tasks, then select Operations Masters. This opens the Operations Masters dialog box shown in Figure 7-9.
The Operations Masters dialog box has three tabs. The RID tab shows the location of the current RID master. The PDC tab shows the location of the current PDC emulator master. The Infrastructure tab shows the location of the current infrastructure master.
You can transfer the current operations master roles by following these steps:
Start Active Directory Users And Computers. In the console tree, right-click Active Directory Users And Computers and select Connect To Domain Controller.
In the Connect To Domain Controller dialog box, enter the name of the domain controller to which you want to transfer an operations master role or select this domain controller in the Available Domain Controller list, and then click OK.
In the console tree, right-click Active Directory Users And Computers and select Operations Masters.
In the Operations Masters dialog box, select the RID, PDC, or Infrastructure tab as appropriate for the type of role you want to transfer.
Click Change to transfer the role to the previously selected domain controller. Click OK.
You can use Active Directory Domains And Trusts to view or change the location of the domain-naming master in the domain forest. In Active Directory Domains And Trusts, the root level of the control tree shows the currently selected domain.
Tip
If you need to connect to a different domain, connect to a domain controller following steps similar to those described in the section entitled "Connecting to a Domain Controller," earlier in this chapter. The only difference is that you right-click Active Directory Domains And Trusts in the console tree.
You transfer the domain naming master role by following these steps:
Start Active Directory Domains And Trusts. In the console tree, right-click Active Directory Domains And Trusts and select Connect To Domain Controller.
In the Connect To Domain Controller dialog box, enter the name of the domain controller to which you want to transfer the domain naming master role or select this domain controller in the Available Domain Controller list, and then click OK.
In the console tree, right-click Active Directory Domains And Trusts. Then select Operations Master. This opens the Change Operations Master dialog box.
The Domain Naming Operations Master field displays the current domain-naming master. Click Change to transfer this role to the previously selected domain controller. Click Close.
You use Active Directory Schema to view or change the schema master’s location. This utility is provided in the Windows Server 2003 Adminpak. After you install the Adminpak from the I386 directory of the Windows Server 2003 CD-ROM, type regsvr32 schmmgmt.dll at a command prompt to register Active Directory Schema. You can then transfer the schema master role by completing the following steps:
Add the Active Directory Schema snap-in to an MMC.
In the console tree, right-click Active Directory Schema. Then select Change Domain Controller.
Select Any Domain Controller to let Active Directory select the new schema master. Or select Specify Name and type the name of the new schema master, such as zeta.seattle.domain.com. Click OK.
In the console tree, right-click Active Directory Schema and then select Operations Master.
Click Change in the Change Schema Master dialog box.
Click OK. Click Close.
Another way to transfer roles is to use NETDOM to list current FSMO role holders and Ntdsutil.exe to transfer roles. Ntdsutil is a command-line tool for managing Active Directory. Follow these steps to transfer roles at the command line:
Get a list of the current FSMO role holders by typing netdom query fsmo at a command prompt.
It is recommended that you log on to the console of the server you want to assign as the new operations master. You can log on to the console locally or use Remote Desktop.
Click Start, select Run, type cmd in the Open field, and then click OK.
At the command prompt, type ntdsutil. This starts the Directory Services Management Tool.
At the ntdsutil prompt, type roles. This puts the utility in Operations Master Maintenance mode.
At the fsmo maintenance prompt, type connections and then at the server connections prompt, type connect to server followed by the fully qualified domain name of the domain controller to which you want to assign the FSMO role, such as:
connect to server engdc01.technology.adatum.com
After you’ve established a successful connection, type quit to exit the server connections prompt, and then at the fsmo maintenance prompt, type transfer and then type the identifier for the role to transfer. The identifiers are:
pdc. For the PDC emulator role
rid master. For the RID master role
infrastructure master. For the infrastructure master role
schema master. For the schema master role
domain naming master. For the domain naming master role
Type quit at the fsmo maintenance prompt and type quit at the ntdsutil prompt.
Occasionally, you might find yourself in a situation where you can’t gracefully transfer server roles. For example, a domain controller acting as the RID master might have a drive failure that takes down the entire server. If you’re unable to get the server back online, you might need to seize the RID master role and assign this role to another domain controller.
Caution
Seizing a server role is a drastic procedure that you should perform only as a last resort. Seize a server role only if the domain controller managing the current role is permanently out of service. The only way to bring the original server master back online is to format the boot disk and reinstall Windows Server 2003. After seizing the FSMO role of a domain controller no longer present in the domain, you must remove the related data from Active Directory. See Microsoft Knowledge Base article 216498 for more details (http://support.microsoft.com/default.aspx?scid=kb;en-us;216498).
Follow these steps to seize a server role:
Get a list of the current FSMO role holders by typing netdom query fsmo at a command prompt.
Ensure that the current domain controller with the role you want to seize is permanently offline. If the server can be brought back online, don’t perform this procedure unless you intend to completely reinstall this server.
It is recommended that you log on to the console of the server you want to assign as the new operations master. You can log on to the console locally or use Remote Desktop.
Open a command prompt window.
At the command prompt, type ntdsutil. This starts the Directory Services Management Tool.
At the ntdsutil prompt, type roles. This puts the utility in Operations Master Maintenance mode.
At the fsmo maintenance prompt, type connections and then, at the server connections prompt, type connect to server followed by the fully qualified domain name of the domain controller to which you want to assign the FSMO role, such as:
connect to server engdc01.technology.adatum.com
After you’ve established a successful connection, type quit to exit the server connections prompt and then, at the fsmo maintenance prompt, type seize and then type the identifier for the role to seize. The identifiers are:
pdc. For the PDC emulator role
rid master. For the RID master role
infrastructure master. For the infrastructure master role
schema master. For the schema master role
domain naming master. For the domain naming master role
Type quit at the fsmo maintenance prompt and type quit at the ntdsutil prompt.
Global catalogs have an important role on the network. This role is discussed in the section of Chapter 6 entitled "Understanding the Directory Structure." You configure additional global catalogs by enabling domain controllers to host the global catalog. In addition, if you have two or more global catalogs within a site, you might want a domain controller to stop hosting the global catalog. You do this by disabling the global catalog on the domain controller.
You enable or disable a global catalog by completing the following steps:
Start Active Directory Sites And Services.
In the console tree, expand the site you want to work with.
Expand the Servers folder for the site, and then select the server you want to configure to host the global catalog.
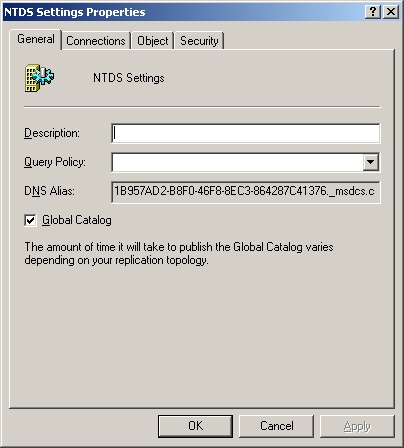
In the details pane, right-click NTDS Settings and then select Properties.
To enable the server to host the global catalog, select the Global Catalog check box in the General tab. An example is shown in Figure 7-10.
To disable the global catalog, clear the Global Catalog check box in the General tab.
Universal membership caching eliminates the dependency on the availability of a global catalog server during logons. When this feature is enabled on a domain operating in Windows Server 2003 operations mode, any domain controller can resolve logon requests locally without having to go through the global catalog server. As discussed in the section of Chapter 6 entitled "Universal Group Membership Caching," this has advantages and disadvantages.
You can enable or disable universal group membership caching by completing the following steps:
Open Active Directory Sites And Services.
In the left pane, expand and then select the site with which you want to work.
In the details pane, right-click NTDS Site Settings and then select Properties.
To enable universal group membership caching, select the Enable Universal Group Membership Caching check box in the Site Settings tab. Afterward, use the Refresh Cache From list to specify a site from which to cache universal group memberships. The selected site must have a working global catalog server.
To disable universal group membership caching, clear the Enable Universal Group Membership Caching check box in the Site Settings tab.
Click OK.
As discussed in Chapter 6, organizational units help you organize objects, set Group Policy with a limited scope, and more. In this section you’ll learn how to create and manage OUs.
You usually create OUs to mirror your organization’s business or functional structure. You may also want to create units for administrative reasons, such as if you want to delegate rights to users or administrators. You can create OUs as subgroups of a domain or as child units within an existing OUs.
To create an OU, follow these steps:
Open Active Directory Users And Computers.
Right-click the domain node or existing organizational unit folder in which you want to add the OU. On the shortcut menu, select New, and then select Organizational Unit.
Type the name of the OU. Click OK.
You can now move accounts and shared resources to the OU. See the section entitled "Moving Computer Accounts," earlier in this chapter, for an example.
You can rename or delete an organizational unit by completing the following steps:
You can move organizational units to different locations within a domain by selecting the OU in Active Directory Users And Computers, pressing down and holding the left mouse button while moving the mouse, and then releasing the mouse button when you’ve dragged the account to the new location.
The following steps comprise another technique you can use to move OUs: