
Because data is the heart of the enterprise, it’s crucial for you to protect it. And to protect your organization’s data, you need to implement a data backup and recovery plan. Backing up files can protect against accidental loss of user data, database corruption, hardware failures, and even natural disasters. It’s your job as an administrator to make sure that backups are performed and that backup tapes are stored in a secure location.
Data backup is an insurance plan. Important files are accidentally deleted all the time. Mission-critical data can become corrupt. Natural disasters can leave your office in ruin. With a solid backup and recovery plan, you can recover from any of these. Without one, you’re left with nothing to fall back on.
It takes time to create and implement a backup and recovery plan. You’ll need to figure out what data needs to be backed up, how often the data should be backed up, and more. To help you create a plan, consider the following:
How important or sensitive is the data on your systems? The importance of data can go a long way in helping you determine if you need to back it up—as well as when and how it should be backed up. For critical data, such as a database, you’ll want to have redundant backup sets that extend back for several backup periods. For sensitive data, you’ll want to ensure backup data is physically secure or encrypted. For less important data, such as daily user files, you won’t need such an elaborate backup plan, but you’ll need to back up the data regularly and ensure that the data can be recovered easily.
What type of information does the data contain? Data that doesn’t seem important to you might be very important to someone else. Thus, the type of information the data contains can help you determine if you need to back up the data—as well as when and how the data should be backed up.
How often does the data change? The frequency of change can affect your decision on how often the data should be backed up. For example, data that changes daily should be backed up daily.
Can you supplement backups with shadow copies? Shadow copies are point-in-time copies of documents in shared folders. These point-in-time copies make it easy to recover documents, as you can quickly go back to an older version in case a document is deleted or overwritten accidentally. You should use shadow copies in addition to standard backup—and not to replace backup procedures.
How quickly do you need to recover the data? Time is an important factor in creating a backup plan. For critical systems, you might need to get back online swiftly. To do this, you might need to alter your backup plan.
Do you have the equipment to perform backups? You must have backup hardware to perform backups. To perform timely backups, you might need several backup devices and several sets of backup media. Backup hardware includes tape drives, optical drives, and removable disk drives. Generally, tape drives are less expensive but slower than other types of drives.
Who will be responsible for the backup and recovery plan? Ideally, someone should be a primary contact for the organization’s backup and recovery plan. This person might also be responsible for performing the actual backup and recovery of data.
What’s the best time to schedule backups? Scheduling backups when system use is as low as possible will speed the backup process. However, you can’t always schedule backups for off-peak hours. So you need to carefully plan when key system data is backed up.
Do you need to store backups off-site? Storing copies of backup tapes off-site is essential to recovering your systems in the case of a natural disaster. In your off-site storage location, you should also include copies of the software you might need to install to reestablish operational systems.
There are many techniques for backing up files. The techniques you use will depend on the type of data you’re backing up, how convenient you want the recovery process to be, and more.
If you view the properties of a file or directory in Windows Explorer, you’ll note an attribute called Archive. You often use this attribute to determine whether a file or directory should be backed up. If the attribute is on, the file or directory might need to be backed up. The basic types of backups you can perform include:
Normal/full backups. All files that have been selected are backed up, regardless of the archive attribute’s setting. When a file is backed up, the archive attribute is cleared. If the file is later modified, this attribute is set, which indicates that the file needs to be backed up.
Copy backups. All files that have been selected are backed up, regardless of the archive attribute’s setting. Unlike a normal backup, the archive attribute on files isn’t modified. This allows you to perform other types of backups on the files at a later date.
Differential backups. Designed to create backup copies of files that have changed since the last normal backup. The presence of the archive attribute indicates that the file has been modified and only files with this attribute are backed up. However, the archive attribute on files isn’t modified. This allows you to perform other types of backups on the files at a later date.
Incremental backups. Designed to create backups of files that have changed since the most recent normal or incremental backup. The presence of the archive attribute indicates that the file has been modified and only files with this attribute are backed up. When a file is backed up, the archive attribute is cleared. If the file is later modified, this attribute is set, which indicates that the file needs to be backed up.
Daily backups. Designed to back up files using the modification date on the file itself. If a file has been modified on the same day as the backup, the file will be backed up. This technique doesn’t change the archive attributes of files.
In your backup plan, you’ll probably want to perform full backups on a weekly basis and supplement this with daily, differential, or incremental backups. You might also want to create an extended backup set for monthly and quarterly backups that includes additional files that aren’t being backed up regularly.
Tip
You’ll often find that weeks or months can go by before anyone notices that a file or data source is missing. This doesn’t mean the file isn’t important. Although some types of data aren’t used often, they’re still needed. So don’t forget that you might also want to create extra sets of backups for monthly or quarterly periods, or both, to ensure that you can recover historical data over time.
In previous editions of the Backup utility for Microsoft Windows, Backup would write errors to the log for any files that were in read+write or write mode. Files in these modes are in use. In Microsoft Windows Server 2003, Backup uses the Shadow Copy feature to create automatic point-in-time backups of files that are in use. As an administrator, you probably know how frustrating it can be to try to get a complete backup set, and this feature goes a long way toward ensuring that the Backup utility is a viable option for backing up data in a wide variety of conditions.
The difference between differential and incremental backups is extremely important. To understand the distinction, examine Table 15-1. As it shows, with differential backups, you back up all the files that have changed since the last full backup (which means that the size of the differential backup grows over time). With incremental backups, you back up only files that have changed since the most recent full or incremental backup (which means the size of the incremental backup is usually much smaller than a full backup).
Table 15-1. Incremental and Differential Backup Techniques
Day of Week | Weekly Full Backup with Daily Differential Backup | Weekly Full Backup with Daily Incremental Backup |
|---|---|---|
Sunday | A full backup is performed. | A full backup is performed. |
Monday | A differential backup contains all changes since Sunday. | An incremental backup contains changes since Sunday. |
Tuesday | A differential backup contains all changes since Sunday. | An incremental backup contains changes since Monday. |
Wednesday | A differential backup contains all changes since Sunday. | An incremental backup contains changes since Tuesday. |
Thursday | A differential backup contains all changes since Sunday. | An incremental backup contains changes since Wednesday. |
Friday | A differential backup contains all changes since Sunday. | An incremental backup contains changes since Thursday. |
Saturday | A differential backup contains all changes since Sunday. | An incremental backup contains changes since Friday. |
After you determine what data you’re going to back up and how often, you can select backup devices and media that support these choices. These are covered in the next section.
Many tools are available for backing up data. Some are fast and expensive. Others are slow but very reliable. The backup solution that’s right for your organization depends on many factors, including:
Capacity. The amount of data that you need to back up on a routine basis. Can the backup hardware support the required load given your time and resource constraints?
Reliability. The reliability of the backup hardware and media. Can you afford to sacrifice reliability to meet budget or time needs?
Extensibility. The extensibility of the backup solution. Will this solution meet your needs as the organization grows?
Speed. The speed with which data can be backed up and recovered. Can you afford to sacrifice speed to reduce costs?
Cost. The cost of the backup solution. Does it fit into your budget?
Capacity, reliability, extensibility, speed, and cost are the issues driving your backup plan. If you understand how these issues affect your organization, you’ll be on track to select an appropriate backup solution. Some of the most commonly used backup solutions include:
Tape drives. Tape drives are the most common backup devices. Tape drives use magnetic tape cartridges to store data. Magnetic tapes are relatively inexpensive but aren’t highly reliable. Tapes can break or stretch. They can also lose information over time. The average capacity of tape cartridges ranges from 24 gigabytes (GB) to 72 GB. Compared with other backup solutions, tape drives are fairly slow. Still, the selling point is the low cost.
Digital audio tape (DAT) drives. DAT drives are quickly replacing standard tape drives as the preferred backup devices. Many DAT formats are available. The most commonly used format is Digital Linear Tape (DLT) or Super DLT (SDLT). With SDLT 320 and 600, tapes have a capacity of either 160 GB or 300 GB uncompressed (320 GB or 600 GB compressed). Large organizations might want to look at Linear Tape Open (LTO) tape technologies. LTO-3 tapes have a capacity of 400 GB uncompressed (800 GB compressed).
Autoloader tape systems. Autoloader tape systems use a magazine of tapes to create extended backup volumes capable of meeting the enterprise’s high-capacity needs. With an autoloader system, tapes within the magazine are automatically changed as needed during the backup or recovery process. Most autoloader tape systems use DAT tapes formatted for DLT, SDLT, or LTO. Typical DLT drives can record up to 45 GB per hour, and you can improve that speed by purchasing a type library system with multiple drives. In this way, you can record on multiple tapes simultaneously. In contrast, most SDLT and LTO drives record over 100 GB per hour, and by using multiple drives in a system, you can record hundreds of GB per hour.
Disk drives. Disk drives provide one of the fastest ways to back up and restore files. With disk drives, you can often accomplish in minutes what takes a tape drive hours. So when business needs mandate a speedy recovery, nothing beats a disk drive. The drawbacks to disk drives, however, are relatively high costs compared to tape library systems.
Disk-based backup systems. Disk-based backup systems provide complete backup and restore solutions using large arrays of disks to achieve high performance. High reliability can be achieved when you use redundant array of independent disks (RAID) to build in redundancy and fault tolerance. Typical disk-based backup systems use virtual library technology so that Windows sees them as autoloader tape library systems. This makes them easier to work with. A typical 20-drive system can record up to 500 GB per hour; a typical 40-drive system can record up to 2 terabytes (TB) per hour.
Note
Disks and disk-based backup systems are usually used between the servers to backup and an enterprise autoloader. Servers are backed up to disk first because disks are very fast compared to tape, and then later backed up to an enterprise autoloader. Having data on tapes also makes it easier to rotate backup sets to offsite storage.
Before you can use a backup device, you must install it. When you install backup devices other than standard tape and DAT drives, you need to tell the operating system about the controller card and drivers that the backup device uses. For detailed information on installing devices and drivers, see the section entitled "Managing Hardware Devices and Drivers" in Chapter 2.
Selecting a backup device is an important step toward implementing a backup and recovery plan. But you also need to purchase the tapes or disks, or both, that will allow you to implement your plan. The number of tapes you need depends on how much data you’ll be backing up, how often you’ll be backing up the data, and how long you’ll need to keep additional data sets.
The typical way to use backup tapes is to set up a rotation schedule whereby you rotate through two or more sets of tapes. The idea is that you can increase tape longevity by reducing tape usage and, at the same time, reduce the number of tapes you need to ensure that you have historic data on hand when necessary.
One of the most common tape rotation schedules is the 10-tape rotation. With this rotation schedule, you use 10 tapes divided into two sets of 5 (one for each weekday). The first set of tapes is used one week and the second set of tapes is used the next week. On Fridays, full backups are scheduled. On Mondays through Thursdays, incremental backups are scheduled. If you add a third set of tapes, you can rotate one of the tape sets to an off-site storage location on a weekly basis.
The 10-tape rotation schedule is designed for the 9 to 5 workers of the world. If you’re in a 24 x 7 environment, you’ll definitely want extra tapes for Saturday and Sunday. In this case, use a 14-tape rotation with two sets of 7 tapes. On Sundays, schedule full backups. On Mondays through Saturdays, schedule incremental backups.
Windows Server 2003 provides a backup utility, called Backup, for creating backups on local and remote systems. You use Backup to archive files and folders, restore archived files and folders, access media pools reserved for Backup, access remote resources through My Network Places, create snapshots of the system state for backup and restore, schedule backups through the Task Scheduler, and create emergency repair disks.
You can access Backup in several ways, including:
Click the Start menu, and then click Run. In the Run dialog box, type ntbackup, and then click OK.
Click the Start menu, choose Programs or All Programs as appropriate, choose Accessories, choose System Tools, and then select Backup.
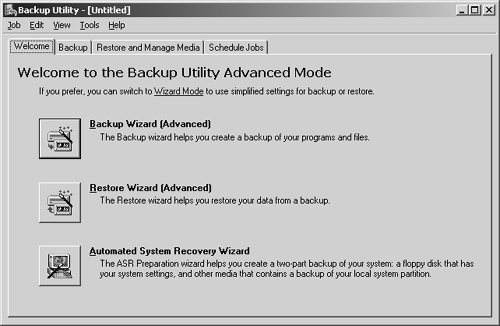
The first time you use the Backup utility, it starts in basic wizard mode. As an administrator, you’ll want to use advanced mode, as it gives you more options. Clear the Always Start In Wizard Mode check box and then click the Advanced Mode link. You should now see the main Backup utility interface. As shown in Figure 15-1, the standard interface has four tabs that provide easy access to key features. These tabs are the following:
Welcome. Introduces Backup and provides buttons for starting the Backup Wizard, the Restore Wizard, and the Automated System Recovery Wizard.
Backup. Provides the main interface for selecting data to back up. You can back up data on local drives and mapped network drives.
Restore And Manage Media. Provides the main interface for restoring archived data. You can restore data to the original location or to an alternate location anywhere on the network.
Schedule Jobs. Provides a month-by-month job schedule for backups. You can view executed jobs as well as jobs scheduled for future dates.
To perform backup and recovery operations, you must have certain permissions and user rights. Members of the Administrators and the Backup Operators groups have full authority to back up and restore any type of file, regardless of who owns the file and the permissions set on it. File owners and those who have been given control over files can also back up files, but only those files that they own or those for which they have Read, Read & Execute, Modify, or Full Control permissions.
Note
Keep in mind that although local accounts can work only with local systems, domain accounts have domain-wide privileges. Therefore, a member of the local administrators group can work only with files on the local system, but a member of the domain administrators group could work with files throughout the domain.
Backup provides extensions for working with special types of data, including:
System state data. Includes essential system files needed to recover the local system. All computers have system state data, which must be backed up in addition to other files to restore a complete working system.
Exchange server data. Includes the Exchange information store and data files. You must back up this data if you want to be able to recover Exchange server. Only systems running Microsoft Exchange Server have this type of data.
Removable Storage data. Is stored in %SystemRoot%System32Ntmsdata. If you back up this data, you can use the advanced restore option Restore Removable Storage Database to recover the Removable Storage configuration.
Remote Storage data. Is stored in %SystemRoot%System32Remotestorage. If you back up this data, you can restore Remote Storage by copying the data back to this directory.
You create backups using the Backup utility’s Backup tab or the Backup Wizards. Both techniques make use of default options set for the Backup utility. You can view or change the default options by completing the following steps:
Click the Advanced Mode link on the first Backup Or Restore Wizard page or start the utility with the wizard mode disabled (by clearing the Always Start In Wizard Mode check box).
Click Tools and then select Options.
As Figure 15-2 shows, there are five categories of default options: General, Restore, Backup Type, Backup Log, and Exclude Files. Each of these option categories is examined in the sections that follow.
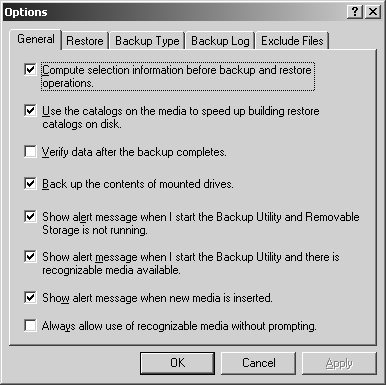
Figure 15-2. Use the General tab of the Options dialog box to set default options for the Backup utility.
General options control the default behavior of Backup. You can work with these options using the fields in the General tab of the Options dialog box. The available options are summarized in Table 15-2.
Table 15-2. General Backup Options
Option | Description |
|---|---|
Always Allow Use Of Recognizable Media Without Prompting | Allows Removable Storage to move new media to the backup pool automatically. Select this option if you use Removable Storage and you want new media to be available to Backup. |
Back Up The Contents Of Mounted Drives | Allows you to back up data on mounted network drives. Otherwise, only the path information for mounted drives will be backed up. |
Compute Selection Information Before Backup And Restore Operations | Calculates the number of files and bytes involved prior to the backup/restore procedure and displays this information. Otherwise, this data isn’t displayed and the progress bar won’t function. |
Show Alert Message When I Start The Backup Utility And Removable Storage Is Not Running | Displays an alert if you start Backup and the Removable Storage service isn’t running. It’s a good option to use if you work with removable media. |
Show Alert Message When I Start The Backup Utility And There Is Recognizable Media Available | Displays an alert if you start Backup and new media is available in the import media pool. It’s useful if you work with removable media. |
Show Alert Message When New Media Is Inserted | Displays an alert when Removable Storage detects new media. It’s useful if you work with removable media. |
Use The Catalogs On The Media To Speed Up Building Restore Catalogs On Disk | Allows you to use archive logs on the media rather than scan the entire archive to determine what files are included. Clear this option only when the catalog is missing, damaged, or otherwise unavailable. |
Verify Data After The Backup Completes | Checks the archive data against the original data to ensure that the data is the same. If the data isn’t the same, there might be a problem with the backup media and you should run the backup again using different media. |
The list of general options is quite extensive but, for the most part, the list doesn’t control the behavior of the actual backup or restore operation. Table 15-3 summarizes options for controlling backup and restore behavior.
Table 15-3. Restore, Backup Type, and Backup Log Options
Tab | Option | Description |
|---|---|---|
Restore | Do Not Replace The Files On My Computer (Recommended) | Select this option if you don’t want to copy over existing files. |
Replace The File On Disk Only If the File On Disk Is Older | Select this option to replace older files on disk with newer files from the backup. | |
Always Replace The File On My Computer | Select this option to replace all files on disk with files from the backup. | |
Backup Type | Default Backup Type | Select this option to set the default backup type. Available types are Normal, Copy, Differential, Incremental, and Daily. |
Backup Log | Detailed | Select this option to log all operations, including the names of files. |
Summary | Select this option to log only key information and backup failure. | |
None | Select this option to disable logging. |
Many types of system files are excluded from backups by default. You manage exclusions in the Options dialog box, which you access by selecting Options from the Tools menu in the Backup utility.
In the Backup utility, you can view file exclusions by clicking the Exclude Files tab in the Options dialog box. File exclusions are based on file ownership, and you can set them for all users as well as for the user currently logged on to the system (see Figure 15-3).

To exclude additional files, follow these steps:
In the Options dialog box, click the Exclude Files tab.
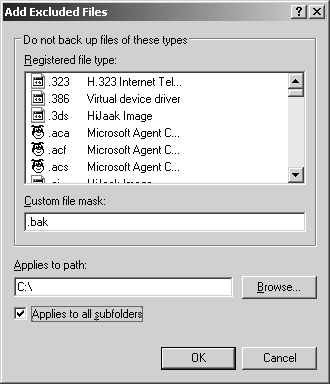
If you want to exclude files that are owned by any user, click Add New under the Files Excluded For All Users list. This displays the Add Excluded Files dialog box shown in Figure 15-4.
If you want to exclude only files that you own, click Add New under the Files Excluded For User ... list. This displays the Add Excluded Files dialog box.
You can exclude files by registered file type by clicking a file type in the Registered File Type list box. Or you can exclude files by custom file type by typing a period and then the file extension in the Custom File Mask box. For example, you could choose .doc or type the custom type wbk.
Enter a drive or file path in Applies To Path text box. Files are then restricted from all subfolders of that path unless you clear the Applies To All Subfolders check box. For example, if you use C: and select Applies To All Subfolders, all files ending with the designated file extension are excluded wherever they occur on the C drive. Click OK.
To change existing exclusions, follow these steps:
The procedures you use to work with the Backup Wizard are similar to those you use to back up data manually. You start and work with the wizard by completing the following steps:
Start the Backup utility in advanced mode and then click Backup Wizard in the Welcome tab. If wizard mode is enabled, click the Advanced Mode link and then click Backup Wizard.
Click Next. Select what you want to back up. The options are:
Back Up Everything On This Computer. Back up all data on the computer, including the system state data
Back Up Selected Files, Drives, Or Network Data. Only back up data you select
Only Back Up The System State Data. Create a backup of the system state data
Note
For servers running Windows Server 2003 that aren’t domain controllers, system state data includes essential boot files, key system files, the Windows registry, and the COM+ class registration database. For domain controllers, system state data includes Active Directory directory service data and files stored on the system volume (Sysvol) as well.
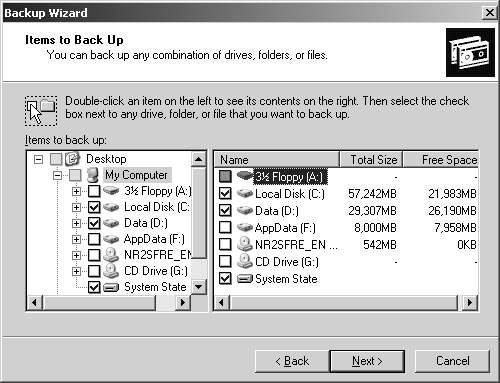
Click Next. If you wanted to select data to back up, choose the items you want to back up as shown in Figure 15-5:
You make selections by selecting or clearing the check boxes associated with a particular drive or folder. When you select a drive’s check box, all the files and folders on the drive are selected. When you clear a drive’s check box, all the files and folders on the drive are cleared.
If you want to work with individual files and folders on a drive, click the plus sign (+) to the right of the drive icon. You can now select and clear individual directories and files by clicking their associated check boxes. When you do this, the drive’s check box shows a shaded checkmark. This indicates that you haven’t selected all the files on the drive.
Click Next and then select the Backup Media Type. Choose File if you want to back up to a file. Choose a storage device if you want to back up files and folders to a tape or removable disk.
Tip
When you write backups to a file, the backup file normally has the .bkf file extension. However, you can use another file extension if you want. Also, keep in mind that Removable Storage is used to manage tapes and removable disks. If no media are available, you’ll be prompted to allocate media to the Backup media pool. Follow the instructions given in the section of this chapter entitled "Managing Media Pools."
Select the backup file or media you want to use. If you’re backing up to a file, select a location from those available or click Browse to specify a file location and name. If you’re backing up to a tape or removable disk, choose the tape or disk you want to use.
Click Next. Click Advanced if you want to override default options or schedule the backup to be run as a job. Important advanced options that you’ll be able to set include:
Verify Data After Backup. Instructs Backup to verify data after the backup procedure is completed. If selected, every file on the backup tape is compared to the original file. Verifying data can protect against write errors or failures.
Use Hardware Compression, If Available. Allows Backup to compress data as it’s written to the storage device. The option is available only if the device supports hardware compression, and only compatible drives can read the compressed information, which might mean that only a drive from the same manufacturer can recover the data.
Disable Volume Shadow Copy. Tells the Backup utility not to perform volume shadow copies. Volume shadow copies are used to back up files that are being written to. Thus, if you disable this feature, the Backup utility will skip files that are locked for writing.
Click Next and then click Finish to start the backup using the default backup options. This starts the backup operation. You can cancel the backup by clicking Cancel in the Set Information and Backup Progress dialog boxes.
During backup operations, the Backup utility behaves differently depending on the type and status of a file. If a file is open, the utility generally attempts to back up the last saved version. If the file is locked by an exclusive lock, such as when the file is being written to, it’s backed up only if volume snapshots are enabled. The utility also doesn’t back up any files on the exclusion list and backs up system state data only if you’ve elected to do so.
When the backup is completed, click Close to complete the process or click Report to view the backup log.
You don’t have to use a wizard to back up files. You can configure backups manually by completing the following steps:
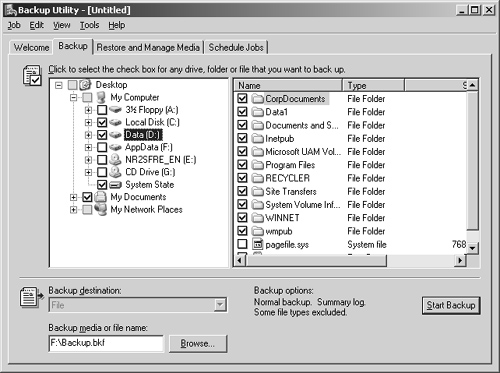
Start the Backup utility. If wizard mode is enabled, click the Advanced Mode button and then click the Backup tab as shown in Figure 15-6. Otherwise, just click the Backup tab.
Clear any existing selections in the Backup tab by selecting New from the Job menu and clicking Yes if prompted.
Choose the data you want to back up:
You make selections by selecting or clearing the check boxes associated with a particular drive or folder. When you select a drive’s check box, all files and folders on the drive are selected. When you clear a drive’s check box, all files and folders on the drive are cleared.
If you want to work with individual files and folders on a drive, click the plus sign (+) to the right of the drive icon. You can now select and clear individual directories and files by clicking their associated check boxes. When you do this, the drive’s check box shows a shaded checkmark. This indicates that you haven’t selected all the files on the drive.
If you want to back up system state data, select System State below the My Computer node. For servers that aren’t domain controllers, system state data includes essential boot and system files, the Windows registry, and the COM+ class registration database. For domain controllers, system state data includes Active Directory data and Sysvol files as well.
If you’re backing up an Exchange server, be sure to select the Microsoft Exchange icon below the My Computer node. When you do this, you’ll be prompted to type the Universal Naming Convention (UNC) name of the Microsoft Exchange server you want to back up, such as \CorpMail.
Use the Backup Destination selection list to choose the media type for the backup. Choose File if you want to back up to a file. Choose a storage device if you want to back up files and folders to a tape or removable disk.
Tip
When you write backups to a file, the backup file normally has the .bkf file extension. However, you can use another file extension if you want. Also, keep in mind that Removable Storage is used to manage tapes and removable disks. If no media are available, you’ll be prompted to allocate media to the Backup media pool. Follow the instructions given in the section of this chapter entitled "Managing Media Pools."
In the Backup Media Or File Name text box, select the backup file or media you want to use. If you’re backing up to a file, type a path and file name for the backup file or click Browse to find a file. If you’re backing up to a tape or removable disk, choose the tape or disk you want to use.
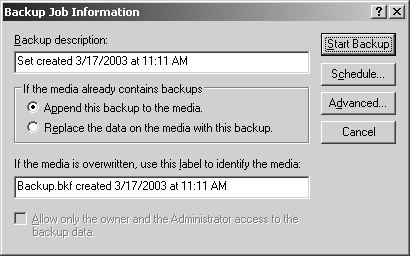
Click Start Backup. This displays the Backup Job Information dialog box shown in Figure 15-7. You use the options in this dialog box as follows:
Backup Description. Sets the backup label, which applies to the current backup only.
Append This Backup To The Media. Adds the backup after existing data.
Replace The Data On The Media With This Backup. Overwrites existing data.
If The Media Is Overwritten, Use This Label To Identify The Media. Sets the media label, which is changed only when you’re writing to a blank tape or overwriting existing data.
Allow Only The Owner And Administrator Access To The Backup Data. If you’re overwriting data, you can select this option to specify that only the owner and an administrator can access the archive file. This restricts the backup set so Backup Operators and Server Operators cannot restore the data. It does not, however, secure the data on the tape.
Click Advanced if you want to override default options. After you select the advanced options to use, click OK.
Click Schedule if you want to schedule the backup for a later date. When prompted to save the backup settings, click Yes. Next, type a name for the backup selection script, and then click Save. Afterward, set the user name and password under which the scheduled job should run. In the Scheduled Job Options dialog box, type a job name, click Properties, and then set a run schedule. Skip the remaining steps.
Click Finish to start the backup. Later, if you need to, you can cancel the backup by clicking Cancel in the Set Information and Backup Progress dialog boxes.
When the backup is completed, click Close to complete the process or click Report to view the backup log.
You can restore files with the Backup utility using the Restore Wizard or the Restore tab. To recover data with the Restore Wizard, follow these steps:
As necessary, make sure that the backup set you want to work with is loaded into the tape library system.
Start the Backup utility in advanced mode and then click Restore Wizard in the Welcome tab. If wizard mode is enabled, click the Advanced Mode link and then click Restore Wizard.
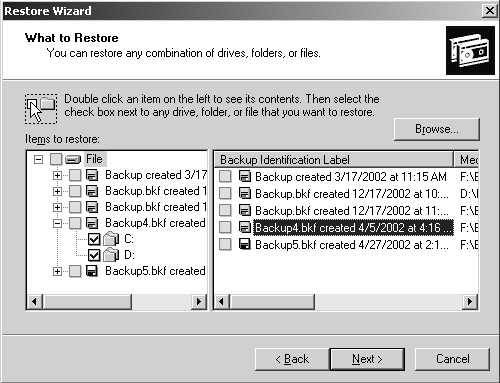
Click Next. As shown in Figure 15-8, you can now choose the data you want to restore. The left view displays files organized by volume. The right view displays media sets. To restore data, complete any or all of the following actions:
Select the check box next to any drive, folder, or file that you want to restore. If the media set with which you want to work isn’t shown, click Import File, and then type the path to the catalog for the backup.
To restore system state data, select the check box for System State as well as other data you want to restore. If you’re restoring to the original location, the system state data you’re restoring will replace the current system state. If you restore to an alternate location, only the registry, Sysvol, and system boot files are restored. You can restore system state data only on a local system.
Tip
When you select a system state restore on a domain controller, you have to be in the Directory Services Restore Mode. To learn how to restore Active Directory, see the "Restoring Active Directory" section of this chapter.
If you’re restoring Microsoft Exchange, select the Microsoft Exchange data to restore. Before the restore starts, you’ll see the Restoring Microsoft Exchange dialog box. If you’re restoring the Information Store, type the UNC name of the Microsoft Exchange server you want to restore, such as \CorpMail. If you’re restoring to a different server, select Erase All Existing Data. This destroys all existing data and creates a new Information Store.
Click Next. Click Advanced if you want to override default options. Important advanced options that you’ll be able to set include the restore location. The restore location options are:
Original Location. Restores data to the folder or files it was in when it was backed up.
Alternate Location. Restores data to a folder that you designate, preserving the directory structure. After selecting this option, enter the folder path to use or click Browse to select the folder path.
Single Folder. Restores all files to a single folder without preserving the directory structure. After selecting this option, enter the folder path to use or click Browse to select the folder path.
Tip
If you aren’t entirely sure that you want to overwrite the files in the original location, select Alternate Path and then specify a new location for the files, such as C: emp. After the files are in the temp directory, you can compare them to the existing files and determine if you want to recover them. Keep in mind that you should always restore files backed up from NTFS drives to NTFS drives. This ensures that you can restore security permissions and retain NTFS compression and encryption.
Click Next and then click Finish. If prompted, type the path and name of the backup set to use. You can cancel the backup by clicking Cancel in the Operation Status and Restore Progress dialog boxes.
When the restore is completed, click Close to complete the process or click Report to view a backup log containing information about the restore operation.
You don’t have to use the Restore Wizard to recover data. You can recover archives manually by completing the following steps:
As necessary, load the backup set you want to work with in the library system.
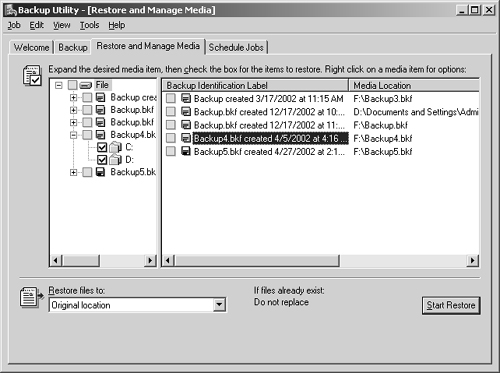
Start the Backup utility. If wizard mode is enabled, click the Advanced Mode link and then click the Restore And Manage Media tab as shown in Figure 15-9. Otherwise, just click the Restore And Manage Media tab.
Choose the data you want to restore. The left view displays files organized by volume. The right view displays media sets. To do this, complete any or all of the following actions:
Select the check box next to any drive, folder, or file that you want to restore. If the media set you want to work with isn’t shown, right-click File in the left view, select Catalog, then type the name and path of the catalog you want to use.
To restore system state data, select the check box for System State as well as other data you want to restore. If you’re restoring to the original location, the system state data you’re restoring will replace the current system state. If you restore to an alternate location, only the registry, Sysvol, and system boot files are restored. You can restore system state data only on a local system.
Tip
When you select a system state restore on a domain controller, you have to be in the Directory Services Restore Mode. To learn how to restore Active Directory, see the section of this chapter entitled "Restoring Active Directory."
If you’re restoring Microsoft Exchange, select the Microsoft Exchange data to restore. Before the restore starts, you’ll see the Restoring Microsoft Exchange dialog box. If you’re restoring the Information Store, type the UNC name of the Microsoft Exchange server you want to restore, such as \CorpMail. If you’re restoring to a different server, select Erase All Existing Data. This destroys all existing data and creates a new Information Store.
Use the Restore Files To drop-down list to choose the restore location. The options are:
Original Location. Restores data to the folder or files it was in when it was backed up.
Alternate Location. Restores data to a folder that you designate, preserving the directory structure. After you select this option, enter the folder path to use or click Browse to select the folder path.
Single Folder. Restores all files to a single folder without preserving the directory structure. After you select this option, enter the folder path to use or click Browse to select the folder path.
Specify how you want to restore files. Click Tools and then select Options. In the Options dialog box, click the Restore tab. Select one of the following options and then click OK:
Do Not Replace The Files On My Computer (Recommended). Select this option if you don’t want to copy over existing files.
Replace The File On Disk Only If The File On Disk Is Older. Select this option to replace older files on disk with newer files from the backup.
Always Replace The File On My Computer. Select this option to replace all files on disk with files from the backup.
In the Restore And Manage Media tab, click Start Restore. This displays the Confirm Restore dialog box.
If you want to set advanced restore options, click Advanced and then set additional options as necessary.
In the Confirm Restore dialog box, click OK to start the restore operation. If prompted, enter the path and name of the backup set to use. You can cancel the backup by clicking Cancel in the Operation Status and Restore Progress dialog boxes.
When the restore is completed, you can click Close to complete the process or click Report to view a backup log containing information about the restore operation.
When restoring system state data to a domain controller, you must choose whether you want to perform an authoritative or nonauthoritative restore. The default is nonauthoritative. In this mode, Active Directory and other replicated data are restored from backup and any changes are replicated from another domain controllers. Thus, you can safely restore a failed domain controller without overwriting the latest Active Directory information. On the other hand, if you’re trying to restore Active Directory throughout the network using archived data, you must use authoritative restore. With authoritative restore, the restored data is restored on the current domain controller and then replicated to other domain controllers.
Caution
An authoritative restore overwrites all Active Directory data throughout the domain. Before you perform an authoritative restore, you must be certain that the archive data is the correct data to propagate throughout the domain and that the current data on other domain controllers is inaccurate, outdated, or otherwise corrupted.
To restore Active Directory on a domain controller and enable the restored data to be replicated throughout the network, follow these steps:
Make sure the domain controller server is shut down.
Restart the domain controller server. When you see the prompt Please Select The Operating System To Start, press F8 to display the Advanced Options Menu.
Select Directory Services Restore Mode.
When the system starts, use the Backup utility to restore the system state data and other essential files.
After restoring the data, but before restarting the server, use the Ntdsutil tool to mark objects as authoritative. Be sure to check the Active Directory data thoroughly.
Restart the server. When the system finishes startup, the Active Directory data should begin to replicate throughout the domain.
You can use the Backup utility to back up data on remote systems. To do this, you must create network drives for the remote file systems before you begin the backup procedure. When backing up data on network drives, be sure to select the General option Back Up The Contents Of Mounted Drives. If you don’t, only folder references are backed up and not the actual data.
You can also use Backup to restore data on remote systems. When you do this, you can select restore locations in My Network Places. If you’re restoring to a volume containing junction points, such as a volume containing the Sysvol, be sure to select the advanced restore option Restore Junction Points, And Restore File And Folder Data Under Junction Points To The Original Location. See Microsoft Knowledge Base article 205524 for more information on junction points (http://support.microsoft.com/default.aspx?scid=kb;en-us;205524).
Backup logs are written as Unicode text files and are stored in %Userprofile%Local SettingsApplication DataMicrosoftWindows NTNTBackupData. The %Userprofile % variable is the profile path for the user who created or scheduled that backup. Backup logs are named in the format backup##.log, where backup01.log is the initial log created by the Backup utility.
Although you can view backup logs in any text editor, including Microsoft Notepad, the Backup utility provides direct access to logs through the advanced mode interface. Complete the following steps:
In advanced mode, select Report from the Tools menu. This displays the Backup Reports dialog box.
To view a log, select it and then click View. This opens the log in the default text editor for the system.
To print a log, select it and then click Print. This prints the log to the default printer for the system.
If you’re an administrator for an organization that uses the Encrypting File System (EFS), your disaster recovery planning must include additional procedures and preparations. You’ll need to consider how to handle issues related to personal encryption certificates, EFS recovery agents, and EFS recovery policy. These issues are discussed in the sections that follow.
File encryption is supported on a per-folder or per-file basis. Any file placed in a folder marked for encryption is automatically encrypted. Files in encrypted format can be read only by the person who encrypted the file. Before other users can read an encrypted file, the user must decrypt the file.
Every file that’s encrypted has a unique encryption key. This means that encrypted files can be copied, moved, and renamed just like any other file—and in most cases these actions don’t affect the encryption of the data. The user who encrypted the file always has access to the file, provided the user’s private key is available in the user profile on the computer or the user has credential roaming with digital identification management service. For this user the encryption and decryption process is handled automatically and is transparent.
The process that handles encryption and decryption is called the Encrypting File System (EFS). The default setup for EFS allows users to encrypt files without needing special permission. Files are encrypted using a public/private key that EFS generates automatically on a per-user basis. By default, Windows XP SP1 or later and Windows Server 2003 use the Advanced Encryption Standard (AES) algorithm for encrypting files with EFS. AES is not supported on Windows 2000 or Windows XP versions prior to SP1, and AES encrypted files viewed on these computers can appear to be corrupted when in fact they are not.
Encryption certificates are stored as part of the data in user profiles. If a user works with multiple computers and wants to use encryption, an administrator will need to configure a roaming profile for that user. A roaming profile ensures that the user’s profile data and public-key certificates are accessible from other computers. Without this, users won’t be able to access their encrypted files on another computer.
Tip
An alternative to a roaming profile is to copy the user’s encryption certificate to the computers the user uses. You can do this using the certificate backup and restore process discussed later in this chapter under "Backing Up and Restoring Encrypted Data and Certificates." Simply back up the certificate on the user’s original computer and then restore the certificate on each of the other computers to which the user logs on.
EFS has a built-in data recovery system to guard against data loss. This recovery system ensures that encrypted data can be recovered if a user’s public-key certificate is lost or deleted. The most common scenario in which this occurs is when a user leaves the company and the associated user account is deleted. Although a manager might have been able to log on to the user’s account, check files, and save important files to other folders, encrypted files will be accessible afterward only if the encryption is removed or by the user that encrypted them to a FAT or FAT32 volume (where encryption isn’t supported).
To access encrypted files after the user account has been deleted, you’ll need to use a recovery agent. Recovery agents have access to the file encryption key that’s necessary to unlock data in encrypted files. To protect sensitive data, recovery agents don’t, however, have access to a user’s private key or any private key information.
Recovery agents are designated automatically and the necessary recovery certificates are generated automatically as well. This ensures that encrypted files can always be recovered.
EFS recovery agents are configured at two levels:
Domain. The recovery agent for a domain is configured automatically when the first Windows Server 2003 domain controller is installed. By default, the recovery agent is the domain administrator. Through Group Policy, domain administrators can designate additional recovery agents. Domain administrators can also delegate recovery agent privileges to designated security administrators.
Local computer. When a computer is part of a workgroup or in a stand-alone configuration, the recovery agent is the administrator of the local computer by default. You can designate additional recovery agents. Further, if you want local recovery agents in a domain environment rather than domain-level recovery agents, you must delete the recovery policy from the Group Policy for the domain.
You can delete recovery policies if you don’t want them to be available.
Recovery policies are configured automatically for domain controllers and workstations. By default, domain administrators are the designated recovery agents for domains and the local administrator is the designated recovery agent for a stand-alone workstation.
Through Group Policy, you can view, assign, and delete recovery agents. Follow these steps:
Access the Group Policy console for the local computer, site, domain, or organizational unit with which you want to work. For details on working with Group Policy, see the section entitled "Group Policy Management" in Chapter 4.
Access the Encrypted Data Recovery Agents node in Group Policy. To do this, expand Computer Configuration, Windows Settings, Security Settings, and Public Key Policies, and then click Encrypting File System.
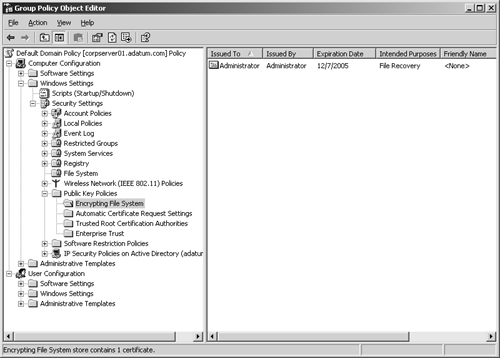
As shown in Figure 15-10, the right-hand pane lists the recovery certificates currently assigned. Recovery certificates are listed according to whom they’re issued to, whom they’re issued by, expiration data, purpose, and more. In the figure, the administrator self-issued the certificate for the purpose of file recovery (it’s a recovery certificate for the local administrator).
To designate an additional recovery agent, right-click Encrypting File System and then select Add Data Recovery Agent. This starts the Add Recovery Agent Wizard, which you can use to select a previously generated certificate that has been assigned to a user and mark it as a designated recovery certificate. Click Next. In the Select Recovery Agents window, click Browse Directory and then use the Finds Users, Contacts, And Groups dialog box to select the user you want to work with. Click OK, and then click Next. Click Finish to add the recovery agent.
Note
Before you can designate additional recovery agents, you should set up a root Certificate Authority (CA) in the domain. Afterward, you must use the Certificates snap-in to generate a personal certificate that uses the EFS Recovery Agent template. The root CA must then approve the certificate request so that the certificate can be used. You can also use Cipher.exe to generate the EFS recovery agent key and certificate.
To delete a recovery agent, select the recovery agent’s certificate in the right pane and then press Delete. When prompted to confirm the action, click Yes to permanently and irrevocably delete the certificate. If the recovery policy is empty (meaning it has no other designated recovery agents), EFS is turned off so that users can no longer encrypt files.
You can back up and restore encrypted data just as you do any other data. The key thing to remember is that you must use backup software that understands EFS, such as the built-in Backup and Restore tools. There are lots of ways to go wrong, however.
The backup or restore process doesn’t necessarily back up or restore the certificate needed to work with the encrypted data. The user’s profile data contains the certificate needed to work with the encrypted data. If the user’s account exists and the profile still contains the necessary certificate, then, yes, the user can still work with the encrypted data.
If the user’s account exists and you previously backed up the user’s profile and then restored the profile to recover a deleted certificate, then, yes, the user can still work with the encrypted data. Otherwise, however, there’s no way to work with the data and you’ll need to have a designated recovery agent access the files and then remove the encryption.
Being able to back up and restore certificates is an important part of any disaster recovery planning. The next sections examine the techniques you can use to perform these tasks.
You can use the Certificates snap-in to back up and restore personal certificates. Personal certificates are saved with the Personal Information Exchange (.pfx) format.
The steps you follow to back up personal certificates are as follows:
Log on to the computer where the personal certificate you want to work with is stored as the user. Open the Run dialog box by clicking Start and then selecting Run.
Type mmc in the Open field and then click OK. This opens the Microsoft Management Console (MMC).
In the MMC, select File, and then select Add/Remove Snap-In. This opens the Add/Remove Snap-In dialog box.
In the Standalone tab, click Add. In the Add Snap-In dialog box, select Certificates, and then click Add. This displays the Certificates Snap-in dialog box.
Select My User Account and then click Finish.
Click Close and then click OK.
Expand Certificates - Current User, Personal, and then select Certificates. Right-click the certificate you want to save, choose All Tasks, and then select Export. This starts the Certificate Export Wizard.
Click Next and then select Yes, Export The Private Key. Click Next.
Click Next, accepting the default values, and then type a password for the certificate.
Specify a file location for the certificate file. Be sure that this location is secure, because you don’t want to compromise system security. The file is saved with the .pfx extension.
Click Next and then click Finish. If the export process is successful, you’ll see a message box confirming this. Click OK to close the message box.
When you have a backup of a certificate, you can restore the certificate to any computer on the network—not just the original computer. The backup and restore process is, in fact, how you move certificates from one computer to another.
The steps you follow to restore a personal certificate are as follows:
Copy the Personal Information Exchange (.pfx) file onto a floppy disk and then log on to the computer where you want to use the personal certificate as the user.
Access the Certificates snap-in for My User Account as described previously.
Expand Certificates - Current User and then right-click Personal. Choose All Tasks and then select Import. This starts the Certificate Import Wizard.
Click Next and then insert the floppy disk.
Click Browse and then use the Open dialog box to locate the personal certificate on the floppy disk. Be sure to select Personal Information Exchange as the file type. After you locate the file, select it and then click Open.
Click Next. Type the password for the personal certificate and then click Next again.
The certificate should be placed in the Personal store by default, so accept the default by clicking Next. Click Finish. If the import process is successful, you’ll see a message box confirming this. Click OK.
Backups are only one part of a comprehensive disaster recovery plan. You also need to have emergency repair disks and boot disks on hand to ensure that you can recover systems in a wide variety of situations. You might also need to install the Recovery Console.
When you set out to recover a system, you should follow these steps:
Try to start the system in safe mode, as described in the section of this chapter entitled "Starting a System in Safe Mode."
Try to recover the system using the System Recovery Data (if available). See the section of this chapter entitled "Using the Recovery Data to Restore a System."
Try to recover the system using the Recovery Console. See the section of this chapter entitled "Working with the Recovery Console."
Restore the system from backup. Be sure to restore the system state data as well as any essential files.
Automated System Recovery (ASR) data can often help you recover a system that won’t boot. The recovery data includes essential system files, partition boot sector information, and the startup environment for a particular system. You should create recovery data for each computer on the network, starting with servers running Windows Server 2003. Normally, you’ll want to update the recovery data when you install service packs, manipulate the boot drive, or modify the startup environment. Recovery data does not include user data files.
You can create ASR data using the Backup utility. ASR data is stored in two different forms: primary data and secondary data. The primary data is stored on the backup media you choose, such as a tape backup or disk drive. The secondary data is stored on a floppy disk and contains the files needed to boot the operating system and access the primary data.
Tip
When you completed the installation of the operating system, basic recovery information was saved in the %SystemRoot%Repair folder on the system partition. The Repair folder contains a copy of the local Security Account Manager (SAM) data and other essential system files. It doesn’t contain a backup of the Windows registry. You should create a registry backup when you create the recovery data.
You can create a system recovery data snapshot by completing the following steps:
Insert a blank 3.5-inch, 1.44-MB disk into the floppy drive.
Start the Backup utility. If wizard mode is enabled, click Next, select Prepare An Automated System Recovery Backup, and then click Next again. If wizard mode is disabled, click Automated System Recovery Wizard in the Welcome tab and then click Next.
On the Backup Destination page, specify where the primary data should be stored. Select the backup media type and then specify the location of the backup media. Click Browse to search for a save location.
Click Next and then click Finish.
Click OK. When prompted, remove the ASR disk and label it for the system.
If a system won’t boot normally, you can use safe mode to recover or troubleshoot system problems. In safe mode, Windows Server 2003 loads only basic files, services, and drivers. The drivers loaded include the mouse, monitor, keyboard, mass storage, and base video. No networking services or drivers are started—unless you choose the Safe Mode With Networking option. Because safe mode loads a limited set of configuration information, it can help you troubleshoot problems. You’ll usually want to use safe mode before trying to use the emergency repair disk or the Recovery Console.
You start a system in safe mode by completing the following steps:
Start (or restart) the problem system.
During startup you should see a prompt labeled Please Select The Operating System To Start. Press F8.
Use the arrow keys to select the safe mode you want to use, and then press Enter. The safe mode option you use depends on the type of problem you’re experiencing. The key options you might see are:
Safe Mode. Loads only basic files, services, and drivers during the initialization sequence. The drivers loaded include the mouse, monitor, keyboard, mass storage, and base video. No networking services or drivers are started.
Safe Mode With Command Prompt. Loads basic files, services, and drivers and then starts a command prompt instead of the Windows Server 2003 graphical interface. No networking services or drivers are started.
Safe Mode With Networking. Loads basic files, services, and drivers, as well as services and drivers needed to start networking.
Enable Boot Logging. Allows you to create a record of all startup events in a boot log.
Enable VGA Mode. Allows you to start the system in Video Graphics Adapter (VGA) mode, which is useful if the system display is set to a mode that can’t be used with the current monitor.
Last Known Good Configuration. Starts the computer in safe mode using registry information that Windows Server 2003 saved at the last successful logon.
Directory Services Recovery Mode. Starts the system in safe mode and allows you to restore the directory service. This option is available on Windows Server 2003 domain controllers.
Debugging Mode. Starts the system in debugging mode, which is useful only for troubleshooting operating system bugs.
If a problem doesn’t reappear when you start in safe mode, you can eliminate the default settings and basic device drivers as possible causes. If a newly added device or updated driver is causing problems, you can use safe mode to remove the device or reverse the update.
When you can’t start or recover a system in safe mode, your next step is to try to recover the system using the last system recovery data snapshot you made (if available). The recovery data comes in handy in two situations. If the boot sector or essential system files are damaged, you might be able to use the recovery data to restore the system. If the startup environment is causing problems on a dual or multiboot system, you might be able to recover the system as well. You can’t recover a damaged registry, however. To do that, you must use the Recovery Console.
You can repair a system using the recovery data by completing the following steps:
Insert the Windows Server 2003 CD or the first setup boot disk into the appropriate drive, and then restart the computer. When booting from a floppy disk, you’ll need to remove and insert disks when prompted.
When the Setup program begins, follow the prompts, and then choose the Repair Or Recover option by pressing R.
If you haven’t already done so, insert the Windows Server 2003 CD into the appropriate drive when prompted.
Choose emergency repair by pressing R and then do one of the following:
Press M For Manual Repair. Select this option to choose whether you want to repair system files, the partition boot sector, or the startup environment. Only advanced users or administrators should use this option.
Press F For Fast Repair. Select this option to have Windows Server 2003 attempt to repair problems related to system files, the partition boot sector, and the startup environment.
Insert the System Recovery floppy disk when prompted. Damaged or missing files are replaced with files from the Windows Server 2003 CD or from the %SystemRoot%Repair folder on the system partition. These replacement files won’t reflect any configuration changes made after setup, and you might need to reinstall service packs and other updates.
If the repair is successful, the system is restarted and should boot normally. If you still have problems, you might need to use the Recovery Console.
The Recovery Console is one of your last lines of defense in recovering a system. The Recovery Console operates much like the command prompt and is ideally suited to resolving problems with files, drivers, and services. Using the Recovery Console, you can fix the boot sector and master boot record; enable and disable device drivers and services; change the attributes of files on FAT, FAT32, and NTFS volumes; read and write files on FAT, FAT32, and NTFS volumes; copy files from floppy or CD to hard disk drives; run Check Disk; and format drives.
The sections that follow discuss techniques you can use to work with the Recovery Console. As you’ll learn, you can start the Recovery Console from the setup boot disks or you can install the Recovery Console as a startup option.
On a system with frequent or recurring problems, you might want to install the Recovery Console as a startup option. In this way, you don’t have to go through the setup boot disks to access the Recovery Console. You can use this option only if the system is running. If you can’t start the system, see the section of this chapter entitled "Starting the Recovery Console."
You install the Recovery Console as a startup option by completing the following steps:
Insert the Windows Server 2003 CD into the CD-ROM drive.
Click the Start menu and then click Run. This displays the Run dialog box.
Type h:i386winnt32.exe /cmdcons in the Open field, where h is the CD-ROM drive letter.
Click OK, and then when prompted, click Yes. The Recovery Console is then installed as a startup option.
Note
Normally, only administrators can install and run the Recovery Console. If you want normal users to be able to run the Recovery Console, you must enable the Auto Admin Logon policy for the local computer policy (Computer ConfigurationWindows SettingsSecurity SettingsLocal PoliciesSecurity OptionsRecovery Console: Allow Automatic Administrative Logon). This, however, is not recommended, as it represents a major security vulnerability.
If a computer won’t start and you haven’t installed the Recovery Console as a startup option, you can start the computer and the Recovery Console by completing the following steps:
Insert the Windows Server 2003 CD or the first setup boot disk into the appropriate drive and then restart the computer. When booting from a floppy disk, you’ll need to remove and insert disks when prompted.
When the Setup program begins, follow the prompts, and then choose the Repair Or Recover option by pressing R.
If you haven’t already done so, insert the Windows Server 2003 CD into the appropriate drive when prompted.
Choose Recovery Console by pressing C. When prompted, type the local administrator password.
When the system starts, you’ll see a command prompt into which you can type Recovery Console commands. Exit the console and restart the computer by typing exit.
The Recovery Console is run in a special command prompt. At this command prompt, type HELP to list all available commands.
The commands you’ll use most often are ATTRIB, NET, FIXBOOT, FIXMBR, and EXIT. ATTRIB changes the attributes of files. You could, for example, change a read-only file to read/write. Windows Server 2003 allows you to map to a shared folder on another system using the NET command. You could then transfer files to or from the remote system. The FIXBOOT and FIXMBR commands can get you out of real jams. These commands can resolve problems with the boot sector and the master boot record on Master Boot Record drives. After you’ve made any necessary changes or repairs, use the EXIT command to exit the console and restart the computer.
If you installed Recovery Console as a startup option and no longer want this option to be available, you can delete the Recovery Console. To do that, follow these steps:
Start Windows Explorer, and then select the hard disk drive on which you installed the Recovery Console. This is normally the boot drive.
From the Tools menu, select Folder Options.
In the View tab, select Show Hidden Files And Folders, and then clear the Hide Protected Operating System Files check box. Click OK.
The right pane should show the root directory for the boot drive. Delete the Cmdcons folder and the Cmldr file.
Right-click the Boot.ini file, and then click Properties.
In the Properties dialog box, clear the Read-only check box. Then click OK.
Open Boot.ini in Notepad. Then remove the startup entry for the Recovery Console. The entry looks like this:
C:CMDCONS BOOTSECT.DAT="Microsoft Windows Server 2003 Recovery
Console " //cmdcons
Save the Boot.ini file and then change its property settings back to read-only. Once deleted, the Recovery Console is no longer listed as a startup option. You can reinstall the console if you need to at a later date or run the console as described in the "Starting the Recovery Console" section of this chapter.
Collections of tapes are organized into media pools. The tasks you use to work with media pools are explained in the following sections.
You manage media pools through the Removable Storage node in Computer Management, shown in Figure 15-11. With Removable Storage all media belongs to a pool of a specific media type. The concept of a media pool is very dynamic. Libraries can have multiple media pools, and some media pools can span multiple libraries.
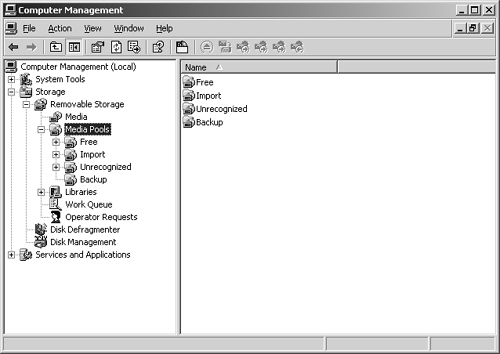
Figure 15-11. When you manage media using Removable Storage, keep in mind that each media pool has a specific purpose. The Backup utility uses media allocated to the Backup application pool and the Free Media pool.
You can also use media pools to establish a hierarchy in which top-level media pools contain lower-level media pools and these media pools in turn contain collections of tapes or disks.
Removable Storage categorizes media pools into types. The different types of media pools are:
Unrecognized. Media pools containing media that Removable Storage doesn’t recognize, as well as new media that hasn’t been written to yet. To make Unrecognized media available for use, move the media to the Free media pool. If you eject the media before doing this, the media are automatically deleted from the Removable Storage database and no longer tracked.
Free. Media pools containing media that aren’t currently in use and don’t contain useful data. These media are available for use by applications.
Import. Media pools containing media that Removable Storage recognizes but that haven’t been used before in a particular Removable Storage system. For example, if you’re transferring media from one office to another, the media might be listed as Import. To reuse the media at the new location, move the media to Free media or Application media pools.
Application. Media pools containing media that are allocated to and controlled by an application, such as the Backup utility. Members of the Administrators and the Backup Operators groups can control Application media pools as well. You can configure Application media pools to automatically draw media from Free media pools, as necessary. Once they’re allocated, you can’t move Application media between media pools.
Free, Unrecognized, and Import media pools are referred to as system media pools. Unlike Application media pools that you can delete, you can’t delete system media pools.
If media have information that you don’t need anymore, you can initialize the media and prepare them for use in the Free media pool. When you do this, you destroy the information on the media and move the media to the Free media pool.
To prepare media for the Free media pool, follow these steps:
You can move media to a different media pool to make it available for use or to allocate it to an application. To do that, follow these steps:
The only type of media pool you can create is an Application media pool. To do this, follow these steps:
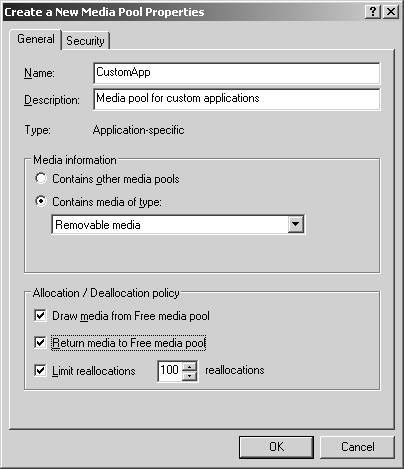
In Removable Storage, right-click Media Pools, and then click Create Media Pool. Or right-click an existing Application media pool and then click Create Media Pool.
In the Create A New Media Pool Properties dialog box, type a name and description of the media pool as shown in Figure 15-12.
If the media pool will contain other media pools, select Contains Other Media Pools. Otherwise, click Contains Media Of Type and select an appropriate media type from the list.
Complete the process by clicking OK. As necessary, allocate media and configure security. These procedures are described in the "Setting Allocation and Deallocation Policies" and "Working with Access Permissions for Removable Storage" sections of this chapter.
Each media pool can contain only one type of media. The media type is normally assigned when you create the media pool, but you can change the media type provided no media is currently assigned to the media pool.
To change the media type, follow these steps:
You can configure Application media pools to automatically allocate and deallocate Free media. By enabling this process, you ensure that when an application needs media, the application can obtain it. Then, when the media is no longer needed, it can be returned to the Free media pool.
You configure allocation and deallocation of media by completing the following steps:
In Removable Storage, double-click Media Pools.
Right-click the media pool you want to work with and then select Properties. This media pool must contain media of a specific type and can’t be a container for other media pools.
In the General tab, use the following check boxes under Allocation/Deallocation Policy to control media allocation:
Draw Media From Free Media Pool. Select this option to automatically draw unused media from a Free media pool when needed.
Return Media To Free Media Pool. Select this option to automatically return media to a Free media pool when no longer needed.
Limit Reallocations. Select this option if you want to limit the number of times that tapes or disks can be reused. Then use the Reallocations field to set a specific limit.
Click OK.
Like other objects in Windows Server 2003, Removable Storage has specific access permissions. You can set access permissions for all of Removable Storage as well as individual media pools, libraries, and media. Table 15-4 summarizes the available user permissions from lowest to highest. Higher-level permissions inherit the capabilities of lower-level permissions.
Table 15-4. Access Permissions for Removable Storage
Permission | Meaning for Removable Storage | Meaning for Media, Media Pools, or Libraries |
|---|---|---|
Use | Grants read access to Removable Storage but not necessarily to media, media pools, or libraries. | Grants read access to the individual media, media pool, or library. Allows user to insert/eject media and take inventory in a library. |
Modify | Grants read/write access. User can create media pools and manage the work and requests queues. | User can change properties of the media, media pool, or library. |
Control | Grants all Use and Modify permissions. In addition, user can delete media pools and delete libraries. | User can insert/eject media, take inventory in a library, and delete media pools or libraries. |
Modify Permissions | Grants user the right to change permissions for media, media pools, and libraries. | User can change permissions for media, media pools, and libraries. |
View Permissions | Grants user the right to change permissions for media, media pools, and libraries. | User can review but not change permissions for media, media pools, and libraries. |
Note
Keep in mind that these permissions apply to the Removable Storage system and not to the files that might be stored in media. NTFS access permissions still apply to files on NTFS formatted media.
Initially, Removable Storage is configured to be managed by the operating system, Administrators, and Backup Operators. Normal users are granted only limited access, which might be necessary when they’re working with both Removable Storage and Remote Storage. If you use Removable Storage for purposes other than backup and recovery operations, you might want to grant access to other users and groups. However, only Administrators and Backup Operators have the necessary permissions to back up and restore files on computers. Thus, even if you grant an operator control, that person might not be able to back up and restore files.
You can set access permissions for Removable Storage, media pools, libraries, and media. The available permissions are Use, Modify, Control, Modify Permissions, and View Permissions. These permissions were summarized earlier in the chapter.
You set or view permissions by completing the following steps:
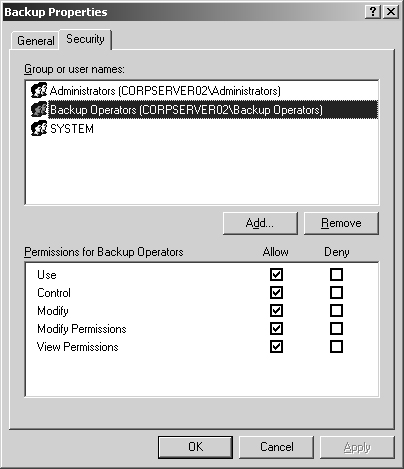
In Removable Storage, right-click the element with which you want to work.
Select Properties from the pop-up menu and then click the Security tab, as shown in Figure 15-13.
Users or groups that already have access to the element are listed in the Group Or User Names list box. Change permissions by selecting a group or user and then using the Permissions For ... list box to grant or deny access permissions.
To set access permissions for additional users, computers, or groups, click the Add button. Then use Select Users, Computers, Or Groups to add users, computers, or groups. Afterward, set permissions for the groups or users you’ve added.
Click OK when you’re finished.
Whenever you work with removable media, you’ll need to keep a close eye on the work queues, operator requests, and security.
Work Queue is the area where Removable Storage displays the status of operations. You access Work Queue by expanding Removable Storage and then clicking Work Queue in the console tree.
Operations are tasks that administrators, backup operators, and other authorized users initiate. Each operation listed in the queue has a specific state, which indicates the operation’s status. Operation states include:
By default, completed, cancelled, and failed requests stay in the queue for 72 hours. Waiting or in-progress operations stay in the queue until their status changes. If waiting or in-progress operations are causing problems, such as delaying priority operations, you can manage the requests in one of these ways:
Reorder mount operations. Changing the mount order can allow priority operations to execute before lower priority operations. For example, if you’re backing up a database, you can make your mount operation the next one in the queue, pushing it ahead of others. You change the mount order as described in the section of this chapter entitled "Changing Mount Operations."
Cancel operations. Canceling an operation can free up drives and media when operations are waiting for another operation to complete. For example, processes that are waiting to be executed can often be holding up other processes, and in this case you might need to cancel the process to allow other processes to execute. You cancel a waiting operation by right-clicking it and then selecting Cancel Operation.
Deleting operations. You can delete completed, canceled, or failed operations manually or automatically. You configure when operations are deleted as described in the section of this chapter entitled "Controlling When Operations Are Deleted."
If operations have a status of Waiting, it can be an indicator that something has gone wrong. For example, the operation might be waiting because the resource isn’t in the correct state. If the operation has been waiting for a long time, this can mean that the resource isn’t mounted, enabled, or otherwise working properly and that you might need to dismount, enable, or correct a problem with the resource.
To correct the problem you might need to cancel the operation, perform a corrective action, and then issue a new operation. You cancel a waiting operation by right-clicking it and then selecting Cancel Operation.
When two or more mount operations are waiting, you can change the order of the operations to allow priority operations to proceed ahead of other operations. To do this, follow these steps:
Right-click the waiting mount operation you want to manipulate, and then select Re-Order Mounts. This displays the Change Mount Order dialog box.
The current order of the mount operation is shown. The options available allow you to:
Move the mount operation to the front of the queue, which ensures that it’s the next mount operation executed.
Move the mount operation to the back of the queue, which ensures that it’s executed after existing mount operations.
Move the mount operation to a specific location in the queue, which allows you to move the operation ahead of or behind other operations without making it the highest or lowest priority.
Click OK.
By default, completed, canceled, and failed operations are deleted from the work queue after 72 hours. You can control when operations are deleted by:
Deleting individual operations. To delete operations individually, right-click them and then select Delete.
Deleting all operations. To delete all completed, canceled, and failed operations, right-click Work Queue, select Properties, and then click Delete All Now.
Reconfiguring automatic deletion times. To change the automatic deletion time, follow these steps:
Right-click Work Queue, and then select Properties. This displays the dialog box shown in Figure 15-14.
To stop automatic deletion of all operations, clear the Automatically Delete Completed Requests check box and complete the process by clicking OK.
To enable automatic deletion, select the Automatically Delete Completed Requests check box. Completed requests are now deleted automatically.
Select Delete Failed Requests to automatically delete failed requests as well. Or, to save failed requests, select Keep Failed Requests.
In Delete After, change the deletion interval using the Hours and Minutes combo boxes.
Click OK.

Operator Requests is the area where Removable Storage displays the status of requests that need the attention of administrators or backup operators. You access Operator Requests by expanding Removable Storage and then clicking Operator Requests in the console tree.
Each entry in the queue represents a task that you or another operator needs to perform. These requests are issued by Removable Storage or a compliant application for operations that are performed manually, such as inserting a cleaning cartridge, inserting offline tapes, or servicing a library. Each request has a specific state, which indicates the request’s status. You can respond to requests by either completing or refusing the request. By default, completed or refused requests stay in the queue for 72 hours.
To help you track the status of requests, all requests are listed according to their current state. Request states include:
Completed. Request was completed as specified by an operator or detected by Removable Storage. To mark a request as completed, right-click it and select Complete.
Refused. Request was refused by an operator and won’t be performed. To mark a request as refused, right-click it and select Refuse.
Submitted. Removable Storage or a compliant application submitted the request and is waiting for an operator to handle the request.