

This chapter covers the rest of the DTS tasks that were listed in Chapter 4, “DTS Tasks.” These additional tasks are listed in Table 5.1.
Table 5.1. Additional DTS Tasks
|
Icon |
Description |
|---|---|
|
|
Execute SQL Task |
|
|
ActiveX Script Task |
|
|
Execute Process Task |
|
|
Execute Package Task |
|
|
Dynamic Properties Task |
|
|
Send Mail Task |
|
|
File Transfer Protocol Task |
|
|
Message Queue Task |
|
|
Transfer SQL Server Objects Task (now called Copy SQL Server Objects Task) |
|
|
Transfer Databases Task |
|
|
Transfer Logins Task |
|
|
Transfer Master Stored Procedures Task |
|
|
Transfer Jobs Task |
|
|
Transfer Error Messages Task |
|
|
Analysis Services Processing Task |
|
|
Data Mining Task |
The group of tasks that allow you to control various processes within a DTS package are explained first. These tasks are the programming tasks. These include Execute SQL Task, which allows you to use SQL and have direct access to SQL databases; the ActiveX Script Task, which allows you to use scripting languages to handle more complex processes; the Execute Process Task, which enables you to invoke batch commands and external executables; and the Execute Package Task and Dynamic Properties Task, which round out the programming group and facilitate the execution of tasks within a package.
Next, the chapter will cover the messaging tasks, which allow you to send emails and download files, as well as send and receive queued messages.
The database management tasks help you move databases and database objects between SQL Server instances will also be discussed. When you use these tasks, it is important to set up your SQL Server installation so that it starts up with the appropriate network account. In some cases, using the local system account will prevent the tasks from copying objects over the network.
Finally, the chapter touches on the tasks specific to the Analysis Server. Analysis Services is a server product included with SQL Server 2000 that lets you implement Online Analytical Processing (OLAP). The Analysis Services Processing Task and the Data Mining Task help automate some of the processes required to maintain data warehouses and to mine the data for useful information.
The Execute SQL Task allows you to do just what the name says—execute an SQL statement. In SQL 7.0, this was all that you could do with this task. Furthermore, it was difficult to pass parameters in. You had to resort to modifying the text of the SQL statement from outside this task before executing it. Using its result set directly was equally difficult unless it was saved into a temporary table that a later task could access. In SQL 2000, the addition of the Parameters feature changes all of that (see Figure 5.1).

Chapter 4 showed you how to use parameters in a query when building a Transform Data Task (see Figure 4.4). The same concepts apply when you work with SQL code that expects values to be passed in during execution.
When you execute SQL code, however, a result set is usually returned, and you most likely would want to gain access to this result set. Both the Transform Data Task and the Data Driven Query Task use the result automatically. By design, the Execute SQL Task does not do anything with any result set; its purpose is simply to execute the SQL code that you give it. However, SQL 2000 now allows you access to the result set.
Click on the Parameters button to display the Parameter Mapping dialog box. You will see the familiar Input Parameters tab. However, in order to use the result set you will be more interested in the new Output Parameters tab (see Figure 5.2).
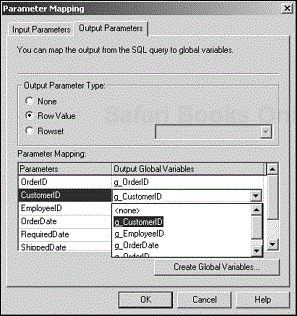
The Output Parameters tab provides two options. You can either save one row from the result set, or save the whole result set itself.
To save one row from the result set, click on the option Row Value. This enables the Parameter Mapping window that displays all the columns returned by the SQL code. Then you can map the columns to global variables. Map any column that you don’t need to <None>.
You can create global variables by clicking on the Create Global Variables button. Again, you will recall that this brings up the Global Variables dialog box that was introduced in Chapter 4.
When the task executes, DTS saves the appropriate columns of the first row to the corresponding global variables as defined in the Parameter Mapping window.
If you want to save more than one row, you can save the whole result set instead. To do this, click on the option Rowset. Then, from the drop-down menu on the right side of the dialog box, select the particular global variable where you want the result set to be saved (see Figure 5.3). The global variable must have a type of <Other>.
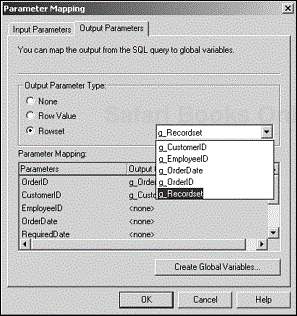
When the task executes, the result set is saved to the variable you selected. Then you can use ActiveX Data Objects (ADO) to access this data using an ADO recordset. Because the global variable’s value (in this case, the result set) can be saved with the package, and because you don’t have to connect to the data source to access the data, what you really have is a disconnected ADO recordset.
Before you go ahead and store gigabytes of SQL results into a global variable, be aware that doing so can severely impair the loading and saving of your DTS package.
After the data (a single row or a whole result set) has been saved to one or more global variables, you can use the ActiveX Script Task to retrieve the data from the global variables collection of the package (see the following section).
Use an ActiveX Script Task whenever you need to perform functions that are not available in any of the other built-in tasks of DTS. With this task, you are limited only by the capabilities of the scripting language that you use.
When you add an ActiveX Script Task to the package, it opens the ActiveX Script Task Properties dialog box (see Figure 5.4). This dialog box is exactly the same one that you saw in Chapter 4. But this time, it is saved as a complete task, not just a property of another task type.

In the Browser tab, you can see the global variables that have been created. You can access the global variables containing data that were returned in a result set. Listing 5.1 shows an example of script you can use to access the row data stored in multiple global variables.
Example 5.1. VBScript Using Global Variables
Function Main()
 Dim OrderID
 Dim CustomerID
 Dim EmployeeID
 Dim OrderDate

 OrderID = DTSGlobalVariables("g_OrderID").value
 CustomerID = DTSGlobalVariables("g_CustomerID").value
 EmployeeID = DTSGlobalVariables("g_EmployeeID").value
 OrderDate = DTSGlobalVariables("g_OrderDate").value

 {other processing}

 Main = DTSTaskExecResult_Success
End Function
Listing 5.2 is an example of retrieving the result set using ADO.
Example 5.2. Using VBScript to Create an ADO Recordset and Save It in a DTS Global Variable
Function Main()
 Dim oRset

 Dim OrderID
 Dim CustomerID
 Dim EmployeeID
 Dim OrderDate

 Set oRset = CreateObject("ADODB.Recordset")
 Set oRset = DTSGlobalVariables("g_Recordset").value

 If oRset.BOF AND oRset.EOF Then
 'There are no rows in the recordset
 Else
 While NOT oRset.EOF
 OrderID = oRset.Fields("OrderID").value
 CustomerID = oRset.Fields ("CustomerID").value
 EmployeeID = oRset.Fields ("EmployeeID").value
 OrderDate = oRset.Fields ("OrderDate").value
 {other processing}
 oRset.MoveNext
 Wend
 End If
 Main = DTSTaskExecResult_Success
End Function
You may have noticed that the code examples are more involved than previous ActiveX scripts. In an ActiveX Script Task, you can do more without worrying about performance. Unlike a transformation, the code is not executed for each row.
Performance Considerations
The code in an ActiveX Script Task is executed once. Code in a transformation is executed once for each row. Therefore, you incur a smaller penalty for doing more within the script.
The status codes also are different. In an ActiveX Script Task, you can return the following status codes:
DTSTaskExecResult_Success—. Indicates that the task executed successfully.
DTSTaskExecResult_RetryStep—. Indicates that the task should be restarted.
DTSTaskExecResult_Failure—. Indicates that the task execution failed.
The Execute Process Task enables you to run programs external to the DTS environ-ment. These programs include executable programs (.exe files) and batch files. For example, it is easier to write Copy File or Delete File commands in a batch file and have it launched by an Execute Process Task than it is to write an ActiveX Script Task. Or perhaps you have a legacy application that needs to run as part of a database-loading procedure. The Execute Process Task allows you to tie disparate programs into a cohesive set of processing procedures.
When you add this task to a package, the Execute Process Task Properties dialog box comes up (see Figure 5.5). This dialog box is relatively simple compared with the ones you have seen earlier in this book.
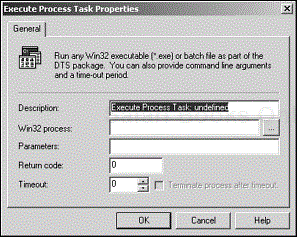
Specify the .exe or batch file that you want to execute or browse for one if you don’t remember its name. If the external program expects parameters to be passed in, you can specify them in the Parameters text box.
You can specify a return code for the successful execution of the external process. You can have the task wait until the external process completes or fails by specifying a timeout value of zero. If you choose to specify a timeout value greater than zero, you have the option of having DTS terminate the process when the timeout period expires. If you don’t check the Terminate Process After Timeout check box, the task will fail after the timeout period, but the external process will continue to execute.
The one important issue in this task that you should be aware of is the context in which the external process is executed. Essentially, it follows the permissions required for executing SQL Server’s xp_cmdshell stored procedure. If the user invoking the task is a member of the sysadmin role in SQL Server, the external process is executed in the context of the account used to run SQL Server. Otherwise, the process is run in the context of a proxy account for SQL Server Agent. Either way, the executable or batch file must be in the PATH environment of the executing account, and the account must have NT execute permissions for that file.
If you are executing the DTS package from the Designer (in Enterprise Manager) or from the command line using DTSRun, especially if you are on a machine other than the server itself, the authentication requirements may be different. The bottom line is that you need to make sure that package execution occurs with the proper authentication and permissions.
When you have several DTS packages that you want to execute together or in a particular sequence, you probably would want to have one main package that executes all these packages.
For example, multiple reports may require different types of preprocessing of data. You can develop a DTS package for each report. Although each package can be scheduled to execute individually, more likely they will need to be executed in a coordinated manner.
With SQL 2000, you no longer need to write code to handle the execution of multiple packages because DTS has a built-in task that does the job for you (see Figure 5.6).
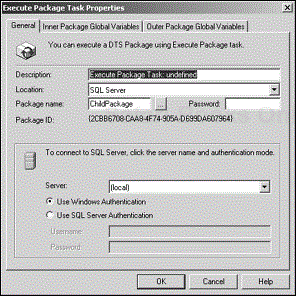
By default, when the Execute Package Task Properties dialog box comes up, the Location field is set to SQL Server. This means that the package to be executed will be loaded from the SQL Server that you specify in the box below (see Figure 5.6). However, you can also load packages saved to SQL Server’s Meta Data Services or packages saved as a structured storage file (see Chapter 7, “Package”).
In addition to simplified package execution, the Execute Package Task makes it easy to pass variables to other packages.You can pass two categories of variables: package variables and task variables. Package variables are global variables defined in the parent package’s GlobalVariables collection. Task variables are defined in the Execute Package Task’s GlobalVariables collection.
You can pass task variables by using the Inner Package Global Variables tab (see Figure 5.7). Specify the name of the task variable, data type, and value in the Variables window.
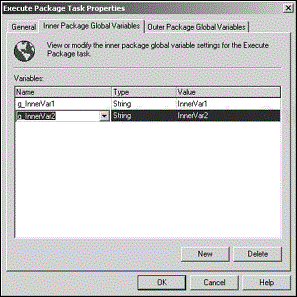
The important thing to remember is that these variables are not added to the global-variables collection of the package in which the Execute Package Task is defined. Instead, they are stored within the task and passed to the child package when the task executes.
The New button at the bottom of the Inner Package Global Variables tab does not create new global variables for the DTS package; it adds the variable to the task’s global-variables collection. This collection is listed in the Variables window of the tab.
Inner-Package Variables Are Task Variables
Variables defined in the Inner Package Global Variables tab are task variables and therefore are stored within the task’s global-variables collection, not at the parent-package level. A corresponding variable in the child package must exist for each of these variables, or the task will fail.
You can pass package variables by using the Outer Package Global Variables tab (see Figure 5.8). You can select variables only from the list of existing global variables currently defined in the parent package.
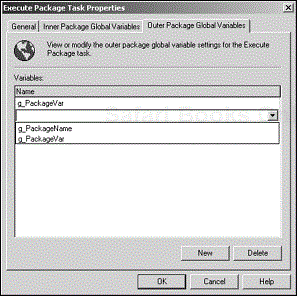
Note that you have to create the global variable in the Package Properties dialog box (at the package level). Just as with the Inner Package Global Variables tab, the New button in this tab does not create new global variables. The name of the global variable you want to pass is actually added to the InputGlobalVariables collection of the Execute Package Task. This collection is listed in the Variables window of this tab. At run time, this list is referenced to determine which package variables need to be passed.
A List of Package Variables to Pass
When you add variables in this tab, you essentially are creating a list of package variables that you want to pass to the child package at run time. If the child package does not have these variables in its global-variables collection, those variables are created at run time.
When the parent package executes, it first appends the package variables to the child package’s global-variables collection (if they don’t exist yet). Then the package passes the current values of those package variables to the corresponding child global variables. Next, the package passes the current values of all the task variables to corresponding variables in the child package’s global variables.
The task variables are essentially static. You set their values at design time, and these are the values that get passed each time the task executes. Package variables, on the other hand, pass their current value when the Execute Package Task executes. If the task is called within a loop, and the value of the package variable changes between calls, the new values are passed to the child package. Understanding package and task variables and how they are passed will enable you to create highly functional groups of DTS packages that work well together.
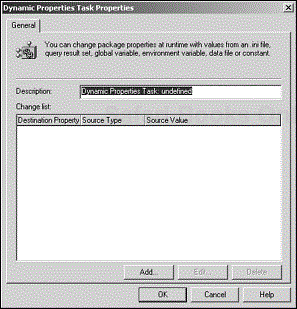
Another great addition to DTS is the Dynamic Properties Task. Use it to modify values of virtually any property within a DTS package at run time. The Dynamic Properties Task Properties dialog box (yes, the Properties dialog box for the Dynamic Properties Task) lists the properties you specify to be set dynamically when the task executes (see Figure 5.9).
Click on the Add button to bring up the Package Properties dialog box (see Figure 5.10). By default, this dialog box displays the package properties, but you can select other objects in the package and set their properties as well. You can click on a data connection to set UserID and Password, for example. You also can click on Global Variables to set the value of one or more global variables.
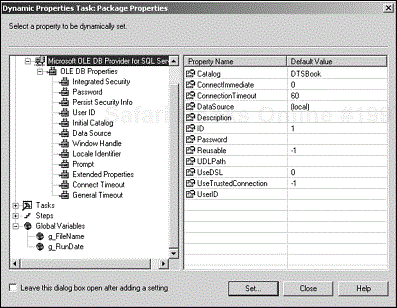
It’s amazing enough that DTS exposes as many properties as it does with the Dynamic Properties Task. Equally amazing is the number of options it gives you when it comes to choosing the source of the value that you want a property to be set to. Suppose that you need to set dynamically the value of a global variable named g_FileName. Click on the variable to display its properties; then click on the Value property. Now click the Set button to display the Add/Edit Assignment dialog box (see Figure 5.11).
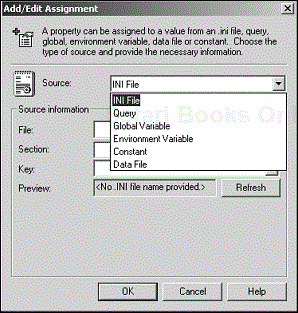
You can choose among six different source types. Depending on the source you choose, the Source Information items will change to prompt you for the information needed:
INI File—. With an INI file, you can specify the filename, the section, and key to identify the value to be used in setting the property value.
Query—. With a query, you can specify the data connection; then you can either enter the query directly or browse to a previously saved query and load it. DTS will use the value in the first column of the first row to set the property value.
Global Variable—. This option lets you select a variable from the global-variables collection of the package. As you saw earlier in this chapter, the Create Global Variable button enables you to add global variables if necessary.
Environment Variable—. This option provides a drop-down menu of all the environment variables available on your development machine. You must make sure that the same environment variable exists on the machine where this package will run.
Constan—. This option allows you to enter a specific constant that will be used to set the property value.
Data File—. This option allows you to browse for a file containing one or more lines of data. (Yes, it will use multiple lines when needed.)
This section ends the discussion of the programming tasks: the Execute SQL Task, ActiveX Script Task, Execute Package Task, Execute Process Task, and Dynamic Properties Task. Without doubt, you can do a great deal with this set of built-in tasks.
The next three sections discuss the messaging tasks: Send Mail, FTP, and Microsoft’s Message Queue Service (MSMQ).
The Send Mail Task was introduced in the initial release of DTS. It enables you to send an email message as part of the processing performed within a DTS package. To use a Send Mail Task, you must have messaging services configured properly on the SQL Server machine. You won’t be able to create or open a Send Mail Task if the server does not have messaging services installed. Later in this section, you will learn how to integrate mail services with SQL Server.
Assume for now that messaging has been configured properly on the server. You can click on the Send Mail Task icon on the toolbar to bring up the Send Mail Task Properties dialog box (see Figure 5.12).
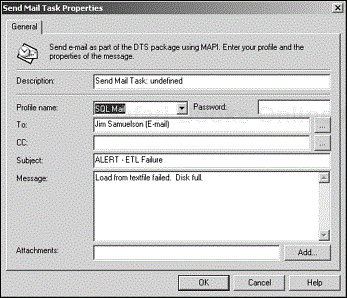
The Send Mail Task uses one of the mail profiles existing on the server machine. Choose an appropriate mail profile from the Profile Name drop-down menu. Specify the recipients of the email message by typing their email addresses, or click the ellipsis (…) buttons to bring up the Address Book dialog box (see Figure 5.13).
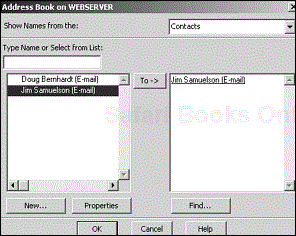
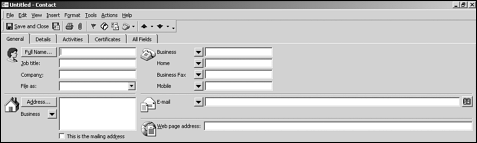
The Address Book dialog box lets you choose one or more recipients of an email message.You can click on the New button to create a new entry in the Address Book. You also can click on the Properties button to edit the entry for the currently highlighted contact in the list on the left window. After prompting you whether you want to create a new contact or a new distribution list, it brings up the entry screen for creating new contacts in Microsoft Outlook (see Figure 5.14).
You can specify that an attachment be sent with the email.Type the path and name of the file to attach or click the Add button to browse for one.
If you will recall, SQL Server consists of two main services:
The SQL Server engine itself, which is called MS SQL Server
The scheduling engine, which is called SQLServerAgent
Each of these services uses its own corresponding mail services. MS SQL Server uses the SQL Mail service, whereas SQLServerAgent uses its own mail service, called SQL Agent Mail. For the purposes of this section, you are particularly interested in the SQL Mail service.
Essentially, the server on which SQL Server is running must be configured as a mail client. The user account used to start MS SQL Server needs a mail profile.
Numerous versions of mail services and mail clients are available; discussing mail implementation and configuration is beyond the scope of this book. However, here is an example of how it would be done in the context of Windows 2000:
Log on to the server machine, using the account you used to start SQL Server.
To successfully implement SQL Server and mail integration the following is required: on SQL Server 7.0 install MS Outlook 97 or higher, and on SQL Server 2000 install MS Outlook 2000 or higher.
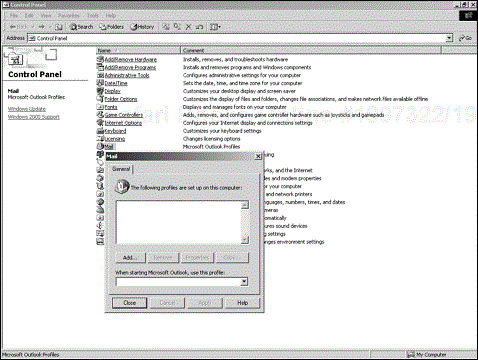
Open the Control Panel, and start the Mail applet.
The Mail dialog box appears, allowing you to add profiles (see Figure 5.15). Note that if a default profile is already specified for the currently logged-in account, that profile will be displayed.
Click on the Add button to add a mail profile.
The Microsoft Outlook Setup Wizard opens (see Figure 5.16). By default, the Use the Following Information Services option is selected. This option creates a default profile called MS Exchange Settings.
Select the second option, Manually Configure Information Services, and click Next.
This allows you to specify a name for your new profile. Call it SQL Mail (see Figure 5.17). When you click Next, you are prompted to set up the mail account.
Set up the mail account.
The SQL Mail Properties dialog box opens (see Figure 5.18). Note that SQL Mail is the name of the profile you are configuring.
Click on the Add button in the Services tab.
The Add Service to Profile dialog box opens, allowing you to choose the messaging service that you need for the mail account (see Figure 5.18). This example uses the Internet email service, but you can use other services. More than likely, Exchange Server will be available in your environment. Select the desired service, and click OK to bring up the Mail Account Properties dialog box.
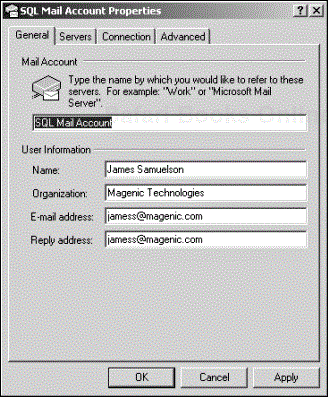
In the SQL Mail Account Properties dialog box, you will be asked to configure the mail account (see Figure 5.19).
Note that the mail account is named SQL Mail Account.
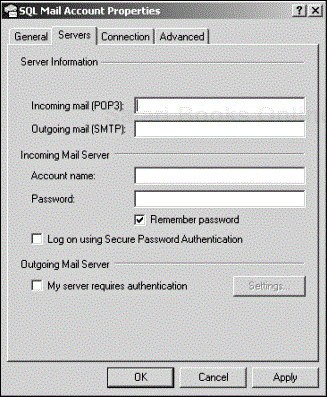
Click on the Servers tab to specify the particular mail servers that SQL Server will be contacting (see Figure 5.20).
If you happen to have Internet Information Server (IIS) installed, chances are that you have an SMTP configured for that server as well. You could set SQL Server to send out mail through that SMTP server and not burden the main mail server that serves the users of your enterprise.
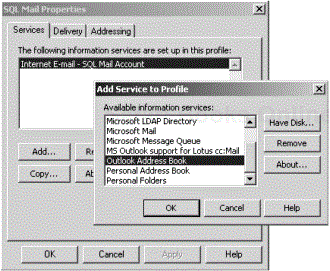
When completed, you are brought back to the SQL Mail Properties dialog box. Click on the Add button to bring up the Add Service to Profile dialog box. Select the Outlook Address Book service. After the selection, you will be returned to the SQL Mail Properties dialog box. Click on Add again, and select Personal Folders from the Add Service to Profile dialog box. Click OK and the Create/Open Personal Folders File dialog box will appear. Provide a location and name for the file to be created in the File Name field. Click Open, and the Create Microsoft Personal Folders dialog box will pop up. Accept the default values, click OK, and you are brought back to the SQL Mail Properties dialog box.You should see the Mail Service, Outlook Address Book, and Personal Folders services listed in the “The following information services are set up in this profile:” field (see Figure 5.21).
Now you can configure SQL Server to use the SQL Mail service.
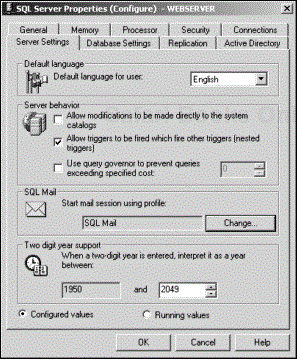
Start SQL Enterprise Manager, right-click the server where you want SQL Mail to be configured, and choose Properties from the shortcut menu.
The SQL Server Properties (Configure) dialog box opens (see Figure 5.22).
Click on the Server Settings tab; then click on the Change button in the SQL Mail section.
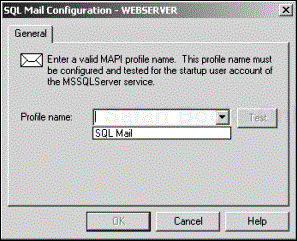
The SQL Mail Configuration dialog box opens (see Figure 5.23).
Choose the mail profile (which you named SQL Mail in Step 4) from the drop-down menu.
To set up SQL Mail from Enterprise Manager, double-click the Support Services folder to expand it. Right-click the SQL Mail object and select Properties from the menu.
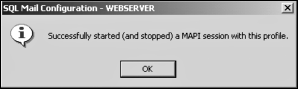
Click the Test button to see whether the profile was configured properly.
If so, you should see a message saying that a mail session was started and stopped successfully (see Figure 5.24). If you get an error instead, try stopping and starting SQL Server first. In some installations, you may have an option to auto-start SQL Mail with SQL Server. This option should start the mail session for the SQL Server account properly.


The File Transfer Protocol Task is a limited implementation of an FTP client. It lets you get files from an Internet FTP site or from a directory and save it in a destination directory. Right-click on the File Transfer Protocol Task object in the DTS Designer main panel and select Properties from the object menu (see Figure 5.25).
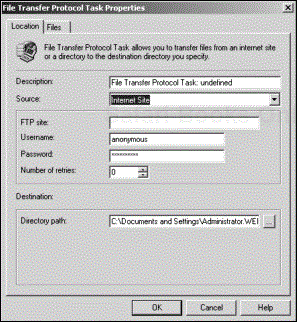
In the Location tab, you must specify a correct site and the proper login information at design time because DTS attempts to connect right away. You also need to specify the destination directory. A Browse button (…) is available to make locating this directory easier.
Select Directory from the Source drop-down menu to transfer files from a directory. Click on the Browse button (…) to bring up the Browse for Folder dialog box (see Figure 5.26).

Selecting a directory on a local drive will return a path in the format [drive]:[directory path]. Selecting a directory on the network will return a path in UNC format (\servernamedirectory_path). Click OK to close the dialog box.
Click the Files tab to see the source and destination directories (see Figure 5.27).

Aside from making it easy to select the files to download, this tab shows file sizes, which can be critical information that you would want to know when setting up a download. The Source directory shows all available files for downloading, but the Destination directory does not show any existing files at all. The only time the Destination directory will list a file is when you’ve specified one from the Source directory by double-clicking on it or by clicking on the source file and then clicking on the right-arrow button (>). In other words, it only shows the files that you intend to download.
If you are waiting for a file to arrive at the source directory, the Refresh button is a great help because it gets the latest list of files and refreshes the display every time you click on it.
One of the biggest additions to SQL Server 2000 DTS is support for Microsoft’s Message Queue Service (MSMQ). MSMQ enables an application architecture where two distinct applications or two instances of the same application can communicate with each other without a direct connection. Each application instance can execute at a different time, and yet the communication between the two is still bridged by way of MSMQ.
In simple terms, a message is sent by one application to a queue that is managed by an MSMQ server. The second application can retrieve this message at its own pleasure.
In Windows 2000, MSMQ is included as a configurable component of the server. In Windows NT 4, you can install MSMQ from the Windows NT 4.0 Option Pack. You need at least the MSMQ client services for the MSMQ task to work properly.
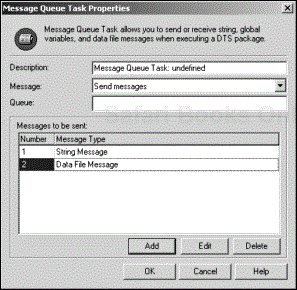
You can use the Message Queue Task to either send or receive MSMQ messages (see Figure 5.28).
You have to specify a queue where you want to send or receive your message. Specifying the correct queue is important; otherwise, the task will fail at run-time. To specify a queue, use the following format:
computer_namequeue_type$queue_name
This format is broken down as follows:
computer_name. is the server running the MSMQ service.queue_type. is Outgoing, Public, Private, or System.queue_name. is the name of the server’s queue.
MSMQ supports three types of messages, and DTS allows you to send and receive all three types. These message types include:
String message
Data-file message
Global-variable message
Within a Message Queue Task, DTS allows you to send or receive, but not both. If you choose to send, you can create multiple messages and send them all out when the task executes. DTS lists the message number and type of each message that you add. Note that you are limited to 4MB for each message.
To send a message, choose Send Messages from the Message drop-down menu and click the Add button. The Message Queue Message Properties dialog box opens (see Figure 5.29).
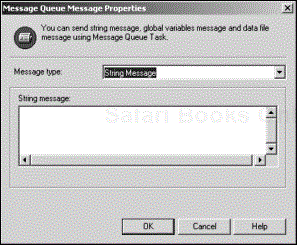
By default, this dialog box lets you build a string message to send. Type the message in the String Message text box; then click on the OK button. The message is added to the main list of messages to be sent out.
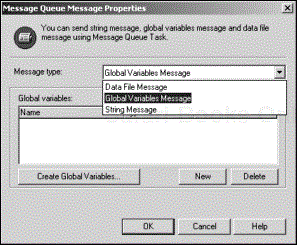
To send a global-variables message, select Global Variables Message from the Message Type drop-down menu. The options in the Message Type menu change to a list of global variables (see Figure 5.30). Click the New button to add an item to the list. Then you can choose a global variable from the drop-down menu below the Name column. You can send multiple global variables in one message as long as the collection does not exceed 4MB. Click on the Create Global Variables button to add global variables to the package.
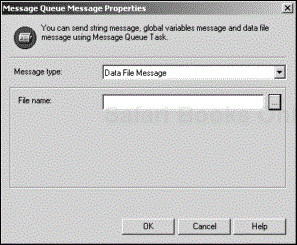
To send a data-file message, choose Data File Message from the Message Type drop-down menu. Then enter the filename of the data file you want to send or browse to it by clicking the ellipsis (…) button (see Figure 5.31). DTS adds this message to its list without validating that the file exists. You must ensure that the file exists at the time the task executes to keep it from failing.
To receive a message, choose Receive Messages from the Message Type drop-down menu. The menu options change to those appropriate for receiving a string message (see Figure 5.32).
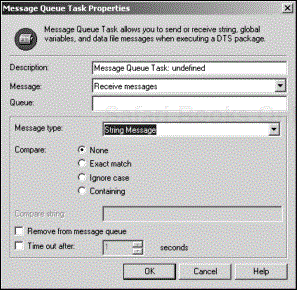
Using the Compare options, you can receive any string message without any constraints, or you can enter a compare string and set up a filter by using the following rules:
Exact Match—. String message must match the compare string, including case.
Ignore Case—. A case-insensitive match must occur between the message and the compare string.
Containing—. The compare string must be found within the message string.
Check the Remove from Message Queue check box to tell DTS to delete the message from the queue after it has been received. You can specify how long the task will wait to receive a message.
To receive a global-variables message, choose the appropriate option from the Message drop-down menu. The dialog box displays options appropriate for receiving a global-variables message (see Figure 5.33).

You can receive a global-variables message without restriction, or you can choose to limit its source. When limiting the source, you can specify a specific source package or, better yet, a specific version of a source package. DTS will ask for an identifier, which is a GUID. If you can remember the GUID of your source package, you are welcome to type it in the Identifier text box, but DTS does not expect you to do so. You can click the ellipsis button (…) instead to find the package from the appropriate server (see Figure 5.34). You must have the proper login account to access packages from the server.

Note that the package can also come from SQL Server’s Meta Data Services or a Structured Storage File because DTS can save packages to these storage destinations. Just as you do for receiving a string message, you can elect to receive the global-variables message from the queue when it arrives or specify how long DTS will wait to receive the message.
To receive a data-file message, choose the appropriate option from the Message drop-down menu. The dialog box displays options appropriate for receiving a data-file message (see Figure 5.35).
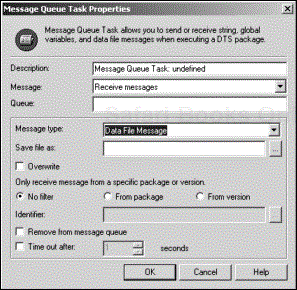
Specify the filename to save the incoming file into or browse to it by clicking the browse button (…). If the destination file contains data, you can specify to overwrite it by checking the Overwrite check box.
You can receive a data-file message without restriction, or you can choose to limit its source by specifying a source package or a specific version of a package. Again, DTS will help you seek out this package if necessary. You have the option of deleting the message after it is received or specifying how long DTS will wait for the message.
Message queuing has seen little use in the real world—at least, not the widespread use that Microsoft Transaction Server and SQL Server have enjoyed. By adding the Message Queue Task to DTS, Microsoft made it easier to use MSMQ. More message-based application architectures might appear in the future.
The Copy SQL Server Objects Task is the renamed Transfer SQL Server Objects Task that was introduced in SQL 7.0 (see Figure 5.36). Aside from the name change, the task itself has had a few meaningful changes.With this task, you can copy SQL Server objects between SQL 7.0 servers, between SQL 2000 servers, and from a SQL 7.0 server to a SQL 2000 server. In the third scenario, you effectively can create SQL 2000 versions of your existing SQL 7.0 database objects.

To copy SQL Server objects, you need to specify a source and destination.You will notice that the Source and Destination tabs of the Properties dialog box are quite similar. In SQL 2000, however, you can create a new database as the destination on the target server by selecting <new>. Doing so brings up the Create Database dialog box (see Figure 5.37).
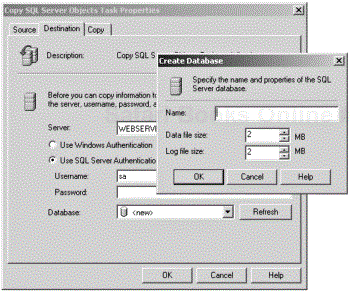
DTS prompts you for the basic information needed to create a database but does not actually create it until you execute the task.
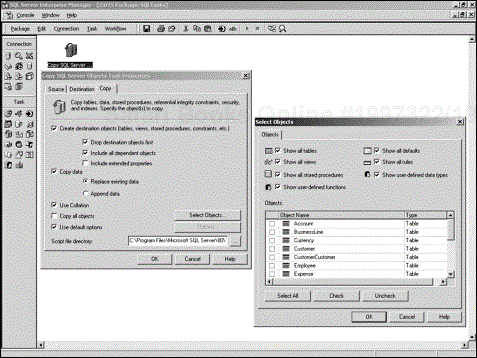
By default, DTS copies all objects in the source database. If you deselect this option, you can click on the Select Objects button to bring up the Select Objects dialog box, where you can specify the objects you want to copy (see Figure 5.38).
You must remember two important things about the Copy SQL Server Objects Task:
If you have foreign keys defined for the table(s) you intend to copy, DTS will copy the related tables and views as well.
If you are copying between SQL 7.0 databases, and the source database is upgraded to SQL 2000, the task will fail. You cannot copy from a SQL 2000 database to a SQL 7.0 database. You will have to reconfigure the task to make sure that the source and destination databases are appropriate.
Although the Copy SQL Server Objects Task deals with objects specific to a database, at times you may need to copy objects specific to the server instead. To do so, you use the five tasks discussed in the following sections:Transfer Databases,Transfer Logins, Transfer Master Stored Procedures,Transfer Jobs, and Transfer Error Messages.
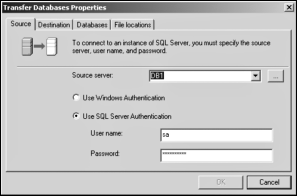
The Transfer Databases Task lets you move or copy databases to a SQL 2000 server. Yes, that’s right—only to a SQL 2000 server. You cannot copy even between two SQL 7.0 servers. Note that this is true for all the tasks that transfer database objects between servers.
Just as with the Copy SQL Server Objects Task, the Source and Destination tabs of the Properties dialog box are similar. The basic option, however, is limited to choosing the name of the server involved and specifying the login account to use (see Figure 5.39).
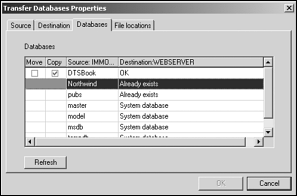
After you specify the source and destination information, DTS will enumerate the databases on both sides and show you which ones can be moved or copied (see Figure 5.40). DTS will provide check boxes only for those databases that qualify, preventing you from specifying the wrong databases. In addition, DTS will not allow you to move or copy any of the built-in master, msdb, model, or tempdb databases.
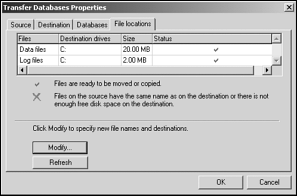
The File Locations tab shows the default locations where DTS will copy the associated files of the database(s) you specified (see Figure 5.41). If you accept this default setting, all the files for all the databases will be copied to the same location.
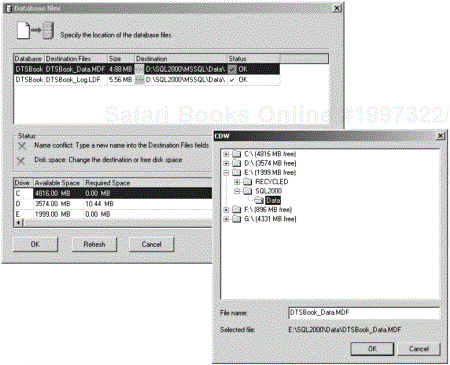
Click on the Modify button to bring up the Database Files dialog box. This dialog box allows you to specify locations for each individual file that will be copied. Click on the ellipsis button (…) to bring up the CDW dialog box (see Figure 5.42). This dialog box lets you browse to the folder on the destination server where you want the file to be copied. Unfortunately, SQL Server will not let you create the destination folder on the fly.
About the Copy Database Wizard
You may be wondering what the title of the dialog box, CDW, means. The title refers to the Copy Database Wizard, which uses the same COM objects that implement this task. You can invoke this wizard by right-clicking the Databases folder in Enterprise Manager, choosing All Tasks from the shortcut menu, and then clicking the Copy Database Wizard option. The wizard walks you through the steps for copying a database from one server to another.
When DTS enumerates the files to be copied, it does some significant checking in terms of disk-space availability as well as names conflicts. DTS shows both the required and the available disk space, and it shows whether an existing file of the same name already exists on the server.These checks help prevent the task from failing when the package is executed.
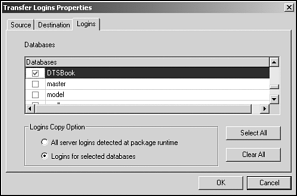
The Transfer Logins Task lets you transfer logins from a SQL 7.0 or SQL 2000 server to a SQL 2000 server. As in the preceding task, the Source and Destination tabs of the Properties dialog box are similar (see Figure 5.43). Both tabs ask for the server name and login information.
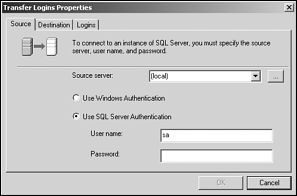
By default, the task copies all logins detected at the source server when the task is executed. In the Logins tab, you have the option to copy only the logins from selected databases (see Figure 5.44).
Veteran DBAs probably will smile upon discovering this task in DTS. The task simplifies two of the most mundane activities performed in a database-server environment: extracting user logins and creating (or re-creating) logins. DBAs have spent countless man-hours scripting just these two activities.
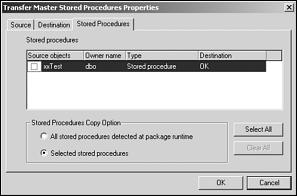
This task is used to copy stored procedures that you have added to the master database. Again, you can copy from both SQL 7.0 and SQL 2000 servers, but the destination will have to be a SQL 2000 server. The Properties dialog box for this task (see Figure 5.45) is very similar to the one for the preceding task.

Instead of the Logins tab, however, this dialog box has a Stored Procedures tab (see Figure 5.46). By default, the task copies all your stored procedures from the source master database at the time of execution. The Stored Procedures tab, however, gives you the option to select particular stored procedures to be copied.
This task provides a quick way to restore your custom master stored procedures from a duplicate database; it also allows you to upgrade your SQL 7.0 custom master stored procedures to SQL 2000.
The Transfer Jobs Task allows you to copy jobs from a SQL 7.0 or SQL 2000 server. Again, the destination needs to be a SQL 2000 server. Jobs are units of work to be performed by SQL Server. Jobs are managed and scheduled by the SQL Server Agent service. Each SQL Server stores all its job information in the msdb database, which explains why the Properties dialog box for this task is called Transfer Msdb Jobs Properties (see Figure 5.47).
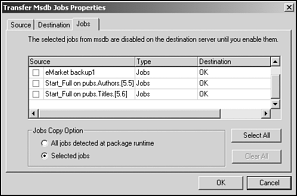
By default, the task copies all the jobs it finds at the source server at the time of execution. As usual, you have the option to specify which jobs to copy.
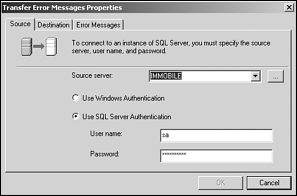
The Transfer Error Messages Task lets you copy error messages that you have added by using the sp_addmessage stored procedure. The task will copy from a SQL 7.0 or SQL 2000 server to—you guessed it—only a SQL 2000 server. This situation may sound like a broken record, but taking note of it is important.
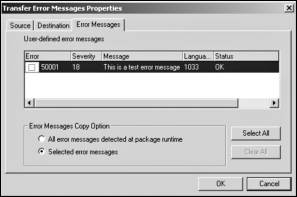
The Properties dialog box for this task looks the same as those for the preceding tasks. The dialog box has Source and Destination tabs, as well as the Error Messages tab.
By default, the task copies all your custom error messages from the source server’s master database at the time of execution. The Error Messages tab, however, gives you the option to select particular error messages to be copied (see Figure 5.49).
Just as you can with your custom stored procedures, this task provides a quick way to restore your custom error messages from a duplicate database. The task also allows you to upgrade your SQL 7.0 custom error messages to SQL 2000.
This section ends the discussion of the database management tasks. The following two sections discuss the tasks added to DTS by the installation of Analysis Services.
The Analysis Services Processing Task is one of two add-on tasks that are enabled with the installation of Microsoft Analysis Services. As you probably are aware, Analysis Services is the renamed Microsoft OLAP Services. OLAP is short for On Line Analytical Processing, the alter ego of On Line Transactional Processing (OLTP). With OLAP, data needs to be in a format that lends itself to easy reporting through aggregation as well as drill-down. Because relational data is not well structured for these purposes, the data needs to be transformed to a storage format that is optimized for OLAP. This data storage, otherwise known as an OLAP database, commonly includes such structures as cubes, partitions, dimensions, and mining models. Analysis Services provides the platform for building and maintaining OLAP databases.
In Analysis Services, the Analysis Server provides the services for extracting data from relational sources and for building and populating cubes and dimensions in an OLAP database. The Analysis Manager is the administrative tool for interacting with the Analysis Server. This tool provides the cube editor and the dimension editor, which you use to specify how the cubes and dimensions will look.
If you are unfamiliar with these terms, see the Analysis Services documentation included with SQL Server.
After the OLAP database structures have been built, certain processing has to occur to keep them updated. Such processing can be a complete rebuild or an incremental update. The Analysis Services Task helps automate this processing.
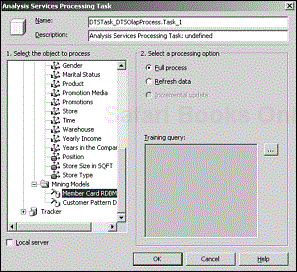
To use the Analysis Services Task, click the yellow cube in the Task toolbar to bring up the Analysis Services Processing Task dialog box (see Figure 5.50).
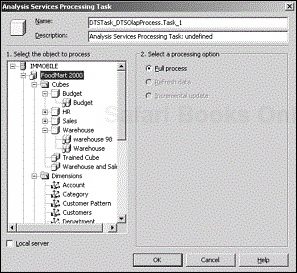
The basic steps required to configure this task are:
You select the object to process in the tree view on the left side of the dialog box. Depending on the type of object you select, processing options are enabled on the right side of the dialog box, allowing you to select them.
Default Repository for Analysis Services
When you install the Analysis Services component from the SQL Server 2000 CD, you might think that the OLAP databases would reside on SQL Server. On the contrary, the default installation uses a Microsoft Access database to open the application beyond the users of SQL Server. As a result, when you build your Analysis Services Task, only the server where you installed Analysis Services shows up in the tree view. Analysis Manager provides an option to migrate the repository to SQL Server.
Just as in Analysis Manager, the processing options include the following:
Full process
Refresh data
Incremental update
Table 5.2 lists the options for each object type that can be selected for processing.
Table 5.2. Analysis Services Processing Options [1]
|
Icon |
Object |
Option |
Processing Value |
Description |
|---|---|---|---|---|
|
|
Database |
Full Process |
0 |
Completely processes all cubes, partitions, and dimensions in the database. |
|
|
Cubes folder |
Full Process |
0 |
Completely processes all cubes in the folder. |
|
|
Refresh Data |
1 |
For each cube in the folder, performs a refresh data operation if possible; otherwise, completely processes the cube. | |
|
|
Cube with single partition |
Full Process |
0 |
Completely processes the cube, including structural changes. This option is the most thorough type of cube processing. |
|
|
Refresh Data |
1 |
Reloads cube data and recalculates aggregations. This option processes changes to existing source data but not the addition of source data. This option does not process structural cube changes, such as new dimensions, levels, or measures. | |
|
|
Incremental Update |
2 |
Adds new data to cube and updates aggregations. This option processes the addition of source data. This option does not process changes to the cube’s structure or existing source data. | |
|
|
Cube with multiple partitions |
Full Process |
0 |
Completely processes the cube, including structural changes. This option is more thorough than the Refresh Data option. |
|
|
Refresh Data |
1 |
Reloads cube data and recalculates aggregations. This option processes changes to existing source data but not the addition of source data. This option does not process structural cube changes, such as new dimensions, levels, or measures. | |
|
|
Partition, including remote partitions |
Full Process |
0 |
Reloads partition data and recalculates aggregations. This option processes changes to existing source data but not the addition of source data. This option does not process structural changes to the parent cube, such as new dimensions, levels, or measures. |
|
|
Incremental Update |
2 |
Adds new data to a partition Update and updates aggregations. This option processes the addition of source data. This option does not process changes to the structure of the parent cube or existing source data of the partition. | |
|
|
Linked cube |
Full Process |
0 |
Completely processes the linked cube. |
|
|
Virtual cube |
Full Process |
0 |
Completely processes the virtual cube. |
|
|
Dimensions folder |
Full Process |
0 |
Completely processes all dimensions in the folder. |
|
|
Incremental Update |
2 |
For each dimension in the folder, performs an incremental update operation if possible; otherwise, completely processes the dimension. | |
|
|
Shared dimension |
Full Process |
0 |
Completely processes the dimension, including structural changes, and rebuilds the dimension structure. This option is more thorough than the Incremental Update option. |
|
|
Incremental Update |
2 |
Processes the addition of members (that is, rows) to the dimension table. This method does not process changes to the structure of the dimension or relationships among members. | |
|
|
Virtual dimension |
Full Process |
0 |
Completely processes the virtual dimension and rebuilds the dimension structure. |
|
|
Mining Models folder |
Full Process |
0 |
Completely processes mining models in the folder. |
|
|
Refresh Data |
1 |
For each mining model in the folder, performs a refresh data operation if possible; otherwise, completely processes the mining model. | |
|
|
Relational Mining model |
Full Process |
0 |
Completely processes the mining model. |
|
|
OLAP Mining Model |
Refresh Data |
1 |
Adds new data to the source data of the mining model and updates nodes. This option does not process changes to the structure of the mining model or existing source data. |
[1] This table was copied from Microsoft SQL Server 2000 Version 8.00 Books Online (BOL). This information is available on the SQL Server installation CD. | ||||
Selecting a database object enables only the Full Process option, which means that all the cubes, dimensions, and partitions in the database are processed. Selecting any other object within the database, however, may enable other options (see Figure 5.51).

For cubes and partitions, you can configure additional options. Click on the Cube Settings button to bring up the Cube/Partition Settings dialog box (see Figure 5.52).
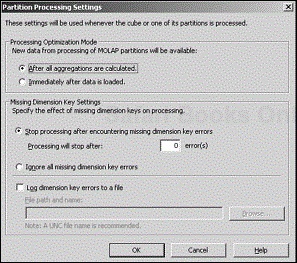
You can enhance the performance of the task (or at least give the impression that it is fast) by not waiting to make the data available until processing is complete. To do so, select the Immediately After Data Is Loaded option in the Processing Optimization Mode section. At times, however, you must complete all processing before making the data available. In those cases, select the After All Aggregations Are Calculated option.
As you know, transforming data from OLTP and other sources does not always run smoothly. Sometimes, certain data is not available. When this data happens to be dimension key values, you can select the Stop Processing After Encountering Missing Dimension Key Errors option. You can specify the number of errors at which point processing will stop. Alternatively, you can select the Ignore All Missing Dimension Key Errors option to allow processing to continue even if errors are encountered. When you have incomplete dimension keys, some of the details in the fact table will not be reflected in the resulting cube.
The last option for cube/partition processing allows you to log the dimension-key errors. You can browse to an existing file, or you can specify the path and filename where errors will be logged.
When you select a mining-model object for processing, you have the option to specify a training query (see Figure 5.53).
Click on the ellipsis button (…) to open the Training Query dialog box (see Figure 5.54). This dialog box allows you to enter a training query that is used in processing the mining model.
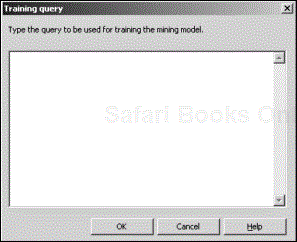
Training queries must conform to the OLE DB for OLAP specification. You can use the Multidimensional Expressions query language to create your training query because MDX is part of the OLE DB for OLAP specification.
The Data Mining Task is the second add-on task introduced by Microsoft’s Analysis Services.To use the Data Mining Task, you must have an existing data mining model defined in an Analysis Services database.
A data mining model is a representation of data in terms of rules and patterns. Using statistical information gleaned from the data itself, you can derive certain predictive information. Given such customer information as (a) number of children at home, (b) annual income, and education, for example, a mining model can predict which credit-card type fits that customer. This section uses the sample FoodMart database that comes with Analysis Services to explore this task.
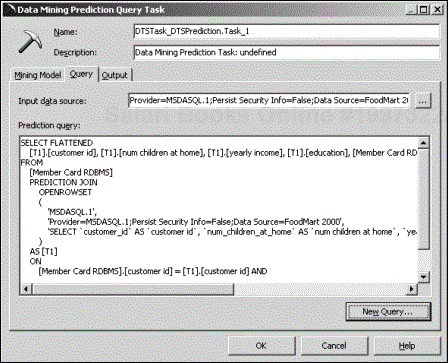
To create the Data Mining Task, click on the pickaxe icon on the task toolbar. The Data Mining Prediction Query Task dialog box opens (see Figure 5.55).
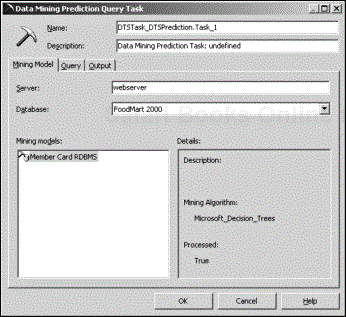
In the Mining Model tab, specify the name of the server where Analysis Services is installed. If DTS finds this server, it lists all available Analysis Services databases in the Database drop-down menu. After you select a database, DTS displays all the available mining models on the Mining Models window on the left side of the dialog box. Click on a particular mining model, and its details are displayed in the Details list. The example in this section uses the Member Card mining model.
Click on the Query tab to specify the prediction query that you want to process. In the Input Data Source text box, type a connection string that points to a data source containing the input data to be processed. Alternatively, you can click the ellipsis button (…) to open the Data Link Properties dialog box (see Figure 5.56).
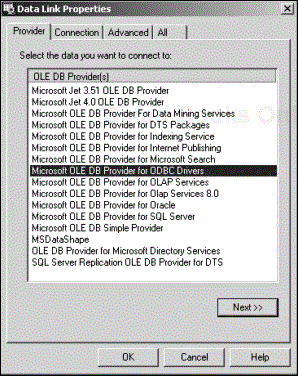
In the Provider tab, select the OLE DB provider for the data source you want to use. Your choice most likely will be dictated by how the mining model was created and where the Analysis Services database is stored.
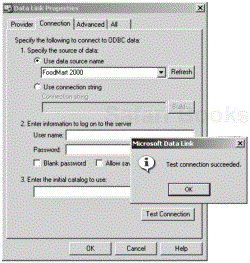
Click the Connection tab to configure your connection to the data source (see Figure 5.57). This tab will vary depending on the provider you selected. In this example, a data source called FoodMart 2000 (created as part of the Analysis Services installation) is available. Specify whatever connection information is appropriate for your selected data source. Then click on the Test Connection button to see whether you can connect to the data source.
Back in the Query tab, you can type or paste in the query that you want to use. This query must have syntax conforming to the OLE DB for Data Mining specification. Fortunately, DTS provides a Query Builder to help build such a query. Click the New Query button to bring up the Prediction Query Builder dialog box (see Figure 5.58).

Earlier in this chapter, you learned that you need an existing mining model to create the Data Mining Task. The mining model specifies (among other things) a case table, a case key, input columns, and the prediction column. These elements are the basis for building the query.
For this example, the mining model uses the Customer table as the case table, so choose it from the Case Table drop-down menu.
In the Input Columns window, specify the names of the columns you want to use for this particular query by checking the check boxes corresponding to the names. Deselect the check boxes for column names that you don’t want to include in the query. Because a case key is needed to identify individual cases in the result set, the designated key column is selected automatically, and its check box is grayed out to keep you from deselecting it. The other input columns that you want to include are the [num children at home], [yearly income], and [education] columns. For each of the input-column names you’ve checked, you need to specify the source columns containing the data to be processed. Click the cell to the right of a name you have selected, and a drop-down menu appears. Choose the appropriate column from that menu.
Finally, from the Predicted Column drop-down menu, choose the column that you want to predict in this task. (A mining model can have multiple prediction columns.) Click the Finish button to display the actual query (see Figure 5.59).
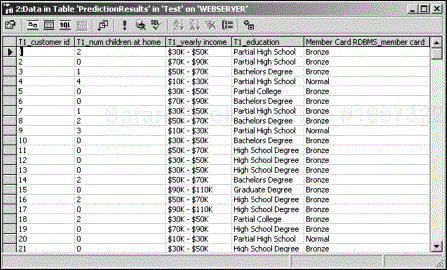
The last step in building the Data Mining Task is specifying where the result set will be stored. You use the Data Link Properties dialog box for this purpose. You can store the result set in the same data source where your Analysis database resides or in any other database that suits your needs. In Figure 5.60, the result set is saved in a SQL Server table.
This chapter discussed the additional DTS tasks. Although these tasks do not perform the core ETL functions per se, they lend support to the main data-movement tasks introduced in Chapter 4, “DTS Tasks.”
The chapter covered the programming tasks—Execute SQL, ActiveX Script, Execute Process, and Execute Package—as well as the Dynamic Properties Task. These tasks enable you to control the processing in many ways. You’ve learned that you can pass parameters to and use the result set returned by the Execute SQL Task. The Execute Package Task makes it easier to coordinate the execution of multiple packages. Also, the Dynamic Properties Task makes it much easier to pass parameters to a package or to modify its properties at run time.
The chapter explained that the messaging tasks make it easy to send mail, download from FTP sites and directories, and send and receive MSMQ messages. The chapter also discussed how to use the database-management tasks to copy databases and database objects to SQL 2000 servers. Finally, the chapter introduced the OLAP tasks that help you automate the processing in an Analysis Services database.
Chapter 6, “DTS Workflows,” explains how two or more tasks can be hooked together inside a DTS package so that they can execute in a controlled manner.