

Setup and environment
This appendix provides a detailed description of how to set up the General Insurance Application (GENAPP) in a single managed region, and in an IBM Customer Information Control System (CICS) Transaction Server (CICS TS) topology.
This appendix provides information about the following topics:
Installing the general insurance application
The general insurance application is available to download from the IBM SupportPac website, and contains the jobs you need to set up the application.
Before you begin
For the support of the CICS TS examples in this IBM Redbooks publication, the implementation of GENAPP requires the following setup, as outlined in Figure A-1 on page 209:
•A single managed CICS TS region. GENAPP can be installed into a stand-alone CICS TS region System Management Single Server (SMSS) that is not managed using IBM CICSPlex System Manager (CICSPlex SM). However, the concepts of applications and platforms discussed in this Redbooks publication require the region to be managed by CICSPlex SM, which is referred to as single managed region.
This region is used in Chapter 3, “Creating a platform” on page 25, to demonstrate how to create a development CICS TS platform with three region types that all map to the same underlying CICS TS region. The platform is used for all further examples in this book.
•Optionally, a CICS TS topology. Chapter 3, “Creating a platform” on page 25, demonstrates how to create a test platform, with three region types, that map to three different CICS TS regions. Chapter 9, “Application lifecycle management” on page 193, describes how an application could be promoted from the development platform to the
test platform.
test platform.
However, the test platform is not required for the examples in this book. For this configuration, connectivity is required from the terminal-owning region (TOR) to the application-owning region (AOR), and from AOR to the data-owning region (DOR). The connection names are used on some program definitions in the @CDEF122 member.
This topology needs to be managed by CICSPlex SM. As part of the customization, sample job control language (JCL) is built for the CICSPlex SM address space (CMAS), web user interface (UI), and optional coupling facility components.
|
Tip: Although it is possible to share a CICS system definition (CSD) between the single managed region and the CICS TS topology, we suggest that you use separate CSDs to avoid conflicts.
|
You must also have a supported version of IBM DB2 and a Common Business Oriented Language (COBOL) compiler installed.
|
Remember: If you do not have DB2 or a COBOL compiler, you can download a version of GENAPP called GENAPP Lite from the CICS TS SupportPac website. This can be used for all but one of the examples. In Chapter 6, “Packaging an application for multiversion deployment” on page 127, we demonstrate making a small change to the application source and deploying a new version of the application, which does assume that you have the application source and can compile it using a COBOL compiler.
|
The CICS TS components, a named counter server and a Shared CICS TS Queue server, are optional.
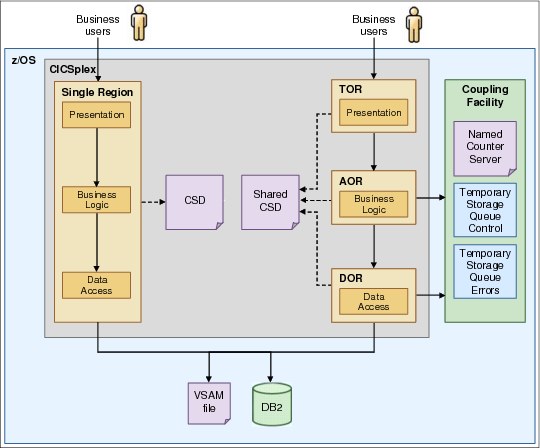
Figure A-1 Single managed region and CICS TS topology
|
Important: You can also find the instructions for installing GENAPP to a single CICS TS region and to a CICS TS topology in the CICS TS Knowledge Center at the following link:
Note that if you follow those instructions, you should not reuse the TOR as a single region as suggested. In addition, do not define the GENAPP load libraries using request parameter lists (RPLs), but use dynamic libraries as described in “Add GENAPP load library to CICS TS as a dynamic LIBRARY” on page 215.
|
Procedure to customize
Follow these instructions to install GENAPP:
1. Go to the IBM support and downloads website and download the genapp.zip file to your workstation. The website Uniform Resource Locator (URL) can be obtained by searching on the web for GENAPP SUPPORTPAC CB12.
2. Extract the files to a suitable directory.
The following files are extracted, as shown in Table A-1.
Table A-1 List of extracted files
|
File
|
Description
|
|
CNTL.XMIT
|
JCL to build the environment for the application
|
|
EXEC.XMIT
|
REXX code that customizes the JCL
|
|
KSDSCUST
|
Sample customer information for the application
|
|
KSDSPOLY
|
Sample policy information for the application
|
|
SOURCE.XMIT
|
Source programs for the general insurance application
|
|
WSIM.XMIT
|
Sample workload simulator scripts
|
3. Use File Transfer Protocol (FTP) to transfer the files to the System z machine and put them in IBM Multiple Virtual Storage (IBM MVS) data sets. Call the data sets <userid>.CB12.<filename>, where <filename> is the name of the extracted file (for example, CICSUSR.CB12.SOURCE.XMIT):
a. Transfer the files with the suffix .XMIT in binary mode.
b. Enter bin on the command line to change to binary mode.
c. Transfer the KSDSCUST file in American Standard Code for Information Interchange (ASCII) mode.
d. Enter ascii on the command line to change to ASCII mode.
If necessary, set the record length of the data set for the KSDSCUST file before transferring it. Enter the following command to set the record length:
If necessary, set the record length of the data set for the KSDSCUST file before transferring it. Enter the following command to set the record length:
quote site lrecl=80 blksize=3120
e. Transfer the KSDSPOLY file in ASCII mode.
f. Set the record length of the data set for the KSDSPOLY file before transferring it. Enter the following command to set the record length:
quote site lrecl=64 blksize=6400
4. Extract the SOURCE, WSIM, CNTL, and EXEC files into partitioned data sets by using the following RECEIVE command:
RECEIVE INDSN('<userid>.CB12.SOURCE.XMIT')
This command identifies the input data set. You must enter a response to the RECEIVE command to identify the name of the destination partitioned data set, as shown in the following example:
DA('userid.CB12.SOURCE')
You do not have to perform this step for the KSDS files, because they are already in a readable format.
5. Customize the CUST1 member in the CB12.EXEC data set. The values in this member include settings for the CICS TS topology and CICSPlex SM.
Replace the values used in Example A-1 with yours. Table A-2 explains the parameters.
Example A-1 Iuserid.CB12.EXEC(CUST) member for customization
PDSMEMin = 'userid.CB12.CNTL'
CICSHLQ = 'CTS510.CICS'
CPSMHLQ = 'CTS510.CPSM'
CSDNAME = 'userid.GENAPP.DFHCSD'
USRHLQ = 'userid'
COBOLHLQ = 'PP.COBOL390.V420'
DB2HLQ = 'SYS2.DB2.V910'
CEEHLQ = 'CEE'
DB2RUN = 'DSN910PM'
SQLID = 'STTESTER'
DB2SSID = 'DHM1'
DB2DBID = 'GENASA1'
TORAPPL = 'CICSTOR1'
AORAPPL = 'CICSAOR1'
DORAPPL = 'CICSDOR1'
TORSYSID = 'TOR1'
AORSYSID = 'AOR1'
DORSYSID = 'DOR1'
CMASAPPL = 'CICSCMAS'
CMASYSID = 'ICMA'
WUIAPPL = 'CICSWUI'
WUISYSID = 'IWUI'
WSIMHLQ = 'WSIM.V110'
Table A-2 Description of the customization parameters
|
Parameter
|
Description
|
|
PDSMEMin
|
Enter the location of the CNTL library, userid.CB12.CNTL. Replace userid with your user ID.
|
|
CICSHLQ
|
Enter the CICS TS high-level qualifier to customize the CICS TS data sets.
|
|
CPSMHLQ
|
Enter the CICSPlex SM high-level qualifier to customize the CICS TS data sets.
|
|
CSDNAME
|
Enter the fully qualified name of the CSD for the CICS TS regions that will run the general insurance application.
|
|
USRHLQ
|
Enter a high-level qualifier for the application data sets.
|
|
COBOLHLQ
|
Enter the high-level qualifier for the COBOL compiler.
|
|
DB2HLQ
|
Enter the high-level qualifier for DB2 libraries.
|
|
CEEHLQ
|
Enter the high-level qualifier for IBM Language Environment®.
|
|
DB2RUN
|
Enter the high-level qualifier for the DB2 runtime library.
|
|
SQLID
|
Enter the IBM Resource Access Control Facility (IBM RACF®) user ID that is authorized to create objects in DB2.
|
|
DB2SSID
|
Enter the subsystem ID of the DB2 instance that you want to use.
|
|
DB2DBID
|
Enter a name for the database that is going to contain the general insurance application data. You can use any value.
|
|
WSIMHLQ
|
Enter the high-level qualifier for the Workload Simulator for IBM z/OS libraries. If you do not use this product, you can ignore this parameter.
|
6. Run the EXEC job to customize the JCL in the CNTL data set. The job copies the members and updates them with your values. Each member name is prefixed with @ to indicate that it has been customized.
Results
You have successfully installed and customized the GENAPP jobs.
The next step is to build the environment for the application.
Building the application environment
Run the customized jobs to create the DB2 database, application files, and CICS TS resources.
About this task
To set up GENAPP, run each of the customized jobs shown in the following sections from the CB12.CNTL data set.
Some jobs are optional, and depend on whether you want to use a coupling facility to share application data across CICS TS regions.
Procedure
Follow these steps to set up GENAPP:
1. Submit the @ADEF121 job to create the Virtual Storage Access Method (VSAM) application files for customer details and policy details. This job populates the KSDSCUST and KSDSPOLY files with data.
2. Submit the @ASMMAP job to build the basic mapping support (BMS) maps for the IBM 3270 interface. This job has a return code of 4.
3. Submit the @COBOL job to compile the COBOL application programs. The compiled programs are put in the <USERHLQ>.CB12.LOAD library. This job has a return code of 4.
4. Verify that the name of the DB2 plan is correct in @DB2CRE, then submit the job to create the DB2 database for the application. It creates a storage group, database, tables, and indexes. This job also populates the database with sample data.
Note: @DB2DEL will drop the database that is created in the @DB2CRE job.
Note: @DB2DEL will drop the database that is created in the @DB2CRE job.
5. Submit the @DB2BIND job to bind the application to the DB2 objects.
6. Optional: If you want to use a named counter server with the application, create a structure in the coupling facility for a named counter server. The pool name is GENA and the structure name is DFHNCLS_GENA.
7. Optional: If you want to use a shared temporary storage queue, create a structure in the coupling facility for a shared temporary storage queue. The shared temporary storage queue is also called GENA and the structure name is DFHXQLS_GENA.
8. Optional: Submit the @SAMPNCS job to create a named counter server called GENA. You can customize this sample to change the pooled name if appropriate. The job is long-running. You can check that the job initialized successfully by looking in the job log for the following CICS TS message:
DFHNC0102I Named counter server for pool GENA is now active.
9. Optional: Submit the @SAMPTSQ job to create a temporary storage queue server called GENA. Again, you can customize the sample to change the pooled name if appropriate. This job should show successful initialization with the following CICS TS message:
DFHXQ0102I Shared TS queue server for pool GENA is now active.
Build the CICS TS environment
In the following steps, you make the required modifications in CICS TS to run GENAPP.
Single managed region
The following steps must be taken against a CICS TS region that is managed by CICSPlex SM. The SupportPac does not contain explicit configuration for a single managed region. For further information about configuring CICSPlex SM, see the CICS TS product documentation.
Perform the following steps to set up the single managed region:
1. Submit the @CDEF121 job to add all of the required resource definitions to the CSD of your single managed CICS TS region. The generated list GENALIST includes groups that contain the following components:
a. Transaction definitions
b. Local program definitions for the presentation, business, and data access logic
c. Definitions for data to be accessed (that is, VSAM files, DB2Connection, and DB2Entry)
|
Hint: The local program definitions can be omitted if the CICS TS auto-install program function is enabled.
|
2. Update the system initialization parameters to provide the following non-default values:
a. CPSMCONN=LMAS
b. GRPLIST=(DFHLIST,GENALIST)
c. DB2CONN=YES
d. Optional: NCPLDFT=GENA
3. Start the CICS TS region.
CICS TS topology
The following steps assume that you already have three CICS TS regions interconnected and managed by CICSPlex SM.
|
Tip: For help configuring GENAPP for a CICS TS topology, see Creating a CICS topology that is managed by CICSPlex System Manager in the IBM Knowledge Center:
|
Perform the following steps to set up the CICS TS topology:
1. Submit the job @CDEF122 to add all of the required resource definitions to the shared
CSD of your CICS TS topology. We suggest using a separate CSD from the single managed region.
CSD of your CICS TS topology. We suggest using a separate CSD from the single managed region.
|
Important: Verify that the Remote system parameter on the program definitions match your connection names for routing purposes.
|
2. The definitions are separated into three different lists to distribute the resources among the presentation, business logic, and data access regions:
a. The list for the presentation region (TORLIST) contains the following components:
• Transaction definitions
• Local program definitions for the presentation logic
• Remote program definitions for routing requests to the business logic layer
b. The list for the business logic region (AORLIST) contains the following components:
• Local program definitions for the business logic
• Remote program definitions for routing requests to the data access layer
c. The list for the data access layer region (DORLIST) contains the following components:
• Local program definitions for the data access logic
• Definitions for data to be accessed
|
Hint: The local program definitions can be omitted if the CICS TS auto-install program function is enabled.
If you want to use CICSPlex SM Workload Manager to manage where the work is routed, the remote programs are defined as DYNAMIC(YES) using the provided @CDEF123 job. If not, they are defined with a specific REMOTESYSTEM using the @CDEF122 job.
|
3. Various SIT overrides are necessary, in the following ways:
a. In all of the regions:
i. CPSMCONN=LMAS
ii. Optional: NCPLDFT=GENA
b. In the JCL for the presentation region, add the following system initialization parameter values:
i. GRPLIST=(DFHLIST,TORLIST)
ii. DB2CONN=NO
iii. ISC=YES
c. In the JCL for the business logic region, add the following system initialization parameter values:
i. GRPLIST=(DFHLIST,AORLIST)
ii. DB2CONN=NO
iii. ISC=YES
d. In the JCL for the data access region, add the following system initialization parameter values:
i. GRPLIST=(DFHLIST,DORLIST)
ii. ISC=YES
iii. DB2CONN=YES
4. CICS TS startup JCL must be modified. The data access region needs to have DB2 libraries adding to the STEPLIB and DFHRPL.
5. It is also necessary to add or modify the EYUPARM DD card to include CICSPlex(GNAPPLEX) and CMASSYSID(cmasysid) parameters.
Add GENAPP load library to CICS TS as a dynamic LIBRARY
The original GENAPP design suggests adding a single load library to the DFHRPL concatenation of the CICS JCL to make GENAPP load modules available to CICS TS. This leads to a disadvantage, because when CICS TS is running, changes to the DFHRPL data set names are not possible without stopping and restarting CICS TS. This is not usually an option in a continuously available environment.
Since CICS TS V3.2, program LIBRARY concatenations can be defined to CICS TS dynamically. Using dynamic LIBRARY concatenations provides several advantages for the system programmer and the organization:
•They contain one or more data sets from which program artifacts can be loaded.
•New applications for deployment can be brought into service at any time without affecting continuous availability.
•Existing applications in dynamic LIBRARY concatenations can easily be withdrawn from service without affecting continuous availability.
•Patches to existing applications can be installed easily, by installing them in a LIBRARY concatenation with a higher ranking than the existing LIBRARY, without affecting continuous availability.
•Data sets in dynamic LIBRARY concatenations can easily be taken offline for compression without affecting continuous availability.
Therefore, you should define and install your GENAPP load library to all CICS TS regions using a CICS TS LIBRARY resource. The following steps show how to do this with CICS Explorer:
1. Connect CICS Explorer to your CICSPlex. See Appendix B, “IBM CICS Explorer setup” on page 219 for further information about how to do this.
2. Open the LIBRARY Definitions view. If it is not already inside your workspace, you can open it using one of the following methods:
a. From the menu bar, select Window → Show View → Other, and then select CICS SM Definitions → LIBRARY Definitions.
b. Press Ctrl+3 and type LIBRARY Definitions until the Quick Access Menu offers LIBRARY Definitions - CICS SM Definitions.
3. Right-click anywhere inside the LIBRARY Definitions view and select New.
4. Enter the following attributes, as shown in Figure A-2:
– CICSPlex: The name of the CICSPlex that manages your GENAPP region(s).
– Region (CSD): The name of your single managed region. The library will be installed to its underlying CSD.
|
Remember: If you are configuring the single managed region and the CICS TS topology, and have used different CSDs for both, you need to repeat these steps to define the library onto both CSDs.
|
– Resource Group: GENASALI.
– Name: GENALIB.
– Ranking: 50 (the default).
– Data Set Name 1: Specify the load library where GENAPP is installed. In Figure A-2, this is CICSSEM.CB12.LOAD.
– Clear Open Editor.
5. Click Finish.
Figure A-2 Example definition of the GENALIB dynamic library
|
Remember: Although this library only contains one data set, it is possible to add up to 16 data set names within one library.
|
6. Right-click the newly defined GENALIB library and select Install.
7. Select your single managed region in the Perform Install Operation window and click OK to install the library.
8. If you want to install this library at CICS TS startup, add the group GENASALI to your CICS TS startup lists defined in the GRPLIST SIT parameter.
9. Install the library to all other CICS TS regions where GENAPP runs. This includes the multitier topology.
Testing the general insurance application
To validate that your setup is correct, run GENAPP using its IBM 3270 interface. Run the test from your single managed CICS TS region, and from the presentation region of the three region topology.
The application has several transactions that you can run to access customer information and policies:
1. Run the LGSE transaction to build the control tables for the application. The transaction also clears out the shared temporary storage queue and the named counter server.
2. Run the SSC1 transaction to open the application customer menu.
3. In the Cust Number field, enter a number between 1 and 10 to browse the customer records and validate that the application can access the DB2 database. The application contains 10 customer records.
4. In the Select Option field, enter 1 to inquire on the customer. The customer information is returned from DB2.
5. Exit the application by pressing F3.
6. Run the SSC1 transaction again to add a customer to the database:
a. Enter the details for a new customer.
b. In the Select Option field, enter 2 to add the customer record to the database.
A unique customer number is allocated from the named counter server. The application adds the customer record to DB2 and the VSAM file in a two-phase commit. If the VSAM file update fails, the DB2 update is rolled back.
The application is successfully set up and running. It can access DB2 and write to VSAM files.
..................Content has been hidden....................
You can't read the all page of ebook, please click here login for view all page.