One of the most useful tools provided in ZENworks for Desktops is the snAppShot utility. As an administrator installing and updating applications on client workstations, you'll save a lot of time using the snAppShot utility. It enables you to create a template during a single install that can be used to easily distribute applications and upgrades to several workstations on your network.
This chapter familiarizes you with the snAppShot utility and describes how to use it to create application packages. The following topics are discussed:
• What snAppShot is
• When you should use snAppShot
• How snAppShot works
• Advanced features of snAppShot
• Limitations of snAppShot
• Using snAppShot
• snAppShot application packages versus .MSI files
The first step in using the snAppShot utility is to understand what it is. The snAppShot utility is an application used to create before and after images of a model workstation when installing or upgrading an application. So in effect, snAppShot takes a picture of the workstation before an application is installed or upgraded to it, and another picture after the application has been fully installed or upgraded.
Once snAppShot has the two pictures, it can then discern the differences between the two pictures. It saves the differences and can use them later to upgrade or install applications to other workstations on the network.
Now that you understand what snAppShot is, you need to know when to use it. By default, snAppShot is generally used to package an application to distribute to several other users based on the eDirectory and the application properties.
However, because snAppShot captures changes made to a workstation during install, many situations exist in which you can use it to save time. The following sections describe how snAppShot is useful in three situations.
Using snAppShot to aid in complex installations or upgrades can save you a considerable amount of time otherwise spent repeating the same steps over and over. By using snAppShot, you simply need to perform the complex installation or upgrade once, record the differences, and then apply those differences to the other workstations.
An example of when snAppShot is useful in a complex upgrade is when installing and configuring a printer driver on a Windows XP client. To do so, use the following steps:
-
Enter the network path to the printer or browse the network to find the appropriate queue.
-
Use the Windows XP CD-ROM or the path to the CAB files that have the necessary files to install the printer driver.
-
Configure the printer drivers for the desktop.
-
Make the appropriate configuration changes for the printer.
The preceding steps are tolerable if it is for one or two workstations, but if 100 or more workstations need the printer set up, the task becomes monumental.
Using snAppShot on one Windows XP machine to “package” a printer installation enables you to create an Application object template that you can use to create an Application object.
Once the Application object is created for the printer installation, other Windows XP clients can install the printer, with drivers, without having to use CAB files, the Windows XP CD-ROM, or make configuration changes!
Using snAppShot to aid in installations that must be done on numerous workstations can also save you a lot of time. Often, application upgrades or installations are very simple to perform and only take a short time on one workstation. However, that time is multiplied by the number of clients you have on your network. Many companies have thousands of clients, and, although installing an application takes only a few minutes on one client, the installation takes days to complete on all network clients.
snAppShot enables you to configure the upgrade or install to be automatically performed throughout the network. Instead of running the install or upgrade on workstation after workstation, you simply perform it once on the model workstation and use snAppShot to record the differences. Once recorded, the changes can be made to several other workstations easily and efficiently.
Using snAppShot to record the changes during the update and packaging into an Application object enables you to have the upgrade performed automatically as the users log in to the network. This saves a lot of time and effort when upgrading a large number of users. It also guarantees that every client has been upgraded.
Another situation where snAppShot is very useful is to verify or view the changes made by an application install or upgrade. Although snAppShot was not designed for this purpose, it works well because it captures the changes made during the install.
Application installations can create difficulties for other applications. snAppShot enables you to detect what the application install did to your client and enables you to correct it without un-installing or re-installing an application.
A good example of where snAppShot can help with reviewing an application install is installing a new application that updates shared DLLs in the SYSTEM directory for Windows 98. The application replaces a working DLL with a newer DLL that has bugs.
Once the new DLL is installed, the new application works fine, but a previously installed application fails to load properly. Normally you would have two options: to re-install the application that is failing to unload, or to un-install the new application and hope that its un-install mechanism backed up the old DLLs before copying over them.
Using snAppShot, however, enables you to see which DLLs were replaced by the new application install, so that you can simply replace them from a backup, CD-ROM, or other source.
Now that you know what snAppShot is and what it is for, you need to understand how it works. This section discusses how snAppShot can analyze and store the changes made by an installation or upgrade.
When snAppShot is used to determine the changes made by an installation or upgrade, many files are created to store information. These files are used later when the installation or upgrade needs to be performed again. They contain all the information needed to update other clients without having to run the installation program or upgrade again.
The following sections describe the file types created by snAppShot when recording the changes during an installation or upgrade.
AXT stands for Application Object Text Template, meaning that the .AXT file is written in human-readable, text format. Therefore, you can open it in a text editor and edit the contents.
Note
The .AXT file takes longer to import into an Application object than an .AOT file, and it is prone to inaccuracies if certain .AXT file format standards are not followed.
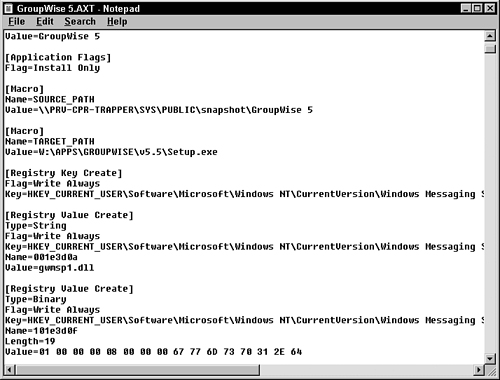
An .AXT file contains information about what happened on a workstation when an application was installed to it. You can also think of it as a “change log” that contains the differences between the pre- and post-application installation states of a workstation. snAppShot discovers these differences and records them in the .AXT file, as shown in Figure 5.1.
You use the .AXT file when creating and setting up Application objects using Application Launcher for large-scale distribution. The .AXT file delivers the information about the application to the new Application object.
AOT stands for Application Object Template. The .AOT file is written in binary format and cannot be edited in a text editor.
Note
.AOT files import faster into an application object and can be more accurate than their text-based counterpart, the .AXT file.
An .AOT file contains information about what happened on a workstation when an application was installed to it. You can also think of it as a “change log” that contains the differences between the pre- and post-application installation states of a workstation. snAppShot discovers these differences and records them in the .AOT file.
You use the .AOT file when creating and setting up Application objects using Application Launcher for large-scale distribution. The .AOT file delivers the information about the application to the new Application object.
One .FIL file represents one application file that was installed to a workstation. Because there can be hundreds of files installed to a workstation during an application's installation or upgrade, there can also be hundreds of .FIL files representing that application.
Think of .FIL files as the Application object's copy of the originally installed application files.
Note
For convenience, it's recommended that you store .FIL files in the same place as the .AOT file. If you place these files in a network location, it is easier to access them as you build and distribute the Application object.
A list of the .FIL files that need to be copied to run an application appears in the .AOT file. This list can be viewed from the Application Files property page in the Application object in ConsoleOne.
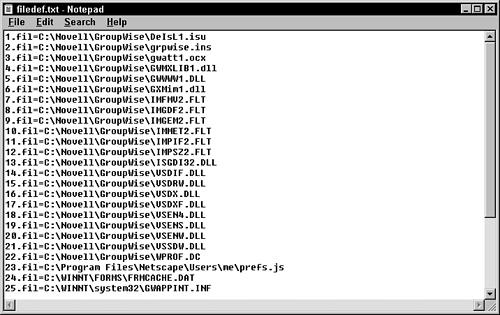
The FILEDEF.TXT file is a “legend” that compares originally named installed files with the newly named .FIL files. snAppShot copies the FILEDEF.TXT file to the same directory where the .FIL files are created. You then use it to compare .FIL files to the originally installed files. A sampling from the FILEDEF.TXT file is shown in Figure 5.2.
snAppShot can determine what changes have been made during an installation or upgrade by saving information before and after, and then determining the differences. Installations and upgrades can change many files and settings on a workstation; therefore, snAppShot saves many different types of information about the configuration of the workstation.
The following sections describe the information that snAppShot stores before and after an installation or upgrade.
First and foremost, snAppShot saves a list of all files that were added or modified during the installation or upgrade. It also saves a copy of the file as a .FIL file to be used in later installations or upgrades.
snAppShot saves any changes to application or system .INI files, so that those files can be modified when the Application object is used later. The following are some of the files snAppShot monitors for changes:
• WIN.INI—This file contains information about the Windows workstation setup, such as desktop settings, file types, and so on.
• SYSTEM.INI—This file contains information about device and driver settings for the Windows workstation.
• PROTOCOL.INI—This file contains information about the network settings for the Windows network protocols.
snAppShot records any changes to system configuration text files. That way any changes to drivers being loaded, paths being set, or environment variables being added or changed are recorded. You can then apply such changes to other systems when you use the Application object to install or upgrade the workstation.
The following are the two files snAppShot monitors for system configuration changes:
• AUTOEXEC.BAT
• CONFIG.SYS
Any changes to Windows shortcuts are also recorded by snAppShot. Therefore, if an application installation or upgrade adds a new shortcut to the desktop or Start menu, or modifies the path in an existing shortcut, those changes are applied to other systems as well along with the Application object.
snAppShot can record any changes made to a Windows workstation's Registry by an installation or upgrade. This is extremely important later, because even if you copy all files installed by an installation or upgrade and make the appropriate changes to configuration files, the application often fails to run, because Registry settings have not been made.
Using snAppShot to save the Registry settings fixes that problem by saving the changes to the Registry and then applying them when the Application object is used to install or upgrade the application on a new workstation.
Although snAppShot is a relatively easy program to run, some advanced features make it an extremely powerful tool. This section discusses the following advanced features included in the snAppShot utility.
If you think of snAppShot as a camera, and the .AOT file as the outputted “picture,” you can think of snAppShot preferences as the adjustments you make to the camera (aperture settings, film speed, and focus) before you take the picture.
snAppShot preferences let you control what snAppShot “sees” as it discovers the changes made to a workstation as a result of installing an application. In other words, you can specify/control information recorded about the certain items (described in the following sections) during an installation or upgrade.
Using snAppShot preferences, you can include or exclude the recording of certain changes to particular folders and files. This enables you to protect certain directories that you do not want to alter on other workstations when the Application object is used on them to install or upgrade an application.
Using snAppShot preferences, you can exclude particular Windows shortcut files from being recorded. This allows you to protect certain application shortcuts from being created or altered on other workstations during the installing or upgrading of an application.
Using snAppShot preferences, you can exclude particular application .INI files from being recorded. This enables you to protect certain application .INI files from being created or altered on other workstations when the Application object is used on them to install or upgrade an application.
Using snAppShot preferences, you can define which system configuration file changes are recorded. This enables you to set which system configuration changes should be recorded and created or altered on other workstations when the Application object is used on them to install or upgrade an application.
Using snAppShot preferences, you can also include or exclude changes from particular portions of the Windows Registry from being recorded. This enables you to protect certain areas of the Windows Registry that you do not want to be altered on other workstations when the Application object is used on them to install or upgrade an application.
Special macros are built-in machine- and user-specific values that the snAppShot utility is able to use to control how Application object templates are created. These special macros read from the Registry, enabling for the customization of Application objects in snAppShot. This customization enables you to distribute the same application to several machines that might have Windows installed or configured differently.
The following is a list of some common macros:
• WinDir—Directory containing the Windows OS, typically C:Windows or C:WINNT.
• WinSysDir—Directory containing the Windows system files (DLLs).
• TempDir—Windows temporary directory, typically C:Windows emp.
• Favorites—File system directory that serves as a common repository for the user's favorite items.
• Fonts—Virtual folder containing system fonts.
• Personal—File system directory that serves as a common repository for personal documents.
Tip
The online help that appears when you click the Help button on the Application Object Macros property page in ConsoleOne provides a detailed list of the macros available to snAppShot.
When snAppShot starts, it asks the client library for a list of the special macros. This list combined with the user macros (created in the custom mode) make up the complete list of macros, which are then placed in order from the longest value to the shortest.
While snAppShot runs, it records the differences between the pre-installation scan and the second scan. It then creates an entry in the .AOT file, during which snAppShot calls the routine that searches and replaces data with the macro's name. Later, when the Application Launcher is used to distribute the object, it gets the macro values from the .AOT file.
The Application Launcher receives the values and names for these special macros by looking in the Registry under the key:
HKEY_CURRENT_USER
+Software
+Microsoft
+Windows
+CurrentVersion
+Explorer
+Shell Folders
The Application Launcher client creates a special macro using the name and value.
Let's say that a special macro is defined for a directory containing temporary files. The entry in the Windows Registry would appear as:
HKEY_CURRENT_USER
+Software
+Microsoft
+Windows
+CurrentVersion
+Explorer
+Shell Folders
TempDir=C:DATATEMP
This Registry entry would correspond to the special macro:
%*TempDir%
Therefore, when snAppShot adds the creation information for the Registry entry in the .AOT or .AXT file, it writes an entry similar to the following:
[Registry Value Create]
Type=String
Flag=Write Always
Key=HKEY_CURRENT_USERSoftwareMicrosoftWindowsCurrentVersionExplorerSHell
Folders
Name=TempDir
Value=%*TempDir%
When the Application Launcher tries to distribute the settings, it sees the special macro value and then, in an attempt to set this Registry key, tries to read the value from this exact Registry key.
If the Registry value was set before the application is distributed, this process works beautifully; however, if it is not set until after the application is distributed, the Application Launcher tries to use data from the same Registry entry that it is trying to create.
This problem can be remedied in two ways:
-
The first way to resolve this problem is to set the Registry value before the user clicks on the icon (perhaps using ZENworks for Desktops workstation policies discussed later in this book). Then when the Application Launcher client reads the data for these special macros, it reads the correct value and knows how to replace the special macro correctly.
-
The second and better/more difficult solution is to manually edit the .AXT file created for the Application object template. Instead of using the macro you are trying to create, add an entry with a different macro name but the same value.
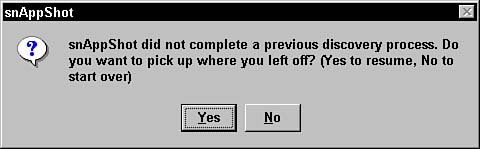
If your application needs to reboot the workstation to finish the installation, snAppShot recognizes this and picks up where it left off before the reboot. All snAppShot data is stored in a hidden directory on the C: drive. Furthermore, snAppShot is automatically run after the machine is restarted. When snAppShot restarts, it detects a partial installation, and a window pops up and allows you to continue with the previous installation.
Now that you know how snAppShot works and understand some of its advanced features, you need to understand its limitations. snAppShot is a very powerful tool; however, it cannot be used for the tasks described in the following sections.
snAppShot is unable to capture the “logic” of an installation involving choices based on existing hardware, software, or other settings. For example, if the application's setup program installs a particular video driver or modem setting file to a workstation, these settings might not be valid when transferred to another workstation.
The following sections describe some of the things you should be aware of when using snAppShot to create application packages.
Some applications query the computer system to determine what hardware is installed and only install necessary drivers for the hardware that actually exists. This often results in problems if you distribute the application to clients that do not have the same hardware as the computer in which the application package was created. You can use the hardware inventory feature of ZENworks for Desktops, discussed later in this book, to quickly determine what specific hardware is installed on clients.
Occasionally, an application install prompts the user to input additional paths of locations to store files. When you use snAppShot to create an application package, make certain that any additional paths you specify, both local and network, exist on all clients you want to distribute the application to. For example, if you specify a path on the D: drive, all clients must have a D: drive on their computer. If necessary, you can use macros and user prompts when distributing the application to handle this; however, that must be defined in the Application object.
Another thing you should watch for when creating application packages using snAppShot is prerequisites for application installs. For example, if the application needs to determine which version of DirectX is installed on the computer, it might determine that the current version is correct and then not install needed DirectX drivers. This results in the drivers not being included in the Application object. If a client that is receiving the application from ZENworks for Desktops does not have the correct version of DirectX drivers, the application might not function properly.
Although, you can use snAppShot to install or upgrade applications on all workstations, it cannot guarantee the impact the application install or upgrade will have on all workstations. The following sections describe some rare occasions when an application distributed to a client might result in problems.
It is possible that an application distributed with ZENworks for Desktops could conflict with a local application that was installed by the user of that workstation. For example, you distribute a corporate virus scanner to all workstations. An existing application then cannot open files correctly because the virus scanner believes it is a virus that is trying to modify the files.
Most companies have some sort of standard for applications that can be installed on clients. This standard usually ensures that applications being distributed with ZENworks for Desktops do not conflict with any other applications on the users' systems.
When an Application object is delivered to a workstation, it can be configured to copy files only if they are newer. This usually protects shared DLLs because the older functionality is usually available in newer versions.
However, some applications have DLLs that have functionality written specifically for them. This functionality does not exist in newer versions, and, if they are overwritten with a newer file, the application they supported might no longer function.
Many applications are written for computer systems that have a high level of CPU speed, RAM, video memory, disk speed, and so on. If this type of application is distributed down to a client workstation that does not have the hardware capability to support them, they will not function properly.
This potential problem can be controlled somewhat by configuring the Application object to check for hardware levels before installing (discussed in the next chapter). You can use the hardware inventory feature of ZENworks for Desktops, discussed later in this book, to quickly determine what hardware is installed on clients.
snAppShot is designed to record changes made by a single application install, and therefore, it cannot image an entire workstation for disaster recovery purposes. When snAppShot discovers a workstation, it only saves some information about the files, such as the date, time, and size of the files. It does not save a copy of all the files on the workstation.
If you have a need to image an entire workstation, refer to Chapter 14, “Imaging a Workstation.”
Once you are familiar with when and why to use the snAppShot utility and understand some of its advanced features, you are ready to begin using it to create Application objects. When you start snAppShot, you see a screen similar to the one in Figure 5.3.
Figure 5.3. The Main menu in the snAppShot utility, which allows users to select which discovery mode they want to use.
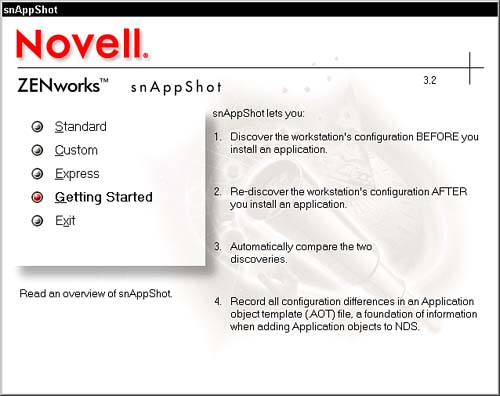
This startup screen for snAppShot allows you to select from standard, custom, express, or super express (command-line) modes (explained in detail in the following sections) depending on your needs, and on whether you already have a preference file ready.
You should use the standard mode in snAppShot to discover the application installation changes on a workstation using default settings. If you have never run snAppShot before, and are unfamiliar with the available settings, this is the best option. It requires little intervention.
To use the standard mode, simply select it and perform the operations outlined in the following sections to create the needed files.
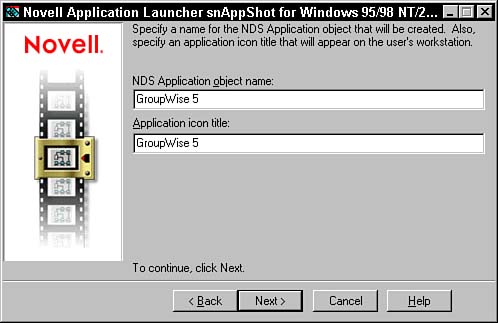
Once you select the standard mode installation from the main screen in snAppShot, a window similar to the one shown in Figure 5.4 is displayed. From this screen, you need to input the name that the Application object has in the eDirectory tree and include a title for the icon that represents the Application object.
Next, a screen similar to the one in Figure 5.5 enables you to set the network location to store the application source files (.FIL).
Figure 5.5. This snAppShot window allows users to specify the location to store the application source files.
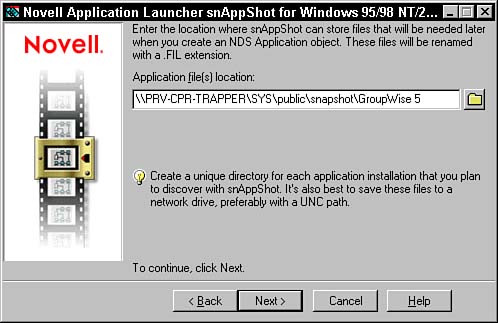
When setting this location, remember the following two issues:
• Make sure you select a location that all users who will need the Application object have access to.
• Make sure there is enough disk space in the network location to store the entire application.
Once you have specified a network location for the .FIL files, snAppShot enables you to set a network location for the application template (the .AOT and .AXT files). Set the network location by either entering it into the text window or by clicking on the folder button and navigating to the appropriate directory.
Once you have selected the network location to store the Application object support files, you need to select which disk drive to scan on the workstation to determine changes, as shown in Figure 5.6.
Figure 5.6. snAppShot window for specifying which disk drives, network and local, are scanned during discovery.
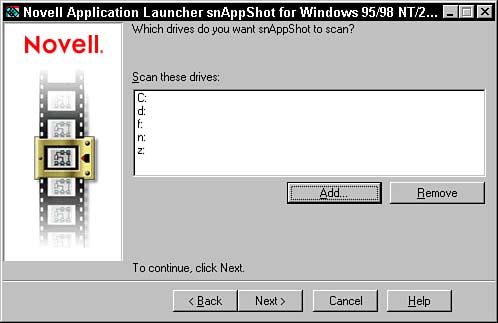
You can add drives to the list by clicking on the Add button and selecting the drives you want to scan. Conversely, you can remove drives from the list by selecting the drive and then clicking on the remove button. You can select network drives as well, but only if they are mapped. This allows you to install applications to a larger network drive if needed and still discover the changes.
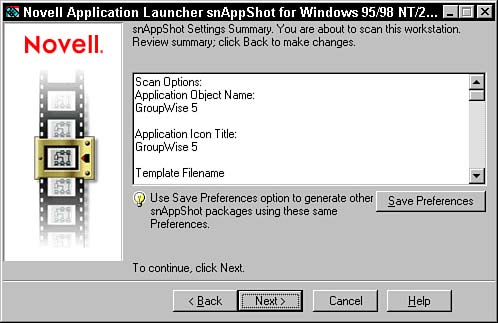
Once you have all the drives you want to select added to the list of drives to be scanned, click Next and a summary of the preferences is displayed in the next window, as shown in Figure 5.7. The information displayed includes:
• Application object name
• Application icon title
• Template filename
• Application files directory
• snAppShot's working drive
• Scan options
• Disks to scan
• Files to exclude
• System text files to scan
The first snAppShot discovery runs when you click Next from the Preference Summary window. A screen shows the status of the discovery and a count of the following items that have been discovered:
• Folders and files
• Windows shortcuts
• .INI files
• System configuration files
• Registry entries
Once the first snAppShot discovery is complete, a Run Application Install button is available. When you select the Run Application Install button, a pop-up menu appears. You can navigate to the application install executable and execute it.
Once the application install is complete, you can continue with the discovery process of the snAppShot application.
Once you have completed the application install, snAppShot gives you the option to specify a path to the application's executable on this workstation. You can enter the location of the installed application files on this workstation in the text field.
Of course, if you do not want snAppShot to set a target distribution location, leave this field blank and continue.
Once you are finished setting the path to the application's executable and you click the Next button, snAppShot runs the second discovery. Once again, you can monitor the status of the discovery by noting the count of the following items:
• Folders and files
• Windows shortcuts
• .INI files
• System configuration files
• Registry entries
Once the discovery is finished, snAppShot begins generating an object template. This is where the differences between the two discoveries are discerned and the template files are created.
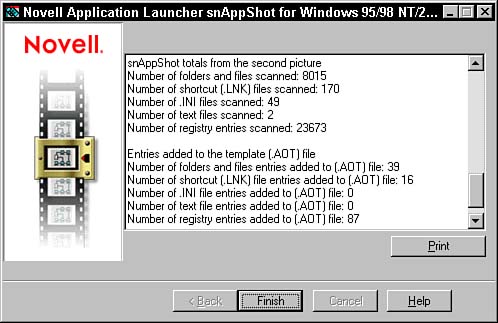
Once the second snAppShot discovery is complete and the template files are generated, a completion summary of what took place is displayed in the window shown in Figure 5.8. The completion summary contains information about the application template creation, including:
• The location of the new Application object template (.AOT)
• The location of the new .FIL files
• The location of the textual version of the Application object template (.AXT)
• Listing of the steps to take to create the Application object
• Statistical totals from the second discovery
• Statistical totals from entries added to the Application object template (.AOT)
You should use the custom mode in snAppShot to set specific options when discovering the application installation or upgrade changes on a workstation. Custom mode is much like standard mode except that it gives you the added opportunity to specify the drives, files, folders, Registry hives, and shortcuts that you want to include or exclude in the discovery process. You can save these settings in a preference file for later use if you need to run snAppShot for a similarly configured application.
Only in custom mode can you see and use all of snAppShot's features. To use the custom mode, simply select it and perform the following operations to create the needed files:
-
Choose the snAppShot preferences file.
-
Name the Application object and icon title.
-
Specify the network location of the application source (.FIL) files.
-
Specify the network location of the application template (.AOT and .AXT) files.
-
Specify which parts of the workstation to include or exclude.
-
Specify the drives that will be discovered.
-
Read the pre-discovery summary.
-
Run the first snAppShot discovery.
-
Run the application's installation or upgrade.
-
Specify how to handle the creation of files, folders, .INI file entries, and Registry settings.
-
Enter the path to the application's executable file.
-
Define macros for distribution automation.
-
Run the second snAppShot discovery.
-
Read the completion summary.
The first window that comes up after you select the custom mode in snAppShot is the Choose snAppShot Preferences window. From this window, you have the option of either using a previously saved preference file, or using the snAppShot default settings.
If you have previously created and saved a preferences file in a previous custom mode, you can navigate to that file or enter the path to it into the text field as shown in Figure 5.9.
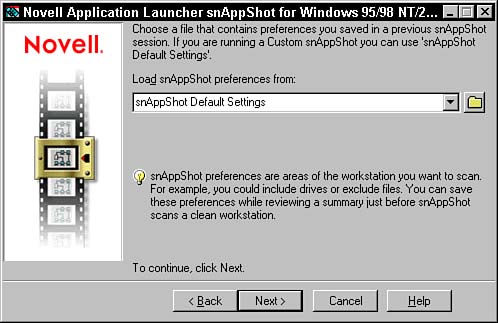
Once you select the preference file option in custom mode in snAppShot, a window is displayed. From this screen, you need to input the name that the application object will have in the eDirectory tree and a title for the icon that represents the application object.
Once you have set the name for the application object and title for its icon in the custom mode install, a screen enables you to set the network location to store the application source files (.FIL).
When setting this location, you should remember the following two points:
• Make sure you select a location that all users who will use the application object have access to.
• Make sure there is enough disk space in the network location that you set to store the entire application.
Once you have specified a network location for the .FIL files, snAppShot enables you to set a network location for the application template (.AOT and .AXT files). Set the network location by either entering it into the text window, or by clicking on the folder button and navigating to the appropriate directory.
Once you have selected the network location to store the Application object support files, you can select which of the following parts of the workstation you want to include or exclude, as shown in Figure 5.10:
Figure 5.10. The snAppShot window for specifying which parts of the workstation to include or exclude.
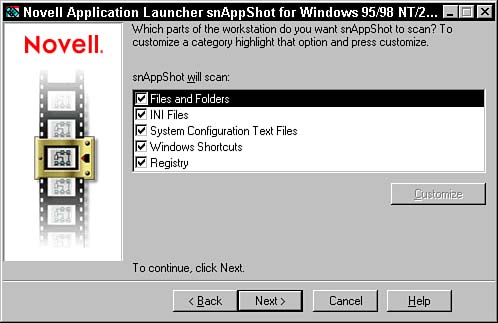
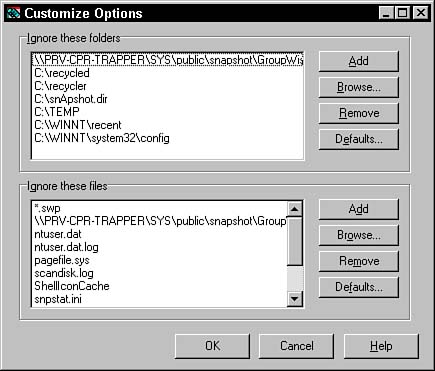
• Files and folders—From the Workstation Scan Customization menu in snAppShot, you can modify which files and folders you want to include or exclude. Simply select the files and folders option and click the Customize button. A window similar to the one in Figure 5.11 pops up, and you must select which files and folders to ignore.
Figure 5.11. The snAppShot window for specifying how and which files and folders are created in the Application object template.
Tip
Wildcards are valid here. For example, if you want to exclude all .DAT files, you could specify *.DAT in the list of files to ignore.
• .INI files—From the Workstation Scan Customization menu in snAppShot, you can modify which .INI files to exclude. Simply select the .INI files option and click the Customize button. A window pops up from which you select which .INI files to ignore.
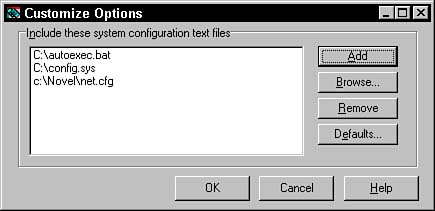
• System configuration text files—From the Workstation Scan Customization menu in snAppShot, you can modify which system configuration text files you want to include in the scan. Simply select the system configuration text files option and click the Customize button. A window similar to the one in Figure 5.12 pops up, from which you select which system configuration text files you want to include.
Figure 5.12. This snAppShot window allows you to specify which system configuration files are created in the Application object template.
• Windows shortcuts—From the Workstation Scan Customization menu in snAppShot, you can modify which Windows shortcuts to exclude. Simply select the Windows shortcuts option and click the Customize button. A window pops up, and you select which Windows shortcuts to ignore.
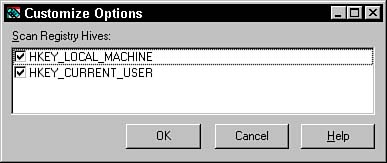
• Registry—From the Workstation Scan Customization menu in snAppShot, you can modify which Registry hives you want to include or exclude. Simply select the Registry option and click on the Customize button. A window similar to the one in Figure 5.13 pops up, and you select and deselect from a list of hives to include.
Once you have specified which parts of the workstation to include or exclude, you must select which disk drive to scan on the workstation to determine changes.
You can add drives to the list by clicking on the Add button and selecting the drives you want to scan. Conversely, you can remove drives from the list by selecting the drive, and then clicking on the Remove button.
Once you have all the drives you want to select added to the list of drives to be scanned, click Next and a summary of the preferences are displayed. The information displayed includes:
• Application object name
• Application icon title
• Template filename
• Application files directory
• snAppShot's working drive
• Scan options
• Disks to scan
• Directories to exclude
• Files to exclude
• System text files to scan
The first snAppShot discovery runs when you click Next from the preference summary window. A screen shows the status of the discovery, and a count of the following items that have been discovered:
• Folders and files
• Windows shortcuts
• .INI files
• System configuration files
• Registry entries
Once the first snAppShot discovery is completed, a Run Application Install button is available. When you select the Run Application Install button, a file pop-up menu appears, from which you navigate to the application install executable and execute it.
Once the application install is complete, you can continue with the discovery process of the snAppShot application.
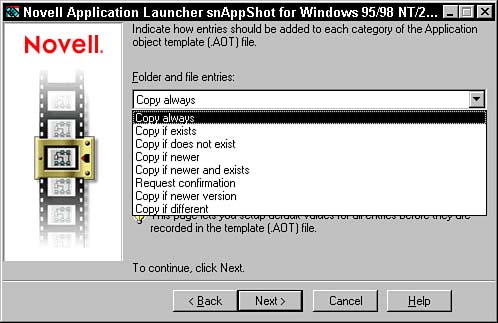
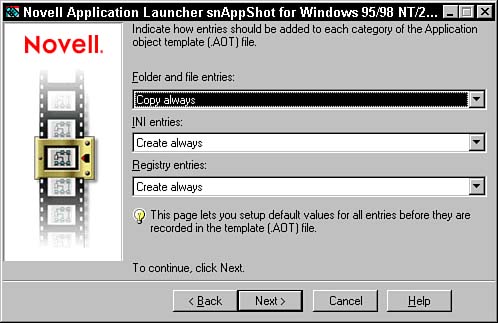
Once the application's installation or upgrade is complete, snAppShot enables you to specify how to handle the creation of entries for the Application object. From the screen shown in Figure 5.14, you can set the additional criteria for the entries described in the following sections.
• Folder and file entries—From the Application Object Entry Addition window in snAppShot, you can choose whether files and folders are added to the Application object. Click the down arrow under the folders and files option and select one of the following additional criteria, as shown in Figure 5.15:
• Copy always
• Copy if exists
• Copy if does not exist
• Copy if newer
• Copy if newer and exists
• Request confirmation
• Copy if newer version
• Copy if different
Figure 5.15. The snAppShot window that allows the users to specify how snAppShot handles the creation of file and folder entries in the Application object template.
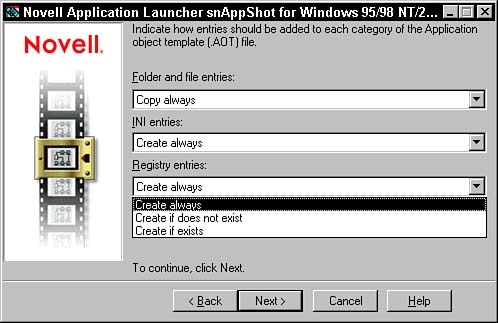
• .INI files—From the Application Object Entry Addition window in snAppShot, you can configure whether .INI files are added to the Application object by clicking the down arrow under the .INI files option and selecting one of the following additional criteria, as shown in Figure 5.16:
• Create always
• Create if does not exist
• Create if exists
• Create or add to existing section
Figure 5.16. The snAppShot window for indicating how snAppShot handles the creation of .INI file entries in the Application object template.

• Registry entries—From the Application Object Entry Addition window in snAppShot, you can configure whether Registry entries are added to the Application object. Click the down arrow under the Registry entries option and select one of the following additional criteria, as shown in Figure 5.17:
• Create always
• Create if does not exist
• Create if exists
Once you have defined the additional criteria for entries into the Application object, snAppShot gives you the option to specify a path to the application's executable on this workstation. You can enter the location of the installed application files on this workstation in the text field.
Of course, if you do not want snAppShot to set a target distribution location, leave this field blank and continue.
Once you are finished setting the path to the application's executable and have clicked the Next button, you can define macros to control the distribution of Application objects. A screen similar to the one shown in Figure 5.18 enables you to add, edit, or remove macros to control automation of application distribution.
Figure 5.18. This snAppShot window allows the users to add, edit, or remove macros to be used in the Application object template.
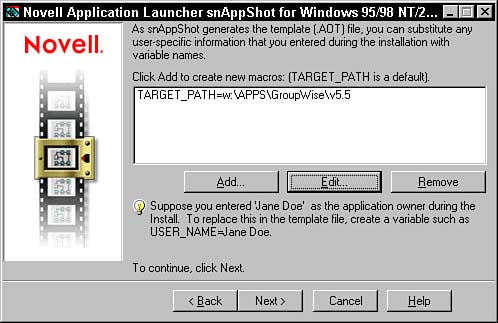
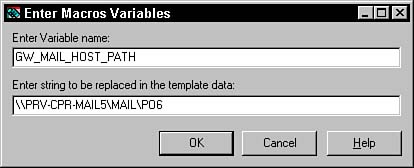
When you click the Add button in the Macro Definition window, you can specify a variable name and a string that is replaced within the template data, as shown in Figure 5.19.
Once you are finished with defining macros to automate Application object distribution, click Next, and snAppShot runs the second discovery. Once again, you can monitor the status of the discovery by noting the count of the following items:
• Folders and files
• Windows shortcuts
• .INI files
• System configuration files
• Registry entries
Once the discovery is finished, snAppShot begins generating an object template. This is when the actual differences between the two discoveries are discerned and the template files are created.
Once the second snAppShot discovery is complete and the template files have been generated, a completion summary of what took place appears. The completion summary contains information about the application template creation, including:
• The location of the new Application object template (.AOT)
• The location of the new .FIL files
• The location of the textual version of the Application object template (.AXT)
• Listing of the steps to take to create the Application object
• Statistical totals from the second discovery
• Statistical totals from entries added to the Application object template (.AOT)
You should use express mode when you've already saved a snAppShot preference file from a previous discovery process. By choosing this file, you can skip over most of the standard or custom mode settings, which enables you to discover a new application installation much more quickly than in standard or custom modes.
To use the express mode, simply select it and perform the operations described in the following sections to create the needed files.
The first window that appears after you select the express mode in snAppShot is the Choose snAppShot Preferences window. From this window, you can choose to use a previously saved preference file.
If you have previously created and saved a preferences file in a previous custom mode, you can navigate to that file or enter the path to it into the text. If you have not previously created and saved a preference file, you must do so before selecting the express mode.
Once you have selected a preference file from a previous application package, click Next and a summary of the preferences are displayed in the next window. The information displayed includes:
The first snAppShot discovery runs when you click Next from the Preference Summary window. A screen shows the status of the discovery and a count of the items that have been discovered, including:
• Folders and files
• Windows shortcuts
• .INI Files
• System configuration files
• Registry entries
Once the first snAppShot discovery is complete, the Run Application Install button is available. When you select the Run Application Install button, a file pop-up menu appears, and you can navigate to the application install executable and execute it.
Once the application install or upgrade is finished, click Next, and snAppShot runs the second discovery. Once again, you can monitor the status of the discovery by noting the count statistics of the following:
• Folders and files
• Windows shortcuts
• .INI Files
• System configuration files
• Registry entries
Once the discovery is finished, snAppShot begins generating an object. This is when the actual differences between the two discoveries are discerned and the template files are created.
Once the second snAppShot discovery is completed and the template files generated, a completion summary of what took place is displayed. The completion summary contains information about the application template creation, including:
• The location of the new Application object template (.AOT)
• The location of the new .FIL files
• The location of the textual version of the Application object template (.AOT)
• Listing of the steps to take to create the Application object
• Statistical totals from the second discovery
• Statistical totals from entries added to the Application object template (.AOT)
You can use super express (command-line) mode to discover changes to a workstation in the fastest possible way. The super express mode of snAppShot enables you to run snAppShot from a command prompt, which enables you to discover changes to a workstation faster than the other available modes.
In order to use this mode of snAppShot, which you do exclusively from the command line, you must use a preferences file from a previous snAppShot session. To use the super express mode, perform the operations described in the following sections.
The first step to use the super express (command-line) mode in snAppShot is to enter DOS and change to the directory where the snAppShot utility is located.
Once you are in the directory of the snapshot utility, enter the following command from the DOS prompt.
snapshot /u:<filename>
<filename> is the name of a snAppShot preferences file you defined and saved earlier when running snAppShot in custom or express modes.
Once you have executed the snAppShot command from the DOS session, a window appears that gives you the option to overwrite the existing Application object template, as shown in Figure 5.20. You must select Yes to continue.
Figure 5.20. The snAppShot window that allows you to overwrite the previous snAppShot discovery when using the super express mode.
Once you select Yes, the Application object template creation continues the same as in the regular express mode, by displaying the pre-discovery summary screen, followed by the first discovery.
Now that the creation of Application object packages using snAppShot has been discussed, it is useful to know how they compare to Microsoft Windows installer (.MSI) package files. The files involved are described as follows:
• .MSI Files—An .MSI file is a storage file containing the instructions and data required to install an application. .MSI files are used by the Microsoft Windows Installer to deploy and install applications to computers with 32-bit versions of Windows on them.
• .MSM Files—A merge module (.MSM) file, referred to as merge package file, is a single package that includes all files, Registry changes, and setup logic to install a shared component. Merge modules are contained inside .MSI files.
The information .MSI files contain depends on how they are created. The following sections describe the ways that .MSI files are typically created.
The most complete way of creating .MSI files is by using development tools to create .MSM and .MSI files, and then configuring them with the files, Registry changes, resources, and logic to perform a complete install of the application.
This method is preferred by most application developers, because it gives them the greatest control over how and what information and logic actually goes into the .MSI file.
The discovery method of creating .MSI files is very similar to the way snAppShot creates its Application object templates. The discovery method works by using a double discovery process to accumulate changes made by an install. Most third-party application installs are created by this method. The following steps describe how this method is accomplished:
-
Begin with a clean PC, or one that is representative of the computers in your network.
-
Start Discover to take a picture of the representative PC's software configuration. This is the “before” snapshot.
-
Install a program on the PC on which you took the before snapshot.
-
Reboot the PC.
-
Run the new program to verify that it works.
-
Quit the program.
-
Start Discover and take an “after” snapshot of the PC's new configuration. Discover compares the before and after snapshots and notes the changes. It creates a Microsoft installer package with information about how to install that program on such a PC in the future.
-
Clean the reference computer to prepare to run Discover again.
Now that you understand what .MSI files are and how they are created, you need to understand what role they can play in creating Application objects, instead of using .AOT or .AXT files.
The ZENworks snap-ins to ConsoleOne enable you to use .MSI files to create Application objects in exactly the same way that .AOT or .AXT files are used. Therefore, if an .MSI file is already available for an Application object, you can save yourself time and effort by simply using the .MSI file to create the Application object (discussed in the next chapter).
Using ZENworks, you can also apply .MST files along with the .MSI files to your desktops.