
One significant feature added to ZENworks for Desktops 4 is the capability to create and deploy images of workstations throughout the network. Using this feature, you can provide an additional level of support and service to users of workstations by being able to take an image of a golden workstation for your organization and then apply that image to any workstation in the network. This can be used to initially set up workstations in your organization and to restore a workstation to properly functioning status should problems occur that are best repaired by getting the workstation to a known, beginning state.
The ZENworks for Desktops 4 system for imaging workstation is made up of the following components: Linux operating system, Linux imaging software, Imaging server agents, and the Windows workstation image-safe data agent. In addition to these components, objects in eDirectory, and some administrative tools in ConsoleOne, are there to get the job done.
There might be a Linux partition placed on a workstation (minimum of 15MB) that can hold the Linux OS and the imaging engine. It's ideal to place this partition on workstations that you might want to image on the fly (from ConsoleOne) because, when requested, the workstation gets notified of this work and then performs the imaging task. If no work exists for the imaging system to perform, the partition boots into the normal operating system. See the section on placing a Linux partition on a workstation for potential issues and instructions.
The ZENworks for Desktops 4 imaging system is designed to function in an automatic mode (although it does have a manual mode). The expectation is that you use the system to deploy images to your workstations in the network in order to set up initial systems or repair systems and get them back online as quickly as possible. Consequently, the system assumes that a workstation that is contacting the imaging server, but is not registered in the tree, is requesting an image; and a registered workstation is contacting the imaging server to determine whether any work (indicated by flags in the workstation object) is to be done.
The ZENworks for Desktops 4 product ships with the ZENworks Preboot Services product. This allows you to have PXE (Pre-Execution Environment) support right out of the box! Now you don't have to have a Linux partition on the workstation. Instead, you can boot PXE. The PXE Server provided in ZfD4 will then send the device the Linux Kernel. The imaging system will contact the imaging server for work and proceed to send and apply the image.
ZENworks for Desktops 4 uses the free Linux operating system to take and apply images to workstations. The imaging process begins by booting the workstation with some boot floppies that contain the Linux operating system and several drivers to handle most network cards. If the boot disks cannot support your network card, you need to look for those resources on the Internet. The following sites might have the driver you're looking for:
cesdis1.gsfc.nasa.gov/linux/drivers/index.html
This is the Linux software application that actually takes and applies the image. This software is automatically started with the boot disks and is launched when the workstation is told to take or receive an image.
This software is not writing bits and bytes on the sectors, but it has knowledge of the various supported file system types, and reads and writes the files. The supported file system types are FAT16, FAT32, NTFS 4 (Windows NT), and NTFS 5 (Windows 2000/XP). Because the imaging software is reading files, it also writes files. This means that if you take the manual approach to restoring the image and the partition is not empty then you have a mingling of currently existing files with the files from the restore—causing a very unexpected behavior (OS and driver files are intermixed, and so on).
Something else to note is that the images always have the suffix of .ZMG and are not compressed. You must have enough room on the destination server to store the entire image or the image transfer will fail and the partial image will be deleted.
The imaging software can function in one of two modes: automatic and manual. In the automatic mode the imaging software contacts the imaging server agent and requests any work. This work can be to take or receive an image (this is set in the workstation object). If an image must be taken or received, the imaging software begins the process. If no work must be done, the imaging software completes and the workstation reboots to the native operating system.
If the imaging software is in manual mode, the software does not automatically communicate with the agent, but places prompts on the workstation screen that enable you to perform specific partitioning and imaging tasks including taking or receiving an image. See the “Advanced Imaging” section in this to learn about the commands you can perform in the manual mode. When the imaging software is done, the user must manually request the reboot to the native operating system.
This is the agent that runs on the server and is responsible for communicating with the imaging software that is running on the workstation. These agents tell the workstation whether to take the image or to receive an image and are responsible for walking the eDirectory tree to find the image. This agent is affected by the Imaging Server Policy in the Server Policy Package. It is responsible for receiving information from the workstation and processing the rules in the policy in order to find an image object that should be applied to the workstation.
Once the image is determined, this agent gets the image file and transmits that image to the Linux image software residing on the workstation. It is also responsible for receiving any images that the workstation is sending it and storing them on the server in the specified and approved locations.
The image server is loaded on the NetWare server as imgserv.nlm and the NT/2000 version is a service DLL with the same name. The imaging server has a status screen that tells you some information on the number of requests and images it has received and served. It, unfortunately, does not have any information on the screen on currently receiving or delivering work. You can load the service with a debug option and get it to write a log file called ZIMGLOG.XML on the server.
This agent resides on the Windows workstation and is responsible for receiving image-safe data from the disk and placing that into the Windows Registry. It also makes sure that the information in the Windows Registry is synchronized on the disk.
A special sector on the disk is reserved for placing information that is preserved despite having an image applied to the workstation. This way, a workstation keeps its IP address (or DHCP settings), computer name, workstation object, domain, and group names.
Several objects are introduced to the tree in order to support ZENworks for Desktops 4 imaging. These objects are the following:
• Workstation Imaging Policy—This policy is in the Workstation Policy Package and determines, for the associated workstations, the image to be used when a re-image is requested. See Chapter 9, “Setting Up a Workstation Policy Package,” for more information about this policy.
• Imaging Server Policy—This policy is in the Server Policy Package and determines the image used when an image is requested for a non-registered workstation. See Chapter 12, “Creating a Server Policy Package,” for more information about this policy.
• Image Object—This is an eDirectory object that represents an image taken of a workstation and stored on the imaging server. See the following section to learn more about the Image object.
• Workstation Object: Imaging Configuration—These are some configuration parameters that are part of the workstation object. In this page, you can configure whether the workstation should take or receive an image on the next reboot.
The administrator creates the Image object in the directory and associates it with an image file (.ZMG) taken by the ZENworks for Desktops 4 imaging system. To properly configure an Image object, you must do the following:
-
Take an image of a workstation and store that image on an imaging server. See the section that follows about creating a workstation image.
-
Launch ConsoleOne and browse to the container where you want the Image object to reside.
-
Create an Image object by selecting the container and then choosing the File, New, Object menu and selecting Workstation Image object from the list of objects.
-
Once the object is created, go into the object's properties by either selecting additional properties in the create process or by right-clicking the object and choosing Properties.
-
Select the Image Files tab and specify whether you want to use a base file image or set up scripted imaging. If you select standard imaging, you must administer the location of the .ZMG files by pressing the browse button in the Base Image File field. You then need to browse to the imaging server and then to the file system on that server to specify the .ZMG file. If you select scripted imaging, you can specify an imaging command in the text window that appears (see “Advanced Imaging” later in this chapter).
-
Choose the file set to bring as part of the image by selecting the set in the Use File Set parameter at the bottom-left side of the screen. You can have up to 10 file sets. See following section, “Modifying an Image,” for more details.
-
If you are using standard imaging, you can also append additional images to this image by pressing the Add button and placing them in the Add on Image File field. These additional images are included with the base image and placed on the workstation when it is imaged. These images can be Application Object images (see Chapter 6, “Creating and Using Application Objects,” for more information).
-
Press OK to save the administrative changes and get out of ConsoleOne.
Several tools exist that are available to perform the imaging operation. First are the snap-ins into ConsoleOne that enable you to create image objects and launch tools to create the imaging boot disks and to view and manipulate an image file.
The boot disk creator and the Image Explorer program are both Windows programs that are launched from the Tools menu of ConsoleOne. The boot disk creator creates the Linux disks needed to boot the workstations to communicate with the imaging server and to take and put the images.
The Image Explorer enables you to view the contents of the image file and to mark files in the image to be included in various sets of files, as well as remove and add files from/to the image. See the “Modifying an Image” section later in the chapter for more details.
The ZENworks for Desktops 4 imaging engine that performs the actual workstation imaging is a Linux application. Therefore, the workstation must be booted to Linux temporarily while the imaging is performed. For a workstation to use the ZENworks engine, you need to prepare a bootable device that has the following components:
• Linux Kernel—Either a bootable device or partition with Linux installed.
• Imaging Engine—ZENworks for Desktops Imaging Software.
• Network Drivers—Drivers to access the network to communicate with the ZENworks for Desktops imaging server.
You can use any of the following methods to prepare workstations to be imaged:
• Preboot services (PXE)
• Boot disks
• Boot CD
• Linux partition on a workstation
When a workstation with Preboot Services (PXE) is booted, it searches the network for PXE. Once it locates the server where PXE is installed, it uses a DHCP request to query the server and determine whether there is any imaging work to do. If ZENworks determines that there is imaging work to do, it then downloads the following files to boot the workstation to Linux and performs the imaging operations: LINUX.1, LINUX.2, and LOADLIN.EXE. These files aren't downloaded if ZENworks determines that there is no work to be done.
PXE is an industry-standard protocol that allows a workstation to boot up and execute a program from the network before the workstation operating system starts. For more information, see “Preboot Services” at the following Web site:
All imaging starts by booting the workstation up with the ZENworks for Desktops 4 Imaging boot disks. To create these disks, you need to do the following:
-
Get two newly formatted floppy disks. The system does not work properly if you create image disks on previously used floppies without reformatting them first.
-
Launch ConsoleOne.
-
Launch the boot disk creator program (
sys:publiczenworksimagingzimgboot.exe) by going to the Tools menu and selecting the correct option (Tools, ZENworks Utilities, Imaging, Create or Modify Boot Diskettes). -
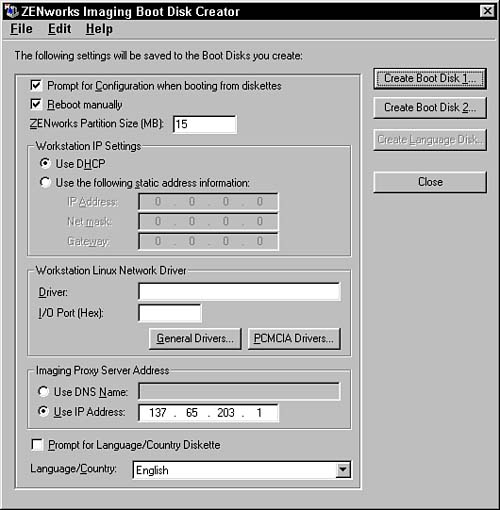
Within the Boot Disk Creator program, choose the options that you want. Figure 14.1 shows a sample of the Boot Disk Creator window.
You can make the following choices in the program:
• Prompt for Configuration When Booting From Diskettes—After the boot process is done, this prompts the screen for the configuration information that is included on this screen (such as reboot manually, proxy address, use DHCP, and so on). This enables you to change these values from the specified defaults given in this screen. You just press Enter when running the imaging program on the workstation, because you want to keep the defaults that you specify on this screen.
• Reboot Manually—Requires that the user request the reboot (Ctl+Alt+Del) manually at the completion of the imaging process (either take an image or receive an image) rather than having the program automatically reboot the workstation when done.
• ZENworks Partition Size—Enables you to specify how many megabytes you want any Linux partition to be on the workstation, if you decide to create the partition.
• Workstation IP Settings: Use DHCP—Tells the Linux system to use DHCP to get the workstation's IP address to connect to the imaging server.
• Workstation IP Settings:Use the Following Static Address Information—Enables you to specify the address instead of using DHCP. This is the address used by the workstation to connect to the imaging server.
• Workstation Linux Network Driver: Driver:—Specifies the special driver to use for your network card. The Linux boot disks are configured for most of the common network cards. The known network cards are automatically detected and the appropriate driver is loaded. Should you not have a card that is part of the default set, you need to include additional drivers on the disk.
• Workstation Linux Network Driver: I/O Port—Identifies the I/O port for access to your network card. In most cases, this field can be blank because it is auto-detected. If not, you need to enter the port number (for example, 300) of the interrupt for the network card.
• Workstation Linux Network Driver: Drive Buttons—These buttons bring up a driver window, which enables you to browse to the file system and find a Linux driver and then select it to be included on the disks. The driver selected in the field is attempted first, followed by the list of alternative drivers in the button lists, followed by the default drivers.
• Imaging Proxy Server Address: Use DNS Name—Enables you to select and enter the DNS name of the imaging server. Choose this option only if you have DNS enabled and have entered a record in the DNS system for this server. Enter the full DNS name, such as
imgsrvr.novell.com.• Imaging Proxy Server Address: Use IP Address—This flag identifies that the system should use the IP address to connect to the imaging server rather than DNS. The address specified should be the address of the server that is running the imaging service.
• Prompt for Language/Country Diskette—Requests that the system should prompt for the language disk at boot time. If this is on, the system waits for the language disk to be inserted before it finishes. This is not necessary if you are using the default English system.
• Language/Country—Chooses the country language. This results in these language files being placed on the system and used in the workstation imaging system.
-
Put a first floppy into the disk drive and press the Create Diskette 1 button. This writes a compressed file with the Linux boot system and portions of the imaging engine.
-
Put a second floppy into the disk drive and press the Create Diskette 2 button. This writes a compressed file with the remainder of the Linux drives and the imaging system.
-
If you chose to have a non-English version of the imaging system, you need to insert the third formatted disk and press the Create Language Diskette button. This places the non-English language files on the floppy.
-
Press the Close button.
Now these floppies can be used to boot the workstation and begin the imaging process.
If you have systems that are capable of booting from CD-ROM, you can create a CD with the Linux boot system. With your CD writer software, you need to create a CD using the ISO file called BOOTCD.ISO from the publiczenworksimaging directory or from the ZENworks for Desktops 4 Program CD. You also need the SETTINGS.TXT file, which holds the configuration for the boot CD, such items as prompt, size of Linux partition, and so on. You also need to include this SETTINGS.TXT file on the CD. Your CD writer software can include the SETTINGS.TXT file into the ISO image, or can write a multi-session CD. Obviously, your workstations will then need to support booting from a multi-session CD.
The SESSION.TXT file is an ASCII text file that holds key/value pairs that tell the boot system the configuration settings for the imaging engine. The following is a sample of the SETTINGS.TXT file:
# ZENworks Imaging settings.txt
# denotes a comment
#PROMPT should be set to YES if you want to configure
# various parameters
#PROMPT=YES
#PARTITIONSIZE should be set to the Linux partition size
# in MB, to be created on install
PARTITIONSIZE=15
#IPADDR should be set to the desired ip address of the
# machine. To use DHCP comment out the line, or remove
# it from the file.
#IPADDR=137.65.138.128
#GATEWAY is the router address for this machine. If
# using DHCP,remove this line, or comment it out.
#GATEWAY=137.65.139.254
#NETMASK is this machine's subnet mask. If using DHCP,
# remove or comment out this line.
#NETMASK=255.255.252.0
#PROXYADDR is the address of the server running ZENworks
# Image Server nlm
PROXYADDR=137.65.203.1
#uncomment if you want to reboot manually.
#MANUALREBOOT=YES
Depending on your situation and setup, you can create a workstation image in one of several ways.
If the workstation is registered in the directory and has a Linux partition on it (see the section following about placing a Linux partition on a workstation), you can go to the Workstation object in the tree and set a workstation flag (in the ZENworks Imaging Configuration tab) to take an image on the next boot. The next time that the workstation boots, the Linux partition boots and then the imaging engine on the workstation contacts the imaging server. The server notes that the Workstation object has the flag set and requests that the workstation send an image. When the image is completed, the flag is reset in the Workstation object and the workstation continues to boot into the native operating system.
Be sure to disable or remove any boot manager systems such as System Commander. You do not want them in the image that you take, because when they are placed onto a workstation, they overwrite the ZENworks boot system and the connectivity between the workstation and the imaging server does not occur. This keeps you from having the features of automatic execution.
If the workstation is registered in the directory but does not have a Linux partition, you need to boot from the floppies, PXE, or the CD. Once the system is booted, you can let Linux proceed in automatic mode. This contacts the image server and takes the image as described in the previous paragraph.
If the workstation is not registered in the directory and yet it has a Linux partition installed, when the workstation boots into the Linux partition it contacts the imaging server, which runs its rules attempting to discover a matching image. If one is found, it images the workstation with the matching image. If you need to, boot the workstation from the floppies to get the imaging engine into manual mode and to avoid connecting to the imaging server.
If the workstation is not registered in the directory and does not have a Linux partition, you must boot from floppies (or CD) and then type manual when the Linux partition is booted. Then you type img mp <proxy address> <full path to image>. Don't forget that the path must use forward slashes and must include the server. The directories in the path must already exist. This takes an image of the workstation and places it on the imaging server.
Note
Whenever you take or place an image on a workstation, the ZENworks imaging engine does not take an image of the Linux partition or replace it with an image being brought down. The only way to place a Linux partition on a workstation is via the bootable floppies or another imaging program.
The imaging process reads files from FAT16, FAT32, NTFS 4, and NTFS 5 systems and includes them in the image on a file-by-file basis. If the imaging system does not understand the partition type, it does a sector-by-sector copy of the partition.
With ZENworks for Desktops 4, Novell is recommending that customers move from the Linux partition and use PXE instead.
If you still want to, you can put a Linux partition on each of your workstations. This Linux partition is the boot partition, and upon boot-up of the workstation, contacts the imaging server to determine whether it has any requested work (based on administration in the workstation object). If it has work, the imaging engine either gets or puts an image. If it has no work, the imaging system continues the boot process, booting the workstation to the native operating system.
If you are placing a Linux partition on a previously functioning system, this process assumes that the workstation has already registered with the network, has an associated Workstation object and that the image-safe data agent has run on the workstation. Having the workstation already registered prevents the imaging server from attempting to place a new image on the workstation. However, if you are placing the Linux partition on a new workstation this process can place a new, standard image on the workstation, preparing it for use in your organization.
The ZENworks for Desktops 4 boot system does not function with such booting programs as System Commander. These systems need to be disabled or marked such that the Linux partition is automatically booted. The ZENworks for Desktops 4 boot system functions properly with the Windows boot manager by fixing the BOOT.INI file to properly boot.
Note
The imaging system has special recognition for Compaq systems and does not destroy the Compaq partition that is used to run machine configurations.
Warning
Placing a Linux partition destroys the disk and all of the other partitions unless you take special care in saving the partitions or using another program to create a new partition without destroying the current partitions.
To place a ZENworks for Desktops 4 Linux imaging partition on a workstation, you need to perform the following steps. Be sure to save any data on the workstation; any time that you are messing with partitions, you must prepare yourself should a failure occur and the data is lost.
Make sure that an empty place exists on the disk that is sufficient to hold the Linux partition (the size was identified in the creation of the boot disks and is 15MB minimum). This can be leftover space or be created by some program such as Partition Magic. If sufficient free space is present on the hard drive, the Linux install process should consume that space only when the free partition is partition 0 (in other words, the first partition in the partition table). The following steps describe how to place the Linux partition without loss of data and without any other tools:
-
Create your ZENworks for Desktops 4 boot disks with the proper configuration, including the setting to reboot manually. See the preceding section for tips on how to do that.
-
Boot the workstation with the ZENworks for Desktops 4 Imaging boot disks. Be sure to request manual mode when the system comes up. Typing
manualat the prompt following the boot to Linux does this. If you type nothing at the prompt in 60 seconds, the system boots to automatic mode. -
If this is a previously functioning workstation, take an image of the workstation by entering the following command:
img makep <address/DNS of image server> <filename for image file>. The address can be an IP address or the DNS name of the image server. The filename is the name of the image file you want to hold the image. The filename must include the following format://servername/dir/dir/../filename.img. The servername is actually ignored because the address of the server that is receiving the image stores the file on its disk. (Redirection of image servers does not work in manual mode.) -
Enter
img dumpto view the list of known partitions on the disk. Remember the numbers of the partitions. -
Enter
/bin/install.sto install the Linux partition on the disk. This destroys all data on the workstation's hard drive. It creates a new Linux partition on the disk at the specified size and place of the Linux boot system on that partition. The ZENworks boot loader is automatically installed in this process. A message should appear stating that the boot process could not fully function. This is because Linux creates logical partitions for all the partitions that are seen at boot time. You just added a new partition and it cannot create a logical partition for it. When it reboots the boot manager system automatically reinstalls itself when it is assumed that all partitions are now present. -
Enter
img dumpto view the list of known partitions. There should be one less partition listed than in Step 4 because the Linux partition is hidden from this listing. You should also note that all the other partitions are destroyed (in other words, they have no file system type associated with them). -
Perform a reboot of the workstation to make sure the Linux partition is functioning properly. This can be done by typing
reboot, or by turning the workstation off and on. Make sure you have removed the Linux boot disks. This should boot to the Linux partition and show the Linux prompt (because the system has been configured to not automatically reboot). -
If you took an image in Step 3, bring down the image that was taken by typing
image rp <address of image server> <image filename>. The image is brought down to the disk. The image is then reduced in size sufficiently to take the remaining space on the disk. If the image is too big to be reduced, an error occurs. Installation of an image from ZENworks for Desktops 4 takes special care to not destroy or overwrite the Linux partition. When the image is successfully down, you have the same workstation data and environment with the exception of a new Linux partition. -
Enter
img dumpto view the list of partitions again. There should be the same number as in Step 6 (one less than in Step 4) and there should now be file system types for the partitions that you have just restored. -
Reinitialize the boot manager by running
/bin/lilo.s. You should do this any time you bring down any image to the workstation. In automatic mode, the system performs this automatically. -
Perform a reboot of the workstation. This can be done by typing
rebootor by turning the workstation off and on. Make sure you have removed the Linux boot disks. This should boot to the Linux partition and get to the Linux prompt (because the system has been configured not to automatically reboot). -
The workstation should now boot to the Linux partition that goes into automatic mode communicating with the image server. It should find no work if the workstation is registered and the image configuration flags are off. If the workstation is not registered and you did not lay down an image in Step 8, the image server goes through its rules processing (see Server Policy Package, Imaging Server Policy) and determines an image that should be placed on this workstation. If one is found, that image is placed on the workstation. If you manually placed an image down on a workstation that had not been previously registered, the imaging server compares the name of that image file with the image determined by the imaging server. If they are the same, the imaging server does not attempt to lay down a new image. This should result in the workstation having no work and again booting to its native operating system.
Once an image has been taken on the system and stored on the imaging server, you can examine the contents of an image by running the ZENworks for Desktops 4 Image Explorer (zenworksimgexp.exe). When you launch the Image Explorer, you are placed in a Windows program. From there you go to the File menu and open the .ZMG file that holds the workstation image. Figure 14.2 shows a sample of an image in the Image Explorer.
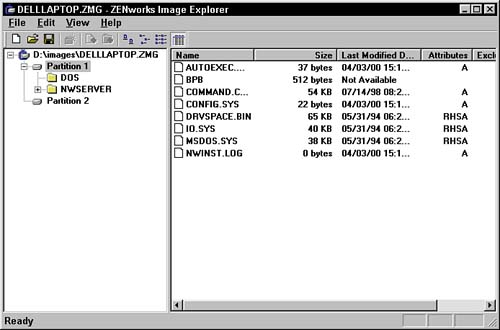
As you can see in the example, you can browse the image and discover the partitions and files in the image. You can also, using the Image Explorer, look at the information gathered from the workstation such as the hardware configuration. To look at this information, select the .ZMG file in the image editor. Go to File, Properties or right-click and select Properties. When you do so, the dialog box in Figure 14.3 is displayed.
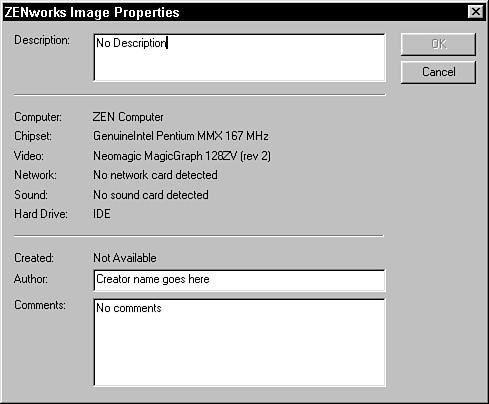
As you can see, this dialog box displays the description of the image, including all of the hardware information on the workstation where the image was captured. (You can use this information to help you construct your rules in the Image server policy.) Other fields include when created, the author, and any comments. If you want to modify any of the Description, Author, or Comments fields, just move the cursor to these fields and type the information you desire.
From within the Image Explorer, you can add files or a directory of files to the image. ZENworks also allows you to create up to 10 versions of the file set for the image. This is extremely useful for tailoring your images once they have been created or creating an image from scratch. For example, you might want to have two separate versions of the same workstation images, one for the user's local workstation and one for your remote workstation.
Use the following steps to add files and/or directories to an image object in Image Explorer:
-
Select the partition and, optionally, the directory in the partition where you want to add the files or directories.
-
Choose Image, Add Files or Image, Add Directory.
-
Navigate to the file or directory you want to add to the image and click the Add button.
The files and directories you selected will be added to the image.
Use the following steps to create a new directory in an image object from within Image Explorer:
-
Select the partition and, optionally, the directory in the partition where you want to create the directory.
-
Choose Image, Add Directory.
-
Specify the name of the directory. A new directory will be added to the image.
Image Explorer also allows you to add a Windows Registry file to an image. This is necessary to add additional Registry entries that you might need to update an image. Use the following steps to add a Registry file to an image object from within Image Explorer:
-
Select the partition and, optionally, the directory in the partition where you want to add the Registry file.
-
Choose Image, Add Registry file.
-
Navigate to the file or directory you want to add to the image and click the Add button.
The files and directories you selected will be added to the image. You can remove files from an image as well as mark files and place them into image sets. These sets consist of a group of files that can then be referenced from the imaging server (for example, place all files in set 1 from image A onto this workstation). By default, all files in the image are included in all sets.
Note
When the imaging engine requests an image from the imaging server, it automatically requests all files from the image in set 1.
Use the following steps to exclude files from a file set:
-
Select the file in the view window of Image Explorer.
-
Right-click the file and select File Sets from the pop-up menu.
-
Select the set you want to exclude from the pop-up menu listing. The file icon will be grayed out.
You can also click Edit from the pop-up menu; a dialog box similar to the one in Figure 14.4 is displayed and you can specify which sets you want to exclude the file from. This is much faster if you need to specify multiple file sets to exclude the file from.

When you create a Workstation Image object in the directory, and associate it with the image file, you can specify, in the object, which set of files to use. See the discussion on image objects in the previous section, “Image Objects.”
Three ways exist in which the workstation automatically discovers the workstation image that it should place onto its hard drive.
• The imaging server can choose an image when an unregistered workstation boots the Linux system and contacts the imaging server. The imaging server goes through its rules to determine the image to place on the workstation. (See Chapter 12.)
• The imaging server can choose the image when a registered workstation boots the Linux system and contacts the imaging server and the workstation has an associated Workstation Imaging policy. (See Chapter 9.)
• If the administrator has configured the workstation object to be associated with a specific image in the directory, when the Linux system is booted and contacts the imaging server, the server looks into the workstation object to determine whether it should be re-imaged. If so, it determines whether a specific image file has been specified and sends that file. Otherwise, it performs as described in Step 2.
In the Workstation object properties, an Image page exists. Within this image page you have a couple of settings that you can administer in relationship to the imaging system. The following settings can be applied on the Image page of the Workstation object:
• Take an image of this workstation on the next boot—This flag enables you to specify that on the next reboot of the workstation, the Linux boot system contacts the imaging server and is told to take an image of the workstation. With this field, you also get to specify the name of the image file. The image server saves the image to the specified filename.
• Put an image on this workstation on the next boot—This flag enables you to signal that the workstation should receive an image on the next boot. When the Linux boot system contacts the imaging server, it is told that it should put down an image. In addition to this field you can specify the image object that represents the image you want put down on the workstation. Press the browse button to select the image object in the directory. If no image object is specified, the image server looks for any Workstation Image Policy that can be associated with the workstation. If no Workstation Image Policy is associated with the workstation and you specify no image, no image is applied to the workstation.
After the workstation reboots and performs the requested action (make or restore an image), these flags are reset so that upon the next reboot no work is done. If the action is not successful, these flags are not reset; they continue to request the action upon each reboot.
One of the most significant advancements that ZENworks for Desktops 4 has over your standard imaging systems is the capability to include all the files and software associated with an application object into a workstation image. This way, when the image is placed onto the workstation, all of the included application object files are installed with the image. When the workstation boots into the native operating system, these application object files are treated as disconnected applications and are available from the workstation. See Chapter 6, for more information regarding ZENworks Application Launcher.
In order to apply the application objects to an image, you need to perform the following steps. These steps assume that you already have an image object representing some base image and an application object in your tree.
-
Launch ConsoleOne.
-
Browse to and select properties on an application object that you want to include in an image. This application object can be included in any number of images.
-
Go to the Common tab, Imaging property page.
-
On the Imaging property page, you can identify the name of the image file by browsing to an existing file (to be overwritten) or by typing in a new filename to be created. It is recommended that you type in a UNC path so that all machines can get to this image, rather than having to have a mapped drive to the identified volume.
-
Select the Application Object flags at the bottom of the screen that tell the ZENworks Application Launcher how to handle the application.
-
Press the Create an Image button to create an image representation of the application into the specified image file.
-
Close the dialog boxes to get back to the main ConsoleOne screen.
-
Browse to and select the properties of the Workstation image object that you want to include the application object.
-
Go to the Images tab.
-
Press the Add button on the screen and enter the server name and path to the image file you want to add to the image.
-
Press OK to save all the changes and exit ConsoleOne.
Now when the image is applied to a workstation, either through the policy or through direct association, the base image and the added image are placed on the workstation.
You can re-image the workstation (for example, apply a new image on top of the file system) through manual mode with the floppies or through the automatic method. Applying an image does not overwrite the Linux partition or the image-safe data on the hard drive.
You can automatically apply an image by following these steps. This procedure assumes that the workstation already has a Linux partition, that the workstation is associated with a Workstation object, and that an image exists in the tree.
-
Launch ConsoleOne.
-
Browse and select properties on the workstation object associated with the desktop.
-
Select the Images tab and select Put an Image on This Workstation on the Next Boot. Press the browse button in the Image file field to select an image to apply.
-
Press OK and exit from ConsoleOne.
-
Request that the users reboot the workstation.
When the workstation boots the Linux partition and you request to enter manual mode, you have the following commands available. The following describes the minimal keystrokes to get the command functional.
Remember that you are running on top of the Linux operating system and that any normal Linux command is valid on the command line. This enables you the freedom to use any command to help in the setup and configuration of the workstation. For example, you can see a listing of files (ls -FC) or mount a drive (mount /dev/hdc /mnt/cdrom). Any Linux utility can be run on the workstation.
You can access operations available in the imaging engine from the command menu. To access the command menu, use the img command with no parameters; a menu appears where you select the operation you want to perform.
The following general-purpose commands display information about the system.
• img help [mode]—This displays a help screen to remind you about some of the commands. It does not display an exhaustive list of available commands. The optional mode parameters are m to display information on the make mode, and p to display information on the partition mode.
Example:
img help p
• img info [zisd]—This displays the detected hardware information. This is useful to determine the values for the rules in the policies. The engine sends this information to the imaging server. The optional zisd parameter lists the data currently stored in the image-safe area on the computer and the last base image that was put down to the workstation.
Example:
img info zisd
Automatic mode images the computer automatically based on any applicable NDS or eDirectory policies and settings. In this mode, the imaging engine queries the imaging specified in the PROXYADDR environment variable for any work to do. The imaging server checks the relevant NDS or eDirectory policies and settings to determine which imaging tasks should be performed. The following command causes the imaging engine to connect to the imaging server and perform any actions that are specified in NDS or eDirectory:
img auto
This command sends a request to the imaging server to determine whether any work needs to be performed. If work must be performed, the imaging server immediately performs the work. The following codes are returned to the Linux shell upon completion: 0—no work to perform; 0—successful imaging task completed, no change to the hard drive; 1—successfully received one or more images, the hard drive has been altered; n—other error codes. Here's an example:
img auto
The following commands deal with manipulation of the partitions on the workstation.
• img dump—Displays the partition information of the hard disk. This command is important because the partition numbers displayed from this command are used as parameters to other advanced imaging commands.
Example:
img dump
• img dump geo—Displays the partition information of the hard disk and the geometry of the disk. This command is important because the partition numbers displayed from this command are used as parameters to other advanced imaging commands.
Example:
img dump geo
• img pa<partition number>—Makes the specified partition the active partition. The partition number is the partition number returned from the img dump command.
Examples:
img pa2
img pa1
• img pc<partition number> <partition type> [partition size] [cluster=<cluster size>]—Creates a partition in an empty slot. The partition number is the partition number returned from the img d command. The command fails if the partition specified is not empty. The partition type must be one of the following: fat12, fat16, fat32, or ntfs. The partition size parameter is optional and represents the number of megabytes requested. If the size is not given, the largest partition size possible for the specified type is created. The cluster size is only supported for NTFS partition types; for the FAT partitions the cluster size is determined automatically by the size of the partition.
When a partition is created, the ZENworks imaging engine performs some low-level pre-formatting. This pre-formatting process is dependent upon the actual file system being created. It is usually a subset of the formatting process performed on new partitions by the various operating systems, but it is not enough to be recognized as a valid partition by those operating systems. It is only formatted enough to enable the imaging engine to start inserting files into the partition. At least one base image must be applied to the partition before it is recognized by the operating system.
Examples:
img pc2 ntfs 500 c8
img pc3 fat32
img pc4 NTFS 2000 cluster=1
• img pd<partition number>—Deletes the specified partition from the hard drive.
Example:
img pd3
The following commands deal with the creation of workstation images:
• img makel[partition number] <path> [comp=<comp level>] [x<partition number>]—Makes an image of the disk and places it in the local file system. The optional partition number represents the partition where you want to store the image. This specified partition is not included in the image. If no partition is specified, all partitions (except the Linux boot partition) are imaged and the image is stored on the Linux partition. The path must resolve to a valid path on the system—no directories are automatically created, and any existing file with the same name is overwritten.
By specifying the partition number used to store the image, you can use an attached Jaz drive, which shows up as a partition and then stores the image of the hard drive on your removable media. The comp parameter specifies the amount of compression used when storing the image. Valid compression levels are from 0-9, where 0 is no compression for optimized speed and 9 indicates full compression optimized for space. Use 6 to balance between space and speed. The x<partition number> option excludes the partition specified from the image. You can exclude as many partitions as you need to reduce the imaging size and time.
Examples:
img makell2 imgdump.zmg
img makel fulldump
img makel /images/wsdump.zmg comp=6 x2 x3
• img makep <imaging server address> <UNCpath> [comp=<comp level>] [x<partition number]—Takes an image of the workstation and sends that image to the specified imaging server. This imaging server address is the actual IP address (not the DNS name) of the imaging server. The UNC path is where the image is stored on that imaging server. The path must resolve to a valid path on the system—no directories are automatically created, and any existing file with the same name is overwritten. The UNC must have the format of //server name/dir/dir.../filename (make sure you use the forward slashes). If the suffix .ZMG is not specified, it is automatically appended to the filename. The server name is really ignored because the image is sent and stored on the imaging server specified by the IP address. The comp parameter specifies the amount of compression used when storing the image. Valid compression levels are from 0-9, where 0 is no compression for optimized speed and 9 means full compression optimized for space. Use 6 to balance between space and speed. The x<partition number> option excludes the partition specified from the image. You can exclude as many partitions as you need to reduce the imaging size and time. The server name might be used at some future release.
Examples:
img makep 137.65.203.1 //zen1/vol1/images/dellb.zmg
img makep 137.65.203.254 //zen2/vol2/ibmlaptop
img makep 137.65.79.123 //zen2/vol2/ntws.zmg comp=9 x2
The following commands deal with restoring images onto the workstation. These commands might destroy previous data on the workstation.
• img restorel[partition number] path [s<set number>]—Restores an image from the partition and path specified onto the disk. All partitions on the hard disk, other than the Linux partition, are removed prior to the image being placed on the workstation. The optional partition number specifies the partition (as displayed in the img d command) where the image is stored. The path must resolve to a valid image file on the system. If you are restoring from a removable media drive, the partition number is the partition for the Jaz or CD-ROM drive. The path must be valid and must represent an image file on the specified partition. The optional set number enables you to specify which set of files to include from the image. The sets can be specified in the ZENworks Image Editor program. If the set number is not specified, it is assumed that it is set 1.
Examples:
img restorel2 myimage
img restorel theimage.zmg s2
• img restorep <proxy IP address> <UNCpath> [s<set number>]—Takes an image from the imaging server and puts it on the workstation. The proxy IP address must be the address of the imaging server where the image is stored. You cannot use a DNS name in this field. The UNC path must be a valid path that represents the image file. The path must be the format //server name/share/dir/dir.../filename or //server name/volume/dir/dir.../filename. The optional set number enables you to specify which set of files to include from the image. The sets can be specified in the ZENworks Image Editor program. If the set number is not specified it is assumed that it is set 1.
Examples:
img restorep 137.65.200.1 //zen9/image/delllaptop.zmg
img restorep 137.65.200.1 //any/image/delllaptop.zmg s2
These advanced image restore commands enable you to specify that the partitions on the disk should not be destroyed and how to map the partitions in the image to the partitions on the disk. Additionally, when images are restored the partitions are automatically resized to fit the archived partition. In these commands, the physical partition can remain larger than the archived partition.
• img restorel[partition number] path [s<set number>] a<archive partition>:p<physical partition>—Restores an image from the partition and path specified onto the specified partition on disk. This does not destroy the partition, but instead takes the archived partition and places its files into the specified partition. Any files already existing on the partition remain; files with the same name are overwritten. The optional partition number specifies the partition (as displayed in the img d command) where the image is stored. The path must resolve to a valid image file on the system. If you are restoring from a removable media drive, the partition number is the partition for the Jaz or CD-ROM drive. The path must be valid and must represent an image file on the specified partition. The optional set number enables you to specify which set of files to include from the image. The sets can be specified in the ZENworks Image Editor program. If the set number is not specified it is assumed that it is set 1.
The a<archive partition>:p<physical partition> option enables you to create a mapping between the two drive spaces. You can take archived partition 1 and place it on physical partition 2, for example. You must specify at least one partition mapping to keep from having the default, wipe all partitions, behavior. You can specify as many mappings as are needed and you can map multiple archive partitions onto a single physical partition. An archive partition cannot be mapped to more than one physical partition.
Examples:
img restorel2 myimage a1:p2
img restorel3 theimage.zmg s2 a1:p2 a2:p2
• img restorep <proxy IP address> <UNCpath> [s<set number>] a<archive partition>:p<physical partition>—Takes an image from the imaging server and puts it on the workstation into the specified partition. The proxy IP address must be the address of the imaging server where the image is stored. You cannot use a DNS name in this field. The UNC path must be a valid path that represents the image file. The path must be the format //server name/share/dir/dir.../filename or //server name/volume/dir/dir.../filename. The optional set number enables you to specify which set of files to include from the image. The sets can be specified in the ZENworks Image Editor program. If the set number is not specified it is assumed that it is set 1.
The a<archive partition>:p<physical partition> option enables you to create a mapping between the two drive spaces. You can take archived partition 1 and place it on physical partition 2, for example. You must specify at least one partition mapping to keep from having the default, wipe all partitions, behavior. You can specify as many mappings as are needed and you can map multiple archive partitions onto a single physical partition. An archive partition cannot be mapped to more than one physical partition.
Examples:
img restorep 137.65.200.1 //zen9/image/delllaptop.zmg a2:p1
img restorep 137.65.200.1 //any/image/dtop.zmg s2 a2:p2 a3:p2
You can use the ZENPartition mode to enable, disable, or remove the installed ZENworks for Desktops imaging partition from the workstation. This allows you to control the behavior of ZENworks imaging on the workstation.
The following are the commands available for the ZEN partition mode:
• zenPartition enable—Enables the ZENworks imaging partition.
• zenPartition disable—Disables the ZENworks imaging partition to stop imaging on the workstation.
• zenPartition remove—Removes the ZENworks imaging partition from the workstation to permanently stop imaging on it.
Example:
img zenPartition enable
You can also set up the ZENworks Imaging system to perform image multicasting. You can set up a single workstation to act as the master and send its hard drive contents to all the participating slave workstations.
You start the multicast session by entering the following on all workstations that are participating on the session:
img session <session name> [option]
The following options are available for the img session name:
• name—Specifies the name of the multicast session that each computer joining the session will use.
• master|client—Specifies whether this client will be the session master or just a client. If you do not use this parameter, the system will wait until a master is found.
• clients=<count>—Specifies the number of computers that must be registered with the master before imaging will begin. Once imaging has begun, computers attempting to register with the session are denied.
• t=<minutes>—Specifies the number of minutes the master computer will wait for the next participant to register before starting the imaging process without reaching the number of computers specified by the clients option.
The session name must be a unique string to identify this multicast session. The session name string used must be identically entered on all workstations (both master and slave) that are going to participate in the session. This string is used to hash a multicast address, so a small chance exists that two different strings can result in the same multicast address. Multicast addresses are class D IP addresses. In order to ease wire sniffing, troubleshooting, and LAN traffic analysis, the imaging engine always uses 231 as the first octet in its address.
Start this process by using the img session <name> command. Each workstation waits until the user determines which station will act as the master. The master workstation should be the source workstation; all slave workstations are destination workstations.
To designate the master workstation, go to the workstation that contains the source drive. The workstation should be running the session command and should be waiting just like all of the other workstations. Press the m key on the master workstation. This designates that workstation as the master. At this point, all of the other workstations attempt to register with the master and receive a unique session identifier. If, for some reason, a slave station is rebooted before the session starts, it always receives the same identifier.
When the desired number of stations has registered with the master, the master displays a running count of the number of registered slaves, and then starts the session by pressing g on the master workstation. Any station attempting to join the session after the session has started is denied access. Contents of the master are now transferred to all of the slave workstations.
Once the session is over, the master workstation displays a list of the stations that did not successfully complete the image.
The following commands perform some type of operation that would normally be activated only when the imaging engine is initially booted in manual mode. These are simple shell scripts that have been created for your convenience by the imaging system. Other script files exist, but these are the most useful to you.
• /bin/cdrom.s—Mounts the CD-ROM drive to /mnt/cdrom.
• /bin/config.s—Enables you to configure the SETTINGS.TXT file for the Linux partition.
• /bin/imaging.s—Runs the imaging engine in auto mode, just like the img a command.
• /bin/install.s—Creates the Linux partition and installs it onto the hard disk. It removes all partitions unless the Linux partition already exists; then it just updates the files.
• /bin/lilo.s—Installs the ZENworks Imaging boot manager system, making sure that this system is booted first on the drive.