In addition to User, Workstation, Service Location, and Container policies is the Server Policy Package. This package is associated with a container or a server and includes policies that are used by agents that reside on the server. This policy package is used by both ZENworks for Desktops 4 and ZENworks for Servers products, although some policies are effective only for Desktops 4 and others for Servers. This chapter discusses the Server Policy package.
A Server Policy Package contains a set of policies that are associated with agents that run on servers. These policies are expected to give policy information and configuration behavior to these agents and can be associated with the server, a group of servers, or a container.
The agents follow the expected walking of the tree to locate their server policy package. Namely, they find the search policy and then use the order specified in the search policy, or they use the default. The default is to search for a Server Policy Package associated with the server, and then the group of servers, and lastly the container. The first policy package is the one that the agents use.
To create a Server Policy Package do the following:
-
Start ConsoleOne.
-
Browse to the container where you want to have the policy package. Remember that you do not have to create the policy package in the container where you are doing the associations. You can associate the same policy package to many containers in your tree.
-
Create the policy package by right-clicking and choosing New, Policy Package or by selecting the Policy Package icon on the toolbar.
-
Select the Server Policy Package object in the wizard panel and press Next.
-
Enter the name of the package in the Policy Package Name field and select the container where you want the package to be located. The container field is already filled in with the selected container so you should not have to browse to complete this field. If it's not filled in, press the browser button next to the field and browse to and select the container where you want the policy object stored. Press Next.
-
Select the Define Additional Attributes field in order to activate some policies. Press Finish.
-
Check and set any policies you desire for this Server Policy Package and press OK.
The following subsections describe each of the fields and property pages that are available in the Server Policy Package.
All of the policies for users are activated within the policies property page. Initially, the page is on the general policies. As other platforms are selected additional policies are displayed. You can select which platform to display by mousing over the small triangle to the right of the word Policies. This activates a drop-down menu that enables you to select which platform specific page you want to display.
The following sections briefly discuss each of the policy pages; subsequent sections cover the specifics of each policy.
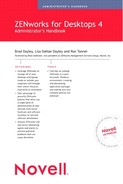
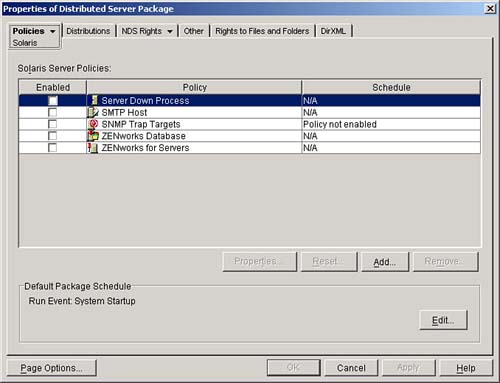
When you first go into the properties of the Server Policy Package, you are presented with the Policies Property page. The policy page first displays the general category. The policies activated in the general category are active for all server platforms supported by ZENworks for Desktops 4 and associated to the server.
Figure 12.1 shows a snapshot of the initial property page of the Server Policy Package.
As you can see in Figure 12.1, four policies are available to all of the platforms supported by ZENworks for Desktops 4. They are Imaging Server Policy, Workstation Import Policy, Workstation Removal Policy, and RollUp Policy. These, as well as all of the other policies, are discussed later in this chapter.
In order to activate a policy, you simply need to select it. You can then go into the details of the policy and set additional configuration parameters on that specific policy.
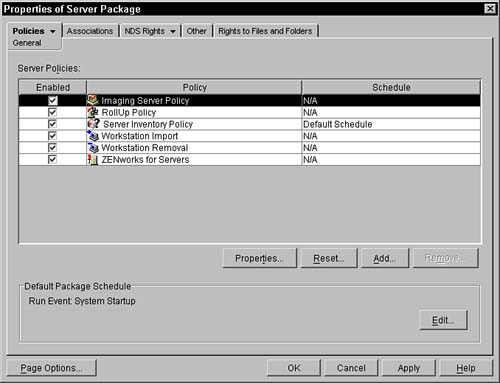
Within the policies tab you can select the Windows Servers policy page. This page displays the policies that are available for your Windows Servers. These policies include Imaging Server Policy, Workstation Import, Workstation Removal, and RollUp Policy. See Figure 12.2 for a sample of the Windows policies page.
As you can see, the same policies appear in the General and the Windows policies pages. When you select a policy in the Windows page it supercedes any selections made on the General tab. The policies will not be merged; only the platform-specific policy is used. For example, if the Workstation Import policy is selected in the General tab and the Workstation Removal policy is selected in the Windows tab, agents on a Windows Servers system use the general import policy and the Windows removal policy is activated.
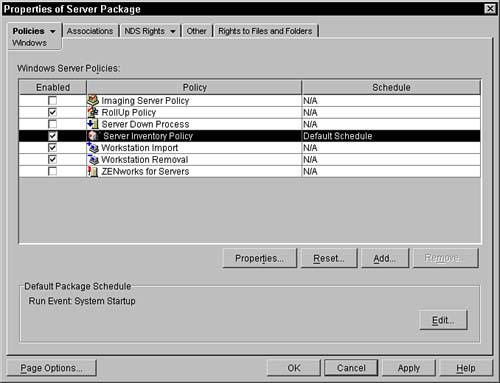
Within the policies tab you can select the NetWare policy page. This page displays the policies that are available for NetWare servers. These policies include Imaging Server Policy, Workstation Import, Workstation Removal, and RollUp Policy. See Figure 12.3 for a sample of the NetWare policies page.
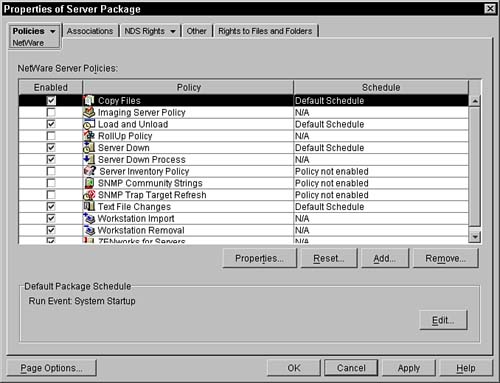
As you can see, the same policies appear in the General and the NetWare policies pages. When you select a policy in the NetWare page, it supercedes any selections made on the General tab. The policies will not be merged; only the platform specific policy is used. For example, if the Workstation Import policy is selected in the General tab and the Workstation Removal policy is selected in the NetWare tab, agents on a NetWare system use the general import policy and the NetWare removal policy is activated.
Within the policies tab you can select the Linux policy page. This page displays the policies that are available for Linux servers. These policies include Imaging Server Policy, Workstation Import, Workstation Removal, and RollUp Policy. See Figure 12.4 for a sample of the Linux policies page.

As you can see, the same policies appear in the General and the Linux policies pages. When you select a policy in the Linux page, it supercedes any selections made on the General tab for that platform. The policies will not be merged; only the platform specific policy is used. For example, if the Workstation Import policy is selected in the General tab and the Workstation Removal policy is selected in the Linux tab, agents on a Linux system use the general import policy and the Linux removal policy is activated.
Within the policies tab, you can select the Solaris policy page. This page displays the policies available for Solaris servers. These policies include Imaging Server Policy, Workstation Import, Workstation Removal, and RollUp Policy. See Figure 12.5 for a sample of the Solaris policies page.
As you can see, the same policies appear in the General and the Solaris policies pages. When you select a policy in the Solaris page, it supercedes any selections made on the General tab. The policies will not be merged; only the platform specific policy is used. For example, if the Workstation Import policy is selected in the General tab and the Workstation Removal policy is selected in the Solaris tab, agents on a Solaris system use the general import policy and the Solaris removal policy is activated.
The Associations Page of the Server Policy Package displays all of the locations in the tree (containers) where the policy package has been associated. These associations do not necessarily reflect where the policy package is located in the directory. The agents that are associated with users or workstations that are in or below those containers have this policy package enforced. The Add and Remove buttons enable you to add or remove containers in the list that are associated with this policy.
The NDS Rights property page is made up of three pages. You can get to each of the pages by clicking on the small triangle to the right of the page name, and then selecting the desired page to be displayed.
These pages enable you to specify the rights that users have to this object in the directory. The following subsections briefly discuss each of these pages. These NDS Rights pages are displayed for every object in the tree.
On this page, you can assign objects rights as trustees of the Server Policy Package. These trustees have rights to this object or to attributes within this object.
If the user admin.novell has been added to the trustee list, this user has some rights to this object. To view the details of any trustee assignment (in order to modify the assignment), you need to press the Assigned Rights button.
When you press the Assign Rights button, you are presented with a dialog box that enables you to select [All Attribute Rights] (meaning all of the attributes of the object) or [Entry Rights] (meaning the object, not implying rights to the attributes).
From within the Assigned Rights dialog box, you can set the rights the object has on this package. You can set those rights on the object as well as any individual property in the object. The rights that are possible are the following:
• Browse—Although not in the list, this right shows up from time to time (especially in the Effective Rights screens). This represents the capability to view this information through public browse capabilities.
• Supervisor—This identifies that the trustee has all rights, including delete, for this object or attribute.
• Compare—This provides the trustee with the capability to compare values of attributes.
• Read—This enables the trustee to read the values of the attribute or attributes in the object.
• Write—This provides the trustee with the capability to modify the contents of an attribute.
• Add Self—This right enables the trustee to add himself or herself as a member of the list of objects of the attribute. For example, if this right were given on an attribute that contains a list of linked objects, the trustee could add himself or herself (that is, a reference to their object) to the list.
If you want to add the object as a trustee to an attribute, you need to press the Add Property button to view a list of properties or attributes available for this object.
From this list you can select a single attribute. This attribute is then displayed in the Assigned Rights dialog box. From there you can select the attribute and then set the rights you want the trustee to have for that property. A user does not require object rights in order to have rights on a single attribute in the object.
Remember that rights flow down in the tree. If you give a user or an object rights at a container level, those rights continue down into that container, and any sub-containers until that branch is exhausted, or another explicit assignment is given for that user in a sub-container or on an object. An explicit assignment changes the rights of the user at that point in the tree. You can also use inheritance rights filters to restrict this flow of rights down into the tree.
This page enables you to set the IRF (Inheritance Rights Filter) for this object. This filter restricts the rights of any user who accesses this object, unless that user has an explicit trustee assignment for this object.
You can think of the IRF as a filter that lets only checked items pass through unaltered. Rights that bump up against an IRF filter are blocked and discarded if the item is not checked. For example, consider a user with write privileges inherited at some point above the current container (they were explicitly granted that right at some container at or above the one they're in). This user runs into an IRF for an object or attribute that has the write privilege revoked (that is, unchecked). When this user gets to that object, their write privilege will be gone for that object. If the object is a container, the user will lose write privileges for all objects in that container or sub-container.
You can effectively remove supervisor privileges to a portion of the tree by setting an IRF with the supervisor privilege turned off. You must be careful not to do this without someone being assigned as the supervisor of that branch of the tree (given an explicit supervisor trustee assignment at the container where the IRF is done). Otherwise, you'll make that part of the tree permanent (that is, you will never be able to delete any objects in that branch of the tree).
ConsoleOne helps keep you from performing this action by showing an error dialog box that keeps you from putting an IRF on the [Entry Rights] of the object without having first given an explicit supervisor assignment on the same container.
The Effective Rights property page enables you to query the system to discover the rights that selected objects have on the object that you are administering.
Within this page, you are presented with the Distinguished Name (DN) of the object whose rights you want to observe. Initially, this is your currently logged in user running ConsoleOne. You can press the browse button to the right of the trustee field and browse throughout the tree to select any object.
When the trustee object is selected, you can then move to the properties table on the lower half of the screen. As you select the property, the rights box to the right changes its text to reflect the rights that the trustee has on that property. These rights can be granted via an explicit assignment or through inheritance.
This page might not be displayed for you, depending on your rights to the plug-in that now comes with ConsoleOne. This page is particularly powerful. People who do not have an intimate knowledge of the schema of the object in question and its relationships with other objects in the directory should avoid using it. The intention of this property page is to give you generic access to properties that you cannot modify or view via the other plugged-in pages. The attributes and their values are displayed in a tree structure, allowing for those attributes that have multiple types (are compound types that consist of, say, an INT and a distinguished name, or postal code that has three separate address fields).
Every attribute in eDirectory is defined by one of a specified set of syntaxes. These syntaxes identify how the data is stored in eDirectory. For this page, ConsoleOne has developed an editor for each of the different syntaxes that is currently available in eDirectory. When an attribute is displayed on this page, the editor is invoked to display the data and then modify it should the user click the specific attribute.
For example, if the syntax of an attribute were a string or an integer, an in-line editor enables the administrator to modify the string or the integer value on the screen. More abstract syntaxes, such as octet-string, require that an octet editor be launched, thus giving the administrator access to each of the bytes in the string, without interpretation of the data.
The danger with this screen is that some applications require that there be a coordination of attribute values between two attributes within the same object or across multiple objects. Additionally, many applications assume that the data in the attribute is valid, because the normal user interface checks for invalid entries and does not allow them to be stored in the attribute. If you should change a data value in the other page, no knowledge of related attributes or objects or valid data values are checked because the generic editors know nothing about the intention of the field. Should you change a value without making all the other appropriate changes, or without putting in a valid value, some programs and the system could be affected.
Rights are still in effect in the Other property page and you are not allowed to change any attribute values that are read-only or that you do not have rights to modify.
This page in the property book is present in all objects in the directory. This property page enables you to view and set rights for this object on the appropriate volumes.
You must first select the volume that contains the files and folders to which you are interested. You can do this by pressing the Show button and then browsing the directory to the volume object. Selecting the volume object places it in the volumes view. When that volume is selected you can then go to the Add button to add a file or folder of interest. This brings up a dialog box enabling you to browse to the volume object; clicking on the volume object moves you into the file system. You can continue browsing that volume until you select the file or directory you are interested in granting rights.
Selecting the file or folder in the lower pane displays the rights that the object has been granted on that file or folder. To modify the rights, you simply click on or off the rights that you want to have explicitly granted for the object.
You can also see the effective rights that the object has on the files by pressing the Effective Rights button. This displays a dialog box, enabling you to browse to any file in the volume. The object's effective rights are displayed (in bold). These effective rights include any explicit and inherited rights from folders higher in the file system tree. Remember that whoever has supervisor rights to the server or volume objects automatically has supervisor rights in the file system.
ZENworks for Desktops 4 can image a workstation and then apply that image back to the original workstation or to other workstations. See Chapter 14, “Imaging a Workstation,” for more detailed information on the functionality of the ZENworks for Desktops 4 imaging system.
The placement of an image associated with an image object in the directory onto a workstation can occur three ways in ZENworks for Desktops 4.
• Booting the workstation with two floppy disks that communicate with the imaging agent on the server.
• Placing a special boot partition on an unregistered workstation that communicates with the imaging agent on the server.
• Placing a special boot partition on a registered workstation and setting the Put an Image On This Workstation On the Next Boot field in the workstation object. (In this case, the image is determined by an image association or the rules in the Workstation Imaging Policy; see Chapter 9, “Setting Up a Workstation Policy Package,” for more details.)
Each of these ways results in the workstation being imaged with the image associated with the workstation, or determined by the imaging agent that resides on the server. The workstation finds the imaging server from the information the administrator specifies—either from an IP or a DNS name for the server. This information is saved on the disks or in the special boot partition.
The imaging policy becomes effective when the workstation is not associated with a workstation object. Because no image is associated with the specific workstation, the imaging server must determine, based on rules, which image to place on the workstation.
This policy enables the administrator to create a set of rules that can govern when a particular image should be used, based on some basic information from the workstation. The imaging server follows the list of rules in the policy until one of the rules is satisfied. The rule that is satisfied results in an associated image that is then applied to the workstation.
The NDS Rights, Other, and Rights to Files and Folders pages are described in the “Setting Up a Server Policy Package” section.
The Imaging Partition page allows you to disable the ZENworks imaging partition if it exists. This is useful when you want to disable imaging because it there is no active imaging occurring on the workstation. For example, you have a one-time image that is applied to a workstation annually in January. You need the partition to remain intact, but you can disable it the rest of the year.
Now that ZENworks for Desktops ships with PXE-enabled software, you can also set the PXE settings for deploying any images. Novell now recommends that the Linux partition on the workstation be removed. Customers should move to the PXE method of image deployment. You can determine whether the PXE menu should appear automatically when PXE is launched and you set the values that appear on the menu.
A PXE menu will display, for example, whether to receive or to take an image.
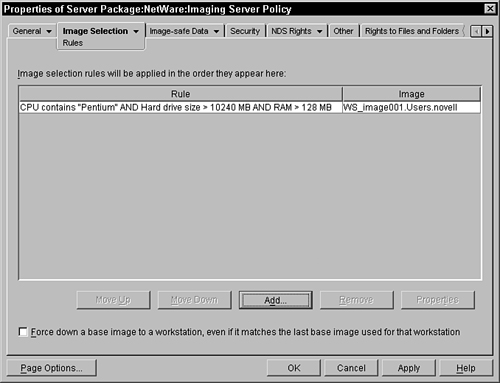
This page enables the administrator to input the rules and associated images that the system uses to determine the image to place on a specific type of workstation. Figure 12.6 shows a sample of this page.
You must first press the Add button to add rules to the list. Once you have added several rules, you can then select a specific rule and change its order in the list, look at its properties, or remove the rule. When you press the Add button, the following screen is displayed (see Figure 12.7).
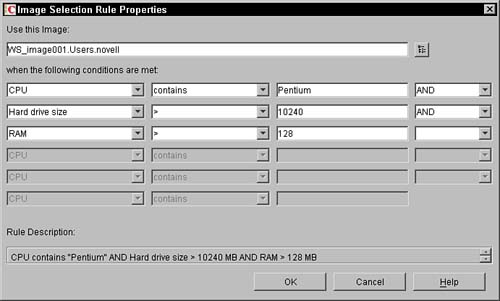
You first press the browse button next to the Use this Image field to browse to an image object in the tree that is associated with an image file on the image server. Once the image object is selected, you can identify the rule that is associated with this image. You can have six key/value pairs at one time.
In the middle of the dialog box, note the six potential equations that you can generate to determine whether the image should be used. The equation is made up of a series of True/False statements that are strung together with AND and OR logic. You construct the statement by filling in the drop-down statements. (The resulting statement is displayed in a more English-like view.)
The logic of the AND and OR operators is strictly left to right in the equation. In the Rule Description box parentheses are added to the equation to help the administrator understand how the rule is evaluated. You cannot insert the parentheses; they are automatically inserted as part of the explanation of the equation and are not under user control.
You first select the key you want to examine by selecting the key via a drop-down dialog box. The keys that you can choose from are the following:
• Chipset—This displays the reported processor. An example is Genuine Intel Mobile Pentium MMX 233 MHZ.
• Video—This captures the type of video adapter that is in the workstation. An example of this would be Trident Cyber9397 (rev 243).
• Network—This is the network adapter for the workstation. An example would be 3Com.
• Sound Card—This is the sound card that has been reported. Often this field results in no sound card being detected. This is because the system sends out a PCI request; if no sound cards respond, you get this even though a sound card is present.
• Hard Drive Controller—This is the type of hard drive in the system. If the hard drive is an IDE device, the value for this field is IDE. If the hard drive is a SCSI device, you get the reported name of the device, such as FUJITSU MHJ2181AT.
• MAC Address—This is the MAC address of the network card. An example of this value is 00 60 80 03 C2 E7.
• IP Address—This is the assigned IP address of the workstation. This is reported as the traditional 137.65.237.5.
• Hard Drive Size—This reports the disk size in number of megabytes. Therefore, an 8GB hard drive would be reported as 8192MB. The imaging system might not always report the full disk capacity. Use a wide boundary when generating your rules. For instance, if you want to look for an 8GB drive, use the statement Hard drive size > 8000 MB.
•
RAM—This is the reported amount of RAM in megabytes. This is reported as 64MB. This field also might not always report the exact amount of RAM space that you would expect on your workstation. It is advisable that you use a wide boundary when generating your rules. If you want to look for 16MB RAM, for example, use the statement RAM > 15MB.
When the workstation is booting the imaging system, it is in reality booting up the Linux operating system and running the tools that are included in the imaging system. The values for the keys described previously are values that the Linux system can report to the software. In order to discover what a system reports to Linux, you need to boot a sample workstation with the Imaging system boot disk and run the Img information command. This displays the information that is sent to the image server about the workstation. This information is the data values that you put into the key comparison equations for your rules. You can also get this information from an image by opening the image in the ZENworks image editor and choosing properties on the image root. See Chapter 14, for more detailed information on the functionality of the ZENworks for Desktops 4 imaging system.
The next part of the equation specifies the operator. Two types of operators exist: string and integer operators. The hard drive size and RAM fields are treated as integers, whereas all of the other fields are treated as strings where a case-insensitive string compare is done to determine operator results. The string operators are contains, doesn't contain, begins with, and equals. The integer operators are =, <>, >, >=, <, and <=.
These operators perform expected comparisons between the key value supplied by the workstation to the imaging server and the value that you place into the value field of the equation. The following meanings are placed with each operator:
• Contains—The specified value is a substring anywhere in the reported value.
• Doesn't Contain—The specified value is not equal to or contained in the reported value.
• Begins With—The specified values are represented in the initial character of the reported value.
• Equals—The specified value is the same as the reported value.
• = (equals)—The specified value is numerically equivalent to the reported value.
• <> (not equal)—The specified value is not equal to the reported value.
• > (greater than)—The specified value is greater than the reported value.
• >= (greater than or equal to)—The specified value is numerically equal to or greater than the reported value.
• < (less than)—The specified value is less than the reported value.
• <= (less than or equal to)—The specified value is numerically less than or equal to the reported value.
The next field in the operation is where you enter the value that you want to compare. The far right field enables you to extend the operation to additional key/value comparisons. Your choices currently are AND and OR.
The Boolean operators are evaluated strictly from left to right. For example, if the following rules were entered into the policy, the resultant evaluation would be (hard drive < 600MB AND RAM < 16MB) OR (RAM > 31MB).
-
Hard drive size >= 600MB AND
-
RAM < 16MB OR
-
RAM > 31MB
This would result in giving the image to any system that has a disk smaller than 200MB with less than 16MB of RAM. This would also give the image to any system that has more than 31MB of RAM regardless of the size of the hard drive.
You can view the precedence of the equation, complete with parentheses, on the bottom half of the screen as you introduce new key/value pairs into your rule.
Once your set of key/value pairs has been entered and you have reviewed your equation at the bottom of the screen, you press the OK button to include the rule into the imaging system, and you are returned to the original Rules page with the rule that you had entered on the screen.
Once again, from this page, after you have entered some rules you can then specify the order in which the rules are evaluated. After selecting a rule you can move that rule in the order by pressing either the Move Up or the Move Down buttons. As the imaging server is evaluating the rules, the first rule that results in a TRUE evaluation results in that image being supplied to the workstation.
This page allows you to specify whether the imaging server determines whether the workstation should take part in a multicast session prior to checking the image selection rules within this policy. If the check box is checked, the imaging server will check the image selection rules prior checking its multicast sessions.
The Image-Safe data page is composed of three pages. These pages represent information and data that is placed or retrieved from the system regardless of the image that is used. The following depicts the pages that are available by selecting the small triangle drop-down menu on the tab.
The Image-Safe Data agent can be placed on the workstation. This agent has the responsibility of moving data between a special sector on the disk that is used to store configuration information such as IP address or DHCP configuration along with workgroup information. This information on the disk is not affected by an image taken or placed on the drive.
When the Image-Safe Data agent runs on the workstation it makes sure that the information in the special sector and the operating system are synchronized properly. For example, following an image placement, the agent moves the data from the disk into the operating system, setting up the DHCP and computer name. On a workstation that has not just been imaged the agent moves the information from the operating system into the sector on the disk so the data can be restored should a new image be placed on the drive. Should the agent not run, the workstation would be an exact mirror of the image (with the same IP and computer name configuration).
The Image-Save Data configuration page enables the imaging server to pass this configuration information to the agent via this disk sector.
The IP Assignment Log page displays the IP addresses that the imaging server has assigned to any imaged or re-imaged workstations. The set of available IP addresses can be set in the IP Configuration page.
The IP Assignment page displays the log of the assigned addresses.
This page can also be used to place an IP address back into the pool of available addresses. If you have an address that you want to place back into the pool, you can select it in the log list and then press the Remove button.
Warning
When you remove a specific IP address it might not be properly represented in the IP Configuration range and therefore cannot be reused.
If you have specified a range to be the set of IP addresses that you will make available for workstations, when the imaging server uses a portion of the range (at the ends), the range is refreshed on the configuration page. For example, if the range 123.65.234.1 … 123.65.234.100 were in the configuration and IP address 123.65.234.1-10 were assigned, the range would be changed to 123.65.234.11 … 123.65.234.100. Consequently, when you go to the log page and free up IP address 123.65.234.10, the range is not reconfigured and the freed IP address is not reassigned. You must manually go to the configuration page and modify the range to include the addresses that you have freed.
The IP Configuration page enables you to specify whether the workstations that are imaged by the imaging server will obtain their IP address from a DHCP server or via a static assignment that is done as part of the imaging process.
If you select the DHCP option, the windows system gets the IP addresses from a DHCP server. If, however, you select that you want to specify an IP address, the other fields on the page are activated.
To specify a static IP address, you must first enter the subnet mask and default gateway that you want all of your imaged workstations (imaged via the image server using this particular policy) to receive. You must also specify the range of IP addresses that are used by the imaging server and assigned uniquely to each of the imaged workstations. You specify the set of IP addresses by using the Add and Add Range buttons.
When the imaging server receives a request for an image, the IP address information is transmitted and assigned to the workstation. That address is then logged in the imaging server and not reused for another workstation.
To remove any address or ranges from the possible set, select the item and press the Remove button. These addresses will no longer be in the pool of available addresses for the imaging server to assign.
In the Windows Networking page, you can specify the computer name for the workstation and the workgroup for the system.
The computer name prefix that you enter in the field (maximum of seven characters) is prepended to a randomly generated set of characters and numbers to construct the final 15-character computer name for the workstation.
The Make the Computer a Member of the Following field enables you to specify the workgroup that you want for the workstation. You select which you prefer by selecting the field and entering the workgroup name.
This page allows you to specify the DNS suffix and name servers used by this policy. Simply type the suffix you want to use and then click the Add button to specify the addresses of name servers. It is important to use the correct suffix and name servers for the ZENworks for Desktops imaging engine to process imaging operations on a workstation.
As part of the imaging system, you can request that the workstation have an image taken of itself and placed onto the server. This is done by checking some fields in the workstation object (See Chapter 14, for more details), which causes the workstation to take an image of itself on its next reboot.
When the workstation takes an image of itself, or when an image is taken when a request is made through the Linux boot system, the image is transmitted to the image server. This image server then receives the .ZMG file and places it in the path that was specified. To protect the system from overwriting any files or by having users place the image files into inappropriate directories, the imaging server takes the information in the security page and restricts the placement of the image files.
When you check the Allow Imaging to Overwrite Existing Files When Uploading option, you are enabling the system to overwrite any files that have the same name as the one specified by the user, with the name of the image file.
The Restrict Uploads to the Following Directories check box activates the requirement that all requested uploads must specify one of the directories identified. If the directory portion of the destination path, specified by the user, does not match one of the directories specified in the list on this page, the request to store the uploaded image is refused. To add paths to the list of accepted destinations, press the Add button and enter in the path that is acceptable.
Paths in the directories can be one of the following formats:
Driveletter:path
Volumepath
NTSharepath
The system does not, for example, take any UNC path. When the user enters the location of the file, this information transmits to the imaging server, and the server compares the directory portion of the path given with all of the strings in this list. If a match occurs (that is, the directory is listed), the operation is accepted and the image is taken and stored; otherwise, the operation fails and the image is not taken.
In previous versions of ZENworks for Desktops when a workstation registered with the tree, it would place a cookie into the container of the user. Then the administrator had to execute an import program on their workstation to take these registration records and create workstation objects. These workstation object DNs were then communicated back to the workstation via the same registration/reboot process. If your system was very large, it could become very uncomfortable having to keep running the import program. Often administrators got creative and scheduled the import process to run as a scheduled action on their workstations.
In ZENworks for Desktops 4, this is no longer necessary. A service that now runs on a NetWare or Windows server automatically receives these requests and immediately creates the workstation object. Once the object is created it returns the DN to the workstation. The workstation no longer needs to perform a reboot in order to get its registered workstation DN. In order to perform these actions, the import service must be running on the server and must be accessible using the DNS name of zenwsimport through the local host file on each workstation or via a DNS service. Additionally, the import service must have rights in the directory to be able to create the workstation objects. The pages in this policy enable you to grant these create rights to the import service, to specify how to name the workstation objects and in which container to place the objects, and to limit the number of requests that can be satisfied (to keep the system from overloading a server).
The import service can also be configured to ignore the first N requests from a workstation before it creates a workstation object. This can be useful if the workstation needs to pass through several hands to get properly configured and tested before it is actually given to the final user. This is to help this process settle before the workstation object is actually created.
Note
Your desktops do not import automatically if the workstations are finding a ZENworks 2 search policy in the tree. They must see either no search policy or a ZENworks for Desktops 4 search policy in order to activate the automatic workstation import and other ZENworks for Desktops 4 features. See Chapter 3, “Setting Up ZENworks for Desktops 4 in Your Tree,” and the section, “Setting Up the Workstation in the Tree” for more information.
The following sections describe each of the pages found in the Workstation Import process. The NDS Rights, Other, and Rights to Files and Folders pages are described in the “Setting Up a Server Policy Package” section.
This page enables you to grant rights to the import service to containers where they must create workstation objects. When you add a container to the list, the system grants rights to the policy object. When the import service needs to perform an import it logs in as the policy being used, enabling it to obtain rights to create workstation objects in the specified container.
The process of adding and removing containers is familiar. You press the Add button and then you are presented with a dialog box that enables you to browse through the tree to select the container you desire. Once selected, the container is added to the list and the import service is given a trustee assignment to that container and given the rights to Browse and Create objects.
To remove a container from the list, select the desired container and press the Remove button. This removes the trustee assignment that was given to the service and deletes it from the displayed list.
The Platforms page enables you to specify the naming of the workstation objects, the location of the object in the tree, and any workstation groups of which you want the workstation objects to be a member. This can be specified for each of the following categories: General, WinNT/2000 (including Windows XP), or Win 9x (for example, Windows 95/98).
Each of the pages within these categories is identical, with the exception that on the non-general pages you have the additional field: Enable Platform Settings to Override General Settings. When this field is checked, the platform-specific configuration parameters are used rather than the general ones. This chapter discusses the general pages because they apply to all of the other platform pages.
Figure 12.8 displays the first general page that is available.

Each page has three tabs that enable you to configure separate options of the import policy. These tabs are Location, Naming, and Groups. Each of the following subsections discusses these tabs.
This page enables you to identify the container in the tree that should hold the workstation object when it is created during the import process. Figure 12.8 displays this screen.
The Allow Importing of Workstations flag enables you to import workstations from this user. Once this flag is activated, the other fields of the page are usable.
The Create Workstation Objects in drop-down box allows the administrator various options for locating the container in which to place the workstation objects. The options are as follows:
• Server Container—This option is new to ZENworks for Desktops 4 and when selected tells the system to place the workstation objects in the same container as the server that is running the import process.
• User Container—This signals that the container that holds the user object, of the user who had logged into the system when the registration of the workstation occurred, is the container that also holds the workstation object. Remember it is the first user who connects to the system (after the number of ignored connections has passed) that has the association to the workstation. You can specify a path relative to the user's container. The path field is constructed by entering a relative path. This relative path is constructed by a series of dots and container names. For each dot in the path, the system moves up one level from the associated object container. For example, the path of ..Workstations tells the system to go up two levels and then in a container called Workstations at that level. If you want an alternative user, you must run the un-registration tool described in Chapter 14.
• Associated Object Container—This signals that the container that has the policy package associated with it is used as the starting container to place the workstation object. If a path is specified, the associated container is used as the base and the path is considered a relative path. The path field is constructed by entering a relative path, as described previously.
• Selected Container—This identifies that the specified path is an absolute container path in the tree. The Path field is required with this selection and must identify the specific container that will hold the workstation object.
On this page, you can describe how the import process should use the information in the registration to craft the name of the workstation object.
The Workstation Name field displays the final combination of registration information that is combined into the name. In the previous example, the workstation object name is the computer name followed by the MAC address. This is confirmed by the fact that the workstation name field has Computer+MAC Address. If the computer name was Rtanner and the MAC address of the NIC card were 12345, the workstation object name would be Rtanner12345.
The Add Name Fields and Place Them in Order field displays the various components that form the workstation name. Each line that is displayed in this field represents a value that is part of the name. The order of the lines from top to bottom represents the order that they appear in the name. The options that can be placed in the names are as follows:
• <User Defined>—This represents an administrator defined string. When this field is chosen, the administrator is prompted to enter a string into the dialog box. This string is placed into the name. This can be any combination of standard ASCII visible characters including white space characters.
• Computer—This represents the computer name that was given to the computer usually during installation of the operating system.
• Container—This represents the name of the container into which the workstation object is placed. This name is then included in the workstation name.
• CPU—This value represents the CPU type of the machine. The possible values are 386, 486, and PENTIUM.
• DNS—This represents the DNS (Domain Name Services) name of the computer.
• IP Address—This represents the IP address of the machine when it is first registered with the tree. In previous versions of ZENworks for Desktops this was retrieved through the Network Address request and a preferred protocol set to IP.
• MAC Address—This represents the address of the machine when it is first registered with the tree. In previous versions of ZENworks for Desktops this was referred to as the network address.
• OS—This represents the operating system type of the machine. The expected values would be WINNT, WIN95, for example.
• Server—This represents the name of the current server. If the user login has not occurred, and the preferred server has not been done, this server could simply be the first server that responded with a connection. In WINNT systems, where the registration is running as part of a service, this server is the first server to respond to the request for the connection and not necessarily the preferred server of the user.
• User—This is the login name of the user who was connected to the tree when the registration process first executed.
As an example, assume that a workstation had been registered with the following values:
CPU = PENTIUM
DNS = zen.novell.com
MAC address = 00600803c2e7
IP address = 137.65.61.99
OS = WINNT
Server = ZENSERVER
User = rtanner
Computer = RonComputer
Then, if you were to administer the workstation import policy with the following naming attributes, the corresponding workstation name would be created, assuming pieces that are in quotes are a user-defined string:
UserOS = rtannerWINNT
DNSCPU = zen.novell.comPENTIUM
User" "MAC Address = rtanner 00600803c2e7
You must remember that these values are only used at workstation object creation time. Once the object is created its name never changes. So if you replace the NIC card, although the address of the workstation changed, the name of the workstation does not change; if the name includes the NIC address, the workstation retains the name with the old NIC address.
The Workstation Groups page enables you to specify into which groups you want to place the workstation object when it is created. By placing the workstation object into a specific group you can automatically provide policies or rights to the workstation by group associations.
In the Workstation Groups page you can add and remove groups in the list and the workstation will be placed in as a member of each group. The following describes the behavior of each button on the screen:
• Add—Press this button to add a group to the list. A dialog box enables you to browse the tree to identify the group. You browse the tree in the right pane and select the group in the left pane. Once a group is selected it is added and displayed to the list.
• Remove—This button is activated when a group in the window is highlighted (by pressing the left mouse button) when the cursor is over the desired group. When a group is selected and this button is pressed, the group is removed from the list.
• Remove All—This button removes all groups from the list and cleans the set from consideration.
Remember that this policy is only activated when a new workstation is imported into the tree. If a workstation that was created with this policy is associated with a group and you go into the import policy and change the group memberships, the workstations that have already been created retain their group memberships. Only the new workstations created after the change are affected.
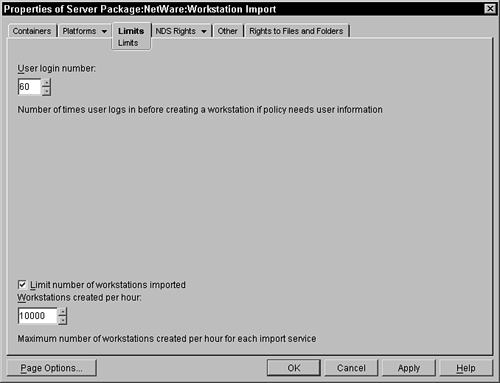
On the Limits page you can have some control over when a workstation automatically registers and how the import service on the server behaves. The intention of these fields is to ensure that the performance of the service does not consume a significant amount of processing on the server.
The first portion of the page, the User Login Number field, enables you to configure how many times the workstation must be used (a user logs into the network via that desktop) before it is registered into the tree. This option is useful when your desktops must pass through several hands (that may connect to the tree) before they get to the final user destination. Each time the workstation is used and a user is connected to the tree (or the Workstation Manager agents connect to the tree), the workstation communicates with the workstation import and requests a workstation object. If the number of login times has not been consumed, the service reports that one is not created, and the workstation continues. This repeats until the number of login times has occurred, whereupon the service creates the workstation object and returns the DN of the workstation object to the workstation. The desktop then records this DN in its Registry.
The user login count is kept in the workstation Registry and is transmitted to the import server, which checks it against the policy. If the count is greater than the policy, the import is performed. This count on the workstation is not reset if the policy changes.
Limiting the number of workstations imported enables the administrator to throttle the number of workstations that are created. This keeps your NDS from overloading with a tremendous amount of objects and having to synchronize them around your tree. Imposing this limit forces the service to only create the specified number of workstations in an hour. As soon as the maximum has been reached within the hour, the workstations are told to proceed without a workstation object. The next time they log into the network, and the maximum has not been exceeded, the service creates a workstation object for them.
Along with the capability to automatically create workstations in the tree, ZENworks for Desktops 4 provides an automated way to remove expired workstation objects from the tree. This is to keep the tree from being cluttered with workstations that are no longer associated with any physical device.
Each time a workstation is used and it has been registered in the tree, a service visits the workstation object and timestamps the last visit into the workstation object, along with refreshing several other pieces of information in the workstation object. This timestamp is what the Workstation Removal service is looking at when it determines whether the workstation should be removed.
The following pages enable the administrator to configure how the system removes these expired workstation objects. The NDS Rights, Other, and Rights to Files and Folders pages are described in the “Setting Up a Server Policy Package” section.
This page enables you to grant rights to the removal service to containers where they must remove workstation objects. When you add a container to the list, the system grants rights to the policy object. When the removal service needs to perform and delete a workstation object it logs in as the policy being used, enabling it to obtain rights to remove workstation objects in the specified container.
These containers are the only ones that the service monitors for stale workstation objects.
The process of adding and removing containers is familiar. You press the Add button and then you are presented with a dialog box that enables you to browse through the tree to select the container you desire. Once selected, the container is added to the list and the import service is given a trustee assignment to that container, and given the rights to Browse and Delete objects.
To remove a container from the list, select the desired container and press the Remove button. This removes the trustee assignment that was given to the service and deletes it from the displayed list.
This page enables you to specify how stale a workstation object must be before it is considered for removal. Figure 12.9 shows a snapshot of a sample limits page.
You can use the up and down buttons to specify the number of days the workstation should not be connected with a device before it is considered for deletion. Once the timestamp in the workstation object is older than the specified number of days on this page, the removal service deletes the object from the directory.
This page enables you to identify how often and when the workstation removal service should run on the server.
On this page, you can identify the following configuration schedules:
• Year—This is the year to begin the launch of the removal service.
• Date—This is the calendar date with the above year when the removal service will be launched.
• Start Time—This is the time of day when the removal service is available to run.
• Duration—This enables you to specify how long, after the start time, the removal service should run.
• Repeat Interval—This enables you to specify how often after the initial start date the removal service should re-run and be made available.
• Limit Number of Workstations Removed—This enables you to specify in the session value the maximum number of workstations that should be removed while the removal service is available. When this maximum is reached, the service quits removing workstations until the next specified execution time. This is to keep from consuming a significant amount of processing cycles for DS to refresh the partitions where the removal has occurred.
The service, when started, calculates based on the start date and how often it should come alive (interval) and which day it should work. If today's the day, the service begins its workstation removal work. This is done so that even if the server needed to be rebooted, the service would still properly calculate the day it should run and not rely on being up the number of days in the interval.
The Roll-Up Policy dictates to the services that are running on a specific server where they should roll-up or transmit the inventory information that they have received from the various workstations. By doing this, the system provides the capability to receive local inventory information and then move it up in the tree hierarchy, consolidating inventory information from various remote locations, and constructing a more centralized database of inventory information (see Chapter 13, “Using ZENworks Workstation Inventory,” for more detailed information).
When the inventory system is installed into the network, the system creates service objects that govern the behavior of the agents that are working on each of the inventory servers. These agents also respond to this policy to understand to which service agent they should transmit their inventory information. All service agents that are associated with this policy transmit their inventory information to the same target agent.
The NDS Rights, Other, and Rights to Files and Folders pages are described in the “Setting Up a Server Policy Package” section.
Figure 12.10 shows a sample of this page.
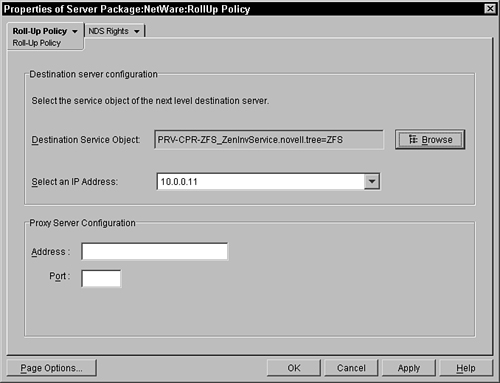
As you can see in Figure 12.10, the policy simply requests the object DN of the service where the associated agents should transmit their inventory information. The local agents can keep a copy of the inventory data, if they are a designated database gathering location, but they still transmit an additional copy if they are configured to do so.
In this policy, you press the browse button to the right of the field and browse the tree to select the service object of the inventory agent that you want to receive the information.
The roll-up policy is only read by the service manager agent upon startup and then every 1000 minutes (this is not configurable). So if the policy change needs to be immediately effective, the service manager agent on the server must be stopped and restarted.
The Wake-on-LAN policy allows you to manage which managed workstations are controlled by the Wake-on-LAN service. The Wake-on-LAN service allows you to wake up a managed workstation or a set of managed workstations when activity on the LAN is detected. From the Wake-on-LAN policy page, you can specify objects from the following list of targets:
• Containers—All workstations in a Country, Locality, Organization, or Organizational Unit.
• Workstation—A specific workstation object.
• Workstation Group—All workstations associated with a specific workstation group object.