
Chapter 3
Hello World
• Writing text to the screen
• Understanding profiles
• Binding values
In this chapter you will start writing JavaFX script. This is where all the prerequisite work from the previous two chapters begins to pay off. All of the time and effort you put into learning the basics in the first two chapters will help you master the JavaFX script nodes introduced in this chapter.
The best part of learning a new language is getting to express your thoughts and visions in a new and exciting way. That is exactly what you will be doing in this chapter. You will learn how to start taking things you may (or may not) know how to do in other languages and bring them to life in JavaFX Script.
Writing to the Screen
The most common form of human expression is the use of words. The main method of communicating your ideas to others is through words and sentences. We are bombarded with information via words every day. When you are listening to music, driving in your car, surfing the Web, or developing code, you are using and digesting words. Whether the words are spoken or written, like the ones you are reading right now, the best way to get a point across is to use words.
For this reason, the first thing you will learn how to do in this chapter is to write text to the screen using JavaFX Script. Chances are, no matter what type of applications or rich environments you want to create in JavaFX, you will need to write some form of text to the screen. Writing text to the screen is a common, everyday task in development. Therefore, let’s start writing text using JavaFX.
To begin, open NetBeans to the project you created in Chapter 1. Using the steps you have already learned, create a new empty JavaFX file and name it Chapter3. We will use this file for all the exercises in this chapter.
For a refresher on creating a new empty JavaFX file, review Chapter 2.
Using the Projects frame, navigate to and open Chapter3.fx (that is, if it does not open automatically for you). In this section you are going to insert some additional comments, create a new Stage and a Scene, and add some text. You are going to discover that with just a few lines of JavaFX Script, you can write anything you want to the screen.
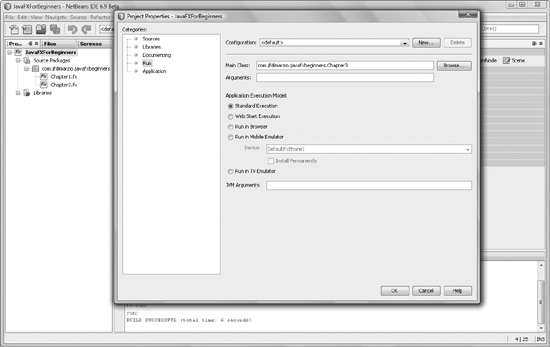
After you add the Chapter3.fx file, you should tell NetBeans that this is your new Main class. Doing so will tell NetBeans to start this file when you compile. To set Chapter3.fx as your Main class, right-click your project name in the Projects frame and select Properties | Run and then set the Main Class: property as shown in Figure 3-1.
Adding Some Descriptive Comments
Your new script file should contain the following code:
package com.jfdimarzio.javafxforbeginners;

/**
 * @author JFDiMarzio
 */
Before you begin coding, you should add some descriptive beginning comments, as described in Chapter 2:
 /*
 * Chapter3.fx
 *
 * v1.0 - J. F. DiMarzio
 *
 * 5/3/2010 - created
 *
 * First JavaFX Text sample - HelloWorld
 *
 */
The comments are now complete. You will easily be able to recognize the purpose of this script’s contents in the future simply by reviewing your comments. This will ensure that if you ever need to refer back to any of the code discussed in this chapter, you will be able to locate it with ease.
Adding the Stage and Scene
You learned about adding Stages and Scenes in Chapter 2. This project will need a Stage, so you need to add one to your Chapter3.fx script for this lesson. Keep in mind that the Stage will hold your Scene, and your Scene will hold the text you want to write to the screen.
The Stage can be added to your script using the Palette. You can insert the Stage by double-clicking the Stage snippet in the Applications section of the Palette. This is the same tool you used in Chapter 2 to insert the sample Stage.
Change the title of your Stage from “MyApp” to “Hello World” (as seen in the following code sample). Changing the title sets this Stage apart from the one used in the last example, and provides it with a more logical reference.
Stage {
      title : ″Hello World″
      onClose: function () {  }
      scene: Scene {
             width: 200
             height: 200
             content: [  ]
      }
}
If you run your JavaFX application as a Desktop application, the “title” you provide for the Stage is also the window title. Therefore, it will be displayed at the top of the window while the window is open.
This code creates a blank Stage named “Hello World” that contains a Scene that is 200 pixels across and 200 pixels high. We are going to leave the dimensions of the Scene at 200×200 for now. You will be changing the dimensions later in this chapter.
Feel free to run your application and wonder at the amazement that is a blank screen. You have several different methods for running your application. For example, you can click the green arrow (on the menu bar), press F6, or select Run | Run Main Project from the menu bar. (Note that clicking the green circle with the arrow on it in the menu bar will run the Chapter2.fx application because it is the last application you ran.)
An intrepid developer may have noticed an option close to all of the “Run” options, labeled “Debug” or “Debug Main Project.” An even more intrepid developer may have clicked Debug and saw that it launches the application like Run does. In fact, Debug is a much more powerful tool than Run, and it allows you step through each line of your code as it runs. For the purposes of this chapter, you should just be using one of the Run options and not worrying about Debug.
Now let’s add some text to this Scene.
Adding Some Text
Anything you want to display to the screen in JavaFX, for these examples, needs to be placed in the content of your Scene. The Scene node is used to hold and display other nodes. Therefore, to display a Text node (for this chapter’s example), you will need to write the Text node to the Scene’s content.
TIP
When discussing the Scene’s content, I am referring to the content attribute of the Scene node.
You are going to use the Text snippet from the Palette to add text to your application. The Text snippet contains the code to create a Text node and four basic attributes that are needed to get you started.
The first step to adding a Text node to your Scene is to place your cursor inside the square brackets—that is, between [ and ]—after the content attribute of the Scene. By placing your cursor here, you are telling NetBeans that this is where you want to insert the Text node. NetBeans will always add snippets to the location of your cursor.
Next, expand the Basic Shapes section of the Palette. This section contains a number of shape nodes, one of which is the Text node. Double-click the Text node to insert the snippet into the script.
Once the snippet has been inserted into your script, you will notice that the value for the font’s size attribute is highlighted. NetBeans will auto-highlight any values within a snippet that need to addressed, as shown in Figure 3-2.
Type the value 26 in the space highlighted by NetBeans. This will change the size of the font used by the Text node. The font attribute takes a Font node as its value. The Font class contains attributes specifically related to the size, style, and color of the font assigned to the Text node. This allows you to have multiple Text nodes in the same application with different fonts. Conversely, it is conceivable that you can assign the same font to multiple Text nodes using advanced programming techniques.
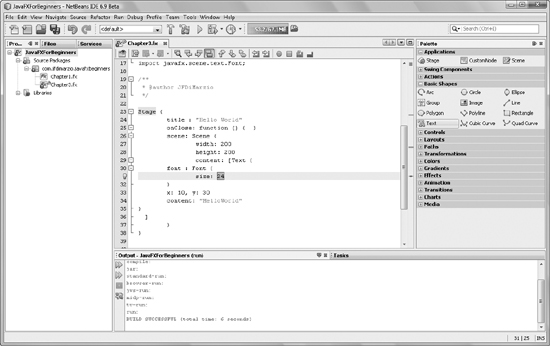
Figure 3-2 Highlighted snippet value
If you were to create and add a Text node manually (without using the Palette menu), you would also need to specify and set the name-value pair attributes manually. One advantage to using the Palette menu is that it forces you to assign values to the more critical attributes, thus ensuring that you have a fully functional node.
After you have entered the value for the font size, press the ENTER key. NetBeans will automatically navigate to, and highlight, the next attribute that needs to be addressed. The values for x and y need to be entered. You can accept the default values of 10 for x and 30 for y by pressing the ENTER key and moving past these values.
The x position and y position indicate the location within the application where you want the text to appear. This position is relative to two points: the top-left corner of the text and the top-left corner of the application window.
NOTE
The x and y positions refer to the Cartesian coordinate axes of X and Y. The X axis is the width whereas the Y axis is the height.
Therefore, a position of x10 and y30 would place your text 10 pixels from the left edge of the application window and 30 pixels down from the top. If you are not familiar with the Cartesian coordinate system for user interface layout, do not worry. You will pick up a lot of practice placing objects on your applications using their related x and y coordinates.
NOTE
The x and y coordinate values are always written out using a lowercase x and a lowercase y. Do not confuse these with any variables named x or y that you may see in your code.
The final attribute that is supplied for you when using the Text snippet is the content attribute. It contains the actual text you want to display in your application. NetBeans has supplied the default text of “HelloWorld”. Simply press enter again to accept this default.
The Text node can accept many more attributes than those listed here. However, these elements represent the minimum of what is needed to create a usable Text node in your application. The Palette forces you to use these four attributes by assigning default values to them and allowing you to change those default values if needed.
With the snippet inserted, your code should look like this:
/*
 * Chapter3.fx
 *
 * v1.0 - J. F. DiMarzio
 *
 * 5/3/2010 - created
 *
 * First JavaFX Text sample - HelloWorld
 *
 */

package com.jfdimarzio.javafxforbeginners;

import javafx.stage.Stage;
import javafx.scene.Scene;
import javafx.scene.text.Text;
import javafx.scene.text.Font;

/**
 * @author JFDiMarzio
 */

Stage {
      title : ″Hello World″
      onClose: function () {  }
      scene: Scene {
            width: 200
            height: 200
            content: [Text {
                       font : Font {
                            size: 26
                             }
                      x: 10, y: 30
                     content: "HelloWorld"
                    }
                ]
           }
}
You have now inserted all the code needed to write the default phrase “HelloWorld” to the screen. Read through the preceding code carefully and you will see that the Palette also inserted the necessary import statements to support the new block of code.
NOTE
On its own, the JavaFX script file has no idea what Text{} means or what to do with it. Code needs to be imported to tell the compiler what the content type of Text{} refers to. Therefore, the import statements that are added by the Insert Template: Text Wizard are necessary for your application to run.
Most nodes you add to a script file will need to be accompanied by a corresponding import statement directing JavaFX to the definition of the node you wish to insert.
Run your project once again. You will see an application window like the one shown in Figure 3-3.
Right now your Run profile is set to <default>. For NetBeans, the default Run configuration executes your code as a Desktop application using the desktop profile. Replace “HelloWorld” with {__PROFILE__} as the Text content value, as follows:
Stage {
      title : ″Hello World″
      onClose: function () {  }
      scene: Scene {
             width: 200
             height: 200
             content: [Text {
                        font : Font {
                              size: 26
                              }
                        x: 10, y: 30
                       content: ″{__PROFILE__}″
                     }
                    ]
      }
}
NOTE
There are two underscores before and after the word PROFILE.

Figure 3-3 Hello World application
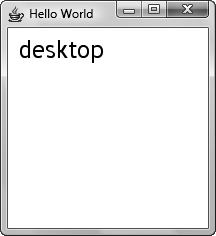
Figure 3-4 The desktop profile
This will tell JavaFX to print out the name of the profile that the application is running under. Run your script again and you should see the word “desktop”, as shown in Figure 3-4.
JavaFX is capable of running under four different profiles. Let’s modify the Run configuration to see how JavaFX runs.
To change the Run configuration, click the drop-down list to the left of the Run menu bar icon and select Customize. This will open the Project Properties window, as illustrated in Figure 3-5.
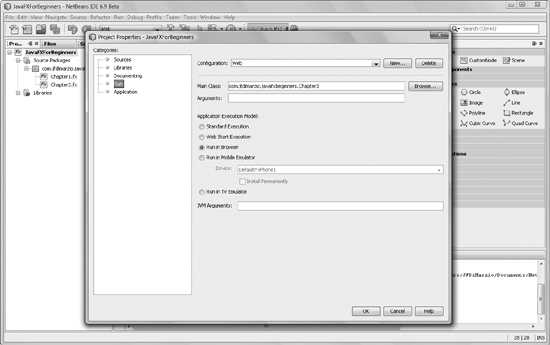
In the Project Properties window, click the New button next to the Configuration option. This will create a new Run configuration for you to use. You will name this configuration Web.
After you have named the configuration, locate the property section Application Execution Models. You need to select Run in Browser to tell NetBeans to use the browser profile when running your project. Click the OK button to accept your configuration change.
Select the Web Run configuration from the drop-down list and press F6. You will see a window like the one in Figure 3-6.
Notice that the text of the window now reads “browser”. JavaFX is displaying the value of the {__PROFILE__} constant, which is now the word browser. The JavaFX profile constant can be used to identify which profile your application is running under.
Open the drop-down list once more and select Customize. Create another new configuration named Mobile, as shown in Figure 3-7.
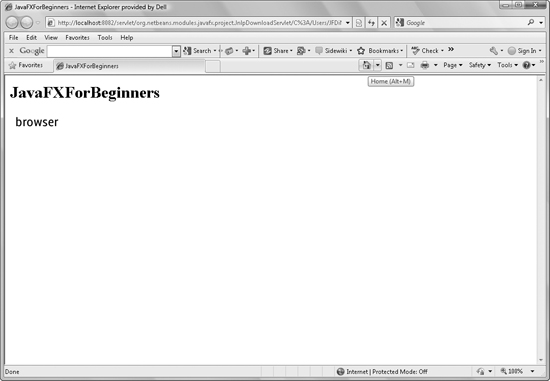
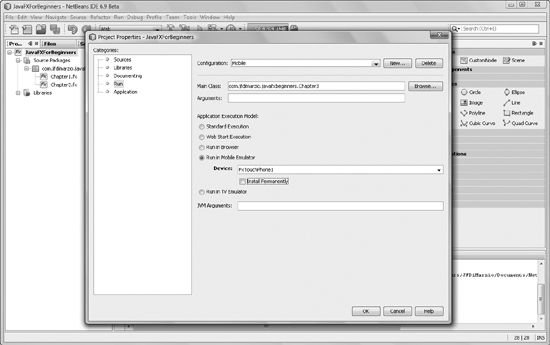
Figure 3-7 Creating a Mobile configuration
Select the Run in Mobile Emulator application execution model and then click the OK button. Run your application again using the Mobile profile. The results are shown in Figure 3-8.
Notice this time that text reads “mobile”. Again, the profile constant has identified which profile you are running under.
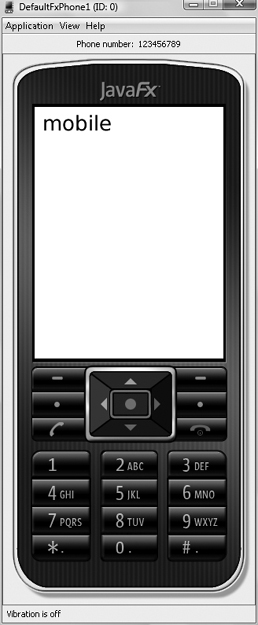
Figure 3-8 Running in the Mobile Emulator
Try This Create a TV Run Configuration
Try making the last Run configuration on your own. Using what you have learned in this section, create a Run configuration named TV that runs in the TV Emulator.
When running your application in the mobile phone emulator, you will notice that there is no title bar obstructing the text. Unlike the applet, where a band of text remnants was visible “floating” on the page, the text on the mobile phone emulator is only obstructed by the top of the phone’s screen.
It is important for you to explore the differences between the Run configurations available to you and your applications. Looking at how all three of these Run configurations display your text (and other nodes) will allow you to alter your scripts as needed and create the best rich environments for your users.
You should now congratulate yourself. You have just mastered one of the two basics skills in learning JavaFX. You possess the root knowledge needed to place a node in your script and display it to the application window. Although on the surface it may seem like you just displayed some simple text to the screen, the process you followed in doing so will be used throughout this book when working with most other JavaFX nodes.
In the next section of this chapter you will learn how to add functions to your scripts. These functions will help you change the behavior of your node attributes.
Adding a Function
After having learned about adding nodes to your script, you may be left wondering about how these simple nodes can be used to make rich interactive environments. The truth is that nodes such as Text and Scene are just a very small part of the overall JavaFX experience.
One way you can add some power to your JavaFX applications is by using functions. Functions are defined blocks of code that can perform a complete task and pass a result to the calling code. The advantage to using functions in your scripts is that they give you more power and more control over the capabilities of your application.
A Script Function Primer
A Script function is defined outside of the class definition and can be called anywhere inside your script. This means you can create a function to perform a specific task and call it from anyplace inside your script file, any number of times.
Think of a Script function as a tech support call center, and you are a script file. You can call the tech support call center to perform a task that you do not have the capability to perform on your own. The call center takes the call, does some work, and returns you an answer. You then hang up the call and go on with your own duties. Script functions perform the same way.
Script functions are defined using the function keyword, and the syntax for creating them is a follows:
function <function name> (<function parameters>)
<: return type> {<function code>}
The first, and most important, item is the function keyword. This keyword tells the compiler that everything between the curly braces—that is, between { and }—is a function and should be compiled as such. The compiler will put the function code together in a way that allows other parts of the script to call it and use the returned values.
function {}
Next, <function name> is the name you assign to the function to separate it from other functions in your script. When naming your function, try to use action words that describe the purpose of the function, such as paintCar, addValues, or getTextFromBox. Notice that the first letter is always lowercase. The first letter of each remaining word in the function name is capitalized. This style of naming is known as camel casing.
NOTE
The act of camel casing your function names is not enforced by the compiler. Therefore, you could name a function addValues or AddValues and the JavaFX compiler would not stop you. However, it is a convention that is followed by most Java developers. This would be a good habit to begin, and it will make your code look more professional.
In some situations, the name of the function is not needed. One such situation is when you are creating the function specifically to be used as the value to one specific attribute of a node. You will explore this situation later in the book, so for now assume that all functions have names.
function addValues() {}
Following the function name is a list of any parameters that can be passed into the function. For example, a function named addValues would be useless without values to add together. You can create input parameters for your function that allow you to send values to the function. The function can then use these values in its code body. The example that follows creates two input parameters for the addValues function:
All input parameters should be placed within the parentheses that follow the function name and separated by a comma.
function addValues(valueA, valueB) {}
A return value type can be placed after the parentheses that follow the function name. The return type tells the compiler that when this function is finished running it is going to return this type of value back to the code that called it. For example, a function that adds two values together and produces a result should return that result as a double:
function addValues(valueA, valueB) : Double {}
NOTE
There are times when the return type of your function would have no corresponding type, or when your function may not need to return anything at all. In these instances it is a good practice to declare the function type as : void. The function will still work if you leave the type designator off completely—it is just good practice to type it as void.
Finally, the code or body of the function should be placed between the curly braces. This is the meat of the function, and it does all the work of the function. If your function returns a specific value, the return keyword is used to push that value back to the calling code:
function addValues(valueA, valueB) : Double {
         return (valueA + valueB);
}
NOTE
Functions should not be followed by a delimiting semicolon (;), but the code lines within the body of the function should.
Now that you have explored the process of writing a function, you will create one that can be used to write a line of text to the screen. The function will be named sayHello and will return a String type. Write the function so that no input parameters are needed, and be sure to remember the opening and closing curly braces.
Looking at your current script, begin writing your function just above the Stage. If you have started writing the function correctly, your script should look like this:
/*
 * Chapter3.fx
 *
 * v1.0 - J. F. DiMarzio
 *
 * 5/3/2010 - created
 *
 * First JavaFX Text sample - HelloWorld
 *
 */

package com.jfdimarzio.javafxforbeginners;

import javafx.stage.Stage;
import javafx.scene.Scene;
import javafx.scene.text.Text;
import javafx.scene.text.Font;

/**
 * @author JFDiMarzio
 */

function sayHello() :String{
    return "";
}

Stage {
      title : "Hello World"
      onClose: function () {  }
      scene: Scene {
            width: 200
            height: 200
            content: [
                    Text {
                         font : Font {
                                size: 26
                                }
                          x: 10, y: 30
                          content: {__PROFILE__}
                         }
                     ]
            }
}
Once you have assigned a return type to a function, you must return a value of that type. Because you have not completed the function in this example yet, an empty string (“”) is returned.
Because you have established that the return value of the function is a String, you need to write the body of the function to pass some kind of text back to the caller. In this case, use the string “Hello – from a function.” The easiest way to accomplish this is by using the return keyword followed by the string of text you want the function to pass:
function sayHello() :String{
               return "Hello – from a function.";
}
Your function is now written. Anything that calls this function will be passed the phrase “Hello – from a function.” This string can be used in other parts of your script, as needed. For example, you can use this function to pass this string of text to your Text node to display in the application window.
The Text node needs to be altered to call the sayHello() function. The logical place to make this modification is the content attribute of the Text node. Currently, the content attribute of your text node appears as follows:
Text {
        font : Font {
             size: 26}
        x: 10, y: 30
        content: {__PROFILE__}
     }
Notice that you are currently directly specifying the content attribute using the value of the {__PROFILE__} constant. You can replace this with a call to your newly created function. Because the function returns a String type, the content attribute will use the return value as though it were a directly specified string:
Text {
                        font : Font {
                        size: 26}
                    x: 10, y: 30
                    content: sayHello();
                    }
Your full script should appear as follows:
/*
* Chapter3.fx
*
* v1.0 - J. F. DiMarzio
*
* 5/3/2010 – created
*
* First JavaFX Text sample – HelloWorld
*
*/
package com.jfdimarzio.javafxforbeginners;

import javafx.stage.Stage;
import javafx.scene.Scene;
import javafx.scene.text.Text;
import javafx.scene.text.Font;

/**
 * @author JFDiMarzio
 */

function sayHello() :String{
     return "Hello – from a function.";
}

Stage {
      title : "Hello World"
      onClose: function () {  }
      scene: Scene {
            width: 200
            height: 200
            content: [
                    Text {
                        font : Font {
                              size: 26
                              }
                        x: 10, y: 30
                        content: sayHello();
                       }
                     ]
            }
}
Using the default Run configuration, run your application. As shown in Figure 3-9, you will see the text “Hello – from a function.”
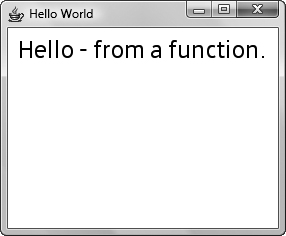
Figure 3-9 Hello – from a function.
In this section you have learned how to write a Text node to the screen. You have also learned about functions and how to use them to return a String type to the content of a Text node. In the next section of this chapter you will learn about one more way to display text using a function.
Using bind with a Text Node
JavaFX includes a very useful keyword called “bind.” The bind keyword is used, on a basic level, to associate one value with another. However, on a more powerful level, bind is used to link one attribute value with another value—even if the second value changes.
Using bind can be a very powerful asset for you because you can bind an attribute value to a variable, change the value of that variable, and those changes will automatically be passed on to the attribute that is bound to the variable. Let’s discover how to use bind with a Text node.
Creating Variables
You have two ways to define variables in JavaFX: using the var keyword and using the def keyword. The var keyword is used to define the majority of the variables you will use in JavaFX. Variables defined using the var keyword can be written to and read from as you see fit. The def keyword also allows you to define variables that are written to and read from. The difference here is that when you define a variable using the def keyword, it is understood that you will assign that variable an initial value and never change it.
The following code defines a variable named hello World:
var helloWorld = "" ;
NOTE
JavaFX variables also follow a naming convention. Although not enforced by the compiler, variables should be camel cased. Also, although the characters $ and _ are allowed as the first character of a variable name, they should generally be avoided.
You have now defined a variable named helloWorld. This is all that is needed to begin using the variable. However, the code could use a little tweaking. Notice that we have not told JavaFX what type of variable helloWorld should be. This is perfectly legal because JavaFX will try to determine what type of variable you need based on the data assigned to it. If you assign a 3 to the variable, JavaFX will infer that your variable should be typed as an integer. If you assign a value of “Hello” to the variable, JavaFX will infer that your variable should be a String type.
Letting JavaFX infer what type your variable should be can be useful, but it does use extra resources that would not be used if you type your variable to begin with. Also, if your script is more complex and relies on more complex types, variable type inference could be hard to impossible, and may throw errors. Therefore, because you already know your helloWorld variable is going to be a String type, take the time out to type the variable correctly, like this:
var helloWorld :String = " ";
Create a small function that assigns the string “Hello – From bind.” to your helloWorld variable. You can name the new function sayHelloFromBind:
function sayHelloFromBind(){
   helloWorld = "Hello – From bind.";
}
You should remove the existing sayHello() function from your script and replace it with your new variable definition and sayHelloFromBind() function. Your script should appear as follows:
import javafx.stage.Stage;
import javafx.scene.Scene;
import javafx.scene.text.Text;
import javafx.scene.text.Font;
var helloWorld :String = "";
function sayHelloFromBind(){
    helloWorld = "Hello – From bind.";
}

Stage {
      title : "Hello World"
      onClose: function () {  }
      scene: Scene {
            width: 200
            height: 200
            content: [
                    Text {
                         font : Font {
                         size: 26}
                     x: 10, y: 30
                     content: "";
                    }
                ]
            }
}
With your variable defined and your function created, it is time to bind the Text node content attribute to the helloWorld variable.
Binding to helloWorld
Binding to your helloWorld variable is easy. To bind to any variable, use the bind keyword followed by the name of the variable you want to bind to. The bind keyword followed by the variable name should be used as the value for the attribute you want to bind to. Take a look at the following code fragment to understand what binding should look like:
content: bind helloWorld;
This is all that is required to bind a value to variable. The value that is assigned to helloWorld from the sayHelloFromBind() function will be displayed on the screen as soon as the sayHelloFromBind() function is called.
The following line of code is used to call the sayHelloFromBind() function:
sayHelloFromBind();
Your script should appear as shown here:
/*
 * Chapter3.fx
 *
 * v1.0 - J. F. DiMarzio
 *
 * 5/3/2010 – created
 *
 * First JavaFX Text sample – HelloWorld
 *
 */

package com.jfdimarzio.javafxforbeginners;

import javafx.stage.Stage;
import javafx.scene.Scene;
import javafx.scene.text.Text;
import javafx.scene.text.Font;

/**
 * @author JFDiMarzio
 */
var helloWorld :String = "";
function sayHelloFromBind(){
    helloWorld = "Hello – From bind.";
}
sayHelloFromBind();
Stage {
      title : "Hello World"
      onClose: function () {  }
      scene: Scene {
            width: 200
            height: 200
            content: [
                     Text {
                         font : Font {
                              size: 26
                               }
                        x: 10, y: 30
                        content: bind helloWorld;
                          }
                    ]
            }
}
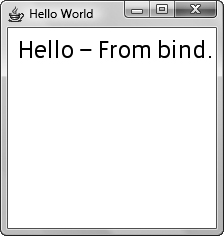
If you follow the code logically, you will see that first the variable, helloWorld, is set to a blank string (""). Then the sayHelloFromBind() function is called, changing the value of helloWorld from a blank string to “Hello – From bind.” Now run the application and view the results. The results should appear as in Figure 3-10.
In the next chapter, you will begin to draw shapes to the screen.
 Chapter 3 Self Test
1. What are the four basic attributes that need to be defined for a Text node?
2. In what Palette menu is the Text node located?
3. What Run configuration is used to run your script as a Desktop application?
4. When creating a function, where would you specify input parameters?
5. True or false? The function name MyFunction follows proper naming convention.
6. What keyword is used to return a value from a function?
7. Name the two keywords that can be used to create variables.
8. How would you type a variable as string?
9. True or false? The bind keyword is used to bind a variable and make sure it never changes.
10. What syntax would be used to bind a variable named tooMuchText to a content attribute?