CHAPTER |
|
2 |
Designing Web Pages with Embedded Maps |
It’s time now to look at the process of generating web pages with embedded maps: HTML pages with a special component where a map is displayed. You can make this special component large enough to cover the entire page. Or, you can reserve some space on the page to place controls that will enable users to interact with the map. You can even fill your page with the map and place the controls you need for your application’s interface on top of the map.
As far as the “special” mapping component, it’s there for you to use it, courtesy of Google. Google has done all the work for you. Not only do they offer you the map, but they also provide the programming tools to control the map from within your application. All it takes is a little JavaScript code. Or a lot of JavaScript code, depending on how far you want to go.
In this chapter, you’re going to build your first web page with an embedded Google map and learn how to design web pages for hosting maps. Instead of jumping directly into the details of the necessary script, let’s start by reviewing the structure of a typical web page for the benefit of readers who aren't familiar with web pages.
The Structure of a Web Page
A web page consists of three parts:
• The HTML code that describes the page’s static content The text and multimedia items on the page, as well as the various controls that allow users to interact with the page.
• The CSS section that contains styles to be applied to the various page elements The same elements can be formatted in the HTML statements that generate these elements, but it’s a much better practice to create named formats (styles) and apply them to multiple elements.
• The JavaScript section that contains code The program that enables users to interact with the page in a direct manner.
HTML was designed to be interactive from the ground up. The hyperlinks on the page are the most basic method of interacting with a web page: You click a hyperlink and you’re taken to another page of the same site, or a page of a totally different site. This type of interaction was very important and it made the Web so popular. For today’s standards, however, this is hardly the interaction you’re looking for in a web page. The next level of interactivity allows users to enter data on a web page, click a button to submit the data to the server, and get back another page. Imagine a page that allows users to enter latitude and longitude values and submits these values to a remote server. An application on the remote server converts the coordinates to a physical address (a process known as geocoding) and returns a new page to the client. This type of application involves a trip to the remote server and displays the results on a new page, which is generated at the server. The interaction isn’t instant because no code is executed at the client (except for some rudimentary data validation code). Everything takes place at the server. This was a “more” interactive Web, but still very far from what today’s users are expecting from a web application.
Today’s web applications use JavaScript to perform all kinds of operations at the client. It’s very easy to design a web page with a Google map and two boxes where users can enter geo-coordinates. When they press a button, the map is panned to the new location without a trip to the server. You can also use JavaScript to perform geocoding. The process of converting geo-coordinates to physical addresses (or the reserve process) is too complicated to be performed at the client, but you can use JavaScript to contact a Google service that performs the calculations and get back just the physical address, instead of a new page. The introduction of JavaScript enabled developers to design web pages that behave like applications and perform all kinds of calculations and data validation at the client. The latest generation of web applications uses JavaScript to retrieve data and update parts of the interface without having to rely on a server that supplies a totally new page every time a selection is made on a form.
HTML is a language for describing the placement and format of the various items that make up the page. These items are text, images, tables, multimedia and, yes, maps. An HTML page contains mostly text and other visible elements, as well as “commands” that control how the text will appear on the page. These “commands” are called tags; they’re special keywords embedded in a pair of angle brackets and they come in pairs (the opening and closing tag). The command takes effect for the part of the page between the opening and closing tag. The
<b> tag, which turns on the bold attribute of the text, is a good simple tag example. The closing tag </b> turns off the bold attribute. Another tag you’ll use with every page in this book is the <div> tag, which denotes a section of the page. Using the style attribute of the <div> tag, you can specify the size and position of this section on the page. The map you place on a web page always appears on a <div> element. You can create a fixed-size <div> element, or a <div> element that fills the entire page, so that the map is resized when the user resizes the browser’s window.The following is the structure of a typical script-enabled web page:

The page has two major sections—the head and the body sections—and they’re delimited with the appropriate tags. The page’s script is contained in the head section of the page along with the style definitions. The script section contains code written in JavaScript that manipulates the contents of the page.
Reacting to Events
Let’s see some JavaScript in action. Start by creating a panel on the page, where the current date and time will appear and a button that will actually populate this panel. The panel is a
<div> element and the button is inserted on the page with an <input> element. Here’s the HTML code that must appear in the page’s <body> section:
Notice that you can’t insert a date into the web page when it’s created, or even when it’s requested, because the page may reside on a server in Hong Kong and be opened by a client in New York. The client expects to see the local time, not the Hong Kong time. To display the correct date and time at the client, you must provide a short program that will be executed at the client and display the local time. In the button’s definition, you must insert the attribute
onclick and set it to the name of the function, the showDate() function, which will display the current date. The function’s definition must be placed in the <script> section, as follows:
The code does two things that are typical in a script: It retrieves an element on the page, in this case the
<div> element, and sets one of its properties. The dateTimeDiv is a local variable, which references the element whose id attribute is date. Any element that you wish to control from within your script must have an id attribute; this attribute is passed as an argument to the getElementById() method. The getElementById() method is a method of the document object, which represents the page that contains the script. The document object exposes the elements that make up the document being displayed, and is also known as the Document Object Model (DOM). DOM is a hierarchy of objects that make up an HTML document, including its script. You can even manipulate the page’s script through the DOM!You can use the DOM to not only retrieve elements of the page, but also to manipulate them. For example, you can create new elements on the page, or even add a new code segment to the page’s script. In Chapter 7, you will see this technique in action, but let’s continue with the exploration of the more basic features of a web page.
The
dateTimeDiv variable represents a <div> element on the page, and the <div> element’s basic property is the innerHTML property, which represents the contents of the element. Typically, you place formatted text on <div> elements. The <div> element is a section of the page that holds anything that could appear in an HTML page: text, images, tables, and the map, of course. In this example, you'll print the current date and time on the <div> element.The following is the listing of the entire page (see the
JavaScript Demo 1.html file in this chapter’s support material).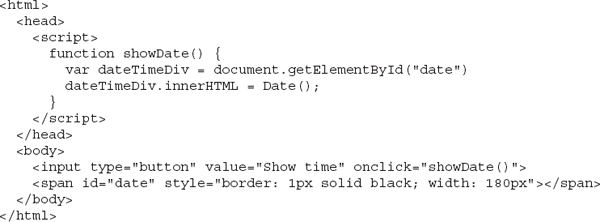
This is how JavaScript typically interacts with the page’s elements. A function is invoked in response to an event, such as the click of the mouse, the press of a key, the drag of the map, and so on. Any keyboard or mouse action that can be detected by an element on the page fires an event. To react to an event, you must assign the name of a function that handles the event to the appropriate attribute of an element on the page. The event
onclick is fired when the user clicks an element (usually a button); the event onkeypress is fired when the user presses a key while the corresponding element has the focus, and so on. The functions that handle specific events are called event listeners and this model of coding applications is referred to as event-driven. There’s not a monolithic segment of code that handles the interaction with the user. Instead, scripts are made up of isolated functions (the event listeners), which are invoked automatically when users initiate certain actions (events) on certain controls.One of the most common operations performed with maps is the drag operation, and the map itself fires the
dragstart, dragend, and drag events. As you will see in Chapter 5, the dragstart and dragend events are fired when the operation starts and ends, respectively, while the drag event is fired continuously while the map is being dragged.Another common usage of JavaScript is to manipulate the style of the various elements on the page. Let’s assume that the
amount field is where users are supposed to enter a monetary amount. If the amount is negative, the field should be colored red, otherwise black. The event you must program this time is the keyup event of the field. The following HTML segment displays an input box that reacts to the keyup event:This statement creates an input box long enough to accept up to ten characters. The
text-align attribute tells the control to align its text right (all numbers should be right-aligned in their fields). The last attribute tells the JavaScript engine to call the colorField() function every time a key is released. The definition of the colorField() function, which changes the color of the text on the control, is shown next (the function renders positive numbers in black color and negative numbers in red color):
First, you define the action that will trigger the function. Then, in the function, you request one of the page’s elements, the
amount element, and change its color attribute. The code examines the value of the amount field after it converts it to a numeric value. If this value is negative, it retrieves the amount element and changes its style by setting the color attribute to the hexadecimal value of the red color. By the way, colors are represented as hexadecimal values with two bytes per color component. The first two bytes correspond to the red component of the color, the following two bytes correspond to the green component, and the last two bytes correspond to the blue component. Each hexadecimal digit has a value in the range 0 - 9, A - F. The preceding sample application is the JavaScript Demo 2.html file, included in this chapter’s support material.The key point to take away from this discussion is that JavaScript is a language that enables the HTML page to interact with the user at the client: No trips to the server are required. All elements on an HTML page have an
id attribute, which is a unique identifier; the getElementById() method can retrieve any element by its id attribute. Then the script can manipulate its content and style through the properties exposed by the element.This book is at least 90 percent about scripts and less than ten percent about HTML. Designing elaborate HTML pages is probably more difficult than writing JavaScript code because there are no visual HTML designers. Yes, there are many programs to help you design web pages visually, but unless you understand how HTML is structured and the role of tables in placing the sections of a document on a HTML page, you won’t go far with visual tools.
The sample applications in this book use straightforward, easy-to-understand HTML code. Some interesting pages that use non-trivial HTML code will be explained in the course of the book, but the focus is on JavaScript and how you will use it to manipulate the objects of the Google Maps API. And you’re going to start right away by building a simple HTML page with a Google map.
Adding a Map to Your Page
To display a Google map on your page, you need to reserve an area on the page where the map will be displayed. This area is defined as a
<div> element and it usually takes up most of the page. Here’s the body of a typical web page with a placeholder for a map:
As you can see, the
<div> element has an id attribute, which you will use in your script to reference the element where the map will be displayed. The style of this element is defined in-line: The style definition is embedded in the declaration of the <div> element. You don’t need to use a separate style for this element because it’s unique on the page. The <div> element is set to fixed dimensions, specified in pixels.To make the map fill the entire page, set the
width and height attributes to 100 percent, as shown here:
To display the map in the
<div> element, you must first embed a script in your page. Insert the following line in the page’s <head> section:The
<script> tag tells the application to download the script from the maps.google.com server. This script contains the code that interacts with a Google server to display the map: Every time a user drags the map or zooms out, new tiles must be downloaded from the remote server and rendered on the page. It’s this script’s responsibility to detect the changes in the map’s bounds and request the new tiles.New tiles are also requested when the user zooms into the map. The map isn’t simply blown up because different zoom levels are constructed with their own tiles, which contain different information. When you center the map on Santa Barbara and look at it at the state level, you will see only the city name and a couple of landmarks. The Google server transmits only information that can be displayed on the map. As you zoom in, the script requests new tiles that cover a smaller area, but with additional information.
So far, your page’s code should look like the following:

Do not open this page in your browser yet because it’s not quite ready to produce a map. You need a script to initiate the map and this script is pretty standardized. Add the following function to the
<script> section of the page:Listing 2-1 All map-enabled web pages must contain a script to set up and render the map.
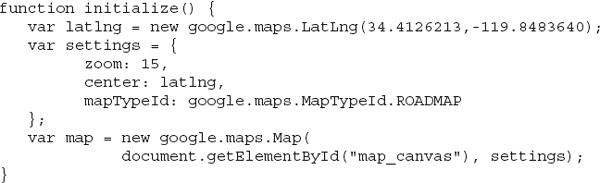
The
initialize() function displays the map in the area reserved for this purpose, and it’s pretty much the same for all applications. You can specify a few more attributes for the map, or use different settings, but the basic outline of the function remains the same.The name of the function can be anything, but this is the name you will find in most examples. The
initialize() function will not be activated on its own; you need to call it after the page has been loaded. The <body> tag recognizes the attribute onload, which must be set to the name of a function that will be executed as soon as the page is loaded:Listing 2-2 is the listing of a simple map-enabled web page including the script.
Listing 2-2 A typical web page for displaying a map
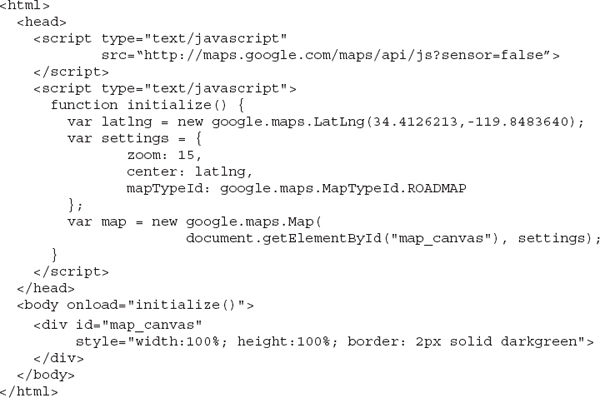
Enter the entire listing in a text file (use Notepad for this) and save it to a file with the extension
html. Or, you can open the Simplest Map Page.html file in this chapter’s support material. Figure 2-1 shows the page’s contents in Notepad, and Figure 2-2 shows the page in Internet Explorer. To open the page in your default browser, just double-click the HTML file’s name.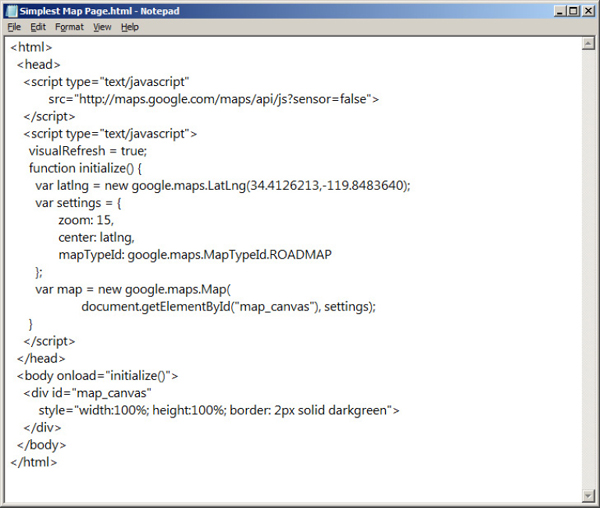
Figure 2-1 Preparing the
Simplest Map Page.html with your favorite text editor (Notepad is not recommended, but it will do.)
Figure 2-2 The
Simplest Map Page.html page rendered in the browser.Is Notepad the Editor of Choice?
You used Notepad to create your first mapping application. Is this the best editor for the job? There are many tools you can use in its place, and Notepad++ is a much better choice. Seriously, though, there are many tools for generating web pages and the best of them come with two components: a visual editor to generate web pages and a JavaScript editor that helps with the syntax of the script. The short answer to the question is that there are visual editors for web page designers, JavaScript editors for developers, and some tools like Visual Studio/WebMatrix that do both. If you’re a web designer, continue using your favorite web page designer, copy the HTML code this tool produces, and paste it into a plain text editor. Then type the script to complete the page.
Visual Studio Express 2013 for Web is a free tool for developing web applications, but it runs on the Windows platform only. You can use it to edit both HTLM and JavaScript files and ignore its (many) extra features if you don’t care about full scale Web development. It also includes a visual HTML editor. If you prefer the Macintosh platform, TextMate is a good choice, and so is Aptana. If you’re a Java developer and you’re using Eclipse, make sure you have installed the Web Page Editor component. You can also install Aptana as a plugin for Eclipse.
All HTML pages for this book were created manually and make little use of style sheets so that you can edit them easily. You can replace the HTML section of a page with your own HTML code and, as long as you use the same IDs for the various elements, the script should work without any modifications.
Map Localization
By default, the names of the features on the map are displayed in the system’s default language. These names include names of countries, cities, monuments, and other map features, as well as copyright notices, the text on the controls, and even the directions when you request instructions for getting from one place to another. If this isn’t what you want for your application, you can request that the strings on the map appear in any other language. To change the default language, add the
language parameter to the Google Maps script, as in the following example, which requests that all names appear in Japanese and produces the map shown in Figure 2-3:
Figure 2-3 The map of Manhattan with Japanese labels
Use this parameter for web sites that run behind a firewall, or are limited to a very specific audience. For publicly accessible sites, stick with the default option. To see the complete list of language codes, visit https://spreadsheets.google.com/pub?key=p9pdwsai2hDMsLkXsoM05KQ&gid=1.
By default, the Google Maps API is geared for the U.S. market and it’s biased toward users in this country. You can request different tiles for your application to overwrite the default behavior with the
region parameter. This parameter doesn’t affect the language of the text on the map, but it affects the results of geocoding operations. When you search for “Athens,” for example, the first match will be Athens, TX. If the map’s region is set to “gr” (Greece), then the first match will be Athens, Greece. For a list of region codes, visit http://www.iana.org/assignments/language-subtag-registry/language-subtag-registry.Zooming with the Mouse
An alternative method to zoom into the desired area of a map is to draw a rectangle with the mouse around the feature you’re interested in while holding down one of the control keys (SHIFT, CTRL, or ALT). This operation is known as drag zoom and it’s implemented by a script, which isn’t part of the Google Maps API and you must include it in your script with the following statement (which in your script should appear on a single line):

To activate the drag zoom feature for a specific map, call the
enableKeyDragZoom() method, as shown here. This statement usually appears in the initialize() function:The
enableKeyDragZoom() method accepts as an argument an array with parameters, which primarily affect the appearance of the selection square. The properties you can pass to the enableKeyDragZoom() method are as follows:•
key The key property is a string that specifies the hot key to be held down for the drag zoom: SHIFT, CONTROL, or ALT. The default value of the key property is SHIFT.•
boxStyle This property is a CSS object that determines the style of the border that marks the area to be zoomed. The default style isBorder widths can be specified in pixels, or with the following descriptive strings:
thin, medium, and thick.•
paneStyle This property is another CSS object that determines the style of the area within the zoom border (the rectangle that overlays the map during a drag zoom operation). The default isNote that the attributes of the
paneStyle property are passed as an array of key-value pairs, just like the attributes of the enableKeyDragZoom() method. The following is a typical call to the enableKeyDragZoom() method:
You can open the
KeyDragZoom.html page in this chapter’s support material to see an example of the drag zoom features. Figure 2-4 shows the sample page during a drag zoom operation.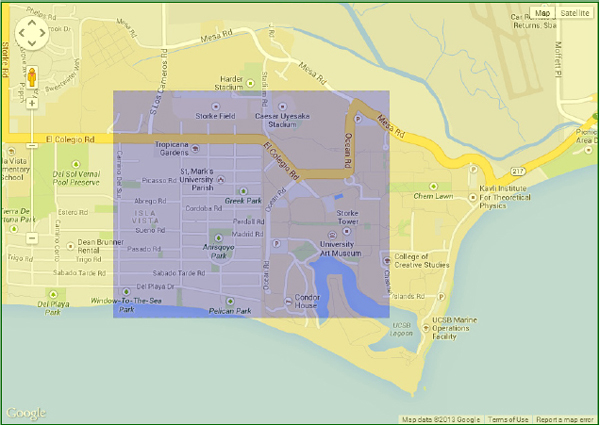
Figure 2-4 The drag-and-zoom feature in action; both the selection pane and its border are customized.
The Map’s Controls
By default, several controls are placed on the map to help users pan and zoom into the area they’re interested in. You can control the appearance of these controls, or even remove them entirely from the map, depending on your application’s specific requirements. The items you can’t remove from the map are the Google logo at the lower-left corner of the map and the map’s copyright messages at the lower-right corner.
It’s doubtful that there are users who aren’t familiar with Google Map’s visual interface, but it should be mentioned here that the exact appearance of the controls on the map depend on the size of the map. When the map is too narrow for the Zoom control to fit on the map, the Zoom control is reduced to a narrow control with a plus and a minus button, without the bar between them. It’s a good idea to test your web pages not only on various devices, but also on screens of widely different sizes.
The map controls are discussed in detail in Chapter 5, but the following sections provide an overview.
The Scale Control
This control is optional and it’s not displayed by default. If you turn it on, it will appear in the lower-right corner of the map. To turn the visibility of this control on or off, set the
scaleControl option to true or false in the map’s options:
The first line contains the mandatory properties; you can’t set the optional attributes and skip any of the mandatory ones.
The Navigation Controls
The most important control is the navigation control that appears on the left of the map and allows users to zoom in and out, as well as to pan the map. There are four navigational controls: Pan, Zoom, Street View, and Rotate. The Street View control is the Pegman icon that allows you to switch to a street level view of the map. To change views, just drag this icon and drop it on the map to see the area from the street level: What you see is a sequence of stitched pictures taken at ground level. When you switch to Street View, the Pan control is replaced by a compass wheel, which allows you to select a direction to look at.
The Rotate control switches the Street View into 45 degrees imagery, when available. When such images do not exist, the Rotate control doesn’t appear.
To manipulate the visibility of the navigational controls, use the following options:

The OverviewMap Control
This control, which is disabled by default, displays a small map with a larger area in the main map’s lower-right corner. The overview map is centered at the same location as the main map. Figure 2-5 shows a simple map with the OverviewMap control enabled (it’s the
OverviewMap.html sample page). Notice that the corresponding area shown in the original map is outlined.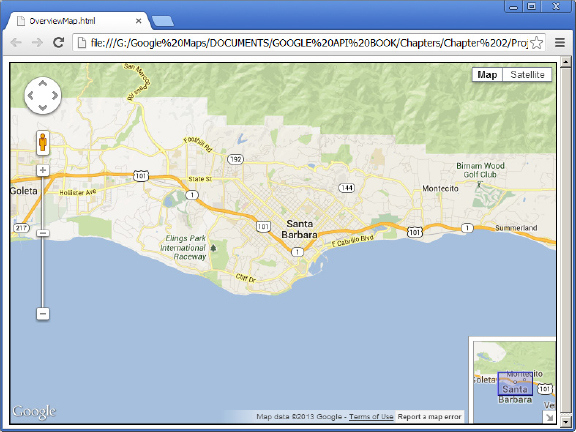
Figure 2-5 The small map in the lower-right corner is an overview of the larger area around the main map.
To turn this feature on, specify the following option:
The MapType Control
This control allows users to set the map type: Map view or Satellite view. Both views have two options. When the map type is set to Map view, you can turn the terrain on or off. When terrain is on, you see the elevation of the various features, most notably the mountains. When the terrain option is off, you see only the administrative boundaries and feature locations, without the elevation shading. Likewise, in Satellite view, you can turn the labels on or off.
Adding Markers to the Map
Embedding a Google map in a web page is straightforward. The challenge is to add value to this map by placing useful information on it, as well as providing more elaborate interfaces that will enable users to interact with the map. Before ending this chapter, let’s explore briefly a very basic feature of Google Maps: the placement of markers on a map. Markers are discussed in detail in Chapter 7 of the book, but first let’s explore the basic statements for identifying points of interest with markers. It takes just a single statement with several parameters to place a marker on the map.
Just like the map is a new instance of the
Map object, markers are new instances of the Marker object. Both objects are part of the google.map library, which was imported to your page’s script with the <script> directive. If you think about it, all the information that’s really required to place a marker on the form is the marker’s location. In addition, a marker should also have a title, which is the description displayed on a small window as you hover the mouse over the marker. The Marker object’s constructor accepts three arguments, the position and title arguments, and a variable that references the map to which it belongs.To place a marker at the location of the Space Needle monument, start by creating a
LatLng object that represents the location of the marker.Then create a new instance of the
Marker object with the following statement:The sample page,
Space Needle.html, displays the area in the vicinity of the Space Needle monument and a marker at the location of the monument, as shown in Figure 2-6.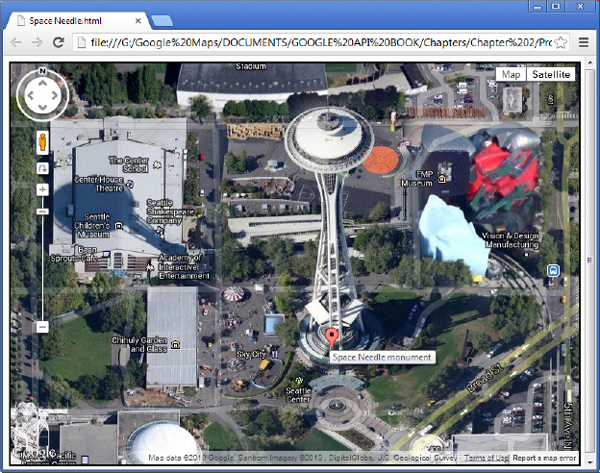
Figure 2-6 A map of the Space Needle area with a marker
You’re already seeing the pattern of typical scripts that manipulate maps: The various items you can place on the map are represented by objects, which you must initialize in your code with the
new keyword. The new keyword creates a new instance of an object and the type of the object determines its function on the map. All objects related to maps are provided by the script you download from Google. LatLng and Marker are two objects that represent locations and markers, respectively, and you can create as many variables of each type to identify points of interest on the map as needed.A Useful Template for Mapping Pages
One of the common themes you will encounter as you design web pages to host your maps is the separation of the browser window into multiple sections. Maps usually take up most of the window, but you need to control the size of the map and ensure that there’s enough space for the other elements on the page. A common pattern is to keep the size of the other elements fixed on the page and allow the map to grow or shrink as the browser window is resized. Figure 2-7 shows a web page with three sections: a title, an auxiliary pane on the left for displaying map-related data, and a map. The page was created with the
Demo Map.html file. The data pane of this example contains driving directions for getting from the address specified in the box to the location of the marker on the map. To retrieve the directions, enter an address and press ENTER. Presumably, the marker identifies a point of interest on the map. You could use the data pane to display additional information about this feature, a list of nearby monuments, room prices (if this were a hotel), or anything you can think of.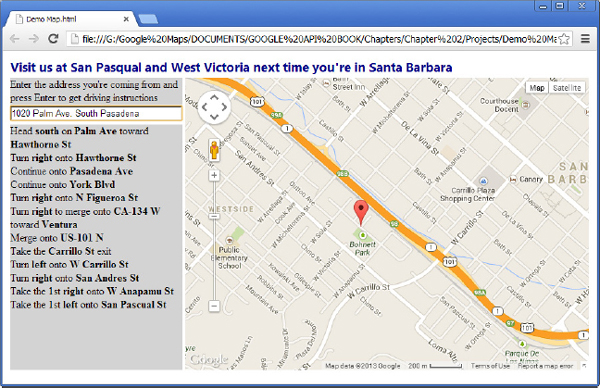
Figure 2-7 A basic web page with three sections for displaying a map and related data with a spatial component
Displaying the driving directions isn’t a trivial topic; it’s discussed in Chapter 17, but the functionality was included in the sample project to make it more interesting (as opposed to filling the data pane with some Latin text). The width of the column with the data pane is fixed and all remaining space is allocated to the map. The title bar takes up the entire width of the page. You can place a footer section with a fixed height that also takes the entire width of the page.
Designing the Demo Map Page
The design of the
Demo Map.html page is based on tables. The page is made up of a table with two rows and two columns, and the column on the right spans all rows. Listing 2-3 shows the HTML code with the page’s content.Listing 2-3 The HTML part of the
Demo Map.html web page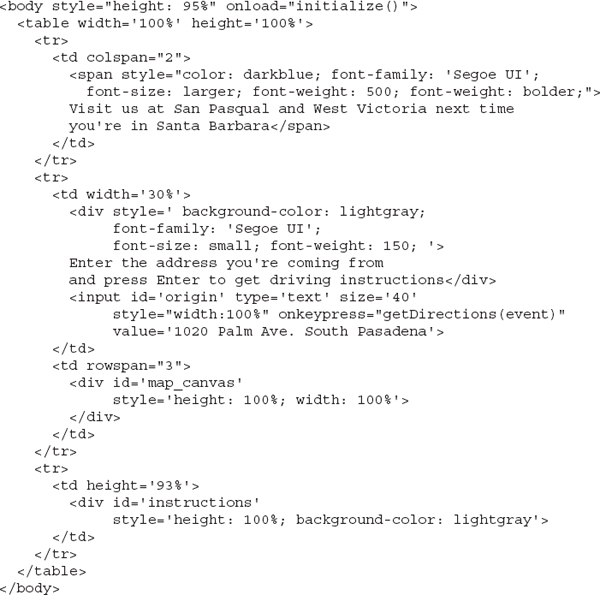
The
initialize() function contains the usual code for displaying the map, plus a few statements to place a marker on the map: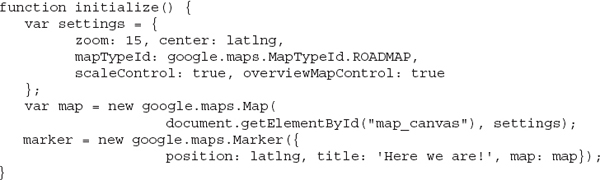
Note the attribute
onkeypress of the <input> tag in the page’s body. This tag corresponds to the input box where users are expected to enter their address. The onkeypress attribute tells the script which function to call when the user presses a key while the input box has the focus:The
getDirections() function requests the driving instructions between the two points (the address entered by the user and the point of interest identified with the marker on the map). The function reacts only to the ENTER key; when any other key is pressed while the input box at the top has the focus, the function simply exits. In Chapter 17, you learn how to request driving instructions between any two locations using Google’s Directions service. The result is then displayed on the data pane with the printInstructions() method. You can look up the code of the getDirections() and printInstructions() functions, or wait to read about the Directions service in Chapter 17. Here’s just the if statement that causes the getDirections() function to react to the ENTER key: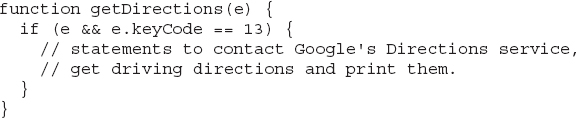
As you will find out if you open the sample page, the two panes are resized automatically as the browser window is resized. The table takes up the entire page, because its
width and height attributes are set to 100%. The browser resizes the two panes proportionally and users can’t change this behavior. If you’re already thinking about resizable panes, you should explore a jQuery component at http://api.jqueryui.com/resizable/.Placing Multiple Maps on the Page
In Chapter 5, we discuss the
Multiple Maps application, which is shown in Figure 2-8. This page contains three maps, all of which are centered at the same location and show the selected area at a different magnification each. The small map at the lower-right corner shows an overview of a larger area, like a state or country. The main map is a basic roadmap of a very specific area (the Santa Barbara airport) and the small map at the upper-right corner is a small detail in satellite view. The three maps remain synchronized: You can scroll any map and the other two will be updated automatically. To keep the maps synchronized, you need to write some JavaScript code, which is discussed in Chapter 5. Here, we’re going to look at the page's body that contains the HTML code.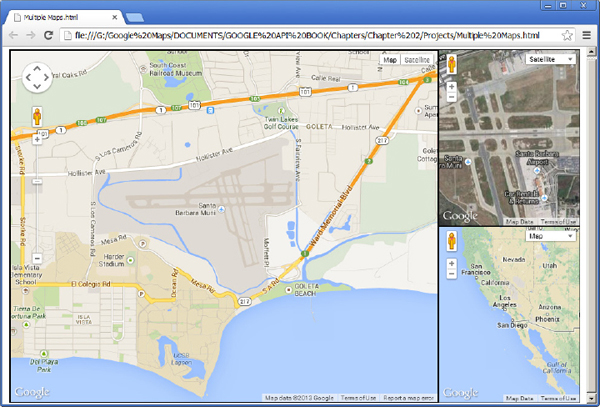
Figure 2-8 The Multiple Maps web page contains three synchronized maps.
The page shown in Figure 2-8 was generated by the HTML fragment shown in Listing 2-4. The page’s body is filled with a
<div> element whose height attribute is set to cover the entire page height (100%). This setting ensures that the <div> is resized every time the user changes the size of the browser’s window.Listing 2-4 Placing three different maps on the same page

The outer
<div> element contains a table with one row and two columns: The first cell takes up two rows and its width is set to 75 percent of the table’s width (which in turn is 100 percent of the page’s width). This cell hosts the large map, which covers the entire height of the page and 75 percent of the available width). The following <td> definition places the <div> element with the large map in its cell:
The other two maps are placed in the same
<td> element, and each one has a height set to 50 percent of the available height. The available height is the height of the row to which they belong. The row’s height is set to 100 percent of the available height, which is the height of the table to which it belongs. And, finally, the table’s height is set to 100 percent of its container’s height. To set the height of a table, you must also set the height of its container, and the height of the container’s container, and so on up to the height of the body.You can open the Multiple Maps project to experiment with the arrangement of the various
<div> controls on the page and their sizes. The version of the sample application included with this chapter doesn’t contain the code to synchronize the three maps (you can drag them independently of one another). The synchronization technique is based on JavaScript code and is discussed in detail in Chapter 5. For now, use the Multiple Maps project to experiment with the placement of three panes on the page.Initializing the Maps on the Page
The maps are displayed in their containers from within the
initialize() function’s code as usual. Instead of creating a single instance of the Map object, you must create three distinct instances of the Map object and assign them to different variables. The code in the initialize() function starts by setting up a variable that represents the location of the center point for all three maps, and another variable with the initial settings of the maps:
The settings apply to all three maps: They’re centered at some location at University of California, Santa Barbara; the initial zoom is 14, and the type for all maps is ROADMAP.
Then the code creates three variables to represent the three maps, all with the same settings:
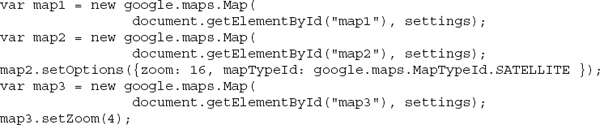
The variables
map1, map2, and map3 represent the three maps on the page. To manipulate the maps, you must use the corresponding variable. This application uses the same initial zoom and the same type for all three maps because all three Map objects use the same settings. After creating each instance of the Map object, the script calls the setZoom() method to set the zoom level of the two smaller maps and the setOptions() method to set the type of the upper one. There are individual methods for setting each property, but if you want to set multiple properties you should use the setOptions() method, which accepts as argument an array of property names and values. The curly brackets indicate objects in JavaScript, and in the case of this example, the argument is a custom object with two properties separated by a semicolon. Each property has a name and a value, and these items are separated by a comma. In short, the following call to the setOptions() method:is equivalent to calling the
setZoom() and setMapTypeId() methods:The
Map object provides a number of methods that you can use to control its appearance from within your script. The getZoom() method, for example, returns the current zoom level, while the getCenter() and setCenter() methods retrieve and set the map’s center point, respectively. In effect, the setCenter() method allows you to pan the map from within your script. The Map object’s methods are discussed in detail in Chapter 5.Customizing the Map's Appearance
Another interesting page design for mapping applications is shown in Figure 2-9 and it's borrowed from Chapter 5. The Customized Map application, which is discussed in detail in Chapter 5, places HTML elements on top of a “minimal” map; moreover, the
<div> element that contains the map has rounded corners. Note that there are no controls on the map; users can zoom in and out by double-clicking the two mouse buttons and drag it with the mouse.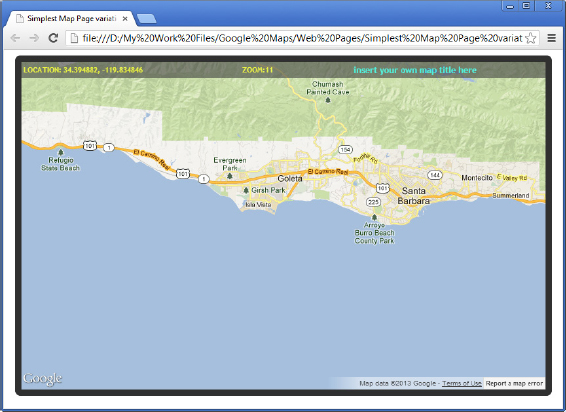
Figure 2-9 A web page with a customized map
Summary
Embedding a Google map into a web page is a straightforward process: You reserve some space on the page for the map, a
<div> element to be exact, and place an instance of the Map object in it. To display the map, you need to import a script from Google's site with the <script> directive and write a simple function that’s called when the page has finished loading. Balancing the map’s placeholder and the other elements of the page requires HTML skills, and you can use your favorite visual tools to design the page.The map includes quite a bit of functionality as is, and in the course of this book, you will learn how to write unique applications on top of the map. The scripts that manipulate the maps on your web pages are written in JavaScript, so before you start exploring the Google Maps API, let’s go over JavaScript’s main features.
..................Content has been hidden....................
You can't read the all page of ebook, please click here login for view all page.