
CHAPTER |
|
17 |
More Google Services: The Geocoding and Directions APIs |
Google offers several smaller APIs related to the Google Maps API. The most commonly used ones are the Geocoding and the Directions APIs, which you’re going to explore in this chapter. Geocoding is the process of converting physical addresses to geo-coded locations (longitude/latitude pairs). You can use the Geocoding API to request your house’s coordinates by specifying its address. The reverse process, known as Reverse Geocoding, does the opposite: You request the physical address at a specific location. The Directions API is the single most popular tool based on Google Maps. The Directions API provides driving/cycling or walking directions between any two points, as long as there’s a “ridable” path between them (it doesn’t work over oceans and tropical forests, for example).
Google provides a few more APIs that are not covered in this book. The Earth API was designed for Google Earth, and it could be the topic of another book. The Elevation API provides altitude information about locations, and the Time Zone API is another web service for finding the time zone at any location. Finally, the Places API allows you to find information about places other people have added to Google Maps.
Geocoding API Usage Limit
Use of the Google Geocoding API is subject to a query limit of 2,500 requests per day. If you exceed the 24-hour limit or otherwise abuse the service, the Geocoding API may stop working for you temporarily (a 24-hour period initially). If you continue to exceed this limit habitually, your access to the Geocoding API may be blocked.
Twenty-five hundred requests may sound like a lot, but if you have an application that requests the address at the center of the map every time you drag the map around, you can easily hit this limit in a few hours (especially if you are debugging your application!). If you do, your requests will not be honored for a 24-hour period, so be sure you don’t keep hitting this limit constantly. Or get a Business license from Google to have unlimited access to its services.
The Geocoding API
The Geocoding API is a library like the other APIs, and you can access its services not only through the appropriate object (an object of the
google.maps.geocoder type) in your script, but also through a URL from within your browser. Because this API is implemented as a web service, you can access it from within any application, not just a script. However, please pay attention to the following note.Correct Usage of the Geocoding and Directions APIs
Calling the Geocoding and/or the Directions API from within applications running behind a firewall is not allowed by Google unless you have a Business license—or your application is hosted at a public site and is free. If it’s a web application, you can still limit access to your application by requiring users to log in, but the application must still be hosted as a public site. For more information on using the APIs described in this chapter, please read the license (https://developers.google.com/maps/licensing), or contact Google’s sales department (you will find the link at the same site). By using any of the Google APIs, you implicitly agree to comply with Google’s license agreement—which certainly isn’t a trivial document you can accept without reading.
The easiest method to geocode an address is to make an HTTP request to a specific application at Google, passing a physical address as parameter. The application returns the results in either XML or JSON format. To geocode an address and retrieve the results in XML format, use a URL like the following: http://maps.googleapis.com/maps/api/geocode/xml?address=1029 Palm Ave, S. Pasadena, CA&sensor=false.
The
sensor parameter is set to false as usual, while the address parameter is the physical address whose geo-location you want to retrieve. It could be a mailing address such as the one shown in the example, a city name like “South Pasadena,” or even a monument or building name such as “Space Needle” or “Christ Redeemer.”The Geocoding Response
Open your browser, paste the preceding URL in the address bar, and press ENTER. Google will respond with the XML file shown in Listing 17-1 (it’s a trivial, but fairly lengthy, listing, included here in its entirety for your convenience). The response is an XML document, because in the request you specified the xml application. It’s also possible to retrieve the results in JSON format (see the section “JSON Response” later in this chapter).
Listing 17-1 A typical geocoding XML response for an address in the United States
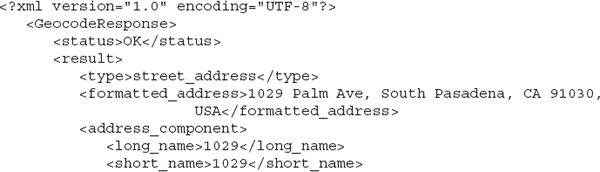
The XML document with the response will be displayed right in your browser, as shown in Figure 17-1. It’s a lengthy response that contains the correct address, which may not be exactly the same as the one you typed. Note that the “Ave” abbreviation became “Avenue” and “S. Pasadena” became “South Pasadena.” The location’s geo-coordinates are stored in the
<location> element under the <geometry> element. The location’s geo-coordinates are the values of the <lat> and <lng> elements. You can process this file either in your script, using JavaScript, or in any high level language, such as Visual Basic or C#, that can parse XML. You will see examples of VB/C# and JavaScript code shortly.
Figure 17-1 Viewing the response of the Geocoding service in Chrome and Internet Explorer
Grab the geo-coordinates from the response to the Geocoding request and form a new URL, which is a request for a reverse geocoding operation: http://maps.googleapis.com/maps/api/geocode/xml?address=34.1143060,-118.1624520&sensor=false.
The URL is the same as before, but now the value of the
address parameter is a geocoded location and not a physical address. You will get an identical document, which describes the same physical address as before. In effect, both requests refer to the same location on the globe, regardless of whether the location was specified as a physical address or as a pair of geo-coordinates. It’s possible that you may not get the exact same address, but one very near the original.The Response Status
Note that the first element in the response is the
<status> element, and its value is OK for successful requests. If the URL you specified contains errors, or if Google can’t geocode the specified address, then the response will contain a different <status> element and no additional information:
Finally, if the coordinates you specified are in the middle of the ocean, you will get back a valid, but very generic, response, like the one shown in Listing 17-2.
Listing 17-2 The XML response of a geocoding request in an uninhabited area

This response contains a new element, the
<partial_match> element. If you receive a response that contains this element, you should probably ignore it. It means that the address you specified does not correspond to a known feature, such as a building or landmark, but is an approximate location. When this happens, the <partial_match> element will be set to true.JSON Response
If you prefer the JSON format, which is better suited for processing the results in a JavaScript client script, use the following URL (note that only the application name changes; the parameter names are the same): http://maps.googleapis.com/maps/api/geocode/json?address=1029 Palm Ave, S. Pasadena, CA&sensor=false.
Listing 17-3 shows the same response in JSON format. As you can see, the JSON response is an array with many custom objects, equivalent to the XML elements of Listing 17-1. The listing was condensed a little by moving the curly brackets on the same line as the objects they delimit to conserve space on the printed page.
Listing 17-3 The JSON response to a typical geocoding request
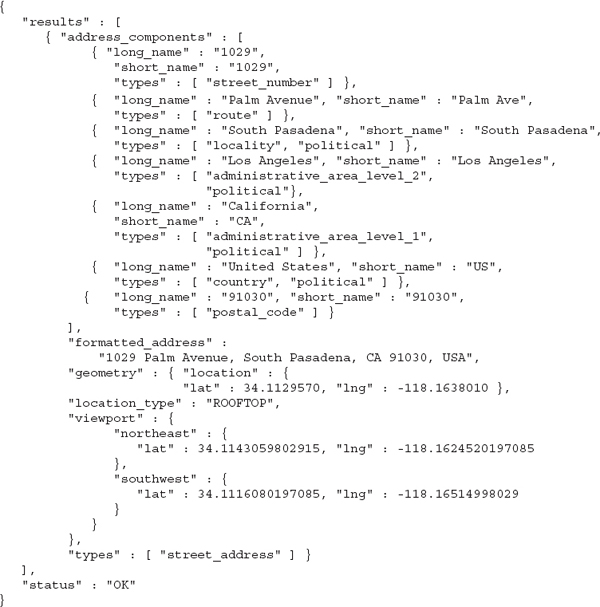
Both the JSON and XML fragments of the two listings describe the same document. The format is syntactically different, but the data is identical in both responses. The structure of the two documents is also identical.
The Response’s Elements
The query returns a custom object, the
results custom object, which has five items (one of them is a string and the remaining four are objects):• The
address_components object, which is an array with the components of the address. The address is specified in more detail than you’ll ever need.• The
formatted_address object, which is a string with the properly formatted address. This is not always the same as the address you passed to the method, but it’s the nearest address to the one you specified and it’s absolutely valid (according to Google, of course).• The
geometry object, which has three properties: the location, location_type, and viewport properties.• The
types object, which is an array of address types. For residential addresses, this array holds a single element, the street_address type.There’s a fifth object at the end, the
status object, which stores the status of the response. You should attempt to process the response only if the status of the response is “OK.” In the JSON response, the address components are property names, while in the XML response, the same components are element names. As you recall from Chapter 11, there’s a correspondence between XML elements and JSON properties, as both formats describe the same data.Each item in the
address_components has a type property and two descriptive properties: the short_name and long_name properties. The type denotes a part of the address: whether the item represents the address’s street or number, the city, and so on. Not all addresses will contain the same number of address components, especially if you’re working with suburban locations outside the United States.If you look up the Space Needle monument in Seattle (the
address argument being “Space Needle, Seattle”), the types array in the response will have the following two values:The Space Needle has two different descriptions because they both fit this type of landmark. Other landmarks may have even more types, and new landmark types may be added in the future as Google Maps is a project in progress.
Using the Geocoding API from Within JavaScript
To use the Geocoding services from within your script, you must create an object of the
Geocoder type like this:This object will enable your script to contact the Geocoding service by calling its
geocode() method. The geocode() method is executed asynchronously and it expects two arguments: an address or a geo-location (as with the HTTP request) and a function that will be executed when the result of the web service becomes available. The following is a typical call to the geocode() method:
The two arguments of the callback function are the service’s response to the request and the status of the response. The
pt variable in the preceding code segment is a LatLng object, declared with a statement like the following:or
If you want to pass a physical address to the method, set the
address parameter to the physical address you’re trying to reverse geocode, as shown here:
The
geocode() method returns its result always in JSON format. To retrieve the formatted_address attribute of the first result, use the following expression:When you specify an address as the argument, you’re probably interested in the location’s geo-location, so you must retrieve the
location attribute of the geometry object from the response:The complete physical address with all its details is still available in the response, of course. Typical scripts use the
formatted_address property of the first result:In the section “An Enhanced Map” later in this chapter, you’ll see how to display not only the coordinates of the map’s center point, but also the physical address of that location (if available). The contents of the status bar of the enhanced mapping page, shown in Figure 17-3, were generated by the
updateStatusBar() function, which is shown in Listing 17-4.Listing 17-4 The
update Status() function displays the map’s center coordinates and address.
The code extracts the
formatted_address property from the response and displays this string, along with the current coordinates, on the status bar. This is a rather simplistic approach; it assumes that the desired location is the first one. It uses the first element of the result array and ignores the rest. In the following section, you’ll see how to handle all results and let the user select the most appropriate address.The
updateStatusBar() function is attached to the dragend event of the map and is invoked every time the user drags the map to a new location. The following statement associates the function with the dragend event:
You can also use the
bounds_changed event, which is fired when the user drags the map, but the bounds_changed event is fired on zooming operations as well, and there’s no reason to update the status bar when the map is zoomed in or out because its center remains the same.Note that there’s a limit on the geocoding requests you can make, and Google will stop responding to your request if you exceed the 2,500 requests per day—unless, of course, you have a business license, in which case you can make as many requests as you wish. A business license is required if you make your application public and too many users hit the geocoding services through your site. If you keep hitting this limit for several days, Google will ban requests from your site permanently.
CAUTION A last word of caution: You should never, absolutely never, call the geocoding services from within a
drag event’s handler! Google will detect the frequency of the requests (several requests per second) and refuse to service them, even if you have a business license. If you get back the ACCESS DENIED status code, make sure your application is not calling the geocoding services too often and that it doesn’t exceed the maximum number of requests on a daily basis. As shocking as it may be, even Google’s servers do have limits.Responses with Multiple Matches
The geocoding response may contain multiple results if the address included in the request is not specific enough. In this case, each location is stored in its own
result object (in JSON) or <result> element (in XML). If you specify “Rushmore Mountain” as the address without any other qualification, the response will contain four different results:• Green Mountain, Mount Rushmore, SD 57702, USA, a natural feature in SD
• Rushmore Place, Forest Park, GA 30297, USA, a route in GA
• Ford Mountain, West Pennington, SD 57730, US, a natural feature in SD
• Mountain Meadow, Rapid City, SD 57702, USA, a route in SD
You will get even more results, and over a much broader area, if you specify “Athens” as the address. You’ll get back one “Athens” in Greece, obviously, and five more in Georgia, Alabama, Ohio, Texas, and Tennessee.
If you get multiple results, you should process them all and present a list of options to the user so that she can select the desired one. The
Geocoding.html application, shown in Figure 17-2, is a simple web page that demonstrates how to handle multiple results returned by the geocode() method. Users can enter an address in the text box and press enter. The script calls the Geocoding service with the user-supplied string as an argument. If the service returns a single location, the map is centered at that location. If the service returns multiple results, they’re all displayed as hyperlinks on a <div> element on top of the map, and the user can jump to any one of them by clicking the appropriate link, or the user can click the Close Dialog link to dismiss the window without changing location.
Figure 17-2 The address specification “Athens” resulted in six different locations, of which the user is prompted to select one.
The sample application uses a simple technique to display the results of the query on a floating window—a technique based on the
<div> element, which is populated as needed, and its visibility is turned on or off depending on the service’s response and the user’s actions. For more information on displaying a floating window on top of a web page, see Chapter 7. You will probably use a third-party tool for a more elegant auxiliary window, but no such tools are used in this book.To detect the pressing of the ENTER key, the application uses the following event listener:

The
locateAddress() function does all the work: It builds the proper URL for the Geocoding API, calls the service, and either pans the map to the specified location (if the service returns a single location) or displays all the matches on a floating window. Listing 17-5 shows the locateAddress() function.Listing 17-5 The function
locate Address() processes the results of a geocoding request.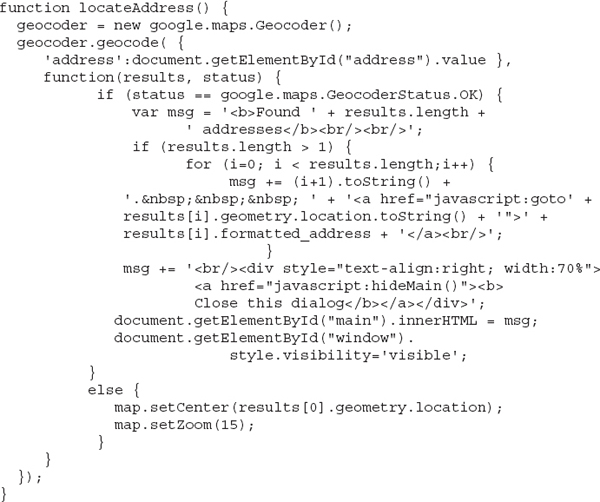
The indentation of the code is rather whacky, but this listing contains long nested statements that can’t be broken clearly on the printed page; you may wish to open the
GeoCoding.html file with a text editor and view the code in its original format.The function calls the
geocode() method of the API passing as an argument the string entered by the user on the page, and processes the results with a custom function, which is specified in-line. This anonymous function is activated automatically as soon as the results of the method are in.If the status of the response is “OK”, the function proceeds by counting the number of items in the
results array in the response. If there’s more than one element in the array, the function builds the string with the addresses to be displayed. It does so by iterating through the results array and reads each element’s geometry.location and formatted_address properties, which it then uses to build the contents to be displayed on the auxiliary window. Each item on this window is formatted as a hyperlink that users can click to pan the map to the desired location. To go to a specific location, the hyperlink calls the goto() function, passing as an argument the geolocation of the selected address:
Note how the script builds the URL of the anchor that calls the
goto() function; it builds a string that contains the coordinates of the location without parentheses:The
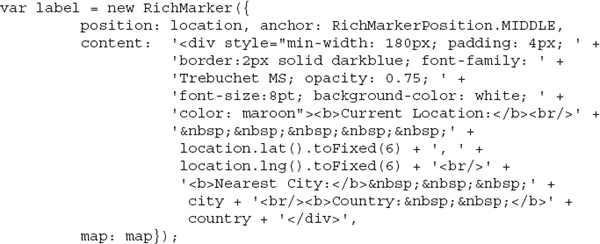
geometry.location object’s toString() method returns the coordinates in parentheses already, so there’s no reason to embed them in another pair of parentheses. In effect, this would cause a run-time error.The “Longitudes Latitudes” project presented in Chapter 1 uses the Geocoding service to retrieve the address of the point that was clicked on the map. This application, however, displays the address as a label directly on the map. The label is an instance of the
RichMarker object, and the script displays the coordinates of the point that was clicked, the name of the nearest city, and the corresponding country. Locations in the ocean return only the geo-coordinates and no address information. For your convenience, Listing 17-6 shows the statement that creates the label with the appropriate content and places it on the map (the entire listing is a single statement):Listing 17-6 Displaying geographical data on a RichMarker object
Localizing the Geocoding Service
The result returned by the geocoding API is in English, but this is an option you can overwrite by specifying the
region attribute. The parameter region=el will return the results in Greek, while the argument region=zh-cn will display the results in Chinese. The actual location names (street, city, and county names) will appear in the default language of the client computer.The
region parameter can also affect (or bias) the result. If the region is el (for Greece) and you’re searching for “Athens,” the first result will be Athens, Greece. If the region is US and you perform the same request, the first result will be Athens, Texas or Athens, Ohio.An Enhanced Map
The web page shown in Figure 17-3 is the
Basic Map with Status Bar.html sample page. In the black status bar below the map, this page displays the map’s current location as well as this location’s address. The status bar is another <div> element and not the browser’s status bar; browsers do not allow scripts to control their status bar.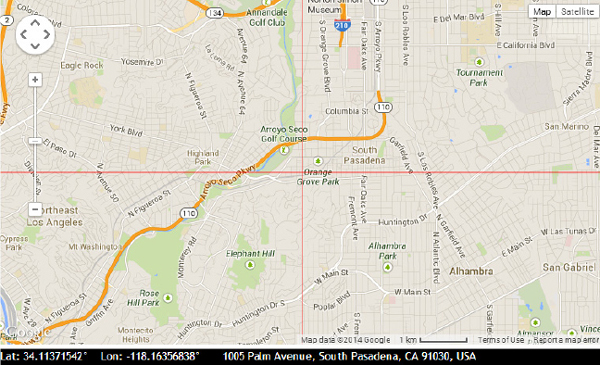
Figure 17-3 Displaying useful information regarding the map’s current location in the status bar
The Directions API
Another related API from Google is the Directions API, which provides instructions for getting from one location to another, as well as driving or walking distances. There’s an abundance of sites on the Internet that can calculate the distance between any two points and provide directions for getting from one point to another. The vast majority of these sites use Google’s Directions API and Google Maps.
You can access the functionality of the Directions API from within any application, regardless of whether the application is based on Google Maps. The map will make it easier for the user to specify the two points and visualize the suggested route, but this isn’t always true. If you know the address of the origin and the destination of your trip, you can use the Directions API to retrieve all the information you need. If you’re working for a delivery company, for example, you can incorporate this functionality in your applications and print the driving instructions automatically for each order to be delivered. No user interaction is required as long as you have a complete delivery address. Most drivers aren’t interested in seeing the route on the map; a few simple instructions will suffice. This is especially true for local drivers, who are familiar with the major avenues in their area and only need to know which exit to take to get to their destination, which is usually a small, less-known street.
Another advantage of using the Directions API in the context of a Windows application is that you’re in control of the printing process. While in the browser you’re limited to the printing capabilities of the browser (a notoriously cumbersome process), printing from within your application’s code is a breeze. You can also assign deliveries to drivers based on the drive’s duration, track distances travelled, charge by the distance, and so on. These operations are handled more easily in the context of a rich client application. On the other end of the spectrum, however, it’s much more practical to pass the instructions to a text-to-speech synthesis application running on a mobile device.
Using the Directions Web Service
You’ll certainly come up with original ways to use the Directions API and add value to your applications, so let’s see how it works. Like the Geocoding API, the Directions API can be accessed outside the context of a map through a URL (as a web service), or from within a script. To see the web service in action, enter the following URL in your browser:

and you will see an XML document with the directions for driving from the first address (specified with the
origin parameter) to the second address (specified by the destination parameter). Figure 17-4 shows the response to the preceding request, displayed in a browser window.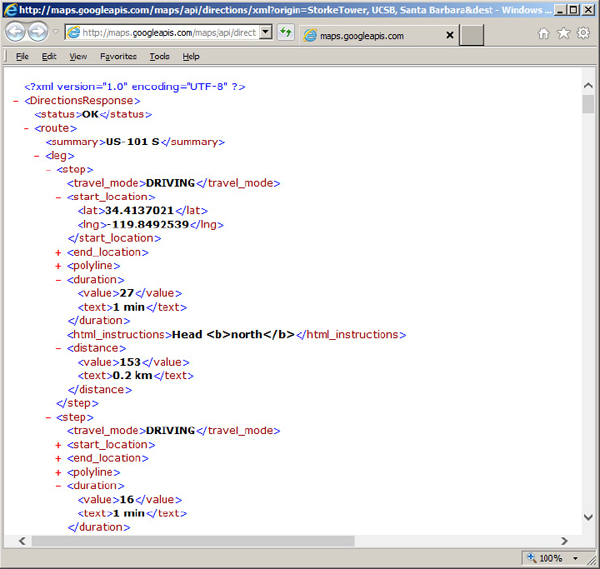
Figure 17-4 Viewing the driving instructions returned by a request to Google’s Directions API
The Directions Request and Response
The URL to contact the Directions service is made up of the address of the Directions service on Google’s server and four arguments: the two locations (specified as physical addresses or geo-locations), the driving mode, and the
sensor parameter. The driving mode, specified with the mode parameter, can have one of the following values: driving, walking, or bicycling. You are free to specify the two addresses as best as you can. The specific locations used in the preceding example are landmarks of two universities in Southern California. You can include the state if you wish, but the two university names are unique in the country and Google didn’t require any additional information.The document returned by the service contains the instructions in XML format and is shown in Listing 17-7 (I’ve skipped most of the document, which contains a
<step> element for each segment of the trip):Listing 17-7 The response of a typical request to the Directions API
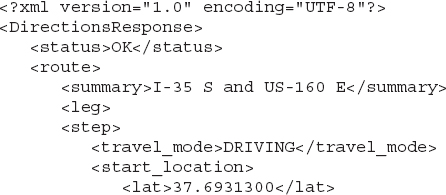

Processing the Directions Response
The trip is made up of one or more legs and each leg has one or more steps. The document is self-descriptive and it even contains each step’s instructions in HTML format, in the
<html_instructions> element. You can’t display the response as is, but you can easily parse the XML and create your own HTML document to display on your application’s interface.Here’s the LINQ query that extracts the
<html_instructions> elements and creates the output in HTML format before displaying it on a web browser control: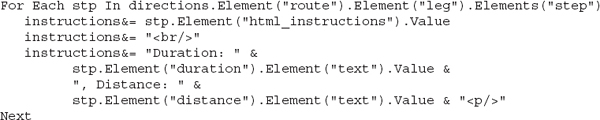
To combine the step instructions from the response in JavaScript, use the following code segment:

Each leg is made up of steps, and each step has its own duration/distance and description. The
<overview_polyline> element outlines the entire trip on the map. This element’s value is a path, and you will see in the section “Displaying the Route on the Map” how to display the suggested route on the map.Each step of the trip has an
<html_instructions> element that contains instructions. To generate a textual representation of the trip’s directions, you must combine the <html_instructions> elements of the response. Listing 17-8, which shows the HTML code of a web page that, was created by combining the <html_instructions> elements Directions service's response.Listing 17-8 Displaying the instructions as a HTML fragment

The Google Directions API, whose main form is shown in Figure 17-5, is a Windows application that demonstrates the use of the Directions API from within a .NET language. The driving directions are displayed on a second WebBrowser control docked to the right-hand side of the form.

Figure 17-5 Requesting driving/cycling/walking directions between any two locations in a Windows application
The Google Directions API sample application is a .NET application designed with Visual Studio 2010—you can open it with any later version of Visual Studio. The interface provides four boxes to specify either the physical addresses or the geo-coordinates of the trip’s origin and destination, and you can either type in these boxes or click on the map to set the trip’s origin and destination. The code will do the necessary reverse geocoding to translate geo-locations to addresses, if available. Even if you click in a forest, the application will attempt to retrieve the driving instructions from the Directions service. However, it will start and end the trip on a road, which may be quite far from the points you clicked.
The Google Directions API application combines both JavaScript and .NET components to demonstrate how you can exploit the best of both environments. When the Show Directions button is clicked, it calls the
calculateRoute() method in the script to display the route on the map with the following statement:where the arguments are the user-supplied data about the trip’s origin and destination and the selected travel mode. The
calculateRoute() function is discussed in the section “Requesting Directions from a Script,” a little later in this chapter. Then, it calls the same service to retrieve the actual driving instructions, which are displayed in the application’s window. The process of requesting the Directions service from within a .NET application is explained in the section “Requesting Directions from a Windows Application.”Trips with Multiple Legs
Simple trips with an origin and a destination have a single leg. If you want to go through specific interim destinations during the trip, you can define one or more so-called waypoints. A trip with waypoints has multiple legs: the first leg from the origin to the first waypoint, the second leg from the first waypoint to the second, and so on until the destination is reached. To specify one or more waypoints in your request, use the
waypoints argument and separate successive waypoints with a pipe symbol (|). The following URL describes a trip from Los Angeles to San Francisco with stops at Ventura, Lompoc, and Solvang.
This trip has four legs and the response contains four
<leg> elements (or four leg objects in the case of JSON). Figure 17-6 shows the XML response to a query with a multi-leg trip. The response is too long to repeat here, but you can navigate to the preceding URL and see it in your browser.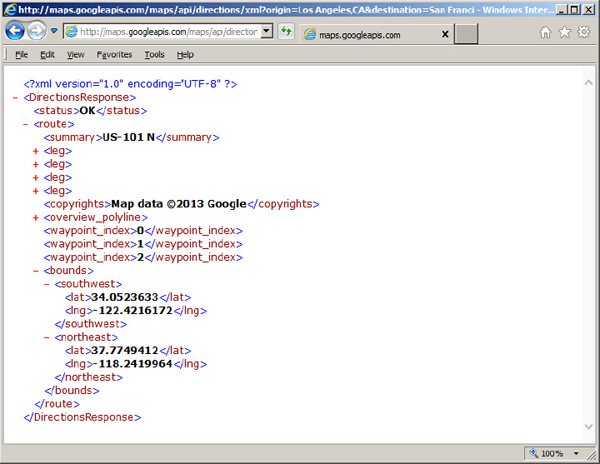
Figure 17-6 The structure of the Directions response when the trip contains multiple legs
The Trip’s Paths
Each step in the response contains a
<polyline> element, which in turn contains a <points> element with a rather odd value. The <points> element contains the points that define the step’s path, in text format. Google uses a special technique to convert geocoordinates into text, which is well documented, but you’ll hardly ever need to decode this information on your own. You can request that the path described by the <polyline> element be rendered on the map, but this option is available only when you call the web service from within a script. The encoded version of the path was discussed in Chapter 10, where you saw how to decode the path into a series of LatLng objects. You won’t have to decode the path on your own, because you can use the encoded form of the path to display the route on the map.Requesting Directions from a Windows Application
To make a request from within a Windows application, you must first create the URL of the service, including the parameters. The following VB statement builds the URL of the Geocode request:

The variables
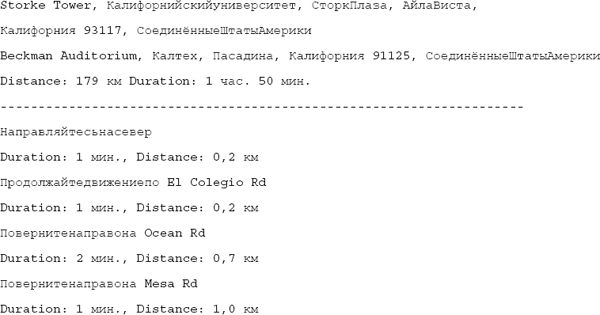
origin, destination, mode, and language have been declared and populated with the content of the appropriate controls before the call. To request the driving instructions in Russian from a UCSB landmark to a Caltech building, use the following URL; it’s identical to the one used in the first example of this section, except for the insertion of the language parameter.
In case you’re wondering what the result looks like, here’s the beginning of the instructions. Everything is in Russian, except for the street names and the captions “Duration” and “Distance,” which are part of the code.
The code that extracts the instructions from the service’s response is also simple and is shown in Listing 17-9.
Listing 17-9 Extracting the instructions from the response of the Directions service

Requesting Directions from a Script
In this section, you're going to see the code of the
Directions Service.html web page, which prompts the user for the addresses of two locations and displays the driving directions for getting from the origin to the destination. The web page is shown in Figure 17-7, and you can enter the origin and destination of the trip in the two boxes at the top of the page. Alternatively, you can center the map at a location and click the Origin or Destination link to copy the coordinates of the map’s center point to the two boxes. The two locations can be specified either as physical addresses or as geo-coordinates.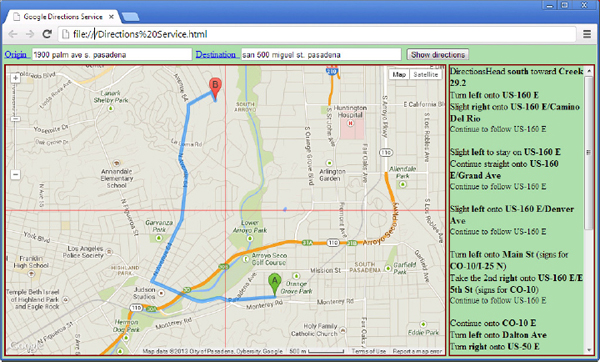
Figure 17-7 The Directions Service page demonstrates how to use the Directions service from within a client script.
To contact the Directions API from within your script, you must create an object of the
DirectionsService type:Then, you can call its
route() method to request instructions and distances. The route() method is executed asynchronously and you must specify two arguments when you call it: the request and the name of a function that will be called as soon as the result is available at the client.The request object has three attributes:
origin, destination, and mode.
In the preceding code,
travelMode is a member of the google.maps.DirectionsTravelMode enumeration: DRIVING, WALKING, or BICYCLING. The origin and destination arguments are the addresses of the two endpoints of the trips and they’re strings. You use the values entered by the user on the appropriate controls.To request driving directions for a specific request object, like the one just shown, call the
route() method as follows: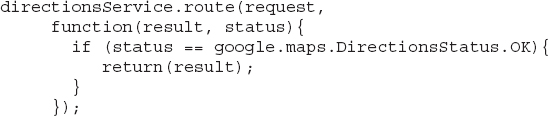
Displaying the Route on the Map
The callback function usually returns the response, but you can also request that it renders the suggested path on the map with the
setDirections() method, as shown here:The
directionsDisplay variable represents another object of the Directions API and must be declared and initialized as follows:The
setDirections() method can only be called from within a scrip that resides in the same web page as the map. Listing 17-10 shows a JavaScript function that retrieves the directions between two locations and displays the directions on a pane:Listing 17-10 The
claculate Route() function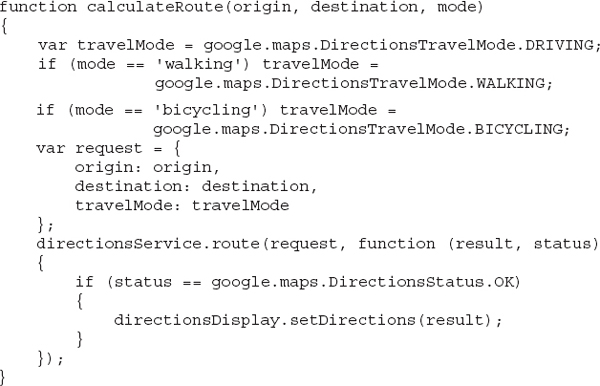
The
directionsService variable represents the Directions web service and it must be declared at the script level as follows:The
route() method of the DirectionsService object contacts the remote service and retrieves the result. The method is executed asynchronously and its second argument is a callback function, a function that will be called as soon as the result becomes available. This function is usually defined inline and it processes its two arguments, the result and status arguments. The result argument contains the service’s response and the status argument contains a status code. If the status is OK, you can process the result; otherwise, you should display an error message. Fortunately, the processing of the result is trivial, thanks to the directionsDisplay component.The
directionsDisplay variable represents a component that renders the route returned by the Directions service object onto the map. First, you must initialize the variable as follows:and then you must associate it with the Map object on which it will render the trip’s path:
Finally, when the Direction service’s response becomes available, you can call the
setDirections method of the directionsDisplay variable to render the trip’s path on the map:So far, you have made a request to the Directions web service, retrieved the result with the driving (or biking or walking) directions, and rendered the route on the map. How about displaying the text on your page? Well,
directionsDisplay to the rescue. The same object that rendered the trip’s path on the map can also display the textual directions on a <div> or <span> element, if you associate it with the appropriate element. Just as you associated the directionsDisplay component with the Map object to render the path automatically, you can associate it with a <div> element using the setPanel() method:The
directionsDisplay is a very handy component because it completely automates the processing of the response of the Directions service. If you need more information on using the directionsDisplay component from within a web page, you can look up the Directions Service.html sample page included with this chapter’s support material.Summary
You have seen practically all aspects of the Google Maps API, including the geometry library, as well as two related APIs: the Geocoding and Directions APIs. The two related APIs can be used outside the context of a map, and you can exploit them from within Windows applications.
There are a few more things you can do with Google maps. One of them is to display a really large set of data as a special type of graph. When you want to display many locations on the map, sometimes it makes no sense to display individual locations. A graph that depicts the distribution of the locations with varying colors conveys very important information. This type of graph is called heatmap, and it’s the main topic of the following chapter.
..................Content has been hidden....................
You can't read the all page of ebook, please click here login for view all page.