
CHAPTER |
|
11 |
The KML Data Format: Persisting Spatial Data |
Being able to place markers and shapes on a map is very exciting and opens a world of capabilities, but it wouldn’t be of much use without the ability to save the shapes and reload them in a later session. For all types of data, there exist standards for describing it so they can be shared among systems and users, and geographical data are no exception. Among the many standards for spatial data, Google has adopted the KML standard, which is the topic of this chapter.
KML stands for Keyhole Markup Language, and it’s an XML schema for representing items on a map. KML was actually adopted by Google for Google Earth and can become very complex. When used with Google Earth, it can describe even the movement of the camera, should you wish to create flyovers. Google Maps supports a subset of the KML language, and this subset supports all the features I’ve discussed so far: markers, polylines, and shapes. You can also use extended attributes to describe just about anything on the map. In this chapter, you learn the basic elements of the KML language, how to create KML documents on your own, and how to display KML documents on the map.
XML 101
KML is pure XML with tags specific to geographical data. If you’re familiar with XML, you can skip this section and read about KML. This section contains a very short introduction to XML, which is the most widely accepted protocol for storing structured data of any type, and it’s used in all computing fields.
So, what’s XML? XML is a way to describe data in unambiguous ways. XML was created to address a very basic need, that of exchanging data between applications and systems. It’s also a pure text protocol. Yes, you can embed binary information in an XML file, but it must first be encoded as a sequence of letters and digits. Because of this, XML is firewall-friendly: It can be safely transmitted from one computer to another over HTTP and overcomes the problem of moving binary data between computers (a basic requirement for data exchange in our connected world).
XML Uses Named Delimiters
XML uses delimiters to identify each data item. Unlike other delimited formats, however, XML allows you to define the names of these delimiters. The only requirement is that delimiters be placed in a pair of angle brackets and appear in pairs before and after the data item they delimit.
Let’s say you want to store data about states in a format that can be easily moved between computers. Standard file types may come to mind, such as comma or tab-delimited files, structured data files with headers, and so on. Here’s one possible method of coding the state of California in XML:

Every data item is placed between a pair of named tags. A tag is a name embedded in angle brackets, such as
<Name>, <Capital>, or <Code>. The segment of the XML document that these tags delimit is called an element. XML contains delimited data, but the delimiters are not some special characters; they’re strings that describe their contents. Moreover, the actual tag names are irrelevant: You get to choose the names that best describe your data. HTML uses identical syntax, only the tags are predefined and they describe how the content will be rendered in the browser. The Temperature element is enclosed by two tags with the same name in angle brackets, the <Temperature> and </Temperature> tags. The only difference between the two is that the closing tag’s name is prefixed by backslash. The name of the closing tag must match exactly the corresponding opening tag as XML is case sensitive. In between the opening and closing tag there’s usually a value, which is the element’s value. The value of the Temperature element is 81 (degrees Fahrenheit, presumably).You’ll rarely create an XML document to store a single entity. In practice, you’ll store a collection of
State elements. To do so, you can embed any number of <State> tags under another tag, say the <States> tag. The following code segment outlines the structure of a XML document with three states. (I’ve omitted the details to focus on the outline of the collection in XML format.)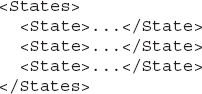
XML elements can be nested to reveal the structure of the data they contain. This is the most prominent characteristic of XML, but more on this later.
Element contents are simple values such as strings, dates, and numbers. However, elements are not limited to simple values (or primitive data types); they may contain other elements. You can think of elements as objects. Just as objects can have properties that are objects themselves, elements may enclose other elements. The
<Coordinates> tag may contain two nested tags, the <Latitude> and <Longitude> tags, which are decimal numeric values. XML elements may contain other elements to any depth; the deepest nested elements, however, are simple values: strings, numbers, and dates.Nesting XML Elements
XML owes its flexibility to the fact that elements can be nested to any depth: You can insert elements within elements to specify the structure of the entity you’re describing. Take a look at the following XML segment that represents the country of France:
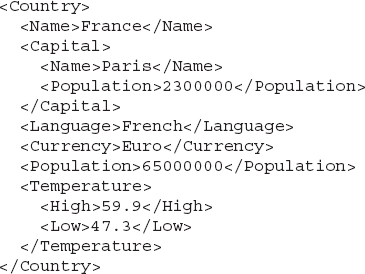
Under the root element
County are six distinct elements: the Name, Language, Currency, and Population elements that represent single values, and the Capital and Temperature elements that contain nested elements. The Capital element contains two subelements: the name and population of the country’s capital. The Temperature element is also a compound one because it contains the High and Low subelements.You have probably noticed in the preceding example that the
<Population> tag is used to denote the population of the country, as well as the population of the capital. These are two distinct Population elements because they belong to different parent elements. What makes an element unique is not its name, but its path in the document. It’s the same as storing multiple files with the same name in different folders on your hard drive.Here’s another fairly simple example of an XML document with nested elements. The
CityData element stores data about cities and includes geographical data.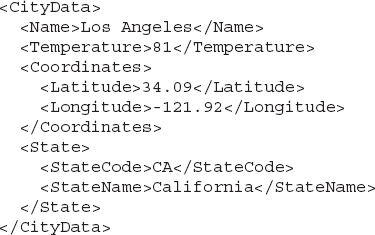
Qualifying Elements with Attributes
In addition to nested elements, each element may contain attributes, which are named values contained in the tag. The temperature in the preceding example is expressed in degrees Fahrenheit, as is obvious from its value. To be on the safe side, you should include this piece of information as well. If you were recording evaporation temperatures, or the temperature of the upper layers in the atmosphere, their units would no longer be “obvious.” Yet this isn’t essential information that deserves its own tag; it’s more of a clarification that qualifies the value of the
<Temperature> tag. It’s possible to include a qualifier in the tag itself, as shown here:degrees is an attribute of the <Temperature> tag, and you may include any number of attributes in a tag. Its name is a string that doesn’t contain spaces and its value is always a string and as such it must be enclosed in double quotes. Attributes qualify in some way the tag to which they belong, but the element’s primary value is the one between the two tags. An attribute’s value may be an arbitrary value, or a member of a collection of values. In the example, the degrees attribute could have one of the values Celsius and Fahrenheit. However, an attribute has to be a primitive data type: You can't nest attributes.You have your choice of specifying some data as attributes and others as elements. There are no hard rules as to what should be coded as attributes and what should be coded as elements. You may run into XML documents with a few elements and many attributes, or many elements and no attributes at all. In most XML documents, attributes are used to qualify the elements to which they belong.
The Three XML Rules
That’s all there is to know about XML! It’s made up of elements, which may contain other nested elements and attributes. Elements are delimited by tags, and tag names are arbitrary. You make up the tag names so that they reflect the entity they contain; once you’ve determined the element names, however, you must use them consistently. There are only a few rules you need to know in order to build valid XML documents:
• Tags are case-sensitive, may not contain spaces, and they always appear in pairs: the opening and closing tag. When you work with XML, you must pay attention to casing as
<Name> and <name> are two totally different tags.• All attribute values must be enclosed in double quotes—even integer values.
• It goes without saying that the tags must be properly nested; otherwise, the document wouldn’t have a structure. You must always close the innermost element first, then its immediate parent, and so on.
Now that you have a basic understanding of the nature and structure of XML, let’s switch out attention to KML and see the specific tags for describing geographical data. KML is pure XML with a specific schema.
XML Schemas
The basic characteristic of XML is that, in addition to the data, it also describes the structure of the data. This structure is called schema and there are ways to specify the schema of an XML document. The schema specification is another XML file and it’s called XML Schema Definition (XSD). XSD files contain the names of the tags and the data type of their values. I’m not going to discuss how to build schema files here, but the idea is that XSD files allow you to create XML documents that conform to a structure. XML editors can take into consideration the schema and won’t let you insert your own tags or tags out of place. In effect, the schema both serves and protects you. A dedicated KML editor, for example, is nothing more than an XML editor that complies with the KML schema. As you type your KML document, the editor suggests the possible elements at the current location and will not accept elements or attributes that do not conform to the schema definition. Let’s sidetrack for a moment to see the XSD schema for the
<Cities> tag (an element that may contain one or more <City> tags). The following schema tag specifies that the City element is a string, and it may occur multiple times under the same parent element:Just as you use XML to describe your data, you can use XML to describe the structure of XML documents for storing specific data. Schemas are published by industry consortiums and all commonly used schemas can be found on the Web. You’re welcome to view the complete schema for KML documents; it’s fairly intimidating, so focus on the basic information presented in this chapter to become familiar with its basic features first.
Understanding KML
KML is an XML-based protocol for describing geographic data on top of a map. The data include points (which are usually rendered as markers), lines, and polygons. The KML protocol is a very rich protocol because it was designed to be used with Google Earth. You can use it to describe buildings (with a third coordinate that corresponds to their height), set your view point, and even create a fly-by animation. These features are available in Google Earth only, so in this chapter you’re going to learn about a subset of the KML, which is adequate for describing annotations on a flat map. All modern GIS applications support KML and many related applications provide tools to import/export their native data in KML format. AutoCAD is a typical example and the ArcInfo suite is another.
The Structure of a KML Document
The top element in a KML document is the
Document element. As odd as it may appear, the <Document> tag is optional. The items that appear in the document are placemarks. A placemark is a feature on the map; it can be a location (a point), a line, or a shape. As far as KML goes, everything you place on a map is a placemark. Google Earth supports additional types of placemarks, but for Google Maps these are the three types of placemarks.A placemark is identified by the
<Placemark> tag, and it may contain multiple items. If you create a placemark that corresponds to a university, or a county, you may include both a location and a shape that outlines the item. At a high level, viewers are interested in the location of an item and a short description. As they zoom in, they may wish to see more details about the item, in which case the outline may become visible.Whatever item you place in a placemark represents a map feature and is described with its geo-coordinates, so let’s start our discussion of KML by examining how geospatial data are represented in KML.
Defining Points
The most basic element in KML is the
coordinates element, which represents a single point, or a series of points that define a path. This element’s value is a comma-separated list of values: longitude, latitude, and altitude values. A location’s coordinates are separated by a comma without spaces. Here’s a coordinates element that corresponds to the location of Rome on the earth’s surface:The first value is the longitude, the second value is the latitude, and the last one is the altitude. The altitude value is optional and it’s used only in KML files intended for Google Earth. In the context of Google Maps, you can omit the last value, or set it to zero. The coordinates can be expressed with many decimal digits, but there’s no point in expressing a city’s coordinates with too much accuracy. To specify the coordinates of St. Peter’s Basilica in Rome, you would use more decimal digits:
TIP Note that there are no spaces between the values and that the geo-coordinates of a point are specified with the longitude first. This is the reverse order in which you specify coordinates with the Google Maps API (the
LatLng object, for example). It would be much safer if the KML protocol included elements such as <Longitude> and <Latitude>, but its designers decided to reduce the total file size at the cost of a potential ambiguity.The
coordinates element of the preceding example specifies a single point on the globe. A point can be the location of a monument, a house, anything that can be represented with a marker. To represent a point item, use the <Point> tag with a nested <coordinates> tag:
Defining Paths and Polygons
You can also represent items with multiple coordinates in KML. These items are specified as a path, which can be a route, a country outline, and so on. To represent multiple point items, you use the
coordinates element with multiple coordinates, such as the following:This element specifies a path with three points. Note that the coordinates of successive points are separated by a space; the comma delimits the individual components of each point’s coordinates. The delimiter between point coordinates need not be a space character; you can use any white space in its place. Here’s an equally valid (yet much easier to visualize and read) way of specifying the same path as in the preceding example:

To insert the definition of a path in a KML file, use the
LineString element:
The
LineString element is used to insert a path in the KML document. To insert a polygon (which is a closed path), use the LinearRing element instead. The LinearRing element contains a series of geo-coordinates, just like the LineString element, but it closes the path automatically, even if the last coordinate doesn’t coincide with the first one.Closed polygons must also be enclosed in another element, the
outerBoundaryIs element. To insert a simple polygon in the document, you should use the following compound element:
The name of the outer element is quite odd, but there’s a good reason for it. A polygon may contain a hole, which is defined as another polygon with the
innerBoundaryIs element. This way, the KML protocol differentiates between the outer polygon and the inner polygon (or polygons) that describe one or more holes in the outer polygon.TIP When you draw polygons with the Google Maps API, you don’t have to specify the outer polygon and the inner polygons that correspond to holes. Every polygon that’s contained in another polygon is a hole of the containing polygon. This is not the case with KML
Everything Is a Placemark
All items you specify in the KML file are placemarks and are represented by
<Placemark> tags. This element has a name and a description and, at the very least, either a <Point> or a <LineString> (or <LinearRing>) tag. The entire KML file is a sequence of Placemark elements, as in the following: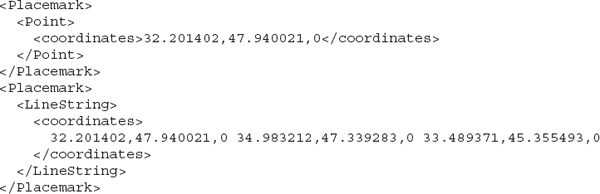
The preceding example contains two placemarks, one of them a marker and the other one a path. When rendered on the map, they will have the default appearance.
Besides a geographical entity, the
Point element may contain a name and a description element. Both elements must appear under the <Placemark> tag, as shown here: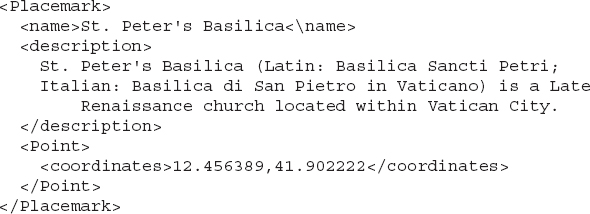
The description may contain HTML, too. To include HTML in the
description element, you must either escape the special symbols (in other words, replace the < symbol with the text < and similar escape codes for all symbols that have special meaning in HTML), or use a CDATA tag within the <description> tag. Then, you can embed any HTML code in the CDATA tag, as shown here:
When this item is opened either in Google Maps or in Google Earth, the specific point will be identified by a marker. The item’s name will become the marker’s title and the item’s description will appear in the marker’s info window.
Finally, all
<Placemark> tags are nested under a <Document>tag:
In short, a KML document contains one or more
<Placemark> tags (usually many such tags), which represent features on the map. The features supported on a Google map can be points, lines, and polygons, and they’re identified by one of the <Point>, <LineString> or <LinearRing> tags. These tags contain a nested <coordinates> tag, which contains as many points as necessary. Finally, they can have two descriptive subelements, the name and description elements.Viewing KML Files on Google Maps
The few elements presented so far are adequate for describing the shapes you can place on a map in a KML document. Let’s look at a KML document with the outline of a state and the locations of a few major cities. Figure 11-1 shows the KML file displayed in the Google Maps site.
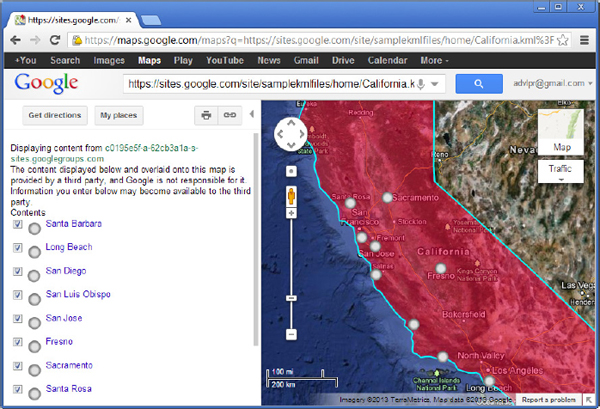
Figure 11-1 Displaying a KML file with the outline of the state of California and a few large cities on top of Google Maps
Opening a KML file on top of a map requires that the file reside in a public server because the file won’t be processed at the client. Google will read the file, create the document with the map and the necessary overlays, and then send it to the client. To verify this, take a look at the source code of the file displayed—if you dare. There’s no link to the file and you won’t find a single city name in the page’s HTML file. If you have your own web server, you can copy the sample KML files to this server. If not, you can still follow this section’s examples using the KML files that were uploaded to a Google site for your convenience.
Create a URL for the Google Maps site followed by the q parameter and the URL of the KML document you want to view: http://maps.google.com?q=KML_URL. In this URL, KML_URL is the URL of a KML document posted on a public server. Enter this URL in your browser address box and press ENTER. The KML document shown in Figure 11-1 can be located at https://sites.google.com/site/samplekmlfiles/, which is a Google Site set up for this book’s examples. The file is shared and you can access it without a password.
On this site, you will find the
California.kml file, which is also included in this chapter’s material. To insert a reference to this file in your page, right-click the Download link under the file name and from the context menu, select the Copy Shortcut command. The complete URL of the file is https://sites.google.com/site/samplekmlfiles/home/California.kml?attredirects=0&d=1.If the KML file is a valid one, it will be rendered on top of the map, as shown in Figure 11-1. In addition to the shapes and markers on the map, the same items will appear in the left pane of the page. The names of the items are hyperlinks: When clicked, they cause an info window to appear at the corresponding feature. You can also show or hide items by checking or clearing the box in front of an item’s name in the list.
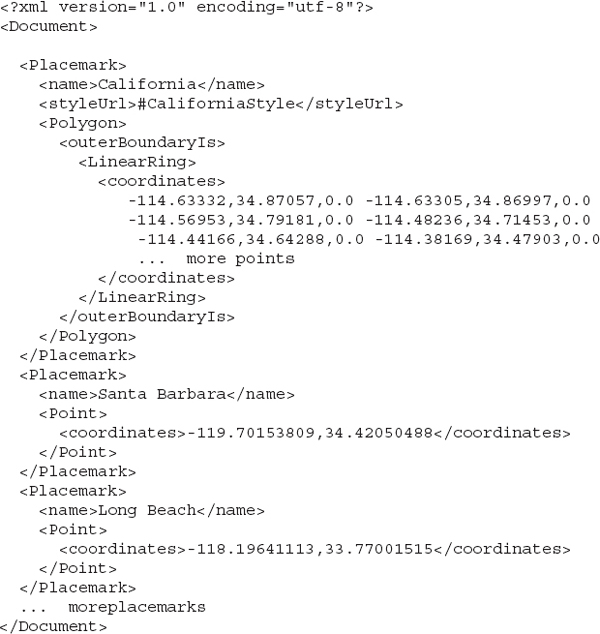
The data for the outline of California was created manually with the Map Tracing application of Chapter 9. The entire state is approximated with a couple hundred points only. As for the city coordinates, they were also generated with the Map Tracing application but saved as individual points rather than as a path’s vertices. Listing 11-1 is a segment of the
California.kml file (most of the cities were omitted, as well as most of the vertices of the state’s polygon). The definitions of the styles were omitted from the listing for the sake of brevity; please open the file with an XML editor to view it in its entirety.Listing 11-1 A KML document with California’s outline and a few major cities
To demonstrate the use of the
CDATA section, the KML document contains the following description for the town of Santa Barbara:
The
[CDATA] section contains straight HTML code that formats the city data as a table. When the California.kml document is viewed on Google Maps, the info window for Santa Barbara looks like the one shown in Figure 11-2. It’s worth noting on the same figure that the text of the CDATA section is shown in the left pane, under the corresponding marker’s name. This is the default mechanism for displaying KML files on top of Google Maps, and there’s nothing you can do about it. You will see shortly how to place KML documents on top of your own map.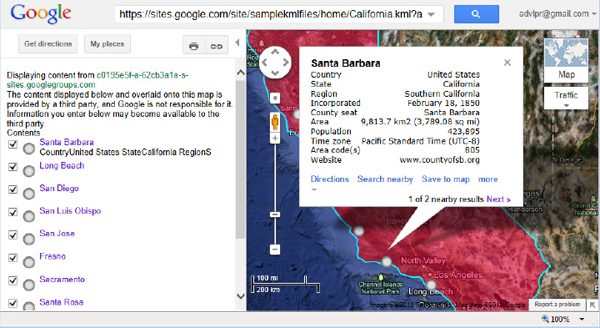
Figure 11-2 Displaying additional data about locations in HTML format
The icons for the cities were specified in the
California.kml file with the Icon attribute of the style element that applies to cities.Tools for Preparing KML Files
As mentioned earlier, the shapes described in the KML file will be rendered on the map only if the file contains valid KML code. If not, no specific warnings will be generated; instead, you will see a message to the effect that the file you’ve loaded is not a valid KML file. So, before you use your KML files, make sure that they’re valid. In most cases, KML files are generated by applications that process large sets of data, which most likely come from databases. There are also dedicated KML editors, which you may wish to use to become familiar with KML, but there’s not much point in editing large sets of coordinates manually.
An Online KML Editor
You can edit a KML file and view it on a map at http://display-kml.appspot.com/, shown in Figure 11-3. You can’t use this online editor for large KML files, but it’s a good starting point. Practical KML files can grow very large, but you will probably use a tool or your own program to produce such files.

Figure 11-3 Connect to this site to edit and preview small KML files.
KML Validators
Another useful operation on KML documents is to check that they contain valid KML code. Displaying a KML document correctly on the map doesn’t mean that every bit of the document is correct; browsers are very forgiving and chances are that your new KML file may contain some invalid data, which may result in a few markers not being shown on the map, or some other hard-to-notice mistake. There are KML validation tools that you can download and install at your computer. You can also use KML editors, which are nothing more than XML editors that validate against the KML schema as you type.
An online KML validator is shown in Figure 11-4. This site allows you to enter the URL of a KML file and validates it. By the way, the application is open source and you can download and use it locally.

Figure 11-4 The FEED Validator site for validating KML documents
To access the application, go to http://feedvalidator.org/check.cgi and enter the URL of the document you wish to validate. The document must reside in a public server, as explained in the earlier section “Viewing KML Files on Google Maps”; if you don’t have your own web server, use a public one as you did in the preceding section.
In Figure 11-4, you see the results of the validation of the
California.kml file. The document is valid, but the validator suggested that an id attribute be added to the Placemark elements. KML validators are much more useful than KML editors because KML files are usually generated automatically by custom applications, and you need only verify that your application generates a properly structured KML document. You’ll never have to create a KML document manually.Adding a KML Layer to Your Map
In this section, you’re going to overlay a KML document on top of a Google map. Start by creating a simple page that displays a Google map, initialize the map as usual, and then insert the following statements to read and render the KML document as a separate layer:

The last statement creates a
KmlLayer object, which is a layer that contains the shapes described in the KML document and is rendered on top of the specified map. The KmlLayer object’s constructor accepts two arguments—the URL of the KML file and the layer’s options. The map option is the only mandatory one, but there are a few more options, such as suppressInfoWindows and preserveViewport, which tell the browser whether it should (or should not) display an info windows upon the selection of an item in the KML layer, and whether to scroll the viewport in order to fit the info window, if needed. The default value for both options is false. Unfortunately, the preserveViewport is a property of the KmlLayer object and not of the InfoWindow object; you can't prevent the scrolling of the map when any other info window is opened.The KML Demo Application
The annotation layer’s data is stored in a KML file at a web server and downloaded by the script as needed. The KML layer is rendered on the map automatically with no user action or any special programming effort. The statement that creates the new
KmlLayer specifies the location of the KML file and tells Google Maps to render the items contained in the file. To see how to open a KML file and create an overlay with the file’s data on top of the map in your own web page, open the KML Demo.html application, shown in Figure 11-5. It’s a simple web page with a script that displays a map in the usual <div> element and then creates a new layer with the KML data using the following two statements:
Figure 11-5 Selected lines of the Paris metro and their stations specified as placemarks in a KML file and viewed as a map overlay

These two statements appear at the end of the page’s
initialize() function. The first statement creates a KmlLayer object with the data of the file specified with the argument of the constructor of the KmlLayer object, and the second statement places the new layer on top of the map. It’s that simple (as long as the specified file resides at a public server).The
KML Demo.kml file contains the path of a few lines of the Paris metro along with their stations and the path of line 12 without any stations. The overlaid data looks fine on the map, but the page is totally static. You can’t select any item on the map with the mouse to view its details, not even a marker. It’s possible to detect the selection of an item on the KML layer and react to this action, but only through custom code, as you will see in the following section.Handling KML Events
In this section, you’re going to revise the
KML Demo.html page by adding an event listener to the overlay’s click event. This section’s sample application is called KML Demo with Events.html, and it’s based on the simple page that loads the KML document you created in the previous section. The new page detects the click event on an item of the KML layer and reacts to it by displaying the selected item’s data, including an ID value, as shown in Figure 11-6.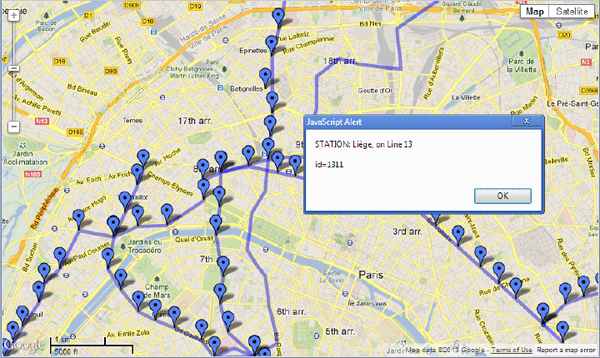
Figure 11-6 Capturing events on the KmlLayer object
The
KmlLayer object fires a few events of its own, regardless of the item that was clicked. To customize the interaction of the user with the layer’s items to some extent, you must (a) disable the default reaction of the layer to the click event and (b) provide a custom function to handle the event. To disable the default interaction, set the suppressInfoWindows attribute to true in the KmlLayer object’s constructor, as shown here:Then, add a listener for the
click event in the layer that contains the items you’re interested in, with a statement like the following:
The
KmlLayer’s EventsThe
KmlLayer object recognizes three events in all: the status_changed event, which is fired when the layer has finished loading, the click event, and the defaultviewport_changed event. The most commonly used event is the click event, which is fired when any of the layer’s features is clicked; it passes to the script the KmlEvent argument, which provides information about the feature that was clicked. The KmlEvent argument exposes the KmlFeatureData object, which represents the item that was clicked. The KmlFeatureData property of the KmlEvent argument contains information about the selected KML item; you can access this information from within your script through the properties which are listed in Table 11-1.
Table 11-1 The properties of the KmlEvent argument
In practice, the most useful property is the
id property, which uniquely identifies a feature in the layer. This feature most likely is stored in a database with the same id so that you use the id stored in the KML document to request additional data from the database.Handling the KmlLayer’s Click Event
To use the
featureData property in a client script, you must first add a listener to the click event of the KML layer as follows:
The
click event is fired when any item on the layer is clicked; you can’t attach an event listener to specific objects in the KML layer. You can extract the id of the selected item in your script and call a function to process the selected item. The sample application displays the id along with the feature’s name in an alert box to keep the code simple (see Figure 11-6). In Chapter 15, you learn how to call web services from within your script and display the service’s response on the same web page that contains the script. The following is the event listener of the KML Demo application: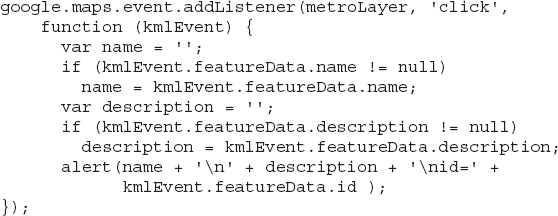
CAUTION Please note the following odd behavior of the
id attribute: If the KML is posted on a production server, the script will retrieve its value as explained here. If you use a drive like Google Drive for your test, the script will read a random id, which is a long hexadecimal number.The
KmlEvent Argument You must also call the preventDefault() method of the kmlEvent argument to cancel the event’s default action from within the event listener:The following
Placemark element represents a metro line and is rendered on the map with a Polyline object. Note that the element has the following subelements: a name, a description, and a series of coordinates that correspond to the polyline’s vertices.
Figure 11-7 shows the custom info window that’s displayed when the user clicks the
Polyline object that represents the metro line 13. To make the application more useful, you can display additional information, such as the number of passengers on the selected line, or the number of passengers boarding at the selected station every day, the arrival time of the next train at the station, and any other type of information you can retrieve from a database. Note that the placemarks are organized in a tree structure in the left pane of the page. This organization is possible because KML supports the Folder element. The concept of organizing placemarks in folders is discussed in the following section.
Figure 11-7 When you select an item in the KML list in the left pane, the custom info window is displayed automatically on the map.
The data used in the examples is embedded in the KML document, but you can modify the application and make it interact with a remote database. If all geography items (stations and lines) are stored in a database and they have a unique ID, you can pass this ID to the client through the initial KML file. The client application can then request additional information about each item from the database by passing the ID to a web service.
Organizing Placemarks in Folders
A very useful KML tag is the
<Folder> tag, which allows you to organize the various items in groups and even nest groups within others. If you open a KML file that contains groups in Google Maps, you will see this structure in the left pane, as shown in Figure 11-7. The folders and their contents are displayed in a tree structure and you can display/hide an entire folder by checking or clearing the box in front of the folder’s name.The
Folder element may contain practically any KML element. The name and description elements under the Folder element are equivalent to the same two subelements of the Placemark element; they specify the folder’s name and a description either in plain text or HTML format.Let’s create a KML with folders to store the lines of the Paris metro. Each metro line will be represented by its own folder, which will be named after the specific line it contains. Under each line’s folder, you’ll store the line’s path, which is a single item. The line’s stations will be stored in their own folder, the
Stations folder, nested under the line’s folder. Listing 11-2 shows the outline of the suggested KML file:Listing 11-2 A KML fragment with
<Placemark> tags organized in folders
A sample file,
Paris Metro Folders.kml, with a few metro lines is included in this chapter’s material. You can open this file in Google Maps as explained already to view its structure and render its elements on the map. The same file can also be accessed at https://sites.google.com/site/samplekmlfilessite. KML folders can be nested to any level and will come in very handy when you work with large datasets. Of course, the data must lend itself to a hierarchical representation to organize it efficiently within folders.Generating KML Files
Before ending this chapter, let’s discuss briefly the topic of generating KML documents with a Windows application. As mentioned at the beginning of this chapter, it’s possible to generate KML files in JavaScript, but you can’t store them at the client—not without resorting to a server component and not without the hassles of moving very large data sets to the server. Your best bet is to generate KML documents with dedicated applications at the server, or to export data in this format from SQL Server (see Chapter 13 for a detailed discussion of SQL Server’s spatial features).
The Map Tracing application of Chapter 9 converts the lines traced by the user and their vertices into a KML document. The function that generates the KML document is surprisingly simple (see Listing 11-3).
Listing 11-3 Generating KML for a collection of paths in Visual Basic
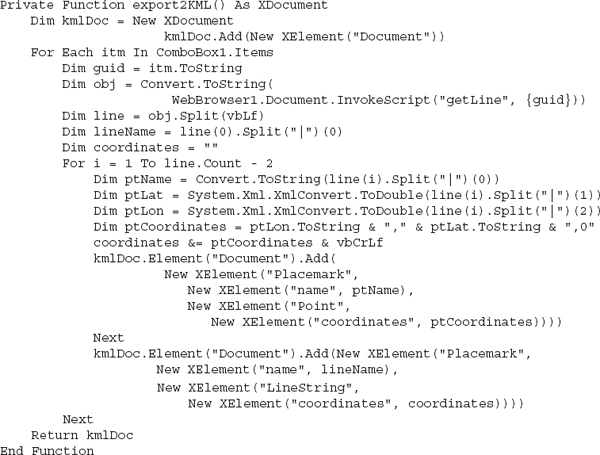
The code iterates through all the lines drawn on the map and requests each line’s data from the script by calling the
getLine() function. This function returns a string with the data, and then the VB code extracts each line’s vertices. First, it splits the long string into separate lines (one line per vertex), and then splits it again at the pipe symbols to extract the vertex data: the vertex’s name, its latitude, and its longitude.The
getLine() function returns a string like the following for each metro line (only the first few stations are shown here):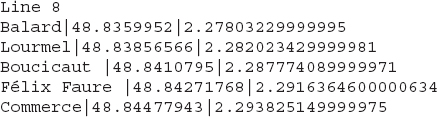
The first line contains the line’s name. The following lines correspond to the line’s stations and each of them contains the name of the station followed by a vertical line (the pipe symbol), the station’s latitude followed by the same separator, and finally, the station’s longitude.
The program iterates through all lines and at each iteration it calls the
getLine() method to retrieve the line’s data. Then it builds the KML document, one line at a time. For each station, the code adds a new <Placemark> tag with two nested tags: the <name> and <Point> tags. The <Point> tag has a nested tag, <coordinates>, where the vertex coordinates are placed. All these actions are carried out with a single statement:
This statement adds to the
<Document> tag the data passed as argument, which is a new element, the Placemark element. This element’s value, in turn, is an array of two elements: the name and Point elements. Finally, the Point element’s value is a coordinates element that contains the actual coordinates of the station. This statement produces an element like the following: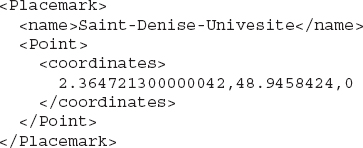
To generate the preceding KML segment, the
Add method was called with the following arguments:
Even if you’re not familiar with Visual Basic’s XML features, you can understand what’s going on by examining the statement that generates the placemark for a station and the output generated by that statement. While generating the
<Placemark> tags for each station, the code also builds the coordinates variable’s value by appending the coordinates of each vertex:After going through all the stations of the line, the code generates another
Placemark element that corresponds to the line. It’s very similar to the stations’ Placemark elements, but it contains a <LineString> tag with the coordinates of the line’s vertices:
Generating KML documents in a high-level language with built-in support for XML, such as Visual Basic or C#, is very easy. You can use statements like the ones shown here to build very long KML documents and save them to local files or submit them to a client application through web services, as you will see in Chapter 15.
Summary
In the last several chapters, you learned how to place lines and shapes on the map, how to allow users to draw on maps interactively, and how to store the geographical data in KML format. KML is not your only option; you could have used your own XML schema to persist the data, or you could have used the JSON format, which is equivalent to XML. No matter what format you use, you can persist the data laid over the map and reuse them later. After placing all the data on the map, you can even generate static pages that include all the data and post them on a web server, where users can select the map they’re interested in and view it.
In short, you have all the information you need in order to build a complete GIS application, which is the topic of the next chapter. In the following chapter, you put together information from previous chapters to build a Windows application for performing basic GIS operations on Google Maps.
..................Content has been hidden....................
You can't read the all page of ebook, please click here login for view all page.