CHAPTER |
|
5 |
Google Maps API: The Building Blocks of Mapping Applications |
In the examples of the first few chapters of this book, you learned how to embed maps on web pages, and in the process you saw some of the members of the
google.maps library, which provides all the functionality for setting up and manipulating a map at the client through JavaScript. This library is part of the script you include in every page that contains a Google map, and it exposes its functionality through different objects. The Map object of the google.maps library represents the map itself. The maps you embed to your pages are instances of this object, and you manipulate the map through the Map object’s methods. You can set the map’s zoom level from within your script by calling the setZoom() method, which accepts the zoom level as an argument, or request the map’s center point with the getCenter() method of the Map object.To write custom applications on top of Google Maps and take advantage of Google’s API, you must first understand the basic components of the
google.maps library, and this is the topic of this chapter. The components you’re going to explore in this chapter are the basic tools for manipulating maps; they will be used in every chapter of this book and every script you write from now on. While a reference chapter, this chapter also contains some interesting examples. Even if you’re familiar with the Google Maps API, you should take a look at the last section of this chapter to see the implementation of a context menu for a Google map.The Google Maps API at a Glance
The complete API is quite rich, and you will find a whole lot of information on how to make the most of it throughout this book. Let’s start with an overview of the basic objects of the API, which represent the basic entities for coding mapping applications. These basic objects include the following:
• The
google.maps.Map object, which represents the map itself.• The
google.maps.LatLng object, which represents locations on the map. This object is nothing more than a pair of decimal numbers: a point’s latitude and longitude.• The
google.maps.LatLngBounds object, which represents the bounds of a rectangular area on the map, usually the bounds of the current viewport.• The
google.maps.Marker object, which represents the markers you use to visually identify features on the map.• The
google.maps.InfoWindow object, which is a window you use to display information about the selected marker.• The
google.maps.event object, which is an auxiliary object for handling all map-related events.There are additional objects you can place on a map, which are also more complicated, such as lines and shapes. These objects are covered separately in Chapter 8. The
Marker and InfoWindow objects are also covered separately in Chapter 7.The
google.maps.Map ObjectThis object represents the map and it’s the most important object of the API. To display the map on the web page, you must create a new instance of this object and use its properties to customize the map’s appearance. When you create a new instance of the
Map object, you pass to the constructor the name of a container element where the map will be rendered. This container is a <div> element on which the map is displayed, and it usually takes up most of the available space on the page, but this isn’t necessary. You can specify the size and position of the <div> tag on the page with HTML attributes, or apply a custom style to it. The map’s <div> element may have a fixed size, or it can be dynamically resized with the browser’s window. This element is passed as an argument to the constructor of the Map object, so it’s imperative that it has a unique id attribute. The appearance of the element that hosts the map is controlled through HTML and has nothing to do with maps. If needed, you can create pages with multiple maps, which you can synchronize with some custom code. You will actually see this technique in action in the last section of this chapter.The contents of the
<div> element are generated by a server application running on a remote Google server, and you interact with the map through a script, http://maps.googleapis.com/maps/api/js, which is also downloaded from the remote Google server. This is a JavaScript file provided by Google and you can certainly read it; fortunately, you’ll never have to read it. Understanding the script is not required (it’s not even optional) for coding the mapping operations you wish to add to your application. The script is the client portion of Google Maps: It allows users to navigate the map, requests new tiles of the map from the remote server as needed, and renders them on the client application. When you zoom in, the script doesn’t simply blow up the existing tiles; it requests new tiles, which contain additional information. All this takes place in the background and you don’t need to write any code.Map Initialization
The statement that creates the map calls the constructor of the
google.maps.Map object passing two arguments: a reference to the <div> element and an auxiliary object that specifies the options of the map, as shown here:map_canvas is the id of the <div> element that will hold the map, and it’s part of the HTML page. Here’s a typical declaration of a <div> element for displaying a map:To control the position and size of the
<div> element, you apply a style to it. The following is a typical CSS (Cascading Style Sheet) definition for the map’s section:
This style definition specifies that the
<div> element to which it will be applied should take up all the available space on the page (100 percent of the page’s width and height), have a blue border with a width of 1 pixel, and have no margins around the map.The statement that initializes the
google.maps.Map object must appear in a script that’s executed as soon as the page is loaded. Typically, you create a script that contains the initialize() function with the initialization data and you call it when the page is loaded by setting the onload attribute in the page’s <body> element to the name of this function:You can use any name for the function that initializes the map, but you will hardly ever find a page that doesn’t use the
initialize() name. The onload keyword is an attribute of the <body> element. It’s also an event of the window object, which is activated as soon as the window is loaded. You can program the window.onload event to perform the initialization of the map with a statement like the following: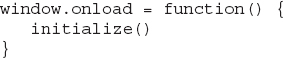
This statement tells JavaScript to execute an anonymous function, which simply calls the
initialize() function. You can also replace the call to the initialize() function with the actual contents of the initialize() function. The preceding statement must appear at the beginning of the <script> section.The second argument of the
google.maps.Map constructor, the mapOptions argument, is an array of key-value pairs that determine the map’s overall appearance and its initial settings. You have seen how to use the mapOptions argument in Chapter 2, and in the following section, you’ll find a detailed discussion of this object.Map Options
The
MapOptions object determines the appearance of the map and it has many properties, three of which are required: the center, zoom, and mapTypeId properties. The first two properties specify the map’s initial center and zoom values. The MapTypeId property specifies the initial map type, and its value can be one of the members of the google.maps.MapTypeId enumeration, shown in Table 5-1.
Table 5-1 The Members of the
google.maps.MapTypeId EnumerationThe following statements create a
MapOptions object with the most basic map attributes and then use it to set up a new map:
The
MapOptions object exposes many more properties for customizing the map. Some of the properties allow you to manipulate the appearance of the various controls that appear in the default map: the Navigation control on the left; the Zoom control, which is normally part of the navigation control; and the MapType control, which allows users to change the map type.Controlling the Map’s Appearance
You can customize the appearance of the map by specifying which of the various controls will be displayed, and their style. The three controls are the Navigation control, the Scale control, and the MapType controls. These items are handled in a similar manner: There’s a property you can set to a true/false value to specify whether the item will be shown on the map or not. You can further customize the appearance of these controls by setting their options.
All objects that can be customized accept an array of options in their constructor. They also provide a
setOptions() method, which accepts the same argument: an array of option names and their settings. The setOptions() method can be called at any time to alter one or more options of the object to which it’s applied. The following call to the setOptions() method changes the map’s type to satellite view and its zoom level:
Note that the property names and their new settings are passed to the method as an array of key-value pairs.
The Navigation Control This is the control that normally appears in the left part of the map, and it contains the Pan control and the Zoom controls. To hide this control completely, set the
navigationControl property to false (its default value is true). You can also manipulate the appearance of the Zoom control with the ZoomControlOptions object, which exposes only two properties: the position property, which determines the location of the control on the map, and the style property. The style property takes on the values as listed in the Table 5-2.
Table 5-2 The zoomControl Styles
MapTypeControlStyle Options The second control you can manipulate individually on the map is the MapType control, which determines the type of map you want to display. The property mapType control can be set to false to hide the entire control (if you don’t want users to change the map type in a specific application). In addition, you can control the appearance of the control by setting the style property of the mapTypeControlOptions object to one of the values listed in Table 5-3.
Table 5-3 The
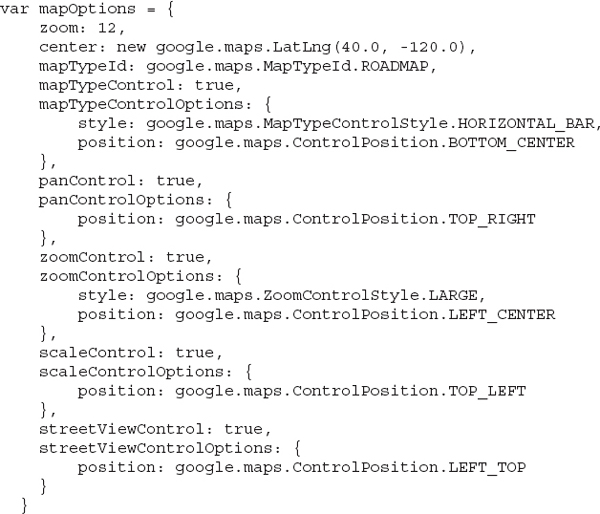
mapTypeControl StylesFinally, you can move the map’s controls to locations other than the default ones with the
Position property, which can take one of the following values: BOTTOM_CENTER, BOTTOM_LEFT, BOTTOM_RIGHT, LEFT_BOTTOM, LEFT_CENTER, LEFT_TOP, RIGHT_BOTTOM, RIGHT_CENTER, RIGHT_TOP, TOP_CENTER, TOP_LEFT and TOP_RIGHT.The following example sets up a map by setting all the properties of the map controls. Paste the following definition in your script and experiment with all possible settings of the map’s options.
google.maps.LatLngThe
LatLng object represents a point on the earth’s surface; it consists of the point’s latitude and longitude, in that order. The getCenter() method of the Map object returns a LatLng object with the coordinates of the center of the map. Whenever you need to pass a location to a function, you create a new LatLng object by specifying its latitude and longitude:To center the map around this point, call the
Map object’s setCenter() method passing the pt variable as an argument:The
LatLng object exposes its two basic components, the point’s latitude and longitude, as methods and their names are lat() and lng(). The following statements read the map’s center coordinates and store them to two variables:
google.maps.LatLngBoundsThe
LatLngBounds object represents the rectangle that encloses the current viewport. The bounds of the current viewport are specified by the coordinates of the upper-right and lower-left corners of the viewport. In terms of actual world coordinates, the upper-right corner is the north-east corner of the viewport, while the lower-left corner is the south-west corner of the viewport. The LatLngBounds object exposes the sw and ne properties, which are LatLng objects, and they represent the coordinates of the map’s opposite corners. To find out the current viewport’s minimum and maximum latitudes, you must call the map’s getBounds() method and then extract the latitude values from the sw and ne properties, as shown here:
The
LatLngBounds object exposes some very useful methods on its own, which can simplify your script, especially if you’re coding a GIS application. The contains() method accepts as an argument a LatLng value (a geo-location) and returns true if the specified location lies within the bounds of the LatLngBounds object. The extend() method accepts as an argument a geo-location and extends the bounds of the current LatLngBounds object so that it will contain the specified geo-location. This method is especially useful when you place multiple markers on a map (say, the hotels in a city or neighborhood), and you want to make sure that all markers are shown. Instead of experimenting with the zoom level, you start by creating a new LatLngBounds object with the location of the first marker. Then, as you add markers to the map, you call the extend() method of the LatLngBounds object, passing the geo-location of the current marker as an argument. Finally, when you’re done, you call the map’s fitBounds() method, passing the LatLngBounds object you have created as argument, and the map will be panned and zoomed in or out as needed to display all markers. The new viewport will comfortably contain all the markers, as its actual size will be slightly larger than the absolute minimum rectangle that contains all markers.The Fit Bounds Demo Page The code in Listing 5-1 demonstrates the
fitBounds() method, and comes from the Fit Bounds Demo.html web page. The script places a few markers at the locations of major airports in Germany. At the same time, it extends the bounds of a LatLngBounds object, the bounds variable, to include the location of the current marker.Listing 5-1 Creating a
LatLngBounds object based on specific locations
These same statements must be repeated for each marker. After placing all markers on the map, the script calls the
fitBounds() method to display the proper viewport:The
Fit Bounds Demo.html web page is shown in Figure 5-1. The initial zoom level is 1, but after you click the button below the map and the airport markers are placed on the map, the zoom level is automatically set to 5 and the map’s viewport is properly adjusted to display all markers. The Fit Bounds Demo.html page contains a very simple script, but you will find it useful when you need to display multiple markers (or other objects) on the viewport.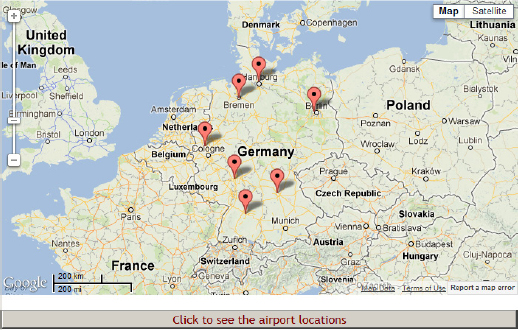
Figure 5-1 The
Fit Bounds Demo.html web page demonstrates the fitBounds() method.Map Methods
The
Map object has many methods, including the getCenter() and getZoom() methods, which return the coordinates of the map’s center point and the map’s current zoom level, respectively. They retrieve the current zoom level, for example, you can call the Map object’s getZoom() method as follows in a JavaScript script:This method returns an integer in the range from 1 to 21. The
getCenter() method, on the other hand, returns an object of the LatLng type, which is made up of two floating values: the geo-coordinates of the map’s center point. If you include the following statement in a script:a popup window with a message like the following appears:
The coordinates will be different, of course, depending on where the map is centered. Note that the parentheses were not inserted by the code; they’re part of the
getCenter() method’s response when it’s converted to a string.All objects provide a
toString() method, which is returned when you request the object’s value as a string. The LatLng object’s textual representation is a pair of comma-separated values embedded in parentheses. The toString() method was not called explicitly, but you requested the value of an object as text and JavaScript returned the object’s textual description.You can also retrieve the location’s latitude and longitude values using the
lat() and lng() methods of the LatLng object (the method toFixed() is a JavaScript method that rounds a floating point value to as many decimal digits as indicated by its argument):
Conversely, you can manipulate the map from within your script. To move to a different location, use the map object’s
setCenter() method, passing as an argument a LatLng object; to zoom in or out, use the map object’s setZoom() method, passing as argument an integer value:Why should you ever control the map programmatically when it’s so easy for the user to navigate to the desired location? You may have a page that displays cities, or monuments, or hotel names in an area, and want to center the map at the selected location and set the zoom to a value that makes sense for the item being selected. Your interface should allow users to select a monument or a hotel in a list and center the map on the selected feature every time the user makes a new selection. The
fitBounds() method discussed in the preceding section does exactly the same.The
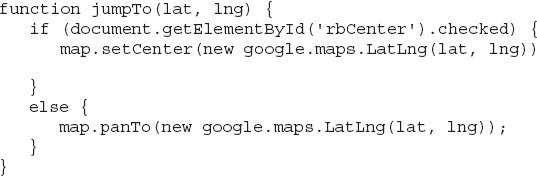
setCenter() method changes the map’s location instantly. Another method, the panTo() method, also accepts a location as an argument and pans the map smoothly to its new location. A third related method, the panBy() method, accepts as arguments the horizontal and vertical displacements and scrolls the map smoothly to its new location. The Basic Map Events.html page, shown in Figure 5-2 later in this chapter, demonstrates the difference between the setCenter() and panTo()methods. Check either radio button below the buttons, and then click the destination buttons to change the viewport. With the setCenter() method, the map is relocated instantly; with the panTo() method, on the other hand, the map is panned smoothly to its new center. The operation lasts much less than a second, but the effect is quite noticeable. Of course, the panning is possible if the destination tiles are already in memory. If you move from one hemisphere to the other, the panTo() method is no different than the setCenter() method. The function jumpTo() in the page’s script accepts the coordinates of the new location as arguments and calls the appropriate method depending on the status of the rbCenter radio button:
Figure 5-2 Monitoring the basic map events
The
Map object is used routinely with all other objects of the Google Maps model object, such as markers, information windows, lines, and shapes. All of these objects expose the setMap() method, which accepts a single argument: the map to which the object will be attached. Assuming that the marker variable represents a marker, you can place the marker on the map by executing the following statement:It’s this statement that actually displays the marker on the page, and not the statement that creates the marker. To remove an object from the map, you call the same method, passing a null value:
The Marker and InfoWindow Objects
These two objects do not represent attributes of a map per se; they are the basic means for identifying locations, or points or interest (POI), on the map. The
Marker object is used to mark a specific location on the map and it’s usually rendered as a pin. Markers contain additional information about the location they identify, and this information can be displayed in a speech bubble icon, which is an InfoWindow object, when users click the marker. The Marker and InfoWindow objects are two of the most recognizable symbols in the computer world. They are very important in designing mapping applications and are described in detail in Chapter 7.Working with Map Events
Google Maps are interactive by design: Users can zoom in and out, and they can drag the map around to bring any location into view. They can also switch views between roadmap view and satellite view. Users can interact with Google Maps and you don’t need to write any code to enable the standard interaction techniques.
The most interesting mapping applications allow users to interact with maps in different and, in many cases, very imaginative and elaborate ways. To implement any type of interaction beyond the basic model, you must supply your own code. To be more specific, any custom interaction model must be implemented in JavaScript code. Need I present any examples? All hotel reservation sites display the hotels in the selected area on the map and they allow users to filter the results. You can select a hotel to see its details, including photos, in popup windows. Every major urban transportation company uses maps that allow users to select routes and stations to view details, banks have an interactive branch/ATM locator, and so on. The Web is full of interactive mapping sites, and this book shows you how to implement web applications with interactive maps. Interactive mapping applications make extensive use of the Google Maps API, of course, and are based on events. An event is a notification passed from the map to your script, and your script should react to the event. Every time users click somewhere on the map, zoom in or out, and every time they drag the map, your application receives an event. Not all applications react to all events, but any model for interacting with the map on a web page is based on events. In the following section, you learn about the map events and how to write code to react to these events. The code is rather trivial, intended to help you understand the nature of the events and how they’re handled at large. In the coming chapters, you will see practical examples for just about any event that the map can raise.
The Basic Map Events Application
To experiment with the basic map’s events, use the
Basic Map Events.html web page, shown in Figure 5-2. The application reacts to the most basic events. The various buttons at the bottom re-center the map at a different location. The text at the bottom (not shown in the figure) describes the map’s events, and you can scroll the page to read it.Drag Events
The following events are raised by the
Map object when the map is dragged; they notify your application about the drag operations initiated by the user. User interaction with the map involves a lot of dragging and your application should be able to react to these events.dragThis event is fired repeatedly while the user drags the map with the mouse. Because the
drag event is fired continuously, it’s wise to insert in this event’s handler very simple and highly optimized code that’s executed instantly. If the code in the drag event takes even a second to execute, it will cause the drag operation to become sluggish. For example, you can easily request the map’s center point coordinates and display them on your page. This operation is carried out at the client and no trip to the server is required. If you want to translate the center point’s coordinates to a physical address, which means an extra trip to the Google server, this will make your page less responsive. Use the dragend event instead for this operation.On the Basic Map Events web page, you will find the following statements that handle the
drag and dragend events. The script displays the string “dragging” in a <div> element on the page while you’re dragging the map. In the dragend event, the script resets the same section on the page. First, add the listeners for the two events in the initialize() function:
The
updateDragLabel() function is a trivial function that sets the contents of the dragStatus and mouseStatus elements on the page:
dragendThis event is fired when the user ends a dragging operation and it does not provide any argument. You’ve already seen an example of the
dragend event in the preceding section.dragstartThis event is fired when the user starts dragging the map with the mouse. If you want to provide a button to “undo” a drag operation, you can store the map’s center location to a script variable in the
dragstart event handler and use this variable to slide the map back to its initial location if needed. This event does not provide any arguments; yet you can retrieve the map’s initial position in the dragstart event’s handler, because it’s fired before the map is moved.mapTypeId_changedThis event is fired when the
mapTypeId property changes. The mapTypeId property determines the type of map being displayed and it’s fired when the user switches from a road map to a satellite/terrain view. Alternatively, you can omit the map type control from the map and change the map’s type from within your script, either in response to a user action, or based on the map’s current content. You can automatically switch to satellite view when the user zooms out beyond a threshold, and back to map view when the user zooms in below this threshold.Mouse Events
The most common events in programming a Google map are the events generated with the mouse. The following subsections describe the mouse-related events.
clickThis event is fired when the user clicks on the map: It’s the most important of the events raised by the
Map object. The click event reports the location of the pointer on the map the moment it is clicked through a LatLng object. Note that the click event isn’t fired when the user starts a drag operation, so you can write code to take advantage of the click operation (to place a mark on the map, for example, or initiate a drawing operation), without interfering with the dragging operations.To handle the map’s
click event, insert the following event listener into your script:This statement appears usually in the
initialize() function, right after the initialization of the map variable. The mapClicked() function, which will be invoked automatically every time the user clicks on the map, contains the code to handle the event. Note that the event automatically passes an argument to the listener of the click event, and this event exposes the coordinates of the mouse location. Here’s a simple function that displays the coordinates of the location where the user clicked in a message box:
The
mapClicked() function is implemented with a single line of code, which is usually embed in the statement that adds the listener:
The
event argument conveys specific information about the event. For the click event, this information exposes a LatLng object as property; this property represents the point that was clicked. In the statement that adds the event listener, the name of the argument is always “event.” In your function that handles the event, the name of the argument can be anything.dblclickThis event is fired when the user double-clicks on the map. The
dblclick event is not distinguished as a separate event from the click event, so when the user double-clicks on the map, a click event is fired, followed by a dblclick event. This behavior makes it impossible to program both the single-click and the double-click events in the same script. There are hardly any applications that make use of the double-click event. If you program the click event, the dblclick event will be raised, but never handled.In effect, you have to choose between the two events and it’s very unusual for an application to react to the double-click, but not to the single-click event. If you want to program the
dblclick event, you must also disable its default function, which is to zoom in by one step. To disable the default function of the double-click, set the disableDoubleClickZoom option of the Map object to true. Like the click event, the dblClick event reports the location of the pointer on the map the moment it was double-clicked through a LatLng object.mousemoveThis event is fired continuously while the user moves the mouse over the map and you can use its listener to update the relevant elements of the interface. This event passes to the script the current location of the mouse.
mouseoutThis event is fired when the user’s mouse exits the map container and passes no additional information to its event listener.
mouseoverThis event is fired when the mouse enters the map. It’s fired only once and it’s followed immediately by consecutive
mousemove events. The three mouse events are fired in the following order:•
mouseover is fired once as soon as the pointer enters the map.•
mousemove is fired continuously while the user is moving the mouse over the map.•
mouseout is fired once as soon as the pointer leaves the map.You can use the mouse events to update a label with the coordinates of the location under the mouse. This should take place in the
mousemove event; you must clear the label on the mouseout event, as the pointer is no longer over the map.rightclickThis event is fired when the user right-clicks the map. You can use this event to display a context menu at the current location on the map, a very convenient feature that’s not used as much as one would expect in mapping applications. The menu displayed with the right mouse click is called a context menu because its items can change depending on the current operation. The
rightclick event reports the location of the pointer on the map the moment it was clicked through a LatLng object. As you already know, right-clicking a map has no effect: The map doesn’t have its own context menu. It’s possible, though not trivial, to implement your own context menu by writing some JavaScript code that reacts to the rightclick event. You actually see how to add a context menu to a map later in this chapter.Another common use of the
rightclick event is to undo the effect of the click event in an application that annotates a map. Let’s say you use the click event to insert a marker at the location where the mouse was clicked. You can intercept the rightclick event of the marker to remove an existing marker. Note that the markers are placed on the map from within the map’s click event handler, but they are removed from within the marker’s rightclick event handler.State Events
There are few events that are fired based on certain user or internal actions, and they signal a change in the map’s status. The
bounds_changed event, for example, is fired when the map’s viewport is changed, whether due to a change in the zoom level, or due to a user-initiated drag operation. These events report changes in the map’s current status; you use them primarily as notifications to update the application’s interface.tilesloadedThe
tilesloaded event is fired when the visible tiles that make up the current map have finished loading. This is a good place to execute any statements that add content on top of the map, or enable any buttons that update the map. The onload event is fired when the page with the map has been completely loaded. It will take a few seconds from the moment you request the map to the moment that the relevant map tiles actually arrive to the client computer. During that time, the map is a gray rectangle. The tiles arrive one at a time and the areas corresponding to tiles that have not arrived yet remain gray.If there are statements that should be executed after the map has been downloaded and rendered at the client, this event is your best choice. If your page has buttons that perform specific actions on the map, you should disable them initially and enable them from within the
tilesloaded event’s handler. A button that adds a new marker to the map shouldn’t be enabled while the map is being loaded, for example.zoom_changedThis event is fired when the map is zoomed in or out. The event doesn’t report the current zoom level, so you must call the
getZoom() method from within the event’s listener to retrieve the current zoom level, if you need it in your code.bounds_changedThis event is fired when the bounds of the visible part of the map change. It takes place when the map is scrolled, or when the map is zoomed in or out, and it reports no additional information. You must call the
getBounds() and getZoom() methods to retrieve the new bounds and the new zoom level. Note that the event is fired after the completion of the operation that caused the event to fire. When the user drags the map, the bounds_changed event will be fired after the map has been dragged to a new location and the map’s contents have been updated. The zoom_changed event is also followed by a bounds_changed event because a change in the zoom level also changes the bounds of the viewport.center_changedThis event is fired when the map’s center is changed and takes place when the map is dragged either with the mouse, or with the navigation control; when the map is zoomed, its center doesn’t change. The
center_changed event is hardly ever used in coding mapping applications; you use the bounds_changed event instead because the bounds of the map change when it’s dragged as well as when the map is zoomed in or out.idleThis is an important event, which is fired only once when the map becomes idle after a drag or zoom operation. Use this event’s listener to insert the code that updates the interface based on the map’s current viewport. Note that the event doesn’t report any information about the map, so you must call the appropriate methods to retrieve the map’s center point, its bounds, and its zoom level.
The
idle event is fired only once after several operations that may affect the map’s viewport, and it was designed specifically to facilitate the update of the interface with the current status. In the Basic Map Events.html page, the idle event is used to update the various <div> elements on the form. First, the script adds a listener for the event with the following statement:
updateLabels()is a simple function that updates the interface by displaying the map’s current center location and zoom level: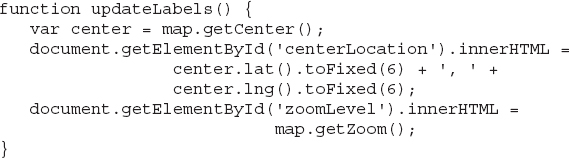
Note that the function calls the
getCenter() and getZoom() methods because the idle event doesn’t report any arguments back to the application. The preceding code segment could assign the return value of the getCenter() method directly to the innerHTML property, but the coordinate values are formatted with a small number of decimal digits.A Customized Map
You’ve covered a lot of ground in this chapter: The topics discussed here will be of help in designing fully customized maps for your applications. Figure 5-3 shows a fairly customized map that looks very different from the default Google Map. The web page shown in Figure 5-3 is the
Customized Map.html page, which is included in this chapter’s support material. The first thing to notice about this page is that the usual controls on the map are missing. This was achieved by setting the disableDefaultUI property to true. To navigate, users can press the arrow buttons, while to zoom they can use the “+” and “–” keys. They can also pan the map around with the mouse and zoom in and out by double-clicking the two mouse buttons.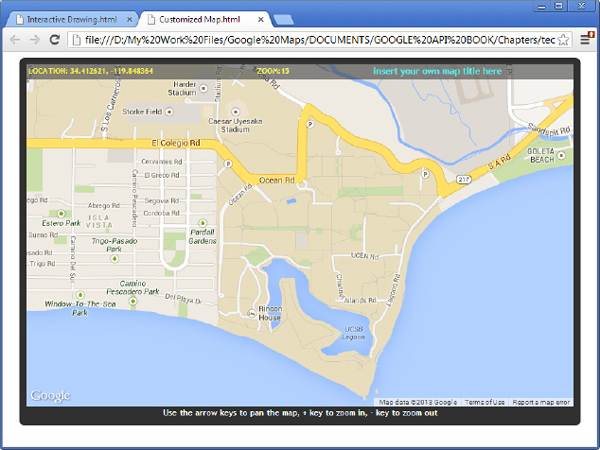
Figure 5-3 A map with a custom look
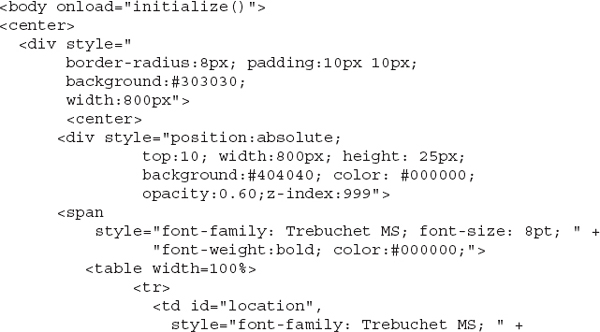
The entire map is embedded in a
<div> element with a black background and rounded corners. Moreover, the map’s section is another <div> element, slightly smaller than its container. Some basic map attributes are displayed on a semitransparent pane at the top of the map. This pane is updated continuously with the map’s basic attributes as the user interacts with the map. This pane is a combination of HTML (it’s a <div> element with absolute position) and some code in the map’s idle event that updates the contents of the <div> element. The HTML code that generated Figure 5-3 is shown in Listing 5-2.Listing 5-2 Placing HTML elements on top of the map
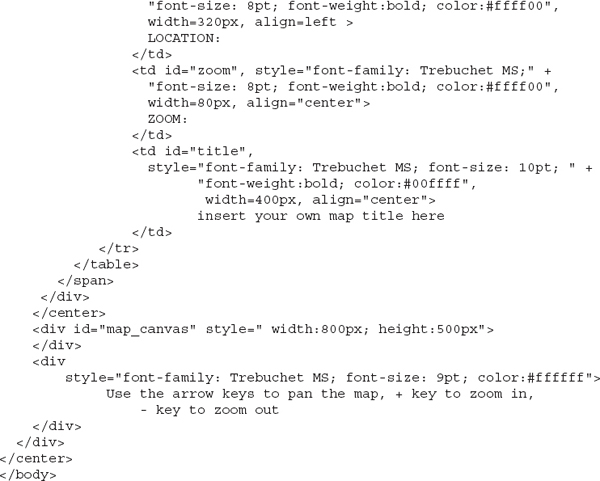
This is straight HTML code; you will probably use a visual tool to design the interface, but these tools produce long listings with complicated style definitions and I wanted to avoid lengthy listings in the book’s samples.
The contents of the semitransparent pane in the upper part of the map are updated from within the
idle event’s listener with the following statements: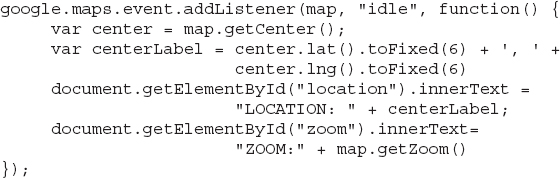
Open the sample web page
Customized Map.html to see how the various <div> elements are nested to produce the effect shown in Figure 5-3. The outer <div> element is the one with the rounded corners (property border-radius) and it contains a <div> element with the semitransparent header, followed by a <div> element with the map, and finally another <div> element with the instructions below the map. The header of the page is implemented as a table with named cells, the location and zoom cells, which are then assigned the appropriate values in the idle event’s listener.Adding a Context Menu to the Map
The second example of this chapter is a non-trivial, but extremely practical and useful, feature for any mapping application: the display of a context menu with commands that apply to the current status of the application and/or the current map location. The context menu appears when the user right-clicks an item on the user interface and it’s a trademark of any Windows application. You can embed a whole lot of functionality in the context menu, which would otherwise require many buttons and/or hyperlinks on your page. If you’re interested in embedding Google maps in a Windows application, then the context menu is a must.
The context menu you will implement in this section is shown in Figure 5-4; it contains three commands: one command to center the map at the clicked location, another command to display the coordinates of the point that was clicked, and a third nontrivial command to display the address of the clicked location. The procedure for requesting the address of any location is discussed in detail in Chapter 16, but I’ve added this command to make the menu a little more interesting.
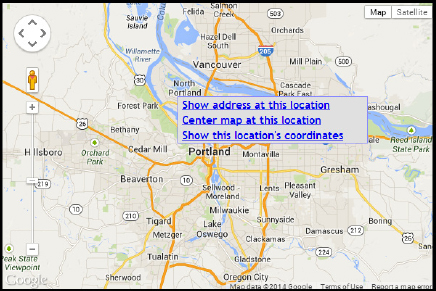
Figure 5-4 A typical context menu that appears at the location that was right-clicked on the map
To display a context menu, you need two items: a floating
<div> element that contains the menu commands, and a listener for the map’s rightclick event. This listener will display the <div> element with the context menu at the proper location on the map when the user requests it by clicking the right mouse button. Let’s build a context menu by implementing the menu’s div element and then the rightclick event listener.The code presented in the following sections requires the jQuery component, so you must include a reference to a JavaScript file that adds jQuery functionality to your custom script. The sample applications of this book are limited to plain HTML to keep the complexity of JavaScript code to an absolute minimum. This section is an exception, because you can’t display a context menu with straight HTML; you need some features available through jQuery. To access the functionality of jQuery, you must include the following statement at the beginning of the script:
Designing the Context Menu
The context menu is a
<div> element that can be displayed on the current page at will; it may even contain a different set of commands depending on the current status of the application, or even the location that was clicked. If you found the last statement exaggerated, keep reading. The following statement creates the <div> element that will hold the menu’s commands and assigns it to the script variable contextMenuDiv:The next step is to apply a style to the
<div> element that will host the menu:For that, you must create a style or, even better, customize the following style definition:

The first style is applied to the element that hosts the menu, while the second one is applied to each menu item. Last, you must add the appropriate commands to the menu. The commands are just hyperlinks. Instead of navigating to another page, however, they react to the
click event by calling a different function. To populate this <div> element, set its innerHTML property to the appropriate HTML fragment, as shown in Listing 5-3.Listing 5-3 Building the complete context menu of the
Context Menu.html page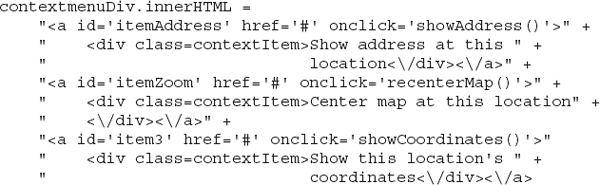
Each menu command is implemented as a hyperlink and its target is a local function. Because the definitions of the HTML elements are embedded in a string, you have to escape the slash character. Each menu item is embedded in its own
<div> element and all these elements are formatted with a common style, the contextItem style. The first command displays the physical address at the location that was clicked by calling the showAddress() function; the second command centers the map at the location of the click with the recenterMap() function, and the last command displays the geo-coordinates of the same location with the showCoordinates() function. They’re simple commands for demonstration purposes, except for the first one. You will see how you can request the physical address of a location on the map in Chapter 16.All three functions need to know the geo-coordinates of the location that was clicked. This location is stored in a script variable,
rightClickLocation, which is a LatLng object.Displaying the Context Menu
The last step is the display of the context
menu. To do so, you must first install a listener for the map’s rightclick event:The
showContextMenu() function accepts as an argument the location that was clicked, creates the context menu by populating a new <div> element with the statement shown in Listing 5-3, and displays it on the map by setting its upper-left corner to the location that was clicked. Note that you don’t need to do anything in order to retrieve the coordinates of the location that was clicked. The listener’s argument, event, is supplied automatically, and it exposes the coordinates of the location that was clicked through its latLng property. The code of the showContextMenu() function is shown in Listing 5-4. The ellipses in the listing stand for the statements that populate the contextmenuDiv variable, shown in Listing 5-3.Listing 5-4 Displaying the context menu
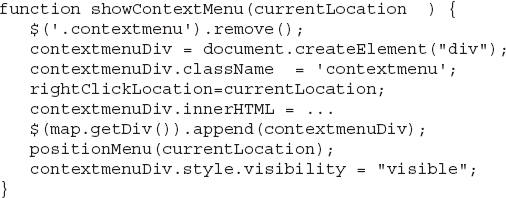
The function starts by hiding the context menu, should it be visible at the time; then it creates a new
<div> element with the context menu’s items. Finally, it displays the menu at the appropriate location by calling the positionMenu() function, which contains jQuery code to properly position the menu, as shown in Listing 5-5.Listing 5-5 Calculating the position of the context menu on the page
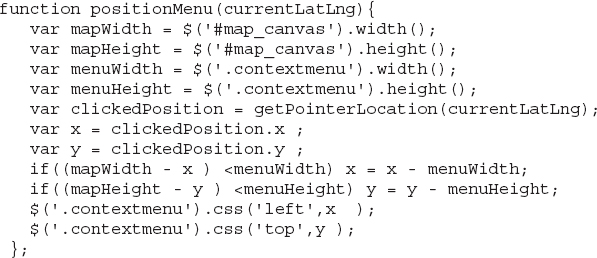
Note that the
positionMenu() function calls another function, the getPointerLocation() function, which converts the geo-coordinates of a location into screen coordinates (pixels) and places the context menu’s upper-left corner at these screen coordinates. It also makes sure that there’s enough space to display the menu and, if not, it places the menu’s upper-right corner there so that the menu appears to the left of the location that was clicked. Similarly, if the user has clicked near the bottom of the screen, the menu is displayed above the clicked location, and not below as usual. To position the menu, the last two statements manipulate the left and top properties of the menu’s style (these properties are introduced by jQuery and there’s no equivalent HTML code).If you’re familiar with JQuery, you will have no problem following the code that displays the context menu. If not, here are the steps to include the maps’ context menu in your web application:
1. Copy the following functions to your script:
In the
showContextMenu(), insert the appropriate statements to create the context menu.2. Declare the
.itemStyle and .contextMenudiv style definitions (and modify them accordingly).3. Declare two variables at the script’s level:
4. Finally, add a listener for the map’s
rightclick event to call the showContextMenu() function.The
rightclickLocation variable is set to the location of the right-click from within the rightclick event listener and it’s used by other functions in the script. The implementation of the functions for centering the map and displaying the current coordinates is trivial: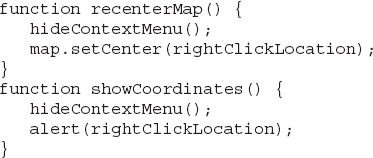
Note the call to the
HideContextMenu() function, which removes the element with the context menu from the map by manipulating the visibility attribute of the div element that contains the entire menu:Open the
Context Menu.html page and examine its script, which is well documented with comments that were not included in the listings. Try adding more options, apply different styles to the menu items and the menu itself, and implement commands that address your specific application requirements. If you’re ambitious, design a menu with different commands, depending on the location that was clicked. You can retrieve the address of the current location and, if it’s not a well-known address, you know that the user has clicked somewhere in the ocean or some other uninhabited place.Context menus are not limited to the
Map object. Practically every item you place on a map recognizes the rightclick event, which can lead to a custom context menu. In effect, you can add many different context menus: one for the map itself, another one for the lines on the map, another one for the shapes, and so on. You can even use different symbols to identify different features on the map, and each symbol could lead to a different context menu, specific to the feature represented by that symbol.A More Elaborate Context Menu
The context menu shown in Figure 5-5 is very similar to the one you designed already, but it also contains a divider and an additional command, the “Show crosshair” command. This command is a toggle that shows/hides a crosshair at the center of the map. It also toggles the caption of the last command between the strings “Hide crosshair” and “Show crosshair” so that the user can hide the crosshair on the map by selecting the same command from the context menu The divider is just an
<hr/> element. You can change the look of the menu as you wish, or as your HTML skills allow you.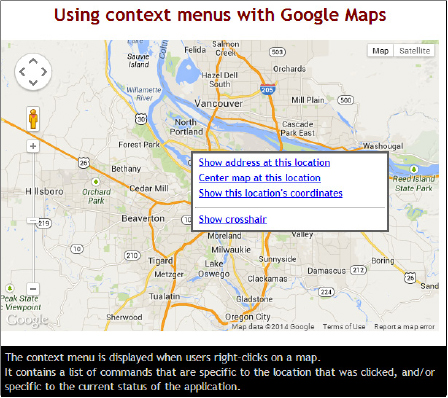
Figure 5-5 A more elaborate context menu with a divider and an additional command
The last command is added with an
if statement because its caption may be “Show crosshair” or “Hide crosshair,” depending on the current visibility of the crosshair. The code uses the crosshair script variable to keep track of the visibility of the crosshair. If this variable is true, the code sets the caption of the last command to “Hide crosshair”; otherwise, it sets it to “Show crosshair.” Listing 5-6 shows the statements that generate the context menu.Listing 5-6 The definition of the enhanced context menu

Note the use of the
crosshair script variable: Depending on this variable’s value, the script generates a command with a different name. This is the reason that you should generate the context menu on the fly, instead of creating a <div> element with the menu commands ahead of time and reusing it as needed. The implementation of the crosshair is a bit involved, and it’s discussed in detail in Chapter 9. The code that draws the cursor is simple, provided you know how to draw lines, but it must be redrawn every time the map viewport changes. You can open the project and see the implementation of the showCrosshair() function, which draws two vertical lines at the middle of the map.The Multiple Maps Application
The last application in this chapter, the
Multiple Maps.html web page, demonstrates how to place three maps on the same page (see Figure 5-6). The three maps have different content, but they’re synchronized. The small map at the lower-right corner shows an overview of a larger area, like a state or country. The main map is a basic roadmap of a very specific area (a university is shown in the figure), and the small map at the upper-right corner is a small detail in satellite view. The yellow semitransparent rectangle in the large map indicates the area of the satellite view.
Figure 5-6 This web page displays three Google maps with different settings. The three maps remain synchronized at all times.
As you expected, the page contains three distinct
<div> elements and each one is assigned a different Google map in the page’s initialize() function. Placing the three maps on three different <div> elements is straightforward: You simply initialize three different Map objects. Keeping the contents of the three maps synchronized is also simple. Each time any of the maps is dragged by the user, the other two maps are repositioned with the setCenter() or the panTo() method from within the appropriate event listener.The script that drives the application is fairly straightforward: each time a map is dragged, the script repositions the other two maps. Along with the project in the chapter’s support material, you will find the
MultipleMaps.pdf file, which explains the code in detail.Summary
This chapter contained mostly reference material. You explored the objects you’ll be using from now on to make your mapping applications more functional and/or interactive. You will soon become proficient with these objects because you will see them in action in all of the examples in the following chapters.
Now that you know how to customize and manipulate the maps from within your script, as well as how to work with events to add interactivity to your mapping applications, it’s time to learn how to embed a map in a Windows application and manipulate it from within a .NET application’s code. In the following chapter, you design a .NET application for interacting with a Google map, intercept the map’s events in your .NET application, and manipulate the map from within a Windows interface.
..................Content has been hidden....................
You can't read the all page of ebook, please click here login for view all page.