
CHAPTER |
|
6 |
Windows Mapping: Embedding Maps in Desktop Applications |
You have already developed map-enabled web pages and you know how to manipulate a map from within the page’s script by programming the basic objects of the Google Maps API. In this chapter, you learn how to embed a Google map in a Windows application. The information in this chapter will help you design desktop applications that exploit all the functionality of Google Maps and at the same time take advantage of the rich user interface (UI) of Windows applications. The principles remain the same: You still manipulate the map through the script, only now you will develop a Windows interface and you’ll be calling the script’s functions from the Windows application’s code.
This chapter is addressed to .NET developers. It doesn’t require any specific programming knowledge, just an overall familiarity with Visual Basic and/or C#, and an installation of Visual Basic Express, Visual C# Express, or any of the licensed versions of Visual Studio. The Express versions of Visual Basic and C# are available for free. At the time of this writing, you can download either Visual Studio Express 2012 for Windows Desktop or the preview of Visual Studio 2013 Express for Windows Desktop. Just go to Microsoft’s MSDN (msdn.microsoft.com) and follow the Visual Studio link. This chapter’s sample project is a Visual Express 2010 project, which you can open with any higher version of Visual Studio. You will find both a Visual Basic and C# version of the application in this chapter’s support material.
CAUTION As with all web applications that make use of the Google Maps API, your desktop applications that rely on this API must be posted to a public facing URL. If you wish to use your application behind a firewall (and this is how most desktop mapping applications are used), you must purchase a business license from Google. For more information on licensing the Google Maps API, visit https://developers.google.com/maps/licensing.
You can still use the API to experiment with it, but the applications you develop with it can’t be used in a corporate environment without a paid license. You may even sell your application, in which case the licensee must abide by the terms of the Google license.
Why a Desktop Application
Web applications have been on the rise for many years, but desktop applications remain the mainstream tools for our daily workload. Applications that require complex interfaces, or advanced calculations, are still implemented as desktop applications, not web applications. In particular, all major GIS and drawing applications are implemented as Windows applications that run on the desktop. Placing complex networks, such as the electricity network or the pipelines of a distribution network, on a map is not something you can do easily with a web application. It involves a lot of operations, fairly complex client-side programming, a server component, and many trips to the server.
Web applications are not yet as flexible and as elegant as Windows applications, especially when it comes to user interface issues. They can’t provide multiple synchronized windows at once, and there are many simple operations that are quite cumbersome to implement in an application running in the browser. You can’t access the local file system from within the browser and some browsers won’t even allow you to access the Clipboard for security reasons. If your task involves more than just presenting data on a map, then you should consider the implementation of map-enabled applications as Windows applications that run on the user’s desktop.
Embedding a simple map in a desktop application—as you will do in this chapter—will add great value to your desktop applications. Just a simple map with markers on selected points of interest will add points to your application, even if the map isn’t truly integrated with the rest of the application. If you’re manipulating business or scientific data with a spatial component, the ability to place your data on the map in your original application will come in handy sooner or later. Consider an application that presents aggregated sales figures per state or per country. In addition to the tabular report that contains names and values, you can present the individual data points as labels on a map. Reporting tools such as SQL Server’s Reporting Services take into consideration the spatial components of one’s data and present data on nice maps.
In this book, you learn how to go beyond nice pictures. You learn how to interact with the map from within the desktop application and eventually apply your programming skills to mapping applications. To get there, you need to understand the basics of embedding Google maps in Windows applications. This is the first chapter in this book that addresses the topic of embedding Google maps in desktop applications. You will find several interesting desktop applications that make use of Google maps in later chapters.
Using Google Maps with Desktop Applications
The Google Maps API was designed to be used exclusively with web applications. Google doesn’t provide a mapping component that you can use to embed maps in a desktop application. However, it is quite possible to embed a web page on a Windows form and interact with the page’s script from within a .NET application. If the web page you embed in a Windows form contains a map, then you can access the functionality of Google Maps from within your .NET Windows application. The basic components for harnessing the features of Google Maps from within your Windows application are: (1) a web page for displaying a map, (2) a control to display the web page in your Windows application, and (3) some code to interact with the page’s script from within the Windows application’s code.
• The web page You already have the web page that displays a Google map; it’s the page you used for all sample applications in earlier chapters. This page contains the definition of a
div element where the map will be displayed, and the initialize() function that requests a map from Google and displays it on the page. The web page should also contain a script with the functions you need to manipulate the map from within your application.• Embedding the map The means for embedding a web page into a form is the
WebBrowser control; .NET developers are familiar with it. The WebBrowser control is nothing less than Internet Explorer packaged as a control: It encapsulates the functionality of Internet Explorer and allows you to embed web pages in desktop applications.• Controlling the script Beyond displaying a web page, the
WebBrowser control exposes the script of the page to your application: You can write code in Visual Basic or C# to call the functions in the page’s script, controlling in effect the map from a high-level language. The same control provides another unique feature: It allows the script to call methods in the Windows application’s code, which is equivalent to firing events to the host application.In this chapter, you’re going to build a simple .NET mapping application with features that rival any similar web application: the WindowsMapping application, which is shown in Figure 6-1. The application’s interface is a typical Windows application with a main window, where the map is displayed, and auxiliary windows that display data about the selected feature(s) on the map. Notice the multiple auxiliary windows that remain open at the same time and users can freely switch among them. This application is a simple one that introduces you to the topic of building map-enabled applications for the desktop. Later in this book, you will find more advanced mapping applications with true GIS features. In this chapter, you’ll explore the architecture of a mapping application written in a .NET language.
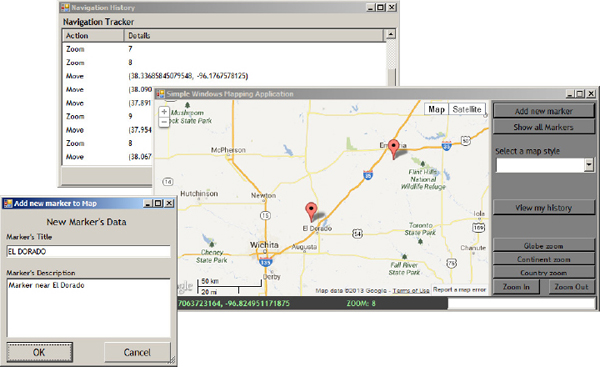
Figure 6-1 The WindowsMapping application is a simple desktop mapping application that combines the functionality of Google maps with a highly interactive UI.
The WebBrowser Control
The
WebBrowser is a component that comes with Visual Studio and allows you to embed HTML documents on a Windows form. The control is a browser window without the menu bar and the status bar of a typical browser, just the area where web pages are rendered.To display a web page on the
WebBrowser control set the DocumentText property of the control to a string that contains valid HTML code. You can also call its Navigate2() method, passing the URL of a page as an argument. In this chapter, you use the DocumentText property because it allows you to build the HTML page on the fly in your code and display it instantly. The following Visual Basic statements display a trivial HTML document on the WebBrowser1 control:
It’s an extremely simple page, but you get the idea. The
WebBrowser control enables you to not only display any web page in the context of a Windows application, but also to create the page you want to display on the fly. If you assign to the DocumentText property the typical HTML page that displays a Google map, this is exactly what you will get on the WebBrowser control: a Google map including all the functionality that comes with it.The
WebBrowser control exposes another very useful property, the Document property, which exposes the document displayed on the control. This property gives you access to the document itself, as well as the script it contains. You can use the Document property to access and manipulate the HTML elements of the document being displayed on the WebBrowser control. This property is equivalent to the document object you use in your script to access the elements of the page. For your purposes, the most important method of the Document object is the InvokeScript() method, which allows you to call a function in the web page’s script from within the host application. Practically, this is the only method you’re going to use to interact with the script in this chapter. Here’s how you can call the map’s setZoom()function from within a Visual Basic application:In this Visual Basic snippet,
WebBrowser1 is the name of the WebBrowser control on the form and the script contains a function called setZoom(). You can even embed multiple maps on the same form (each one in its own WebBrowser control) and manipulate them independently. If you prefer C#, here’s the equivalent method for calling the same function in the page’s script:The first argument to the
InvokeScript() method is the name of the function you want to call. Note that the function is specified as a string so you must be careful to type it exactly as it appears in the script, including character casing. Unfortunately, any mistakes you make when using the InvokeScript() method will manifest themselves as run-time errors. The compiler has no way of knowing the names of the functions contained in the page’s script, and it can’t validate your code.The second argument is an array of objects: You can place any values you want to pass to the function as arguments in this array and make sure that the order of the array’s elements matches the order of the function’s arguments. For the
setZoom() function, you pass only an integer, which is the new zoom level. Even a single value must be placed into an array and this is what the curly brackets do: They create an array of objects and initialize it with the specified values.The Windows Mapping Application
To demonstrate the process of building Windows mapping applications on top of Google Maps, you’re going to build a simple application in Visual Studio and embed a Google map in its main form, which is shown in Figure 6-2. The map is displayed on a
WebBrowser control, which covers most of the form.
Figure 6-2 The main form of the Windows Mapping application
Figure 6-2 shows two instances of the same application. As you can see, the user decides how much space will be assigned to the map and the remaining space will be taken by the application’s interface (the pane with the buttons on the right). The divider between this pane and the map is draggable and users can change the relative widths of the two panes by dragging their divider. The map’s pane on the left and the buttons on the right pane are resized by the user without any programming effort.
Note the status bar at the bottom of the form, where some trivial but useful data about the current map is displayed. The last item in the status bar is a text box, where users can type an address, and as soon as they press ENTER, the map will be centered on the requested address. This address could be as generic as a city name, or as specific as your home’s address. It’s not an award-winning interface, but it demonstrates some of the advantages of a typical Windows interface. You can use it as your starting point for building your own award-winning interface. Even this simple interface, however, is not as easy to achieve with HTML and JavaScript.
The Application’s Architecture
The WindowsMapping application is a fairly simple one, but it combines two distinct layers: the web layer, which consists of HTML and JavaScript, and the .NET layer, which consists of Windows forms and .NET code. The application’s user interface consists of the map, which is displayed on a
WebBrowser control, and the Windows part, which contains everything else (buttons, labels, menus, any element that can be used to build the interface of a desktop application). Users can’t tell what’s going on behind the scenes. All they see is a rich interface that contains a Google map. Figure 6-3 outlines the structure of the application.
Figure 6-3 The structure of a desktop application that contains a Google map. Users see a unified interface, which is handled by two distinct components behind the scenes.
The user interacts both with Windows controls and the map. The events raised by the Windows controls are intercepted and handled by .NET code, which also manipulates the map through the script. The events raised by the map are intercepted by JavaScript and can be handled as they occur in JavaScript by the web page’s script, or they can trigger an event in the .NET part of the application. Your task is to write two components in two totally different languages and make them talk to one another and operate in tandem so that users will perceive them as a single application.
Designing the Application
Any Windows map-enabled application you will design with Visual Studio will be based on the
WebBrowser control. The web page displayed on the control is a typical, very simple web page that displays a Google map, like the ones you have seen so far. The web page contains a trivial HTML section, just the definition of the div element that hosts the map, and the usual initialize() script.Start Visual Studio and follow these steps to design the application:
1. Create a new project with Visual Basic Express 2012 or Visual Studio Express 2013. Name the new project WindowsMapping. The sample project you will find in this chapter’s support material was written in Visual Basic Express 2010, and you’ll be able to open it with Visual Studio 2012 Express as well. It goes without saying that the same projects can be opened with the licensed versions of Visual Studio.
2. Create a new folder in the solution, the Map Components folder. To do so, right-click the project’s name and, from the context menu, select Add | New Folder. Name the new folder Map Components. In this folder, you will place the HTML file that contains the map.
3. Right-click the new folder’s name and, from the context menu, select New Item. In the New Item dialog box that appears, select the Web Category item in the left pane and the HTML Page item in the right pane, as shown in Figure 6-4. Name the new page
MapPage.html. If you’re using Visual Basic Express, you won’t be able to add an HTML page to the project. Add an XML file instead and rename to MapPage.html.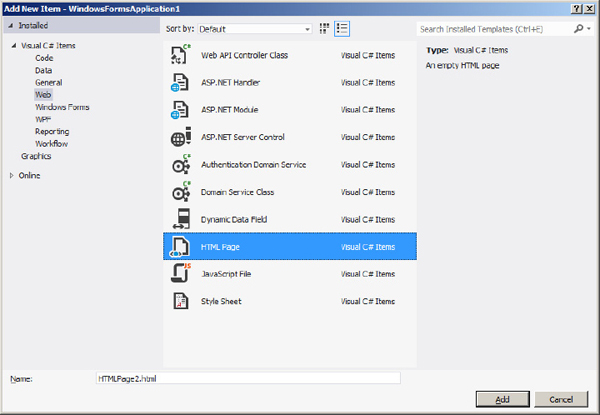
Figure 6-4 Adding an HTML page to a Visual Studio project
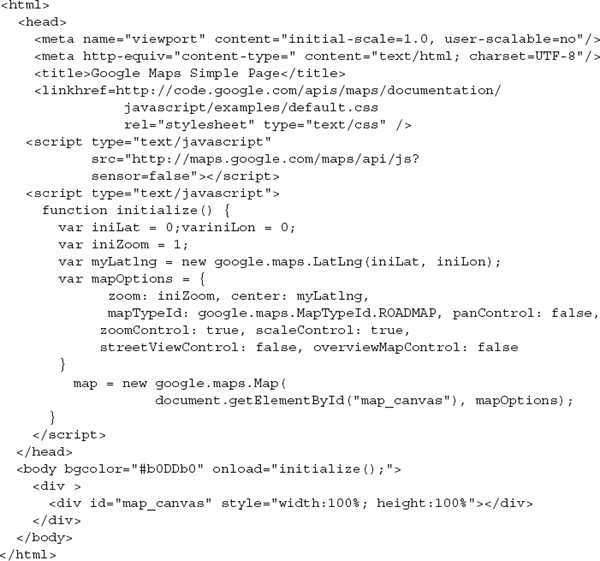
4. Then, paste the code of Listing 6-1 in the HTML file. The code shown is not new to you: It’s the HTML page for displaying Google maps on web pages.
Listing 6-1 The basic web page for displaying a Google Map
Preparing the Form to Accept the Map
Let’s switch to the Visual Basic application and prepare it to recognize an external script and communicate with it. Double-click the form to open the Code window and you will see the event handler for the Form’s
Load event. Insert the following directive at the top of the file:In C#, you will use the
using directive:The
Permissions namespace is not included by default in a new project, but it’s essential for communicating with the web page’s script. Then, prefix the Form’s declaration with the following declaration:The
WebBrowser control is a COM component and you must specifically instruct it to expose its public members (its properties and methods) to other COM components. You must also insert a statement in the Form’s Load event handler to tell the WebBrowser control that your code needs to access the script contained by the page being displayed:The last step is to load the HTML file you added to the project into the
WebBrowser control. This must also take place in the form’s Load event handler with the following statements:
The first statement reads the contents of the
MapPage.html file, and the following statement assigns the HTML document to the control’s DocumentText property. Depending on the location of the HTML file, you may have to change the path of the file to be opened. You may also have to change the path if you deploy the project on a server at your company. If you are a .NET developer, you already know that you can create a resource with the contents of the HTML file and avoid the external component altogether.Figure 6-5 shows what Visual Basic Express IDE should look like at this point. You’re ready now to add some custom functionality to your application. To do so, you must implement functions in JavaScript and call them from within your .NET code.
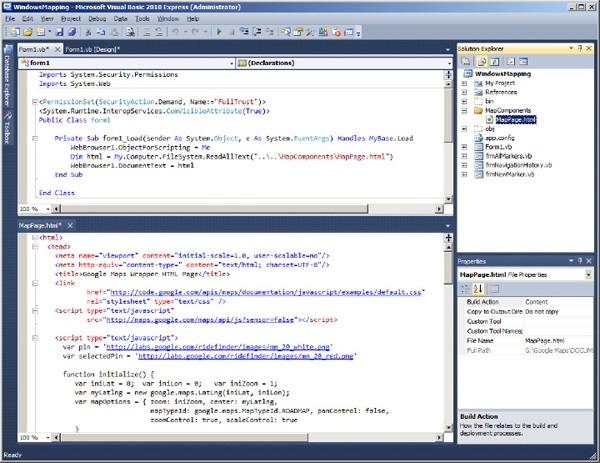
Figure 6-5 The initial steps in preparing a .NET application to access a web page with a Google map
Run the project by pressing F5. You already have a working Windows application that displays a map. You can even interact with the map using the built-in functionality provided by Google: You can zoom and drag the map, switch views, and so on.
Building the Windows Interface
The application’s main form, shown earlier in Figure 6-1 and 6-2, contains a
SplitContainer control with two panes: one with the map on the left and another one with the buttons to the right. Between the two panes is a thin vertical divider that users can slide on either side to make more room either for the map, or for the buttons. The SplitContainer control is not visible on the interface. It’s a control that hosts other controls. You can only see the divider between the two panes of the control by hovering the mouse over it. The pointer will turn into a double arrow indicating the direction in which you can move the divider. Drag the divider and the controls on each pane will be resized automatically.There’s also a
Panel control docked at the bottom of the form, where the map’s center location and current zoom level are displayed. The contents of the controls on this Panel are updated as needed.As you can see in Figure 6-1, the application’s interface contains a number of buttons for performing various operations on the map. The Add New Marker button creates a new marker and adds it to the map. The user is first prompted with an auxiliary form for the marker’s data and then the program instructs the script to create a new marker and place it on the map. The Show All Markers button displays yet another auxiliary form with all the markers on the map.
You can omit the navigation bar from the map and use the Zoom In and Zoom Out buttons for zooming. The other three zooming buttons set the zoom level to arbitrary values that roughly correspond to globe/continent/country zoom levels. The application uses the zoom levels 1, 3, and 6 for the zooming operations.
The ComboBox with the styles contains a few items, but no code behind it. You will see how to apply styles to your maps in Appendix C. The View My History button leads to an auxiliary form that contains the user’s navigation history: the drag and zoom operations in the order that they were performed. You can add more actions to the history, such as the insertion of markers, and give users the option to undo certain actions, or review their edits.
The white box at the far-right edge of the status bar is a TextBox, where you can enter an address and press ENTER. As soon as you press ENTER, the map will be centered at the specified address. You will learn how to locate addresses on the map in Chapter 16, but this feature was included to make the application a little more functional.
Finally, the main form has its own context menu, which is shown in Figure 6-8 later in this chapter. It contains just two commands, one to center the map at the location that was clicked and another one to display the coordinates of the location that was clicked. This menu was included to demonstrate the process of initiating an action in the script (the right-click operation on the map is detected by the script with the appropriate event listener) and complete it at the .NET side of the application. The context menu was designed in Visual Studio, not in JavaScript.
The sample desktop application contains no features that can’t be implemented with a web interface, but the Windows UI is rich, highly interactive, and very responsive, as it doesn’t require any trips to the web server. It will make as many requests as it needs to Google’s servers to update the map, but this can’t be avoided.
Adding Custom Functions to the Script
You have successfully embedded a Google map in your Windows form and users of the application can interact with the map using the built-in navigational tools: They can zoom in and out, and drag the map around with the mouse. Now you must add custom functions to the script to implement all the operations you want to initiate from within your .NET application. No matter how you will use the application, here are a few functions that you will need in every mapping application. They’re the functions for setting the map’s center location and its zoom level. They’re quite trivial, but you will see shortly much more useful functions that will be implemented along the same lines.

The following Visual Basic statement in the host application sets the map’s zoom level to 12:
If you want to do the same in C#, use these equivalent statements:
The collection of custom functions you implement in JavaScript for the requirements of a specific application makes up a new API because you can build the interface for your mapping application by calling these functions and never having to “touch” the JavaScript code. Just as Google provides an API for its maps, you can build your own API for your custom mapping applications. You can actually pass the project to a group of developers who will call the script’s functions with the
InvokeScript() method and they’ll never see the JavaScript code that implements them. You can do even better: You can design a class that sits between your .NET application and the page’s script and hide in this class all the complexity of calling JavaScript functions in the script and passing arguments back and forth. The class will look like another .NET component to other developers and it will encapsulate the map’s functionality in methods and custom objects. This technique is discussed in detail in Chapter 12. Before you get there, however, let’s see how to pass data between the two sides of the application: the .NET application and the page’s script.Passing Arguments to JavaScript Functions
The script is the component that displays the map and handles the map’s interaction with the user. The external application provides an advanced interface that allows users to initiate map-related commands, but it can’t contact the map directly. The two components need to communicate with one another and exchange data. The exchange of data between any two components takes place through two basic mechanisms, which are the same whether you use components written in the same language, such as calling functions in JavaScript, or you use two totally different components, which are written in different languages and may not even reside on the same computer. The caller requests an operation by supplying a function name followed by a list of arguments. The function being called extracts the values of the arguments, processes them, and optionally returns a value to the calling component. Let’s take a look at the operation of panning the map programmatically.
The host application provides a button or a command in a right-click menu that re-centers the map. To pan the map from within your application, you need to call a function in the script, which in turn will call the
Map object’s setCenter() method. Alternatively, you can use the panTo() method, which is smoother. Here’s the script’s function to center the map at another point:
You can call the script’s
setCenter() function from within your .NET code by using the InvokeScript() method, as explained already. The two arguments that determine the map’s new center location can be passed either as strings, or as numeric values. JavaScript doesn’t impose data types and it will convert the arguments to the appropriate data type. If you pass the two arguments to the alert() function, they will be treated as strings; if you pass them to the setCenter() method, they will be treated as numbers.To center the map on Rome, you just pass two decimal values to the
setCenter() function. The two values must be packaged as an array with the following notation:or
The following Visual Basic statement calls the script’s function:
and the following is the equivalent C# code:
The arguments are always passed by value, which means that the function being called cannot alter their values. Even if the script function changes the value of one of its arguments, the changes are local to the function and will not affect the corresponding variable in the .NET part of the application.
Function Return Values
Functions usually return values, which are the result of a calculation. The
getCenter() method is a typical example of a function returning a value. The string representation of the LatLng object returned by this method consists of two comma-separated values in a pair of parentheses. It’s fine to pass this string to the host application and parse it there.The Google Maps API Custom Objects
How about passing a
LatLng object as argument? This is an option, but there’s no equivalent object in any .NET language. You must either implement custom classes for the API objects you want to access in your .NET code, or use custom objects and late binding. The custom LatLng object must encapsulate all the functionality of the original LatLng object. And while it’s easy to implement a LatLng object, you must do the same for other, less trivial objects. If you’re designing an ambitious GIS system based on the Google Maps API, it is worth exploring this option. In this chapter, you’re going to use strings to pass single values and custom objects to pass multiple arguments.Some functions may pass multiple values as their result. To represent multiple data items, you can use a custom separator between them. Delimited data aren’t the most flexible mechanism to pass multiple values; the separator may be part of a string argument and when this happens it will throw off your parser. A much more elegant approach is to package all the values you want to return to the calling application into a custom object and pass back this object.
Returning Custom Objects
Multiple values (of the same or different data type) should be coded as custom JSON objects, or even plain XML. Let’s consider a marker, which has a position, a title, and a description (the description may be optional, but you must handle it when present). If the host application needs to retrieve all the properties of a
Marker object, write a JavaScript function to package all the information in a custom object and return this object. Here’s a possible implementation of the getMarker(i) function, which retrieves the data of a single marker on the map. The function’s argument, index, is the index of the marker you wish to retrieve: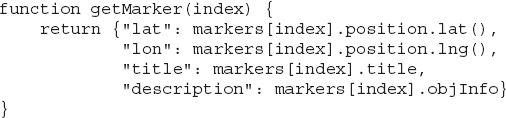
The
getMarker() function accepts as argument the index of a Marker object in the markers array, which stores all the markers on the map. The return value is a custom object created on the fly and this object provides the four properties of any marker: lat and lon are the coordinates of the marker’s position on the map, title is the marker’s title, and description is an extended description that will appear in an InfoWindow box when the marker is clicked. Because the Marker object doesn’t have a description property, or any other property that can be used for this purpose, the extended description is stored in the marker’s objInfo property.On the .NET part of the application, you must extract the values of the custom object’s properties and either use them as they are, or create a custom object in .NET. Here’s how you could call the
getMarker() function from within your Visual Basic application:This statement requests the properties of the fourth marker in the array. The
obj variable is a COM object, and you can extract its individual properties by name: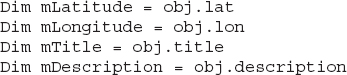
The four variables are set to the properties of the custom object returned by the script and can be used in the code. They’re also initialized to the appropriate types: The first two variables are of the Double type and the other two variables are strings. Each variable’s type is determined by the type of the value you store in it.
To invoke the same script in C#, use the following statements:

You can also map the JSON objects to .NET objects with equally simple statements:

Notifying the Host Application with Method Calls
In the preceding section, you saw how to initiate an action in the script from within the .NET code, but not the opposite. An equally important aspect of the interaction model is the ability to notify the host application when certain events take place. The page’s script detects all the events you’re interested in, and may even react to some of them without passing any information to the host application. The motivation for developing a mapping desktop application, however, is to process as many events as possible in the host application.
To notify the host application about specific events, the script can call the
window.external method, followed by the name of a method in the host application. Let’s say you want to handle the map’s click event in the .NET application. In the page that contains the WebBrowser control, create a public subroutine and name it MapClicked. The name can be any valid method name; the only requirement is that the method is prefixed with the Public keyword. Here’s the declaration of a typical .NET method:
If you prefer C#, the equivalent declaration is

To call the
MapClicked() method from within your script every time the user clicks the map, switch to the HTML page and insert the following event listener in the script, after the map variable has been initialized:With this event listener in place, every time the user clicks the map, the
MapClicked() method of the host application will be invoked. You can think of the MapClicked() method as an event handler in your .NET application because this is exactly what it does: It handles an event. It’s not the .NET runtime that detects the event and fires the method, but nevertheless the method is called in reaction to an event caused by a user action.Calling Event Handlers with Arguments
What possible operations can you perform in the map’s
click event handler? You can update the interface, add a marker on the map—it’s really your call. It turns out that for any operation you initiate from within the map’s click event, you will need some additional information: the coordinates of the point that was clicked on the map. These coordinates must be passed to the method as arguments. To pass the latitude and longitude values of the point that was clicked, use the following signature for the external method:
Then, change the event listener in the script as follows:

The function specified in the
addListener() method includes two float values: the latitude and longitude of the point where the click event took place. These values will be interpreted as Double values by the .NET application’s code.You can also create a custom object that exposes multiple properties and pass this object as argument to the external method. The custom object can be created on the fly in JavaScript, its structure is not known to the .NET application. This means that the custom object’s properties won’t appear as members of the argument when you program the method that will handle the event in the host application. The following JavaScript statement passes a custom object with the point’s coordinates.

The external method must be declared with a single argument of the
Object type. Here’s the definition of the MapClicked() method, which matches the new argument and the statements that extract the two values from its argument:
If you’d rather code your .NET application in C#, you should declare the argument with the
dynamic keyword because C# doesn’t support late binding by default. Here’s the signature of the MapClicked() function in C#: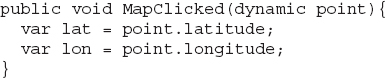
The
lat and lon variables have a type of Double in .NET, but note that their types haven’t been specified explicitly. The compiler will infer their type from the values you assign to the variables, and the variables of the point argument are Double values.The Interaction Model of the Two Components
This is all the information you need to control the map on a web page through a .NET application. Let’s review the process, which is also outlined schematically in Figure 6-6.
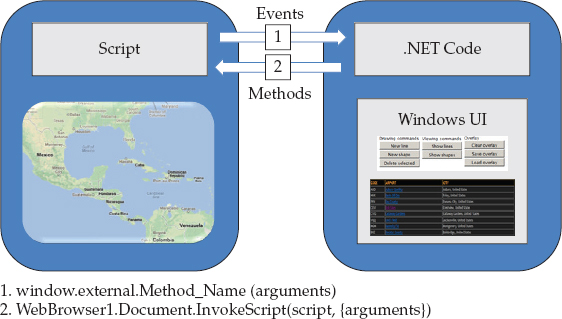
Figure 6-6 The process of manipulating a Google Map from a .NET application through the map’s script
• To embed a web page that displays the map in a .NET application, you assign the page’s contents to a
WebBrowser control’s DocumentText property. To display a page with a Google map, you must assign to the DocumentText property the contents of the typical web page for displaying a Google map.• Add functions to perform the basic mapping operations in the script. The number of functions and their complexity depend on the specific requirements of the application. The host application can’t access the Google Maps API directly; instead, it must call the appropriate function in the page’s script, which in turn will call the appropriate API methods.
• To initiate an action from your Windows UI, call the
InvokeScript() method with a statement like the following (function_name is the function’s name):• To react to user events on the map, such as a click or right-click action, call the relevant method in the host application from within your script with a statement like the following:
where
method_name is the method that will handle the event in the host application. Any arguments must be passed as value types in a pair of parentheses following the name of the method. Multiple arguments should be separated by commas, or passed as custom objects.Initializing the Map
When the host application starts, it initializes the map through the
initialize() function. The project’s script initializes the map by centering it at point (0, 0) and setting its zoom level to 1. Any other settings would be just as valid, or just as meaningless. You should be able to initialize your map by setting its center and zoom level from within the external application’s code; after all, your goal is to control the map from within the host application. Obviously, you can’t rely on any values embedded in the script because you would have to edit the script every time. In a proper Windows application, you should store the map’s initialization data to a configuration file and load it every time the program starts.To set the map’s initial position, simply call the
setCenter() and setZoom() functions. These functions, however, must be called as soon as the map has finished loading all tiles. In the script, insert the following listener for the idle event. As you recall from the previous chapter, the idle event is fired every time the map completes an operation. When the map is initially loaded and all tiles have arrived at the client, the idle event is fired for the first time. You’ll use this event to notify the host application that the map is ready. The host application can then enable the various controls on the interface so that users can start interacting with the map.The listener is added with the
addListenerOnce() method, which adds the event listener and removes it after it’s executed once. The MapLoaded() method will be called once, and after that the application will no longer handle the idle event. Alternatively, you can associate another listener with the idle event after you have initialized the map.In the application’s
MapLoaded() method, you can call the setCenter() and setZoom() functions to initialize the map:
The entire globe will be displayed for a brief moment and then the map will display a section of globe. The section displayed initially is determined by the values of the variables
iniLat, iniLon, and iniZoom. Presumably, these variables are declared in the Windows application. You can persist their values at the end of a session, and the next time you start the application, initialize the map to the same location it was the last time the application was used.Updating the Interface
Now you can focus on the host application’s code, starting with the code that updates the host application’s interface: Every time the user zooms in/out or drags the map around, the coordinates of the new center point and the new zoom level at the bottom of the form must be updated. These user actions are detected by the script, as long as it monitors the appropriate events.
You should first install two event listeners to detect changes in the map’s status:

When a
zoom_changed or a bounds_changed event takes place, the script calls two public methods in the host application, passing the appropriate values: The ZoomChanged() method accepts the new zoom level as an argument, while the BoundsChanged() method accepts the new bounds of the map. Note that the script uses the values returned by the corresponding API methods. JavaScript inserts the string representation of the zoom level, or the value of the current viewport’s bounds. The latLngBounds object returned by the getBounds() object is a compound object, as you recall from the previous chapter, but it’s represented with the following string (including the parentheses):The two methods in the host application are implemented as follows:

The
BoundsChanged() method accepts as an argument the new bounds, not the map’s center point; this is why it has to call the getCenter() method to retrieve the map’s center point coordinates. Figure 6-7 shows the JavaScript listeners for the bounds_changed and rightclick events in the lower pane and the BoundsChanged and MapRClicked event handlers in Visual Basic in the upper pane.
Figure 6-7 The definitions of two event listeners in the script and the corresponding methods of the host application
Building Custom JSON Objects
As you recall from previous chapters, you can create a custom object on the fly in JavaScript. A very simple object could represent the map’s center point with two floating type numbers. So, instead of passing the host application a string with the coordinates of the center point encoded as strings, here’s an alternate implementation of the
getCenter() method that returns a custom object with the latitude and longitude properties:
The function uses simple object notation to create a custom object on the fly. The two properties of the custom object are set to floating values, which will be recognized by the .NET component of the application as Double values.
The Visual Basic code that reads the
getCenter() function’s return value can be rewritten more elegantly as follows:
The properties
center.latitude and center.longitude are Double values and can be used as they are in calculations.Other objects of the Google Maps API are not as simple to implement as custom objects. The
LatLngBounds object, for example, provides quite a few properties. It’s up to you to determine the properties you need in your Windows application and create the appropriate custom object in your script. In most situations, you need the minimum and maximum latitude and longitude values of the bounding box, so here’s a possible implementation of a custom object that represents the map’s current bounds: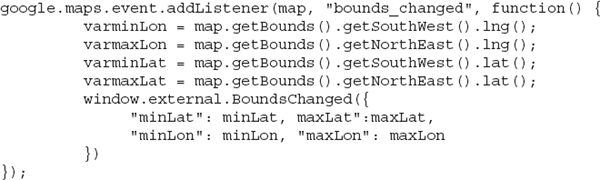
The script extracts the coordinates of the bounding box and generates a new custom object with four simple properties. To use this object in the .NET code, write statements like the following:

To better exchange data between the host application and the web page’s script, it’s best to design custom objects, both in your script and in the host application’s code. You’ll return to this topic in Chapter 12, where you explore the topic of building a GIS application on top of Google Maps.
Adding the Context Menu
In the preceding chapter, you saw how to implement a context menu in your script. The context menu was designed as a
<div> element in the script and it contained operations that could be easily coded in JavaScript. For a Windows application, you need something more elaborate. In the sample application, you pass the responsibility of displaying the context menu to the host application. Context menus are a standard feature in Windows applications; you can embed commands that can’t be implemented in JavaScript but are trivial in .NET. Grabbing data from a local database, accessing the Clipboard, generating XML documents, and storing data to a local file are a few typical examples.It’s a bit early in the book to demonstrate any advanced features for the context menu, so the sample application’s context menu contains a few simple commands, as shown in Figure 6-8. Later in this book, you will read about numerous operations that can be embedded as commands in a context menu. After you learn how to place shapes on the map, you can add commands to locate the nearest shape to the location that was clicked, remove the selected shape, and so on.
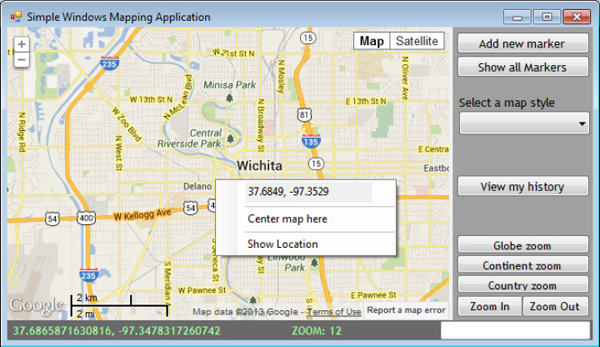
Figure 6-8 The sample application provides a context menu that’s implemented by the host application.
The host application must be notified about the right-click operation, which is the action that causes the display of a context menu. It’s very likely that you will need the coordinates of the point that was right-clicked on the map, so you’ll pass this location as argument to the method that handles the right-click.
The first step is to design the context menu. Visual Studio allows you to create a context menu with visual tools. You can design nested menus and format each command differently. The WindowsMapping sample application provides a very simple context menu, which is shown in Figure 6-9. The same figure shows the Visual Studio menu editor for this menu.

Figure 6-9 Designing a context menu for the WindowsMapping application with Visual Studio
Start by inserting a listener for the maps’
rightclick event with the following statement in your script. This statement must appear right after the Map object’s constructor in the initialize() function: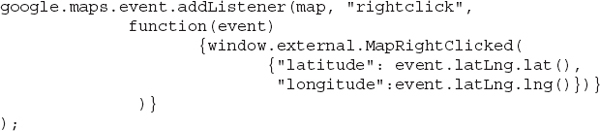
The page’s script doesn’t react to the right-click; it simply notifies the external application about the event passing the coordinates of the point that was clicked as arguments. The
MapRightClicked() method in the .NET application displays the context menu that has already been created with visual tools at the location that was clicked. The context menu will appear on top of the map. The two components of the application are tightly integrated, and the user sees a desktop application with all the features of a typical Windows application plus all the functionality of Google Maps. Here is the implementation of the MapRightClicked() method: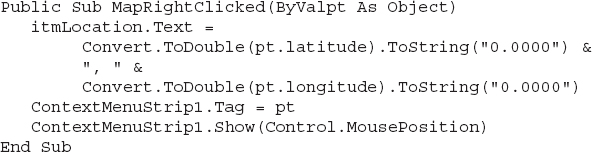
The method stores the coordinates of the point that was clicked in the context menu’s
Tag property because this value may be required later in one of the menu’s commands. Then it builds the string displayed on top of the context menu (see Figure 6-8) using the same coordinates.The context menu is displayed by the last command, which uses the
Control object to request the position of the mouse. The Control object is just a class in .NET and it provides the MousePosition property, which returns the screen coordinates of the point that was clicked, and this is exactly where the context menu will appear. The coordinates are expressed in pixels relative to the screen’s upper-left corner, and you can pass the value of this property as is to the Show() method.Note that you don’t have to worry about positioning the context menu yourself; it will be positioned on the control automatically. The context menu’s
Show() method will determine the best location for the menu, depending on the free space on either side of it. To achieve this functionality in JavaScript, you had to write quite a few statements in the positionMenu() function of the Context Menu.html sample page of Chapter 5. The real advantage of implementing the context menu in the host application, however, is that you can include commands that couldn’t be implemented in JavaScript, such as database lookups.Coding the Context Menu’s Commands
The context menu was designed with Visual Studio’s visual tools; it contains just two commands: the Center Map Here and Show Location commands. The first command centers the map at the location that was clicked, while the second command displays the coordinates of the location that was right-clicked on the map. The top item in the menu is not a command; it’s a box that displays the coordinates of the selected point rounded to four decimal digits. It was included as a demonstration of the custom functionality you can achieve with a Windows context menu. The top item is populated when the menu is displayed, as you saw earlier. The other two commands of the context menu are implemented with the following code:

The code reads the geo-location of the point that was clicked from the
Tag property of the context menu and passes this location as an argument to the setCenter() function of the script. The setCenter() function in the script is a trivial function that accepts two coordinate values as arguments and calls the Map object’s setCenter() method.Tracking User Navigation
Another interesting feature you can add to a Windows mapping application is to track the user’s navigational actions. The navigational actions include zoom and drag operations (whether performed with the mouse or with the help of the map’s navigation control). These actions can be tracked just as easily in a script, but what you can’t do from inside the web page is to display these actions in an auxiliary form, like the one shown in Figure 6-10. The navigational operations are added to the auxiliary window as they occur, even if the window isn’t visible. To view the Navigation History window, users can click the View My History button on the main form. From this point on, the window remains open and new actions are added as they occur.
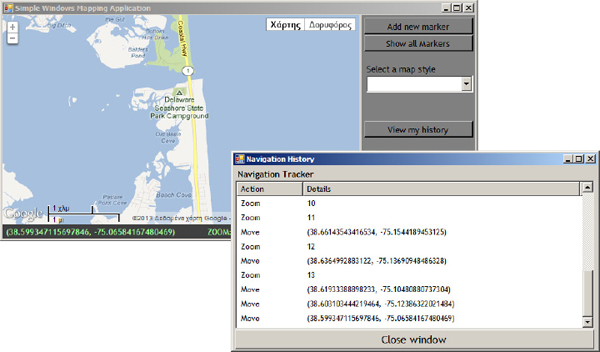
Figure 6-10 Tracking the user’s navigational history on an auxiliary form
With a little extra coding effort, you can play back the user’s history, or allow users to move to any of the previous map views, similar to a history option for Google Maps. You can also include entries for other actions, such as the insertion of a marker. If all user actions are logged, you can re-create the map by repeating all actions on a new map.
To implement this feature, you must first design the auxiliary form. The sample application’s auxiliary form contains a
ListView control with two columns: a title for each action, which is a Zoom or Move action, and the action’s details. The details are the new zoom level for a Zoom action and a pair of coordinates for the Move action.To add an item to the
ListView control, the various parts of the application call the Add2History() method, passing as arguments two strings: the action’s title and its details. Here’s the Add2History() method that’s called in several places in the application’s code:
This method is called by several of the application’s methods. The
DragEnd() and ZoomChanged() methods call Add2History() to append new terms to the list of navigational actions: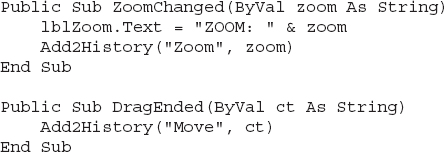
Locating Addresses on the Map
In Chapter 16, you learn about the GeoCoding API, which allows you to look up addresses and convert physical addresses into geo-coordinates (and the opposite). Users of the WindowsMapping application can enter a location name in the text box at the right end of the status bar and center the map to the desired location by pressing ENTER. The .NET application’s code includes an event handler for the text box’s
KeyPress event. Every time the user presses the ENTER, the host application makes a request to Google’s GeoCoding service, passing as an argument the string in this box. If it’s an address that Google can recognize, it returns the proper address of the specified location, including its geo-coordinates. These coordinates are then extracted from the web service’s response and passed as arguments to the setCenter() function to reposition the map. In Chapter 16, you will see how to call the GeoCoding service from within a VB application and process the service’s response.Adding Markers to the Map
Another very common and easy-to-implement feature for mapping applications is the placement of markers on the map. You know how to place a new marker on the map using JavaScript, and you have seen the JavaScript code to do so (it’s actually a single statement). A marker is identified by three data items: its coordinates, a title, and the map it belongs to. The following JavaScript function accepts as arguments the values of the marker’s properties, creates a new marker, and places it on the map:
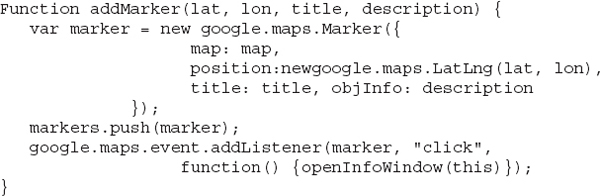
The code behind the Add New Marker button displays an auxiliary form where users can enter the marker’s title and description, and then calls the
addMarker() function to create the new marker, passing the user-supplied values as arguments:
The marker appears at the center of the map, and the VB code requests the center point’s coordinates from the script with the
getCenter() function. You could omit the first two arguments to the addMarker() function and let the JavaScript code place the marker on the center of the map. However, it’s more flexible to pass the coordinates of the new marker as arguments to the addMarker() function, because you may wish to place a marker at a different location. You could also insert some code to make sure that no two markers are placed at the same location, or within a minimum distance from an existing marker.The
addMarker() function of the script stores all markers in an array, the markers array. To request the markers from within the host application, implement two functions: the getMarkerCount() function, which returns the total number of markers in the array, and the getMarker() function, which accepts as an argument the index of a marker in the array and returns the specified marker’s data. The two functions are implemented with straightforward JavaScript code.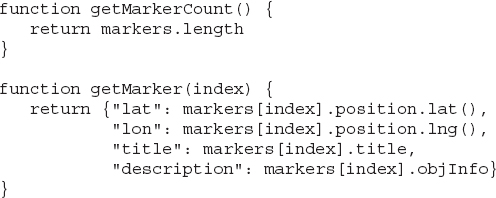
The
getMarker() function returns a custom object with the marker’s coordinates, its title, and its description. The code behind the Show All Markers button in the host application calls the getMarker() function for each marker and displays the marker data on the frmAllMarkers auxiliary form with the following statements:
The statements that display the actual data on the auxiliary form are not shown in the listing because they’re simple Visual Basic statements that process the
obj variable. The obj variable represents the current marker and it exposes the properties lat, lon, title, and description. The code extracts the individual properties and displays them on an auxiliary form, shown in Figure 6-11.
Figure 6-11 Displaying marker data on the map in an auxiliary Windows form
Summary
This has been a lengthy chapter, but it took you a step away from web pages with static maps toward an interactive desktop application that allows users to interact with maps, and a step closer to the implementation of a GIS system. You’re going to get there gradually, as there are a few more topics to cover.
In the first five chapters of this book, you learned how to create web pages with mapping features, and in this chapter, you learned how to incorporate Google maps into desktop applications written in .NET. The map component of the interface, which is a
WebBrowser control displaying a web page with an embedded map, carries with it all the functionality of a typical Google map, allowing you to create interesting desktop applications with mapping features. The sample application of this chapter was a simple one, but certainly not trivial, and you will see even more advanced mapping applications for the desktop in the following chapters...................Content has been hidden....................
You can't read the all page of ebook, please click here login for view all page.