

CHAPTER
3
Building Applications with the Mobile Application Platform
PeopleSoft Mobile Application Platform (MAP) is the second of two mobile development tools in the PeopleTools chest (Fluid is the first). Although both produce similar mobile results, they take a very different approach. As you learned in the last chapter, Fluid uses Application Designer and core PeopleTools development concepts. Fluid serves content through the PeopleSoft Pure Internet Architecture (PIA), just like classic pages. MAP is very different. MAP uses an online configuration tool and serves content through Integration Broker’s REST listening connector. About the only part of MAP that is familiar to PeopleSoft developers is the PeopleCode editor. MAP uses PeopleCode Application Classes to respond to events.
Since PeopleSoft includes two mobile development tools, it is very reasonable to ask the question, “Which mobile tool should I use?” Oracle recommends that customers use fluid whenever possible because it uses standard PeopleTools development patterns. Since MAP serves content through Integration Broker, Oracle recommends that customers use MAP when building mobile applications that span multiple PeopleSoft databases. You might also choose to use MAP when creating a responsive, mobile version of a complex component. In this scenario, you would create a component interface for the complex component and then use that component interface in a MAP application.
MAP combines online design and modeling tools with PeopleCode to create mobile applications. The online designer is functional enough to share with subject matter experts, allowing them to make mobile user interface changes that would normally require a PeopleSoft developer.
MAP produces MV* applications. I hesitate to identify the * because there is a lot of gray area surrounding that last element. Is it a ViewModel? A Controller? A Presenter? How about just “glue” (MVG). The Model (or ViewModel) is described through a PeopleSoft Document. The View is configurable through a Layout Designer. In this chapter, we will first create Documents to represent the data required by Layouts. Second, we will create Layouts to display information. As a final step, we will connect the model to the view using PeopleCode.
Hello MAP
Let’s build the simplest MAP application possible… how about ' Hello ' | %OperatorID?
Creating a Document
Since PeopleSoft moved to the PIA, Integration Broker Message definitions have described data going into and out of Integration Broker. The problem with Message definitions is that they only describe hierarchical Record structures. Another shortcoming of Message definitions is that they only support XML. Considering the popularity of JSON, PeopleTools needed a new way to represent data in other formats. PeopleTools added the Documents module to PeopleTools 8.51 as a structured abstraction, abstracting the structure of a data set from the representation of that data. We can use PeopleCode to populate a Document and then render that Document in a variety of formats including XML and JSON.
In MAP, Documents represent the ViewModel. Each Layout (View) is attached to a Document (Model), and that Document contains all of the data rendered by the Layout.
Log into your PeopleSoft online application and navigate to PeopleTools | Documents | Document Builder. Create a new document that has the package BMA_HELLO, document HELLO_USER, and version V1. I used upper case words to define this document, but you can use any mixture of upper and lower case characters. Figure 3-1 is a screenshot of the Add New Document page.
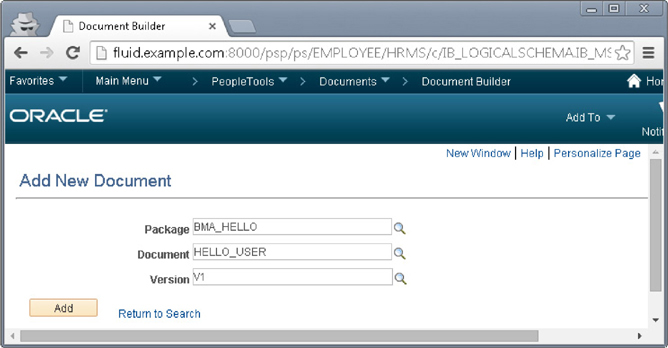
FIGURE 3-1. Add New Document page
When the new document appears, select the HELLO_USER node in the tree on the left and add a new primitive child. Primitive values represent basic data types, such as binary, number, string, and so on. Name the new primitive element GREETING and select the Text type. Documents can contain primitive, collection, and compound types. You can think of a collection as an array. The child of a collection is either a primitive or a compound. A compound is a reference to another Document. Figure 3-2 is a screenshot of the Document.

FIGURE 3-2. New Document definition
Configuring a Layout
With our ViewModel defined, we can move onto the layout. Navigate to PeopleTools | Mobile Application Platform | Layout Designer. Switch to Add mode and create a new layout named BMA_HELLO_USER. The first step in creating a new layout is to specify the Layout Document (also known as the ViewModel). Figure 3-3 is a screenshot of the Layout document selection. After selecting a document, select the PT_TEMPLATE_ONE template. Layout templates allow for reuse by moving commonly used items into templates. MAP Layout templates are the MAP synonym for Fluid layouts.
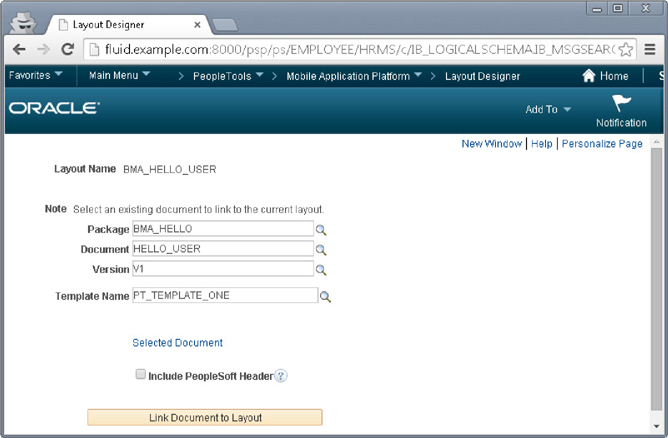
FIGURE 3-3. Specify a document for a layout
Figure 3-4 is a screenshot of the Layout Designer. Notice that the left side contains a representation of the Document we created specifically for this layout. Just above and to the right of that you see a template name. Below the template name is a toolbar. This toolbar contains buttons that insert input and output controls into the layout. Below the toolbar you find a list of items that are part of this layout. Container elements contain a start and end item. For example, mapheader_1 is immediately followed by mapheader_end. Anything you add between these items is displayed within the header. Nearly everything you add to a page will exist in some sort of container. While viewing the Layout grid, set the Label Text for mapheader_1 to Hello World.
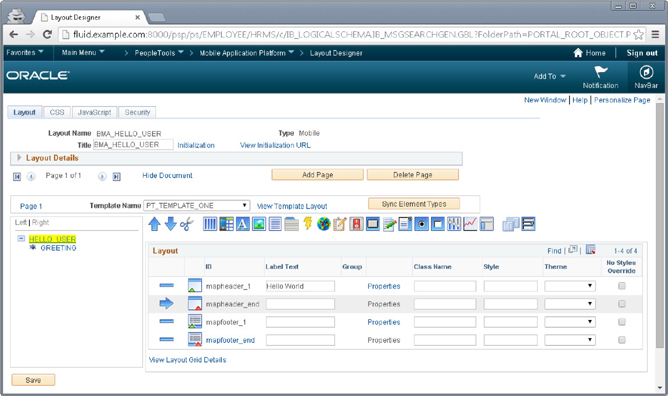
FIGURE 3-4. Layout Designer
The arrow in the left column of the Layout grid determines the new item insertion point. Move the arrow to mapheader_end by clicking on that row’s bar in the left column. Now click the ‘A’ icon in the toolbar to insert a static text element. MAP will respond by asking you what you want to put in the static text element. Choose the Primitive radio button and then check the box for the GREETING row. Figure 3-5 is a screenshot of the text element properties. The Layout Designer grid will now contain a mapstatictxt_1 element that has the label text GREETING.
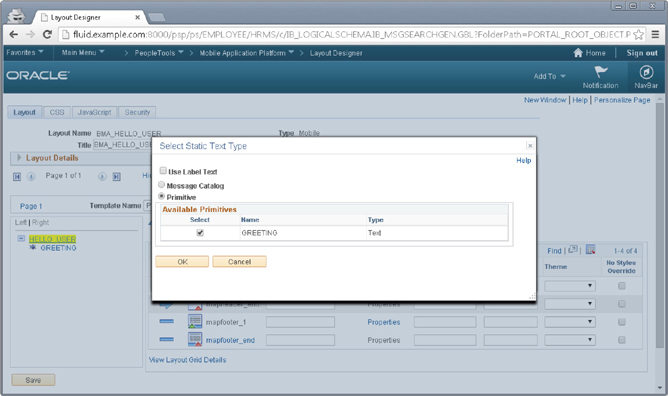
FIGURE 3-5. Adding a text element to a layout.
![]()
NOTE
If you add an element in the wrong place, then ensure that row has an arrow in the left column and then use the up and down arrows in the toolbar to move the row up or down within the grid. If you want to completely delete a row, then select the row and then use the scissors icon to delete the row.
Layout Security
Switch to the security tab in the Layout Designer and change Req Verification from none to Basic Authentication and SSL. Next, click the Layout Permissions link and add a Permission List. I chose PTPT1000, which is the permission list common to all users.
![]()
Never authenticate without SSL. SSL is the encryption layer that ensures your username and password are protected as they travel across the network.
At some point we need to populate the ViewModel. Let’s first view our layout without data. Switch back to the Layout tab and click the View Initialization URL link. This will display a dialog containing the MAP application’s URL. Paste this URL into a web browser to load the application. Figure 3-6 is a screenshot of the layout as viewed at runtime.

FIGURE 3-6. Hello User layout without data
Data Initialization
When Integration Broker receives a request for a layout, it runs the Layout’s initialization routine. The initialization routine is responsible for populating the Layout’s Document. These initialization routines are Application Classes. Let’s create the initialization routine for this layout. Log into Application Designer and create a new Application Package. Name the new package BMA_HELLO_MAP. To this Application Package, add the class HelloUser. Open the HelloUser PeopleCode editor and add the following PeopleCode:
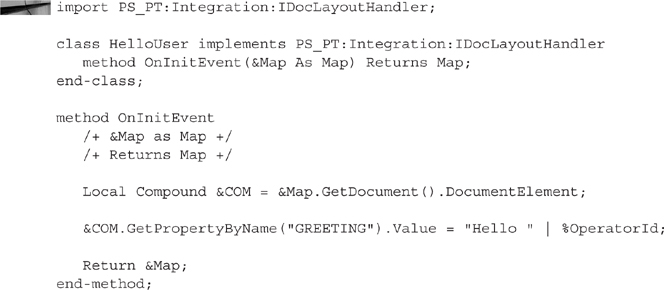
This PeopleCode first asks MAP for a reference to the ViewModel and then it updates the GREETING property to a relevant greeting.
![]()
NOTE
There is a great book named PeopleSoft PeopleTools Tips and Techniques published by Oracle Press that contains a chapter on creating Application Classes.
Return to the online application and find the Initialization link. Select this link and then expand the Base Event Method group box. Enter the application package and class we just created. Figure 3-7 is a screenshot of the Base Event Method properties.
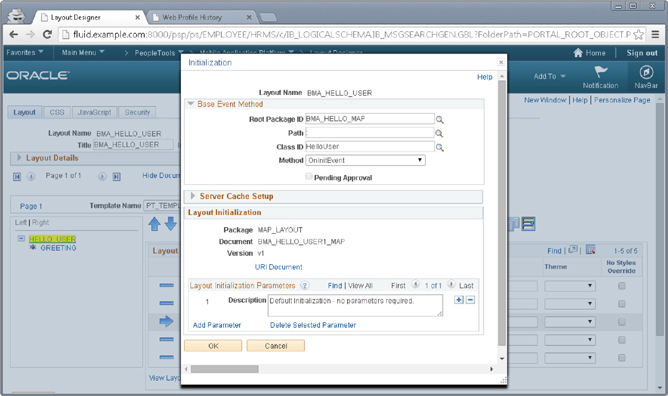
FIGURE 3-7. Base Event Method properties
Save your layout and then reload the runtime version of the layout. It should now contain the text GREETINGHello PS (or whomever you logged in as). A greeting doesn’t need a label, so return to the layout and delete the mapstatictxt_1 Label Text, which currently has a value of GREETING. Save the layout. Reload your runtime MAP application and confirm your changes are successful. Figure 3-8 is a screenshot of the final Hello User MAP application. Congratulations! You have now created your first MAP application.
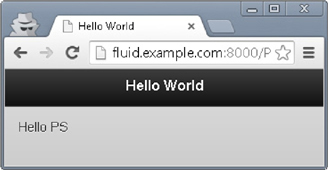
FIGURE 3-8. Final Hello User MAP application
One more thing before we move onto the next concept … at the top of the Layout Designer there is a collapsed group box labeled Layout Details. Expand this group box and locate the Document Dump checkbox. This checkbox adds the mLayoutDocument JavaScript variable to the layout page at runtime. I find this immensely valuable. When I create a layout and don’t see the data I expect, I can review the contents of the mLayoutDocument variable to determine whether the problem is with the initialization PeopleCode or a property within the Layout. After enabling Document Dump, reload your online MAP application and open the JavaScript console. At the prompt, enter mLayoutDocument. Figure 3-9 is a screenshot of the mLayoutDocument output.
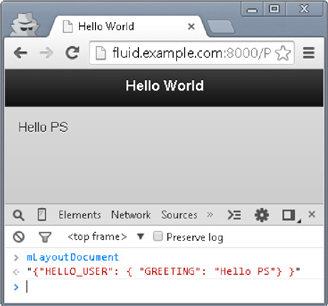
FIGURE 3-9. mLayoutDocument
The Role of jQuery
Our Hello User layout contained a header, text area, and footer. When we viewed the MAP application at runtime, we saw that the header consisted of a very dark color with centered, contrasting text. Likewise, the body had a lighter color with contrasting text, the text having an outline. The styling present in this MAP application is standard jQuery Mobile styling. You can change an element’s appearance by selecting a different theme letter from the Layout grid. For example, to change the header’s background color from black to blue, change the value in the theme drop-down to “b.” As you interact with the Layout Designer, you will notice quite a few allowances for jQuery Mobile configuration data. For example, the JavaScript tab contains a section dedicated to jQuery Mobile Document Events.
A PeopleTools Cross-Pillar Mobile Process Monitor
Every PeopleSoft application has a process monitor. It would be convenient to be able to access all of the monitors from one location. Since this functionality requires web services, it is a great candidate for MAP. Our process monitor will consist of an initial page containing a list of processes. Each item in the list will be a link to a details page. Considering that the process scheduler has the potential to generate a significant amount of data, we will limit results to just the logged in user, and then further restrict the rows to only the most recent 30.
Data Model
As we saw from our Hello MAP example, there are multiple layers to the MAP data model. At the lowest level we have the database logical model and at the highest level we have the MAP view model document structure. There is a fair amount of overlap between the database model and the view model. The Documents module includes a great tool that generates a Document from a Record definition. First, however, we need a record definition. Let’s create a Record definition that matches our process monitor data structure and then use it to create a portion of our view model. Open Application Designer and create a new Record definition. To this new record definition, add the following fields:
PRCSINSTANCE
PRCSTYPE
PRCSNAME
RUNDTTM
OPRID
PT_AESTATUS
Switch to the Record Type tab and change the Record Type to SQL View. Open the view’s SQL editor and insert the following effective dated SQL:
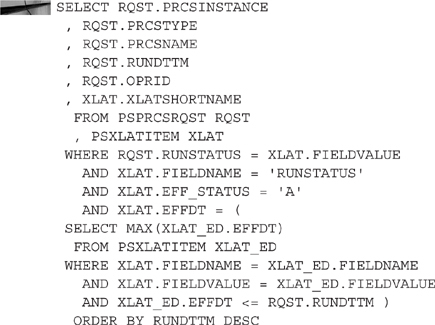
Save the Record and name it BMA_PRCSRQST_VW. Build the record by choosing Build | Current Definition from the Application Designer menu bar. Figure 3-10 is a screenshot of this new record definition.
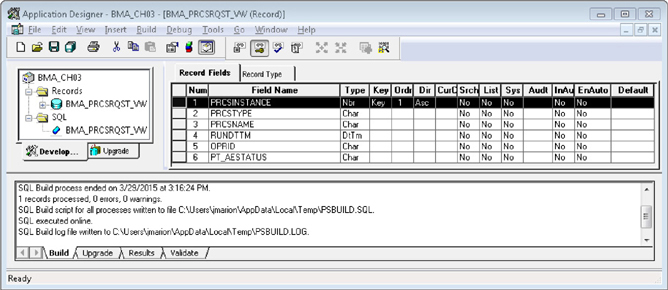
FIGURE 3-10. BMA_PRCSRQST_VW Record definition
![]()
NOTE
I chose to relate the process status translate value to the run date. If a translate value changes, then older processes will show the prior value, whereas newer processes will show the current value. Alternatively, I could have chosen the current date so that all processes would show the most current status label.
With our data record in place, let’s log into PeopleSoft online and create a Document that matches this record’s definition. After authenticating, navigate to PeopleTools | Documents | Document Utilities | Create Document from Record. When prompted, choose the BMA_PRCSRQST_VW Record definition. The utility will inspect the selected record and give you the opportunity to select which fields to include in the target Document. Set the Package Name to BMA_PROCESS_MONITOR_MOBILE. Accept the defaults, and click the OK button. Figure 3-11 is a screenshot of the utility.
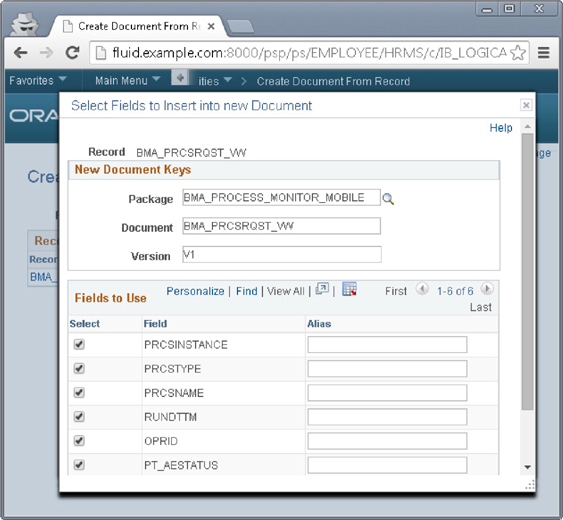
FIGURE 3-11. Create Document from Record utility
After clicking OK, the Create Document from Record utility displays a Build Result. You want that Build Result column to contain the text, “Document created successfully.” If it does, then click that text because it is a hyperlink to the newly created Document. If the Build Result column contains a different message, then you may need to build the Document manually.
The Create Document from Record utility is a convenience tool that saves some typing and clicking. While great for a back-end data model, the generated document contains some primitive configurations that won’t display well. For example, the RUNDTTM primitive contains a highly specific date format that is designed for integration, not display purposes. As currently defined, the RUNDTTM will be a little difficult to comprehend in the view layer. Let’s change the RUNDTTM from a DateTime type to a Text type (Don’t try to save yet because changing the type will make the document invalid). Later we will use PeopleCode to format the RUNDTTM into something meaningful. After changing the RUNDTTM, switch to the Relational tab and expand the Relational Details section. Clear the record name from the record prompt (Now you can save because the document is now valid). The Documents module maintains the record/document relational mapping for the Document.GetRowset and Document.UpdateFromRowset methods. The relationship however is quite strict, requiring the Document’s and Record’s fields to have the same types.
![]()
NOTE
The Create Document from Record utility created a Document representation of a Record definition. If a Document and Record share the same structure, then having them share the same name, BMA_PRCSRQST_VW, also makes sense. However, we changed the structure of the Document, so that it no longer matches the source record definition. With that in mind, it seems misleading to have the Document and Record sharing the same name. Perhaps a better name would have been BMA_PRCSRQST_VM, the suffix VM representing ViewModel.
We now have a Document that contains a field for each item we plan to display in the Process Monitor mobile list. This Document represents just one row. Our Layout ViewModel requires multiple rows. To accomplish this, we must wrap this Document in a container Document. Navigate to PeopleTools | Documents | Document Builder and create a new document in the package BMA_PROCESS_MONITOR_MOBILE. Name the new document BMA_PROCESS_LIST_VM and set the version to V1. When the Document structure appears, click on the BMA_PROCESS_LIST_VM node and then add a Collection child node. Name the collection ROWS. To the ROWS collection, add a Compound child node. The basis for the compound child node is BMA_PROCESS_MONITOR_MOBILE.BMA_PRCSRQST_VM.V1. Figure 3-12 is a screenshot of the compound child node selection dialog. Select a basis Document and then save this new compound Document.
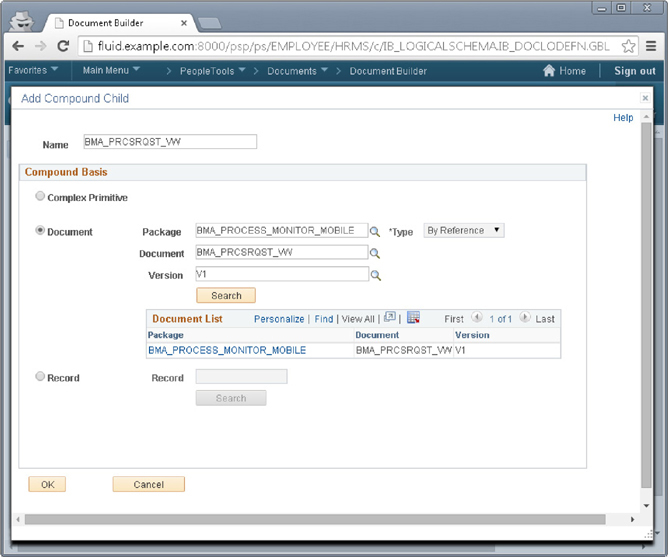
FIGURE 3-12. Adding a Compound Child node
![]()
NOTE
Don’t click the OK button in the compound child node selection dialog. Instead, search for a basis document and then select it from the list. This will populate the Document’s metadata and close the dialog.
We are just a few pages away from creating a layout. The list in our first layout will link to a details layout. That target layout MUST exist before we create our list. As you saw with the Hello MAP example, we have to create a Document before we can create a layout. We can modify both later, but we need to create something for placeholders. Return to the BMA_PROCESS_MONITOR_MOBILE.BMA_PRCSRQST_VW.V1 Document and click the Copy button. BMA_PRCSRQST_VW contains the base fields we will display on a details page. Later we will want to add more fields to the details Document without changing the initial process list Layout and Document. Place the new Document in the same package: BMA_PROCESS_MONITOR_MOBILE and name the new Document BMA_PROCESS_DETAILS_VM. Set the version to V1.
Layout
Our application consists of two layouts: A list layout and a details layout. We need to create the details layout first because the list layout will link to the details layout. The target (details) layout must exist before we can create that link.
Details Layout
Navigate to PeopleTools | Mobile Application Platform | Layout Designer. Create a new Layout named BMA_PMON_DETAILS. The Document for this layout is the Document we just created: BMA_PROCESS_MONITOR_MOBILE.BMA_PROCESS_DETAILS_VM.V1. Choose the template PT_TEMPLATE_ONE and then click the Link Document to Layout button.
When the new Layout appears, set the mapheader_1 label text to Process Details. Select the mapheader_end item and use the toolbar button to add a container. Inside the container, add a static text element. MAP will ask how to populate the static text element. Select Primitive and then choose the PRCSINSTANCE field.
The first Layout exists to help a user select a process instance. This second layout displays details about the process instance. Since this Layout represents the second page within our application, it needs a parameter. Click the Layout Initialization link near the top of the Layout. When the Initialization dialog appears, identify the Layout Initialization Parameters section. Add a new row by clicking the “plus” signed button. When the Parameter List appears, use the Select Primitive link to select the PRCSINSTANCE field. Figure 3-13 is a screenshot of the Layout parameters.
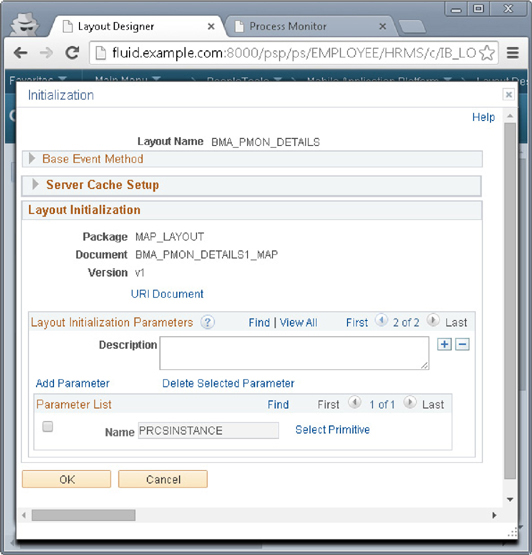
FIGURE 3-13. Layout parameters
Switch to the Security tab and configure security for the Layout. Set the Req Verification to Basic Authentication and SSL and then use the Layout Permissions to assign this Layout to a permission list. I chose PTPT1000 so all users can access the mobile process monitor. We could view this layout now by handcrafting a URL with the appropriate parameters, but we will wait and let the list Layout create one for us.
List Overview Layout
Create a new Layout named BMA_PMON_LIST. Select the Document BMA_PROCESS_MONITOR_MOBILE.BMA_PROCESS_LIST_VM.V1 and set the template name to PT_TEMPLATE_ONE. Click the Link Document to Layout button to continue. Locate mapheader_1 and set the label to Process Monitor. Select the mapheader_end element and add a Listview element. When prompted if you want to create a group, click “No.” The Listview configuration dialog will appear. Check the Add URL and Dynamic Flag attributes. Add URL will allow us to associate a target link with each item in the list. The Dynamic Flag will let us select elements from a collection. In the Listview Composition grid, set values for Title, Description, and Aside. For the title, choose the primitive PRCSNAME. Set the description to PRCSTYPE and the aside to RUNDTTM. Just above the grid is a link titled Add Field. Use this link to add one additional field. For this new field, set the primitive to PT_AESTATUS. Figure 3-14 is a screenshot of the Listview configuration dialog.
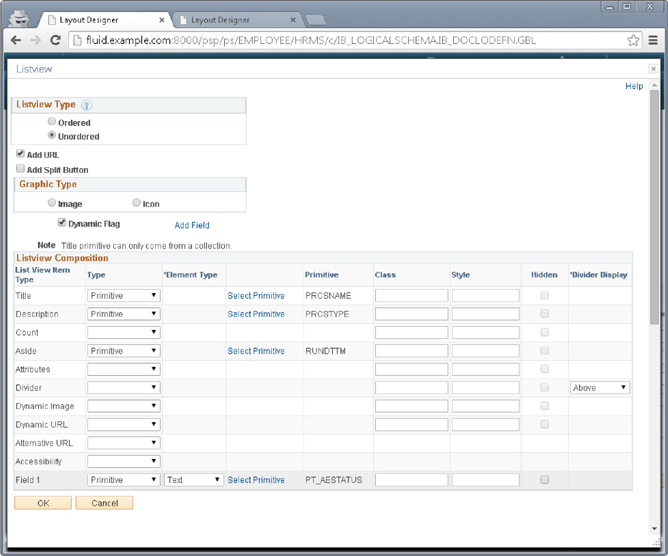
FIGURE 3-14. Listview configuration dialog
Since we specified Add URL, MAP will prompt us for URL details. Select the Call Layout option and then select the Layout BMA_PMON_DETAILS. The details Layout has two URLs:
![]() A default initialization URL with no parameters.
A default initialization URL with no parameters.
![]() The URL we created that expects a process instance.
The URL we created that expects a process instance.
Select the second URL (the one with no description). The URI Parameters grid will appear, allowing us to map the PRCSINSTANCE parameter to a primitive from our ViewModel. Select the PRCSINSTANCE primitive. Figure 3-15 is a screenshot of the URL mapping.
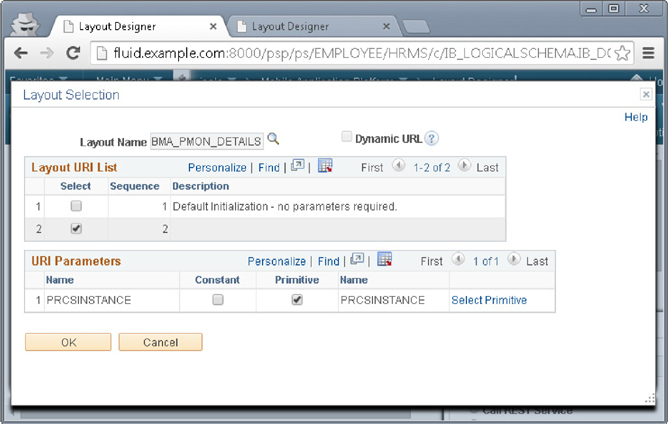
FIGURE 3-15. URL mapping
After assigning security to the Layout (Basic Authentication with SSL and permission list PTPT1000) return to the Layout tab and click the View Initialization URL link. A dialog will appear that contains the URL for launching the Layout. On my VirtualBox image, the URL is http://fluid.example.com:8000/PSIGW/RESTListeningConnector/PSFT_HR/BMA_PMON_LIST1_MAP.v1/INIT/-1. If you are interested, you can paste your Layout’s URL into a browser and view the current state of the Layout. Since we haven’t populated the Layout’s Document, all you will see is the header.
Initialization
Our Layouts need some data. Log into Application Designer and create a new Application Package named BMA_PMON_MOBILE.
List Overview Initialization
Add a new Application Class to the BMA_PMON_MOBILE Application Package and name the new class ProcessOverviewList. Add the following PeopleCode:
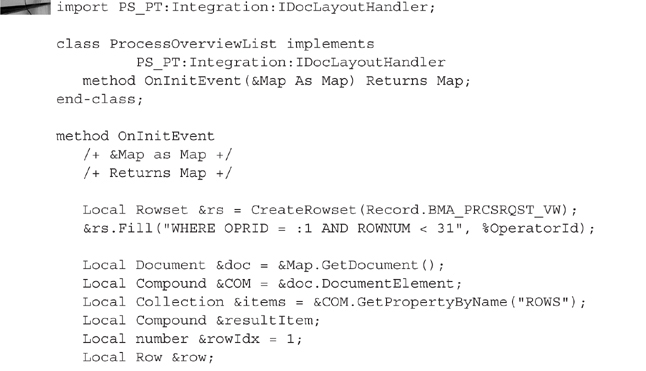
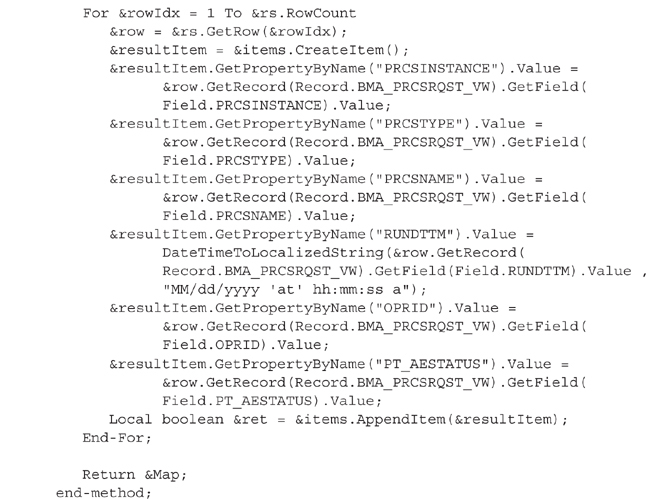
The PeopleCode initialization routine is very similar to the Hello MAP example, but with a few lines of code to copy a rowset into the Layout Document’s collection. I wrote the WHERE clause of the Rowset.Fill method to specifically limit the returned results to no more than 30 rows. The process scheduler can generate a significant amount of data. It is important to restrict how much information you send over a wireless network.
Return to the online Layout Designer for the BMA_PMON_LIST Layout and click the Initialization link. Expand the Base Event section and enter the Application Class BMA_PMON_MOBILE:ProcessOverviewList. Select the method OnInitEvent. Figure 3-16 is a screenshot of the Base Event Application Class properties. Save the Layout and then attempt to access the Layout through the initialization URL. Figure 3-17 is a screenshot of the Overview list. It isn’t very pretty yet, but it contains data. After implementing the details initialization routine we will return to the layout and adjust properties for an optimal viewing experience.
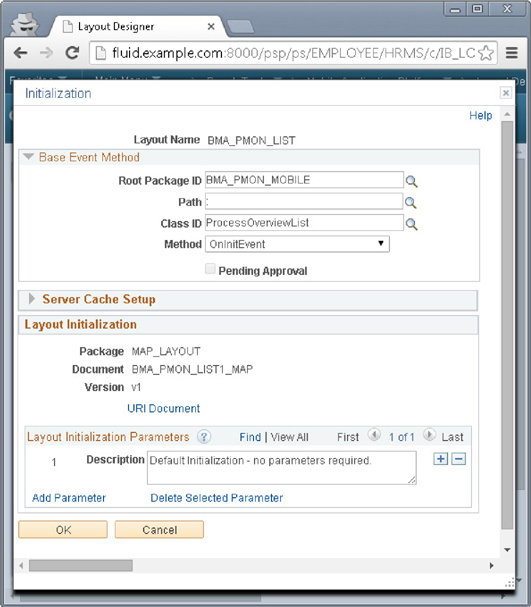
FIGURE 3-16. Base Event properties
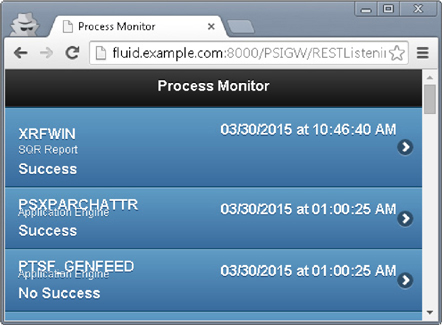
FIGURE 3-17. Process Monitor overview with data
Details Initialization
Inside Application Designer, add a new Application Class to the BMA_PMON_MOBILE Application Package. Name the new class ProcessInstanceDetails and add the following PeopleCode:
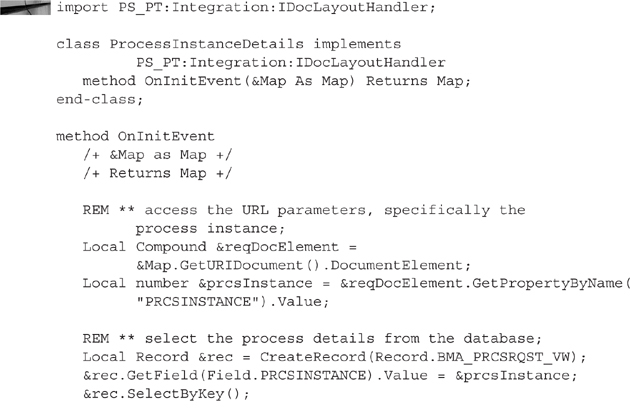
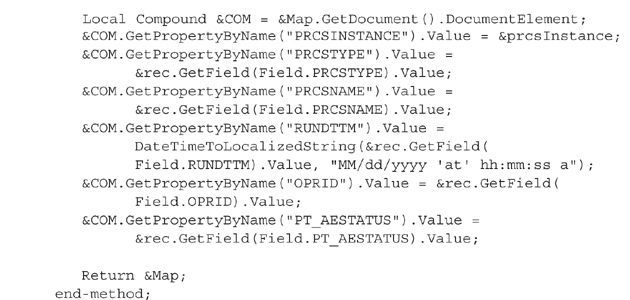
Return to the online Layout Designer for the BMA_PMON_DETAILS Layout and click the Initialization link. Expand the Base Event section and enter the Application Class BMA_PMON_MOBILE:ProcessInstanceDetails. Select the method OnInitEvent. Save the Layout and then attempt to access the Layout by clicking through the Process Overview Layout list. Figure 3-18 is a screenshot of the Details page. This page is not very pretty, either. Right now, we are just testing the initialization routine.
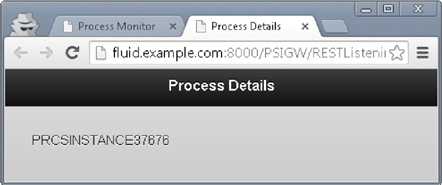
FIGURE 3-18. Unformatted Details page with data
Final Layout Adjustments
Our Layouts are now functional. Let’s make some configuration changes to enhance the user experience.
List Overview Layout
Open the BMA_PMON_LIST Layout in the Layout Designer. Identify the maplist_view1 element in the Layout grid and click the element’s Properties link. Scroll half way down the Listview Properties dialog to find the Dialog checkbox and check the box to select it. The default MAP behavior is to open links in a new window. Using the dialog option will keep the list active while loading the details Layout in the same window. Scroll the rest of the way through the dialog and find the Listview Properties group. Select the Inset and Filter options. Figure 3-19 is a screenshot of the Listview Properties.
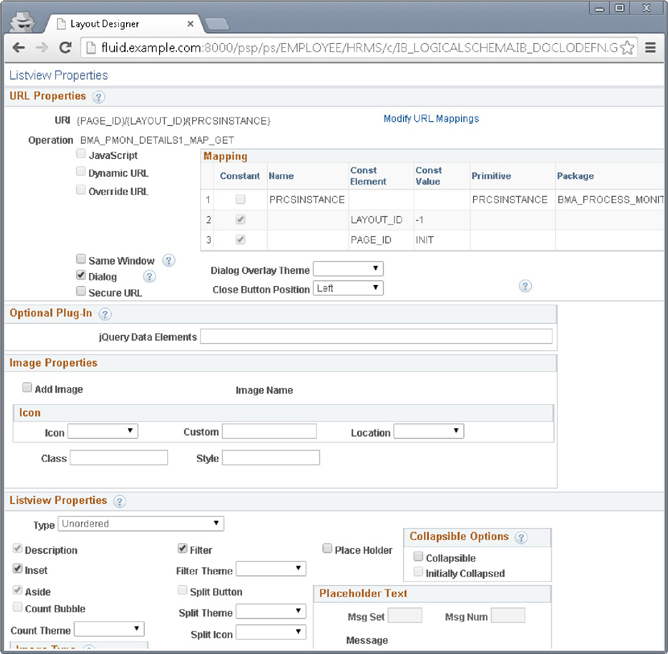
FIGURE 3-19. Listview Properties
Reload the Process Monitor mobile page, and notice that the list now has a filter at the top and the list is inset rather than filling the entire screen. Enter some text into the filter box to see the results list filtered to show only matching items. For example, enter SQR to see only SQR reports.
The list still has a few visual idiosyncrasies. For example, the process type is not aligned quite right and the run status seems to be oddly placed. Let’s move the run status to the right so that it appears under the run date. I am also not fond of the overwhelming blue background within the list. Let’s use the jQuery Mobile theme support to select a different color scheme for the list. Return to the Layout Designer and locate the Theme column. Change the theme for maplistview_1 to the “c” theme.
We can solve the remainder of the layout issues with CSS. There are two ways to apply CSS. The first is to add CSS attributes to the style property of each element we want to change. The second method is to define CSS style classes in the Layout’s CSS tab and then assign those classes to each element. We will use this second approach. Return to the Layout Designer and switch to the CSS tab. About the middle of the page, click the button labeled Add Stylesheet. This will add a row to the Stylesheets grid. Enter a name in the CSS Name field. The name is not that important. It just needs to end with .css. I named the file list-layout.css. Enter the following into the text field below the CSS Name field. Figure 3-20 is a screenshot of the Layout Designer CSS editor.
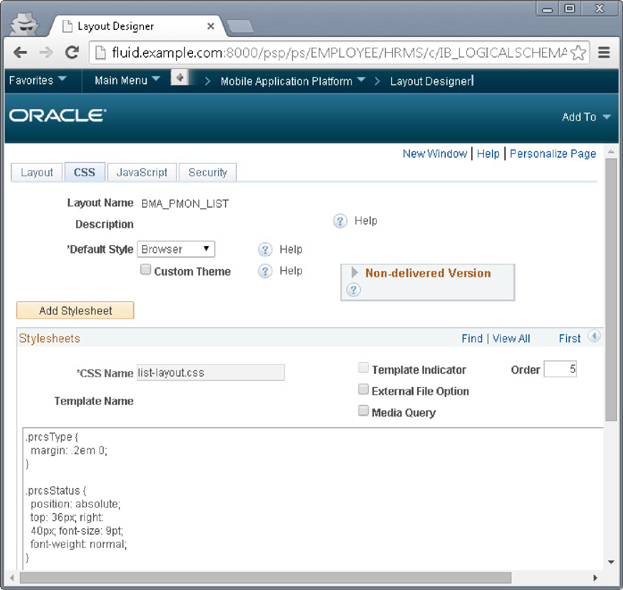
FIGURE 3-20. Layout Designer CSS editor

![]()
We can solve a lot of problems with CSS. For example, MAP does not have a mechanism to concatenate fields. Fields added to a page are stacked vertically. We can align them horizontally by adding the css display: inline-block. We can also add delimiters with CSS using the :after and :before pseudo-classes.
Return to the Layout tab and then select the Properties link of the maplistview_1 element. Locate the Field and Description items at the bottom of the properties dialog. Set the class name for the Description item to prcsType and the class name for the Field item to prcsStatus. Figure 3-21 is a screenshot of the field and class properties. Refresh the Process Monitor application and confirm that the layout changed as expected. Select one of the process links and verify that it opens the details page in a dialog box. Figure 3-22 is a screenshot of the Process Monitor list after applying styling adjustments.

FIGURE 3-21. Field and class properties

FIGURE 3-22. Updated Process Monitor
The Process Monitor Overview is complete. Let’s return to the details layout and make a few adjustments. Specifically, let’s add a grid for layout purposes and then add a few primitives from our ViewModel.
Open the BMA_PMON_DETAILS Layout in the Layout Designer. Delete the mapcont_start_1, mapstatictxt_1, and mapcont_end_1 fields by selecting them and then clicking the “scissor” toolbar button. With mapheader_end selected, click the Add Mobile Grid toolbar button. This will add mapmobl_start_1 to the Layout. Ensure mapmobl_start_1 is selected and add two containers. Do not nest the containers. These containers need to be siblings. Inside the new first container within the grid, add PRCSINSTANCE and PRCSNAME as static text fields. Add PRCSTYPE and OPRID as static text fields to the second container. The grid now contains content, but the grid needs some internal metadata. Click the grid’s properties link and a message will appear stating, “Defaulting mobile grid counts. Column count defaults to 2 and row count to 1.” This is perfect. We want a two-column grid with a single row. Click OK to dismiss the properties dialog and then save the layout. Adding the grid element created a nonresponsive two-column grid within the details dialog. The fields we added to each container are vertically stacked. Open the Mobile Process Monitor Overview list in a new window and click a row to see the changes we made to the details layout.
The fields within the details grid have labels, but the labels run right into the detail values as if they were all one word. The containers also run together as if they represented one single container. Let’s apply CSS to improve the appearance of the dialog. As we saw with the Overview list, the Layout Designer has provisions for CSS files. We just have one problem: jQuery doesn’t load external stylesheets into dialogs. We have a couple of options:
1. Convert the dialog into a standard link that opens either in the current window or a new window.
2. Use the style property instead of CSS files and class names.
3. Add the CSS to the parent Layout.
Option 1 is a great option, but would require the overview list to refresh each time we return to the list. Option 2 will let us apply some styling, but won’t allow us to style nested elements that are hidden from the Layout table. We will choose option 3 because it avoids refreshing the list and lets us apply as much styling as we desire. Open the BMA_PMON_LIST Layout in the Layout Designer, switch to the CSS tab, and locate the list-layout.css file. Append the following to the end of the file:
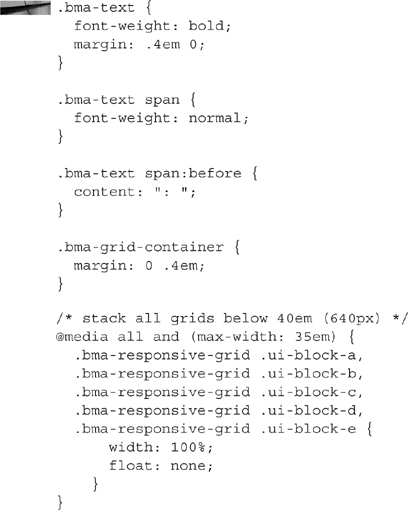
Save the Layout and open the BMA_PMON_DETAILS Layout in the Layout Designer. In this Layout, we want to change the labels and add some CSS class names. First, use the values from Table 3-1 to update the CSS class names. The first column of the table contains the element type. The second column contains the CSS class name. For container elements (elements with a start and end element), only update the start element, not the end element.
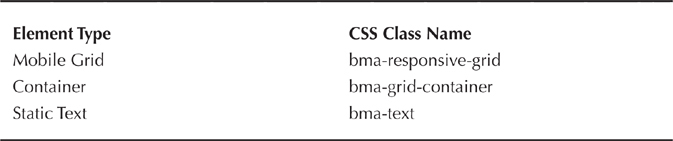
Table 3-1. Element/Class mappings
Update the labels to something meaningful. Figure 3-23 is a screenshot of the Layout grid within the Layout Designer. Reload the Mobile Process Monitor Overview list and select an item. Figure 3-24 is a screenshot of the updated dialog. Make the browser window width smaller (resize the window) and notice that the containers within the grid stack vertically. Figure 3-25 shows the responsive grid.

FIGURE 3-23. Layout grid showing labels class properties
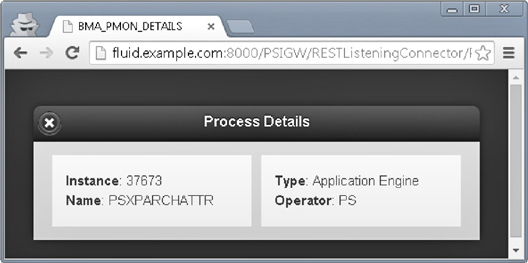
FIGURE 3-24. Details dialog after applying CSS changes
FIGURE 3-25. Responsive layout
Multipage Layouts
In this scenario, we created a separate Layout for each view within the Process Monitor mobile application. Alternatively, we could have created multiple pages within the same Layout. All pages within the same Layout must share the same Document ViewModel. Each page can use different fields (primitives, compounds, and collections), but they all share the same Document. Using the multipage approach would have required us to add the details view Compound to the same Document used by the process overview list. This is acceptable because a Layout Document structure exists specifically for the Layout, not for the underlying data model. Personally, however, I do not like to clutter my Layout Documents. I would rather create multiple Layouts with comprehensible Documents.
The multipage approach shares the same initialization Application Class between pages. If all of the pages within the Layout use the same Document fields (primitives), then initialization follows the same approach demonstrated in this chapter. If each page uses different fields (primitives), then you can determine the selected page from the GetURIDocument() method of the &Map variable that is passed to the initialization routine. You only need to initialize the primitives that are used by the page identified by the request parameters.
Conclusion
In this chapter, you learned how to use PeopleSoft Mobile Application Platform configuration tool to build mobile applications. We created Document ViewModels and related Layouts. We worked with collection items and used CSS to change the layout and appearance. In the next section of this book, you will learn how to use HTML5 frameworks to create mobile applications.