
Chapter 9. Mixing CUDA and Rendering
With the focus on the use of CUDA to accelerate computational tasks, it is easy to forget that GPU technology is also a splendid platform for visualization. In combination with the Open Graphics Library (OpenGL), CUDA-enabled GPUs become visualization supercomputers. Even highly experienced OpenGL programmers will find this chapter both new and informative, as the examples use primitive restart—a feature recently added to the OpenGL 3.1 standard—to render high-performance, high-quality graphics even when the images require irregular meshes. Example kernels demonstrate data sharing between CUDA and OpenGL through buffer sharing. Profiling will show that primitive restart is 60 times faster than the optimized OpenGL multiDraw() method because it avoids performance robbing transfers across the PCIe bus. This chapter will also discuss how primitive restart can produce images of higher quality than other OpenGL methods and optimize texture rendering as well. Readers should note that this chapter is intended only to teach how to mix CUDA and OpenGL in the same application and demonstrate the speed of the methods used. The provided software framework is quite general and can be used for experimentation merely by changing the CUDA kernel. For example, Chapter 12 will use this framework with live video streams from a webcam. Those who wish a more detailed discussion of OpenGL should look to the many other, far more detailed books and Internet tutorials that teach OpenGL and computer graphics.
Keywords
Primitive restart, OpenGL, Perlin noise, rendering, profiling, frames per second, interoperability.
With the focus on the use of CUDA to accelerate computational tasks, it is easy to forget that GPU technology is also a splendid platform for visualization. In combination with the Open Graphics Library (OpenGL), CUDA-enabled GPUs become visualization supercomputers. Even highly experienced OpenGL programmers will find this chapter both new and informative, as the examples use primitive restart—a feature recently added to the OpenGL 3.1 standard—to render high-performance, high-quality graphics even when the images require irregular meshes. Example kernels demonstrate data sharing between CUDA and OpenGL through buffer sharing. Profiling will show that primitive restart is 60 times faster than the optimized OpenGL multiDraw() method because it avoids performance robbing transfers across the PCIe bus. This chapter will also discuss how primitive restart can produce images of higher quality than other OpenGL methods and optimize texture rendering as well. Readers should note that this chapter is intended only to teach how to mix CUDA and OpenGL in the same application and demonstrate the speed of the methods used. The provided software framework is quite general and can be used for experimentation merely by changing the CUDA kernel. For example, Chapter 12 will use this framework with live video streams from a webcam. Those who wish a more detailed discussion of OpenGL should look to the many other, far more detailed books and Internet tutorials that teach OpenGL and computer graphics.
At the end of this chapter, the reader will have a basic understanding of:
■ Mixing OpenGL and CUDA in the same application.
■ How to use primitive restart and why it can generate images of higher quality than other methods.
■ The performance implications of primitive restart for CUDA and in comparison to other OpenGL rendering techniques.
■ How to use the simple general OpenGL framework in this chapter for your own kernels.
■ The use of Perlin noise to generate artificial terrain.
■ The difference between a PBO and VBO.
OpenGL
OpenGL is one of the most common programming interfaces used in visual applications from games to HPC (high-performance computing). OpenGL is standards-based and gives developers the ability to create graphics and special effects that appear nearly identical on any operating system running OpenGL-compliant hardware, making it possible for developers of 3D games and programs to port their software to multiple platforms.
OpenGL is controlled by an Architectural Review Board (ARB) composed of members from many institutions, including NVIDIA, SGI, Microsoft, AMD, HP, and others. The intention of the board is to:
■ Keep the API stable.
■ Ensure that the standard evolves to reflect new hardware capabilities.
■ Allow for platform-specific features through extensions.
There are two very clear benefits of the separation (yet efficient interoperability) between CUDA and OpenGL:
■ From a programming view: When not mapped into the CUDA memory space, OpenGL gurus are free to exploit existing legacy code bases, their expertise, and the full power of all the tools available to them, such as GLSL (the OpenGL Shading Language) and Cg. CUDA programmers can demonstrate their computational prowess when the buffer is mapped into the CUDA memory space.
■ From an investment view: The mapped approach allows efficient exploitation of existing legacy OpenGL software investments. Essentially, CUDA code can be gradually added into existing legacy libraries and applications just by mapping the buffer into the CUDA memory space. This feature allows organizations to test CUDA code without significant risk and then enjoy the benefits of CUDA once they are confident of the performance and productivity rewards delivered by this programming model.
GLUT
The OpenGL Utility Toolkit (GLUT) is a programming interface for writing window system–independent OpenGL programs. Applications that utilize GLUT can be compiled on many platforms. NVIDIA uses GLUT in the CUDA SDK examples.
The GLUT toolkit provides various functionalities, but only a small subset will be used in this chapter:
■ Windows for OpenGL rendering.
■ Callback-driven event processing.
■ Mouse and keyboard input devices.
Mapping GPU Memory with OpenGL
From a CUDA programmer's point of view, OpenGL creates and manages regions of memory on the GPU in generic buffers called buffer objects. The CUDA/OpenGL interoperability happens when a CUDA kernel maps a buffer into CUDA memory space. Control of the buffer is returned to OpenGL when the buffer is released, or unmapped. Mapping is a low-overhead operation that happens quickly and provides high-speed interoperability with CUDA without requiring any memory copies.
Interoperability with OpenGL requires that the CUDA device be specified by cudaGLSetGLDevice() before any other runtime calls. Note that cudaSetDevice() and cudaGLSetGLDevice() are mutually exclusive. 1 Interoperability with OpenGL requires that the CUDA device be specified by cudaGLSetGLDevice() before any other runtime calls. Once a resource is registered to CUDA, it can be mapped and unmapped as many times as necessary using cudaGraphicsMapResources() and cudaGraphicsUnmapResources(). The method cudaGraphicsResourceSetMapFlags() can be called to provide hints (e.g., read-only, write-only) that the CUDA driver can use to optimize resource management.
There are two principal OpenGL memory objects that CUDA programmers will manipulate:
1. Pixel buffer objects (PBOs): A region of memory used by OpenGL to store pixels. A 2D image is composed of multiple pixels, or dots of color. CUDA applications map a PBO to create or modify images on a pixel-by-pixel basis and display them using OpenGL.
2. Vertex buffer objects (VBOs): A region of memory that OpenGL uses for 3D vertices. CUDA applications map a VBO to generate or modify 3D information that OpenGL can render meshes as a colored surface, wireframe image, or set of 3D points.
The following is an outline of the key OpenGL calls associated with VBO usage (excerpted from the OpenGL VBO whitepaper on http://spec.org):
■ glBindBuffer(): This function allows client-state functions to use binding buffers instead of working in absolute memory on the client side. Buffer object names are unsigned integers. The value zero is reserved. Setting the buffer name to zero effectively unbinds any buffer object previously bound, and restores client memory usage for that buffer object target.
■ glBufferData(), glBufferSubData(), and glGetBufferSubData(): These functions control the size of the buffer data, provide usage hints, and allow copying to a buffer.
■ glMapBuffer() and glUnmapBuffer(): These functions lock and unlock buffers, allowing data to be loaded into them or relinquishing control to the server. A temporary pointer is returned as an entry to the beginning of the buffer, which also maps the buffer into client memory. OpenGL is responsible for how this mapping into the client's absolute memory occurs. Because of this responsibility, mapping must be done for a short operation, and the pointer is not persistent and should be stored for further use.
More detailed information about the CUDA API and OpenGL calls used when mixing CUDA with OpenGL can be found in parts 152 and 183 of my Doctor Dobb's tutorial series. Another excellent source of information is Joe Stam's 2009 NVIDIA GTC conference presentation, “What Every CUDA Programmer Should Know about OpenGL,” (Stam, 2009) which is available in both PDF and video formats. 4
Using Primitive Restart for 3D Performance
As mentioned in the introduction to this chapter, the examples herein utilize an OpenGL extension called primitive restart to minimize communications across the PCIe bus and to speed rendering. Primitive restart gives the programmer the ability to specify a data value that is interpreted by the OpenGL state machine as a token indicating that the current graphics primitive has completed. The next data item is assumed to be at the start of another graphics primitive of the same type. Valid graphics primitives include GL_TRIANGLE_STRIP, GL_TRIANGLE_FAN, GL_LINE_STRIP, and others.
Figure 9.1 illustrates this process for two lines containing different numbers of vertices. The figure shows that glPrimitiveRestartIndexNV() is first called to specify the value of TAG to be the primitive restart token. The routine glEnableClientState() is then called to tell the OpenGL state machine to start using primitive restart. The lines are then drawn with glDrawElements().
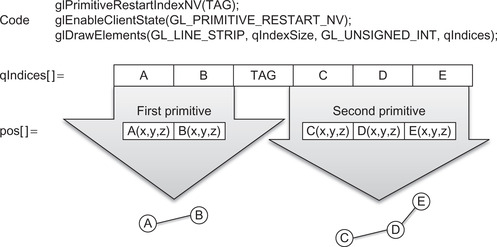
The advantages of the primitive restart approach include:
■ All control tokens and data for viewing can be generated and kept on the GPU.
■ Variable numbers of items can be specified between the primitive restart tokens. This allows irregular grids and surfaces to be drawn, as arbitrary numbers of line segments, triangle strips, triangle fans, and so on, can be specified depending on the drawing mode passed to glDrawElements().
■ Rendering performance can be optimized by arranging the indices to achieve the highest reuse of data cache in the texture units.
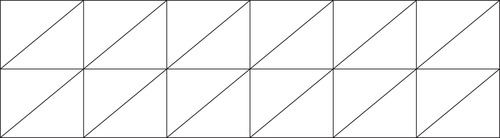
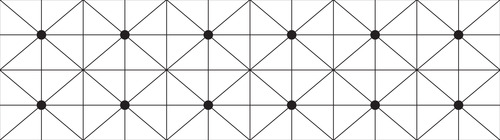
■ Higher-quality images can be created by alternating the direction of tessellation as noted in the primitive restart specification and illustrated in Figure 9.2 and Figure 9.3. The centers of the triangle fan are marked with dots in Figure 9.3.
OpenGL offers other optimized rendering methods aside from primitive restart, such as multiDraw(). However, these methods, as the primitive restart specification notes, “still remain more expensive than one would like” (Craighead, 2002).
Following is a performance comparison of primitive restart against other OpenGL rendering methods. Primitive restart is clearly faster. These tests were performed using an Intel 2.3 GHz Core 2 Duo processor running Linux with an NVIDIA GTX 280 CUDA-enabled gaming GPU running the Perlin kernel from this chapter to generate a virtual terrain map.
When interpreting these numbers, it is important to understand that these frame rates include the time required to recompute the 3D position and color for every vertex and color in the image. This represents a worst-case frame-rate scenario that demonstrates the power and speed possible with hybrid CUDA/OpenGL applications. Real applications will undoubtedly deliver much higher performance by recalculating only the minimum data necessary to render the scene.
| Method | Observed FPS | Rough Average (FPS) |
|---|---|---|
| Simple one by one | 470–500 | 500 |
| MultiDraw | 490–510 | 508 |
| Primitive Restart | 550–590 | 560 |
More details can be found in parts 185 and 206 of my freely available “Supercomputing for the Masses” CUDA tutorials on the Doctor Dobb's Journal website.
The timeline in Figure 9.4 from Parallel Nsight shows that the Perlin kernel consumes very little time compared to the OpenGL buffer swapping.
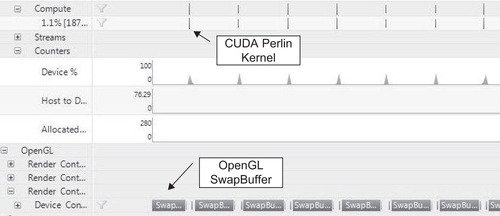
The OpenGL API Call Summary in Parallel Nsight reports the following time for each rendering method.
■ Primitive restart: around 60 μs (microseconds).
■ Multidraw: around 3,900 μs.
■ Iteratively drawing each triangle fan: approximately 1,100,000 μs.
Introduction to the Files in the Framework
Readers should note that care was taken in the design of the software framework so that it could be adapted to new applications. For example, this same framework was used in chapter twelve to display and modify live video streams. To compartmentalize operations, the framework was broken into four separate files. Merely by changing the CUDA kernel, this example code can be used to render an animated sinusoidal surface or an artificial terrain that the user can explore and fly around in. The examples are known to compile and run on Linux and Windows.
For clarity and flexibility, separate 3D vertex and color arrays are used within the example code. This helps speed understanding and makes data visualization as easy as writing a new kernel or loading data from disk to alter the 3D vertex array, color array, or both. Those readers who choose to create their own CUDA kernels should gain a strong practical sense of how easy and flexible visualization can be with a combined CUDA/OpenGL approach.
The relationship between the four files used in the framework discussed in this chapter is illustrated in Figure 9.5. Each of the files is discussed in more detail below.
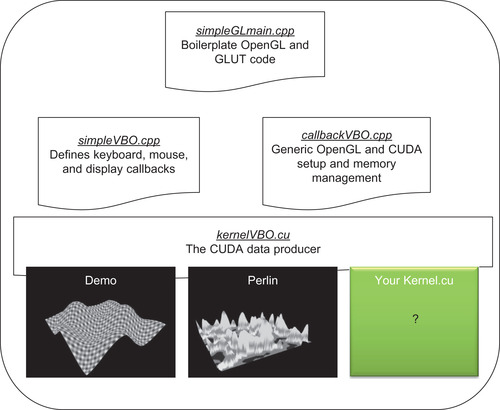
The Demo and Perlin Example Kernels
Two example kernels are provided in this chapter, demo and Perlin. Each kernel generates both 3D vertices and colors.
The Demo Kernel
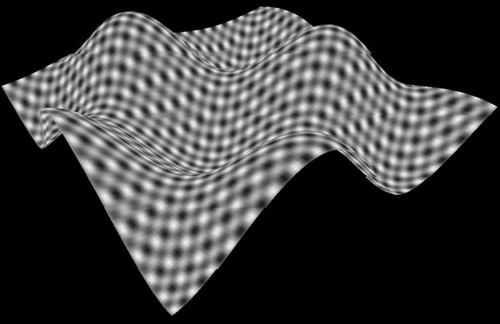
The demo kernel creates an animated sinusoidal surface very similar to the NVIDIA simpleGL SDK example. It is a good test case to confirm that the code is working and to evaluate the speed of a GPU.
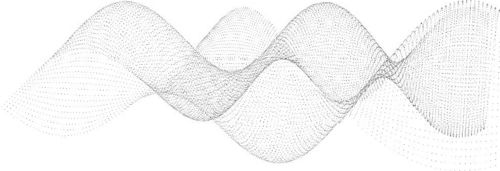
Figure 9.6 shows a grayscale screenshot of the highly colorful surface generated with the demo kernel. Also, note that the colors will evolve with time. Keyboard input allows selecting between rendering the surface with triangles (shown in Figure 9.6), lines (not shown), or dots (shown in Figure 9.7).
The Demo Kernel to Generate a Colored Sinusoidal Surface
The demo kernel draws a time-varying sinusoidal surface by calculating a height value for each location in a 2D mesh. The height value varies by time. See Example 9.1, “Calculating the Heights of the Sinusoidal Surface”:
// calculate simple sine wave pattern
float freq = 4.0f;
float w = sinf(u*freq + time) * cosf(v*freq + time) * 0.5f;
The position and height information is stored in the float4 position, or pos, array, as shown in Example 9.2
// write output vertex
pos[y*width+x] = make_float4(u, w, v, 1.0f);
Similarly, the colors are calculated based on position in the mesh and the animation time, as shown in Example 9.3, “Calculating the Colors of the Sinusoidal Surface”:
// write the color
colorPos[y*width+x].w = 0;
colorPos[y*width+x].x = 255.f *0.5*(1.f+sinf(w+x));
colorPos[y*width+x].y = 255.f *0.5*(1.f+sinf(x)*cosf(y));
colorPos[y*width+x].z = 255.f *0.5*(1.f+sinf(w+time/10.f));
The complete listing for kernelVBO is as shown in Example 9.4, “The Complete Source for the demo Kernel”:
// sinusoidal kernel (Rob Farber)
// Simple kernel to modify vertex positions in sine wave pattern
__global__ void kernel(float4* pos, uchar4 *colorPos,
unsigned int width, unsigned int height, float time)
{
unsigned int x = blockIdx.x*blockDim.x + threadIdx.x;
unsigned int y = blockIdx.y*blockDim.y + threadIdx.y;
// calculate uv coordinates
float u = x / (float) width;
float v = y / (float) height;
u = u*2.0f - 1.0f;
v = v*2.0f - 1.0f;
// calculate simple sine wave pattern
float freq = 4.0f;
float w = sinf(u*freq + time) * cosf(v*freq + time) * 0.5f;
// write output vertex
pos[y*width+x] = make_float4(u, w, v, 1.0f);
colorPos[y*width+x].w = 0;
colorPos[y*width+x].x = 255.f *0.5*(1.f+sinf(w+x));
colorPos[y*width+x].y = 255.f *0.5*(1.f+sinf(x)*cosf(y));
colorPos[y*width+x].z = 255.f *0.5*(1.f+sinf(w+time/10.f));
}
The launch_kernel() method calculates the execution configuration and queues the launch of the demo kernel with the appropriate parameters, as shown in Example 9.5, “The Source Showing the Logic to Launch the demo Kernel”:
// Wrapper for the __global__ call that sets up the kernel call
extern "C" void launch_kernel(float4* pos, uchar4* colorPos,
unsigned int mesh_width, unsigned int mesh_height,
float time)
{
// execute the kernel
dim3 block(8, 8, 1);
dim3 grid(mesh_width / block.x, mesh_height / block.y, 1);
kernel<<< grid, block>>>(pos, colorPos, mesh_width, mesh_height, time);
}
Perlin Noise
Many people use random number generators to add variation and unpredictability to their applications. Landscapes exhibit both variation and seeming unpredictability, but not purely at random. Instead they vary at different scales, meaning that they have various levels of detail. A mountain range demonstrates this variation in scale:
■ Large scale: the outline of the mountain range.
■ Medium scale: various hills, valleys, and other features.
■ Small variation: boulders and rock outcroppings are common examples.
■ Tiny variations: stones and the bumps you see when hiking on a trail.
Perlin noise is function for generating coherent noise over a space. Coherent noise means that for any two points in the space, the value of the noise function changes smoothly as you move from one point to the other; that is, there are no discontinuities. Natural phenomena tend to exhibit the same pattern of large and small variations. The Perlin noise function recreates this natural effect by simply adding up noisy functions at a range of different scales.
In 1997, Ken Perlin received an academy award for developing the Perlin noise generator. Perlin noise has a multitude of uses ranging from the creation of natural textures to artificial terrain and even worlds! Numerous websites discuss Perlin noise. Ken Perlin's homepage is an excellent place to start. 7
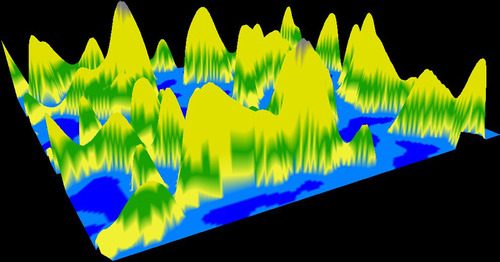
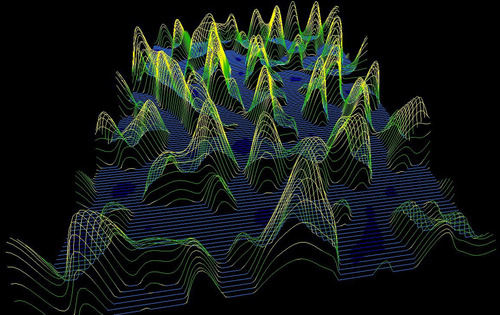
The Perlin noise kernel will be used to create a height map of virtual terrain shown in Figure 9.8, Figure 9.9 and Figure 9.10. The user can fly around this virtual world and dynamically alter it with the keyboard commands defined in callbacksVBO.cu. Figure 9.8 shows the virtual terrain rendered as a surface with triangles. Figure 9.9 show the surface rendered as a wireframe with lines, and Figure 9.10 shows a pilot's-eye view of the artificial terrain during a virtual “flight.”

Using the Perlin Noise Kernel to Generate Artificial Terrain
The following example uses the Improved Perlin Noise generator from parts 158 and 189 of my “Supercomputing for the Masses” tutorial series on the Doctor Dobb's Journal website. For implementation simplicity, fBm (Fractal Brownian Motion) was chosen to generate the fractal terrain, which is simply a weighted sum of multiple scales of an arbitrary basis function, such as noise. Better methods exist to create more realistic landscapes, as noted in “Fractal Landscape and Texture Generation” on the Max Plank Institute website (Max Planck Institute, 2004). 10
The kernel starting in Example 9.6 is slightly more complicated than the demo kernel. The first part of the kernel specifies the include files, variables, and methods used in the Perlin noise calculation. A discussion and link to the reference paper is found on the NYU Media Research Lab website. 11
//Perlin kernel (Rob Farber)
#include <cutil_math.h>
#include <cutil_inline.h>
#include <cutil_gl_inline.h>
#include <cuda_gl_interop.h>
extern float gain, xStart, yStart, zOffset, octaves, lacunarity;
#define Z_PLANE 50.f
__constant__ unsigned char c_perm[256];
__shared__ unsigned char s_perm[256]; // shared memory copy of permuation array
unsigned char* d_perm=NULL; // global memory copy of permutation array
// host version of permutation array
const static unsigned char h_perm[] = {151,160,137,91,90,15,
131,13,201,95,96,53,194,233,7,225,140,36,103,30,69,142,8,99, 37,240,21,10,23,190, 6,148,247,120,234,75,0,26,197,62,94,252, 219,203,117,35,11,32,57,177,33,88,237,149,56,87,174,20,125, 136,171,168, 68,175,74,165,71,134,139,48,27,166,77,146,158, 231,83,111,229,122,60,211,133,230,220,105,92,41,55,46,245, 40,244,102,143,54, 65,25,63,161, 1,216,80,73,209,76,132,187, 208, 89,18,169,200,196,135,130,116,188,159,86,164,100,109,198, 173,186, 3,64,52,217,226,250,124,123,5,202,38,147,118,126,255, 82,85,212,207,206,59,227,47,16,58,17,182,189,28,42,223,183, 170,213,119,248,152,2,44,154,163, 70,221,153,101,155,167, 43, 172,9,129,22,39,253, 19,98,108,110,79,113,224,232,178,185, 112,104,218,246,97,228,251,34,242,193,238,210,144,12,191,179, 162,241, 81,51,145,235,249,14,239,107,49,192,214, 31,181,199, 106,157,184,84,204,176,115,121,50,45,127, 4,150,254,138,236, 205,93,222,114,67,29,24,72,243,141,128,195,78,66,215,61,156,180
};
__device__ inline int perm(int i) { return(s_perm[i&0xff]); }
__device__ inline float fade(float t) { return t * t * t * (t * (t * 6.f − 15.f) + 10.f); }
__device__ inline float lerpP(float t, float a, float b) { return a + t * (b − a); }
__device__ inline float grad(int hash, float x, float y, float z) {
int h = hash & 15;// CONVERT LO 4 BITS OF HASH CODE
float u = h<8 ? x : y,// INTO 12 GRADIENT DIRECTIONS.
v = h<4 ? y : h==12||h==14 ? x : z;
return ((h&1) == 0 ? u : −u) + ((h&2) == 0 ? v : −v);
}
__device__ float inoise(float x, float y, float z) {
int X = ((int)floorf(x)) & 255,// FIND UNIT CUBE THAT
Y = ((int)floorf(y)) & 255,// CONTAINS POINT.
Z = ((int)floorf(z)) & 255;
x −= floorf(x);// FIND RELATIVE X,Y,Z
y −= floorf(y);// OF POINT IN CUBE.
z −= floorf(z);
float u = fade(x),// COMPUTE FADE CURVES
v = fade(y),// FOR EACH OF X,Y,Z.
w = fade(z);
int A = perm(X)+Y, AA = perm(A)+Z, AB = perm(A+1)+Z, // HASH COORDINATES OF
B = perm(X+1)+Y, BA = perm(B)+Z, BB = perm(B+1)+Z; // THE 8 CUBE CORNERS,
return lerpP(w, lerpP(v, lerpP(u, grad(perm(AA), x , y , z ), // AND ADD
grad(perm(BA), x−1.f, y , z)),// BLENDED
lerpP(u, grad(perm(AB), x , y−1.f, z),// RESULTS
grad(perm(BB), x−1.f, y−1.f, z))),// FROM 8
lerpP(v, lerpP(u, grad(perm(AA+1), x , y , z−1.f ), // CORNERS
grad(perm(BA+1), x−1.f, y , z−1.f )),// OF CUBE
lerpP(u, grad(perm(AB+1), x , y-1.f, z-1.f ),
grad(perm(BB+1), x−1.f, y-1.f, z−1.f ))));
}
__device__ float fBm(float x, float y, int octaves,
float lacunarity = 2.0f, float gain = 0.5f)
{
float freq = 1.0f, amp = 0.5f;
float sum = 0.f;
for(int i=0; i<octaves; i++) {
sum += inoise(x*freq, y*freq, Z_PLANE)*amp;
freq *= lacunarity;
amp *= gain;
}
return sum;
}
The colorElevation() method returns a pixel color based on the elevation in the terrain. The colors were chosen to give the user a sense of looking at a map. See Example 9.7, “Part 2 of the Improved Perlin Noise Kernel”:
__device__ inline uchar4 colorElevation(float texHeight)
{
uchar4 pos;
// color textel (r,g,b,a)
if (texHeight < -1.000f) pos = make_uchar4(000, 000, 128, 255); //deeps
else if (texHeight < -.2500f) pos = make_uchar4(000, 000, 255, 255); //shallow
else if (texHeight < 0.0000f) pos = make_uchar4(000, 128, 255, 255); //shore
else if (texHeight < 0.0125f) pos = make_uchar4(240, 240, 064, 255); //sand
else if (texHeight < 0.1250f) pos = make_uchar4(032, 160, 000, 255); //grass
else if (texHeight < 0.3750f) pos = make_uchar4(224, 224, 000, 255); //dirt
else if (texHeight < 0.7500f) pos = make_uchar4(128, 128, 128, 255); //rock
elsepos = make_uchar4(255, 255, 255, 255); //snow
return(pos);
}
A method to check for errors is shown in Example 9.8, “Part 3 of the Improved Perlin Noise Kernel”:
void checkCUDAError(const char *msg) {
cudaError_t err = cudaGetLastError();
if( cudaSuccess != err) {
fprintf(stderr, "Cuda error: %s: %s.
", msg, cudaGetErrorString( err) );
exit(EXIT_FAILURE);
}
}
The k_perlin() kernel calls the Perlin noise to generate the terrain map. Regions that are below sea level are set to zero. The call to cudaThreadSynchronize() is important because it causes the host to wait until after the kernel has completed updating the OpenGL buffers. See Example 9.9, “Part 4 of the Improved Perlin Noise Kernel”:
//Simple kernel fills an array with perlin noise
__global__ void k_perlin(float4* pos, uchar4 *colorPos,
unsigned int width, unsigned int height,
float2 start, float2 delta, float gain, float zOffset,
unsigned char* d_perm, float octaves, float lacunarity)
{
int idx = blockIdx.x * blockDim.x + threadIdx.x;
float xCur = start.x + ((float) (idx%width)) * delta.x;
float yCur = start.y + ((float) (idx/width)) * delta.y;
if(threadIdx.x < 256)
// Optimization: this causes bank conflicts
s_perm[threadIdx.x] = d_perm[threadIdx.x];
// this synchronization can be important if there are more than 256 threads
__syncthreads();
// Each thread creates one pixel location in the texture (textel)
if(idx < width*height) {
float w = fBm(xCur, yCur, octaves, lacunarity, gain) + zOffset;
colorPos[idx] = colorElevation(w);
float u = ((float) (idx%width))/(float) width;
float v = ((float) (idx/width))/(float) height;
u = u*2.f - 1.f;
v = v*2.f - 1.f;
w = (w>0.f)?w:0.f; // don't show regions underwater
pos[idx] = make_float4( u, w, v, 1.0f);
}
}
uchar4 *eColor=NULL;
// Wrapper for the __global__ call that sets up the kernel call
extern "C" void launch_kernel(float4 *pos, uchar4* posColor,
unsigned int image_width, unsigned int image_height, float time)
{
int nThreads=256; // must be equal or larger than 256! (see s_perm)
int totalThreads = image_height * image_width;
int nBlocks = totalThreads/nThreads;
nBlocks += ((totalThreads%nThreads)>0)?1:0;
float xExtent = 10.f;
float yExtent = 10.f;
float xDelta = xExtent/(float)image_width;
float yDelta = yExtent/(float)image_height;
if(!d_perm) { // for convenience allocate and copy d_perm here
cudaMalloc((void**) &d_perm,sizeof(h_perm));
cudaMemcpy(d_perm,h_perm,sizeof(h_perm),cudaMemcpyHostToDevice);
checkCUDAError("d_perm malloc or copy failed!");
}
k_perlin<<< nBlocks, nThreads>>>(pos, posColor, image_width, image_height,
make_float2(xStart, yStart),
make_float2(xDelta, yDelta),
gain, zOffset, d_perm,
octaves, lacunarity);
// make certain the kernel has completed
cudaThreadSynchronize();
checkCUDAError("kernel failed!");
}
The simpleGLmain.cpp File
The simplGLmain.cpp file opens a window on the screen and sets some basic viewing transforms. The call to gluPerspective() places a camera in a three-dimensional location from which to view the data generated with CUDA.
Three-dimensional rendering occurs in OpenGL when the programmer:
■ Specifies objects in 3D space using simple triangles, vertices, and lines.
■ Defines a virtual camera position and viewing angle.
OpenGL can then identify and update the display pixels as the data and/or viewing position changes.
Rendering requires the following 3D transform:
1. Position and point the camera at the scene (a view transformation).
2. Arrange the scene composition (a model transform).
3. Adjust the camera zoom (a projection transform).
4. Choose the final size (a viewport transform).
OpenGL view, model, projection, and viewport transforms plus specification of the coordinate system require very detailed thinking and explanation. Song Ho Ann12 has an excellent set of tutorials, including visual aids to help understand the details of OpenGL transforms and the OpenGL rendering pipeline, the differences between pixel and geometry rendering, the OpenGL projection matrix, and much more. Numerous other excellent sources are also available, including the online version of the OpenGL Red Book.
The schematic in Figure 9.11 summarizes how the VBO example code interacts with GLUT. 13

The following example is the complete source code for the VBO version of simpleGLmain.cpp. This is fairly generic code that should not require modification. The start of the file specifies the needed include files and prototypes for the external methods. The main() routine initializes a timer to calculate frame rates, calls a user-defined method to initialize the CUDA kernel(s), registers the user-defined callbacks, and calls the GLUT main loop, as shown in Example 9.10, “Part 1 of simpleGLmain.cpp”:
// simpleGLmain (Rob Farber)
#include <GL/glew.h>
#include <cutil_inline.h>
#include <cutil_gl_inline.h>
#include <cutil_gl_error.h>
#include <cuda_gl_interop.h>
#include <rendercheck_gl.h>
// GLUT specific contants
const unsigned int window_width = 512;
const unsigned int window_height = 512;
// The user must create the following routines:
void initCuda(int argc, char** argv);
CUTBoolean initGL(int argc, char** argv);
void fpsDisplay(), display();
void keyboard(unsigned char key, int x, int y);
void mouse(int button, int state, int x, int y);
void motion(int x, int y);
unsigned int timer = 0; // a timer for FPS calculations
int sleepTime=0, sleepInc=100;
// Main program
int main(int argc, char** argv)
{
// Create the CUTIL timer
cutilCheckError( cutCreateTimer( &timer));
if (CUTFalse == initGL(argc, argv)) { return CUTFalse; }
initCuda(argc, argv);
CUT_CHECK_ERROR_GL();
// register callbacks
glutDisplayFunc(fpsDisplay);
glutKeyboardFunc(keyboard);
glutMouseFunc(mouse);
glutMotionFunc(motion);
// start rendering mainloop
glutMainLoop();
// clean up
cudaThreadExit();
cutilExit(argc, argv);
}
Example 9.11, “Part 2 of simpleGLmain.cpp,” computes the frame rate and displays it in the window title.
// Simple method to display the frames per second in the window title
void computeFPS()
{
static int fpsCount=0;
static int fpsLimit=100;
fpsCount++;
if (fpsCount == fpsLimit) {
char fps[256];
float ifps = 1.f / (cutGetAverageTimerValue(timer) / 1000.f);
if(sleepTime)
sprintf(fps, "CUDA Interop (Rob Farber): %3.1f fps sleepTime %3.1f ms ",
ifps, sleepTime/1000.);
else
sprintf(fps, "CUDA Interop (Rob Farber): %3.1f fps ", ifps);
glutSetWindowTitle(fps);
fpsCount = 0;
cutilCheckError(cutResetTimer(timer));
}
}
void fpsDisplay()
{
cutilCheckError(cutStartTimer(timer));
display();
cutilCheckError(cutStopTimer(timer));
computeFPS();
}
The GLUT and OpenGL initialization creates a window and specifies a viewing location in the 3D space, as shown in Example 9.12, “Part 3 of simpleGLmain.cpp”:
float animTime = 0.0;// time the animation has been running
// Initialize OpenGL window
CUTBoolean initGL(int argc, char **argv)
{
glutInit(&argc, argv);
glutInitDisplayMode(GLUT_RGBA | GLUT_DOUBLE);
glutInitWindowSize(window_width, window_height);
glutCreateWindow("CUDA GL Interop Demo (adapted from NVIDIA's simpleGL)");
glutDisplayFunc(fpsDisplay);
glutKeyboardFunc(keyboard);
glutMotionFunc(motion);
// initialize necessary OpenGL extensions
glewInit();
if (! glewIsSupported("GL_VERSION_2_0 ")) {
fprintf(stderr, "ERROR: Support for necessary OpenGL extensions missing.");
return CUTFalse;
}
// default initialization
glClearColor(0.0, 0.0, 0.0, 1.0);
glDisable(GL_DEPTH_TEST);
// viewport
glViewport(0, 0, window_width, window_height);
// set view matrix
glMatrixMode(GL_MODELVIEW);
glLoadIdentity();
// projection
glMatrixMode(GL_PROJECTION);
glLoadIdentity();
gluPerspective(60.0, (GLfloat)window_width/(GLfloat) window_ height,0.10, 10.0);
return CUTTrue;
}
The simpleVBO.cpp File
The simpleVBO.cpp file contains the logic that creates and maps both the color PBO and the vertex VBO. The start of the file specifies the include files and the variables used in the file. The variables mesh_width and mesh_height specify the size of the mesh calculated on the GPU. The variable RestartIndex specifies the integer value used by the OpenGL state machine to restart the user-defined graphics primitive. See Example 9.13, “Part 1 of simpleVBO.cpp”:
//simpleVBO (Rob Farber)
#include <GL/glew.h>
#include <GL/gl.h>
#include <GL/glext.h>
#include <cutil_inline.h>
#include <cutil_gl_inline.h>
#include <cuda_gl_interop.h>
#include <rendercheck_gl.h>
extern float animTime;
//////////////////////////////////////////////////////////////////
// VBO specific code
#include <cutil_inline.h>
// constants
const unsigned int mesh_width = 256;
const unsigned int mesh_height = 256;
const unsigned int RestartIndex = 0xffffffff;
typedef struct {
GLuint vbo;
GLuint typeSize;
struct cudaGraphicsResource *cudaResource;
} mappedBuffer_t;
extern "C"
void launch_kernel(float4* pos, uchar4* posColor,
unsigned int mesh_width, unsigned int mesh_height, float time);
// vbo variables
mappedBuffer_t vertexVBO = {NULL, sizeof(float4), NULL};
mappedBuffer_t colorVBO = {NULL, sizeof(uchar4), NULL};
GLuint* qIndices=NULL; // index values for primitive restart
int qIndexSize=0;
The createVBO() method performs the actual allocation of the graphics buffer on the GPU through the call to glBufferData(). The GL_DYNAMIC_DRAW flag lets OpenGL know that this data store will be repeatedly modified and used. The buffer object is registered for access with CUDA with the call to cudaGraphicsGLRegisterBuffer(). The deleteVBO() method unregisters and frees the memory held by the OpenGL buffer object. See Example 9.14, “Part 2 of simpleVBO.cpp”:
/////////////////////////////////////////////////////////////////
//! Create VBO
/////////////////////////////////////////////////////////////////
void createVBO(mappedBuffer_t* mbuf)
{
// create buffer object
glGenBuffers(1, &(mbuf->vbo) );
glBindBuffer(GL_ARRAY_BUFFER, mbuf->vbo);
// initialize buffer object
unsigned int size = mesh_width * mesh_height * mbuf->typeSize;
glBufferData(GL_ARRAY_BUFFER, size, 0, GL_DYNAMIC_DRAW);
glBindBuffer(GL_ARRAY_BUFFER, 0);
cudaGraphicsGLRegisterBuffer( &(mbuf->cudaResource), mbuf->vbo,
cudaGraphicsMapFlagsNone );
}
//////////////////////////////////////////////////////////////////
//! Delete VBO
//////////////////////////////////////////////////////////////////
void deleteVBO(mappedBuffer_t* mbuf)
{
glBindBuffer(1, mbuf->vbo );
glDeleteBuffers(1, &(mbuf->vbo) );
cudaGraphicsUnregisterResource( mbuf->cudaResource );
mbuf->cudaResource = NULL;
mbuf->vbo = NULL;
}
void cleanupCuda()
{
if(qIndices) free(qIndices);
deleteVBO(&vertexVBO);
deleteVBO(&colorVBO);
}
The runCUDA() method performs all the work of mapping and retrieving the pointer to both the color PBO and the vertex VBO. These addresses are passed to the launch_kernel() method for use by the user-defined kernel. Note that launch_kernel() waits for the kernel to complete before returning, which is why it is safe to return the OpenGL resources after this method returns. See Example 9.15, “Part 3 of simpleVBO.cpp”:
//////////////////////////////////////////////////////////////////
//! Run the CUDA part of the computation
//////////////////////////////////////////////////////////////////
void runCuda()
{
// map OpenGL buffer object for writing from CUDA
float4 *dptr;
uchar4 *cptr;
uint *iptr;
size_t start;
cudaGraphicsMapResources( 1, &vertexVBO.cudaResource, NULL );
cudaGraphicsResourceGetMappedPointer( ( void ** )&dptr, &start,
vertexVBO.cudaResource );
cudaGraphicsMapResources( 1, &colorVBO.cudaResource, NULL );
cudaGraphicsResourceGetMappedPointer( ( void ** )&cptr, &start,
colorVBO.cudaResource );
// execute the kernel
launch_kernel(dptr, cptr, mesh_width, mesh_height, animTime);
// unmap buffer object
cudaGraphicsUnmapResources( 1, &vertexVBO.cudaResource, NULL );
cudaGraphicsUnmapResources( 1, &colorVBO.cudaResource, NULL );
}
The initCuda() method chooses the fastest device according to the NVIDIA documentation. It makes the appropriate calls to allocate the OpenGL buffers. The qIndices array needed for rendering with primitive restart is allocated and initialized. See Example 9.16, “Part 4 of simpleVBO.cpp”:
void initCuda(int argc, char** argv)
{
// First initialize OpenGL context, so we can properly set the GL
// for CUDA. NVIDIA notes this is necessary in order to achieve
// optimal performance with OpenGL/CUDA interop. Use the command-line
// specified CUDA device ; otherwise use device with highest Gflops/s
if( cutCheckCmdLineFlag(argc, (const char**)argv, "device") ) {
cutilGLDeviceInit(argc, argv);
} else {
cudaGLSetGLDevice( cutGetMaxGflopsDeviceId() );
}
createVBO(&vertexVBO);
createVBO(&colorVBO);
// allocate and assign trianglefan indices
qIndexSize = 5*(mesh_height-1)*(mesh_width-1);
qIndices = (GLuint *) malloc(qIndexSize*sizeof(GLint));
int index=0;
for(int i=1; i < mesh_height; i++) {
for(int j=1; j < mesh_width; j++) {
qIndices[index++] = (i)*mesh_width + j;
qIndices[index++] = (i)*mesh_width + j−1;
qIndices[index++] = (i−1)*mesh_width + j−1;
qIndices[index++] = (i−1)*mesh_width + j;
qIndices[index++] = RestartIndex;
}
}
// make certain the VBO gets cleaned up on program exit
atexit(cleanupCuda);
runCuda();
}
The renderCuda() method binds the buffers with the appropriate type and size information for use in rendering. Rendering is performed as defined by drawMode.
Note the simplicity of the call when rendering triangles with primitive restart. The OpenGL state machine is informed of the value of the restart index via the glPrimitiveRestartIndexNV() method, after which primitive restart is enabled in the OpenGL client state machine. The call to glDrawElements() causes data to be rendered. Once completed, primitive restart is disabled in the OpenGL state machine. See Example 9.17, “Part 5 of simpleVBO.cpp”:
void renderCuda(int drawMode)
{
glBindBuffer(GL_ARRAY_BUFFER, vertexVBO.vbo);
glVertexPointer(4, GL_FLOAT, 0, 0);
glEnableClientState(GL_VERTEX_ARRAY);
glBindBuffer(GL_ARRAY_BUFFER, colorVBO.vbo);
glColorPointer(4, GL_UNSIGNED_BYTE, 0, 0);
glEnableClientState(GL_COLOR_ARRAY);
switch(drawMode) {
case GL_LINE_STRIP:
for(int i=0 ; i < mesh_width*mesh_height; i+= mesh_width)
glDrawArrays(GL_LINE_STRIP, i, mesh_width);
break;
case GL_TRIANGLE_FAN: {
glPrimitiveRestartIndexNV(RestartIndex);
glEnableClientState(GL_PRIMITIVE_RESTART_NV);
glDrawElements(GL_TRIANGLE_FAN, qIndexSize, GL_UNSIGNED_INT, qIndices);
glDisableClientState(GL_PRIMITIVE_RESTART_NV);
} break;
default:
glDrawArrays(GL_POINTS, 0, mesh_width * mesh_height);
break;
}
glDisableClientState(GL_VERTEX_ARRAY);
glDisableClientState(GL_COLOR_ARRAY);
}
The callbacksVBO.cpp File
The keyboard routine is very simple. Basically, it allows the user to toggle through the display modes (point, line, surface) by pressing the “d” or “D” key.
The mouse and motion routines work in concert with each other to modify the values of the rotate_x and rotate_y variables based on user mouse movements and the state of the mouse buttons.
Most of the work occurs in the display routine that defines the view transforms, as shown in Example 9.18, “Code Snippet Showing Where Most of the Work Occurs in the callbacksVBO.cu”:
// set view matrix
glMatrixMode(GL_MODELVIEW);
glLoadIdentity();
glTranslatef(0.0, 0.0, translate_z);
glRotatef(rotate_x, 1.0, 0.0, 0.0);
glRotatef(rotate_y, 0.0, 1.0, 0.0);
// run CUDA kernel to generate vertex positions
runCuda();
// render the data
renderCuda(drawMode);
The CUDA kernel is then called to create the data with runCuda() and render it with renderCuda().
The buffers are swapped so that the latest version can be made visible and GLUT is informed that the display needs to be updated. The animation time is also incremented. See Example 9.19, “Logic to Swap the OpenGL Buffers and Post a Redisplay Event to OpenGL”:
glutSwapBuffers();
glutPostRedisplay();
animTime += 0.01;
Table 9.2 lists the keyboard commands and the applicable kernels.
The complete source code is provided in Example 9.20, “Part 1 of callbacksVBO.cpp.” The start of the file defines the include files and required variables:
//callbacksVBO (Rob Farber)
#include <GL/glew.h>
#include <cutil_inline.h>
#include <cutil_gl_inline.h>
#include <cuda_gl_interop.h>
#include <rendercheck_gl.h>
// The user must create the following routines:
void initCuda(int argc, char** argv);
void runCuda();
void renderCuda(int);
// Callback variables
extern float animTime;
extern int sleepTime, sleepInc;
int drawMode=GL_TRIANGLE_FAN; // the default draw mode
int mouse_old_x, mouse_old_y;
int mouse_buttons = 0;
float rotate_x = 0.0, rotate_y = 0.0;
float translate_z = −3.0;
// break the file modularity so that both Perlin and demo kernels build
// some initial values for Perlin
float gain=0.75f, xStart=2.f, yStart=1.f;
float zOffset = 0.0f, octaves = 2.f, lacunarity = 2.0f;
The GLUT display callback is called whenever there is a need to draw the screen. The OpenGL calls define the 3D transformation and rotation operations. The runCuda() method is called to generate the data and renderCuda() is called to render the data. The OpenGL buffers are then swapped to utilize the latest update. This use of double buffering allows the screen to be updated causing visual artifacts such as screen flicker. See Example 9.21, “Part 2 of callbacksVBO.cpp”:
// GLUT callbacks display, keyboard, mouse
void display()
{
glClear(GL_COLOR_BUFFER_BIT | GL_DEPTH_BUFFER_BIT);
// set view matrix
glMatrixMode(GL_MODELVIEW);
glLoadIdentity();
glTranslatef(0.0, 0.0, translate_z);
glRotatef(rotate_x, 1.0, 0.0, 0.0);
glRotatef(rotate_y, 0.0, 1.0, 0.0);
runCuda(); // run CUDA kernel to generate vertex positions
renderCuda(drawMode); // render the data
glutSwapBuffers();
glutPostRedisplay();
animTime += 0.01;
}
The keyboard callback is a very straightforward code that implements the logic to be performed on each keystroke, as shown in Example 9.22, “Part 3 of callbacksVBO.cpp”:
void keyboard(unsigned char key, int x, int y)
{
switch(key) {
case('q') : case(27) : // exit
exit(0);
break;
case 'd': case 'D': // Drawmode
switch(drawMode) {
case GL_POINTS: drawMode = GL_LINE_STRIP; break;
case GL_LINE_STRIP: drawMode = GL_TRIANGLE_FAN; break;
default: drawMode=GL_POINTS;
} break;
case '+': // Perlin: lower the ocean level
zOffset += 0.01;
zOffset = (zOffset > 1.0)? 1.0:zOffset; // guard input
break;
case '-': // Perlin: raise the ocean level
zOffset -= 0.01;
zOffset = (zOffset < -1.0)? -1.0:zOffset; // guard input
break;
case 'k': // move within the Perlin function
yStart −= 0.1;
break;
case 'j': // move within the Perlin function
yStart += 0.1;
break;
case 'l': // move within the Perlin function
xStart += 0.1;
break;
case 'h': // move within the Perlin function
xStart −= 0.1;
break;
case 'I': // Perlin: change gain
gain += 0.25;
break;
case 'i': // Perlin: change gain
gain −= 0.25;
gain = (gain < 0.25)?0.25:gain; // guard input
break;
case 'O': // Perlin: change octaves
octaves += 1.0f;
octaves = (octaves > 8)?8:octaves; // guard input
break;
case 'o': // Perlin: change octaves
octaves −= 1.0f;
octaves = (octaves<2)?2:octaves; // guard input
break;
case 'P': // Perlin: change lacunarity
lacunarity += 0.25;
break;
case 'p': // Perlin: change lacunarity
lacunarity −= 0.25;
lacunarity = (lacunarity<0.2)?0.2:lacunarity; // guard input
break;
case 'S': // Slow the simulation down
sleepTime += 100;
break;
case 's': // Speed the simulation up
sleepTime = (sleepTime > 0)?sleepTime −= sleepInc:0;
break;
}
glutPostRedisplay();
}
The mouse and motion callbacks handle mouse events to enable rotation and scaling. The motion callback for a window is called when the mouse moves within the window while one or more mouse buttons are pressed, as seen in Example 9.23, “Part 4 of callbacksVBO.cpp”:
void mouse(int button, int state, int x, int y)
{
if (state == GLUT_DOWN) {
mouse_buttons |= 1<<button;
} else if (state == GLUT_UP) {
mouse_buttons = 0;
}
mouse_old_x = x;
mouse_old_y = y;
glutPostRedisplay();
}
void motion(int x, int y)
{
float dx, dy;
dx = x - mouse_old_x;
dy = y - mouse_old_y;
if (mouse_buttons & 1) {
rotate_x += dy * 0.2;
rotate_y += dx * 0.2;
} else if (mouse_buttons & 4) {
translate_z += dy * 0.01;
}
rotate_x = (rotate_x < -60.)?-60.:(rotate_x > 60.)?60:rotate_x;
rotate_y = (rotate_y < -60.)?-60.:(rotate_y > 60.)?60:rotate_y;
mouse_old_x = x;
mouse_old_y = y;
}
The testDemo example can be built with a variation of the bash script in Example 9.24, “An Example Script to Build testDemo.” The bold items specify that this is a demo example that will create the testDemo executable. This script assumes that the callbacks and kernel are kept in the demo directory:
#/bin/bash
DIR=demo
SDK_PATH … /cuda/4.0
SDK_LIB0=$SDK_PATH/C/lib
SDK_LIB1= … /4.0/CUDALibraries/common/lib/linux
echo $SDK_PATH
nvcc -O3 -L $SDK_LIB0 -L $SDK_LIB1 -I $SDK_PATH/C/common/inc simpleGLmain.cpp simpleVBO.cpp $DIR/callbacksVBO.cpp $DIR/kernelVBO.cu -lglut -lGLEW_x86_64 -lGLU -lcutil_x86_64 -o testDemo
The testPerlin example can be built with a variation of the bash script in Example 9.25, “An Example Script to Build testPerlin.” The bold items specify that this is a demo example that will create the testPerlin executable. This script assumes that the callbacks and kernel are kept in the perlin directory:
#/bin/bash
DIR=perlin
SDK_PATH=/ichec/packages/cuda/4.0
SDK_LIB0=$SDK_PATH/C/lib
SDK_LIB1=/ichec/packages/cuda/4.0/CUDALibraries/common/lib/linux
echo $SDK_PATH
nvcc -O3 -L $SDK_LIB0 -L $SDK_LIB1 -I $SDK_PATH/C/common/inc simpleGLmain.cpp simpleVBO.cpp $DIR/callbacksVBO.cpp $DIR/kernelVBO.cu -lglut -lGLEW_x86_64 -lGLU -lcutil_x86_64 -o testPerlin
Summary
Mixing CUDA and visualization opens tremendous opportunities for commercial games and visual products as well as scientific applications. The examples in this article demonstrate that the current generation of CUDA-enabled graphics processors can both render and generate very complex data at hundreds of frames per second.
In particular, this article attempts to point the way to an extraordinarily simple and flexible way for CUDA developers to generate and render 3D images using the OpenGL standards compliant primitive restart capability so that minimal host processor interaction is required. As a result, PCIe bottlenecks and latencies can be avoided to deliver high-performance, high-quality graphics even when the images require irregular meshes and/or computationally expensive data generation. Of course, this issue is of interest when generating very realistic images on high-end GPUs, but do not forget that this same technique can enable product penetration into the mid- and lower-performance markets as well.
..................Content has been hidden....................
You can't read the all page of ebook, please click here login for view all page.