
Chapter 7. Techniques to Increase Parallelism
CUDA was designed to exploit the massive parallelism inside the GPU as well as through the use of concurrent streams of execution to utilize multiple GPUs, asynchronous data transfers, and simultaneous kernel execution on a single device. By default, CUDA creates a single stream of execution on a one GPU, which is usually device 0. All data transfers and kernel invocations are queued on this single stream and processed sequentially in the order they were queued. By explicitly creating and using multiple streams of execution, a CUDA programmer can perform more work per unit time to make applications run faster. For example, multiple GPUs can be utilized by simply changing the device with cudaSetDevice(). Work can then be queued on each device, which can potentially increase application performance by the number of GPUs in the system. CUDA programmers can overlap computation and data transfers to reduce application runtime plus enable real-time data processing on both single and multi-GPU systems. Under special circumstances, greater efficiency per device can be achieved when running multiple streams on a single device to exploit concurrent kernel execution. The addition of UVA in CUDA 4.0 simplifies data management to facilitate the use of these techniques to increase parallelism and application performance.
Keywords
MultiGPU, UVA (Unified Virtual Address) space, Mapped memory, Asynchronous kernel execution, task parallelism, data parallelism
CUDA was designed to exploit the massive parallelism inside the GPU as well as through the use of concurrent streams of execution to utilize multiple GPUs, asynchronous data transfers, and simultaneous kernel execution on a single device. By default, CUDA creates a single stream of execution on a one GPU, which is usually device 0. 1 All data transfers and kernel invocations are queued on this single stream and processed sequentially in the order they were queued. By explicitly creating and using multiple streams of execution, a CUDA programmer can perform more work per unit time to make applications run faster. For example, multiple GPUs can be utilized by simply changing the device with cudaSetDevice(). Work can then be queued on each device, which can potentially increase application performance by the number of GPUs in the system. CUDA programmers can overlap computation and data transfers to reduce application runtime plus enable real-time data processing on both single and multi-GPU systems. Under special circumstances, greater efficiency per device can be achieved when running multiple streams on a single device to exploit concurrent kernel execution. The addition of UVA in CUDA 4.0 simplifies data management to facilitate the use of these techniques to increase parallelism and application performance.
1As will be discussed, the default GPU device can be changed by either the programmer or the systems administrator.
At the end of this chapter, the reader will have a basic understanding of:
■ How to run on multiple GPUs in a system.
■ UVA and how it makes multi-GPU applications simpler.
■ How to use asynchronous data transfers to speed application performance.
■ The use and performance implications of using mapped memory.
■ How to use asynchronous kernel execution; plus, how it can benefit application performance and potentially decrease kernel performance.
■ The use of the profiler to understand performance and identify bottlenecks in multi-GPU systems.
CUDA Contexts Extend Parallelism
A CUDA application interacts with the GPU hardware through the device driver as shown in Figure 7.1.
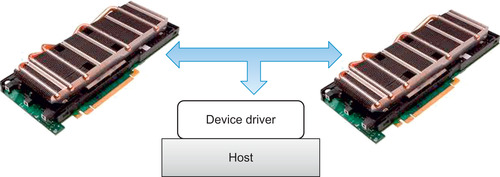
The driver supports multiple concurrent applications by creating a separate context for each GPU-based application that runs on the system. The context contains all of the driver state information required by the application such as the virtual address space, streams, events, allocated blocks of memory, and other data necessary to run a GPU-based application. By switching between contexts, the device driver acts like a small operating system that can multitask multiple GPU applications. For example, a user can run multiple OpenGL rendering applications plus multiple CUDA computational applications at the same time. In a similar fashion, the GPU device driver lets individual CUDA applications utilize multiple devices simply by giving the application access to multiple contexts in the device driver.
Only one context can be active at a time, which is why the CUDA driver incorporates a timer to detect GPU applications that hang while performing some operation on the GPU. Mistakenly running a CUDA kernel that contains an infinite loop is one example of an application that will cause a time out. The good news is that control eventually reverts to the user so that he or she can correct the problem without rebooting the system.
By default, CUDA creates a context during the first call to a function that changes the state of the driver. Calling cudaMalloc() is one such call that changes the context state. Many CUDA programmers rely on this default behavior to transparently utilize a single GPU. Note that a context is usually created on GPU zero by default unless another GPU is selected by the programmer prior to context creation with cudaSetDevice(). The context is destroyed either by calling cudaDeviceReset() or when the controlling host process exits.
Starting with CUDA 2.2, a Linux administrator can select exclusive mode via the SMI (System Management Interface) tool. In exclusive mode, a context is no longer created by default on GPU 0, but rather on a GPU that does not have an active context. If there are no available GPUs, or if cudaSetDevice() specifies a GPU that already has an active context, the first CUDA call that attempts to change the device state will fail and return an error. This capability can be used to run compute or memory intensive applications on unused GPUs in a system.
Streams and Contexts
CUDA applications manage work and concurrency by queuing operations onto a stream. CUDA implicitly creates a stream when it creates a context so commands can be queued for execution on the device. For example, calling cudaMemcpy() queues a blocking data transfer on the current stream. Similarly, calling a CUDA kernel queues the kernel invocation on the stream associated with the current device. If desired, the programmer can specify the stream in the execution configuration as shown in Example 7.1, “An Execution Configuration Including a Stream Specification”:
Kernel<<<nBlocks, nThreadsPerBlock, 0, stream[i]>>>(parameters)
All operations queued on a stream execute in order, which means that each operation is pulled off the queue in the order it was placed on the queue. In other words, the queue acts as a FIFO (first-in, first-out) buffer whereby operations are sequentially pulled off the queue in the order they appeared for execution on the device.
Multiple streams are required for concurrent execution across devices or to run multiple kernels concurrently on a single device.
Multiple GPUs
The simplest way to use multiple GPUs in a single application is to implicitly create a single stream per context per device as shown in the following example. The method cudaGetDeviceCount() is used to determine the number of devices in the system. Calling cudaSetDevice() sets the device. In this code snippet, cudaMalloc() was used to induce the creation of the context by causing a change of context state. If desired, additional device properties can be enumerated via the cudaDeviceProp variable passed to cudaGetDeviceProperties(). See Example 7.2, “Creating Contexts on Multiple Devices”:
cudaGetDeviceCount(&nGPU);
int *d_A[nGPU];
for(int i=0; i < nGPU; i++) {
cudaSetDevice(i);
cudaMalloc(&d_A[i],n*sizeof(int));
}
Work can then be queued on the default stream associated with each device. Again, cudaSetDevice() is used to select the device context. All GPU operations queued after a cudaSetDevice() are implicitly queued on the stream associated with the device unless a stream is explicitly specified in the API call or kernel execution.
Explicit Synchronization
There are various ways to explicitly synchronize streams with each other.
Events are a way for the programmer to create a placeholder in a stream. The event can then be monitored to determine when a group of tasks have completed. Note that:
■ CUDA 4.0 also allows events to be shared across contexts, which gives events the ability to coordinate tasks across multiple devices in a system.
■ Events in stream 0 complete after all tasks in all streams have completed.
■ For profiling purposes, the elapsed time between two events can be determined with cudaEventElapsedTime().
The following example shows how to create two events in variables stop and start. The start event is placed on the queue after which one or more tasks are queued. The stop event is then pushed on the queue. The host then stops at the call to cudaEventSynchronize(). Execution will not continue on the host until after the stop event has been marked complete.
Meanwhile, the driver asynchronously works through the queue in order. This means that it processes and marks the start event as complete. Work proceeds through the rest of the tasks on the queue. Eventually the driver processes the stop event and marks that it is completed. This wakes up the host thread, which continues on to process the code after the call to cudaEventSynchronize().
As shown in this example, time is a property associated with an event. The difference between the time when the start and stop events were marked complete is retrieved with the call to cudaEventElapsedTime(). Thus, Example 7.3, “Timing Tasks with Events,” demonstrates how to time a group of tasks:
// create two events
cudaEvent_t start, stop;
cudaEventCreate(&start); cudaEventCreate(&stop);
cudaEventRecord(start, 0)
// Queue some tasks
...
cudaEventRecord(stop, 0);
cudaEventSynchronize(stop);
// get the elapsed time
float elapsedTime;
cudaEventElapsedTime(&elapsedTime, start, stop);
// destroy the events
cudaEventDestroy(start);
cudaEventDestroy(stop)
Following are runtime methods for explicitly synchronizing streams and events:
■ cudaDeviceSynchronize() waits until all preceding commands in all streams of all host threads have completed.
■ cudaStreamSynchronize() takes a stream as a parameter and waits until all preceding commands in the given stream have completed. It can be used to synchronize the host with a specific stream, allowing other streams to continue executing on a device.
■ cudaStreamWaitEvent() takes a stream and an event as parameters and makes all the commands added to the given stream after the call to cudaStreamWaitEvent() delay their execution until the given event has completed. The stream can be 0, in which case all the commands added to any stream after the call to cudaStreamWaitEvent() wait on the event.
■ cudaStreamQuery() checks whether all preceding commands in a stream have completed.
Implicit Synchronization
Tasks queued on different streams generally run concurrently. Some host-based operations force all streams to pause until the host operation completes. Care must be taken when performing the following host operations, as they will stop all concurrent operations and negatively impact application performance:
■ A page-locked host memory allocation.
■ A device memory allocation.
■ A device memory set.
■ A device–device memory copy.
■ A switch between the L1/shared memory configurations.
The Unified Virtual Address Space
UVA space provides a single address space for all host and GPU devices in a system. UVA is available to all 64-bit applications on Windows Vista/7 running in TCC mode, on Windows XP, and on Linux. UVA does not work on 32-bit systems.
On supported systems, the pointer returned from any allocation made with cudaHostAlloc() or any of the cudaMalloc*() methods (cudaMalloc(), cudaMallocPitch(), and others) uniquely identifies both the region of memory and the device upon which the memory resides. If desired, the CUDA programmer can determine where the memory resides with cudaPointerGetAttributes().
As a consequence of UVA:
■ The cudaMemcpy() method no longer pays attention to the cudaMemcpyKind parameter. For compatibility with non-UVA environments, the direction of the transfer (host to device or device to host) can still be specified. If portability is not a concern, cudaMemcpyDefault can be used for convenience.
■ High-performance GPU to GPU transfers are now possible by simply specifying pointers to memory on the two devices.
■ On UVA systems, host memory pointers returned by cudaHostAlloc() can be used directly by device kernels. There is no need to obtain a device pointer via cudaHostGetDevicePointer(). This includes mapped memory created by passing the flag cudaHostAllocMapped to cudaHostAlloc() or cudaHostRegisterMapped to cudaHostRegister(). For compatibility with compute 1.x devices and 32-bit applications, cudaHostGetDevicePointer() can still be used. Thrust-based applications will need to cast the pointer with thrust::device_pointer_cast().
Applications may query whether the unified address space is used for a particular device by checking that the unifiedAddressing device property is set.
A Simple Example
The following example demonstrates how to concurrently run one or more GPUs. It:
1. Allocates space for n integers on each GPU. In this example, n is one million.
2. Concurrently fills the vectors on each GPU to create a single large vector of consecutive integers.
3. Asynchronously transfers the GPU memory to the host memory.
4. Checks the result for correctness.
The following walkthrough discusses the multi-GPU and concurrent aspects of the code. All the code segments can be combined into a single source file that can be compiled and executed.
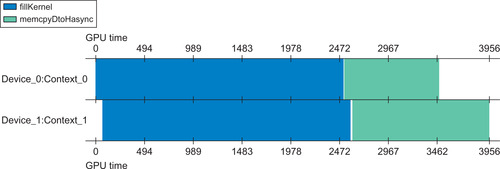
The CUDA kernel, fillKernel(), writes the sequential integers offset+0 to offset+n to the vector on the device. Each integer is written 100 times to global memory to increase the runtime of fillKernel() to better illustrate the concurrent execution of this kernel on two GPUs, as shown in Figure 7.2. See Example 7.4, “Part 1 of multiGPU.cu”:
#include <stdio.h>
__global__ void fillKernel(int *a, int n, int offset)
{
int tid = blockIdx.x*blockDim.x + threadIdx.x ;
if (tid < n)
for(int i=0 ; i < 100 ; i++)
a[tid] = offset+tid ;
}
The main() routine starts by calling cudaGetDeviceCount() to determine the number of GPUs in the system. The value is saved in the variable nGPU. See Example 7.5, “Part 2 of multiGPU.cu”:
int main(int argc, char* argv[])
{
int nGPU ;
int n = 1000000 ;
int size=n*sizeof(int) ;
cudaGetDeviceCount(&nGPU) ;
Memory is allocated on the host with cudaHostAlloc(). The flag cudaHostAllocPortable specifies that the host memory will be page-locked. The page-locked memory permits the following:
■ Copies between page-locked host memory and device memory can be performed concurrently with kernel execution.
■ On systems with a front-side bus, bandwidth between host memory and device memory is higher if host memory is allocated as page-locked.
The method cudaSetDevice() is then used to change the context to each GPU device. The context is actually created with the call to cudaMalloc(), which changes the state of the context and implicitly creates a stream per device, as in Example 7.6, “Part 3 of multiGPU.cu”:
int *d_A[nGPU];
for(int i=0; i < nGPU; i++) {
cudaSetDevice(i);
cudaMalloc(&d_A[i],size);
}
The fillKernel() kernel is then queued on each device along with a call to cudaMemcpyAsync() to transfer the values back to the host. The method cudaDeviceSynchronize() is used to ensure that the work on all devices has completed. See Example 7.7, “Part 4 of multiGPU.cu”:
int *h_A;
cudaHostAlloc(&h_A, nGPU*n*sizeof(int), cudaHostAllocPortable);
for(int i=0; i < nGPU; i++) {
int nThreadsPerBlock= 512;
int nBlocks= n/nThreadsPerBlock + ((n%nThreadsPerBlock)?1:0);
cudaSetDevice(i);
fillKernel<<<nBlocks, nThreadsPerBlock>>>(d_A[i], n, i*n);
cudaMemcpyAsync(&h_A[i*n], d_A[i], size, cudaMemcpyDeviceToHost);
}
cudaDeviceSynchronize();
The host then checks the vector for correctness, as in Example 7.8, “Part 5 of multiGPU.cu”:
for(int i=0; i < nGPU*n; i++)
if(h_A[i] != i) {
printf("Error h_A[%d] = %d
",i,h_A[i]); exit(1);
}
printf("Success!
");
All the device resources are freed, as in Example 7.9, “Part 6 of multiGPU.cu”:
cudaFreeHost(h_A) ;
for(int i=0; i < nGPU; i++) {
cudaSetDevice(i); // to be same, set the context for the free
cudaFree(d_A[i]);
}
return(0);
}
This source code can be saved to a file multiGPU.cu. The application can be compiled and executed with the following nvcc command. Note the use of the -run command-line option. The application reports that multiple GPUs were used to successfully fill the vector with consecutive integers.
$ nvcc multiGPU.cu –run
Success!
Profiling Results
Figure 7.2, a width plot from the Visual Profiler, clearly shows that fillKernel() runs concurrently on both device 0 and device 1. Further, the asynchronous memory transfers also run concurrently. Due to variations in when operations start on each queue, one of the data transfers finishes slightly later that the other.
Out-of-Order Execution with Multiple Streams
CUDA developers can also explicitly create streams with cudaStreamCreate(). As shown in Example 7.11, “Example Showing the Creation of Multiple Streams,” cudaSetDevice() can be called to set the device (and context) in which the stream will be created.
for(int i=0; i < nGPU; i++) {
cudaSetDevice(i)
if(cudaStreamCreate(&streams[i]) != 0) {
fprintf(stderr,"Stream create failed!
"); exit(1);
}
}
A kernel launch or memory copy will fail if it is issued to a stream that is not associated to the current device as illustrated in Example 7.12, “Example Showing that the Correct Context Must Be Used,” taken from the NVIDIA CUDA C Programming Guide:
cudaSetDevice(0);// Set device 0 as current
cudaStream_t s0;
cudaStreamCreate(&s0);// Create stream s0 on device 0
MyKernel<<<100, 64, 0, s0>>>(); // Launch kernel on device 0 in s0
cudaSetDevice(1);// Set device 1 as current
cudaStream_t s1;
cudaStreamCreate(&s1);// Create stream s1 on device 1
MyKernel<<<100, 64, 0, s1>>>(); // Launch kernel on device 1 in s1
// This kernel launch will fail:
MyKernel<<<100, 64, 0, s0>>>(); // Launch kernel on device 1 in s0
As demonstrated in multGPU.cu, multiple streams can be created in different contexts to perform out-of-order execution to support multiple GPUs in a single host thread. In other words, there is no guarantee that the commands on different streams will run in the same order relative to each other. Similarly, multiple streams can be created within a single context to support out-of-order execution within a single context. Asynchronous kernel execution is one example of out-of-order execution within a single context, where multiple kernels run concurrently on the same device.
The following source code (Example 7.13) modifies multiGPU.cu to demonstrate concurrent kernel execution on a single GPU. Changes are highlighted in the source code:
■ The number of loops in fillKernel() was increased to better highlight the difference between synchronous versus concurrent kernel runtime.
■ The value of n was decreased to 1024, so only two blocks are utilized by fillKernel() to process each vector.
■ Five streams are created that run concurrent fillKernel() instances.
■ For timing comparison, all the kernels will run sequentially on stream[0] when the C processor variable USE_SINGLE_STREAM is defined.
__global__ void fillKernel(int *a, int n, int offset)
{
int tid = blockIdx.x*blockDim.x + threadIdx.x;
if (tid < n) {
register int delay=1000000;
while(delay > 0) delay--;
a[tid] = delay + offset+tid;
}
}
int main(int argc, char* argv[])
{
int nStreams=5;
int n = 1024;
int size = n * sizeof(int);
cudaStream_t streams[nStreams];
int *d_A[nStreams];
for(int i=0; i < nStreams; i++) {
cudaMalloc(&d_A[i],size);
if(cudaStreamCreate(&streams[i]) != 0) {
fprintf(stderr,"Stream create failed!
"); exit(1);
}
}
int *h_A;
cudaHostAlloc(&h_A, nStreams*size, cudaHostAllocPortable);
int nThreadsPerBlock= 512;
int nBlocks= n/nThreadsPerBlock + ((n%nThreadsPerBlock)?1:0);
double startTime = omp_get_wtime();
for(int i=0; i < nStreams; i++) {
#ifdef USE_SINGLE_STREAM
fillKernel<<<nBlocks, nThreadsPerBlock>>>(d_A[i], n, i*n);
#else
fillKernel<<<nBlocks, nThreadsPerBlock, 0, streams[i]>>>(d_A[i], n, i*n);
#endif
}
cudaDeviceSynchronize();
double endTime= omp_get_wtime();
printf("runtime %f
",endTime-startTime);
for(int i=0; i < nStreams; i++) {
cudaMemcpyAsync(&h_A[i*n], d_A[i], size, cudaMemcpyDefault, streams[i]);
}
cudaDeviceSynchronize();
for(int i=0; i < nStreams*n; i++)
if(h_A[i] != i) {
printf("Error h_A[%d] = %d
",i,h_A[i]); exit(1);
}
printf("Success!
");
for(int i=0; i < nStreams; i++) {
cudaFree(d_A[i]);
}
return(0);
}
Example 7.13 can be saved to a file called asyncGPU.cu. The following commands demonstrate how to build and run the code. A comparison of the runtime between the sequential and parallel version shows that asynchronous kernel execution does speed this application according to the number of concurrent kernels. See Example 7.14, “asyncGPU.cu Results”:
$ nvcc -D USE_SINGLE_STREAM -arch sm_20 -O3 -Xcompiler -fopenmp asyncGPU.cu -run
runtime 4.182832
Success!
$ nvcc -arch sm_20 -O3 -Xcompiler -fopenmp asyncGPU.cu -run
runtime 0.836606
Success!
In CUDA 4.0, the visual profiler cannot profile concurrent kernel execution. For this reason, wallclock time as reported by omp_get_wtime() is utilized to detect a speedup. This example demonstrates nearly perfect speedup by a factor of 5 as the runtime decreased according to the number of concurrent streams that ran on the GPU.
Tip for Concurrent Kernel Execution on the Same GPU
The linear speedup according to the number of kernels exhibited by asyncGPU.cu demonstrates that concurrent kernel execution can be an important tool to increase performance when running small compute-bound kernels. It is important to consider how the multiple kernels will interact with global memory. For example, a single kernel may access global memory in a cache friendly high-performance coalesced manner. Running multiple kernels may change the locality of reference, increase L2 cache misses, and reduce or eliminate the effectiveness of this cache. Concurrently running different kernels can exacerbate this problem and introduce additional problems with bank conflicts and memory partition camping, as discussed in Chapter 5. As a result, performance will degrade. Although the overall speedup when running multiple concurrent kernels will likely be better than running each kernel sequentially, a linear speedup may not always be possible.
The following guidelines should improve the potential for concurrent kernel execution on devices that support concurrent kernel execution:
■ All independent operations should be issued before dependent operations.
■ Synchronization of any kind should be delayed as long as possible.
Atomic Operations for Implicitly Concurrent Kernels
CUDA is designed to let each SM run independently of each other. In this way, the CUDA model does not impose any scalability limit on the number of devices. The gating factor for kernel scalability in a kernel is the number of thread blocks. With concurrent kernel execution, the scalability of an application is limited by the number of blocks of all the independent tasks that can run at one time.
The functionReduce() example from Chapter 6 demonstrates that the CUDA model does introduce some complexity for reduction types of operations. By definition, a reduction operation must provide a single value that is based on computations performed by all the SM on the GPU, which requires that some form of synchronization happen between computational units. This is antithetical to the CUDA programming model. The simple solution used by the functionReduce() example was to move the data to the host, where the final step of the reduction is performed. This approach works but presents challenges when programming with multiple devices or streams because host-side operations are not queued on a CUDA stream.
There are two options that allow the complete reduction to a single value to happen via a CUDA stream:
1. Write a separate kernel that runs after functionReduce(). CUDA guarantees that all global memory transactions will be completed prior to the start of the next kernel. Because global memory has the lifetime of the application, the partial sums stored in global memory can be used by the second kernel to complete the reduction operation.
2. Utilize atomic operations to synchronize operations within a kernel. Basically, an atomically incremented counter is used to determine which SM is the last to finish. An atomic operation performed on a memory location is guaranteed to complete before any other processing element can access the result of the operation. The atomic increment lets the CUDA programmer determine when all the SM on the GPU have finished performing their part of the reduction. Atomic operations force each SM to serially access a single memory location, which imposes obvious scaling limitations. However, atomic operations do allow kernels such as functionReduce() to perform a reduction to one value in a single kernel call.
The NVIDIA SDK includes threadFenceReduction, a well-documented example that utilizes atomic operations to synchronize all the SM on a GPU. This SDK example is rather long and complicated. Example 7.15, “Using Atomics to Complete a Reduction Inside a Kernel,” is a concise and highly abbreviated example that utilizes an atomicInc() in the same fashion as the SDK example:
#include <iostream>
using namespace std;
__global__ void gmem_add(int *a, int n, unsigned int *counter, int *result)
{
bool finishSum;
if(threadIdx.x == 0) {
// introduce some variable delay based on threadIdx.x
register int delay=blockIdx.x * 1000000;
while(delay >0) delay--;
// write blockIdx.x to global memory
a[blockIdx.x] = blockIdx.x;
__threadfence();
}
// Use an atomic increment to find the last SM to finish.
// The counter must start at zero!
if(threadIdx.x == 0) {
unsigned int ticket = atomicInc(counter, gridDim.x);
finishSum = (ticket == gridDim.x-1);
}
if(finishSum) {
register int sum = a[0];
#pragma unroll
for(int i=1; i < n; i++) sum += a[i];
result[0] = sum;
}
counter=0; // reset the counter
}
#define N_BLOCKS 1400
int main(int argc, char *argv[])
{
int *d_a, *d_result;
unsigned int *d_counter;
cudaMalloc(&d_a, sizeof(int)*N_BLOCKS);
cudaMalloc(&d_result, sizeof(int));
cudaMalloc(&d_counter, sizeof(unsigned int));
int zero=0;
cudaMemcpy(d_counter, &zero, sizeof(int), cudaMemcpyHostToDevice);
gmem_add<<<N_BLOCKS, 64>>>(d_a, N_BLOCKS, d_counter, d_result);
int h_a[N_BLOCKS], h_result;
cudaMemcpy(h_a, d_a, sizeof(int)*N_BLOCKS, cudaMemcpyDeviceToHost);
cudaMemcpy(&h_result, d_result, sizeof(int), cudaMemcpyDeviceToHost);
int sum=0;
for(int i=0; i< N_BLOCKS; i++) sum += h_a[i];
cout << "should be " << sum << " got " << h_result << endl;
}
In Example 7.15:
1. The first thread in each thread block is delayed by a variable amount.
2. The first thread in each thread block atomically increments a counter to show that the thread block has completed all prior work.
3. Only the first thread in the last thread block will see that the counter equals the number of thread blocks. That indicates it is safe for it to perform the final sum.
Tying Data to Computation
Tying data to computation is essential to attaining program correctness and performance in a distributed multi-GPU environment. CUDA programmers have the following options to make data available to kernels running on multiple GPUs:
■ Map the memory into the memory space of all the GPUs. In this case, data will be transparently transferred between the host and GPUs.
■ Manually allocate space and transfer the data.
■ For applications that will run in a distributed MPI (Message Passing Interface) environment, space can be allocated on each device and transferred directly to the GPU via MPI send and receive calls. This is discussed further in Chapter 10.
Manually Partitioning Data
The most flexible, scalable, and highest-performance method to tie data to computation is manually partitioning and transfering data amongst devices. With this technique, the programmer can control and optimize all aspects of the computation. Unlike mapped memory, the programmer assumes the responsibility of ensuring that all data is on the GPU when it is needed. The multiGPU.cu example (starting with Example 7.4) provided a simple demonstration that manually partitioned data.
Effectively partitioning data across many devices is a hard problem. The decision-making process of how to distribute data across devices does create a very deep and detailed insight into the computational problem being solved. Most important from a performance perspective, this design process highlights how asynchronous data transfers and overlapped kernel execution can speed performance. The good news is that the technical and scientific literature contains numerous examples of excellent parallelization schemes that have been created by very bright people. Look to these sources early in your design process to see how others have addressed parallelism in problems similar to the one to be solved.
The discussion in Chapter 6 concerning tiles, stencils, and quad- and octrees provides some good starting points for research. Data-parallel APIs such as Thrust implement common parallel design patterns that can be used to simplify and implement many high-performance applications. Again, the good news is that these general libraries are rapidly expanding and improving.
For all applications, the three rules of high-performance GPU programming discussed in this book should be used as a basic starting point in all your design efforts:
1. Get the data on the GPGPU and keep it there.
2. Give the GPGPU enough work to do.
3. Focus on data reuse within the GPGPU to avoid memory bandwidth limitations.
Mapped Memory
Simplicity is the advantage of mapping memory among the devices in a system:
■ There is no need to partition data. All devices see the complete memory image.
■ There is no need to allocate space in device memory or to manually copy data. All data transfers are implicitly performed by the kernel as needed.
■ There is no need to use streams to overlap data transfers with kernel execution. All data transfers originate from the kernel and are asynchronous.
Application performance is the cost associated with this simplicity. Using mapped memory does mean that the programmer gives up control over the data movement between the host and devices. From the forums and experience, it is not unusual for kernel performance to drop when using mapped memory because there are no guarantees when or how often data will need to be transferred across the PCIe bus. Other considerations to using mapped memory include:
■ If the contents of the mapped memory are modified, the application must synchronize memory accesses using streams or events to avoid any potential read-after-write, write-after-read, or write-after write hazards.
■ The host memory needs to be page aligned. The simplest and most portable way to enforce this is to use cudaAllocHost() when allocating mapped host memory.
The simplicity of using mapped memory is illustrated by the following example (Example 7.16), which fills a mapped memory vector using one or more GPUs in the system. The highlighted command cudaHostAlloc() creates a mapped region of memory when passed the cudaHostAllocMapped flag. This region is freed at the end of the program with cudaFreeHost().
Thrust was used to make this code concise and easy to read. The device_pointer_cast() method was used to correctly cast the mapped host memory for the thrust sequence() method.
The highlighted call to cudaDeviceSynchronize() ensures that the mapped data is synchronized between the host and devices prior to checking the results on the host. All data transfers occur transparently and asynchronously. Finally, the contents of the mapped region of memory are checked for correctness on the host and the mapped region is freed.
#include <iostream>
using namespace std;
#include <thrust/device_vector.h>
#include <thrust/sequence.h>
int main(int argc, char* argv[])
{
int nGPU;
if(argc < 2) {
cerr << "Use: number of integers" << endl;
return(1);
}
cudaGetDeviceCount(&nGPU);
int n = atoi(argv[1]);
int size = nGPU * n * sizeof(int);
cout << "nGPU " << nGPU << " " << (n*nGPU*sizeof(int)/1e6) << "MB" << endl;
int *h_A;
cudaHostAlloc(&h_A, size, cudaHostAllocMapped);
for(int i=0; i < nGPU; i++) {
cudaSetDevice(i);
thrust::sequence(thrust::device_pointer_cast(h_A + i*n),
thrust::device_pointer_cast(h_A + (i+1)*n),
i*n);
}
cudaDeviceSynchronize(); // synchronize the writes
for(int i=0; i < nGPU*n; i++)
if(h_A[i] != i) { cout << "Error " << h_A[i] << endl; exit(1); }
cout << "Success!
" << endl;
cudaFreeHost(h_A);
return(0);
}
Compiling and running this example on a system containing two GPUs shows that the vector h_A is correctly initialized for both very small and large problems (Example 7.17, “Sample Output from the Mapped Memory Example”):
$ ./mappedGPUsthrust 2
nGPU 2 1.6e-05MB
Success!
$ ./mappedGPUsthrust 200000000
nGPU 2 1600MB
Success!
The result when using two integers per GPU illustrates a very important characteristic of mapped memory: it allows multiple devices to correctly update adjacent, nonoverlapping locations in memory! This makes mapped memory a very valuable tool, as programmers need to ensure only that their codes write to nonoverlapping addresses in memory. Of course, concurrent writes to the same memory location are undefined. Also, writes will become visible across devices only after synchronization.
How Mapped Memory Works
All CUDA threads operate in a virtual address space. This means that every address generated by a CUDA kernel is translated by the MMU (Memory Management Unit) into a physical address that is used by the hardware to actually read data from the physical memory. Virtual memory makes life simple for application programmers, as they can use a single virtual memory address to correctly access data within a kernel or across devices – even when that same data resides at a different physical address on each separate device.
When presented with a virtual address, the MMU consults an internal cache (called a TLB or Translation Lookaside Buffer) to find the correct value needed to translate the virtual address into a physical address. The MMU views memory in terms of fixed-sized blocks of memory called pages. If the MMU does not find the page offset for a given virtual address, it will load the correct offset into the TLB from a data structure in physical memory called a page table. No address translation is required for page table access by the MMU. Once the MMU has the correct offset in the TLB, the address translation completes, which lets the application memory transaction proceed at the correct location in physical memory.
Microbenchmarks indicate that the size of a page of memory in a GPU can vary according to the hardware and the CUDA driver. Generally, 4 KB is the accepted size of a GPU page, but 64 KB pages have also been observed (Wong, Papadopoulou, Sadooghi-Alvandi, & Moshovos, 2010). The lesson learned is that the page size can vary even across device driver updates.
In addition to translating virtual addresses to physical memory, the MMU also keeps track of other information in the page table. For example, each page in the page table contains a bit that specifies whether the page is resident in memory. When the MMU is asked to translate an address for a page that is not resident, it generates a page fault that informs the device driver that it needs to fetch some data on behalf of the GPU. Address translation resumes only once the page has been loaded into the GPU memory.
When a region of memory is mapped, none of the pages are marked as resident. As a result, the first access to each page of mapped memory will be slow, as the GPU must wait while the GPU and device driver interact to transfer the required page of memory. Later accesses will be very fast, as the page will already be resident on the GPU. Of course, the GPU can decide at any time to free memory for other purposes, in which case a follow-on page access will again be slow.
The successful two-integer test case using the code in Example 7.16 tell us that the device driver has implemented a mechanism that correctly modifies adjacent, nonoverlapping regions of mapped memory even when multiple devices modify addresses that reside in the same page. The implication for the CUDA programmer is that data can be modified in mapped memory as long as the programmer:
■ Takes care not to modify the same memory location on different devices.
■ Synchronizes as needed to make updates visible to all devices.
Summary
This chapter introduced multi-GPU programming, which is one of the most exciting areas of research and application development in GPU computing. Current technology allows up to 16 GPUs devices to be installed in a single workstation or computational node. Such a workstation has a potential computational capability that is three times greater than the $30 million supercomputer at Pacific Northwest National Laboratory that was replaced in 2006.
Data partitioning and scalability are key challenges for multi-GPU application development. Ideally, CUDA programmers should be able to achieve a linear speedup according to the number of devices in the system. This is where understanding the computational problem and creative thinking can really make a difference in application performance.
Still to be discussed is MPI programming for distributed GPU clusters. With this technology, CUDA programmers can scale to literally thousands of GPU devices to address big computational problems. It also creates opportunities to perform “leadership”-class computations on some of the largest supercomputers in the world. To accelerate performance for distributed applications, NVIDIA has introduced GPUdirect technology, which allows GPUs to communicate directly with each other across a distributed network. Chapter 10 discusses this technology and the use of GPUs for distributed computing and supercomputers.
..................Content has been hidden....................
You can't read the all page of ebook, please click here login for view all page.