
Protecting yourself on social media
Abstract
This chapter provides information on configuring the top social media sites of Facebook, Twitter, and YouTube, with information that relates to other social media sites the reader may join and use.
Keywords
Cyber safety; social media; Facebook; Twitter; YouTube
While sites have traditionally been one-sided, in that a person creating a web page conveys information, social media allows people to create their own content, interact with others, and be exposed to different kinds of threats. While there are various settings available to protect your privacy and security, all-too-often people will accept the default settings and not even look at what settings have been preconfigured for them. In this chapter, we’ll discuss settings on popular social media sites, and how you can change these settings to best protect yourself.
What Is Social Media?
Social media is a term that refers to sites, apps, and tools that are used to create user-generated content. People using social media create, share, collaborate and exchange information, photos, video, and other content. While social media itself is a broad term, it can be broken down into different categories, inclusive to:
![]() Bookmarking, in which people create, organize, and tag links to make them easy to share. These would be sites such as Delicious (www.delicious.com) or StumbleUpon (www.stumbleupon.com).
Bookmarking, in which people create, organize, and tag links to make them easy to share. These would be sites such as Delicious (www.delicious.com) or StumbleUpon (www.stumbleupon.com).
![]() Forums and Blog Comments, where people can write posts and interact with others in forums that tend to focus on a particular question or topic.
Forums and Blog Comments, where people can write posts and interact with others in forums that tend to focus on a particular question or topic.
![]() Media Sharing, in which people upload and share photos or videos. These would include sites like YouTube (www.youtube.com), Flickr (www.flickr.com), and Instagram (www.instagram.com).
Media Sharing, in which people upload and share photos or videos. These would include sites like YouTube (www.youtube.com), Flickr (www.flickr.com), and Instagram (www.instagram.com).
![]() Microblogging, which allows you to post short messages that others can subscribe to, such as seen with Twitter (www.twitter.com).
Microblogging, which allows you to post short messages that others can subscribe to, such as seen with Twitter (www.twitter.com).
![]() Social networking, where people can make connections to others with similar interests, goals, or relationships. There may be professional networks like LinkedIn (www.linkedin.com) or personal ones like Facebook (www.facebook.com).
Social networking, where people can make connections to others with similar interests, goals, or relationships. There may be professional networks like LinkedIn (www.linkedin.com) or personal ones like Facebook (www.facebook.com).
![]() Social News, where people can write news items or share links to external articles. Other users can then vote to choose the most popular ones. Examples of these sites include Reddit (www.reddit.com) and Digg (www.digg.com).
Social News, where people can write news items or share links to external articles. Other users can then vote to choose the most popular ones. Examples of these sites include Reddit (www.reddit.com) and Digg (www.digg.com).
Securing Social Media
If you think that changing the security and privacy settings on a social media site is difficult, you wouldn’t be alone. According to a 2012 study, 48% of people using social media reported some difficulty managing the privacy controls on sites they used (Madden, 2012). Interestingly enough, those who were college graduates were significantly more likely to experience difficulty than those with lower education. While taking the step to properly configure your account may seem intimidating or confusing, you’ll find it easier once you learn how to configure the best possible settings, and understand how they’ll protect you.
Security should be on your mind from the time you log in to the time you log out of a site. When you first logon, the site may have a checkbox to Keep Me Logged In or Remember Me. By checking the box, a cookie is stored on your computer, which is used to automatically log you on the next time the browser’s opened. While this may be convenient, anyone else who uses the computer and opens the browser would also automatically be logged in to your account. To prevent unauthorized logins this way, you should never check this checkbox on shared, insecure, or public computers. To ensure that you’re properly logged off, you should sign out of any site you use when you’re done.
Because so many use social media sites, it attracts a wide variety of people, including those seeking to learn more information about you, such as criminals looking for potential victims. To avoid problems, you should do the following:
![]() Never provide personal, sensitive, or embarrassing information on a profile or in posts. The information you post could also be used by identity thieves, stalkers, and other cybercriminals. It can be seen by employers or teachers and have an impact on your career.
Never provide personal, sensitive, or embarrassing information on a profile or in posts. The information you post could also be used by identity thieves, stalkers, and other cybercriminals. It can be seen by employers or teachers and have an impact on your career.
![]() Be aware of what others are posting about you, and the photos you’re tagged in. If you see personal details, embarrassing posts, or information about your activities, ask them to untag your or edit their post.
Be aware of what others are posting about you, and the photos you’re tagged in. If you see personal details, embarrassing posts, or information about your activities, ask them to untag your or edit their post.
![]() Don’t use identifying information in the usernames or email addresses you use. Having a name like michaelcross may seem convenient, but it also reveals who you are. You should also setup a new email account to register with the site, and receive email from it. If you stop using the site, you can simply stop using the email. In creating these accounts, you should also use strong passwords and change them regularly.
Don’t use identifying information in the usernames or email addresses you use. Having a name like michaelcross may seem convenient, but it also reveals who you are. You should also setup a new email account to register with the site, and receive email from it. If you stop using the site, you can simply stop using the email. In creating these accounts, you should also use strong passwords and change them regularly.
![]() Don’t be pressured into doing things you don’t want. Your peers on these sites may convince you to do things you’re not comfortable with, or you may see large numbers of people participating in online campaigns or challenges. If you don’t want to do something, don’t.
Don’t be pressured into doing things you don’t want. Your peers on these sites may convince you to do things you’re not comfortable with, or you may see large numbers of people participating in online campaigns or challenges. If you don’t want to do something, don’t.
![]() Don’t post information about when you’re on vacation or attending an event. This includes turning off location features that show where you are, and not using sites that allow you to check-in to a location. If you show you’re not at home, it advertises to burglars, stalkers, and other criminals that your house is an easy break-in.
Don’t post information about when you’re on vacation or attending an event. This includes turning off location features that show where you are, and not using sites that allow you to check-in to a location. If you show you’re not at home, it advertises to burglars, stalkers, and other criminals that your house is an easy break-in.
Using the Information You Learn on One Site to Secure Others
It would be impossible to provide detailed steps to secure the accounts of every social media site on the Internet. In this chapter, we’ll discuss settings on some of the most popular ones, inclusive to Facebook, Twitter, and YouTube. In Chapter 7, Finding a job online, we’ll also tell you about settings in your LinkedIn account. In looking how to configure these accounts, remember that other social media accounts you have would also have settings, and many of them will be similar to other sites. By using the knowledge you gain from adjusting settings on one site, you’ll generally be able to make educated changes to the privacy and security settings on others.
Monitoring Activity
An easy way to see if someone has gained unauthorized access to your account is to simply view its activity. If you see any unfamiliar posts or changes, it may indicate that someone has hacked or hijacked the account. Having said this, a heavy social media user may have difficulty keeping track of the browsers and devices they’ve used to logon and what they’ve done online. Fortunately, sites may provide features that allow you to quickly review your online activity.
On Facebook, your account can be monitored using the Activity Log, which is an easy-to-use listing of what you’ve done, as well as any posts you were included in. After going to your homepage, click on the View Activity Log button that’s located on your cover photo. When the Activity Log page appears, you’ll see a list of recent activities. You can scroll down to see posts you made, what you liked, comments you’ve made and other items, and also filter the list using controls in the left pane of the page. For example, to only see posts you’ve made, click on the Your Posts link, or if you’d prefer seeing your comments, click on the Comments link.
While you have control over your own posts, you should pay particular attention to posts others have mentioned you in. On the Activity Log page, click on the Posts You’re Tagged In link to see any textual posts where your name was mentioned and photos that others have tagged you in. You should always review such content to see whether you’re being associated in a way you want to be portrayed online.
While the Activity Log is an important tool, it’s not the only method of monitoring your activity. It’s important to know when someone logs on, so you can determine if an unauthorized person is using your account. In Facebook, you can configure your settings to notify you when someone logs on and where they were located. This is done on the Security Settings page, which is accessed by clicking on the downward arrow in Facebook’s top navigation bar, clicking Settings, and then clicking the Security link in the left pane of the page.
As seen in Fig. 6.1, the Security Settings page has a Login Alerts section, where you can set whether you’ll receive notifications when someone logs in from a new device or browser. By clicking on the Edit link, the section expands to reveal additional options. Once clicked, you’ll see a Notifications section where you can click on an option to either Get notifications or Don’t get notifications, and an Email section that allows you to specify whether or not you’ll be alerted via email when someone logs in. If you click the option to get notifications but don’t have them sent to your email address, information about the login attempt will appear in Facebook Notifications, which can be viewed by clicking the world-shaped icon on Facebook’s top navigation bar.
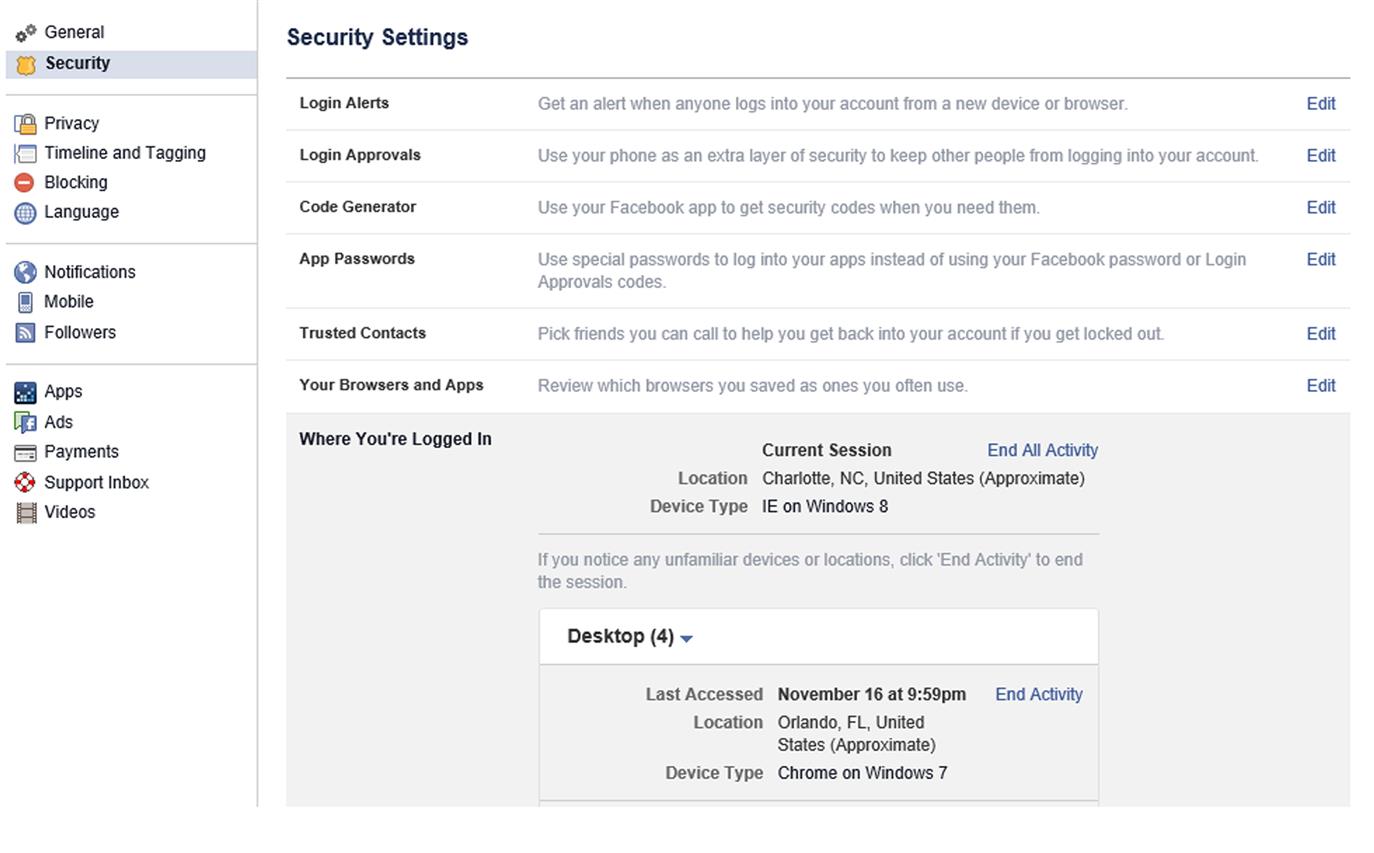
The Security Settings page also has a Where You’re Logged In section, which allows you to see where you (and possibly others) were when logging into Facebook. As seen in Fig. 6.1, when you click on this you’ll see your current location at the top, and the device and browser used to logon. Below this, you’ll see a list of previous locations, devices, and browsers used to login. If you haven’t configured Facebook to send notifications of when people login from a new device or browser, you should review this section regularly. If you see an unfamiliar location in the list, then click the End Activity link to the right of that entry to log them off. To logoff every device or browser that’s been used to login to your account, click on the End All Activity link beside your current location.
On Twitter, you can also monitor the activity related to your account, and see if someone logged in from an unknown device. To view this information:
1. Click on the Profile and Settings button, which is located to the left of the Tweet button, in the upper right-hand corner of the page. Once the dropdown menu appears, you would then click Settings.
2. On the left-hand side menu, click Your Twitter data.
3. Review the information in the Account History section, which tells you when your account was created, and allows you to view and edit your Twitter handle, email, and phone number.
4. In the Device history section, review the devices you’ve used to access Twitter.
5. In the Login history section, review the apps and sites that have been used to access your account. If you see an app that is no longer used or seems suspicious, click on the Apps link in the left pane of the page, find the app in the list, and click the Revoke Access button beside that app’s name.
Securing Facebook
Facebook (www.facebook.com) is a social networking site, where people can connect and interact with others, share photos, play games, and join networks of people with similar interests. According to the Pew Research Center, as of September 2014, 71% of the adults who are online use Facebook (Pew Research Center, 2014). In terms of social networking as a whole, they also found that 72% of men and 76% of women use social networking sites. This is a jump from their May 2013, which found 74% of women and 62% of men used this type of social media. Of those who use the sites, 40% of them access the sites on a mobile phone, and 28% do so daily.
Although Facebook is extremely popular, it has had a reputation for not respecting privacy. Prior to 2014, any posts you made were Public by default, allowing anyone to view your posts, photos, and other information unless you changed your privacy and security settings. Although this is no longer the case with new accounts created on the social networking giant, anyone who already had an account and hadn’t reviewed and changed the settings retained the previous defaults. Even if you had made changes, Facebook adds new features and settings, which may be missed if you don’t regularly review and change your settings.
General
The General settings page in Facebook is primarily used to configure basic information about your account. When you click on the downward arrow in the upper right-hand corner of the top navigation bar and click Settings, it’s the default page where you’ll find the following settings:
![]() Name, where you can change how your name appears.
Name, where you can change how your name appears.
![]() Username, where you can set your public username, which is the same as your Timeline address.
Username, where you can set your public username, which is the same as your Timeline address.
![]() Email, which allows you to add and remove email addresses and mobile numbers, set whether to use your Facebook email, and configure whether friends will see your email when they download a copy of their Facebook data.
Email, which allows you to add and remove email addresses and mobile numbers, set whether to use your Facebook email, and configure whether friends will see your email when they download a copy of their Facebook data.
![]() Password, where you can change your password.
Password, where you can change your password.
![]() Networks, which allows you to have your primary network appearing beside your name.
Networks, which allows you to have your primary network appearing beside your name.
![]() Temperature, which you can change from Fahrenheit to Celsius.
Temperature, which you can change from Fahrenheit to Celsius.
By clicking the Edit link beside any of these settings, the area will expand to show additional options. For example, if you clicked the link beside Name, you would see boxes where you can change your first, middle, and last names. You can change your name once every 60 days, and any friends you’ve added will see that change immediately. Modifying your name can be useful if you’ve gotten married and taken a spouse’s name, divorced, and reverted to a maiden name, or want to change your name so that others won’t be able to search and find you easily. While convenient, you should also realize that others may change their name to conceal themselves, such as when someone you don’t like wants you to add them as a friend. You can also click the Add other names link and be taken to the About page of your profile (which we’ll discuss later in this chapter), where you can add any nicknames, aliases, birth names, and so on.
The Username section allows you to set the name used for your Timeline address. Rather than people going to an obscure URL, when you enter a username, people will be able to type www.facebook.com/<username> into their browser and go directly to your profile page.
The Email section allows you to set primary and additional email addresses, as well as a mobile number. If you add a mobile number and don’t set privacy on it (as we’ll discuss later in this chapter), it will appear to others in the About section of your profile. The section also has a checkbox to use your Facebook email, which is the Username you set in the previously discussed setting with the Facebook domain (e.g., [email protected]). If you check this option, any emails sent to it are forwarded to your primary email address.
The other option in the Email section that you want to leave unchecked is the Allow friends to include my email address in Download your information. The Download your information option, and how you can use it to download a copy of content on your Facebook account, inclusive to information you’d see in your timeline and other data. When this archive is downloaded, it also includes information about people added as friends. To avoid your email address from appearing in another person’s download, you should leave this checkbox unchecked. After all, if their account was hacked, and the hacker downloaded an archive of the account, you wouldn’t want the unauthorized user to have your email address.
The Password section informs you of the last time you changed your password. Clicking Edit, the section will expand, showing boxes where you would enter your current password, a new password and another box to confirm it. Once you click Save Changes, your password is immediately changed. As we discussed in Chapter 2, Before connecting to the Internet, you should always use a strong password to protect your account and change it on a recurring basis. Also, if you believe someone other than yourself has logged into your account, you should end their activity (as we discussed earlier), and then change your password.
Security
As we saw earlier in this chapter, the Security Settings page has a number of features that allow you to monitor your activity and disconnect other devices and computers that are logged in. It also has features related to logins, passwords, and other setting to control access to your account. After going into Settings, you would access this page by clicking Security on the left-hand navigation of the page and see the following options:
![]() Login Alerts, where you can configure Facebook to send you notifications when someone logs in from a new device or browser, which we discussed earlier in this chapter when we talked about monitoring activity.
Login Alerts, where you can configure Facebook to send you notifications when someone logs in from a new device or browser, which we discussed earlier in this chapter when we talked about monitoring activity.
![]() Login Approvals, which sets a requirement that a security code is needed to login to your account. If you or someone else is using a browser that hasn’t been used to login to Facebook, the security code is required.
Login Approvals, which sets a requirement that a security code is needed to login to your account. If you or someone else is using a browser that hasn’t been used to login to Facebook, the security code is required.
![]() Code Generator, which is used to enable the code generator in the Facebook mobile app. If you’ve enabled Login Approvals, the mobile app can be used to generate security codes and reset your password.
Code Generator, which is used to enable the code generator in the Facebook mobile app. If you’ve enabled Login Approvals, the mobile app can be used to generate security codes and reset your password.
![]() App Passwords, which allows you to set special passwords for Facebook apps, so they don’t login using your Facebook account.
App Passwords, which allows you to set special passwords for Facebook apps, so they don’t login using your Facebook account.
![]() Trusted Contacts, which is used to select friends who can help you access your Facebook account if you’re locked out.
Trusted Contacts, which is used to select friends who can help you access your Facebook account if you’re locked out.
![]() Your Browsers and Apps, where you can review and remove devices and browsers that you’ve confirmed as trusted, so you aren’t notified about logins or require a security code to login.
Your Browsers and Apps, where you can review and remove devices and browsers that you’ve confirmed as trusted, so you aren’t notified about logins or require a security code to login.
![]() Where You’re Logged In, which shows where you’re logged into Facebook. We discussed this option earlier, when we talked about monitoring activity.
Where You’re Logged In, which shows where you’re logged into Facebook. We discussed this option earlier, when we talked about monitoring activity.
![]() Legacy Contact, where you can control what happens to your account and who has control of managing it if you pass away.
Legacy Contact, where you can control what happens to your account and who has control of managing it if you pass away.
![]() Deactivate Your Account, which allows you to disable your account temporarily. We’ll discuss this feature in more detail in Chapter 11.
Deactivate Your Account, which allows you to disable your account temporarily. We’ll discuss this feature in more detail in Chapter 11.
The Login Approvals feature is useful in preventing unauthorized access to your account. Once set, anyone who logs in from a browser or device that isn’t listed in the Your Browsers and Apps list will require a security code to login. To activate it, you’ll need to have a mobile number associated with your account. You would then click Edit beside Login Approvals, click the Require a security code to access my account from unknown browsers checkbox so it appears checked, and then click the Save Changes button.
The Code Generator is part of the Login Approvals process. A code is required to login to Facebook from new browsers or devices when Login Approvals is enabled, so the Code Generator is used. It works with the Facebook app on Android and iOS devices, where a new security code is created every 30 seconds. Once you have a code, you would then login to Facebook with your password, and then enter the security code as a second method of authentication. Once you’ve clicked Enable in the section on your Facebook page, you would do the following:
1. After opening the Facebook apps installed on your iPhone, iPad, or Android device, tap the Settings icon (depicted as three horizontal bars).
2. Scroll down and tap Code Generator. A code will be generated that you would use to login to Facebook.
The App Passwords section is used to generate passwords that can be used to log onto an app. Rather than using your Facebook password, you can generate a unique password that you’d use to login to Facebook the first time you use it. If Login Approvals are turned on, you wouldn’t need to wait to receive a code to use an app password. To use this feature:
1. Click on the Edit button beside App Passwords.
2. Click Generate app passwords, and when prompted, click the Generate App Passwords button.
3. Type in the name of the app you want to approve and then click Generate Password.
4. When the password is presented, use the password in the password field of the app, and then click Finish.
Once you’ve created the password for an app, the app’s name will appear in the App Passwords section. To remove an app from the list, click the Remove link beside the app’s name, and then click Save Changes.
If you ever have a problem logging into Facebook, you can get a security code from friends you’ve previously added to the Trusted Contacts section. You would then use the codes to login. To avoid potential problems, you should choose people who are able to confirm your identity prior to giving out a code. To add a trusted contact, you would do the following:
Privacy
The Privacy Settings and Tools page is where you would configure who is able to see your posts, and control who can contact you or look you up. You can access this page by clicking on the downward arrow in the top navigation bar, clicking Settings, and then clicking Privacy in the left-hand navigation. Once done, you’ll be presented with a page similar to what’s shown in Fig. 6.2.
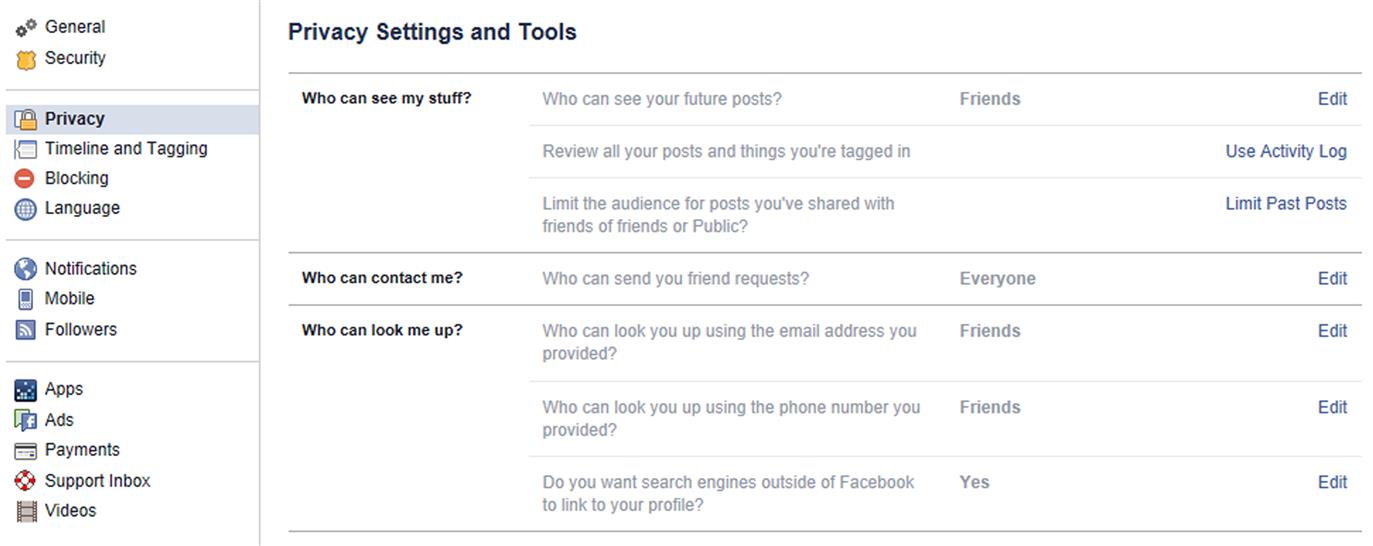
The Privacy page is broken into three sections, the first of which is titled Who can see my stuff?, where you can review and set who will be able to see past and future posts. The settings in this section consist of:
![]() Who can see your future posts?, where you can set who will be the default audience that will be able to see any posts you make. You should have this set to Friends, or (as we’ll discuss later in this chapter) a specific list. If you want to set a post to being visible to everyone, then you should modify the audience of that particular post, as we’ll discuss later in this chapter.
Who can see your future posts?, where you can set who will be the default audience that will be able to see any posts you make. You should have this set to Friends, or (as we’ll discuss later in this chapter) a specific list. If you want to set a post to being visible to everyone, then you should modify the audience of that particular post, as we’ll discuss later in this chapter.
![]() Review all the posts and things you’re tagged in, which provides a link to Use Activity Log. Clicking this link will open the Activity Log we discussed earlier, showing the Timeline Review, where you can see any posts, photos, and so on that you’ve been tagged in.
Review all the posts and things you’re tagged in, which provides a link to Use Activity Log. Clicking this link will open the Activity Log we discussed earlier, showing the Timeline Review, where you can see any posts, photos, and so on that you’ve been tagged in.
![]() Limit the audience for posts you’ve shared with friends of friends or Public, which will change all of your past posts to only being visible to Friends. If you’ve never set the default audience for future posts, are unsure of what you’ve posted Public, and/or have had most or all of your posts posted publically, then you should click the Limit Past Posts link on this setting, and then click the Limit Old Posts button. After limiting past posts, make sure you set the proper audience level for future posts as we just discussed.
Limit the audience for posts you’ve shared with friends of friends or Public, which will change all of your past posts to only being visible to Friends. If you’ve never set the default audience for future posts, are unsure of what you’ve posted Public, and/or have had most or all of your posts posted publically, then you should click the Limit Past Posts link on this setting, and then click the Limit Old Posts button. After limiting past posts, make sure you set the proper audience level for future posts as we just discussed.
The Who can contact me? section contains only one setting to control who can send you friend requests. By default, it is set to Everyone. If you wanted to vet requests, so that only people who share a mutual friend with you can make a request, you could reset this to Friends of Friend. However, keep in mind that just because someone else added the person as a friend, this doesn’t mean that they’re necessarily safe and shouldn’t be treated as a stranger.
The final section is Who can look me up?, where you have some control over search results. The settings in this section are:
![]() Who can look you up using the email address you provided? If people don’t have access to see an email address you provided, people within the group you specify will be able to use it to look for you. The options are Everyone, Friends of Friend, and Friends. Since you probably don’t want strangers and other people finding you by a search for your email address, set it to the most restrictive option of Friends.
Who can look you up using the email address you provided? If people don’t have access to see an email address you provided, people within the group you specify will be able to use it to look for you. The options are Everyone, Friends of Friend, and Friends. Since you probably don’t want strangers and other people finding you by a search for your email address, set it to the most restrictive option of Friends.
![]() Who can look you up using the phone number you provided? If people don’t have access to see a phone number you provided, only those who fall into the group you specify will be able to search for you using that number. The options are Everyone, Friends of Friend, and Friends. Since your phone number may be easily obtained using a phone book, resume, or some other document you’ve given out, it’s recommended that you set this to the most restrictive option of Friends.
Who can look you up using the phone number you provided? If people don’t have access to see a phone number you provided, only those who fall into the group you specify will be able to search for you using that number. The options are Everyone, Friends of Friend, and Friends. Since your phone number may be easily obtained using a phone book, resume, or some other document you’ve given out, it’s recommended that you set this to the most restrictive option of Friends.
![]() Do you want search engines outside of Facebook to link to your profile? If enabled, search engines like Google, Bing, and so forth may link to your profile and show its contents in search results. To prevent people from seeing your profile in search results, click on the Allow search engines outside of Facebook to link to your profile checkbox so it appears unchecked.
Do you want search engines outside of Facebook to link to your profile? If enabled, search engines like Google, Bing, and so forth may link to your profile and show its contents in search results. To prevent people from seeing your profile in search results, click on the Allow search engines outside of Facebook to link to your profile checkbox so it appears unchecked.
Privacy shortcuts
The Privacy Settings and Tools page isn’t the only place where you can configure settings related to privacy. By clicking the Privacy Shortcuts icon (depicted as a padlock) on Facebook’s top navigation screen, you’re presented with a number of settings that we just discussed, as well as others mentioned in other chapters. Here, you can control who can see your stuff, who can contact you, and also block people (as we’ll discuss in chapter, Beyond technology—dealing with people).
A useful item on this menu is the View As feature, which allows you to view your page as others see it. It’s accessible in several ways. First, you can go to your profile page, click the button with three dots that’s on your cover photo, and then click View As. The other way is by clicking on the Privacy Shortcuts icon, clicking Who can see my stuff? and then clicking View As. You can also access it from the Timeline and Tagging Settings page, which we’ll discuss later. Once clicked, you’ll be redirected to your Timeline, and see it as someone would with no access to your page (i.e., Public). To view it as if you were someone else (such as your mother or boss), you would do the following after clicking View As:
1. Click View as Specific Person.
2. In the box that appears, begin typing the person’s name, and then select the Facebook account that appears in the list. The Timeline will change to show what that person sees.
3. Now that you’re viewing as that person, click on the tabs in your profile to reveal additional information about you, and see what’s visible.
Another option on the Privacy Shortcuts menu is the Privacy Checkup. Once clicked, a new window will open, taking you step-by-step through the process of configuring your privacy settings. Even though this is an easy to use tool, you should continue to check the Security and Privacy settings we’ve discussed to ensure everything has been configured as you expect.
Know your audience
When you update your status, post a photo or other content, you can click on the audience selector tool beside the Post button and control who can see that post. As seen in Fig. 6.3, when you click on the button you have the option of that post only being visible to the Public, Friends, Only Me, or other lists (which we’ll discuss later in this chapter).
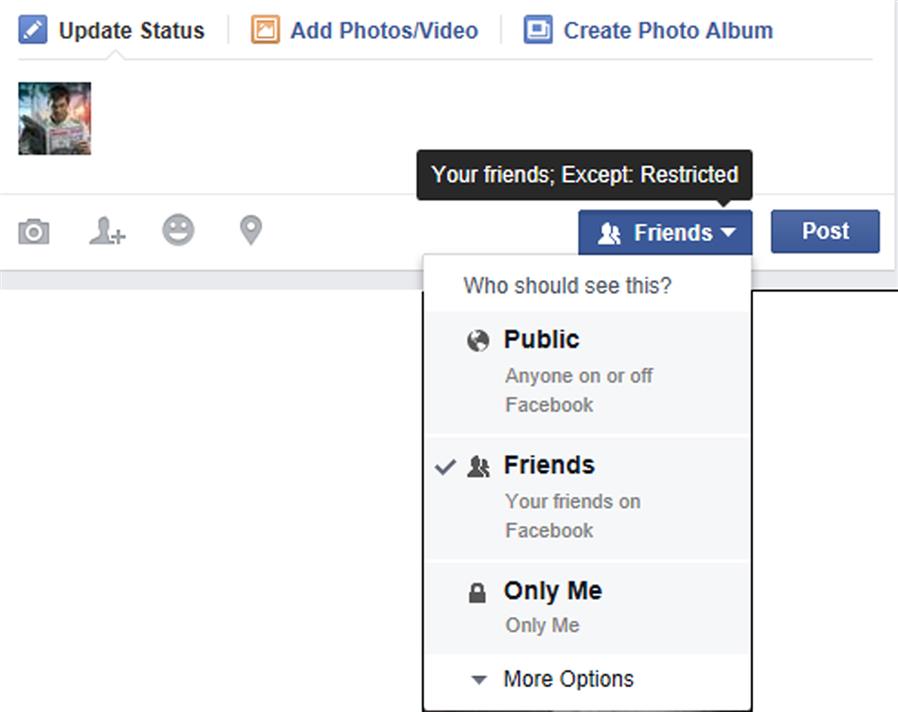
Once you’ve selected a particular audience, the tool will remember it and use that setting for future posts unless you change it. In other words, if you posted something and decided it should be Public, the next post you make will also be Public. This can be particularly awkward if you’ve posted an embarrassing photo, or a rant that doesn’t portray you in the best light. If you’re switching audiences, be careful of what you select and ensure that you haven’t given greater access than desired.
Timeline and Tagging
The Timeline and Tagging Settings controls who can add and view content on your Timeline, as well as content others have tagged you in. The features allow you to regulate what people post and associate with you, preventing others from publishing content that may be embarrassing.
As seen in Fig. 6.4, the Who can add things to my timeline? section has two features. When you click the Edit link beside Who can post on your timeline?, you have the option of allowing either Friends or Only Me to post on your timeline. If you’re concerned about what others may post, select Only Me. The other option here is Review posts friends tag you in before they appear on your timeline?, which can be either enabled or disabled. It’s recommended that you set this to Enabled, so that you can look at what someone’s posted so you can either approve or reject it prior to others seeing it.
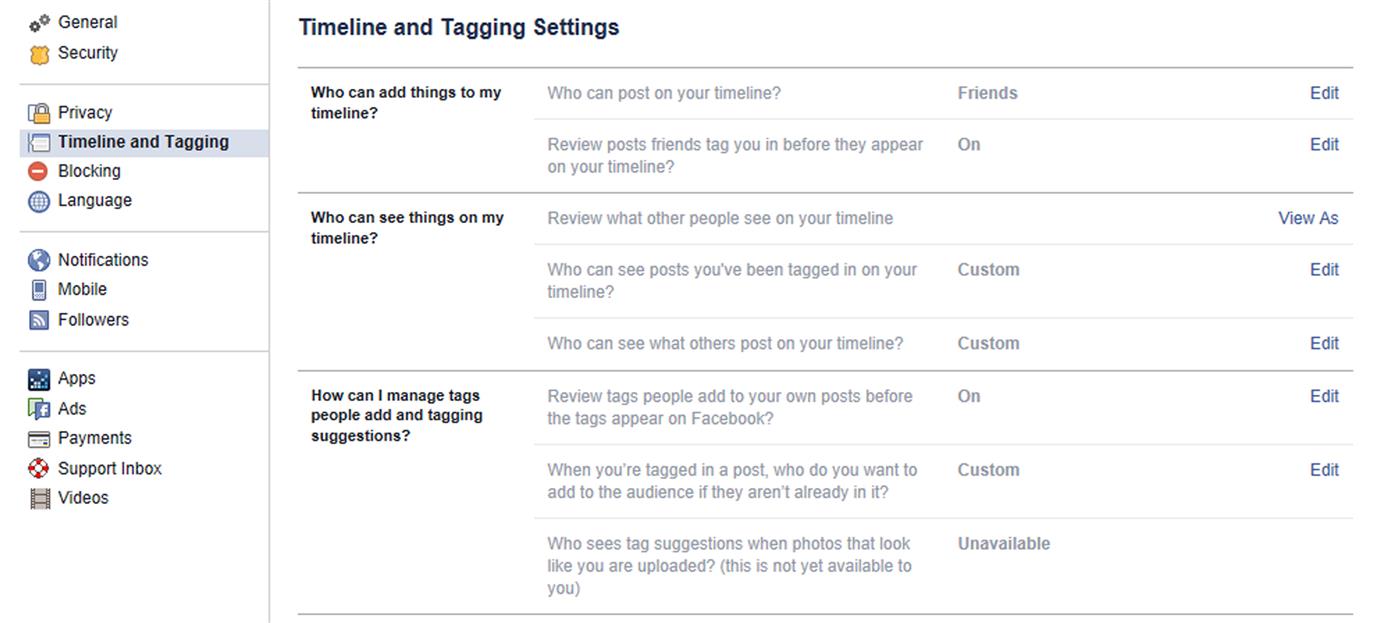
The second section is Who can see things on my timeline? The first option allows you to view your Timeline as the public or a specific person would, which we discussed earlier. The second option Who can see posts you’ve been tagged in on your timeline? allows you to control who will see posts others have tagged you in. By clicking on the dropdown, you’ll be able to select specific groups or lists that will have access to this content. The final option is Who can see what others post on your timeline?, which controls access to posts others have made. As with the previous option, you can click on a dropdown and select a specific list of people who will be able to view this content.
The final section on the Timeline and Tagging Settings page is How can I manage tags people add and tagging suggestions? The first option allows you to Review tags people add to your own posts before the tags appear on Facebook?, which can be either enabled or disabled. You should Enable this so that you can check whether someone has tagged another person in a photo or post that may be inappropriate or embarrassing, before others on Facebook can see it. The second option in this section allows you to control When you’re tagged in a post, who do you want to add to the audience if they aren’t already in it? In using this option, you can add people from a list so they can see the post if they don’t already have access.
Lists
When you add a friend, you may think that you’re limited to only allowing them access to everything you’ve posted. However, you can add them to lists to organize them into different groups, and control how much of their posts you see in your news feed, and what appears in theirs. The different lists available include:
![]() Close friends, which will prioritize their posts so you’ll see more of them in your newsfeed, and get notified when they make a post.
Close friends, which will prioritize their posts so you’ll see more of them in your newsfeed, and get notified when they make a post.
![]() Acquaintances, which will cause fewer of their posts to appear in your newsfeed. When you post, you can exclude these people from seeing your posts by clicking Friends except acquaintances in the audience selector.
Acquaintances, which will cause fewer of their posts to appear in your newsfeed. When you post, you can exclude these people from seeing your posts by clicking Friends except acquaintances in the audience selector.
![]() Restricted, which limits the person to only seeing public posts and those they’re tagged in.
Restricted, which limits the person to only seeing public posts and those they’re tagged in.
Alternatively, you can also create new lists to keep track of why people are your friends, and organize them accordingly. To illustrate how this might be used, consider how you should never add someone as a friend that you don’t know. However, many people do, and sometimes it seems necessary. You’ll play a game, and one of the requirements to continue may be that you need a certain number of “neighbors” or allies to continue. If none of your friends are playing that game, you might go on the app’s page and tell people to add you. In doing so, they’ll make a friend request, and you can add them as an ally. Unfortunately, you’ve just added a stranger, and given them access to what you and possibly your friends and family are posting, as well as access to additional information appearing on your profile. Even if you stop playing the game later, you might forget that these people have been added. To keep track of them, you might create a new list named after that game, and add them to this list and the Restricted list. Now those people can only see your public posts, and if you leave the game, you can just unfriend anyone in that games list.
To add a person to a list, go to your profile page, and click the Friends link on the navigation bar below your cover photo. When the list of friends appears, do the following:
1. Click the button beside their name that says Friends, and then either click Close Friends, Acquaintances, or Add to Another List.
2. If you clicked Add to Another List, the dropdown will appear allowing you to select another list to add them to.
When you accept or send a friend request, you can also add them to lists. In doing so, the person automatically gets the level of access you’ve set, without them being notified.
About
One of the biggest threats to your privacy is the information you reveal to others. The About section of your profile is where you tell people about yourself, inclusive to contact information, your interests, and other facts about yourself. You can access this page by going to your profile, and clicking on About under your cover photo.
What you add to the About section can be considerably more than you want revealed. In fact, it can be a virtual treasure trove of details, useful to identity thieves, stalkers, bullies, and other unwanted or criminal elements. In this section, you can enter such things as:
![]() Contact information, such as your address, city, neighborhood and zip code, phone numbers, email, and other social media accounts you use.
Contact information, such as your address, city, neighborhood and zip code, phone numbers, email, and other social media accounts you use.
![]() Professional information, inclusive to where you work and went to school, and skills.
Professional information, inclusive to where you work and went to school, and skills.
![]() Personal information, such as who you’re married to or in a relationship with, family members, current and previous places you’ve lived, your birthdate, other names (such as nicknames or maiden names), gender, religious and political views, and other details and life events.
Personal information, such as who you’re married to or in a relationship with, family members, current and previous places you’ve lived, your birthdate, other names (such as nicknames or maiden names), gender, religious and political views, and other details and life events.
There are also sections that show your likes, ex: sports, books, TV shows, movies, music, and places you’ve checked in. In looking at this information, you might find they reveal words or phrases you’ve used in a password, or answers to common questions that you’d answer to gain access to an account after forgetting your password. If you’ve ever forgotten your password and been asked a security question like the high school you attended or your favorite thing, the answer could be readily available on your Facebook profile. Even the more difficult security questions may be answered by visiting a couple of profiles. If you wanted to get into someone’s account and the security question asked for their mother’s maiden name, you could probably find who their mother listed as a friend, and by visiting her page see the maiden name.
Some information on your profile could also bias people against you. There are those who might take issue with the religious or political views you’ve mentioned in your profile. As we’ll see in the Chapter 7, Finding a job online, if a potential employer saw your birthdate, they could discriminate against you because of your age. Even if such action is illegal, you would never know that they saw something on your profile that was detrimental to your being hired.
Other information you put in the About section is blatantly risky. Under no circumstances should you enter any information that would allow a stranger to contact you. Despite this, you may come across those who’ve entered an address, mobile phone number, or other contact information and not adjusted the settings to restrict just anyone from viewing it.
To see how you can restrict access to information in the About section, let’s look at the field that shows your birthdate, which you provided when you first signed up to Facebook:
1. On your profile page, click on the About tab under your cover picture.
2. In the left navigation of the About section, click on the Contact and Basic Info link.
3. Under Basic Information, hover your mouse over the year of your birth, and then click the Edit link when it appears.
4. Click on the audience dropdown to the right of the entry, and then select who will be able to see it. Since its sensitive information, select Only Me.
Now that you’ve changed access to one piece of information, review what’s on your profile and repeat the process. Look at any answers with a discernible eye, questioning the benefit of having it even appear on your profile. In some cases, such as a business page, you may want the company’s address and phone number. For a personal account, it’s dangerous having such details online, and you should restrict access or remove these facts completely.
Securing Twitter
Twitter (www.twitter.com) is a microblogging site in which people can write 140 character messages called tweets. If you’ve never used Twitter, you’ll find it uses a unique terminology in describing what’s done and who uses it. The person sending the tweet is called a tweeter. The tweets themselves can include attachments, and be shared by others as a retweet. If people have particular interest in the content you’re providing from your account, they can follow you and see them as they come out. They can also like or favorite a tweet, showing their approval of it.
If you don’t already have a Twitter account, chances are you know someone who does. According to the Pew Research Center, as of September 2014, 23% of the adults who are online use Twitter (Pew Research Center, 2014). As we’ll see in Chapter 10, Protecting your kids, it is also a popular social media site used by children and teens.
With the ability to send out a quick message, and no way to edit it afterwards, you can imagine that a large number of people have gotten themselves into trouble using this site or the mobile app. In November 2014, comedian Roseanne Barr tweeted “Got in a tussle w bill cosby. U shoyld see that mfer” with a photo of her swollen face after getting a chemical peel. Although she deleted the tweet shortly afterwards, the backlash from those who had seen and retweeted it was severe. The moral is think before you tweet.
Other instances of tweeting gone wrong is seen when hashtags are used. A hashtag is a word with the # symbol in front of it. When included in a tweet, it acts like a link, where people can click on it and see others in conversation who also used the hashtag. In 2012, McDonalds decided to start a Twitter campaign using the hashtag #McDStories, which allowed people to share their memories and favorite stories of the restaurant. After all, who doesn’t have a nice memory of getting a Happy Meal with their parents? Unfortunately for McDonalds, the hashtag became a bashtag, and people began sharing horror stories of eating the food, working for the company, and snarky comments and jokes.
As you can see by these examples, the level of control you have over your tweets is limited compared to other social media sites like Facebook. You can’t edit what you’ve tweeted, so you need to get your point across the first time. While you can delete a tweet, there is no guarantee that someone hasn’t quoted or retweeted it, so that a copy still exists. You also can’t control the responses of other people, or what they may say when you use hashtags to share your point with a greater number of people. As we’ve seen, hashtags can take on a life of their own, and not in a way that you expected.
Security
Twitter provides a number of settings related to privacy and security. After logging into your account, you can click on the Profile and Settings button (which uses an icon of your profile picture) in the upper right-hand corner, and then click Settings. Once this is done, you’re presented with a page of account settings, which has navigation on the left side of the screen to configure different features. As the steps below show, clicking on the Security and Privacy link provides options to control how you login, how to recover your password, and whether to verify login requests.
Once you click the Login verification checkbox, when you try and login to Twitter from a mobile device, you’ll also receive an email or SMS text message with a six-digit login code. To gain access, you need to have both the code and your password.
If you use Twitter for iOS and don’t have login verification turned on, you can configure Twitter to allow logging with either a password or a code. After entering an incorrect password on an iOS device, Twitter would then send you a temporary code to your email or as an SMS text message, which you could then enter to gain access to your account. Of course, this provides an obvious hole in keeping your account secure. If your phone was lost or stolen, and the person who had it tried to login using Twitter, they would simply need to use the code sent to that phone to login.
To access the security settings in Twitter, you would do the following:
1. Click on the Profile and Settings button, which is located to the left of the Tweet button, in the upper right-hand corner of the page. Once the dropdown menu appears, you would then click Settings.
2. On the left-hand side menu, click Security and privacy.
3. Click on the Verify login requests checkbox in the Login verification section so it appears checked. Click Okay, send me a message when prompted, and then click Yes when you receive the code. If you haven’t added a phone number that Twitter can use to notify you about a login attempt, you’ll need to click on the add a phone link and provide a number before you can configure the setting to verify login requests.
4. In the Password reset section, click on the Require personal information to reset my password checkbox so it appears checked. Once checked, you’ll need to provide the email address or phone number associated with your account before you can request a password reset.
5. In the Log in with code section, click the Always require a password to login to my account checkbox so it appears checked.
Privacy
Many people don’t really associate privacy with Twitter, as it’s commonly used to make public comments that anyone can see. Whether you want to shout your opinions to the world or a select few, Twitter does gives you options over how much of your life is exposed. When you scroll down on the Security and privacy screen, you’ll see a number of privacy settings you can change to meet your personal needs.
By default, when you open a Twitter account, any of the tweets you make are public. For most people, allowing anyone to see what they’ve tweeted is what’s expected, but you can change the settings so that the tweets are protected, and can only be seen by those you’ve approved. This is useful when you only want to communicate with your friends, within a company, or with a select group of people. If you switch your account so that tweets are protected, any of your previous public tweets won’t appear in searches and will only be visible to you and those you’ve given access. However, this isn’t entirely instantaneous. Old tweets may still appear in search engines until Twitter’s been crawled and results have been updated, and (of course) any screenshots people have taken of your previous tweets will still be out there.
Other settings in this section will also determine how much is revealed about where you are, and how easy it is for others to find you or see content about you. The Discoverability setting determines whether people can find you by your email address, or if they’ll only find you by the handle you give them. The Photo tagging setting will control if anyone can tag you in a photo, if only the people who follow you, or no one can tag you in photos. Also, the Location controls whether your location will appear in tweets, while other settings determine what’s revealed to third parties and whether Twitter will retain information on sites you’ve visited.
To have greater control over the content on Twitter, you should make a number of changes to the privacy settings. On the Security and privacy page, these changes would include:
1. In the Photo tagging section, click on the Do not allow anyone to tag me in photos.
2. If you only want certain people to see your tweets, click on the Protect my tweets checkbox in Tweet privacy so that it appears checked. Click on the Delete all location information button to remove any existing location information in past tweets. If you click this button, it may take upwards of 30 minutes before it disappears from previous tweets.
3. In the Tweet location section, ensure that the Add a location to my tweets checkbox is unchecked. This will prevent Twitter from storing your location, and locations from appearing in the tweets you make.
4. In the Discoverability section, ensure the Let others find me by my email address checkbox is unchecked.
5. In the Personalization section, ensure the Tailor Twitter based on my recent website visits checkbox is unchecked. If its checked, Twitter will store information on the sites and web pages you’ve visited for up to 10 days. While Twitter may use this to provide relevant suggestions on who to follow, you may not want them to know what you’re doing on the Internet, so its suggested you uncheck this box.
6. Similarly, you may be concerned that Twitter will match your account to information shared with ad partners, inclusive to information that’s browser-related, identifies your mobile device, and so on. If so, you should uncheck the Tailor ads based on information shared by ad partners checkbox in the Promoted content section.
7. Finally, in the Direct Messages section, you should uncheck the Receive Direct Messages from anyone checkbox. This will prevent people you don’t follow or who don’t follow you from sending you Direct Messages.
Passwords
As we saw in Chapter 2, Before connecting to the Internet, a strong password is an important first line of defense, especially when it comes to the sites you visit. In Twitter, you can modify your password by doing the following:
1. As we saw earlier, click on the Profile and Settings button, and then click Settings.
2. On the left-hand side menu, click Password.
3. In the Current password box, type your current password. If you’ve forgotten it, click the Forgot your password? link.
4. Type the new password in the New password box, and then retype it in the Verify password box.
Securing YouTube
YouTube (www.youtube.com) is a media sharing site where people can view, create, and share videos online. Even if you don’t have an account, you can still visit the site and watch streaming content. Once you register an account with YouTube, you’re then able to create a channel and upload your own videos.
The desire to create videos and post them online isn’t unique. According to the Pew Research Center, as of August 2012, 46% of the adults who are online post original photos and videos, and 41% repost or share them on other sites (Pew Research Center, 2014). According to YouTube, there are over a billion users, with more people watching videos on their site than on any American cable network and 80% of the views coming from outside the United States (YouTube, n.d.).
The content you’ll see on YouTube varies, as the creators of the videos are diverse. You’ll find complete or segments of movies and TV shows from networks and major production companies, instructional and entertainment videos created by adults, and even content created by children. These videos can also be shared on other sites like Facebook, increasing their exposure to a wider audience.
Creator Studio
Once you’ve signed into YouTube with a Google account, you’re prompted to create a channel, where you can create playlists and upload videos. You maintain and configure your settings through Creator Studio, where you’ll find a variety of tools and features. After clicking on the icon with your profile picture in the upper right-hand corner, you then click the Creator Studio button. There are categories of options related to your channel in the left navigation bar of the screen, inclusive to:
![]() Dashboard, which gives you a high-level view of your channel and its popularity. You’ll find analytics of how many people have viewed videos and the length of time they watched them, a list of videos, tips, and comments.
Dashboard, which gives you a high-level view of your channel and its popularity. You’ll find analytics of how many people have viewed videos and the length of time they watched them, a list of videos, tips, and comments.
![]() Video Manager, where you can organize and update videos.
Video Manager, where you can organize and update videos.
![]() Live Streaming, which allows you to stream a video live on YouTube.
Live Streaming, which allows you to stream a video live on YouTube.
![]() Community, where you can view and respond to comments, read messages, view subscribers, and change settings on how YouTube will handle comments to videos.
Community, where you can view and respond to comments, read messages, view subscribers, and change settings on how YouTube will handle comments to videos.
![]() Channel, which is where most of the settings affecting your channel are found.
Channel, which is where most of the settings affecting your channel are found.
![]() Analytics, where you can view greater details about views, likes, and watch time of your videos. It also provides information on the geographic location of viewers, their gender, and where they’re watching your videos.
Analytics, where you can view greater details about views, likes, and watch time of your videos. It also provides information on the geographic location of viewers, their gender, and where they’re watching your videos.
![]() Create, which is where you can edit the audio and video content you’ve uploaded to your channel.
Create, which is where you can edit the audio and video content you’ve uploaded to your channel.
Community
When you click on the Community link, you’ll see additional links to view comments, private messages, subscribers, videos you’ve been credited in, and options for closed captions. By clicking Comments, you’ll see all the comments people have made. Clicking the trash can icon to the right of a comment will delete it, while clicking the flag icon will present the following options:
![]() Report spam or abuse, which reports the comment to YouTube.
Report spam or abuse, which reports the comment to YouTube.
![]() Hide this user’s comments on this channel, which prevents any comments from the user from appearing.
Hide this user’s comments on this channel, which prevents any comments from the user from appearing.
![]() Always approve comments from this user, which will allow the user’s comments to appear automatically if you’ve configured the channel to hold comments from appearing until they’ve been reviewed.
Always approve comments from this user, which will allow the user’s comments to appear automatically if you’ve configured the channel to hold comments from appearing until they’ve been reviewed.
When you create your own content, you should not only be concerned with your own protection, but also that of those viewing what you’ve created. Clicking the Community Settings link in the Community category on the left navigation allows you to configure settings relating to approving and hiding commenters and other creators, and configure default settings.
The top of the Community Settings section consists of Automated Filters settings. The top two sections provide a list of approved and hidden users. Approved Users are those that you’ve flagged as always being allowed to have their comments appear on your channel or videos. Hidden Users are those that won’t have comments appear to others, such as those from trolls (someone that posts rude, abusive, or disparaging comments), bullies, or other unwanted users.
The Blacklist section is where you type in words that will be used to indicate a comment is inappropriate for your channel. For example, if you entered the word “crap,” and some troll wrote a comment that “this video is crap,” YouTube would flag the comment so it needs to be reviewed. Any live chats with these words would be blocked. If you have a child with a YouTube channel, you should handle the settings yourself. After all, it makes no sense protecting them from offensive words if they’re going to see them anyway in the blacklist.
The Default Settings allow you to control the behavior of comments and credits that appear on your channel. If you’re concerned about trolls and other unwanted people from making nasty or derogatory comments, you should set these so that either comments aren’t allowed or they’re held for review so that others can’t see them without your approval. The options in this section are:
![]() Comments on your new videos, where you can set YouTube to Allow all comments (in which comments will appear immediately), Hold all comments for review (which causes all comments to be hidden until you approve them), and Disable comments (which prevents anyone from posting comments).
Comments on your new videos, where you can set YouTube to Allow all comments (in which comments will appear immediately), Hold all comments for review (which causes all comments to be hidden until you approve them), and Disable comments (which prevents anyone from posting comments).
![]() Comments on your channel, which also has the options of Allow all comments, Hold all comments for review, and Disable comments.
Comments on your channel, which also has the options of Allow all comments, Hold all comments for review, and Disable comments.
![]() Creator credits on your channel, where you have the options to Allow all creator credits or Hold all creator credits for review.
Creator credits on your channel, where you have the options to Allow all creator credits or Hold all creator credits for review.
Channel
When you click on the Channel link, it will expand to show a number of categories including options for Upload defaults, where you can set default options for any videos you upload. The Privacy dropdown on the page allows you to set whether a new video is Private (which can only be seen by you and the users you select) or Public (which is available for anyone to see).
The Comments and Ratings section is another important setting, especially if you have a child who has a channel.
Another important default setting is in the Comments and Ratings section. If the Allow Comments checkbox is set, you can then choose whether All or Approved viewers can post comments on a video. If the Users can view ratings for this video checkbox is checked, they can also view the ratings on a particular video.
Blocking and reporting
You can deal with problem users on YouTube by going to their channel page, and then clicking on the About tab. On the page, you’ll see a flag-shaped icon, which when clicked on allows you to Block User, Report channel art, Report channel icon, or Report User. If you choose Block User, the user will be unable to comment on videos or send messages to you.
Restricted mode
If the video is potentially offensive, you need to affirm that you’re over 18 years of age before you can watch it. In addition, you can also set YouTube so that content you may find objectionable or don’t want family members to see is filtered out. At the bottom of any YouTube page you’ll see the Restricted Mode button, indicating whether it’s turned on or off. Clicking it, you can then click an option to turn it On or Off.
Summary
In this chapter we discussed settings on a number of the most popular social media sites. These not only control the default behavior or your activity, but can also be used to protect your privacy and reduce the chance of unauthorized users gaining access to your account, or problem users causing issues for you with their comments and posts. Now that you’ve seen the options available to you on Facebook, Twitter, and YouTube, let’s move on to Chapter 7, Finding a job online, where we’ll discuss settings on YouTube and ways you can protect yourself looking for work online.