Chapter 7. Taking Five: My 5-, 15-, and 30-Minute Retouches
Okay, so as photographers, we don’t have the luxury of being able to spend hours on a retouch. Heck, we don’t have the luxury of spending even an hour, because (a) we usually don’t get to bill separately for the retouching (unless you live in New York, where you’re allowed to bill for everything from air to paper clips), and (b) the time we spend retouching is time we’re not shooting, which is what we do get paid for, so we need to get back to work as quickly as possible. Honestly, most of my retouches fall within the 5-to-15-minute range. Every once in a while, I have an important image, and I spend 30 minutes on it, but that’s about it, because I’ve got to get back to shooting (or filling out invoices for paper clips). So, I wanted to give you three real-world scenarios, and take you from start to finish on what I would do to an image if I had just 5 minutes, or just 15, or if I got lucky and had 30 minutes to go from the unretouched photo to a final image. There’s another topic we haven’t yet discussed that plays into all this, and that is the famous “Factor3,” which you always hear retouchers talking about. Factor3 actually refers to a mathematical calculation that’s commonly used to help determine how much time a retouch is likely to take. This calculation is based on multiplying the number of blemishes on your subject’s face by the gross tonnage of a Soviet freighter, and then dividing the sum by the number of hairs you’ll have to clone out of your subject’s nostrils, which I can tell you in most cases is 38. It delivers a surprisingly accurate time frame, especially since the gross tonnage of a Soviet freighter can vary from 17,053 to 18,605 tons fully laden. This is precisely why an HP 33s scientific calculator is sometimes included right in the box when you buy a Wacom tablet. Now you know.
Retouching Checklist
One of the things I’m asked the most is: “How do you know what needs to be retouched?” To help answer that, I put together this list of 60 areas to at least consider for retouching, which you can quickly go through to make sure you’re covering all your bases. Now (and this is important), hopefully you’re not going to do all 60 things to any single photo (or you have an entirely different problem. Well, your subject does), but at least by checking this list, hopefully you’ll keep from having something sneak by you. Also, I created a Photoshop panel for you that contains this entire list (see page xiii).
Face
1. Are there red veins in the eyes?
2. Whites of the eyes should be white, but not overly white.
3. Is there good contrast in the eyes?
4. Do you see catch lights in the eyes?
5. Do the irises need brightening?
6. Does the color of the irises need to be changed or enhanced?
7. Darken the circle around the iris.
8. Sharpen the eyes.
9. Are both eyes symmetrical?
10. Do the eyes need to be larger?
11. Are both eyelids open enough?
12. Check eyelashes (top & bottom).
13. Are the eyebrows dark enough?
14. Do the eyebrows need filling in?
15. Trim any extra eyebrow hairs away.
16. Check the shape of the eyebrows.
17. Are the eyebrows symmetrical?
18. Does the nose need to be smaller?
19. Do the cheeks need to be tucked in?
20. Check the size of the ears.
Skin
21. Remove any blemishes.
22. Remove or reduce moles or individual freckles.
23. Remove or reduce wrinkles.
24. Remove dark circles under eyes.
25. Remove or reduce smile lines.
26. Reduce any hot spots.
27. Is the skin tone consistent?
28. Does the skin color of the face match the rest of the body?
29. Repair blotchy skin.
30. Does the skin need smoothing?
31. Does the skin need additional makeup applied?
32. Add dodging and burning to sculpt the face.
33. Are the hands, elbows, knees, or feet too red?
34. Remove veins in the arms, wrists, hands, and feet.
35. Sharpen the portrait.
Mouth & Lips
36. Fix pointed teeth or gaps.
37. Remove any yellowing on teeth.
38. Brighten teeth.
39. Enhance the size of the lips.
40. Enhance lip color.
41. Brighten up highlights.
42. Clean up lips (spillover, lip liner, smudges, etc.).
Hair
43. Remove stray hairs.
44. Remove strands that cross other hairs.
45. Remove strands that appear over skin.
46. Remove strands that cross over eyes and eyebrows.
47. Fill any gaps in hair.
48. Add highlights to hair.
49. Change hair color.
50. Darken part line.
51. Fix roots.
Body
52. Reduce any double chin or jowls.
53. Does the subject need slimming?
54. Reduce love handles.
55. Trim arms or legs, if necessary.
56. Do the legs need lengthening?
57. Do the arms and legs appear symmetrical?
58. Are there any distracting armpit wrinkles or any pit fat that needs reducing?
59. Enhance the abs, if visible.
60. Smooth and straighten clothing.
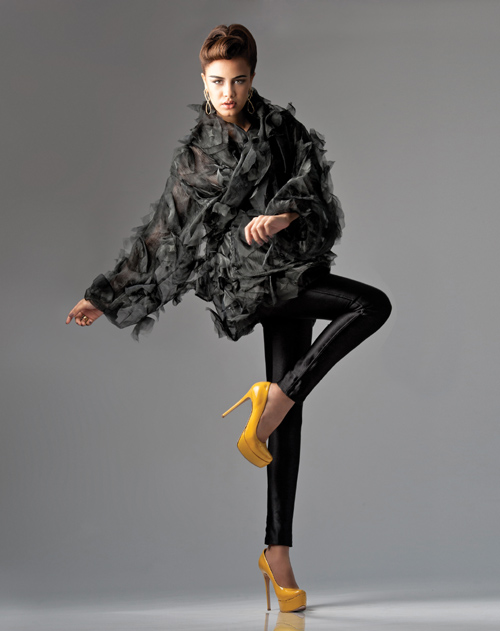
My Five-Minute Retouch
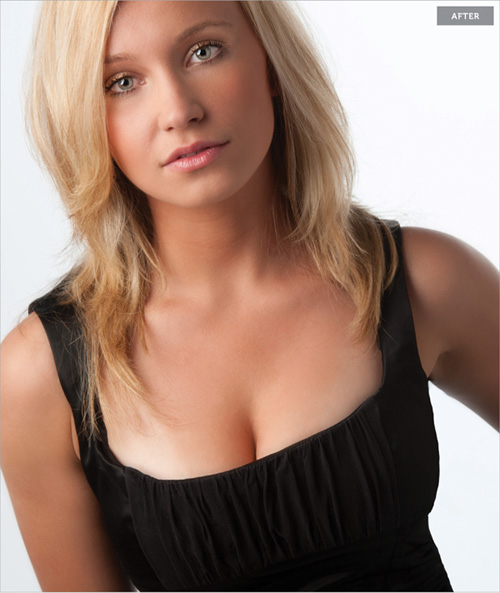
When you can only invest five minutes in a retouch (which probably means you have a bunch of images to retouch), you have to work smart. You’re not going to be able to do a lot of detail work on the eyes or skin—you just have to make sure the main areas get taken care of. You’re going to have to make some compromises to the list of things you want to do, versus what you’re going to have time to do. But, two things can really help you fit seven minutes of retouching into a five-minute bag: (1) use actions for stuff you do over and over, and (2) use a tablet.
Step One:
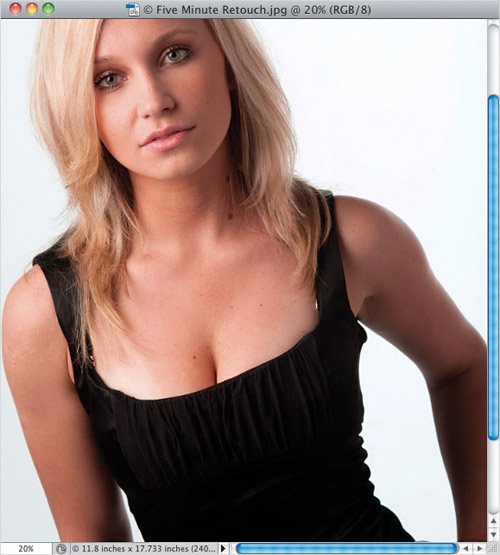
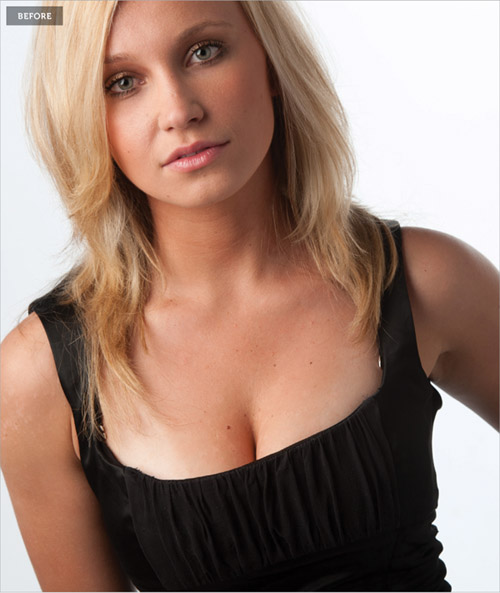
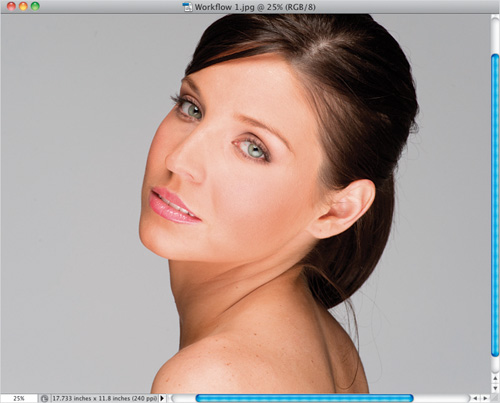
Here’s the original unretouched shot. Just giving it a quick look, here’s what I’ll try to retouch in the five minutes we have: (1) brighten the eyes and eye socket areas, (2) remove any major blemishes, (3) clone away the two buckles beneath the blouse straps, (4) soften the skin, (5) smooth out the folds on the sides of the blouse, and then (6) sharpen the eyes and the overall image. That’s six things in only five minutes, which means you’ll need to spend only 30 seconds on some things, so you’ll have 60 seconds to spend on others. Don’t sweat it if you go over by 30 seconds or so at first (making it a 5½-minute retouch). Since you’ll probably be doing this on 20 or so images at a time, by the time you get to the twentieth, you’ll probably have it down to 4½ minutes. Here we go...
Step Two:
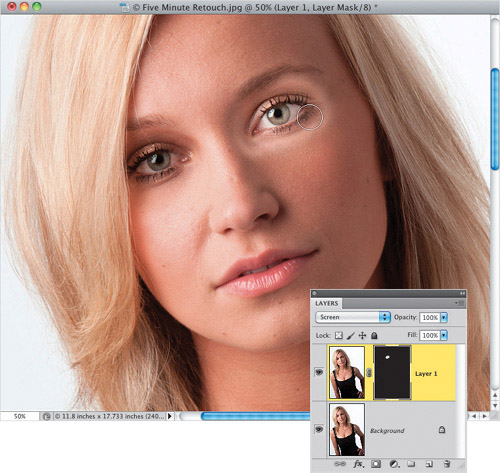
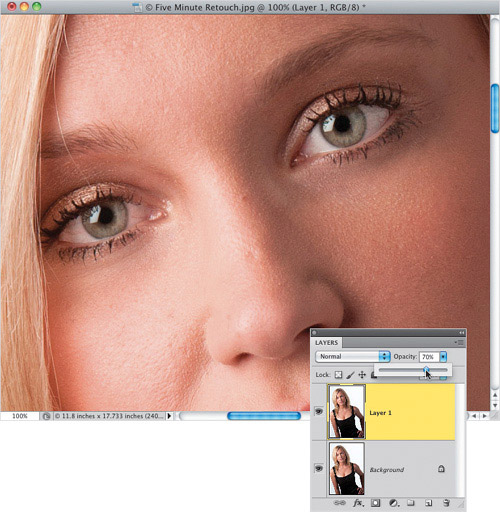
First, we’re going to fix the eyes and eye sockets all at once by just lightening those entire areas, like we did back on page 27. So, zoom in on the eyes, duplicate the Background layer, and change the blend mode of the duplicate layer to Screen to make the whole image brighter. Then, add a black layer mask to hide this brighter version of her. With your Foreground color set to white, paint over her eyes and the surrounding eye socket areas (as shown here, where I’m painting over and around the eye on the right). I know right now it looks like she’s been lying in the sun with sunglasses on, but we’ll fix that next.
Step Three:
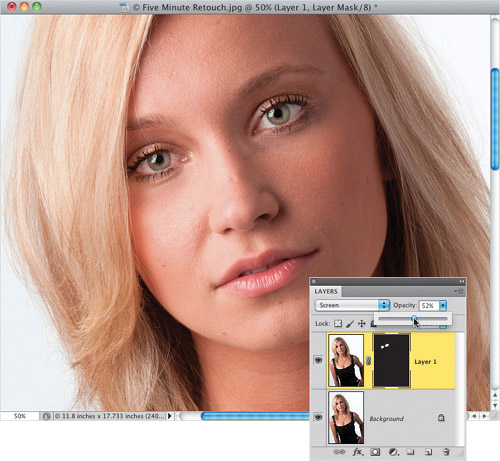
Lower the Opacity of the Screen layer (as shown here) to the point where your brightening matches the rest of her face (here, I lowered it to 52%). If you see any edges that look brighter, change your Foreground color to black and paint right over those edges to get rid of them (I had to do a little of that here, just under one of her eyes, and you may need to lower your brush’s opacity). We don’t have the time to do any detail work on the eyes, but they certainly look much better here than they did in Step One. Now, you can choose to flatten your image (Command-E [PC: Ctrl-E]), or create a merged layer, but with only five minutes, you’re not going to be going back and tweaking things so much that you’re going to need to maintain all your original layers. So, this is when you “flatten and move on,” and I’ll be doing this with each retouch that I do here.
Step Four:
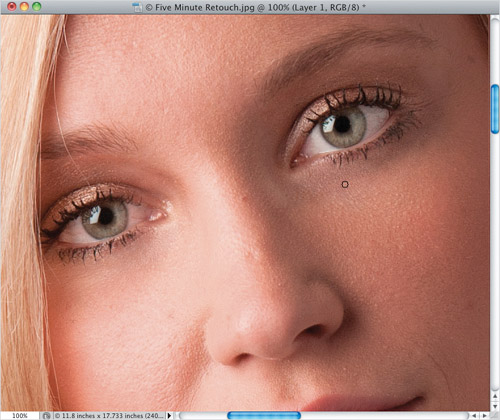
Duplicate the Background layer again, then switch to the Healing Brush tool, Option-click (PC: Alt-click) in a clean area beneath a wrinkle, and completely remove as many wrinkles under her eyes as possible, like you learned back on page 119. Use a small brush size and avoid the eyelashes as much as you can, because we’re not going to work on those at all. For now, just remove as many wrinkles as possible in as little time as possible. We’re going to bring some of these wrinkles back in the next step, so don’t sweat making this wrinkle removal perfect—just get close.
Step Five:
Now, go to the Layers panel and lower the Opacity of this layer, so just a little bit of the wrinkle, and the darkening under her eyes, comes back for a more natural look. If your subject is someone older, make sure you don’t leave this Opacity setting too high, or they’ll look weird. The older your subject is, the more wrinkles they’re expected to have. Your job is to make them look 10 years younger—not 40 years younger. Okay, we’re done with the eyes and eye areas (critical retouches), so now let’s go get rid of the blemishes, just like we did back on page 86.
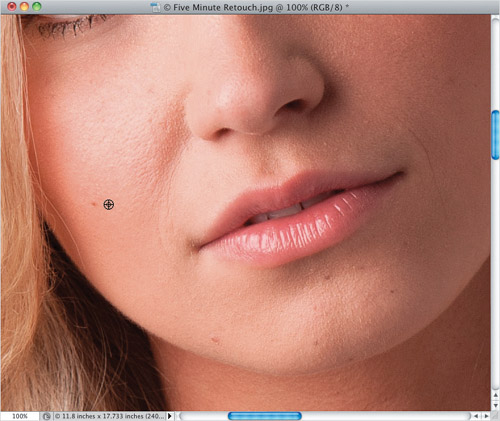
Step Six:
Flatten your layers again, and then with the Healing Brush still selected, make your brush just a little bit larger than the blemishes you’re going to remove. Option-click (PC: Alt-click) in a nearby area of clean skin (as shown here), then move your cursor over a blemish and just click once to remove it. Since all you’re doing is just moving around and clicking, this goes really quickly. Don’t worry about tiny little blemishes, because they’ll be hidden somewhat in the skin softening process. For now, just remove the stuff that really stands out. Also, as you make your way near her mouth, remove those little smile lines on either side of it.
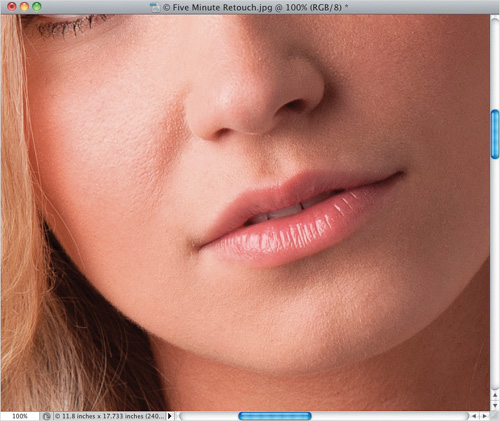
Step Seven:
Here’s what it looks like after 15 seconds of individual clicks, and two brush strokes to remove the smile lines. Getting rid of blemishes is one of the things you want to leave yourself the most time for, because we’ve only done one section of her face, and we used up 15 or 20 seconds.
Step Eight:
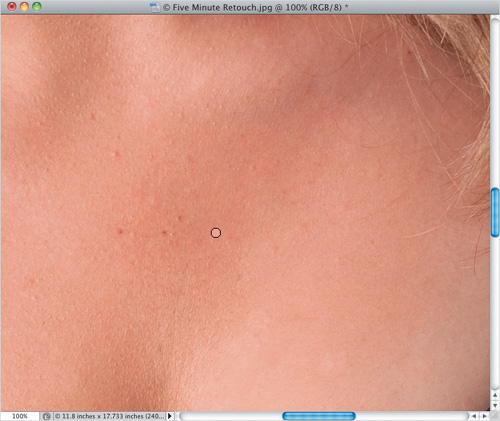
Work your way down from top to bottom (that way you won’t miss any areas like you would if you were just jumping around). When you get to her neck and chest, don’t forget to only remove the most obvious and large blemishes—the rest will pretty much get taken care of during skin smoothing, so don’t waste your time getting every single one. Here, I’ve removed a few of the bigger blemishes from the right side of her chest, and now I’m moving over to the center and left. You’ll also see some areas where the skin is a lighter color than the surrounding area (like she’s peeling a little from a sunburn a week ago), so just remove the most obvious of those by painting over them with the Healing Brush, as well. If this was a larger area that needed to be fixed, you could use the technique you learned back on page 131.
Step Nine:
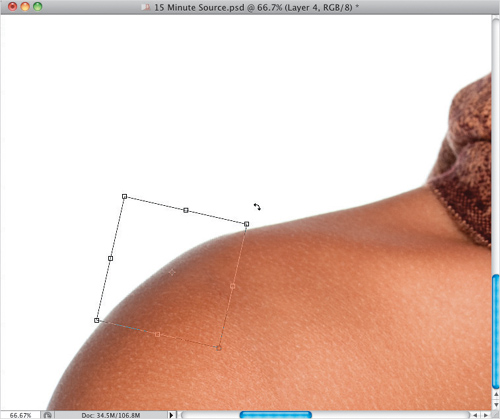
This is one you’re going to have to make a call on whether to fix or not, because it’s going to eat up a minute all by itself. See those little metal buckles sticking out beneath the straps of her blouse? Because they’re reflecting the lighting, they draw the eye, and to me they’re really distracting, but if it doesn’t bother you, just jump straight over to Step 13. If it’s driving you nuts (like it is me), then get the Lasso tool (L) and draw a quick, loose selection around the buckle on the right, but make sure you get your selection nice and snug up against the material of her blouse (as shown here). Remember, as you learned back on page 289 when we were fixing clothes, by putting this selection here first, you’re making sure your cloning stays inside that area, and that you don’t run the risk of accidentally painting on her blouse.
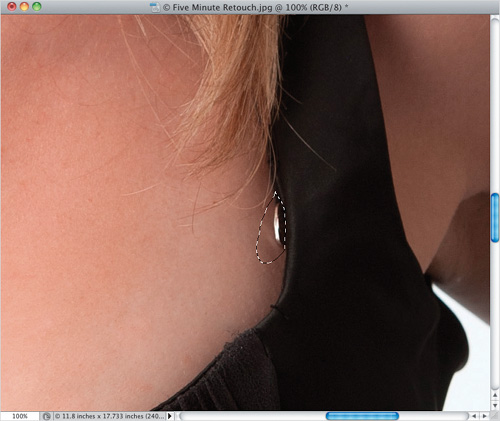
Step 10:
Get the Clone Stamp tool, and then sample an area nearby that has the same tone and texture as what we’re trying to remove (in this case, the buckle is in a shadow area, so I sampled right below where the buckle is—you can see where I sampled from by where the little crosshair cursor is here), and then quickly clone that buckle away. This took just a few seconds, thanks to the fact that the selection was in place. Without it, I would have had to be really careful, and work with a small brush. With it, I can use a medium-sized brush and just “get ’er done!”

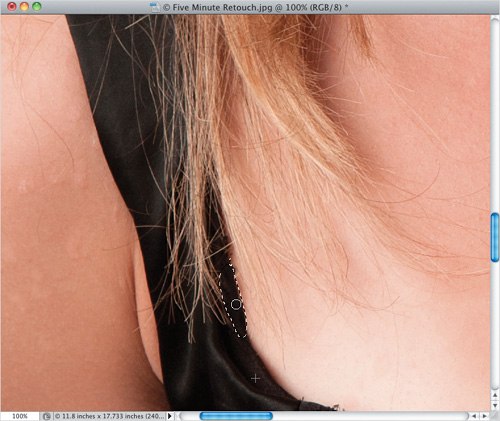
Step 11:
Now, this is where I got worried, and why (if I had any sense) I would have let this part of the retouch go. The buckle on the other side is a nightmare. There’s hair overlapping it, and getting a convincing retouch with hair intact is going to take some serious time. So, I went with “Plan B,” which is to just cover it up with some of the black strap. This isn’t going to be a pretty fix, but with the limited time we have, I just want to make sure it doesn’t draw the eye. Draw a quick Lasso selection around it (like you see here), that’s snug on the side up against the strap.

Step 12:
Switch back to the Clone Stamp tool and sample an area on the strap an inch or so below where the buckle is, and then just clone right over the buckle, basically extending the strap where the buckle used to be (while I was at it, I also cloned away the stray threads to the right of the strap on the left). I told you this wouldn’t be pretty (and it’s not), but these are the kind of trade-offs you have to make when you’ve only got a few minutes to invest, and 19 more pictures waiting to be retouched. Like I said, I probably should have let this go, and spent more time on making the rest of the retouch look good, but I decided to go “all-in” and get rid of those buckles. I wish I had just had the makeup artist fix this during the shoot, and then I wouldn’t have had to deal with it at all. I’m all for fixing it during the shoot. That way, I could have skipped this part altogether.
Step 13:
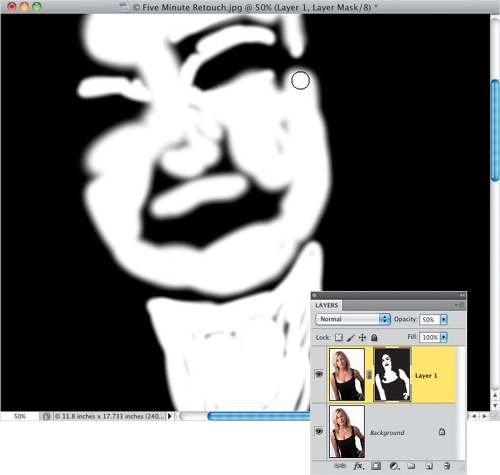
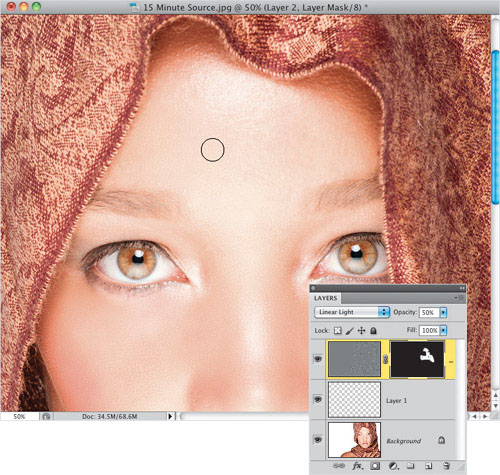
Now, we’re going to do some quickie skin softening, like we did back on page 90. Because we only have five minutes, we’re going to break my “no blurring skin” rule a tiny bit, but we’re going to bring back lots of skin texture, so it’ll look pretty decent when we’re done. Start by duplicating the Background layer (remember, we’ve been flattening as we go to save time), then add a 20-pixel Gaussian Blur. Lower the Opacity of this layer to 50%, so you can easily see the blur (don’t worry, we’re not going to leave it at 50%—we just want it set high, so we can easily see what we’re painting as we go), and add a black layer mask to hide your blurry layer (as seen here).
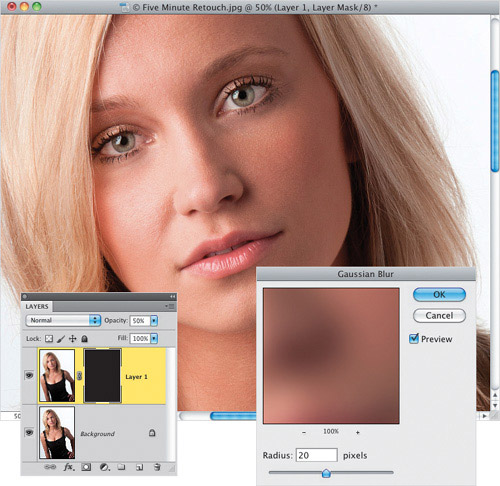
Step 14:
Get the Brush tool, and with your Foreground color set to white, choose a medium-to-large-sized, soft-edged brush at 100% Opacity (if you use too small a brush, you’ll never make it in five minutes), and paint over all the skin areas, being careful to avoid the eyes, eyebrows, hair, nostrils, lips, the edges of her face, and anything that should remain sharp.
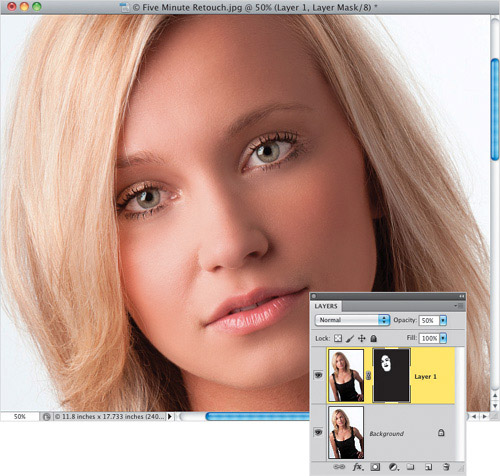
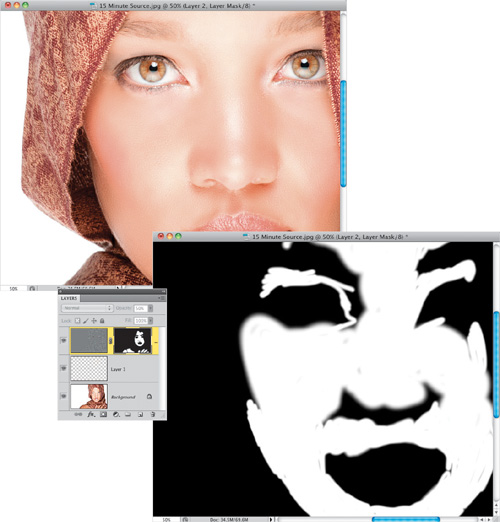
Step 15:
Once you get it kind of roughed out, Option-click (PC: Alt-click) on the black layer mask thumbnail in the Layers panel, so you can see just the mask (seen here). Now, you can quickly see exactly which areas you missed and you can paint right over them in white on the mask (areas in white are getting softened). See all those little black spots I missed on her neck and cheek? And I missed an entire area to the right of her eye on the right. You can toggle back and forth between this mask and the full-color image by just Option-clicking on the mask in the Layers panel. That way, you can check to make sure you don’t accidentally blur over an area that should be sharp.
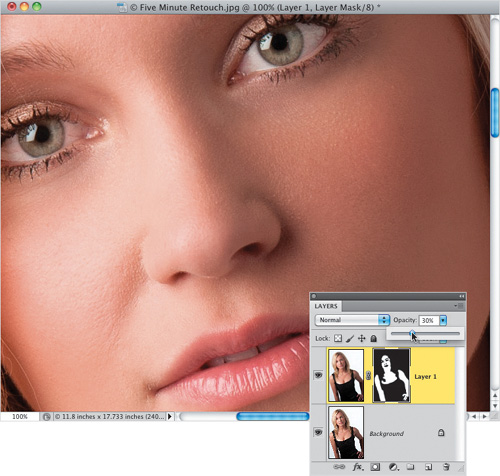
Step 16:
Once you’re done painting, Option-click back on the layer mask thumbnail to return to the full-color image. Now, here’s where you can bring detail back. Although we painted at 50% opacity, we only did that so we could easily see where we’re painting as we go, but 50% is too high an amount—it obliterates the skin texture, and her skin looks plastic. Your job, then, is to lower the layer’s Opacity setting as low as you can go to retain some of the smoothing, and yet still see skin texture. In most cases, that’s somewhere between 25% and 35%. Here, I lowered it to 30%, and then zoomed in, so you can see the skin texture, which is definitely clearly visible. If you can get away with 20%, and you think the skin is improved, all the better, but this is a call you’ll have to make based on your subject’s skin.
Step 17:
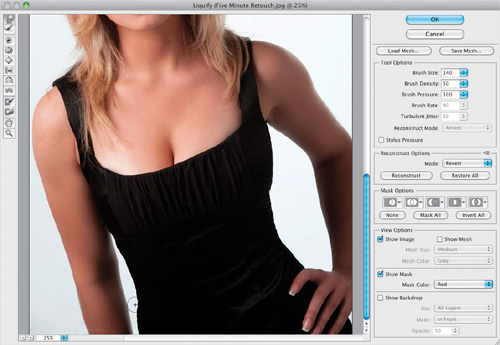
Now, let’s tackle all those unflattering folds on the sides of her blouse. Flatten your layers, then go under the Filter menu and choose Liquify. Using the Forward Warp tool, we’re going to use the same technique you learned back on page 285 for dealing with folds in clothes like this. The key to this is working with a small brush size—one that is the approximate size of what you’ll be working on. So, if you’re pushing in/out a small fold, your brush should be about that same size. If you’re moving a large area, use a large-sized brush, so it all moves as a unit.
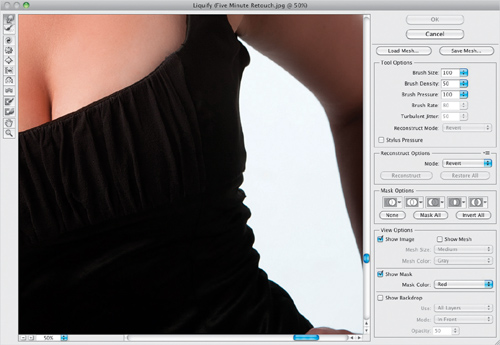
Step 18:
There are two things I would do here: Look back at the image in Step 17 and you’ll see that the top of her blouse on the right side of her breast looks pushed inward, which makes her breast look flat on that side. We’re not going to make her breast larger, but I think we need to use a large brush and push that right side out a bit, so it looks fuller and matches the shape of the breast on the left. So, start by fixing that. The key is to use a very large brush, but without distorting her arm on the right. Compare this capture, with the blouse pushed out, versus the one shown in Step 17. Next, let’s work on the folds going down the right side of the blouse. Switch to a much smaller brush, and start pushing out those tucked-in areas between the folds on her side. With folds, it’s a process of pushing out the crease, then tucking in the side. Again, just keep your brush size small and gently nudge the folds in and out until it starts to flatten out nicely, without looking too uniform, or it’ll look retouched. Here, I’m about ![]() of the way down on her side, pushing in a fold.
of the way down on her side, pushing in a fold.
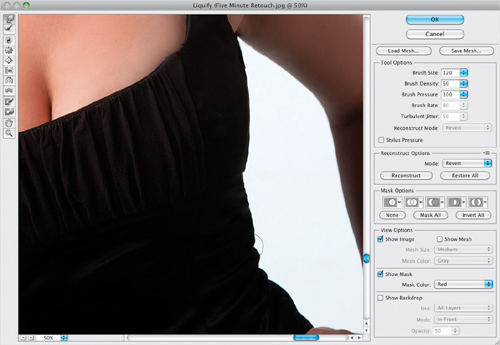
Step 19:
Do the same fold-fixing to the other side of her blouse, and while you’re there, I’d tuck in the sides a little bit, giving a slight curve to her side, so it matches the right side (as seen here). Now, you can click OK to apply these changes.
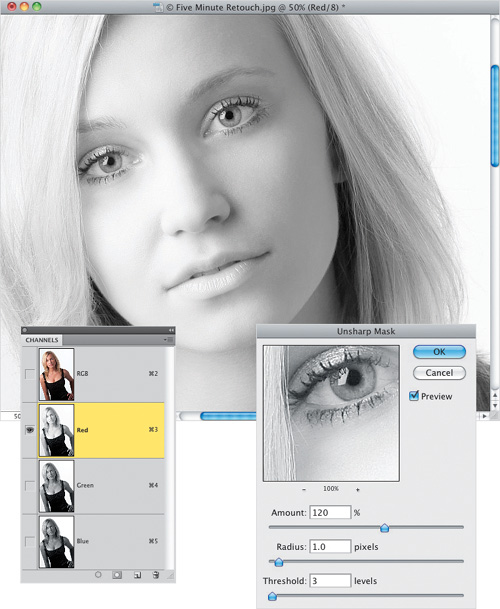
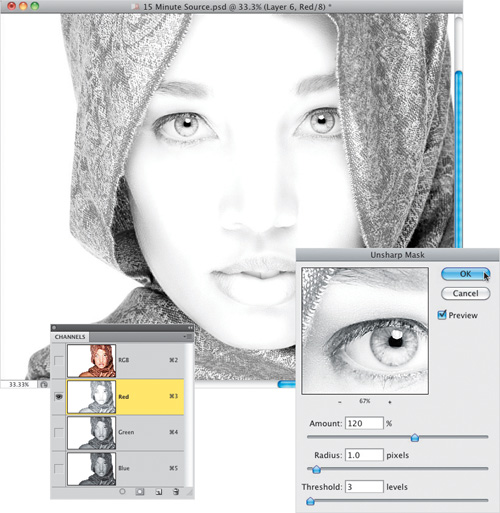
Step 20:
Now, let’s apply some overall sharpening, like you learned back on page 160. Since this is a photo of a woman, we want to avoid sharpening the skin as much as possible, so go to the Channels panel and click on the Red channel. This restricts the sharpening we’re about to apply to mostly the non-skin areas (the Red channel doesn’t hold a lot of skin texture detail), and since we’re applying this sharpening to just the Red channel, I can apply more than I normally would. So, apply an Unsharp Mask filter, using settings of Amount: 120%, Radius: 1, Threshold: 3.
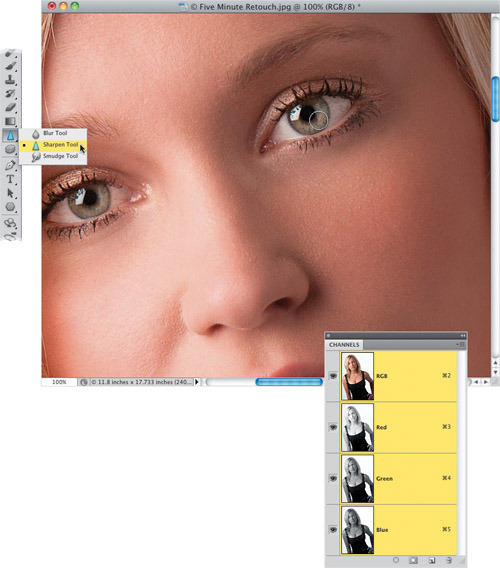
Step 21:
Click back on the RGB channel at the top of the Channels panel to return to the full-color image. Get the Sharpen tool (like you did back on page 81) and paint a few strokes over the eyes (as shown here) to finish off our retouch. Now, if you’re looking at this image and thinking we missed some things that should be retouched—you’re right. Doing a five-minute retouch means you fix what you can fix in five minutes and move on to the next image. So, for this image, we covered the most important areas we could, in a really fast and efficient way. Now, if you ran a timer to see how you did, and you’re at seven minutes or 10 minutes, don’t let it get you down (also, remove any time you spent on the buckles). What makes you faster at this is simply repetition. The more times you do this, the less you’ll have to read out of the book what to do next, and the faster you’ll get. You’ll get this down to four minutes before you know it.
My 15-Minute Retouch
I try to keep my regular, run-of-the-mill retouching tasks to around 10 to 15 minutes, but keeping it closer to 10 makes a big difference. For a standard shoot, in most cases, I give the subject five to six finished images for their portfolio or project. If I spend just 15 minutes on each image, that’s an hour and a half of editing for just six images. If I can take it down to 10 minutes an image, it’s only an hour, but that’s an hour I’m not shooting, so working fast and efficiently is key. Most of my retouching falls in the range of what you’ll see me doing here (hopefully, I can do it in less than 15, but of course, it depends on the subject, and the client).
Step One:
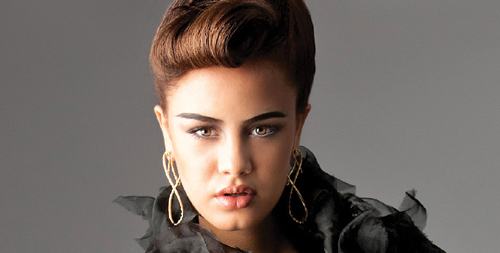
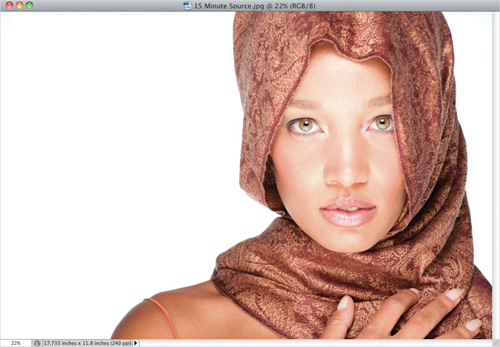
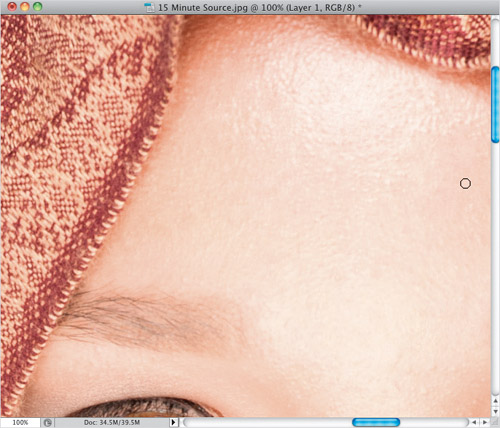
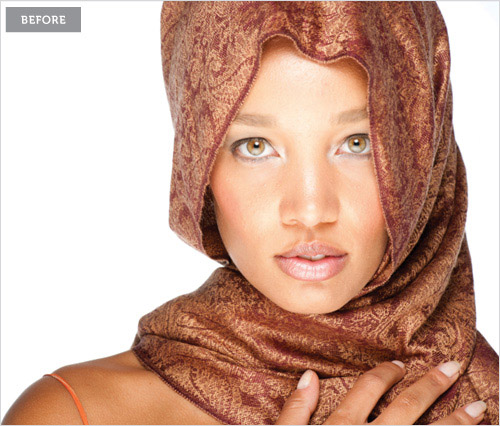
Here’s the original, unretouched shot. I know what you’re thinking, “Hey, the hair is covered, so this won’t take as long.” Actually, I chose this one because it’s going to take the full 15 minutes (remember, removing flyaway hair doesn’t take long), because of her skin, which has lots of tiny bumps (almost like goose pimples), and although we can’t remove them all, we can hide a lot of them and still retain lots of skin texture. Here, we’re going to work on the skin, eyes, and eyebrows. We’re also going to remove the strap from the shoulder on the left, and we’re going to tone the scarf she’s wearing, as well. Don’t worry, you’ll be plenty busy.
Step Two:
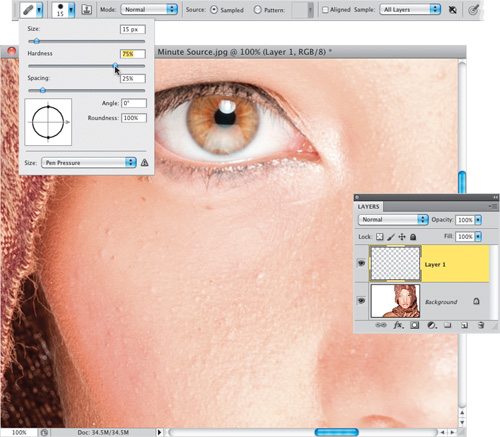
I’m going to zoom in tight on one part of her face, so you can see the goose bumps I was talking about, and a few blemishes, as well. Here’s the strategy based on us keeping this a 15-minute retouch: we’re going to start by removing the major blemishes and bumps the way we did on page 86, mostly ignoring the smaller ones, because the skin softening technique we’re going to use next will help lessen them quite a bit. So, create a new layer for your blemish removal. Next, get the Healing Brush tool, then go up to the Options Bar and, in the Brush Picker, set the Hardness to 75% (as shown here) to get a little better blending along the edges.
Step Three:
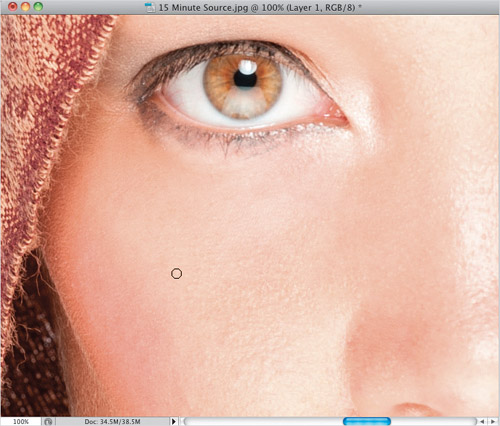
Now, with a very small brush size—just a tiny bit bigger than the blemishes and bumps we want to remove—sample a clean area near a blemish or bump, then move your cursor over each one and just click. Don’t paint. Click (like you learned back in Chapter 2). This is when a tablet with a wireless pen really pays off, because you can tap the head of a pen a lot of times in a minute. Make your way around, removing just the largest and most obvious blemishes, lines, or bumps. Remember to sample in a clean area near where you’ll be healing, and don’t hesitate to resample as you move from the side of the face, to the cheek, to the nose. They all have slightly different skin textures, so you need to sample from those areas.
Step Four:
Just move around her face and forehead, and continue this process of removing only the biggest, most distracting bumps, lines, or blemishes. It’s okay to spend a little extra time doing this, because the main retouch on this image will be the skin. The other stuff is pretty quick and easy. So, for example, if you had a dollar to spend on retouching, I’d spend 40¢ on this removing blemishes part. The skin smoothing that comes next is pretty quick, so take a few extra seconds on this.
Step Five:
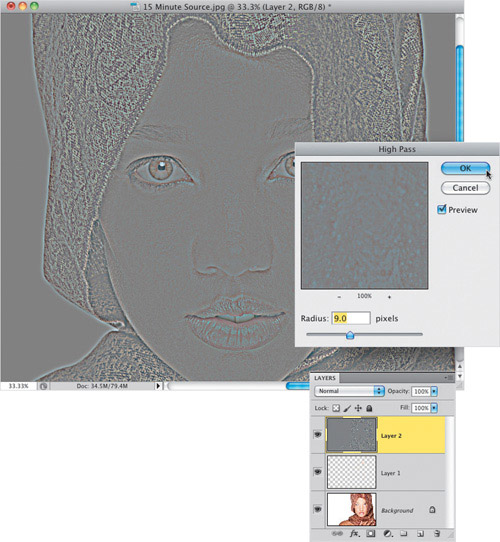
We’re going to do a simplified version of the skin smoothing technique you learned back on page 96. It’s simplified because, rather than determining how much of the High Pass filter you should apply, I’m going to give you a number that (a) works okay for your average high-res image (not ideal, but okay), and (b) is easily divisible by three. So, create a new merged layer at the top of your layer stack, then add a High Pass filter with a Radius of 9 pixels.
Step Six:
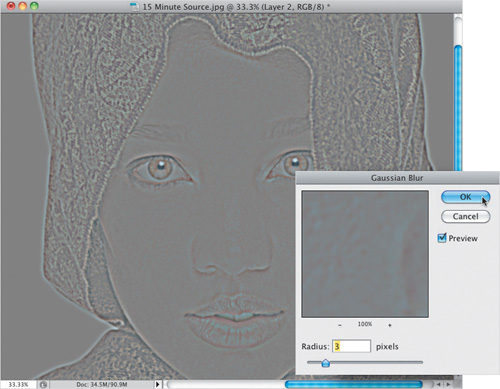
Next, you’ll apply a Gaussian Blur filter to your High Pass layer using an amount that’s one-third as much as you used in the High Pass filter. So, from the Filter menu, under Blur, choose Gaussian Blur, and in this case, you’d enter 3 pixels, and then click OK to blur the High Pass layer a bit. Now, invert that High Pass layer.
Step Seven:
Go to the Layers panel and do two things: (1) change the blend mode of this layer to Linear Light, and (2) lower the Opacity to 50% (as shown here).
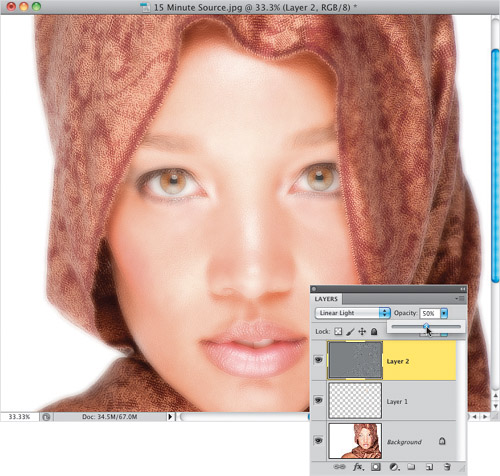
Step Eight:
Of course, we want to limit this smoothing to just the skin, and not the detail areas, so add a black layer mask to hide this smoothing layer (as seen here, in the Layers panel). With your Foreground color set to white, get the Brush tool, choose a medium, soft-edged brush at 100% Opacity, and start painting over her skin. Of course, as always, avoid areas that shouldn’t get softened, like her eyebrows, eyes, inside of her nostrils, lips, the scarf, and so on. As you paint, you’ll see that it smoothes out the bumps, yet there is a lot of texture, courtesy of that High Pass layer. Don’t forget to paint over her shoulder on the left and her fingers (avoid the fingernails, though).
Step Nine:
Here’s how the image looks at this stage. The skin is softened and the transitions between the shadow and highlight areas are smoothed out. To make sure you didn’t miss any areas, Option-click (PC: Alt-click) directly on the black layer mask thumbnail in the Layers panel and you’ll see the black-and-white mask (shown here at the bottom). You can paint in white, right on the mask, over any areas you might have missed. At this point, the opacity of this layer is at 50%, but if you feel you can get away with a lower amount (40%, 35%), I would consider it. Zoom out a bit to make seeing the overall image easier, lower the Opacity, and then try a few different opacities to see which one looks best (I ended up leaving it at 50%).
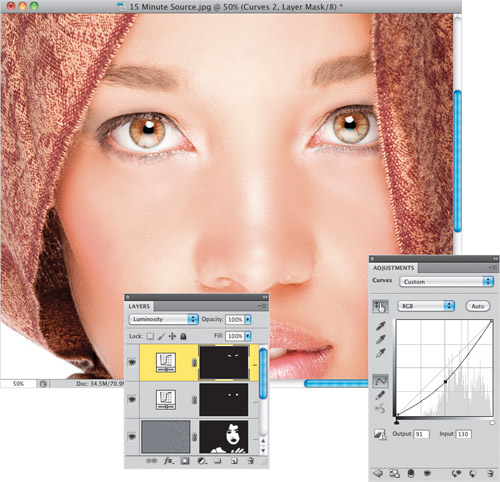
Step 10:
Now that we’ve spent all this time on the skin, we’d better finish up all the other stuff fairly quickly, so let’s move on to the eyes. We’re going to use a trick I mentioned on page 4 here. Add a Curves adjustment layer. Then, from the Curves pop-up menu at the top of the Adjustments panel, choose Strong Contrast (RGB) (as shown here).
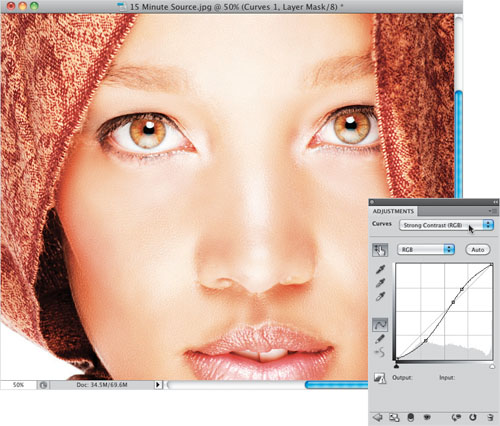
Step 11:
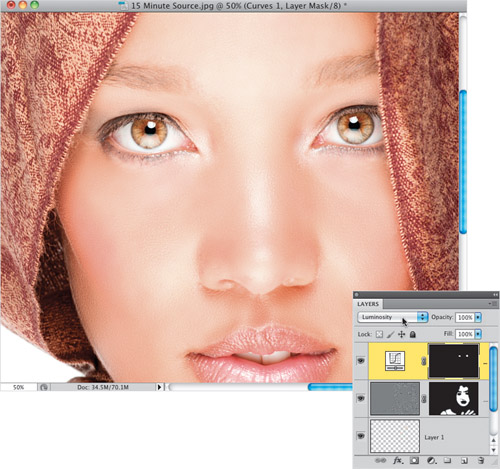
Invert the layer mask to hide the contrasty version of your image behind a black mask. With your Foreground color set to white, get the Brush tool, choose a medium, soft-edged brush at 100% Opacity and paint over the eyes to add lots of contrast (as seen here). Tweaking the contrast like this can tend to actually change the color of the eyes, but since we just want more contrast, change the blend mode of this layer from Normal to Luminosity (as shown here), so you get the contrast, but not the color shift. Compare the eyes here, with the eyes in Step Nine, and you can see what a difference this quick trick makes.
Step 12:
Now, let’s work on the eyebrows, which need to be darkened, like you learned back on page 79. Add another Curves adjustment layer to the top of your layer stack, and from the Curves pop-up menu at the top of the Adjustments panel, choose Darker (RGB) to darken the midtones in the image. Invert the layer mask to hide this darker version, then paint over just her eyebrows (in white, of course) to make them darker (as seen here, where I’m painting the eyebrow on the right).

Step 13:
If you think her eyebrows need to be darker, just go to the Adjustments panel and drag the center point of the curve farther down (as I have here). Since you already masked the eyebrows, as you drag the curve downward, only the eyebrows get darker. However, just like with the eyes, darkening the midtones can change the color of the eyebrows, as well. So, don’t forget to change the adjustment layer’s blend mode to Luminosity (as seen here) to keep the color looking the same, but give them the added darkening they need.
Step 14:
Next, let’s work on removing the orange strap on her shoulder. This is going to take two different retouches: one to remove the strap, and then where her shoulder is indented, you’re going to have to smooth that out, as well. So, start by creating a new merged layer at the top of your layer stack (we’ll need this because we’re going to pick up part of her shoulder later on) and then zoom in on her shoulder.

Step 15:
For large things like this, I prefer to use the Patch tool, rather than the Healing Brush. But, the problem with using either for a retouch like this is they don’t like edges—they smear if what you’re trying to remove is touching an edge. So, what I do is start by using the Clone Stamp tool. Here, what I’ll do is make a break in the strap, so it’s no longer touching anything. So, grab the Clone Stamp tool (S), start down at the bottom where the strap touches the bottom of the image, Option-click (PC: Alt-click) to sample a clean area of skin, and just clone away a little ½″ gap. Then do the same thing up near the top (as shown here), but leave the part of the strap that lies in the indent (we’ll be fixing that next).
Step 16:
Get the Patch tool (we’ll use it kinda like you did when you removed the hot spots on page 127), and draw a loose selection around the strap, just like you would with the Lasso tool. Now, click your cursor inside your selected area and drag your selection over to a clean nearby area (I dragged mine straight over to the right, where you see my cursor here), and then release the mouse button. Your selection snaps back to its original location and the strap is gone (as seen here)! You can press Command-D (PC: Ctrl-D) to Deselect, and if there are any tiny bits left over, just get rid of them with the Healing Brush. But, in this case, it pretty much did the trick first time out for me.

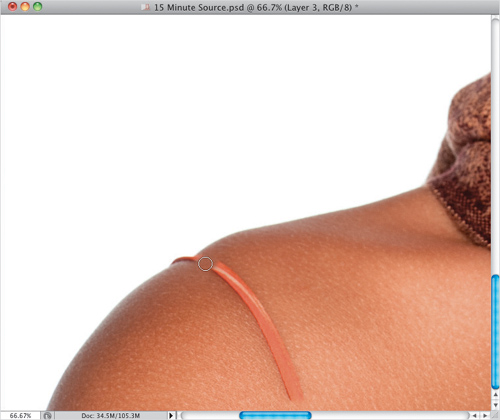
Step 17:
We still have that little bit of strap and the indent it caused to get rid of. We’re going to use the body sculpting technique we used back on page 271, except here, we’ll feather the selection. So, get the regular ol’ Lasso tool and draw a loose selection around a part of the shoulder that doesn’t have an indent (as shown here). Make sure you grab some of the background, as well as a decent amount of skin. Next, let’s soften the edges of the selection, so it blends in with the rest of the skin. Go under the Select menu, under Modify, and choose Feather. When the dialog appears, enter 10, and click OK.
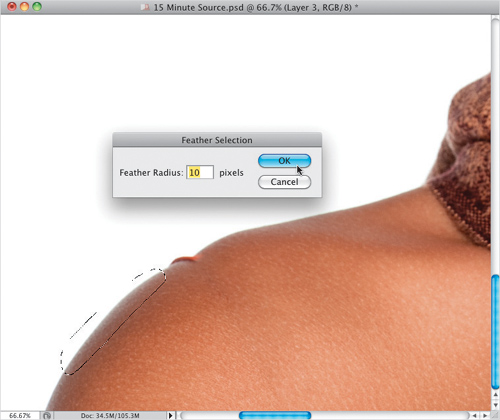
Step 18:
Duplicate that selection to get it up on its own layer, and then use the Move tool to drag that chunk of shoulder up over the area with the indent. Of course, it’s not going to line up (as you can see), so bring up Free Transform. Now, move your cursor outside the Free Transform bounding box and it changes into a two-headed arrow. Click-and-drag downward to rotate the copied piece of shoulder, so it lines up with the part of the shoulder that we’re trying to fix.
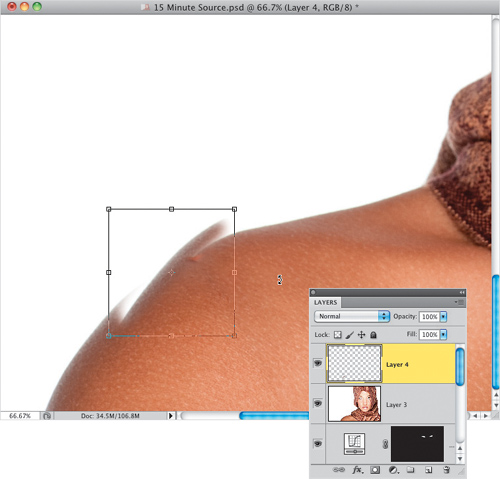
Step 19:
Keep rotating until it lines up perfectly. Since you feathered the edges, you probably won’t even have to do any edge blending (but if you do, you could always just add a layer mask and paint it away in black). Once it’s rotated to perfectly line up (like you see here), press the Return (PC: Enter) key to lock in your rotation.
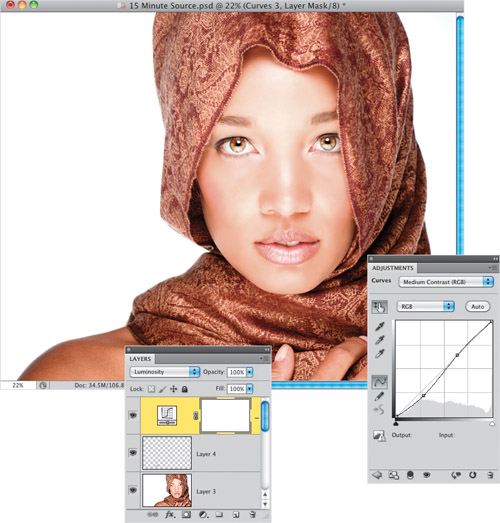
Step 20:
Now, to add some contrast to her scarf, do like we did with her eyes and eyebrows: add a Curves adjustment layer to the top of your layer stack, and then, from the Curves pop-up menu at the top of the Adjustments panel, choose Medium Contrast (RGB). My original idea was to darken just the scarf (so we’d darken the whole image with a Curves adjustment layer, and then mask in just the scarf), but once I chose Medium Contrast, I thought the whole image looked pretty good, so let’s just leave it as is. But, go ahead and change the layer blend mode to Luminosity, so we don’t get a color shift.
Step 21:
If you have time left (I ran a timer during my retouch, and I had over two minutes left), I would do some dodging and burning to sculpt the face. So, first create another merged layer, then duplicate that layer—this will be where you do your dodging and burning (you already learned this back in Chapter 3, along with the differences between using CS5 or newer, or working with an older version of Photoshop). I always start with burning (darkening), so get the Burn tool, set your Exposure in the Options Bar to 10% or 12%, choose a medium-sized, soft-edged brush, and start painting over the shadow areas (see page 185 for an example of where to burn).
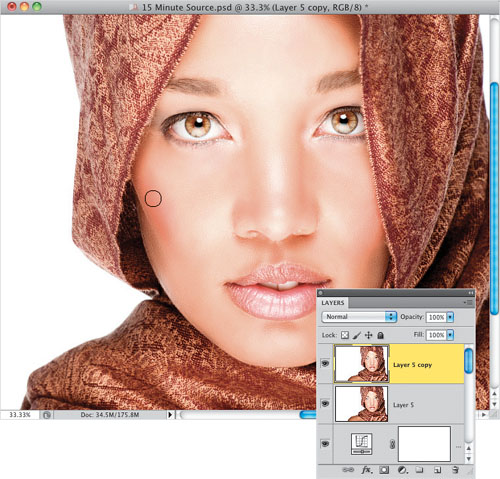
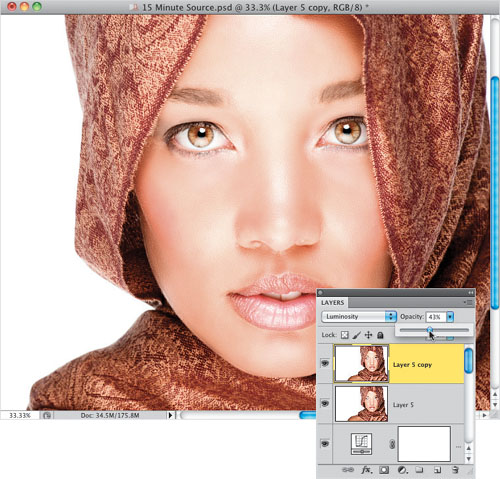
Step 22:
Now, switch to the Dodge tool and brighten the highlight areas, like the straight-line highlight going down the top of her nose, her chin, her forehead—basically everything that extends outward from the face (again, see page 187 for more on what to dodge). Dodging and burning like this tends to change the color of the image, so change the blend mode of this layer from Normal to Luminosity (as seen here), then lower the Opacity quite a bit, so it blends in with the image (here I lowered it to 43%).
Step 23:
It’s time to sharpen and finish this baby up (before our 15 minutes are up), so merge your layers once again. We want to sharpen the image without sharpening her skin detail, like we did on page 160, so go to the Channels panel and click on the Red channel. Now, our sharpening will be applied just to this channel, and you can see by looking at the channel, there’s not much skin detail here at all (it’s mostly in the Green and Blue channels). So, by sharpening here, for women’s skin, you can avoid making the skin texture stand out. Add an Unsharp Mask filter, using settings of Amount: 120%, Radius: 1.0, Threshold: 3, and click OK.
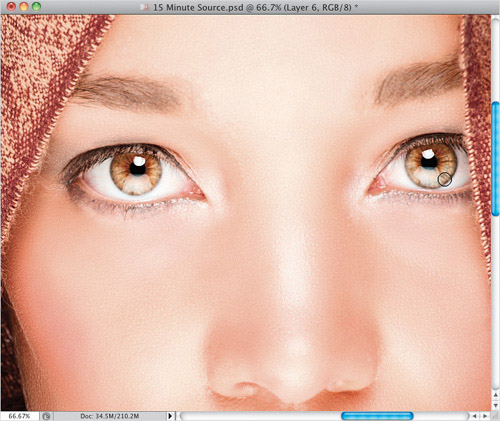
Step 24:
Now, click back on the RGB channel at the top of the Channels panel to return to the full-color image. To finish things up, let’s give those eyes a final sharpening. Get the Sharpen tool (only do this if you have Photoshop CS5—see page 81) and sharpen both irises by painting over them with a soft-edged brush, with the Strength set at 20%. Since your Strength is set pretty low, you may have to paint a few strokes over them to get them nice and sharp—just be careful not to over-sharpen. Well, our 15 minutes are up, and we covered a lot of territory here. Remember, don’t be upset if this took you 20 minutes or more. You’ll get much faster the more you do this. So, for now, just get the steps down—the speed will come next.
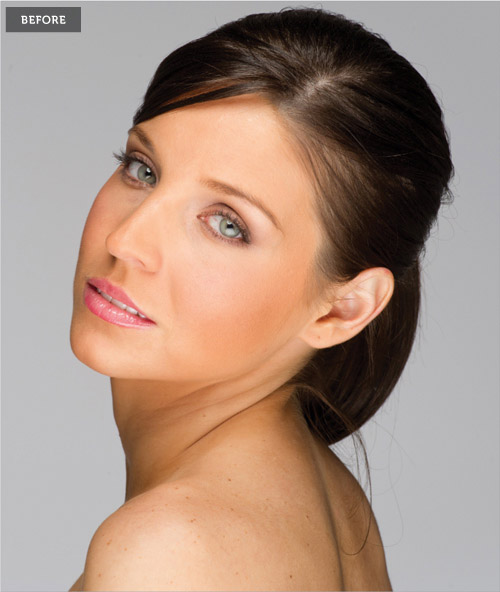
My 30-Minute Retouch
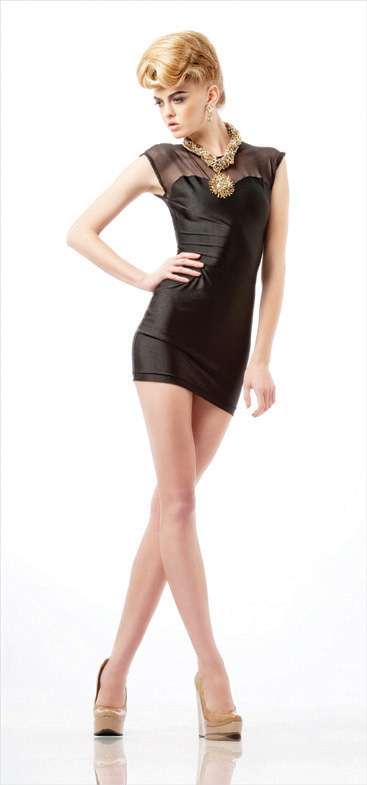
Here, I’m going to show you my workflow for a start-to-finish beauty-style retouch. We’re not retouching this for the cover of a fashion magazine or anything like that, so my goal is to make this a 20- to 30-minute retouch from start to finish. You might think that, because our subject has great skin, the process will be really simple, but not having to do that much with her skin really only saves us one step, so you’ll still stay pretty busy for the next 20 to 30 minutes.
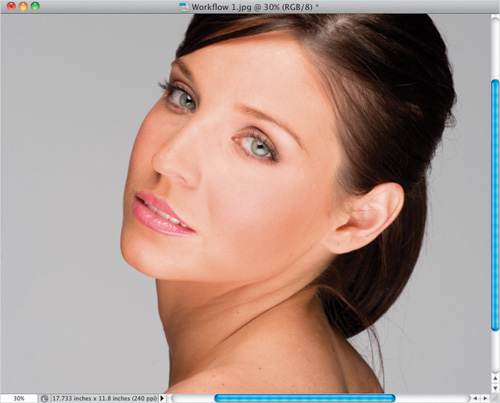
Step One:
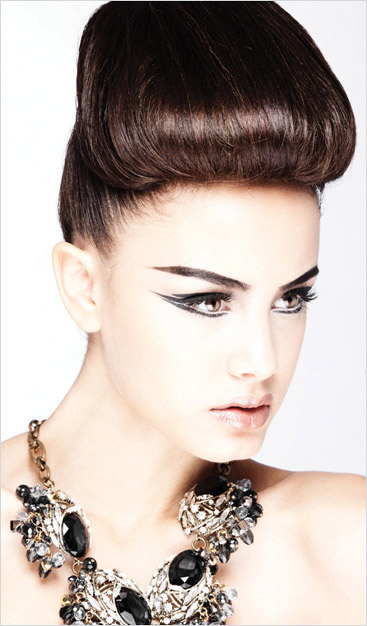
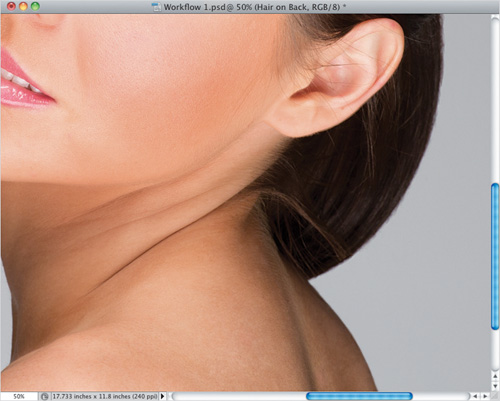
Here’s the original unretouched shot, so we’re starting from scratch. Let’s start with a quick evaluation of what we’re going to retouch, and we’ll go from top to bottom. As always, we have lots of stray hairs to fix, some minor gaps in the hair on the left side of her forehead, and we need to remove that extra sprig of hair coming off her neck and going down her back. We’ll also need to darken the part in her hair. From there, we’ll fill in the eyebrows a bit, and enhance the top and bottom eyelashes, too. She has an earring hole in her earlobe we need to remove, and the top of her ear has a red patch that needs to be removed, as well. But, we’re not done yet. Zoom in just a little.
Step Two:
If you look at her eyes, you’ll see we need to remove some red veins from them, and add contrast and sharpening to them, as well. There are a few lines under her eyes, so we’ll remove those, too. We have some more hair going over into her ear that has to go, and we have minor skin blemishes that need to be removed from her face, along with some freckles and blemishes on her neck and shoulders. We’ll also lessen or remove most of the lines on her neck. I know that seems like a lot, but the good news is this should be a pretty quick and easy retouch (especially since we have so little to do to the skin).
Step Three:
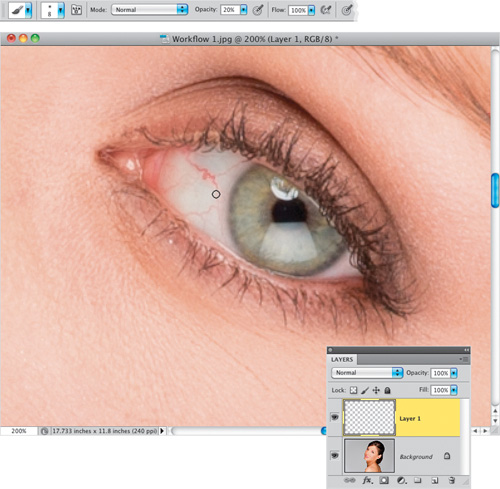
Although I evaluate the image from top to bottom (to figure out which retouches I might need to do), I usually start the actual retouch by retouching the thing that bothers me the most first. That way, it’s no longer distracting me, and I don’t wind up rushing through other retouches, so I can finally get to fix the part that’s driving me crazy. In this particular case, it’s the red veins in her eyes that bother me the most, so we’ll start there, using the technique you learned on page 32. But more often than not, it’s large blemishes that I usually wind up getting rid of first. So, let’s get to it (start your timer). First, zoom in really tight on the eye on the right and then create a new layer. Get the Brush tool and choose a small, soft-edged brush set to 20% Opacity. Then, Option-click (PC: Alt-click) in a clean area of eye right near the red veins to switch to the Eyedropper tool, and sample and set your Foreground color, then just paint a series of strokes over each vein until they’re gone.
Step Four:
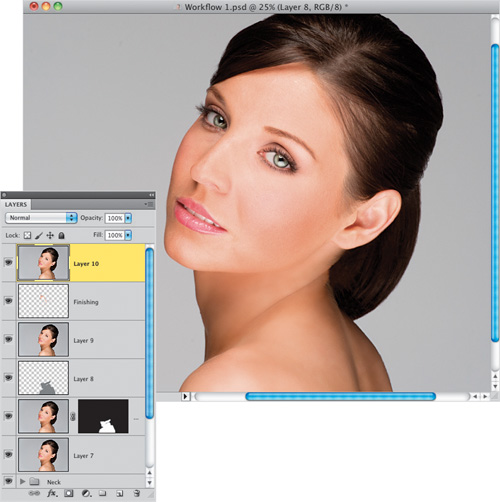
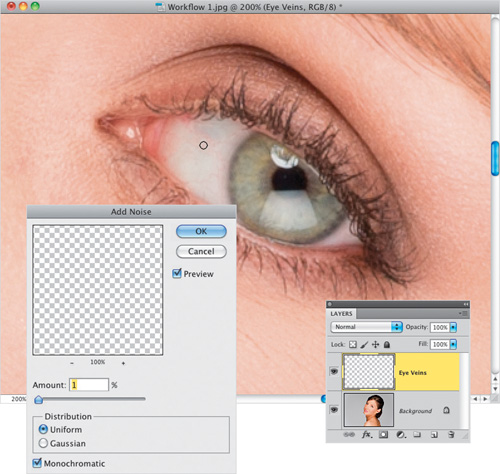
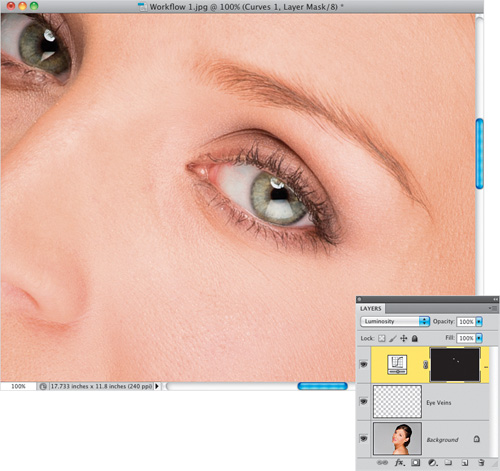
Just keep painting them, one-by-one, remembering to resample (I had to resample a number of different times as I moved to different areas of the eye, because light falling on a spherical eye causes the tone to change), until they’re gone (doesn’t take very long at all). By the way, don’t forget to do both eyes. Also, we’re going to add a tiny bit of noise to this layer. So, go under the Filter menu, under Noise, and choose Add Noise. When the filter dialog appears, choose 1%, Uniform distribution, turn on the Monochromatic checkbox, and click OK. Since we’re doing an entire start-to-finish retouch, you’re going to have a lot of layers, so this would be a good time to start naming your layers. Name this one “Eye Veins” (okay, that was kind of obvious).
Step Five:
Next, we’ll add some contrast to the eye, so add a Curves adjustment layer (we learned this trick on page 4). From the Curves pop-up menu at the top of the Adjustments panel, choose Strong Contrast (RGB). This adds an S-shape to the curve, which increases the highlights and shadows, which increases the contrast in the image (as you can see here).
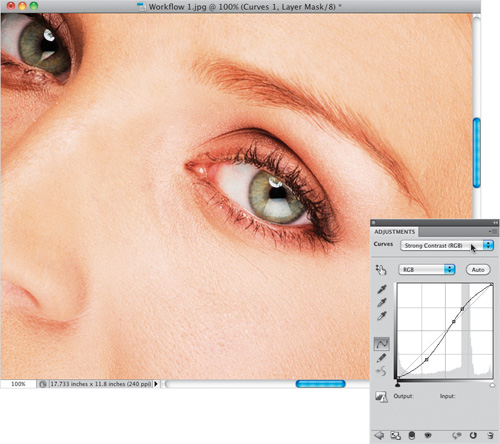
Step Six:
Of course, this contrast curve totally trashed her skin color (and we don’t generally want to add contrast to a woman’s skin), so Invert the adjustment layer’s layer mask, hiding the contrasty version of her behind a black mask. Now, get the Brush tool, choose a small, soft-edged brush set to 100% Opacity, and then paint over each iris to give them lots of contrast (like you see here). This strong amount of contrast actually changed the color of the eyes a little bit (that’s pretty common), so to get around that, at the top of the Layers panel, change the blend mode of this adjustment layer from Normal to Luminosity (as shown here). Also in the Layers panel, toggle the visibility of this Curves adjustment layer on/off a couple of times, and you’ll see what a difference this makes.
Step Seven:
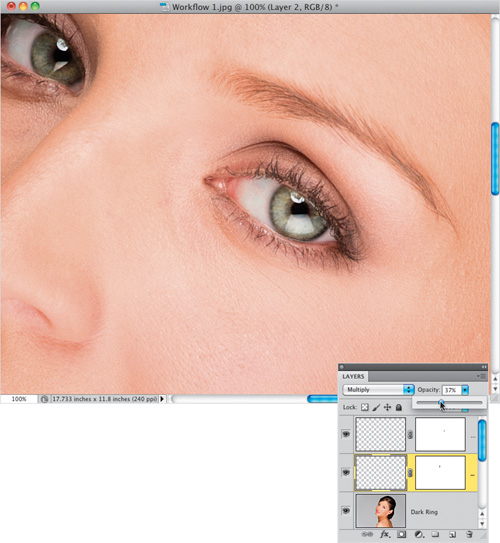
Three more things left to do to her eyes: First, create a merged layer at the top of the layer stack to work on. Now, let’s darken the outer ring of the irises using the technique you learned back on page 6, where we make a selection of an iris, feather it, and put it up on its own layer (I’m doing each iris on its own layer here, instead of both on one, because the lighting is different on each eye). Next, change the layer blend mode to Multiply, Command-click (PC: Ctrl-click) on the layer thumbnail to bring the selection back up, and then contract it. Hit the Delete key to knock a hole out of the center of the darker eye, leaving just the darker outer ring, and then deselect. If there’s any spillover, add a layer mask and paint it away in black. Don’t forget the other eye. In this case, when I did the eye on the left, because of where I positioned the lighting, that eye is darker, and the ring looked too dark at 100%, so I reduced its Opacity to 37%.
Step Eight:
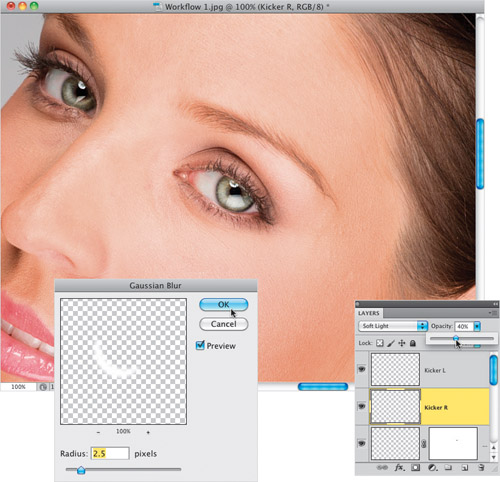
Now, you’re going to create those iris kickers that make the eyes sparkle (from back on page 12) by first clicking back on the merged layer and creating a new blank layer, then drawing a white circle over the iris a little smaller than the iris itself. Deselect, then cut off the top half of your circle (put a rectangular selection across the top half of the circle, then hit Delete and deselect. I used the Polygonal Lasso tool for the rectangular selection, since her face is on an angle). Command-click on the layer thumbnail to put a selection around your half-circle. While the Polygonal Lasso tool is active, click-and-drag that selection upward about half the height of the half-circle and hit Delete. Deselect, and you’re left with a quarter-moon shape. Now, add a 2.5-pixel blur to soften, change the layer blend mode to Soft Light, then lower the Opacity until it looks right to you (for me, the right eye was 40%; the left 80%. I also moved both iris kicker layers to the top of the layer stack).
Step Nine:
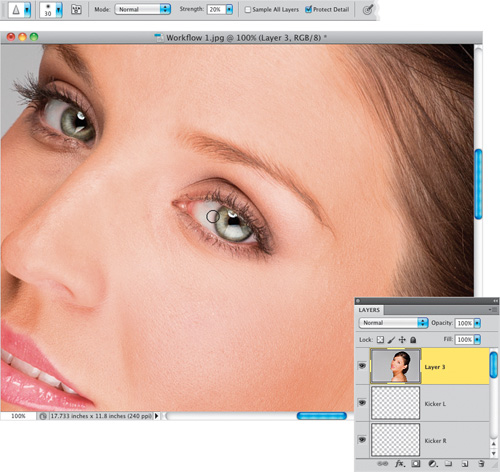
We still need to work on the eyebrows and eyelashes, but our last little tweak to the eyes is to sharpen them separately from the rest of the image. In Photoshop CS5, I use the Sharpen tool, because it’s got the best sharpening algorithm of anything in Photoshop (as I explained back on page 81). So, start by creating another merged layer, then get the Sharpen tool and, at a Strength of around 20% and with the Protect Detail checkbox turned on in the Options Bar, paint over each iris and pupil—don’t forget to paint a little over the edges of the irises to make them really sharp. Now, take a look at her eyebrow on the right, because we’re about to fill it in, trim the top, and heal away any stray eyebrow hairs.
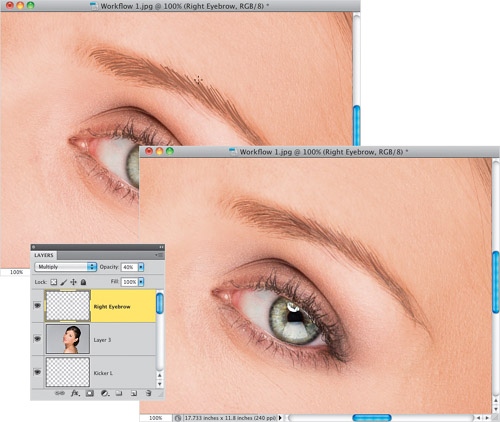
Step 10:
First, we’ll do the fill (like you learned back on page 75). Just a reminder: this eyebrow fill-in looks awful until we’re done with it. Also, if you were doing this for a makeup company, you’d be filling in the eyebrow by copying the original hairs one at a time, but for our 30-minute retouch, we’re just going to get the Brush tool, then quickly sample the color of the eyebrow hairs (by pressing-and-holding the Option [PC: Alt] key to switch to the Eyedropper tool). So, create a new blank layer (name it “Right Eyebrow”), then with the Brush tool, Option-click to sample, and paint in 1- or 2-pixel-wide, soft-edged strokes over the thin areas (as seen here at the top. The cursor is so small here, it’s hard to see, but I’m painting 2-pixel strokes over her eyebrow hairs, following the same direction as the hairs). Now, change the blend mode of this layer to Multiply, then lower the Opacity of it until it blends right in with the existing hair and looks natural (here I lowered the Opacity of the Right Eyebrow layer to 40%).
Step 11:
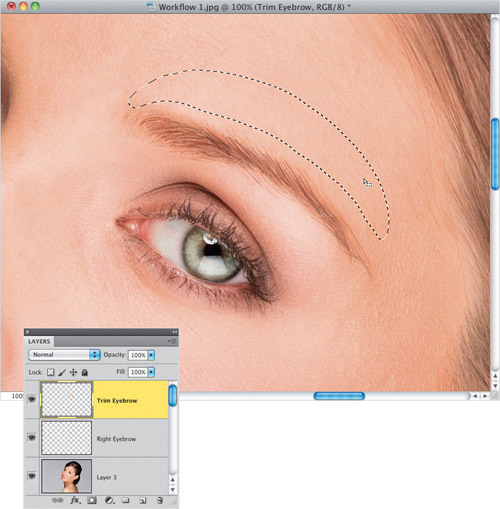
Next, let’s trim the top of the eyebrow (like we learned back on page 72). First, click back on your last merged layer (Layer 3), then take the Lasso tool and draw an eyebrow-shaped selection (like the one you see here) in a clean area right above the eyebrow. Add a 3-pixel Feather to soften the edges, copy this selection up onto its own layer, name it “Trim Eyebrow,” and then move the layer to the top of the layer stack.
Step 12:
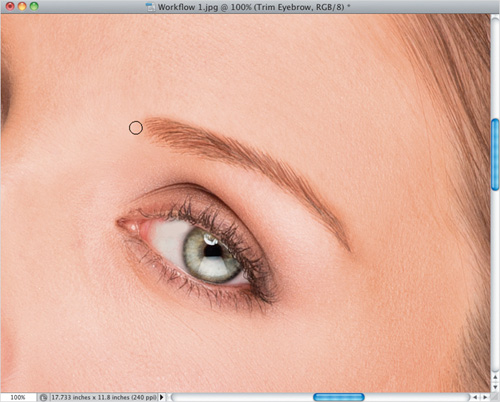
Switch to the Move tool and drag this area downward toward the top of the eyebrow, until it trims off the top and makes it nice and smooth (like you see here). Lastly, using the Healing Brush, let’s clean up the stray hairs on the left end of the brow (as shown here) and under the center (you can see them in Step 11). If anything smears, undo it, switch to the Clone Stamp tool, and use a small, soft-edged brush instead. Now, while I was retouching in this area, I noticed a small bluish vertical vein just below the far-right side of the eyebrow (again, look back at Step 11 to see this), which I removed, along with a few little skin bumps.
Step 13:
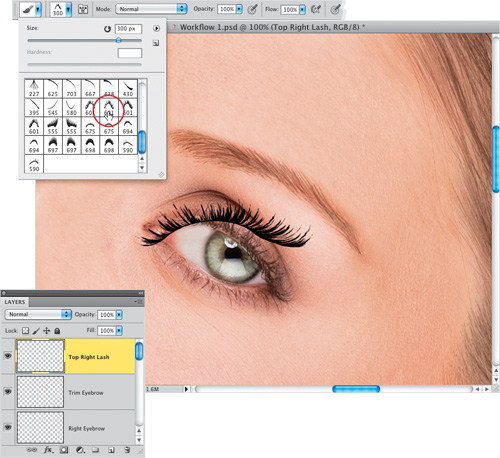
Now, we’ll move on to the eyelashes. Create a new blank layer, name it “Top Right Lash,” and then get the Brush tool. Load the eyelash brush set that you downloaded from the book’s companion website (see page 57) and choose the Feather Lash Right brush (shown circled here in red). For this image, you need to lower the size of the brush to around 300 pixels (remember, it’s okay to have the lash be too big at first, because you can size it down. What you don’t want is to make it too small and then have to stretch it larger, because the brush will get pixelated and soft). Now, just click the eyelash brush once on your blank layer, somewhere near where it’s going to go (as shown here).
Step 14:
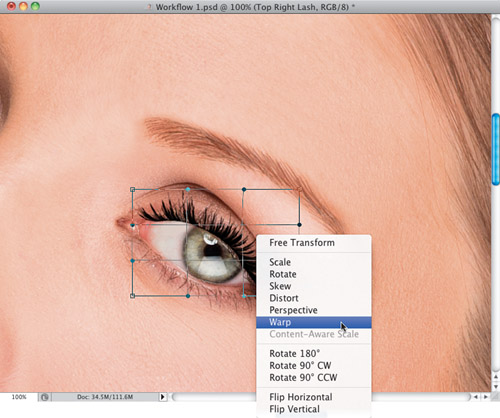
Bring up Free Transform, and rotate the eyelash, so it matches the angle of the eye, and then size it down to match the size (by the way, the way to make sure you’ve chosen the proper right or left brush is the longer lashes should be at the outside of the eye—the end closest to the ear). Next, you’re going to Right-click inside the Free Transform bounding box and choose Warp from the pop-up menu (as shown here) to tweak the eyelash, so it perfectly fits the eye (as you learned back on page 60).
Step 15:
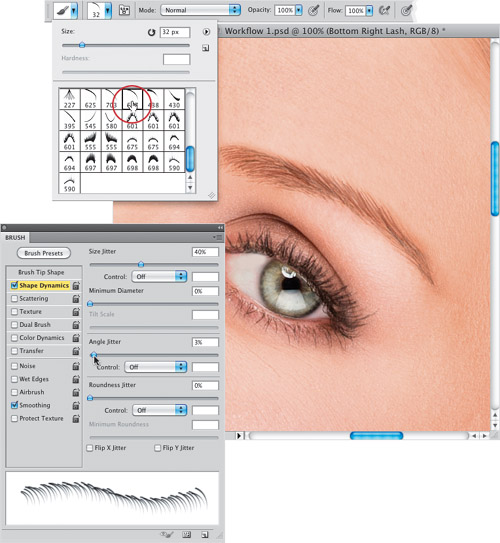
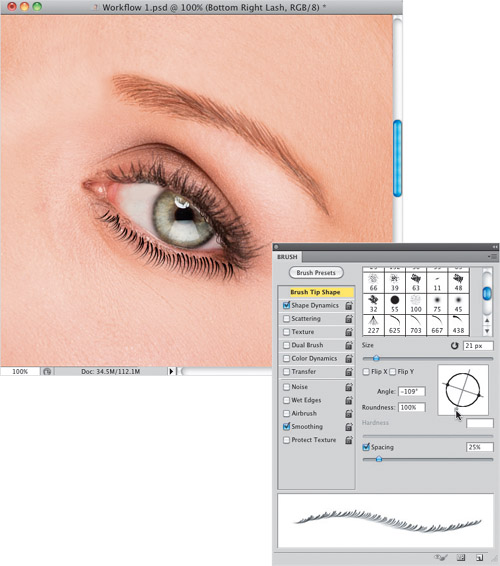
Lower the Opacity of the lashes layer, so that it blends in better with the natural lashes in the image (here, I lowered it to 40%). Now, on to the bottom lashes (from the same technique in Chapter 1). Create a new blank layer, name it “Bottom Right Lash,” and then go to the Brush Picker again, but this time choose one of the single eyelash brushes (I like the Bottom Lash 3 single lash brush, shown circled here). For this image, lower the Size to around 32 pixels using the Size slider at the top of the Picker. Don’t forget to go to the actual Brush panel and set your 32-pixel brush up, so it varies the size and shape as you paint with it (here, I set the Size Jitter to 40%, and the Angle Jitter amount to 3%. See page 63 for more on this).
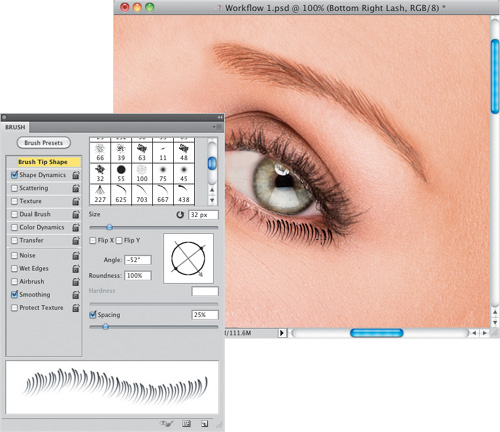
Step 16:
Now that your brush is set up to automatically vary size and angle slightly, you’ll need to choose the direction to match the natural eyelashes (which form an arc under the eye, with the lashes fanning from left to right). In the Brush panel’s Brush Tip Shape options, click-and-drag the brush direction preview to change the direction of your eyelash brush. You’re going to start painting just to the right of the center, so have your lashes arcing to the right a bit, then start painting along the lash line (as shown here). It’s way too much at this point, but we’ll fix that in a moment.
Step 17:
Change the direction so the lashes are straight and paint over the center, then rotate the brush again as you get near the left side of the eyelashes (nearest the nose). As you get closer to the nose, you’ll need to shrink the lash size and angle as you go, because the left side should have smaller lashes than the right. So, just remember to rotate the brush and adjust the Size slider in the Brush panel as you go. By the way, I don’t normally do the right, then the center, and then back to the left. I normally start on the inside side of the eye and work my way out, but I just wanted to do it this way to help you understand what has to be done. You can paint your strokes any way you’re comfortable with, as long as you vary the direction and size as you go. Now, to make the bottom fake eyelashes blend in with the real ones, lower the layer Opacity of your Bottom Right Lash layer to around 40% and then add a Drop Shadow layer style. Important: Don’t forget to do the other eye—both top and bottom lashes!
Step 18:
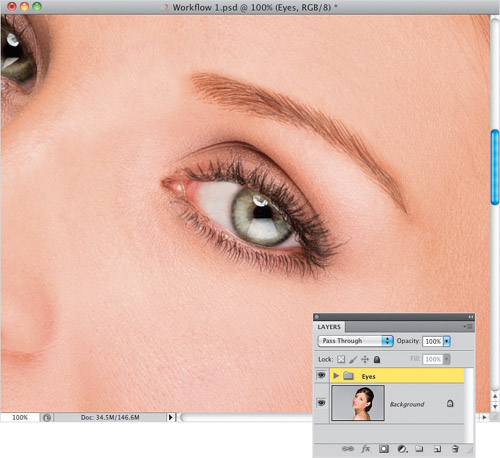
The last thing we want to do with the eyes is to heal away those small lines beneath them (look back in Step 17 and you’ll see them) using the technique you learned on page 119. So, create another merged layer and then switch to the Healing Brush tool. Just a simple healing with a small brush will do the trick. Lastly, let’s put all these eye layers together in a group (so we’re not dealing with all these layers for the rest of our retouch). Select all of the eye layers in the Layers panel, then choose New Group from Layers from the panel’s flyout menu. Name this set “Eyes” and now they’re all in one tidy folder.
Step 19:
Now, let’s clean up the hair, using the technique on page 196. First, create a new blank layer (name it “Hair Cleanup”), then get the Clone Stamp tool, and choose a small, hard-edged brush (we have to use a fairly hard brush tip like this, so we don’t soften the edge of her hair when we reach it, but if the hard edge seems too hard, in the Brush Picker, lower the Hardness from 100% to 75%). Her hair is more in focus on the top of her head, and less so on the side, so you might have to vary the softness a bit. Now, go around the head and clone away any stray hairs (as shown here) by sampling a clean background area right near the hair you want to remove, then painting over it to clone it away.
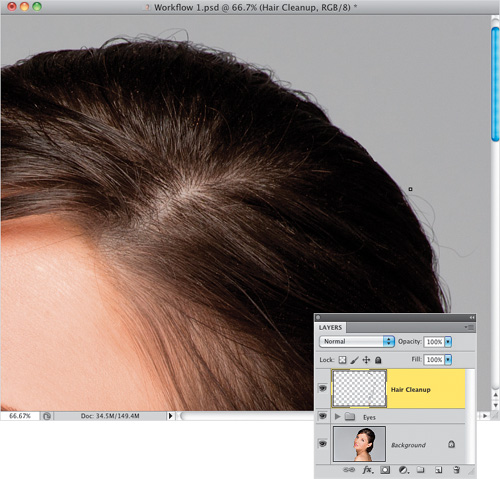
Step 20:
Continue going around removing the stray hairs, but leave a few here and there or it’ll look like she has plastic hair (here I’ve cleaned up most of the stray hairs, including a few crossed hairs within her head). Now, let’s work on darkening the part in her hair, like you learned back on page 214. Start by creating a merged layer, then change the layer’s blend mode to Multiply. Option-click (PC: Alt-click) on the Add Layer Mask icon at the bottom of the Layers panel to add a black layer mask, hiding the darker version of your image. Now, get the Brush tool, choose a medium-sized, soft-edged brush, and paint in white over the part area (as shown here). If you think the part looks too dark, reduce the layer’s opacity.
Step 21:
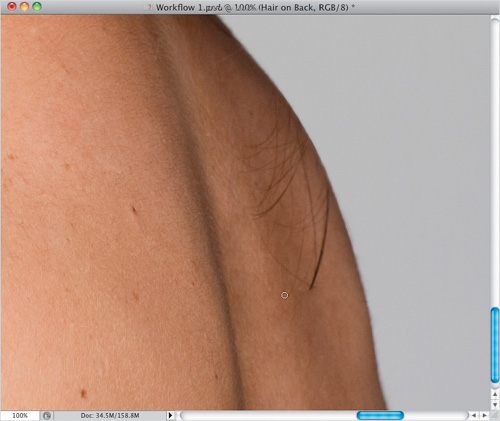
Now, let’s work on the hairs that extend over onto her back (here, we’ll follow part of that same technique from Chapter 4 we used to clean up the edges of her hair). Start by creating a new layer, name it “Hair on Back” (not “Back Hair,” which is something else and just sounds so cruel), and then switch to the Healing Brush tool (which works really well and is my go-to tool when hair extends over skin, but other than that, when it comes to removing hair, I use the Clone Stamp tool). There really isn’t any trick to this—you just have to be patient, sample clean areas, and heal all the hair away strand by strand. Once you’ve got those healed away (you may have to switch to the Clone Stamp tool to get the edge of her back), while you’ve still got the Healing Brush, you might as well get to work on those blemishes and get rid of them, as well. I also got rid of her earring hole.
Step 22:
Just go around and keep healing away those blemishes, until they’re all gone. Her skin is a little bit blotchy on her back, so we’ll deal with that, but before we get to that, we have two more annoying hair things to work on: (1) those little wisps of hair at the top of the back of her neck, and behind her ear, extending into the rest of her hair (we’ll just clone that out), and (2) the hair extending onto her ear.
Step 23:
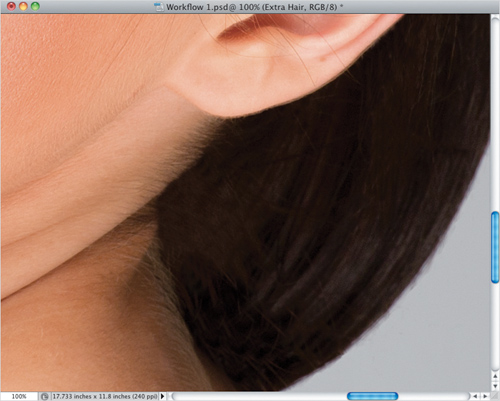
Normally, when you’re working inside the hair area, outside of cloning away some individual crossed hair strands, your best bet is to pick up some existing hair, copy it onto its own layer, and then move that hair over the large piece you want to cover (like you learned back on page 202). If you need to, you can then use Free Transform’s Distort feature—just Command-click on a corner point and drag to make it fit perfectly. However, since there’s not much detail in this dark area of her hair behind her neck to begin with, we can get away with just cloning over those wisps. So, create a new blank layer (name it “Extra Hair”), then get the Clone Stamp tool, choose a medium-sized, soft-edged brush, and clone over those areas (don’t forget to follow the direction of the hair). While you’re there, shrink your brush size way down and trim away those little hairs on the back of her neck, as well.
Step 24:
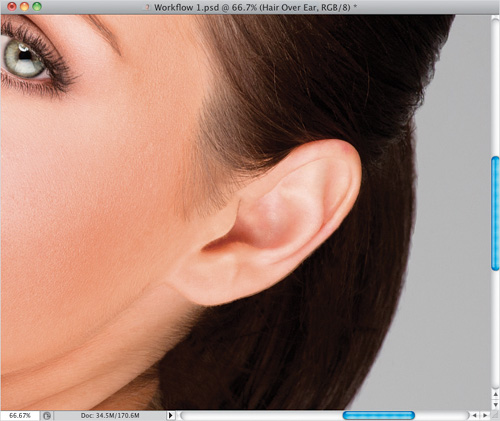
Now, the hair-over-the-ear retouch is one of those pain-in-the-butt retouches that there isn’t a great trick for—just a great pair of tools. Use the Healing Brush tool as much as possible, then switch to the Clone Stamp tool when you get to the edges to keep them from smearing. It’ll take a few minutes, so be prepared to spend some time here. Create a new blank layer (name it “Hair Over Ear”), zoom in tight, like I did here, use a small Healing Brush, and start just chipping away at each strand of hair, until they’re all gone.
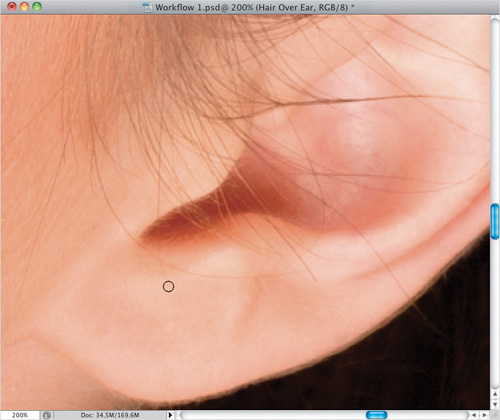
Step 25:
Here, the hair’s pretty much gone. Again, I only used the Healing Brush and Clone Stamp tools with a very small brush size, and I just took the time to painstakingly remove every strand. It wasn’t fun, and I wouldn’t normally do this for a quickie retouch, but in this case, we’re going to go a little farther than I normally would just to show you what can be done with some patience and a small brush size. We still have the issue of that red patch at the top of her ear (that I mentioned in the first step), but you can get rid of that in five seconds using the Healing Brush, so it’s really not an issue (go ahead and do that now). She does have a gap in her hair on the left side of her forehead, so let’s go fix that next.
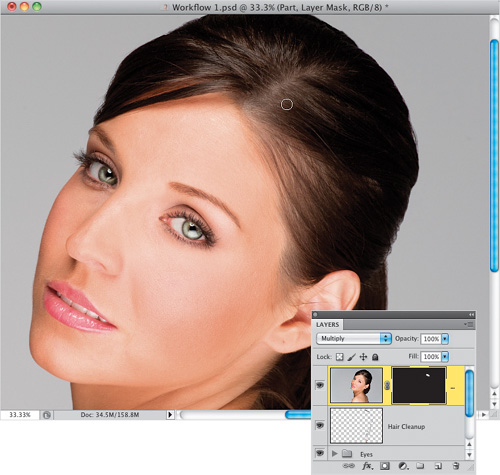
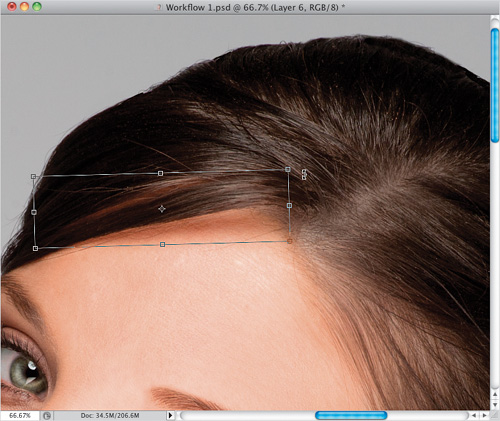
Step 26:
To fix that gap, we’re going to borrow some hair from somewhere nearby, copy it up onto its own layer, and move it over to cover up the gap (like you learned back on page 204). The piece that looked to me like it might look the best is the one in front with the nice highlight near the top. Before you make your selection in this area, though, get rid of any crossed hairs, spots, specks, or anything else that might repeat itself, in case you have to make more than one copy. Now, create a new merged layer, then get the Lasso tool and make a selection around that perfectly clean nearby area (as shown here). Normally, I would feather this area by 10 pixels, but since the selection is so thin, let’s just go for 5 pixels, and then copy this selection up on its own layer.

Step 27:
Now, switch to the Move tool and drag that chunk of hair over until it starts to fill in the gap. Moving it straight over leaves a little gap at the bottom, so go to Free Transform and rotate this a little counterclockwise (as shown here) to cover that small gap at the left end.
Step 28:
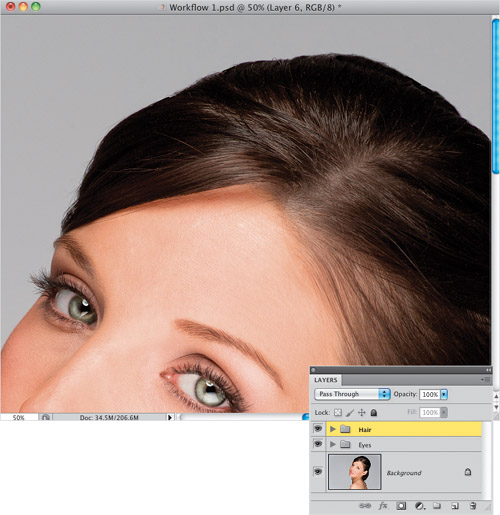
You’ll need to do this two more times (make two copies of the selected hair layer, move them over to cover the next part of the gap, and then rotate them as necessary). Once the gap is fully covered (as seen here), zoom in tight and check to see if you have any obvious repeating patterns in the hair (like a speck or crossed hair you see three times in a row—a dead giveaway). If you see something like that, just get the Clone Stamp tool, use a really small brush, and clone those little repeating areas away so it looks natural, like you see here. Now, go to the Layers panel, select all the hair layers, and put them into a group (like you did with the eye layers back in Step 18), and name this group “Hair.”
Step 29:
There’s not that much left to do on this image, but I would generally either tone down or remove the neck lines, so let’s do that. For a beauty shot like this, when it comes to neck lines, less is more, so let’s remove the top two lines altogether (and any other little neck muscle twists), and then we’ll greatly tone down the bottom one (we’ll do this like we removed the wrinkles back on page 119). Create a new blank layer, name it “Neck Lines,” and then get to work with the Healing Brush tool. Just sample a nearby area and remove those top two neck lines and any nearby stragglers.
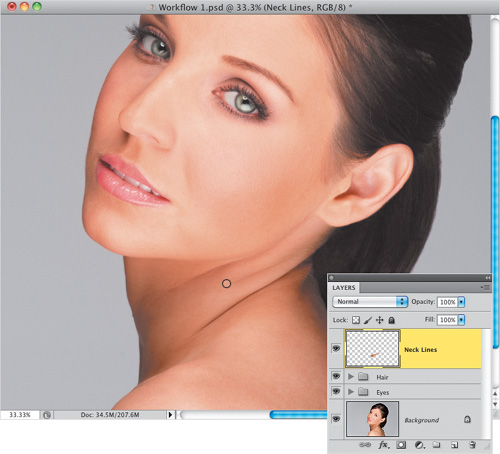
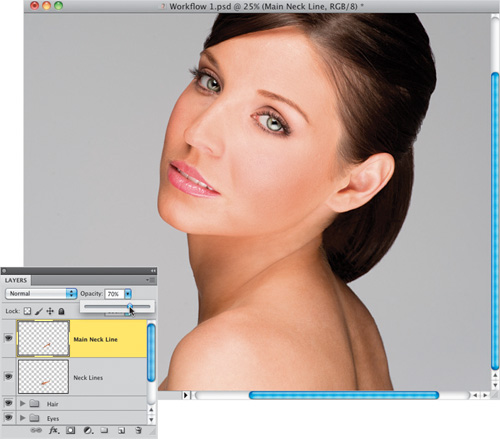
Step 30:
Now, let’s create a separate blank layer for the main neck line (name it “Main Neck Line”), so we can remove it completely, then bring it back a little bit by lowering the Opacity a tiny bit (as shown here)—so it’s there, but it’s really subtle. You can certainly remove the neck line altogether (I’ve seen it done numerous times in beauty shots), so it’s really your call, but I will usually leave a little line there because to me it looks more natural.
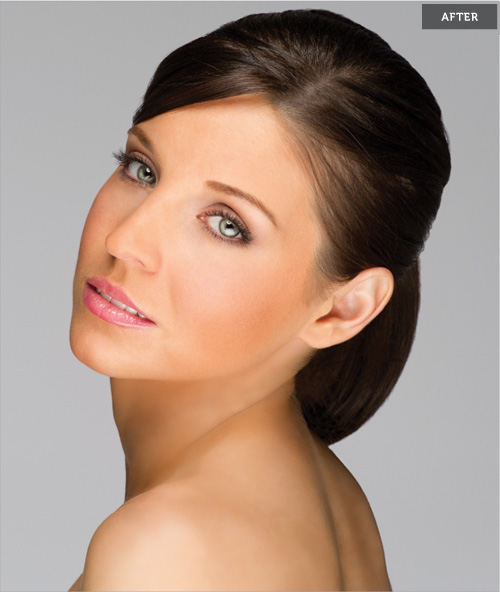
Step 31:
I’d finish the retouch of this image off with a skin retouch. But, since the skin on her face is very good, it would just be a matter of getting in tight with a very small Healing Brush, finding any small blemishes or discolorations, and healing them away. There’s a little area under her left eye I would probably work on, and a few little blemishes here and there. But what I’m most concerned about is the uneven skin on her back, so for a fairly quick retouch like this, I’d finish off by using the skin smoothing technique found on page 102. Now, while it does use the Surface Blur filter, it brings back the original skin texture on top, so the final result is not blurred-away detail, but nice, clearly visible texture. Lastly, I’d sharpen the entire image by going to the Channels panel, clicking on the Red channel, and then applying the Unsharp Mask filter with settings of Amount: 120, Radius: 1, and Threshold: 3 (you learned this back on page 160).