
5. Working with Resources
This chapter covers assigning different kinds of resources to tasks in your project.
In Project, the people, things, and money you need to get the tasks in your project done are called resources. By adding resources to your project, you make them available to assign to tasks within your project. Resources can have calendars that are unique to them and can be assigned specific cost information.
Understanding Resource Types and Other Factors
Project supports three different types of resources:
• Work resources are the people and equipment that will do the work to complete tasks in your project. For example, a developer for your product is a work resource, and the server he uses to check code is also a work resource.
• Material resources are the things that the work resources need to complete tasks in your project. For example, if one of the work resources for your project is a plotter, you may also want to include material resources for paper and toner. Or, if you’re planning a construction project, you may want to include cement, rebar, lumber, and other supplies for your project as material resources.
• Cost resources are the fees associated with getting tasks in your project done, which aren’t associated with the amount of work put into a project or how long the project lasts. For example, if a task in your project requires a business trip, you would include the airfare and hotel charges as cost resources.
Cost resources are different from the costs incurred by work resources doing work on your project, or the costs incurred as you use material resources (supplies) to get work done. For more information on costs in your project, see Chapter 6, “Accounting for Project Costs.”
Tell Me More: Media 5.1—Making Sense of Cost Resources

Access this audio recording through your registered Web Edition at my.safaribooksonline.com/9780132182461/media.
In addition to these three types of resources, keep a couple other considerations in mind when planning your project:
• Will other projects use the same resources as my project? If the resources you’ll be using in your project can also be used in other projects in your organization, and if you are running Project Professional 2010 with Project Server, you can choose to make resources in your project enterprise resources or assign enterprise resources to your project. An enterprise resource is a resource that is included in a list of all resources in your organization (the enterprise resource pool). By assigning resources from the enterprise resource pool, you are able to account for work that your resources are doing on other projects, not just your own. This helps track resource availability and enables you to more accurately plan your project within the broader scope of your organization.
• Do I know exactly who/what will be working on my project? If you know you’ll need a specific kind of resource on your project, such as a developer or a roofer, but you’re not sure exactly who or what will be doing the work (that is, you don’t know which person or which server), you can use generic resources to plan your project. By assigning generic resources, you can identify just how many people or things your project will need, and then you can substitute them later for the specific people, equipment, or other resources that will be doing the work you have laid out in your project plan.
Show Me: Media 5.2—Adding a Resource

Access this video file through your registered Web Edition at my.safaribooksonline.com/9780132182461/media.
Adding Resources to Your Project
The process for adding a resource to your project is different, depending on whether you’re adding a resource used only in your project (a local resource) or an enterprise resource available for assignment throughout your organization (Project Professional only).
 LET ME TRY IT
To add a local resource to your project, follow these steps:
- On the View tab, in the Resource Views group, click Resource Sheet.
- Type the name of your work, material, or cost resource in the Resource Name column. If you are adding a generic resource, type a generic label for the resource, such as Roofer, Web Server, or Designer.
- Choose whether the resource is a work, material, or cost resource using the list in the Type column.
- If you chose Material in the Type column, type the unit label for the material resource in the Material Label column. For example, if you are adding fabric as a material resource, you might choose to type yards in the Material Label column.
- If you want the resource to be part of a larger group of resources, such as employees in the same role or in the same department, type the name of the group in the Group column.
- Type the maximum amount of the resource’s time that can be spent on the project, as a decimal or percentage of the resource’s time, in the Max Units column. For example, if a resource is working half-time on your project and half-time on other projects, type 50% or .5 in the Max Units column for that resource.
- If appropriate, type the cost information for the resource in the following fields:
• Std Rate— Type the standard cost rate for the resource. That is, how much the resource is paid for specific time units, such as an hourly, daily, or yearly rate.
• Ovt Rate— Type the overtime cost rate for the resource. That is, how much the resource is paid for overtime work in specific time units, such as per minute, per hour, or per day.
• Cost/Use— Type a per-use cost for the resource, if applicable. For example, several tasks in your project will use an industrial printer. Each time you use the printer, there is an initial cost-per-use fee of $250 on top of the standard daily rate.
• Accrue at— Choose when the costs will be accrued for the resource. By default, this is set to Prorated, meaning that the costs for this resource will be accrued as work is scheduled and actual work is reported on a task. If you choose Start, costs for the entire task will be accrued at the beginning of a resource’s assignment, based on the scheduled work for the task. If you choose End, costs for the resource’s task assignment will not be accrued until the remaining work for the task is set to 0.
- If you are adding a generic resource, on the Resource tab, in the Properties group, click Information.
- Select the Generic check box and click OK.
LET ME TRY IT
Here’s how to add an enterprise resource to your project, using Project Professional 2010:
- On the Resource tab, in the Insert group, click Add Resources, and then click Build Team from Enterprise.
- Use the Existing filters box to filter the list of enterprise resources.
- Select the Available to work check box to narrow the list of resources to only those that are available to work a certain number of hours during a specific time range.
- To find generic resources, click + to expand Customize filters and then define a filter:
• Field Name— Generic
• Test— Equals
• Values— Yes
- Click Apply Filter to display only generic resources.
- After you decide which enterprise resources you want to add to your project, press Ctrl and click each resource in the Enterprise Resource column and then click Add.
- Click OK to add the selected resources to your project.
Adjusting Resource Calendars
An individual resource within your project may use a different calendar from the rest of the organization. For example, one of your project’s resources might be out on vacation for two weeks in the middle of July, or a specific piece of equipment might be available for reservation only on Mondays, Tuesdays, and Wednesdays each week. You can set a resource-specific calendar to accurately represent when that resource is able to work on your project.
Show Me: Media 5.3—Understanding Resource Calendars
Access this video file through your registered Web Edition at my.safaribooksonline.com/9780132182461/media.
LET ME TRY IT
To set a separate calendar for a resource, follow these steps:
- On the Project tab of the ribbon, in the Properties group, click Change Working Time.
- Click Create New Calendar.
- Choose how you want to create the resource’s calendar:
• Create new base calendar— Click this option to create a new calendar for the resource, from scratch. Working times will be set to the calendar options from the Project Options dialog box, by default.
• Make a copy of [existing base] calendar— Click this to use an existing base calendar as a starting point for the resource’s calendar. Use the drop-down list to choose which base calendar you want to copy.
- Type a name for the resource’s calendar in the Name box. You may want to use a name that helps to identify this as a calendar that is intended for use by a specific resource. This helps differentiate it from the base and task calendars for your project.
- Click OK to create the resource’s calendar.
- Similar to creating a base or task calendar, set the working days, nonworking days, default working times, and working times for specific time periods in the resource’s calendar. For more information on these procedures, see the corresponding sections in Chapter 3, “Starting a Project.”
- With the resource’s calendar set up and saved, on the View tab, in the Resource Views group, click Resource Sheet.
- Choose the calendar you just created in the Base Calendar column for the corresponding resource.
Assigning Resources to Tasks
After you add resources to your project, the next step is to assign them to tasks within your project.
LET ME TRY IT
Assigning a Resource Using the Task Information Dialog Box
You have a few different ways to assign work, material, and cost resources to tasks in your project. The Task Information dialog box provides a convenient location to identify details about the resource assignment, including the assignment owner and what percentage of the resource will be used for the task.
To assign a resource to a task in your project, follow these steps:
- In the Gantt Chart view, double-click the row for a task.
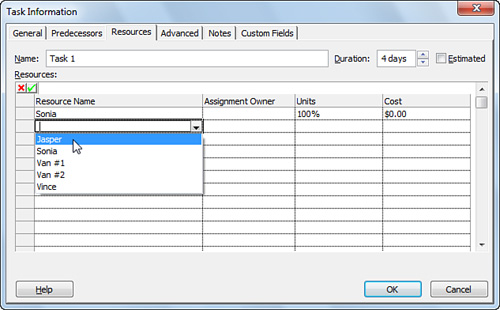
- Click the Resources tab on the Task Information dialog box.
- Click once in the first available row in the Resource Name column and use the drop-down list to select the resource you’re assigning to the task, as shown in Figure 5.1. This list is populated by the resources you have added to your project.
Figure 5.1. Click the name of the resource you are assigning in the Resource Name column.
- Type a percentage in the Units column that represents how much of the resource’s time (or, if you’re assigning a material resource, units as identified in the Material Label column of the Resource Sheet view) will be spent on this task. For example, if a single resource is working half-time on this task and half-time on other tasks, type 50% in the Units column.
- Click OK to assign the resource to the task.
Assigning a Work Resource Using the Team Planner View
For work resources in your project, you can use the Team Planner view to assign tasks to specific people.
Here are the steps to follow to assign a task to a work resource using the Team Planner view:
- On the View tab, in the Resource Views group, click Team Planner.
- Click and drag a task listed under Unassigned Tasks up to a row in the time-scaled portion of the view for one of the work resources listed in the Resource Name column. When dragging the task, note that you can also adjust where the task falls horizontally in the time-scaled portion of the view. This will adjust the start and finish dates for the task and may result in a change in the constraint for the task.
- If you want to add another resource to a task that is already assigned to a work resource in the Team Planner view, double-click the task bar to open the Task Information dialog box. Use the steps in the previous section, “Assigning a Resource Using the Task Information Dialog Box,” to assign an additional resource.
Editing an Existing Resource Assignment
If resources in your project already have been assigned to tasks, it’s possible that, at some point, you may need to make changes to those resource assignments. This isn’t terribly complicated when work hasn’t started on a task. Simply go back to the Task Information dialog box and make the necessary changes. This gets more complicated when a resource has started work on a task and the actual work values have been recorded in the project. You can take a few different approaches in this situation, depending on what changed:
• If all work assigned to all resources on the task needs to pause and resume at a later time, you can split the work on the task. This creates a gap between the first part of the task, in which the actual work has been recorded, and the next part of the task, in which the remaining work is scheduled.
• If work assigned to one resource on the task needs to pause and resume at a later time, you can use the Resource Usage view to fine-tune the work schedule for that resource.
• If the remaining work assigned to one resource needs to be reassigned to another resource, you can use the Task Usage view to move the remaining work to that resource.
Show Me: Media 5.4—Splitting a Task
Access this video file through your registered Web Edition at my.safaribooksonline.com/9780132182461/media.
LET ME TRY IT
Splitting a Task to Create a Gap in Work
By splitting a task, you create a gap between one part of the task and another. This keeps the actual work where it was recorded but enables you to move the remaining work to a later time within the project schedule. When you split a task, all resource assignments for the task are split. If you just want to create a gap in one resource’s schedule for the task, see the next section, “Fine-Tuning a Resource’s Work Schedule for a Task.”
To split work on a task, follow these steps:
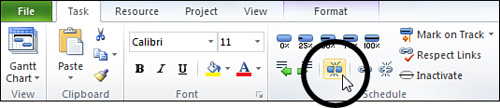
- In the Gantt Chart view, click the Task tab; in the Schedule group, click Split Task, as shown in Figure 5.2. The mouse cursor changes to a vertical line with an arrow pointing to the right.
Figure 5.2. Click Split Task on the Task tab of the ribbon.
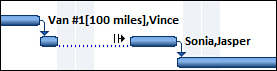
- On the Gantt bar for the task that you want to split, click the date when you want to end the work on the first part of the task and then drag the second part of the task to the date when you want work to resume. Figure 5.3 shows a task that has been split.
Figure 5.3. This task has been split into two portions, with a gap in the middle represented by a dotted line.
Show Me: Media 5.5—Using Usage Views to Edit Assignments
Access this video file through your registered Web Edition at my.safaribooksonline.com/9780132182461/media.
LET ME TRY IT
Fine-Tuning a Resource’s Work Schedule for a Task
If a resource assigned to your task needs to put work on the task on hold for some reason (maybe to work on a last-minute, higher-priority task, for example), you can use the Resource Usage view to split that resource’s work, without splitting the entire task.
Follow these steps to adjust the task’s work schedule for a single resource:
- On the View tab, in the Resource Views group, click Resource Usage.
- On the Format tab, in the Details group, select the Work and Actual Work check boxes.
- On the left portion of the Resource Usage view, scroll down to locate the resource that has an assignment you want to adjust, and then look below that resource for the task assignment. Scroll through the time-phased portion of the view, on the right side, to find the dates where work on the task is scheduled. Figure 5.4 shows an assignment with work in the time-phased portion of the view.
Figure 5.4. This assignment has actual work reported on Monday and Tuesday, and scheduled work for Wednesday and Thursday.

- If the resource has recorded Actual Work on the task, the best practice is not to modify those hours. The Work row for the assignment contains the scheduled work. Any work that is scheduled for after the recorded Actual Work is fair game for moving. To move the scheduled work, delete the hours from each day when the resource will not be available and then retype the hours in the Work row for the assignment on the days when the resource can resume working on the task.
Assigning Remaining Work on a Task to Another Resource
If a resource has been working on a task and recording actual work, but then is taken off of the task for some reason (poor performance or a job change, for example), you can move the remaining work to another resource.
To reassign the remaining work on a task to another resource, follow these steps:
- In the Gantt Chart view, click the task that contains the resource you are replacing.
- On the Resource tab, in the Assignments group, click Assign Resources.
- On the Assign Resources dialog box, click the name of the resource you are replacing, and then click Replace (see Figure 5.5). Resources currently assigned to the selected task have a check mark displayed to the left of the Resource Name column.
Figure 5.5. Select a resource and click Replace.

- On the Replace Resource dialog box, click the name of the resource you want to reassign work to, and then click OK.
- Click Close on the Assign Resources dialog box.