
Chapter 17. Caching and Performance
Hard work never killed anybody, but why take the chance?
—Edgar Bergen (as Charlie McCarthy), 1903–1978
Historically Rails has suffered from an unfair barrage of criticisms over perceived weaknesses in scalability. Luckily, the continued success of Rails in ultra-high-traffic usage at companies such as Twitter and Groupon has made liars of the critics. Nowadays, you can make your Rails application very responsive and scalable with ease. The mechanisms used to squeeze maximum performance out of your Rails apps are the subject of this chapter.
View caching lets you specify that anything from entire pages down to fragments of the page should be captured to disk as HTML files and sent along by your web server on future requests with minimal involvement from Rails itself. ETag support means that in best-case scenarios, it’s not even necessary to send any content at all back to the browser, beyond a couple of HTTP headers. Hard work may never have killed anyone, but make your Rails application work harder than it needs to, and you might kill your server!
17.1 View Caching
There are three types of view caching in Rails:
Page caching The output of an entire controller action is cached to disk, with no further involvement by the Rails dispatcher.
Action caching The output of an entire controller action is cached to disk, but the Rails dispatcher is still involved in subsequent requests, and controller filters are executed.
Fragment caching Arbitrary bits and pieces of your page’s output can be cached to disk to save the time of having to render them in the future.
17.1.1 Caching in Development Mode?
I wanted to mention up front that caching is disabled in development mode. If you want to play with caching during development, you’ll need to edit the following setting in the config/environments/development.rb file:
config.action_controller.perform_caching = false
Of course, remember to change it back before checking it back into your project repository, or you might face some very confusing errors down the road.1
17.1.2 Page Caching
The simplest form of caching is page caching, triggered by use of the caches_page macro-style method in a controller. It tells Rails to capture the entire output of the request to disk so that it is served up directly by the web server on subsequent requests without the involvement of the dispatcher. Nothing will be logged to the Rails log, nor will controller filters be triggered—absolutely nothing to do with Rails will happen, just like the static HTML files in your project’s public directory.
17.1.3 Action Caching
By definition, if there’s anything that has to change on every request or specific to an end user’s view of that page, page caching is not an option. On the other hand, if all we need to do is run some filters that check conditions before displaying the page requested, the caches_action method will work. It’s almost like page caching, except that controller filters are executed prior to serving the cached HTML file. That gives you the option to do some extra processing or even redirect if necessary.
Action caching is implemented with fragment caching (covered later in this chapter) and an around_filter (covered in Chapter 4, Working with Controllers). The cached action content is keyed based on the current host and the path, which means that it will still work even with Rails applications serving multiple subdomains using a DNS wildcard. Also, different representations of the same resource, such as HTML and XML, are treated like separate requests and cached separately.
Listing 17.1 (like most of the listings in this chapter) is taken from a blog application with public and private entries, so for default requests, we should run a filter that figures out whether the visitor is logged in and redirects them to the public action if necessary.
Listing 17.1. The EntriesController of lil_journal
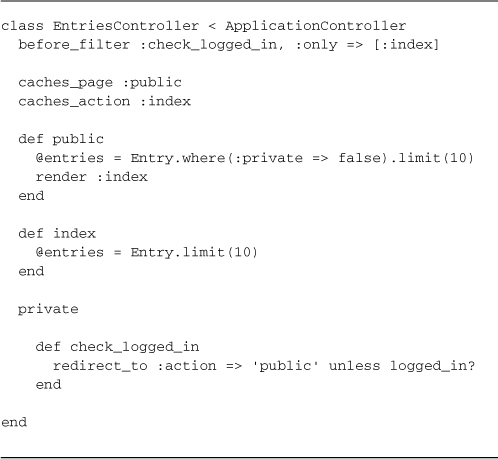
The public action displays only the public entries and is visible to anyone, which makes it a candidate for page caching. However, since it doesn’t require its own template, we just call render :index explicitly at the end of the public action.
Design Considerations
Knowing that your application will eventually require caching should influence your design decisions. Projects with optional authentication often have controller actions that are impossible to page or action-cache, because they handle both login states internally. That would have been the case in Listing 17.1 if we had written the index action to handle both public and private display:

Most of the time, you won’t have too many pages with completely static content that can be cached using cache_page or cache_action, and that’s where fragment caching comes into play.
17.1.4 Fragment Caching
Users are accustomed to all sorts of dynamic content on the page, and your application layout will be filled with things like welcome messages and notification counts. Fragment caching allows us to capture parts of the rendered page on disk and serve them up on subsequent requests without needing to render their content again. The performance improvement is not as dramatic as with page or action caching, since the Rails dispatcher is still involved.
The cache Method
Fragment caching is by its very nature something that you specify in your view template rather than at the controller level. You do so using the cache method of Action View. It takes a block, which lets you wrap content that should be cached.
Once we log in to the sample application reflected in Listing 17.1, the header section should really display information about the logged-in user, so action-caching the index page is out of the question. We’ll remove the caches_action directive from the EntriesController, but leave cache_page in place for the public action. Then we’ll go into the entries/index.html.haml template and add fragment caching, as shown in Listing 17.2.
Listing 17.2. entries/index.html.haml template with fragment caching
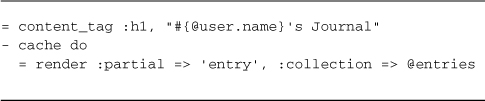
Easy as that—the HTML output of rendering the collection of entries is stored in the fragment cache associated with the entries/index page. That’s fine if we’re only caching one fragment of the page, but most of the time we’ll need to give the fragment some extra identification.
Named Fragments
The cache method takes an optional name parameter. If you leave it blank, as we have in Listing 17.2, it caches its content keyed to the URL of its parent page. That’s an acceptable solution as long as there is only one fragment on the page.
If we’re caching more than one fragment on the page, we need to add an extra identifier, so that we don’t suffer name collisions. Listing 17.3 is an enhanced version of the entries page, where we’ve added the display of recent comments in the sidebar.
Listing 17.3. The entries page with two fragment cache directives
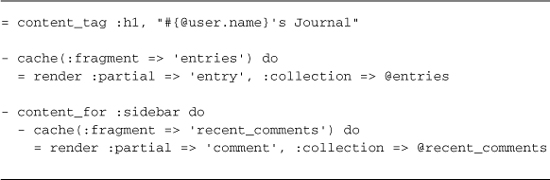
After the code in Listing 17.3 is rendered, there will be two fragments stored in the cache, keyed as follows:
/entries/index?fragment=entries
/entries/index?fragment=recent_comments
The fact that Rails uses the page’s URL scheme to key fragments in the cache is an elegant solution to a somewhat difficult problem. Consider, for instance, what would happen if you added pagination to the application and pulled up the second page of entries. Without further work, a pair of additional fragments would be correctly cached for future use:
/entries/index?page=2&fragment=entries
/entries/index?page=2&fragment=recent_comments
Note
Note that Rails uses the url_for mechanism to construct unique identifiers for fragments out of convenience. There’s no requirement that your fragment keys correspond to actual working URLs in your application.
Global Fragments
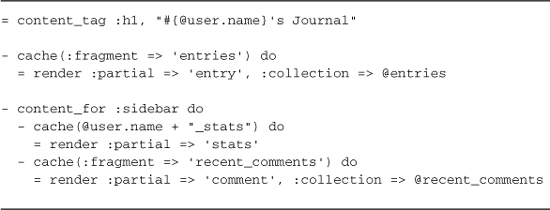
Sometimes, you’ll want to fragment-cache content that is not specific to a single URL of your application. To add globally keyed fragments to the cache, we’ll again use the name parameter of the cache helper method, but this time we’ll give it a string identifier instead of a hash.
To demonstrate, let’s add a requirement that our sample application should display user statistics on every page. In Listing 17.4, we cache the stats partial for every user, using their name and a "_stats" suffix as the key.
Listing 17.4. The entries page with global user stats
Avoiding Extra Database Activity
Once you have fragments of your view cached, it no longer makes sense to do the database queries that supply those fragments with their data. After all, the results of those database queries will not be used again until the cached fragments are expired. The fragment_exist? method lets you check for the existence of cached content, and takes the same parameters that you used with the associated cache method.
Here’s how we would modify the index action accordingly:
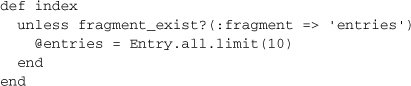
Now the finder method will only get executed if the cache needs to be refreshed.
Tim says ...
You wouldn’t need to clutter your controller code with calls to fragment_exist? if you were using decent_exposure.2
17.1.5 Expiration of Cached Content
Whenever you use caching, you need to consider any and all situations that will cause the cache to become stale, out of date. Then you need to write code that sweeps away the old content, so to speak, making room for new content to be cached in its place.
Expiring Pages and Actions
The expire_page and expire_action methods let you explicitly delete content from the cache, so that it is regenerated on the next request. There are various ways to identify the content to expire, but one of them is by passing a hash with url_for conventions used elsewhere in Rails. Listing 17.5 shows how we’ve added expiration to the create method of the entries controller.
Listing 17.5. The entries create action
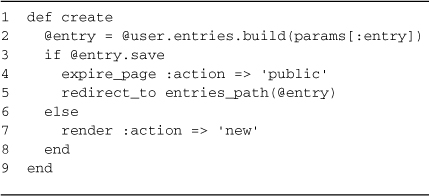
Notice how line 4 of Listing 17.5 explicitly expires the page associated with the public action. If you think about it, though, it’s not only the create action that invalidates the cache. The update and destroy actions would invalidate it too.
In your applications, particularly when you’re doing RESTful resources, remember that different representations of the same resource are treated like separate requests and cached separately. If you’ve cached the XML response of an action, you’ll have to expire it by appending :format => :xml to the action specification.
Expiring Fragments
The sample app we’ve been considering also has cached fragments to clear out, using the expire_fragment method. Now the create action looks like:
Listing 17.6. The entries create action with fragment expiration
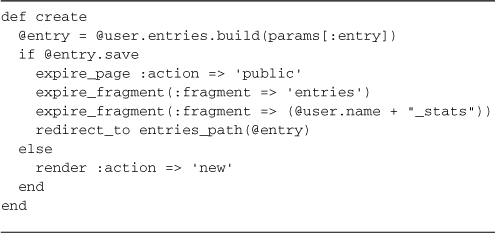
There’s actually a serious problem with the expiration routine that we wrote in Listing 17.6. Remember we said that the fragment caching of entries would work with pagination and that we’d have cached fragments keyed like '/entries/ index?page=2&fragment=entries'
As a result, just doing expire_fragment(:fragment => 'entries') will only clear the first page from the cache. For that reason, the expire_fragment method understands regular expressions, and we’ll need to use them in our code:
expire_fragment(%r{entries/.*})
There has to be a better way to handle invalidation than remembering to stick a bunch of complicated expiration statements in all your action methods. Also, since caching is a unique concern, it feels like something that should be applied in an aspect-oriented fashion instead of procedurally.
17.1.6 Automatic Cache Expiry with Sweepers
A Sweeper class is kind of like an ActiveRecord Observer object, except that it’s specialized for use in expiring cached content. When you write a sweeper, you tell it which of your models to observe for changes, just as you would with callback classes and observers.
Listing 17.7 is a sweeper to keep the caching of our sample app’s entries in order.
Listing 17.7. An entry sweeper
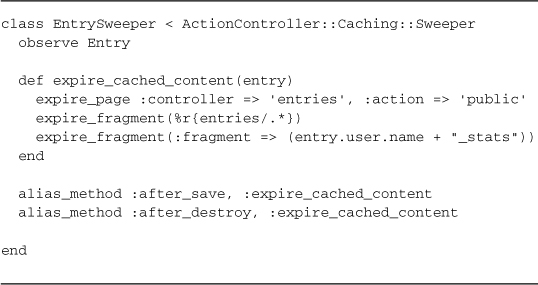
Once you have a Sweeper class (put it in your app/models directory), you need to tell your controller to use that sweeper in conjunction with its actions. Here’s the top of the revised entries controller:
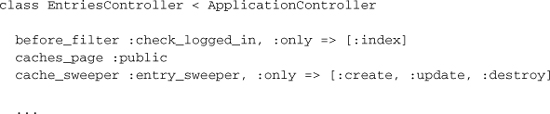
Like many other controller macros, the cache_sweeper method takes :only and :except options. There’s no need to bother the sweeper for actions that can’t modify the state of the application, so we do indeed include the :only option in our example.
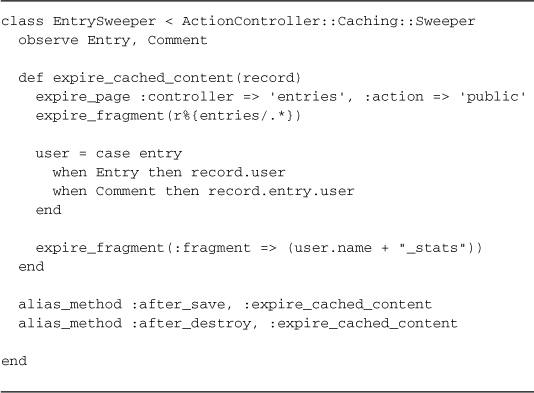
Like the related observers, sweepers are not limited to observing just one model. The main thing to remember if we go down that route is that our callback methods will need to know how to handle all of them. Ruby’s case statement may come in handy, as shown in Listing 17.8, a full revision of the EntrySweeper, which may now observe Comment as well as Entry objects.
Listing 17.8. The EntrySweeper revised to observe and handle both entries and comments
The big gotcha with regular expression and expire_fragment is that it is not supported with the most common caching service used on Rails production systems: Memcached.
17.1.7 Cache Logging
If you’ve turned on caching during development, you can actually monitor the Rails log for messages about caching and expiration.
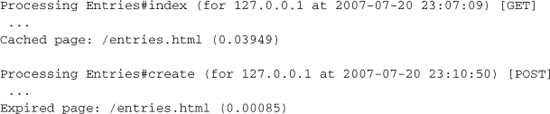
It’s a good way to see whether your caching is actually working as expected.
17.1.8 Action Cache Plugin
The Action Cache plugin by Tom Fakes and Scott Laird is a recommended drop-in replacement for the built-in Rails caching facilities. It doesn’t change the Caching API at all, only the underlying implementation.
rails plugin install http://craz8.com/svn/trunk/plugins/action_cache
These are the major features of the Action Cache plugin:
• Stores cached entries as YAML streams (instead of just HTML) so that the Response headers from the original response can be returned along with cached content.
• Adds a last-modified header to the response so that clients use a get-if-modified HTTP request. If the client already has cached content, sends a 304 Not Modified response.
• Ensures that only requests with a 200 OK status are cached. Otherwise, error pages and empty content can get stuck in the cache (and cause difficult-to-diagnose problems.)
• Allows developers to override Rails with their own implementation of cache key generation.
• Allows an action to specify an optional Time To Live value for a response, before cached content associated with the response will be automatically expired.
• Allows control over whether caching occurs for an action at runtime based on request parameters. (For instance, never cache content for site administrators.)
• A new method, expire_all_actions, clears out the entire action cache contents.
• Changes the expire_action implementation to actually use the Regexp fragment expiry call, causing all matching cache items to be cleared. For those of you using REST, and providing HTML, JS, and XML for the same action, all three will be expired when you expire one of them with code like expire_action :controller => 'foo', :action => 'bar'
17.1.9 Cache Storage
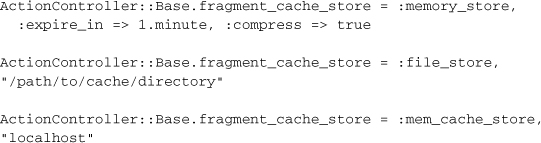
Unlike session data, fragment-cached data can grow to be quite large. Rails gives you three different options for cache storage:
ActiveSupport::Cache::FileStore Keeps the fragments on disk in the cache_path, which works well for all types of environments and shares the fragments for all the web server processes running off the same application directory.
ActiveSupport::Cache::MemoryStore Keeps the fragments in the memory, and can potentially consume an unacceptable amount of memory per process if you do not have a good expiration strategy. As of Rails 3, MemoryStore is now thread-safe.
ActiveSupport::Cache::MemCacheStore Keeps the fragments in a separate process using a proven cache server named memcached. General consensus at the time or writing suggests that memcache is the best option.
Configuration Example
The :memory_store option is enabled by default.
All cache stores take the following hash options as the last parameter:
• expire_in: Supply a time for items to be expired from the cache.
• compress: Specify to use compression or not.
• compress_threshold: Specify the threshold at which to compress, the default is 32k.
Note that most production Rails deployments use Passenger or Unicorn, which spawn new processes depending on application load. You will want to use a MemCacheStore or FileStore in these cases if you need the cache shared between processes.
Durran says ...
Using a key/value store in your application like Redis or Tokyo Cabinet? Check out Moneta3 if you want to leverage it for your caching. Most supported databases are more than fast enough, and it has a very simple and easy to use API.
Limitations of File-Based Storage
As long as you’re hosting your Rails application on a single server, setting up caching is fairly straightforward and easy to implement (of course, coding it is a different story).
If you think about the implications of running a cached application on a cluster of distinct physical servers, you might realize that cache invalidation is going to be painful. Unless you set up the file storage to point at a shared filesystem such as NFS or GFS, it won’t work.
Manual Sweeping with rake
If you do choose file-based storage, you probably want to give yourself a way to manually clear your application’s cached content. It’s not difficult to do using Rake. Just add a file to the lib/tasks folder named cache.rake. You’ll be creating a task similar to the one shown in Listing 17.9.
Listing 17.9. A cache_sweeper custom rake task
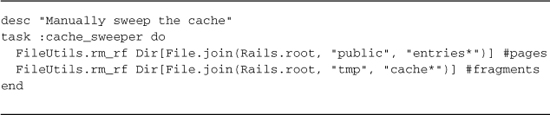
I used entries in the example task, but remember that you may have to add one or more of your own FileUtils.rm_rf statements corresponding to the pages that your application is caching.
As a final note, keep in mind, that it’s common to use the FileUtils.rm_rf brute-force approach in sweepers instead of the expire_* methods, mostly because a lot of times it’s just easier to blow away entire cached directories and let them be rebuilt as needed.
17.2 General Caching
Each of the caching mechanisms described in the previous section is actually using an implementation of an ActiveSupport::Cache::Store, covered in detail within Appendix A.
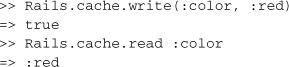
Rails always has a default cache store accessible via Rails.cache:
17.2.1 Eliminating Extra Database Lookups
One of the most common patterns of cache usage is to eliminate database lookups for commonly accessed data, using the cache’s fetch method. For the following example, assume that your application’s user objects are queried very often by id. The fetch method takes a block that is executed and used to populate the cache when the lookup misses, that is, a value is not already present.
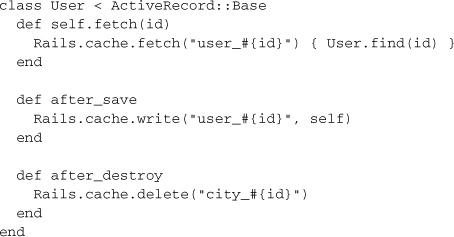
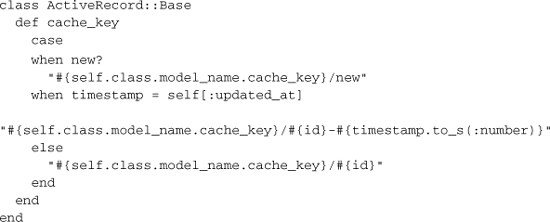
I opted to use my own key generation scheme in the example, because of the use of the updated_at attribute in the implementation of Active Record’s cache_key method.
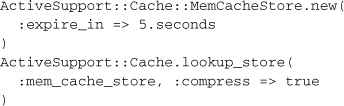
17.2.2 Initializing New Caches
We can also initialize a new cache directly, or through ActiveSupport::Cache.lookup_store if we want to cache other objects in the application and not just the views. Either one of these methods of creating a new cache takes the same expiration and compression options as mentioned previously, and the same three stores exist as for fragment caching: FileStore, MemoryStore, and MemCacheStore.
Once you have your cache object, you can read and write to it via its very simple API and any Ruby object that can be serialized can be cached, including nils.
cache = ActiveSupport::Cache::MemoryStore.new
cache.write(:name, "John Doe")
cache.fetch(:name) # => "John Doe"
17.2.3 fetch Options
There are several options that can be passed to fetch in order to provide different types of behavior for each of the different stores. Additional options than those listed here are available based on the individual cache implementations.
• :compress Use compression for this request.
• :expire_in Tell an individual key in the cache to expire in n seconds.
• :force If set to true will force the cache to delete the supplied key.
• :race_condition_ttl Supply seconds as an integer and a block. When an item in the cache is expired for less than the number of seconds, its time gets updated and its value is set to the result of the block.
There are other available functions on caches, and options can be passed for the specific cache store implementation.
• delete(name, options) Delete a value for the key.
• exist?(name, options) Will return true if a value exists for the provided key.
• read(name, options) Get a value for the supplied key or return nil if none found.
• read_multi(*names) Return the values for the supplied keys as a hash of key/value pairs.
• write(name, value, options) Write a value to the cache.
17.3 Control Web Caching
Action Controller offers a pair of methods for easily setting HTTP 1.1 Cache-Control headers. Their default behavior is to issue a private instruction, so that intermediate caches (web proxies) must not cache the response. In this context, private only controls where the response may be cached and not the privacy of the message content.
The public setting indicates that the response may be cached by any cache or proxy and should never be used in conjunction with data served up for a particular end user.
Using curl --head we can examine the way that these methods affect HTTP responses. For reference, let’s examine the output of a normal index action.
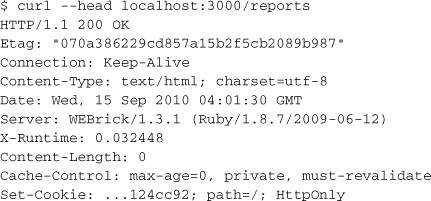
Don’t get confused by the content length being zero. That’s only because curl --head issues a HEAD request. If you’re experimenting with your own Rails app, try curl -v localhost:3000 to see all the HTTP headers plus the body content.
17.3.1 expires_in(seconds, options = {})
This method will overwrite an existing Cache-Control header.4 Examples include

Setting expiration to 20 minutes alters our reference output as follows:
Cache-Control: max-age=1200, private
17.3.2 expires_now
Sets a HTTP 1.1 Cache-Control header of the response to no-cache informing web proxies and browsers that they should not cache the response for subsequent requests.
17.4 ETags
The bulk of this chapter deals with caching content so that the server does less work than it would have to do otherwise, but still incurs the cost of transporting page data to the browser. The ETags scheme, where E stands for entity, allows you to avoid sending any content to the browser at all if nothing has changed on the server since the last time a particular resource was requested. A properly implemented ETags scheme is one of the most significant performance improvements that can be implemented on a high traffic website.5
Rendering automatically inserts the Etag header on 200 OK responses, calculated as an MD5 hash of the response body. If a subsequent request comes in that has a matching Etag6, the response will be changed to a 304 Not Modified and the response body will be set to an empty string.
The key to performance gains is to short circuit the controller action and prevent rendering if you know that the resulting Etag is going to be the same as the one associated with the current request. I believe you’re actually being a good Internet citizen by paying attention to proper use of ETags in your application. According to RFC 2616,7 “the preferred behavior for an HTTP/1.1 origin server is to send both a strong entity tag and a Last-Modified value.”
Rails does not set a Last-Modified response header by default, so it’s up to you to do so using one of the following methods.
17.4.1 fresh_when(options)
Sets ETag and/or Last-Modified headers and renders a 304 Not Modified response if the request is already fresh. Freshness is calculated using the cache_key method of the object (or array of objects) passed as the :etag option.
For example, the following controller action shows a public article.
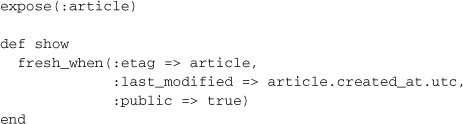
This code will only render the show template when necessary.
17.4.2 stale?(options)
Sets the ETag and/or Last-Modified headers on the response and checks them against the client request (using fresh_when). If the request doesn’t match the options provided, the request is considered stale and should be generated from scratch.
You want to use this method instead of fresh_when if there is additional logic needed at the controller level in order to render your view.
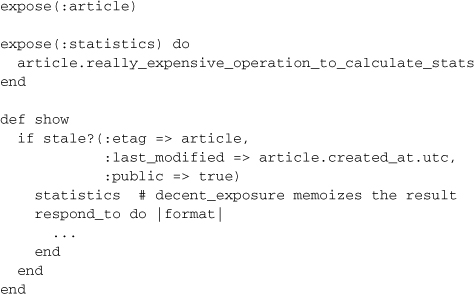
The normal rendering workflow is only triggered inside of the stale? conditional, if needed.
17.5 Conclusion
We’ve just covered a fairly complicated subject: Caching. Knowing how to use caching will really save your bacon when you work on Rails applications that need to scale. Indeed, developers of high-traffic Rails websites tend to see Rails as a fancy HTML generation platform with which to create content ripe for caching.