
Chapter 7. Creating Transitions
If you’ve followed the lessons in this book in order, you should now feel comfortable adding and deleting footage in your project, and trimming clips to improve the pacing of the movie you’re producing. In this lesson, you’ll learn how to take a project in which your clips have already been sequenced and trimmed, and add nuance and dimension using transitions between the clips. You’ll learn how to do the following:
• Apply a transition using Transitions view
• Preview transitions
• Modify transition settings
• Apply the default transition to multiple clips
• Copy and paste transitions
• Create fade-ins and fade-outs
• Render transitions
![]()
This lesson will take approximately one hour.
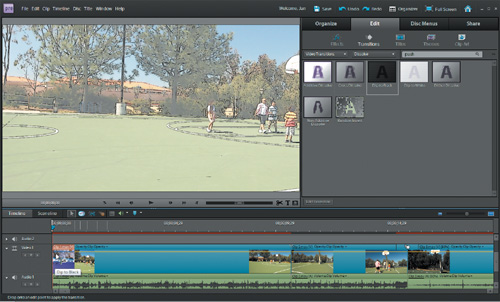
Inserting a Dip to Black transition at the start of the movie.
Getting Started
You’ll modify scenes in this lesson’s project by adding transitions in stages. But first you’ll open the Lesson07 project and prepare your Adobe Premiere Elements workspace.
- Make sure that you have correctly copied the Lesson07 folder from the DVD in the back of this book onto your computer’s hard disk. See “Copying the Classroom in a Book Files” in the Getting Started section at the start of this book.
- Launch Premiere Elements.
- In the Welcome screen, click the Open Project button, and then click the Open folder.
- In the Open Project dialog, navigate to the Lesson07 folder.
- Within that folder, select the file Lesson07_Start_Win.prel (Windows) or Lesson07_Start_Mac.prel (Mac OS), and then click Open.
Your project file opens with the Monitor, Tasks, and My Project panels open.
- Choose Window > Restore Workspace to ensure that you start the lesson in the default panel layout.
Viewing the Completed Movie Before You Start
To see what you’ll be creating in this lesson, you can play the completed movie.
- In the Organize tab of the Tasks panel, click Project (
 ). In the Project view, locate the file Lesson07_Movie.mov, and then double-click it to open the video in the Preview window.
 - In the Preview window, click the Play button (
 ) to watch the video showing some kids shooting hoops, which you will build in this lesson.
 - When you’re done, close the Preview window by clicking the Close button (
 ) in the upper-right corner of the window.
Working with Transitions
Transitions phase out one clip while phasing in the next. The simplest form of a transition is the cut. A cut occurs when the last frame of one clip is followed by the first frame of the next. The cut is the most frequently used transition in video and film, and the one you will use most of the time. However, you can also use other types of transitions to achieve effects between scenes.
Using Transitions View in the Tasks Panel
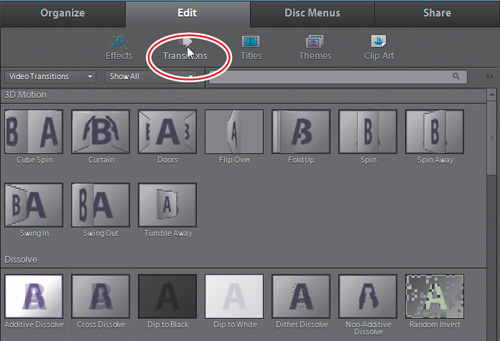
Premiere Elements includes a wide range of transitions, including 3D motion, dissolves, wipes, and zooms. The animated thumbnail view that appears when you click on a specific transition gives you a good idea of how it might be applied to your project. Transitions are grouped into two main folders in Transitions view: Audio Transitions and Video Transitions.
- To access Premiere Elements transitions, click the Transitions button (
 ) in the Edit tab of the Tasks panel. Hover over or select a transition to see an animated preview.
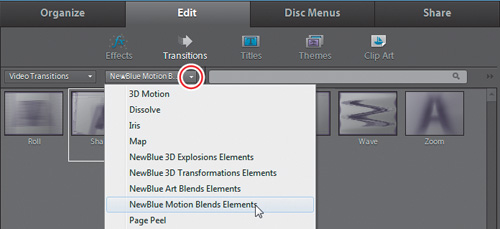
- Select Video Transitions (if it’s not already selected) from the category menu in the upper-left corner of Transitions view. Then select NewBlue Motion Blend Elements from the adjacent menu to see only the different types of transitions in Transitions view. We’ll use the Shake transition from that category in a moment.
Applying a Transition
Understanding how transitions work is essential to using them successfully. For a transition to shift from one clip to another, the transition must overlap frames from both clips for a certain amount of time.
- In the Monitor panel, position your current-time indicator at the 00;00;33;07 mark, the edit point between Clip 4.mov and Clip 5.mov. You’ll be placing a transition between these two clips.
- If Sceneline is not already selected in the My Project panel, switch to it now.
- From Transitions view, which should still be showing the content of the NewBlue Motion Blend Elements, drag the Shake transition to the rectangle between Clip 4.mov and Clip 5.mov in the Sceneline. You’ll know the transition has been added because its icon is visible in the rectangle between the two clips in the Sceneline.

- In the Sceneline, double-click the rectangle between the two clips to preview the Shake transition. After the transition ends, press the spacebar to stop playback.
Viewing Transition Properties
When you add a transition to a clip, the default length of the transition is determined by your preferences. You can change the length of transitions after applying them. Additionally, there are several other attributes of transitions that you can adjust. These include alignment, start and end values, border, and softness.
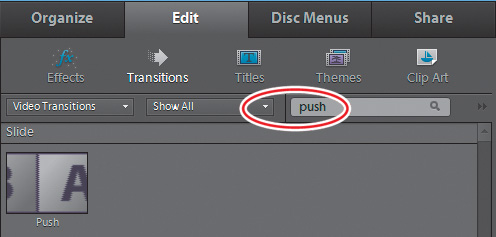
In this exercise, you’ll add a Push transition that pushes one image offscreen to replace it with the next clip. You will then modify the various attributes of the transition in Properties view.
- In Transitions view of the Edit tab, choose Video Transitions from the category menu. Make sure Show All is selected in the menu next to it. Then click in the text search box to the right of the magnifying glass icon (
 ) and type the word push. Premiere Elements automatically searches the list of video transitions and locates the Push transition.
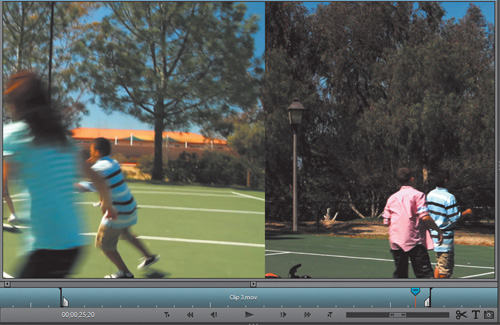
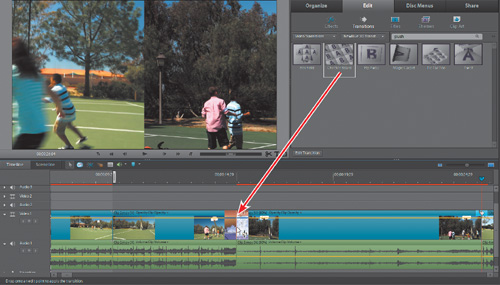
- If necessary, scroll to the right in the My Project panel until you can see the third and fourth clips of the movie, Clip 3.mov and Clip 4.mov. Drag the Push transition from Transitions view to the rectangle between these two clips in the Sceneline.
- In the Monitor panel, position the current-time indicator a few frames before the transition. Press the spacebar to view the transition. The Push transition will push the first clip off to the side. After the transition ends, press the spacebar to stop playback.
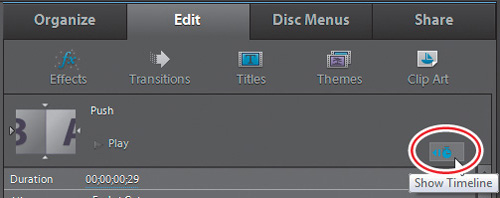
- Select the Push transition in the Sceneline, and then click the Edit Transition button (
 ) in the lower-left corner of Transitions view. This will load the transition’s parameters into Properties view where you can edit them.
- Click the Show Keyframes button (
 ) at the top of Properties view to view a magnified version of your Timeline. This enables you to view the transition as it is applied between your two clips. If necessary, resize the Properties panel or just its Timeline to better see this Timeline.
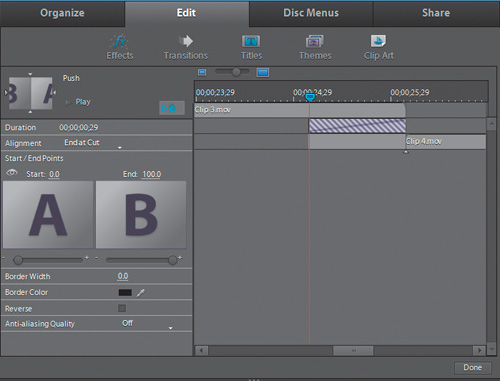
- In the Timeline of Properties view, drag the current-time indicator back and forth over the transition to preview your transition effect.
Stay in this window. You will now modify your transition’s settings.
Modifying Transition Settings
All transitions have default settings. To achieve specific results, you can customize the settings in Properties view. Modifying the length of a transition is easy, as you will see in this exercise. You’ll adjust the transition using the actual clip, so click the Show Actual Sources (![]() ) icon just below Start/End Points before getting started.
) icon just below Start/End Points before getting started.
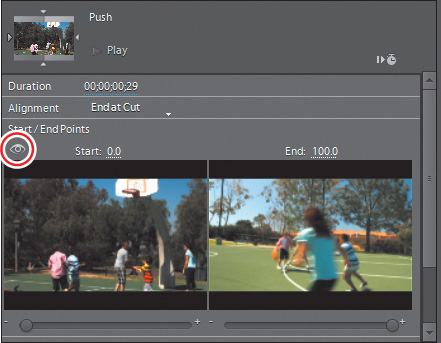
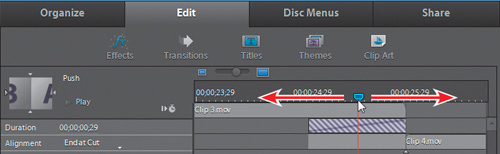
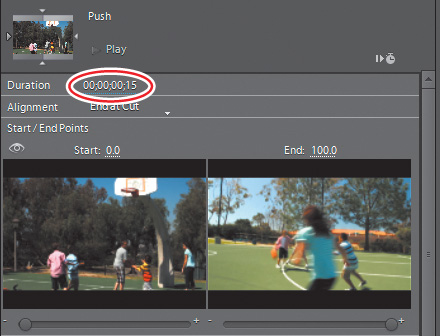
- To change the length of a transition in Properties view, place your pointer over the Duration value, and then drag to the left to change the Duration to 00;00;00;15 (15 frames). Remember that there are 30 frames in one second of NTSC video; therefore, 15 frames represent a half second of time. For a small preview of the adjusted transition, click the Play button immediately above the Duration field. This converts to a Stop button once pressed, and you can click Stop to end the preview.
- For a big-screen preview, drag the current-time indicator—in either the Monitor panel or Properties view—to a position before the Push transition, and press the spacebar to preview the transition. After the transition ends, press the spacebar to stop playback. If you should accidentally click the track area of your Sceneline, you will deselect the transition and its parameters will vanish from Properties view. Don’t worry; just click the transition in your Sceneline to select it again and display its parameters in Properties view.
- In Properties view, click the Alignment drop-down list to view the options. Note that you can set the transition to start at the cut between the two clips (Start at Cut) or end at the cut between the two clips (End at Cut), or position it at the center of the cut (Center at Cut). Experiment with these settings to get a feel for the different looks they create, but choose Center at Cut before moving on to step 4.
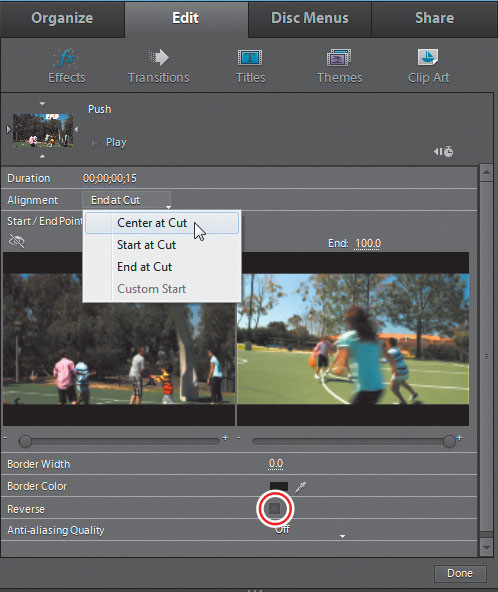
- In Properties view, select the Reverse check box (see the circled item in the preceding figure). This reverses the transition so that the second clip now pushes the first clip to the left. Depending on the size of your monitor, you may need to scroll down and resize Properties view or its Timeline to see this check box.
- Click the Timeline button on the upper-left corner of the My Project panel to shift into Timeline mode. Zoom into the Timeline, if necessary, to see the transition.
- Drag your current-time indicator to approximately halfway through the transition, at roughly the 00;00;27;06 mark.
Because you’re in the middle of the transition, your screen will be split in half. This makes it easier to preview the modifications you’ll apply in the next steps.
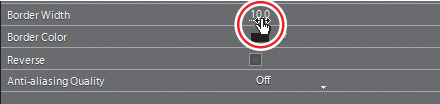
- If necessary, scroll down Properties view to view the additional controls. Click the value for Border Width, type the number 10, and then press Enter.
This creates a 10-pixel border on the edge of your transition. The default color of the border is black, but you can modify this as well.
- Click the black color swatch next to the Border Color. This opens the Color Picker dialog.
- In the color slider, which displays the spectrum of colors in a vertical strip, click in the blue hues.
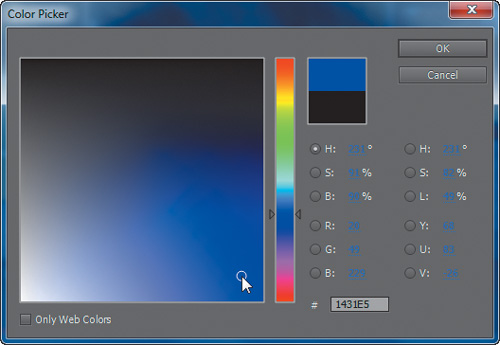
- In the larger color spectrum, click the lower-right corner to select a medium blue.
- Click OK to close the Color Picker dialog. The border of your transition is now 10 pixels wide and blue.
- Drag your current-time indicator to a position before the transition, and then press the spacebar to play your modified transition. After the transition ends, press the spacebar to stop playback.
- Choose File > Save As, name the file Lesson07_Work.prel in the Save Project dialog, and then click Save to save it in your Lesson07 folder.
Replacing a Transition
Replacing an existing transition between two clips is done in essentially the same way as adding a new transition: Simply drag the transition from the Media panel onto the existing transition in the Sceneline. You can do this repeatedly to compare the effects of different transitions.
To practice adding and replacing transitions—this time using the Timeline—you will now apply a Checker Board transition between Clip 2.mov and Clip 3.mov, and then replace it with an Iris Diamond transition.
- In the My Project panel, click the Timeline button. If necessary, use the Zoom controls and scroll your view so that the aforementioned clips are visible.
- Press the Page Up and Page Down keys to position the current-time indicator at the edit line between the two clips. You might want to click the Zoom In tool (
 ) to magnify the view at this edit line.
 - If necessary, click the Transitions button to open Transitions view in the Edit tab, and then click the Categories tag and choose NewBlue 3D Transformations Elements.

- In this step and the following step, do not release the pointer until instructed. Drag the Checker Board transition over the edit line between Clip 2.mov and Clip 3.mov; do not release the pointer. Pay careful attention to the appearance of your pointer.
- Move your pointer on top of the edit line between the two clips. Notice how your pointer changes to the Center at Cut icon (
 ). Release the pointer to center the transition over the cut.
- Preview the Checker Board transition by dragging your current-time indicator before the transition and then pressing the spacebar. When the transition is over, press the spacebar to stop playback.
Note
When working with transitions in the Timeline, you may need to zoom into the timeline using the zoom slider on the upper right of the Timeline to see the transitions close-up.
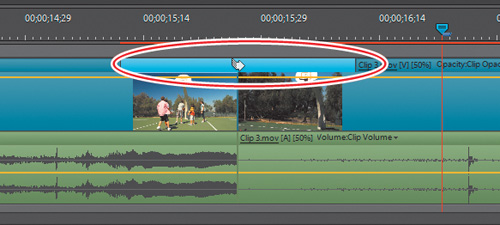
Notice how the transition is represented by a swooshing arrow above the cut between the clips in the Timeline.
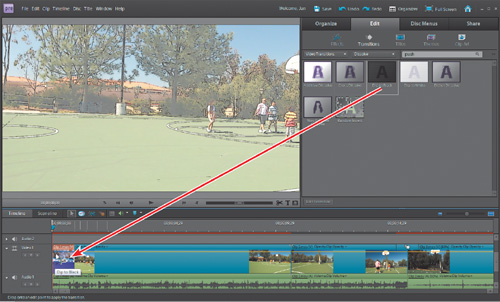
- In Transitions view, select the Iris Diamond transition in the Iris category and drag it on top of the Checker Board transition in the Timeline to replace it. You can have only one transition between two clips.
- Preview the new transition by dragging the current-time indicator before the transition and pressing the spacebar to start playback. After the transition ends, press the spacebar to stop playback.
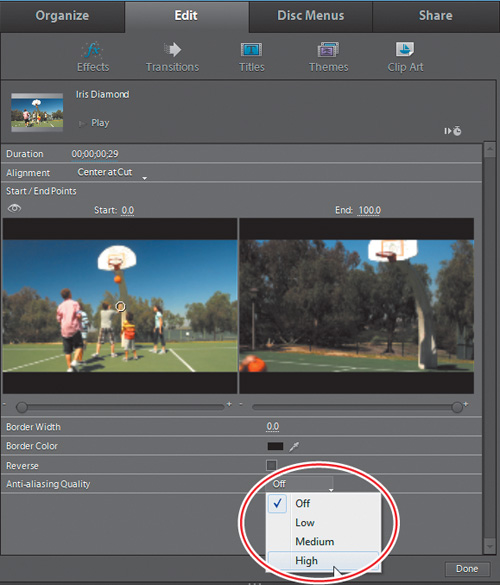
- Select the Iris Diamond transition in the Sceneline, and then click the Edit Transition button () in the lower-left corner of Transitions view.
This transition’s parameters are loaded into Properties view where you can edit them.
- Find the Anti-aliasing Quality control on the bottom of the Transition Properties view. Click the list box, and choose High, which will smooth rough edges in some regions of the wipe.
Adding a Single-sided Transition to Create a Fade-in
Transitions do not necessarily need to be located between two clips. For example, you can quickly add a fade-in and fade-out to the beginning and end of your movie.
- If you’re not already in Timeline view, in the My Project panel, click the Timeline button. Press the Home key to position the current-time indicator at the beginning of the first clip.
- In the Transitions view of the Edit tab, select the Dissolve transition category.
- Drag the Dip to Black transition from the Transitions view to the beginning of Clip 1.mov on the Video 1 track.
- Press the spacebar to play the transition. The beginning of the transition starts at black and then fades into the video. After the transition ends, press the spacebar to stop playback.
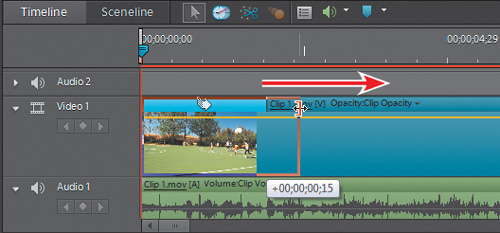
- To extend the duration of these transitions by a half second, grab the right edge of each transition box one at a time, and drag it to the right until the text box next to the drag pointer indicates that you’ve added 00;00;00;15. Release the pointer.
- Save your project as Lesson07_End.prel.
Applying the Default Transition to Multiple Clips
There’s no rule that says you need to use transitions between all clips in your movies. However, rather than using cuts between clips, many producers insert very short cross-dissolve transitions between clips to smooth out any visual jarring between the clips. A feature in Premiere Elements makes this very simple to do. In this exercise, you’ll start by changing the duration of the default transition and then applying it to multiple clips simultaneously.
- Choose Edit > Preferences > General (Windows) or Adobe Premiere Elements 9 > Preferences > General (Mac OS) to open the Preferences panel.
- Highlight the number in the Video Transition Default Duration box to make it active, type in 5, and press Enter.
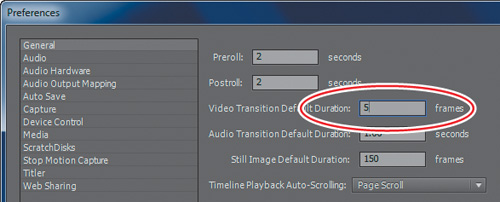
- Click OK to close the Preferences panel.
- If you’re not already in Timeline view, in the My Project panel, click the Timeline button. Press the Backslash () key to display the entire contents of the project in the Timeline.
- Drag to select Clip 5.mov through Clip 10.mov on the Timeline.
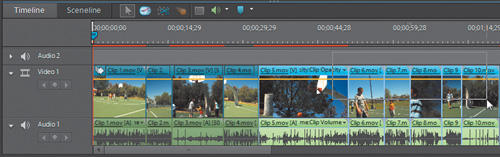
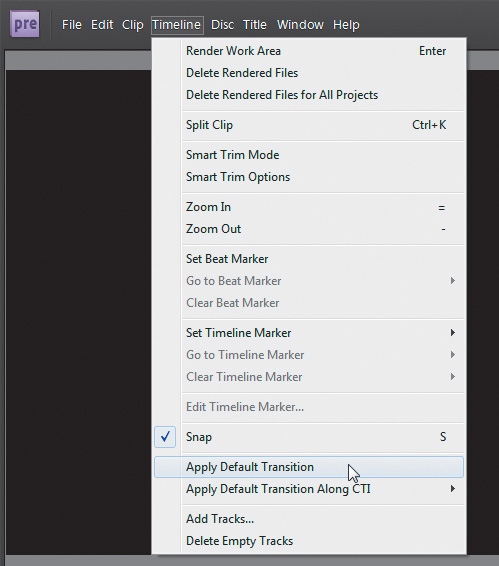
- In the Premiere Elements menu, choose Timeline > Apply Default Transition.
- Click OK if the “Insufficient media” error message appears. This appears because you’re using short, mostly untrimmed clips in this exercise; you shouldn’t see this message too often in your own projects.
- Premiere Elements applies the default transition between all selected clips. In practice, if you applied the default transition to clips with existing transitions, Premiere Elements would replace the transitions but wouldn’t change the duration of the previously inserted transitions, which you’d have to adjust manually if you wanted them to match that of the newly inserted clips.
- Drag the current-time indicator around the project and preview the transitions. You’ll notice that the effect is subtle but smoothes the flow from clip to clip.
Making Transitions Work in Your Movie
Now that you know the how of transitions, let’s spend a bit of time discussing the when and why. Although there are few absolutes about the art of transitions, your productions will benefit by incorporating these two concepts into your creative decisions.
But recognize that you don’t need to include a transition between each and every clip in your movies. If you watch a Hollywood movie, for example, you’ll see that noticeable transitions (that is, those longer than four or five frames) are seldom used between clips within a scene but are often used between scenes.
Why? Because the transition lets the viewer know that there’s been a change in time or location. That is, if a scene jumped from a kitchen at night to the backyard the next day, simply jumping from scene to scene would confuse the viewer. You can imagine the viewer saying, “Hey, what happened here? One second they were in the kitchen drinking milkshakes at night, and the next second they were playing dodgeball in the yard in sunlight.” However, if the editor inserts a fade to black between the two scenes, the viewer understands that there is a change of time or location.
Within the context of the basketball project, there are two distinct scenes—the videos and the slide show. These would be the natural locations for noticeable transitions within this project. You inserted the Dip to Black at the start of the clip in this chapter, and in the project going forward, you’ll notice the same transition between the video and the slide. These transitions are all one-second long, so they’re meant to be noticed. The dissolves between movie clips are all five frames, which is one-sixth of a second. You may recall that the transitions you inserted in the slide show back in Lesson 5 were all one-second long as well, which worked because each slide was like a separate scene.
The other location where you might want a noticeable transition is when you advance from Clip 2.mov to Clip 3.mov. Here, you’ll go from full speed to a half-speed instant replay. You’ll highlight that with a title in Chapter 9, but the transition helps as well.
Of course, with family videos, your goal is to produce smiles, not to win an Academy Award. If you’d like to use transitions as content rather than in their traditional role, feel free to add as many as you’d like, anywhere you’d like. Just be sure to consider the following rule.
When using transitions, you should match the tone of the transition to the tone of the movie. In a fun, family video like a trip to the zoo or other vacation, you could use any transition that Premiere Elements offers—in some cases, the zanier the better. This is why highly noticeable transitions are used frequently in children’s shows like Barney & Friends or The Wiggles.
On the other hand, when shooting a solemn event—say, a wedding or graduation—the tone is usually much more serious. In these instances, you’d probably want to use only cross dissolves or the occasional Dip to Black transition to maintain that tone.
Exploring on Your Own
My compliments; that’s another lesson well done! You’ve discovered how transitions can make your projects more professional looking by adding continuity between clips. You’ve learned about placing, previewing, modifying, and rendering different transitions, as well as applying them en masse.
As you continue to edit with transitions, you’ll get a better idea of how to use them to enhance the tone or style of your project. The best way to develop that style is by trying different transitions and discovering how they affect your movie. So here’s your task list for further experimentation.
- Make the changes discussed in “Making Transitions Work in Your Movie” to your project.
- Experiment with different transitions; preview their animated icons in Transitions view. Remember that dragging a transition onto an existing transition will replace it.
- Be sure that you’re comfortable modifying the default parameters of your transitions. One by one, select the transitions you’ve added and explore their settings in Properties view.
Review questions
1. Where are Video Transitions located, and what are two ways to locate specific transitions?
2. How do you modify transitions?
3. How can you extend the duration of a transition?
4. How can you apply a transition to multiple clips simultaneously?
Review answers
1. Video Transitions are located in Transitions view, which you can access at anytime from your Edit workspace. You can browse for individual transitions, which are organized in categories and by transition type. Additionally, you can find a specific transition by typing its name or part of its name into the search field in Transitions view.
2. Click the transition you want to modify to select it, and then choose Edit Transition in Properties view.
3. One method of extending the duration of a transition is to change its length in Properties view. Select the transition in the Sceneline to access its properties. You can also change the duration of a transition by dragging its edges in the Timeline of the My Project panel.
4. Two techniques can be used: One is to select multiple clips on the Timeline and choose Timeline > Apply Default Transition. Premiere Elements will insert the default transition between all selected clips. You can also copy a previously applied transition, select multiple clips on the Timeline, and then paste the transition onto any selected clip.